Adding a Button to a CRM 2011 Form Ribbon
Here’s a shortcut guide to customising the Form ribbon in CRM 2011. Rather than explaining all of the intricacies of the ribbon here’s a set of instructions that will get a button added to a form with the least amount of steps/complexity. In this scenario we will add a button to the Account form that will launch an external web page (if you prefer the button executes a jscript function keep reading as I cover that as well)…
Here’s the steps:
1. Create a new Solution called Ribbon.
2. Add to your Solution the Account entity and then export the Solution.
3. Determine the location ID for where you want your button to sit (note: this take a bit of research, keep reading…)
3a. Download and install the CRM SDK. Then go to the following SDK folder:
sdksamplecodecsclientribbonexportribbonxmlexportedribbonxml
Here you will see Ribbon definitions for each entity (e.g. accountribbon.xml)
[UPDATE: 14 Dec 2011 – The latest SDK did not include the ribbon definition XML files forcing you to build and run an app from source code provided in order to generate them for your self. I provide instructions on this process here]
3b. Open accountribbon.xml in Visual Studio.
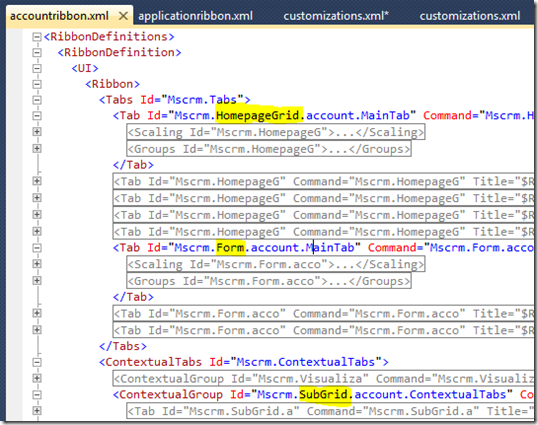
Now we need to find the relevant bit of XML that defines the ribbon component we want to customise. Each entity has ribbon definitions for it’s form ribbon (“Form”), for the ribbon that appears when the entity’s grid view is selected from the main CRM menu (“HomePageGrid”) and for the ribbon that appears when the entity is displayed as an in-line grid on either a dashboard on another entity’s form (“SubGrid”). You will see Tab definitions for each of this:
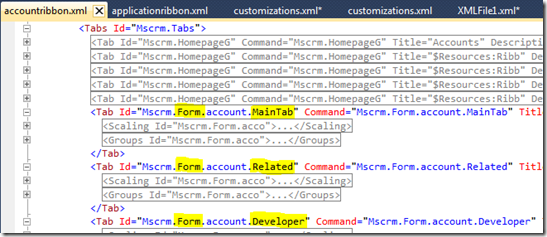
We are interested in the Form ribbon so minimise the other XML elements and have a look at the Tab definitions for the Account Form. You will see 3 tabs are defined:
These are the definitions behind the “Account”, “Add” and “Customize” tabs you see when looking at the Account form in CRM:
(Note: As the “File” tab is generic it is defined in the application.ribbon.xml rather than inside each entity’s ribbon xml file)
The Tab that we want is the one that appears as “Account”. The Tab definition for this is:
Tab Id=”Mscrm.Form.account.MainTab”
(Note: look at the Buttons defined under each Tab to help figure out the correct Tab)
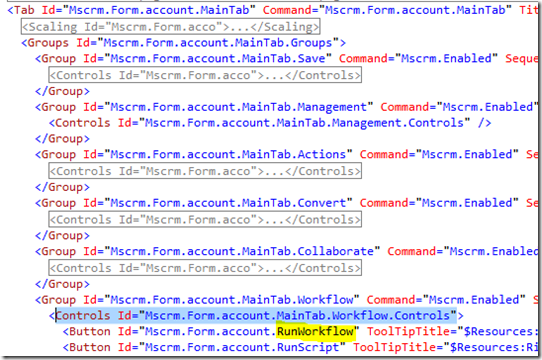
To add a button to the CRM ribbon we need to specify a location. The value we need is the “Controls Id”. Find the button you want your button added next to and grab the “Controls ID” that button sits under. We will add our button to the “Process” Group next to the “Run Workflow” button so the Controls ID value we want is:
Controls Id=”Mscrm.Form.account.MainTab.Workflow.Controls”
3c. Copy the Controls Id value to NotePad
3d. Close accountribbon.xml
That’s our research done, let’s get back to defining our button…
4. Open the customisation.xml file that was included in your exported Solution zip file (open in Visual Studio).
5. From the XML menu, click Schemas and then add from .. sdkschemas the 3 xsd files that have “ribbon” in their name and also customizationssolution.xsd (this gives us intellisense)
7. Back in the main window of VS do a Find on “RibbonDiff” and then swap out: “<CustomActions />” with:
If you want to deviate from my scenario of customising the Account form the relevant bit in the above is the Location reference. This is where the Controls ID value that we we obtained from our research goes. Note: The Controls ID value needs to be appended with “._children” e.g.:
Location=”Mscrm.Form.account.MainTab.Workflow.Controls._children”
8. If you have 16×16 and 32×32 icons for your button go and add those into CRM as web resources and then change the references in the above code snippet. Otherwise, remove theImage16by16 and Image32by32 lines (they’re optional, the button will still show).
9. Scroll down a bit and replace: “<CommandDefinitions />” with:
10.Adjust the Url reference to whatever you want. You can use use a relative reference if you want to launch a CRM URL or an HTML page you have loaded into CRM.
or:
If you want to execute a jscript function instead swap out the <Actions> node with a jscript web resource and function name reference like the below:
11. Save your customisation.xml changes.
12. Re-zip your unzipped solution back into a solution zip file, import, publish all and then refresh your browser.
Done. 
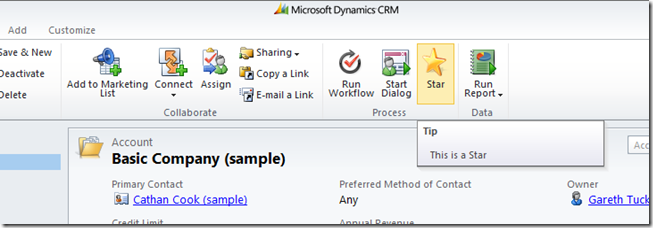
End result:


