Menu Close

Author: uk365guy

{Did you know} how it looks when enable relationship insights in Dynamics 365 Sales Insights

Hello Everyone,

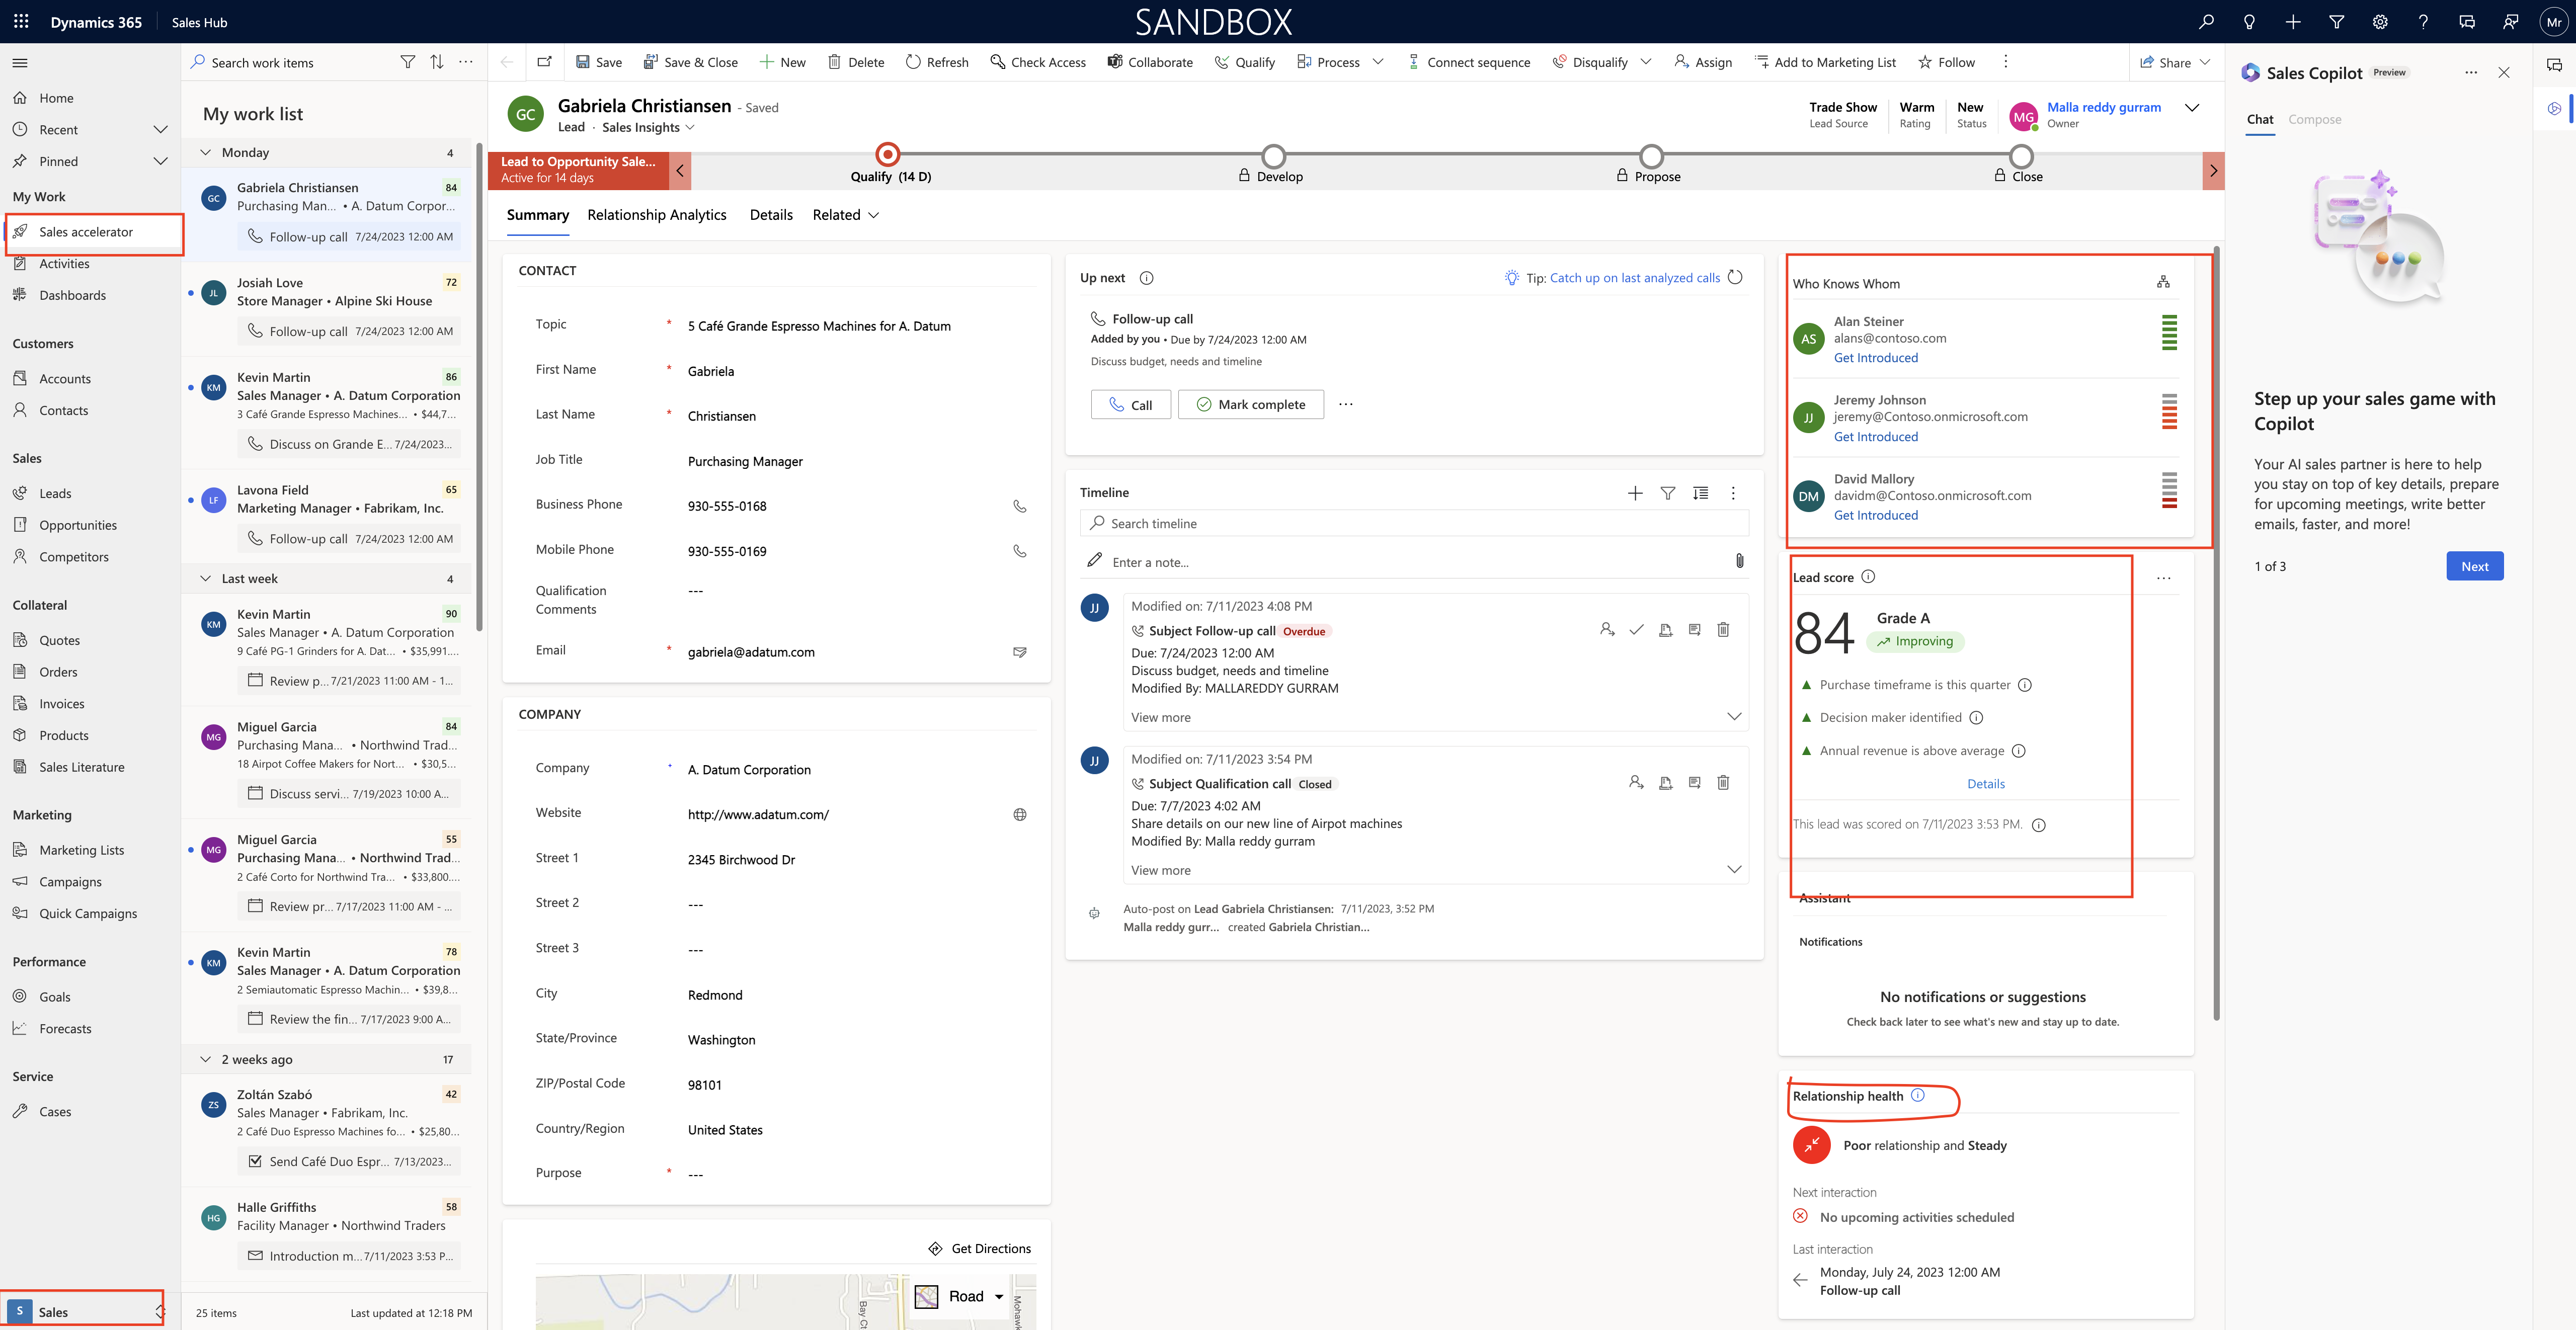
Today i am going to show how it looks when relationship insights enabled on Dynamics 365 Sales Insights.

Let’s get’s started.

Login into Dynamics 365 Sales Insights.

If you want to know how to enable Dynamics 365 Sales Insights click

Then if you switch to Sales and open the sales accelarator then you will see the sales insights see below screenshot.

That’s it for today.

I hope this helps

Malla Reddy(@UK365GUY)
#365BlogPostsin365Days

Share this:

{Do you know} Dynamics 365 and Microsoft Power Platform release planner documentation

Hello Everyone,

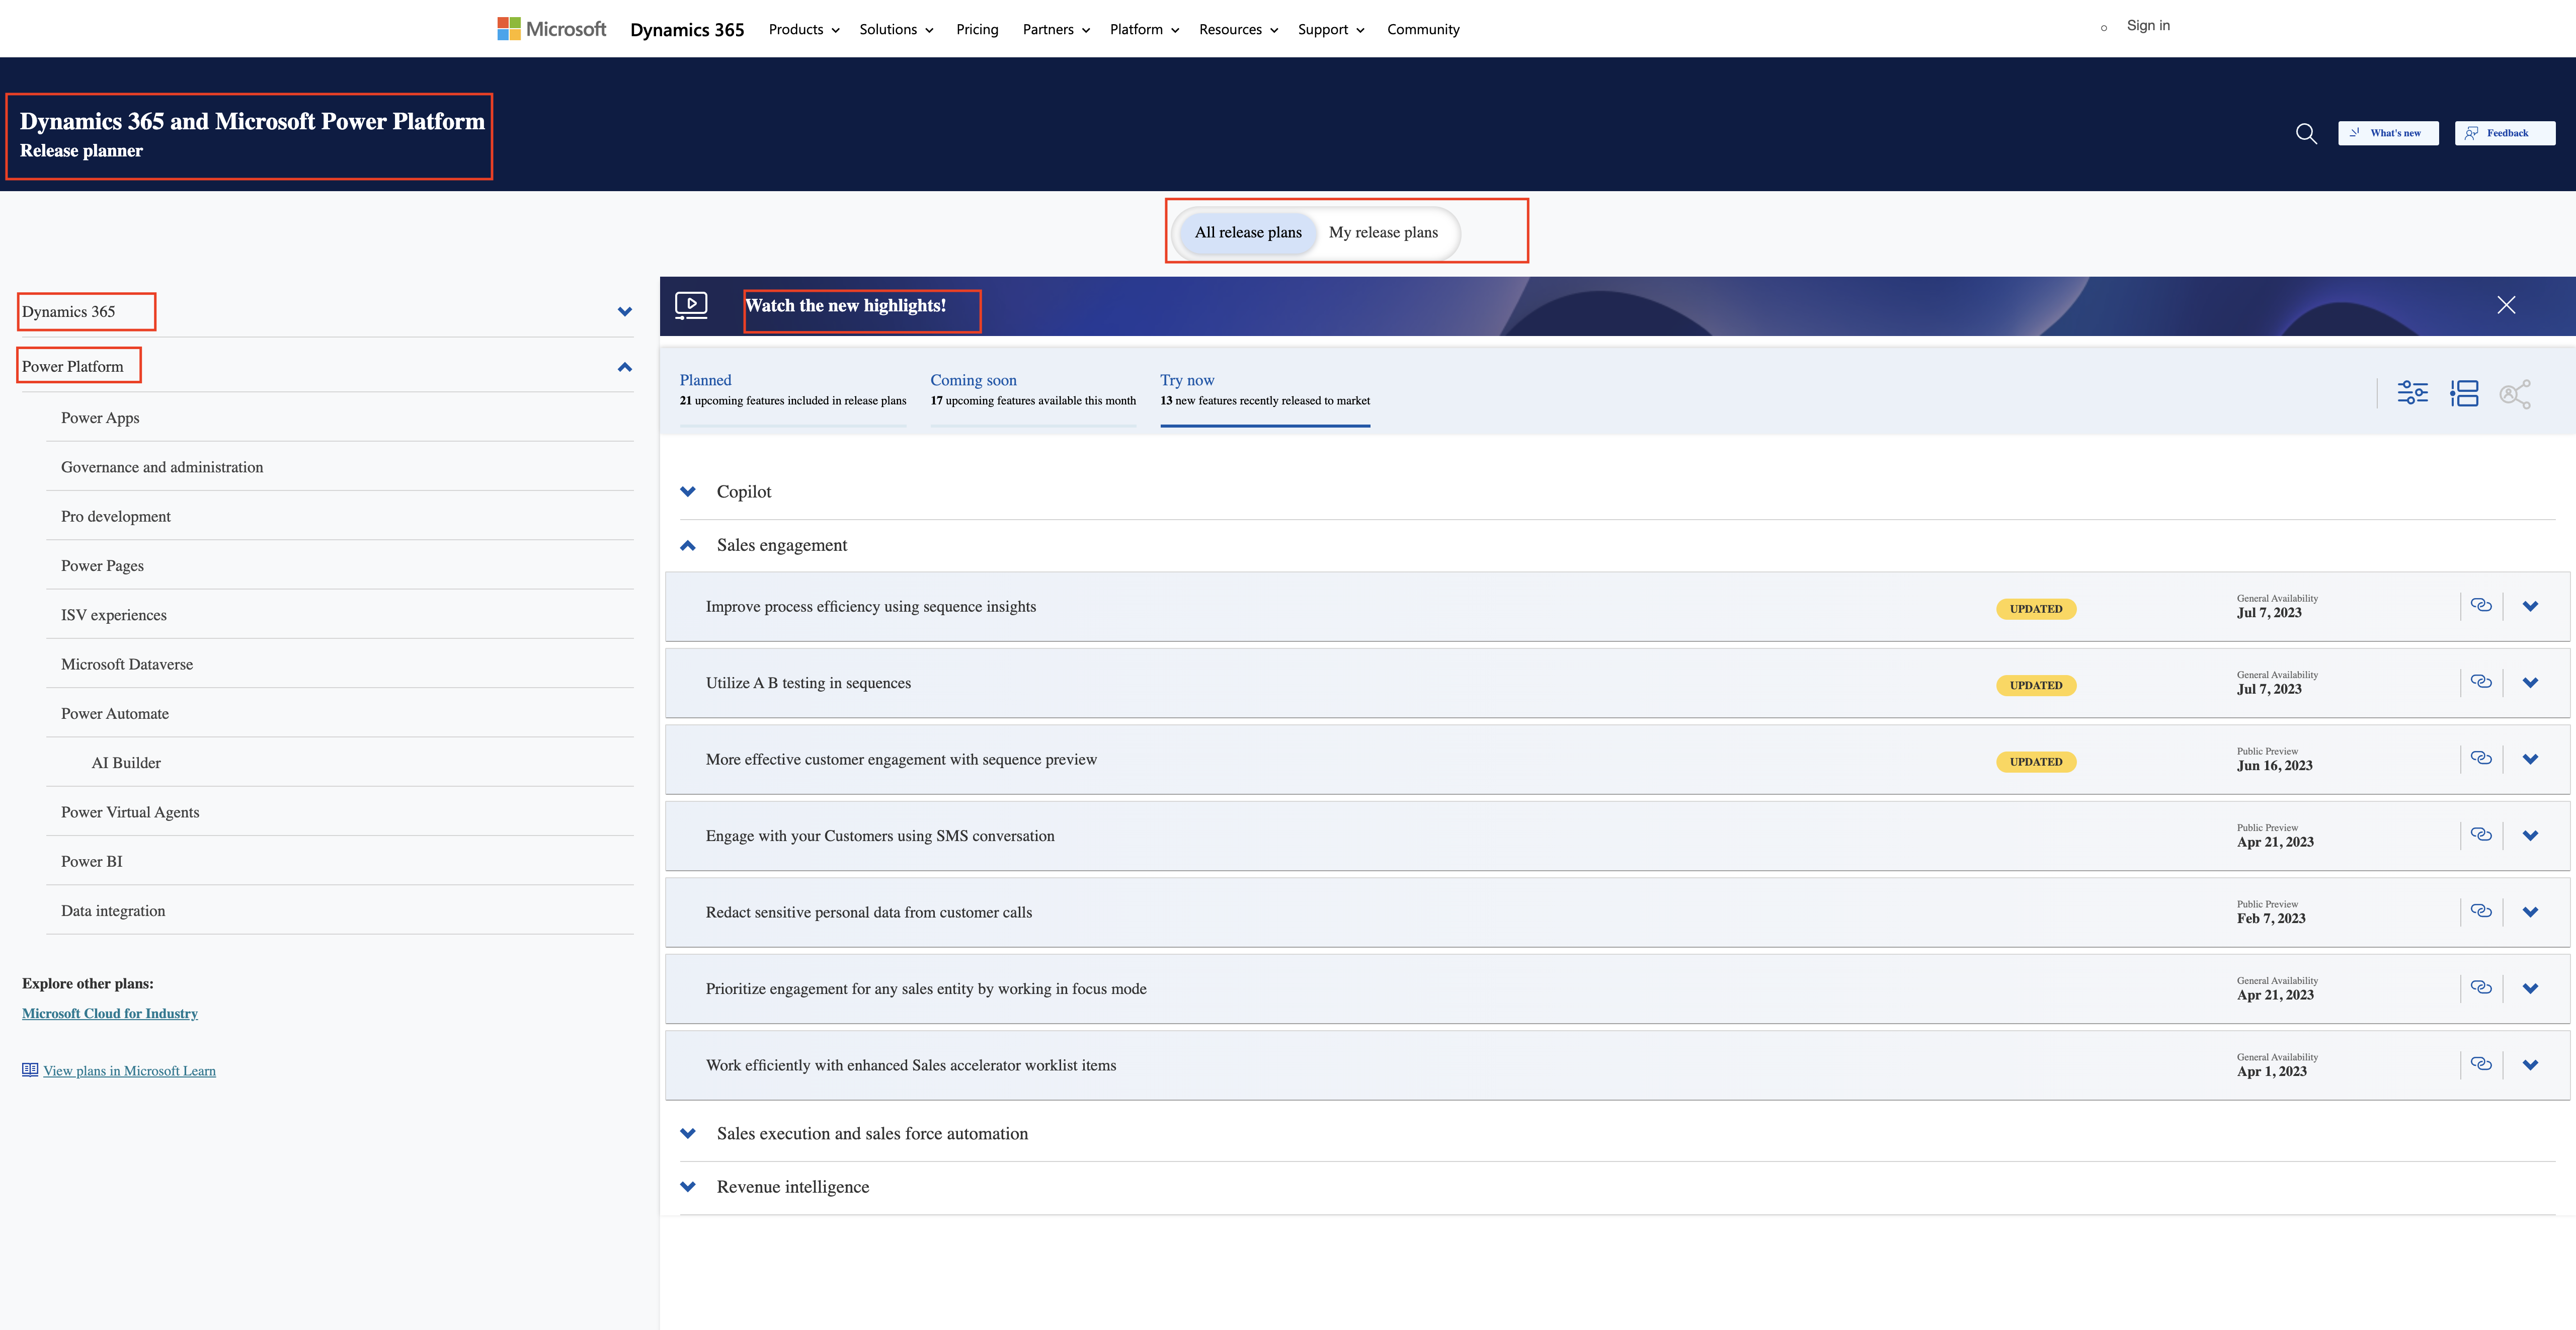
Today i am going to share Dynamics 365 and Microsoft Power Platform release planner documentation site.

Let’s get’s started.

Microsoft Dynamics 365 and Power Platform Community usually look for release documentation area on search engines.

I am going to share the url here

That’s it for today.

I hope this helps.

Malla Reddy(@UK365GUY)
#365BlogPostsin365Days

Share this:

How to approve email addresses for Users or Queues privilege by normal user other than system administrators in Dynamics 365 Sales

Hello Everyone,

Today i am going to show to approve email addresses by normal user other than system administrator.

Let’s get’s started.

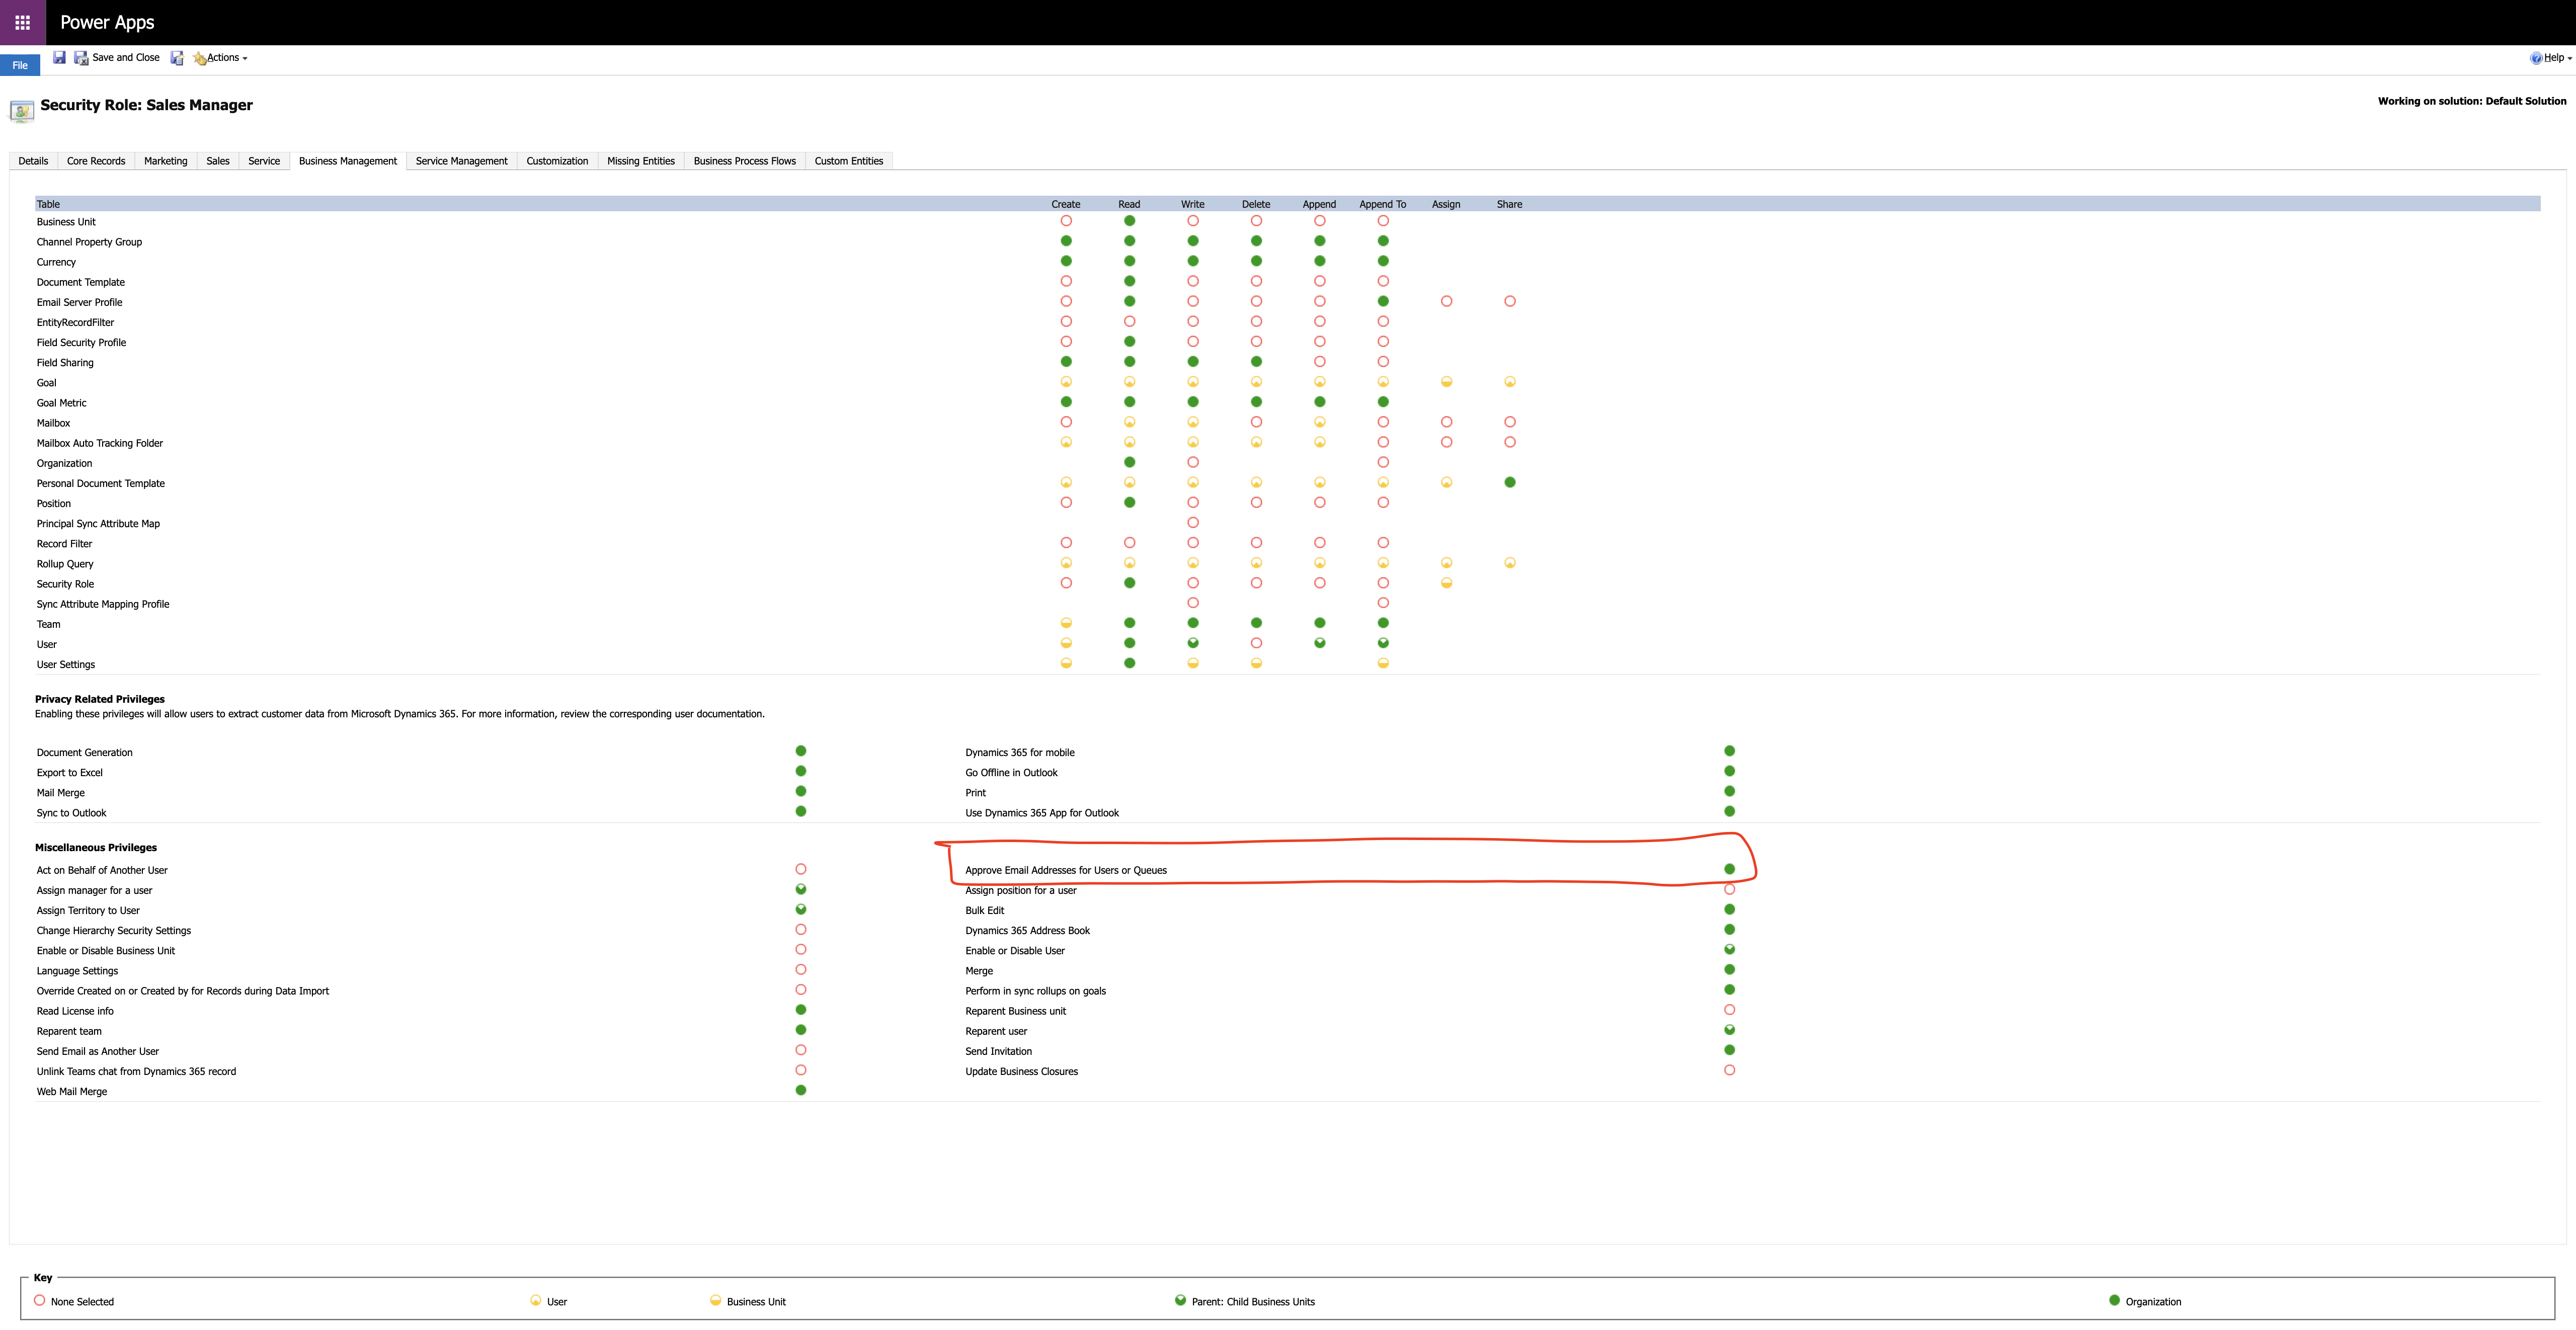
Normally to approve an email addresses in Dynamics 365 user requries the Approve Email Addresses for Users or Queues Privileges.

System Administrators usually have this role assigned default, so if any other user requires to approve email addresses, system admin’s can assign this Approve Email Addresses for Users or Queues Privileges to their security role.

How to assign manually lets see in action:

Login into Power Platform Admin Center and select an environment,

In the legacy web client in the upper right hand corner, click on Advanced Settings.

Settings > Users + Permissions > Security roles.

Security role and then select the Business Management tab.

Under Miscellaneous Privileges, set the previleges level for Approve Email Addresses for Users or Queues.

Then Approve Mailboxes:

How do you do that?

Login into Power Platform Admin Center, select the environment,

Legacy web client click on advanced settings.

Select Settings > Email > Mailboxes.

Select Active Mailboxes.

Select the mailboxes that you want to approve and then select More commands > Approve Email.

Select OK.

That’s it for today.

I hope this helps
Malla Reddy(@UK365GUY)
#365BlogPostsin365Days

Share this:

{How to } enable and open Customer Service admin center on Dynamics 365 Customer Service Hub

Hello Everyone,

Today i am going to share how to enable and open new customer service admin center from Dynamics 365 Customer Service App.

Let’s get’s started.

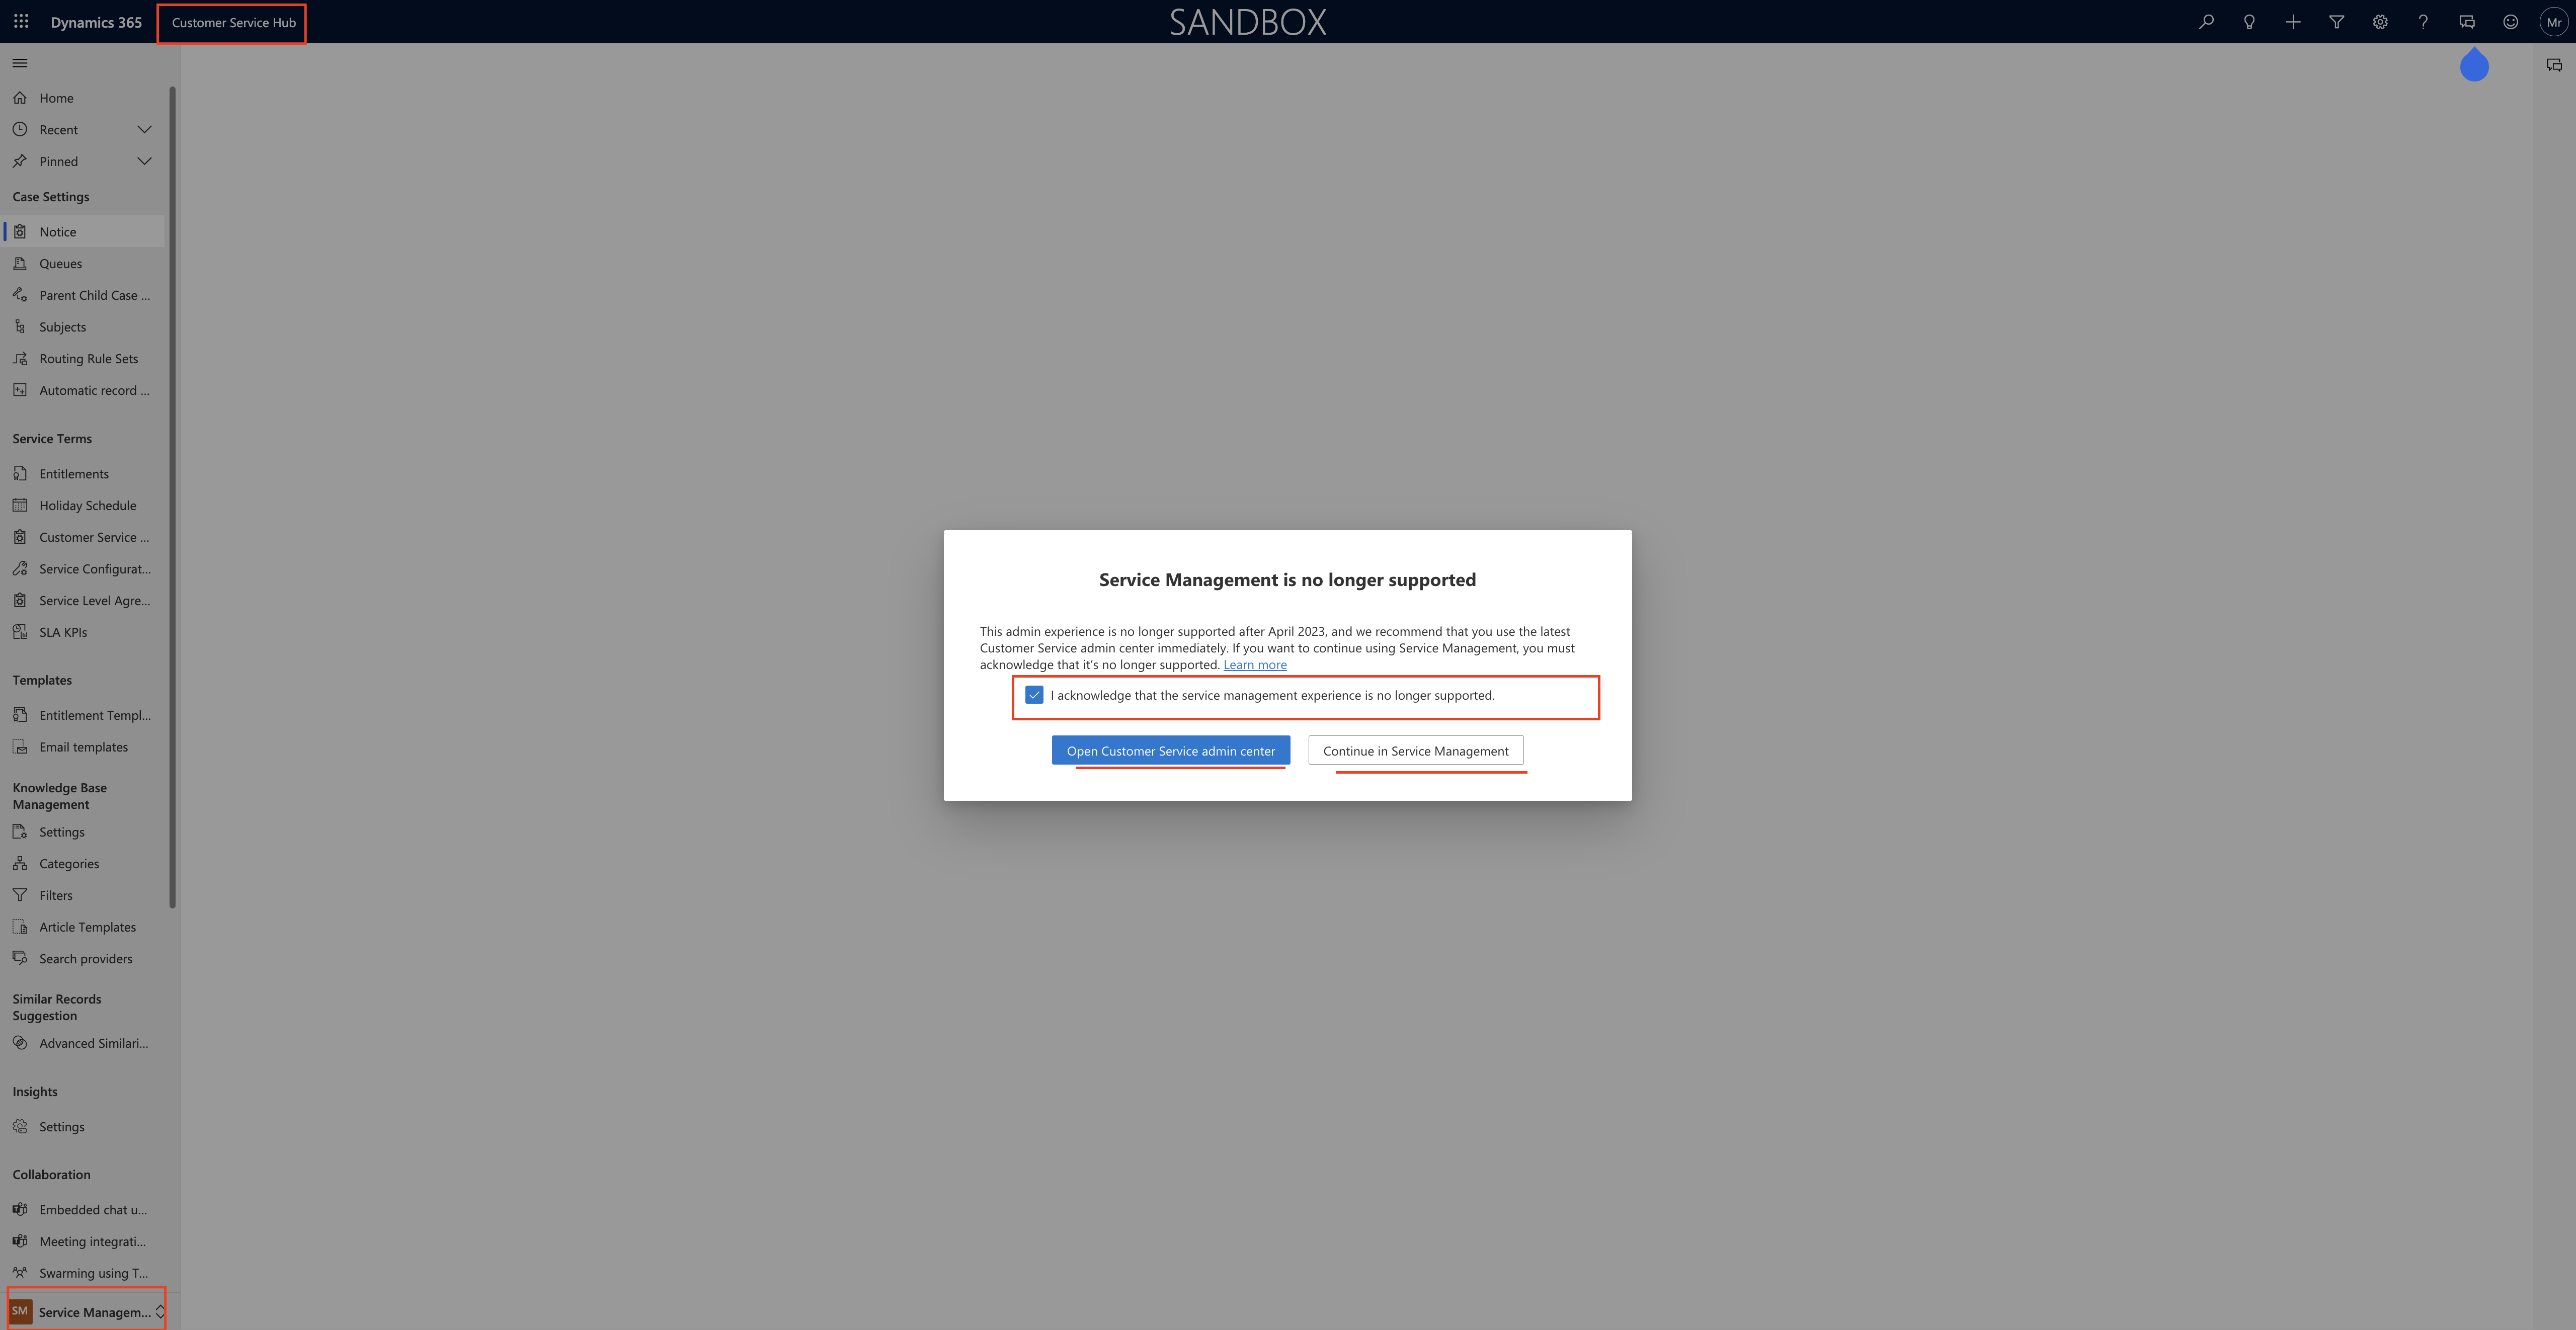
Normally we used to go to service management section on Dynamics 365 Customer Service from settings and the service management to maintain the SLA’s for customer service for any kind of business. but from April 2023 no longer the admin experience available. so Microsoft recommends that you use the latest Customer Service admin center’s immediately. if you want to continue using Service Management, you must acknowledge that it’s no longer supported.

Once acknowledge is completed you can go for either Open Customer Service admin center or Continue in Service Management

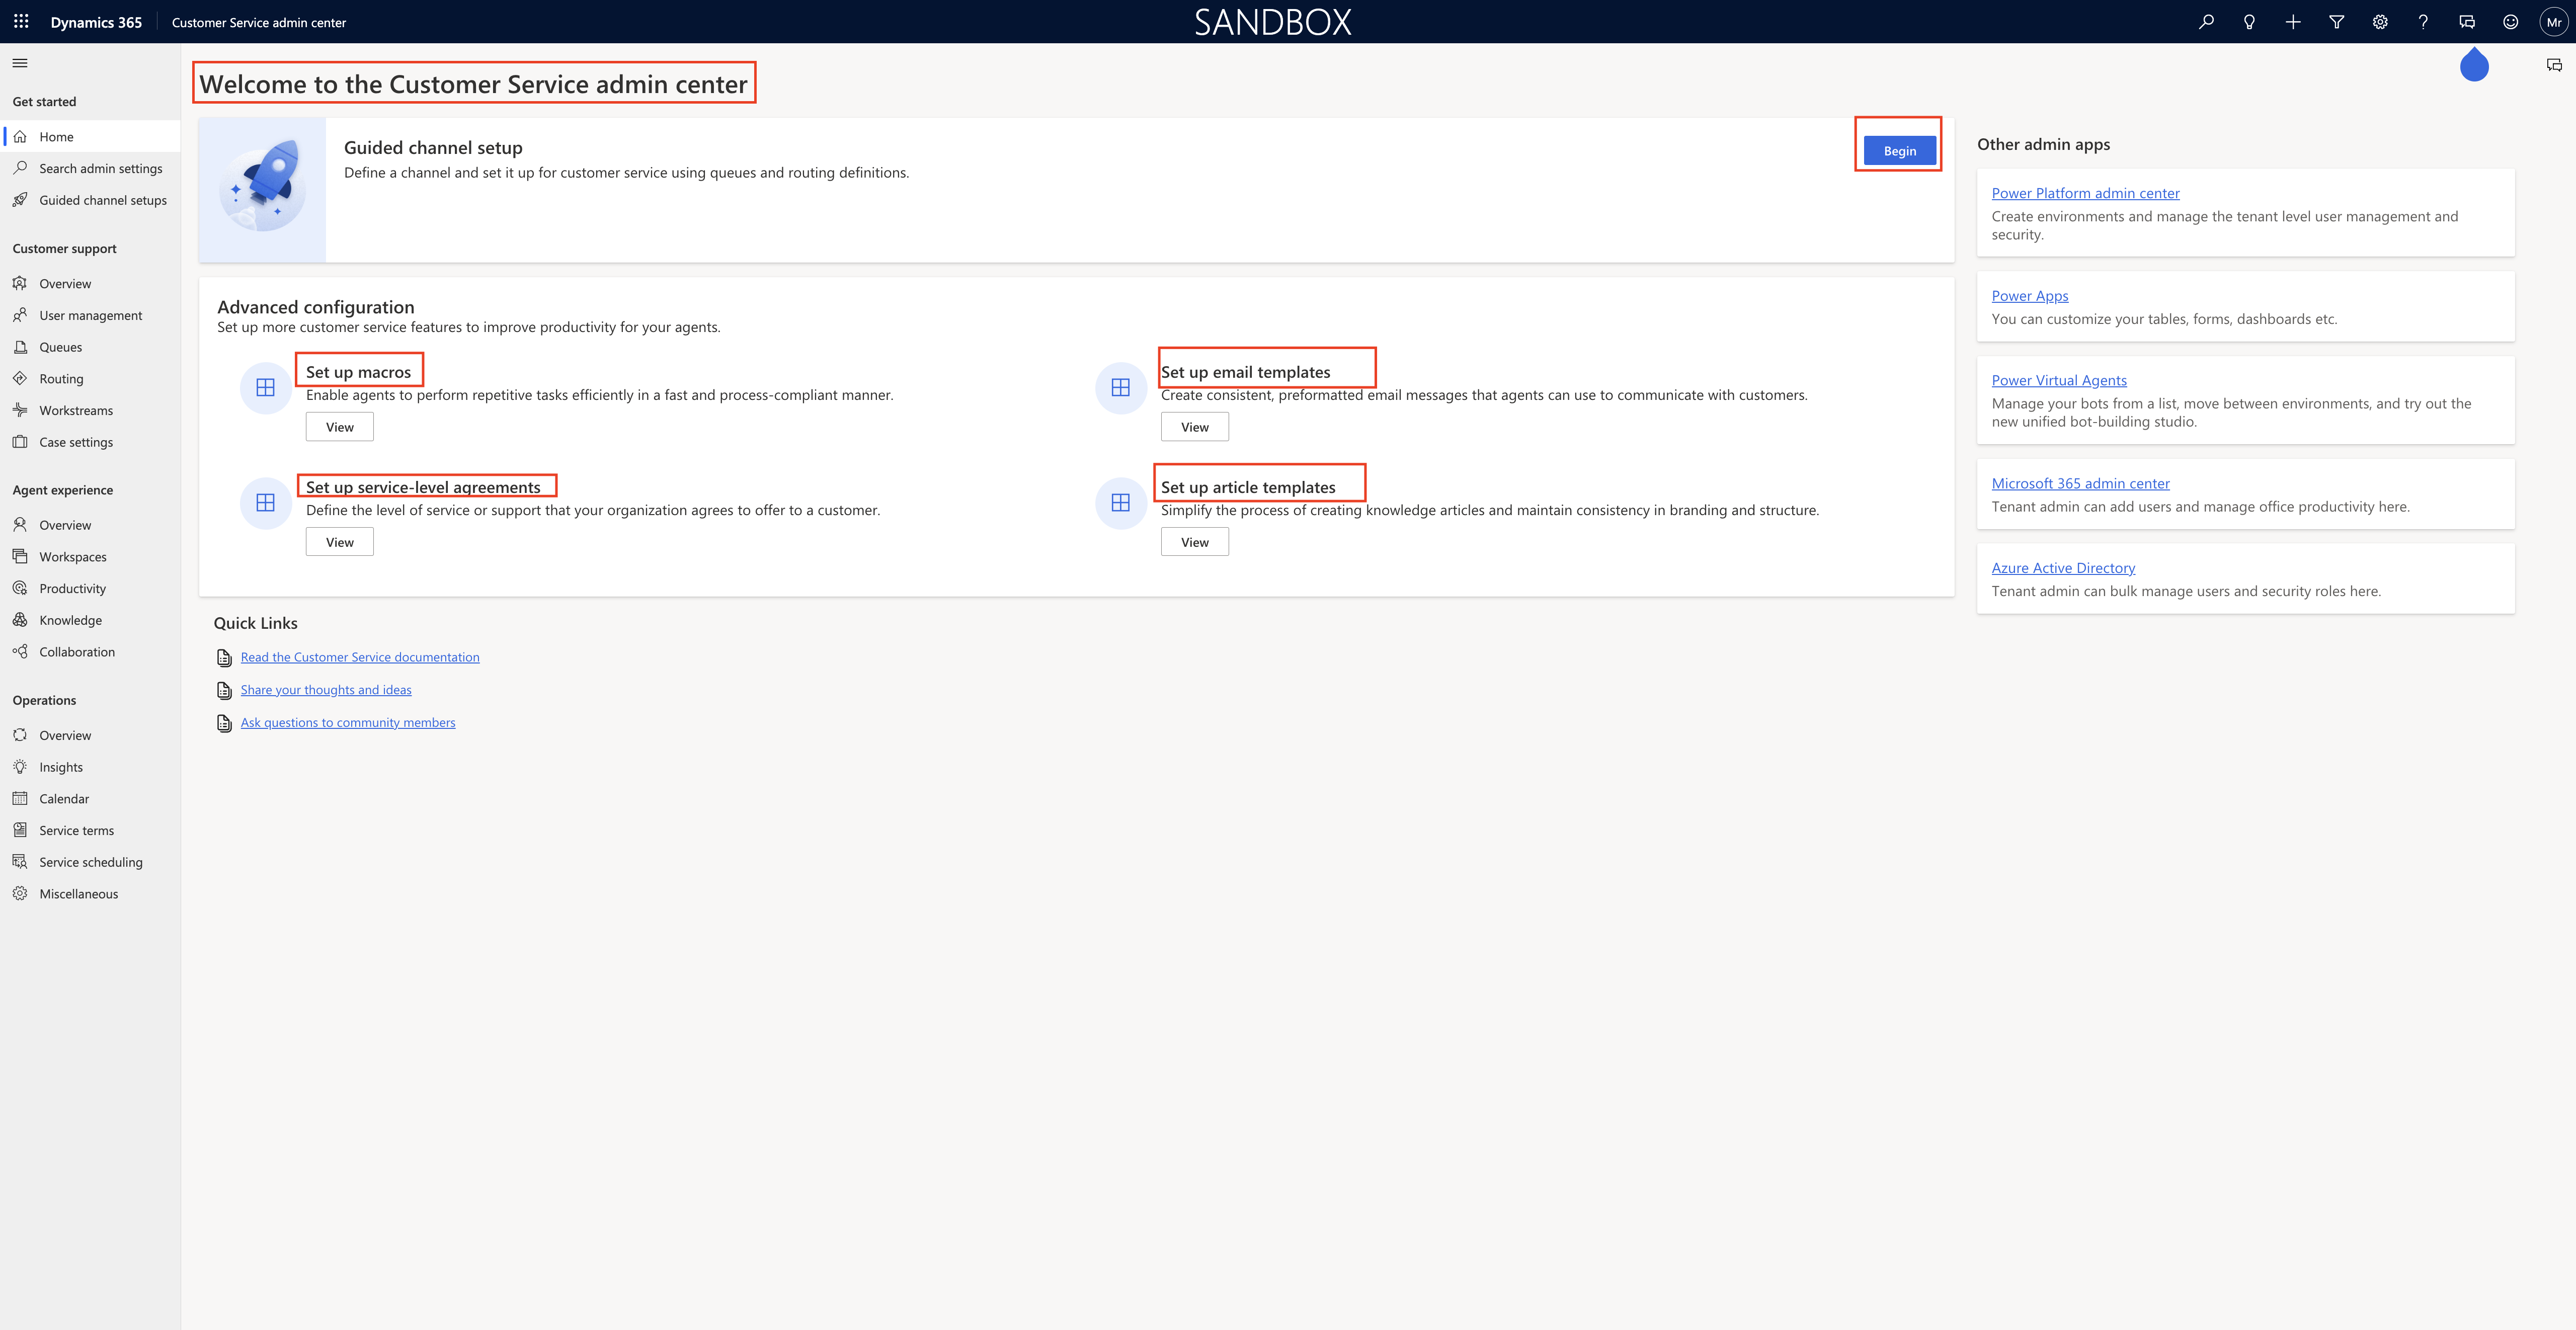
In this case i have chosen the Open Customer Service Admin Center and new window will be displayed see below.

Guided channel setup:

You can configure the define the channel setup for customer service using queues and routing definitions. BEGIN.

Advanced configuration:

1. Set up macros: Which enable agents to perform repetitive tasks efficiently in a fast and process-complaint manner.

2.Set up service- level agreements: Define the level of service or support that your organisation agrees to offer to a customer.

3. Set up email templates: Create consistent, preformatted email messages that agents can use to communicate with customers.

4. Set up article templates: Simplify the process of creating knowledge articles and maintain consistency in branding and structure.

That’s it for today.

I hope this helps
Malla Reddy(@UK365GUY)
#365BlogPostsin365Days

Share this:

[How to} enable relationship insights in Dynamics 365 sales insights

Hello Everyone,

Today i am going to share how to enable relationship insights in dynamics 365 sales insights.

Let’s get’s started.

What is relationship insights?

Relationship Intelligence helps sellers use the information in Dynamics 365 and Microsoft 365 to identify, build, and nurture relationships with their customers.
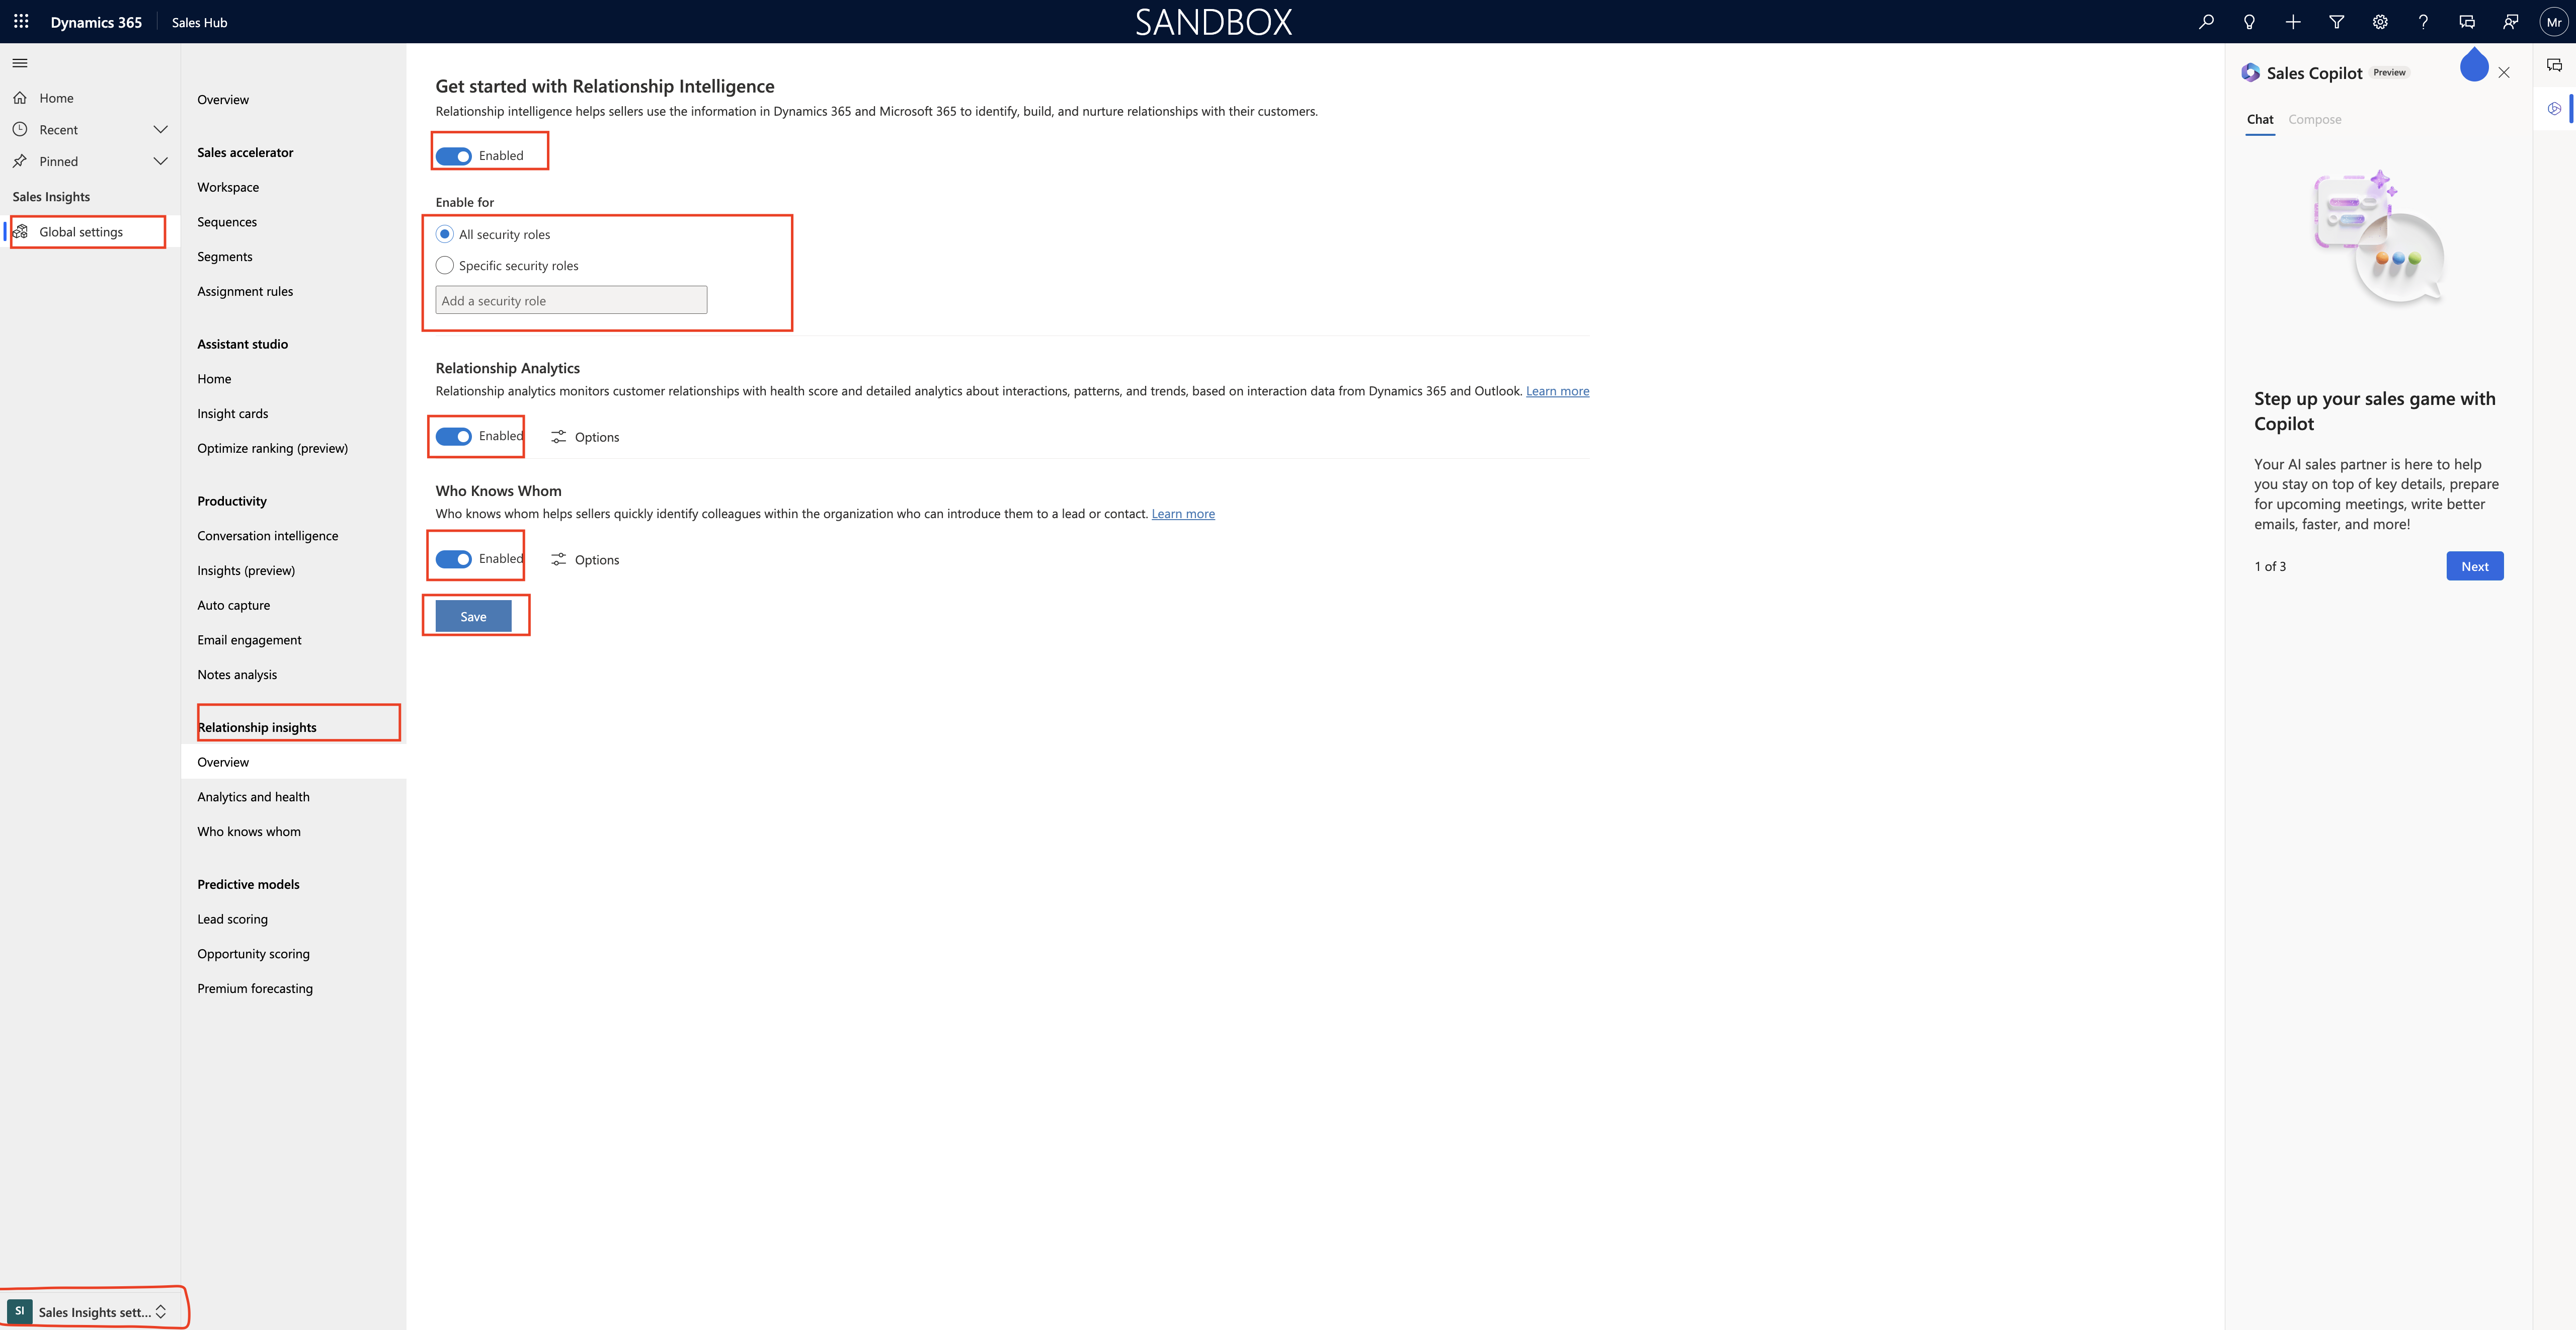
Relationship Intelligence = ENABLE.

Enable for all security roles, specific security roles.

Relationship Analytics:

Relationship analytics monitors customer relationships with health score and detailed analytics about interactions, patterns and trends based on interaction data from Dynamics 365 and Outlook.

Enabled.

Who Knows Whom:

Who knows whom helps sellers quickly identify colleagues within the organisation who can introduce them to lead or contract = Enabled.

Finally Save.

Relationship analytics and health:
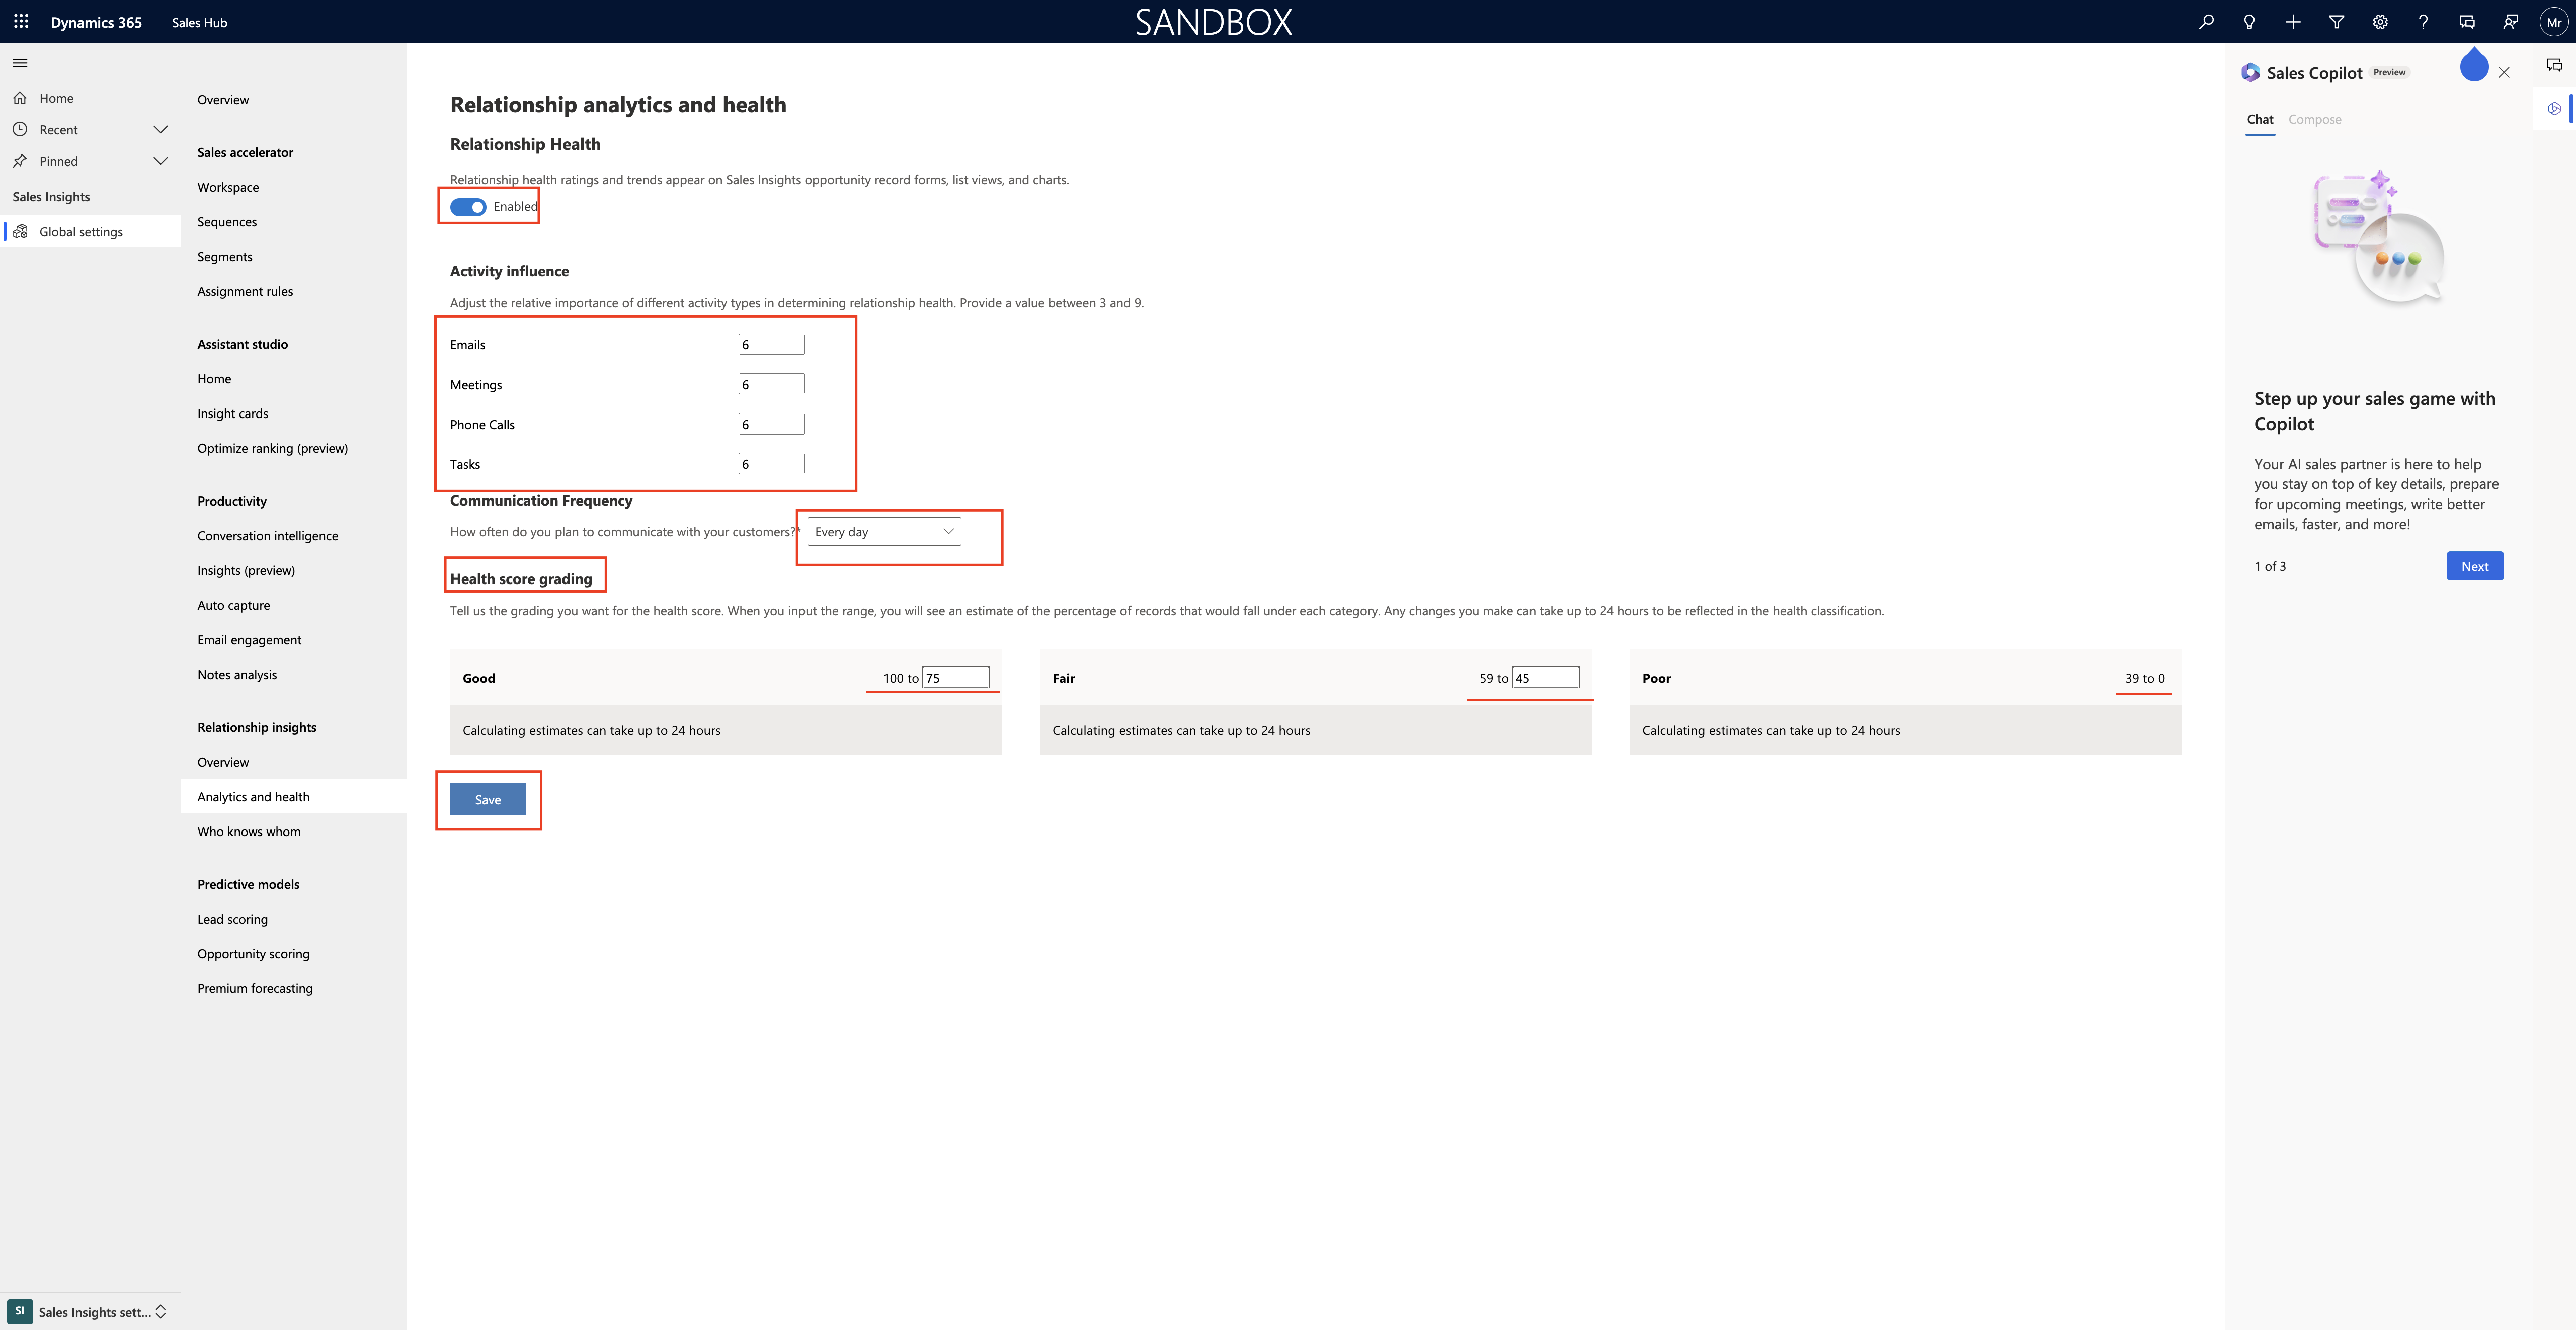
Relationshio health : Rating and trends appear on sales insights opportunity record forns, list views and charts. ENABLED.

Activity influence:

You can adjust the relative importance of different activity types in determing relationship health. Provide a value between 3 and 9.

English: 6
Meetings 6
Phone calls 6
Tasks 6

Communication Frequency:

How often do you plan to communicate with your customers : Every day, a few times a week, Once a week, a few times a month, Once a month.

Health score grading:

Tell us the grading you want for the health score. when you input the range, you will see an estimate of the percentage of records that would fall under each category. Any changes you make can take up to 24 hours to be reflected in the health classification.

1. Good: calculating estimates can take up to 24 hours: 100 to 75

2. Fair: Calculating estimates can take up to 24 hours. 59 to 45

3. Poor: Calculating estimates can take up to 24 hours. 39 to 0

Who Knows Whom:

To use who knows whom in Dynamics 365, ensure that connection graph in Office 365 Admin Center is enabled,
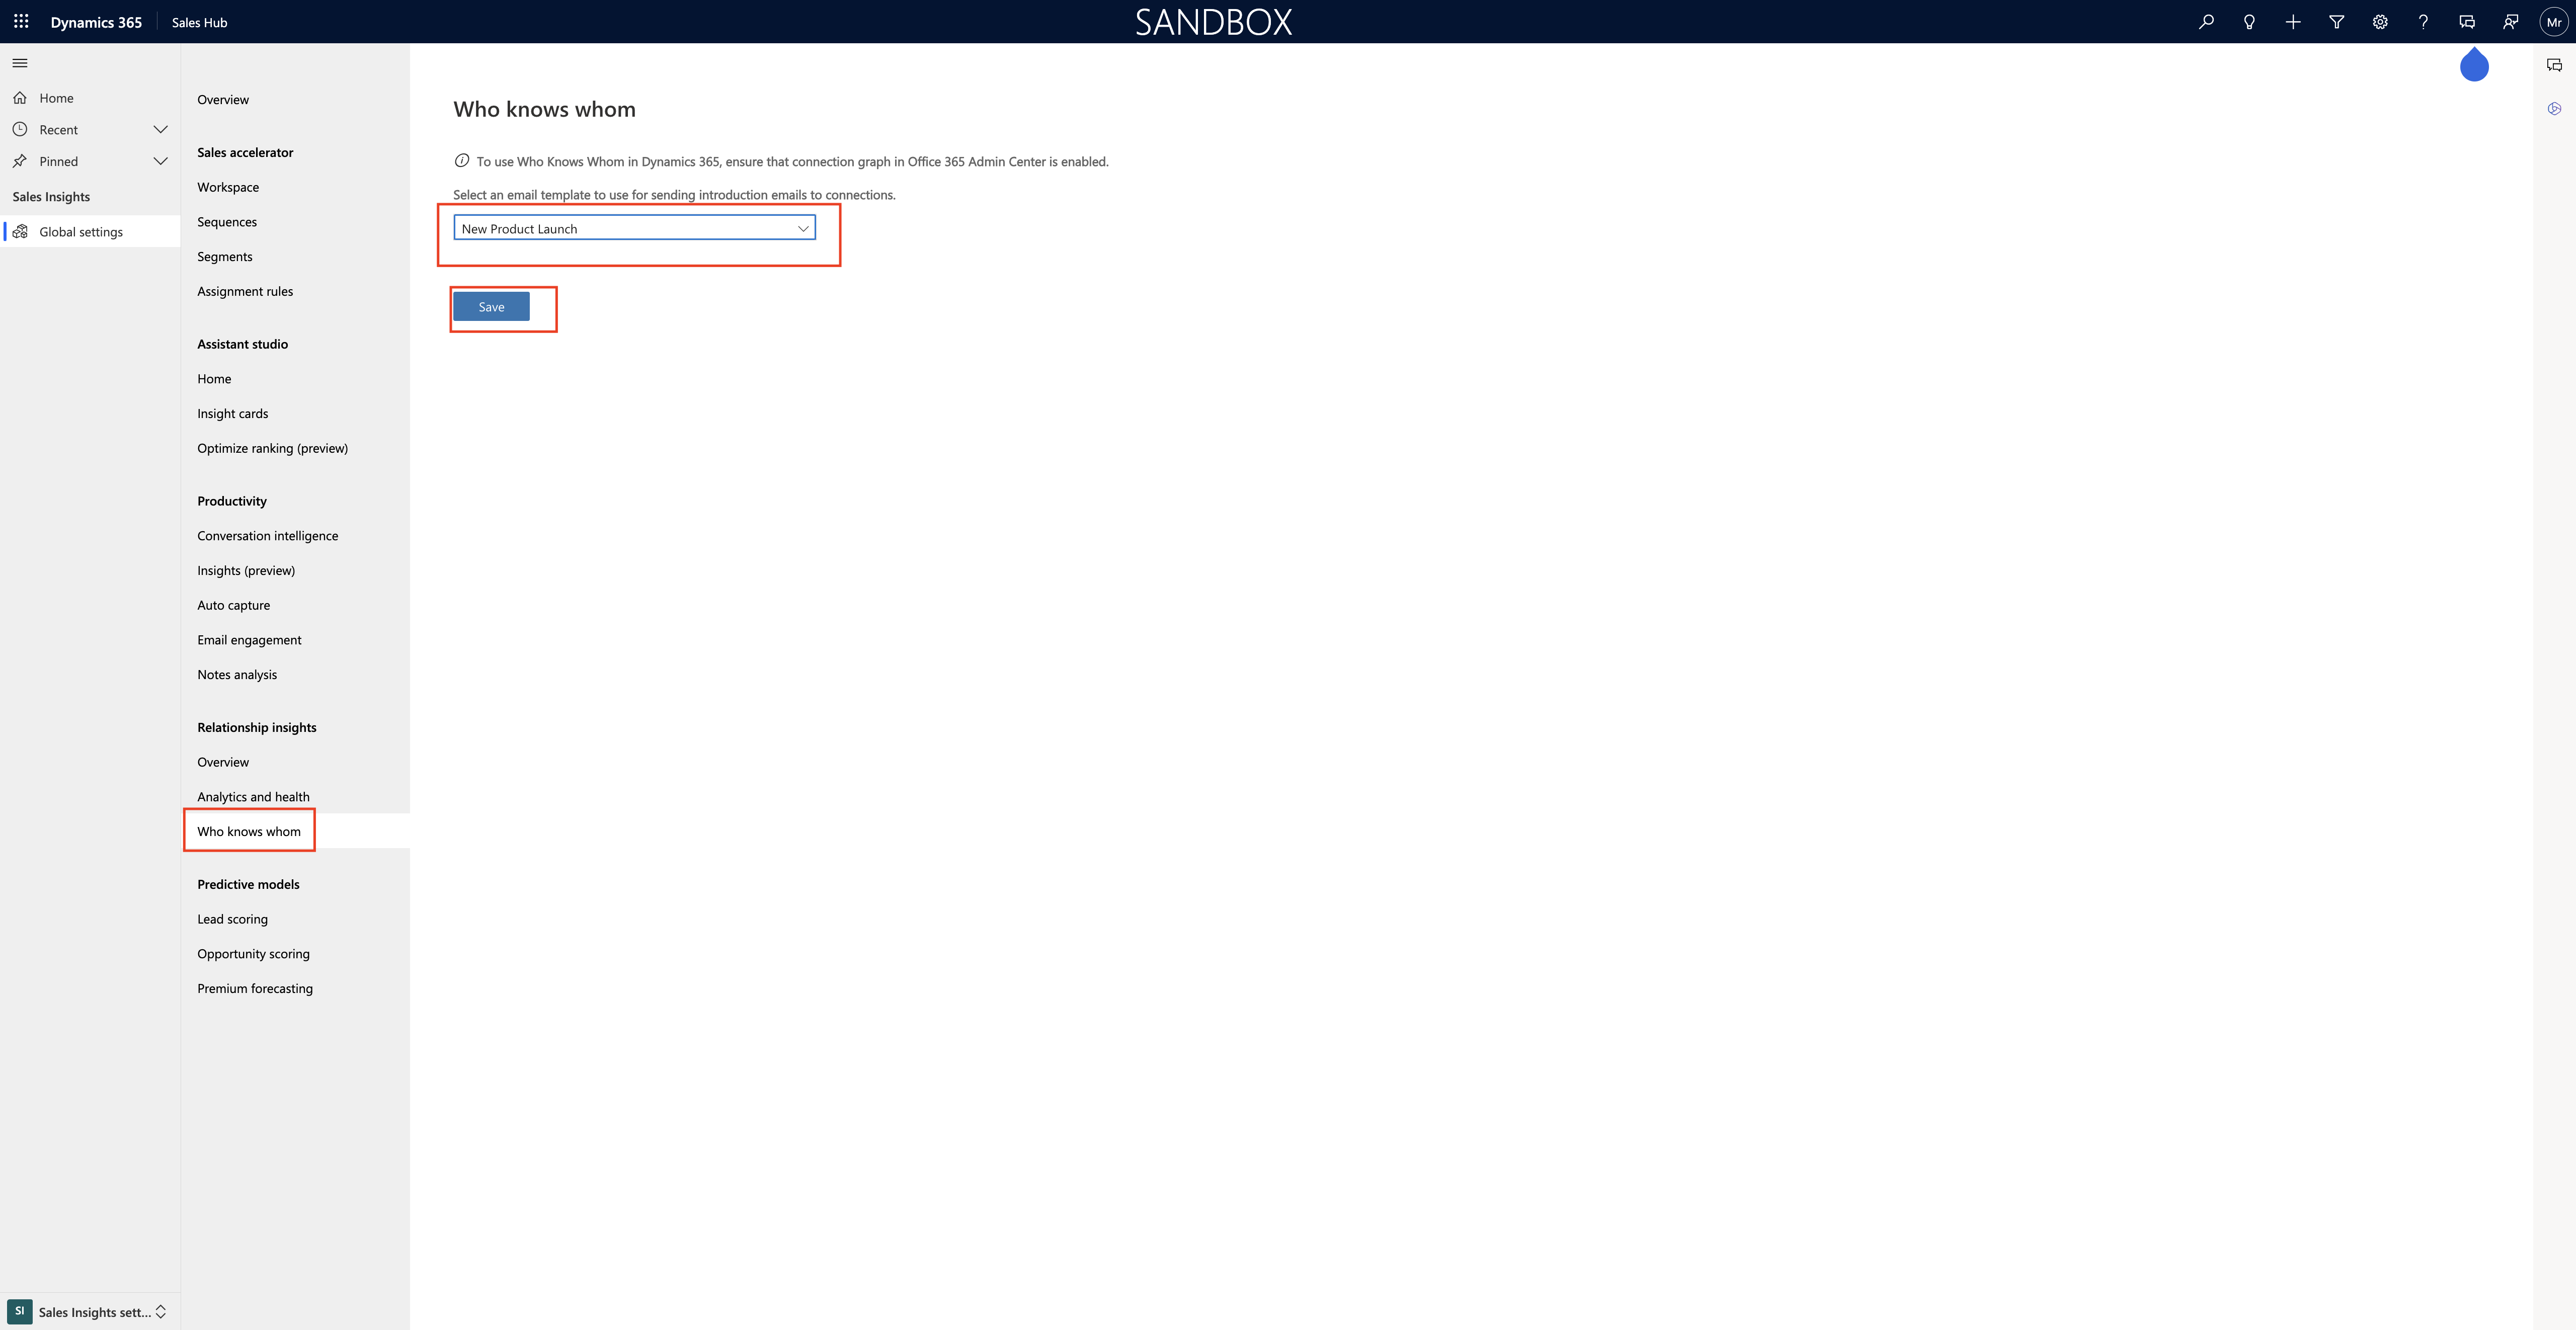
Select an email template from the below to use for sending introduction emails to connections.

1. Who knows whom introduction.
2. Marketing communication unsubscribe acknowledge
3.New Product Launch.
4. Who Knows whom Introduction.

Then save.

That’s it for today.

I hope this helps
Malla Reddy(@UK365GUY)
#365BlogPostsin365Days

Share this: