Menu Close

Author: uk365guy

Create Dataverse Table and run canvas app using excel file upload(Preview)

Hello Everyone,

Today i am going to share new feature public preview related to upload an excel file and convert it into Dataverse table and canvas app.

Lets gets started.

Login www.make.powerapps.com

Ways to create an app:

Start with data

Create a table, pick an existing one, or even import from excel to create an app.

Click on “Start with data”

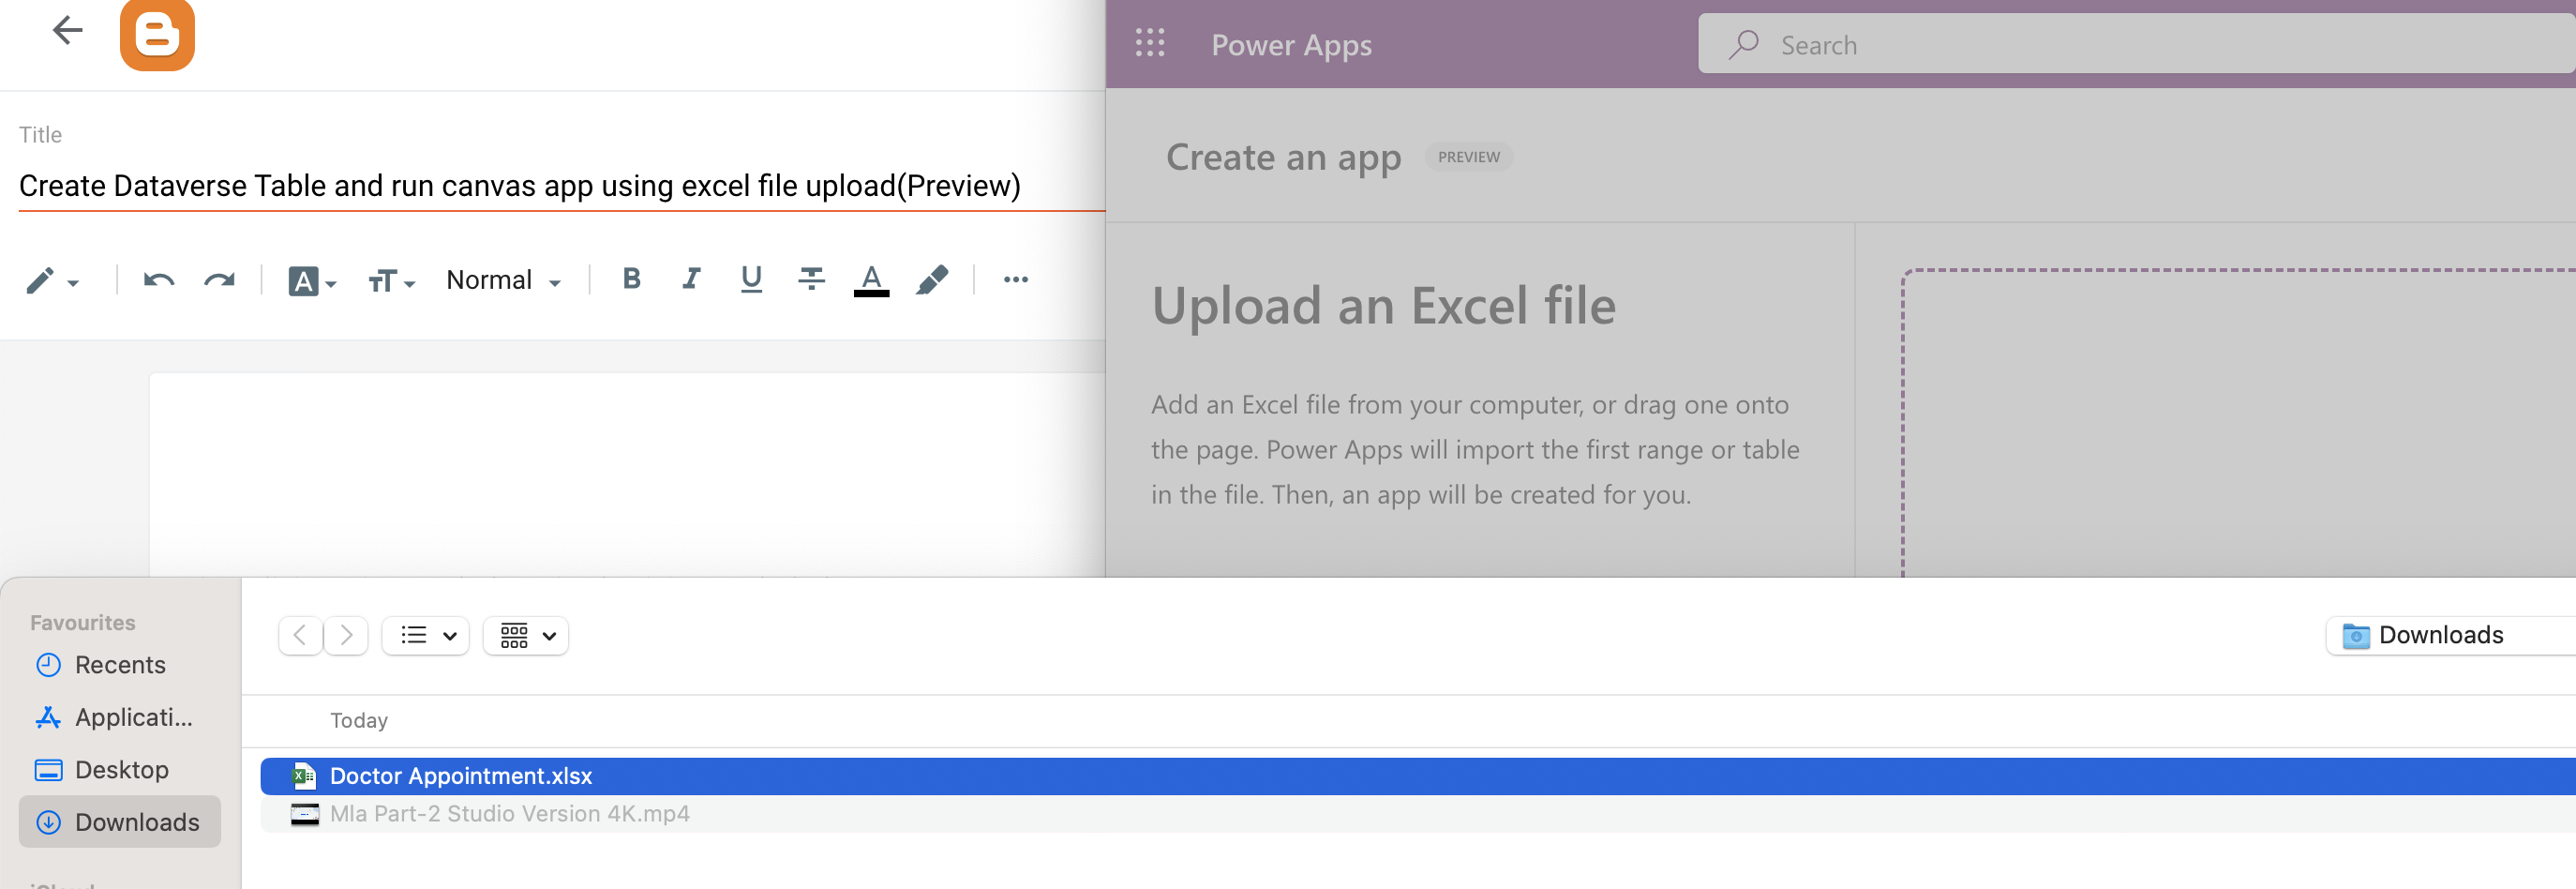
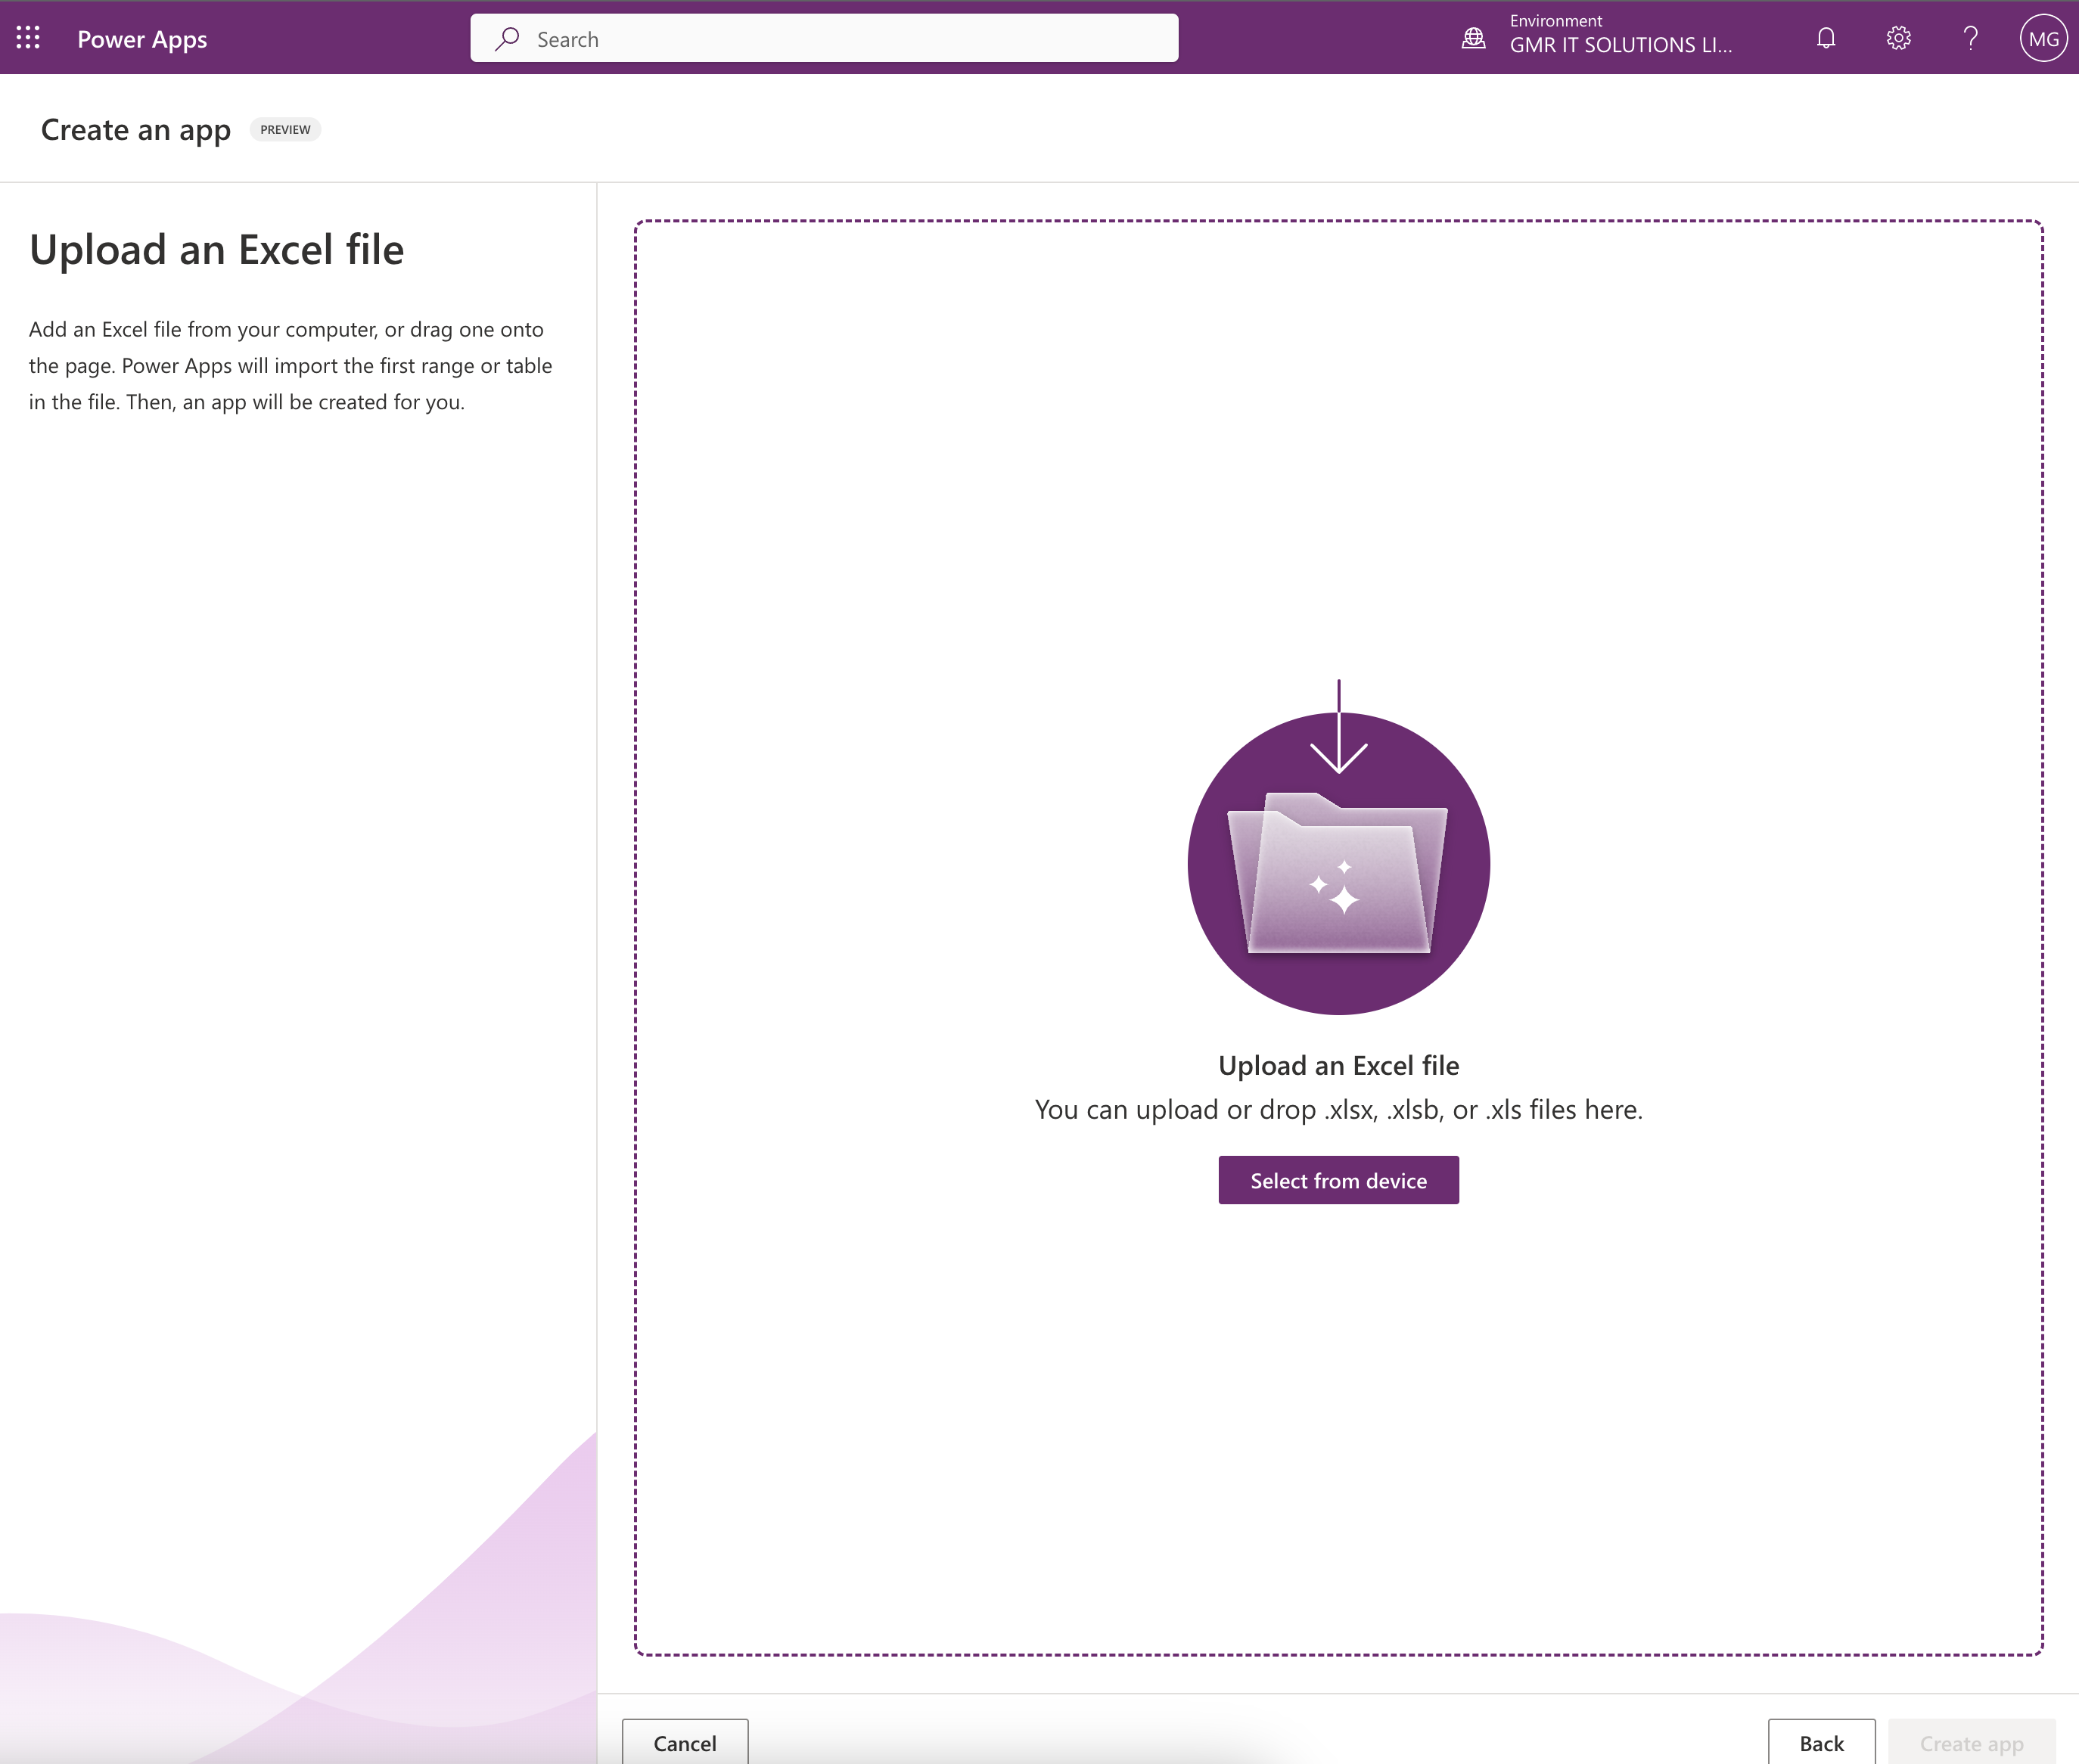
Then click on the Excel file and upload the excel file from your computer or drag and drop onto the page. Power Apps will import the first range or table in the file. Then, an app will be created for you.

Uploaded from the computer.

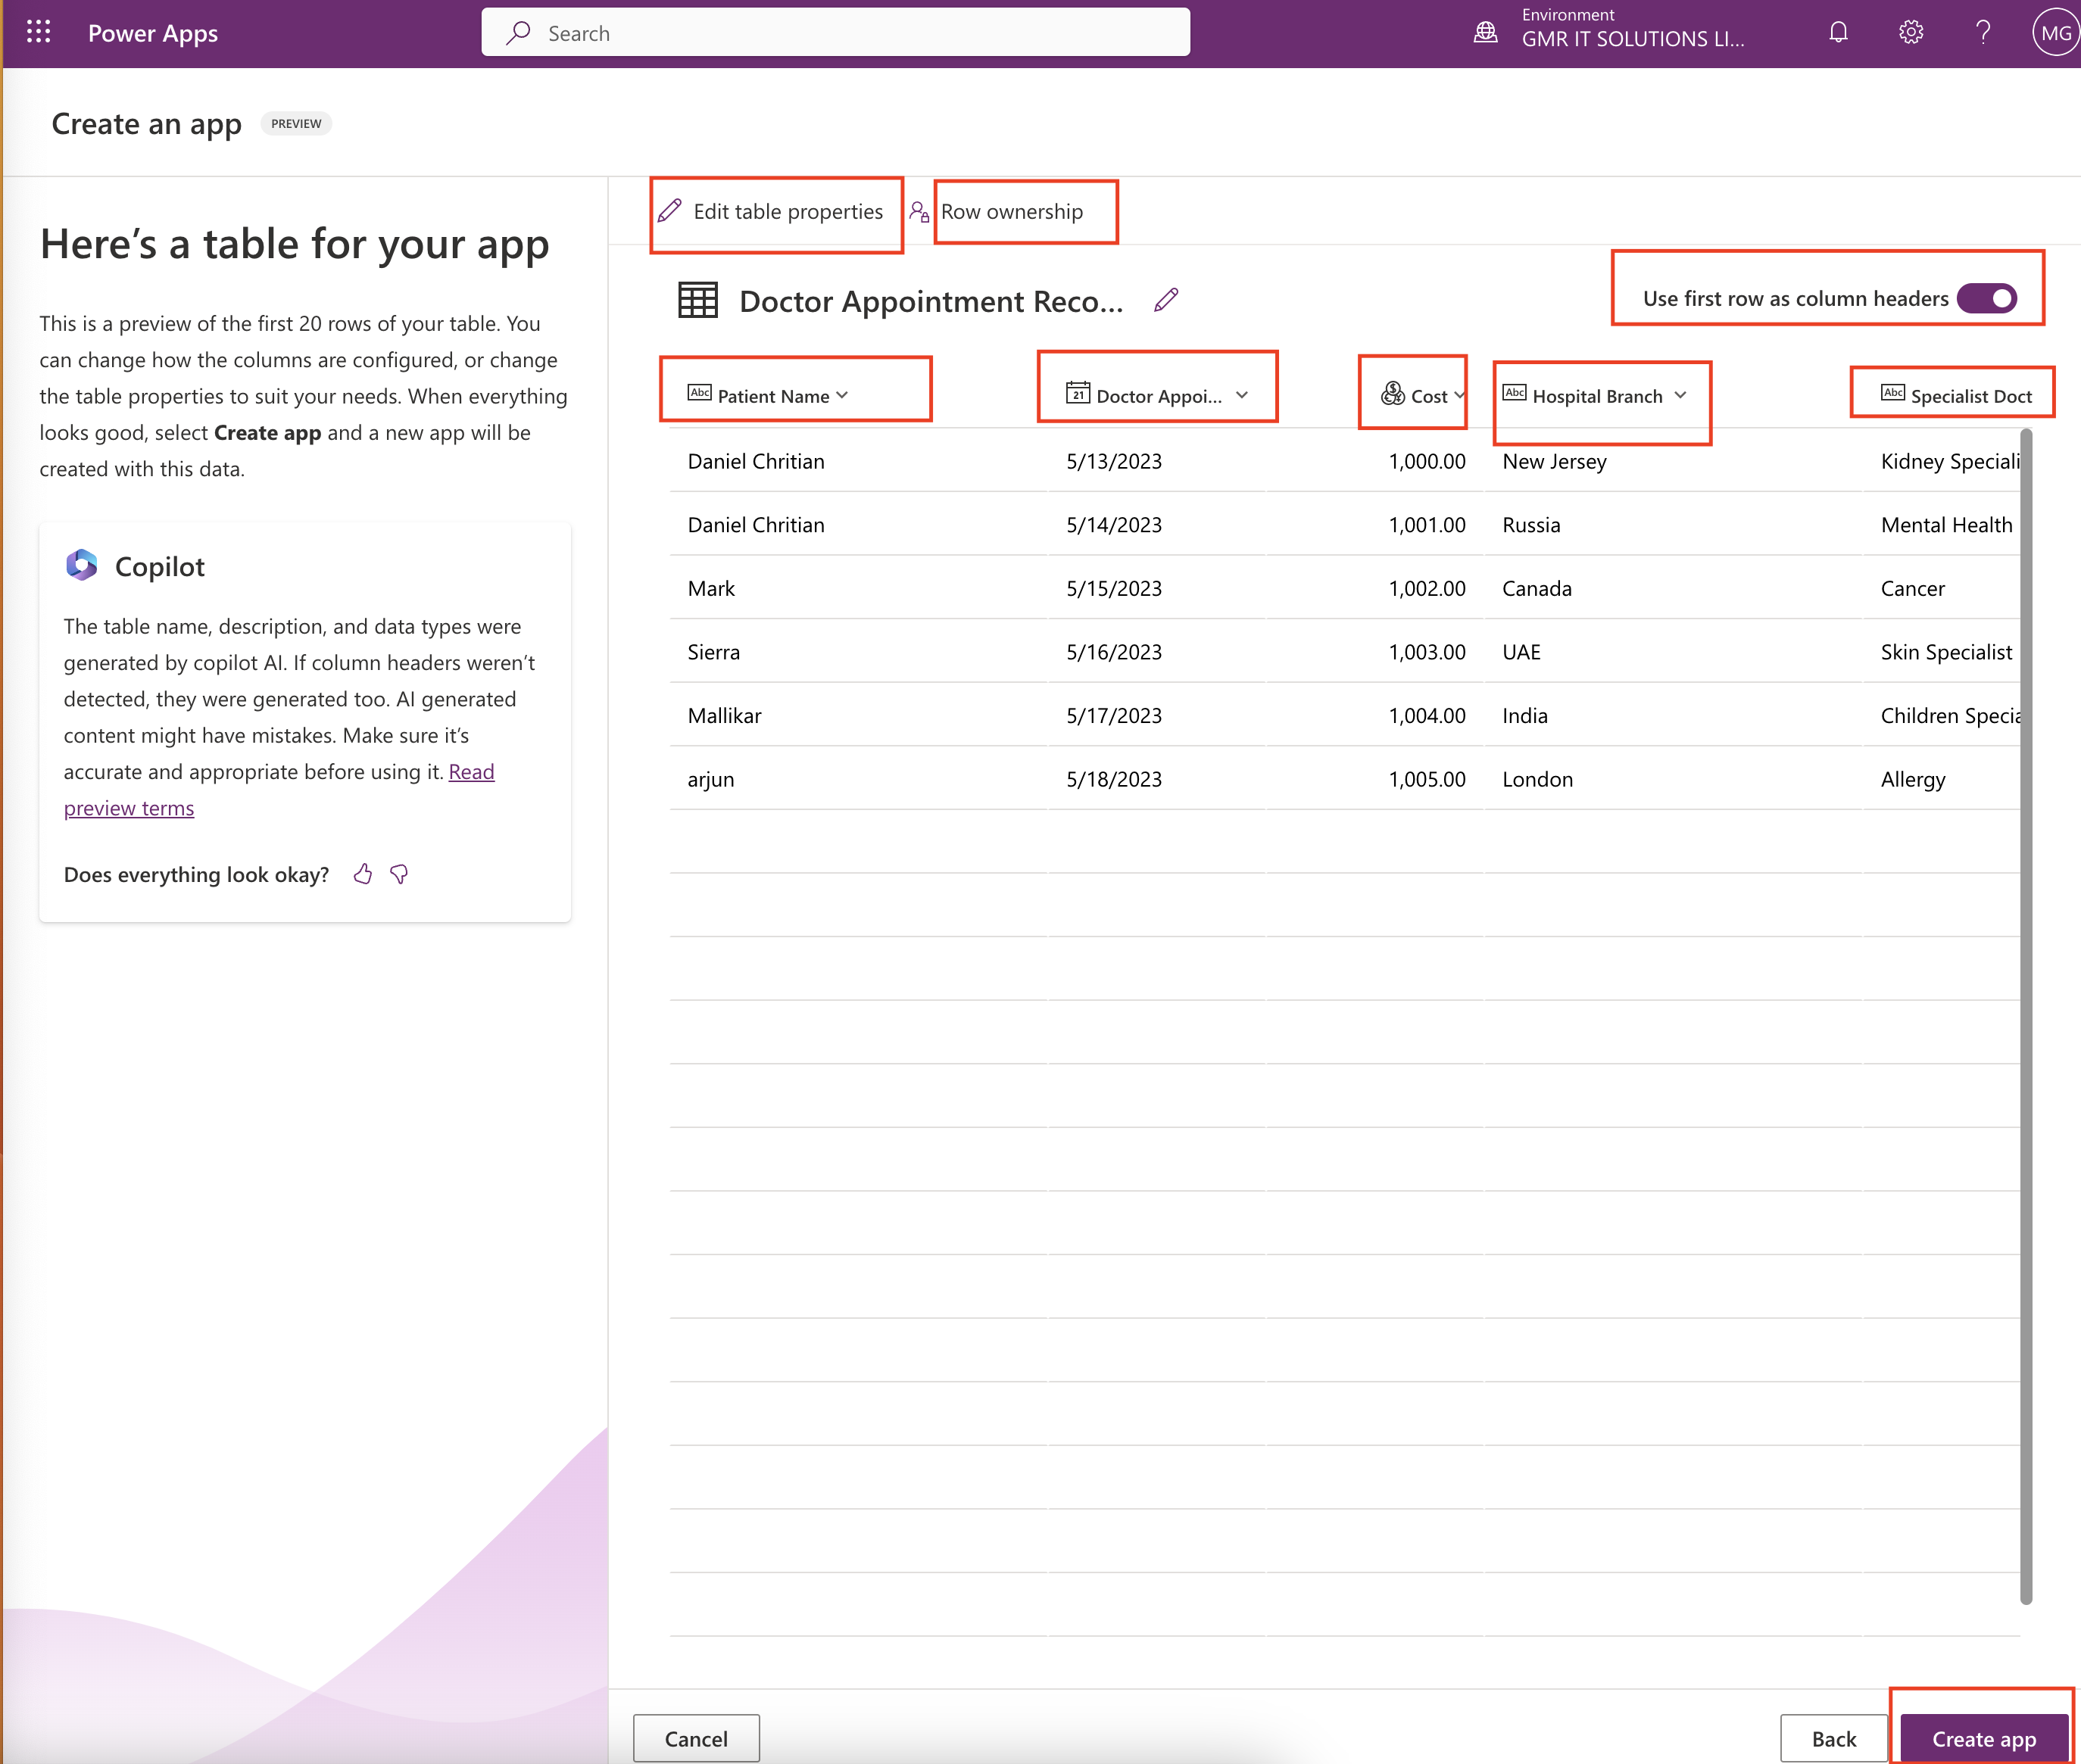
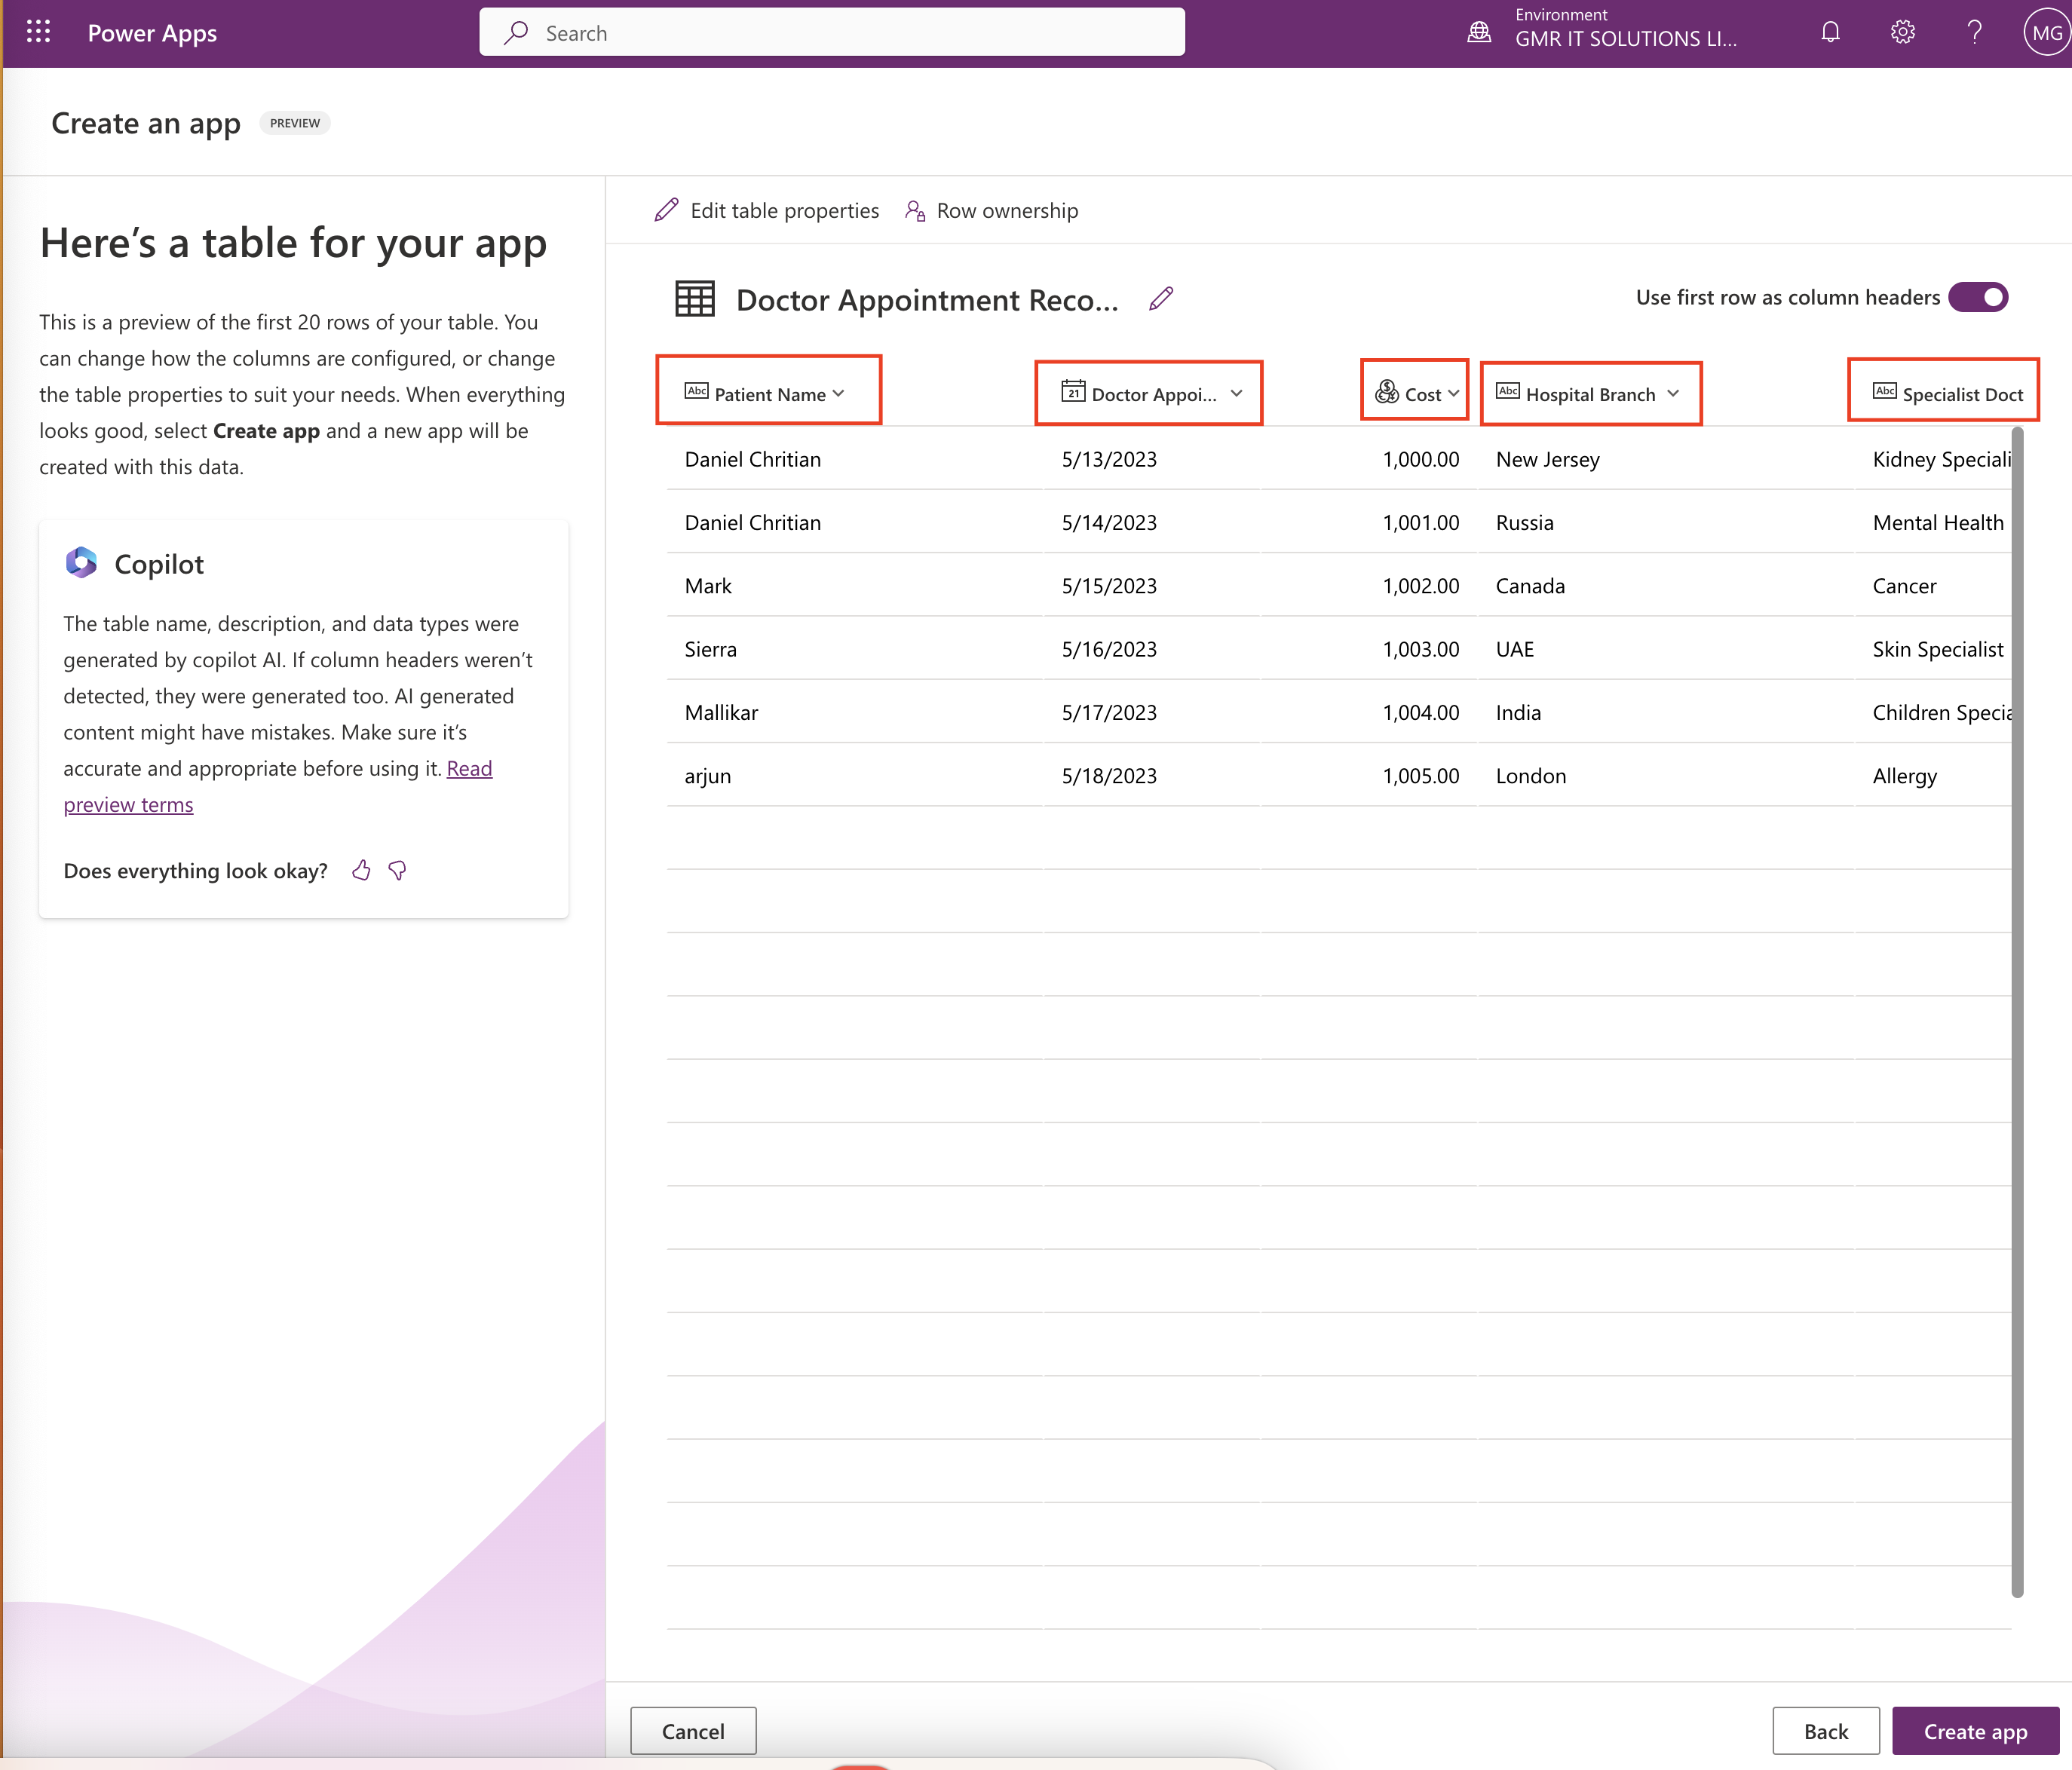
So the uploaded file will be created on the dataverse, As this is public preview for first 20 rows of your table, here you can change the columns how they have configured, or change the table properties to suit your needs . When everything looks good, select the Create App and a new app will be created with this data from excel file.

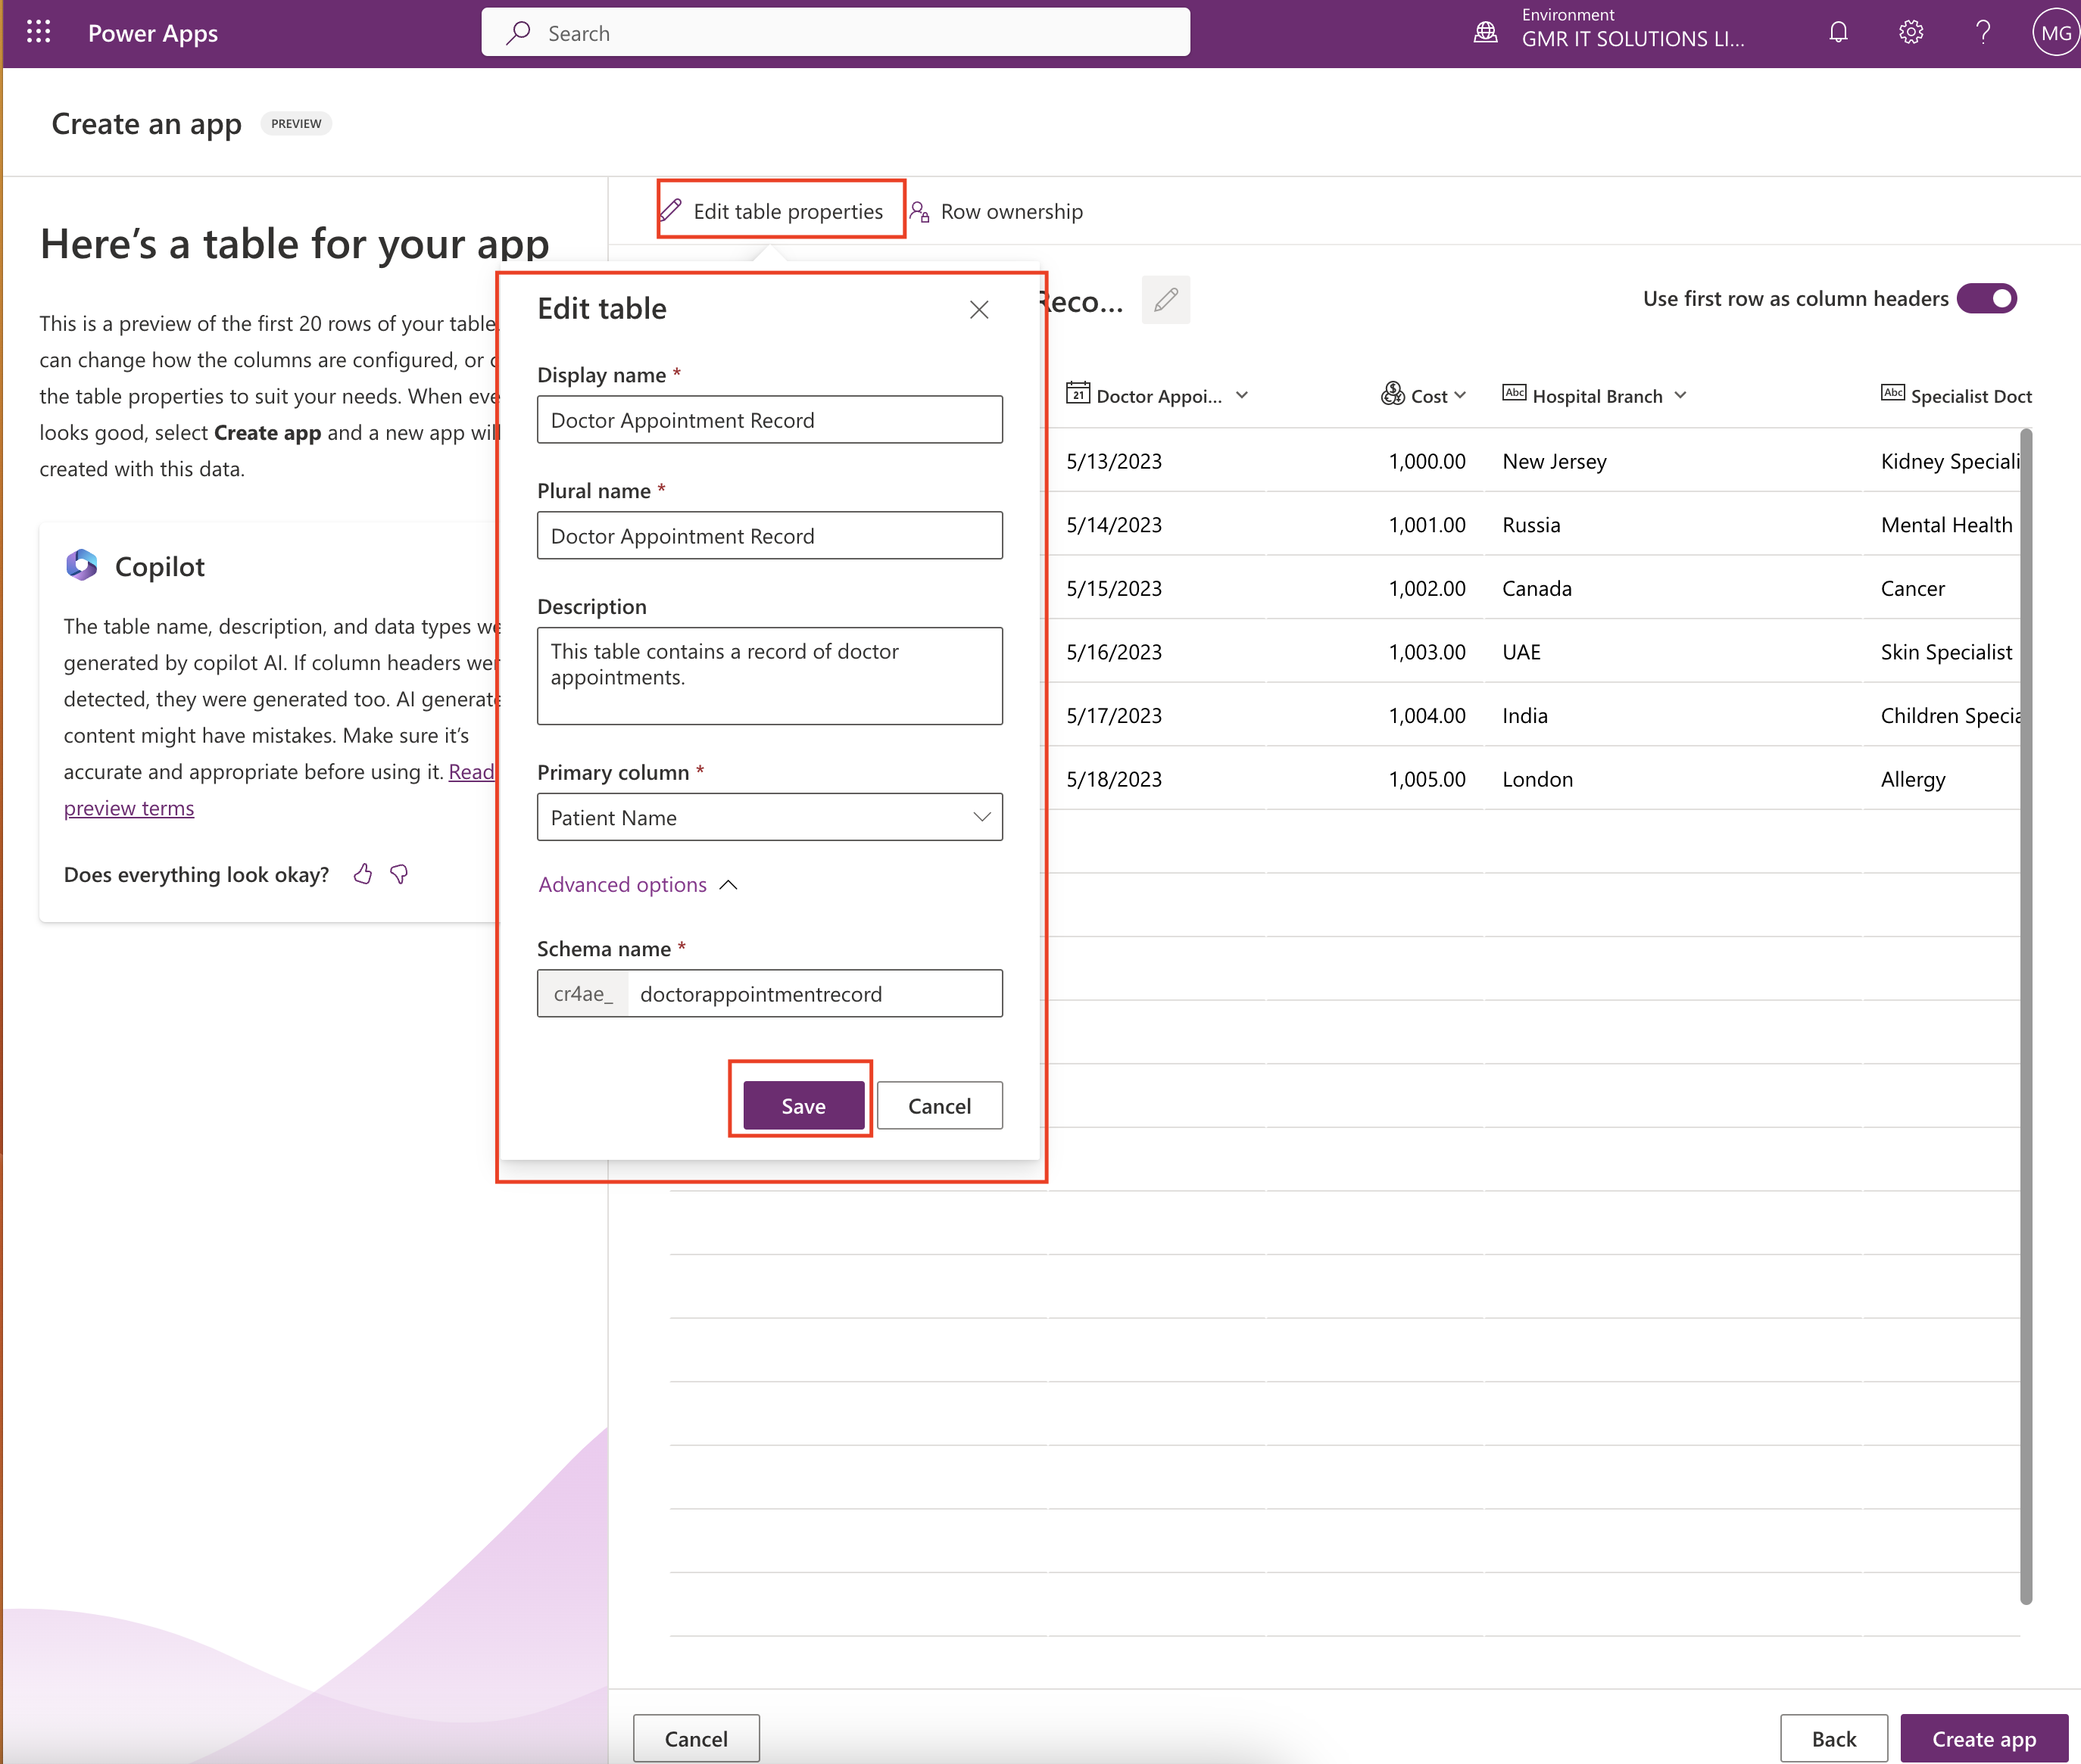
Edit table properties:

You can see the display name, plural name, description, primary column, schema name, you can modify them if you need to change anything and finally click on SAVE.

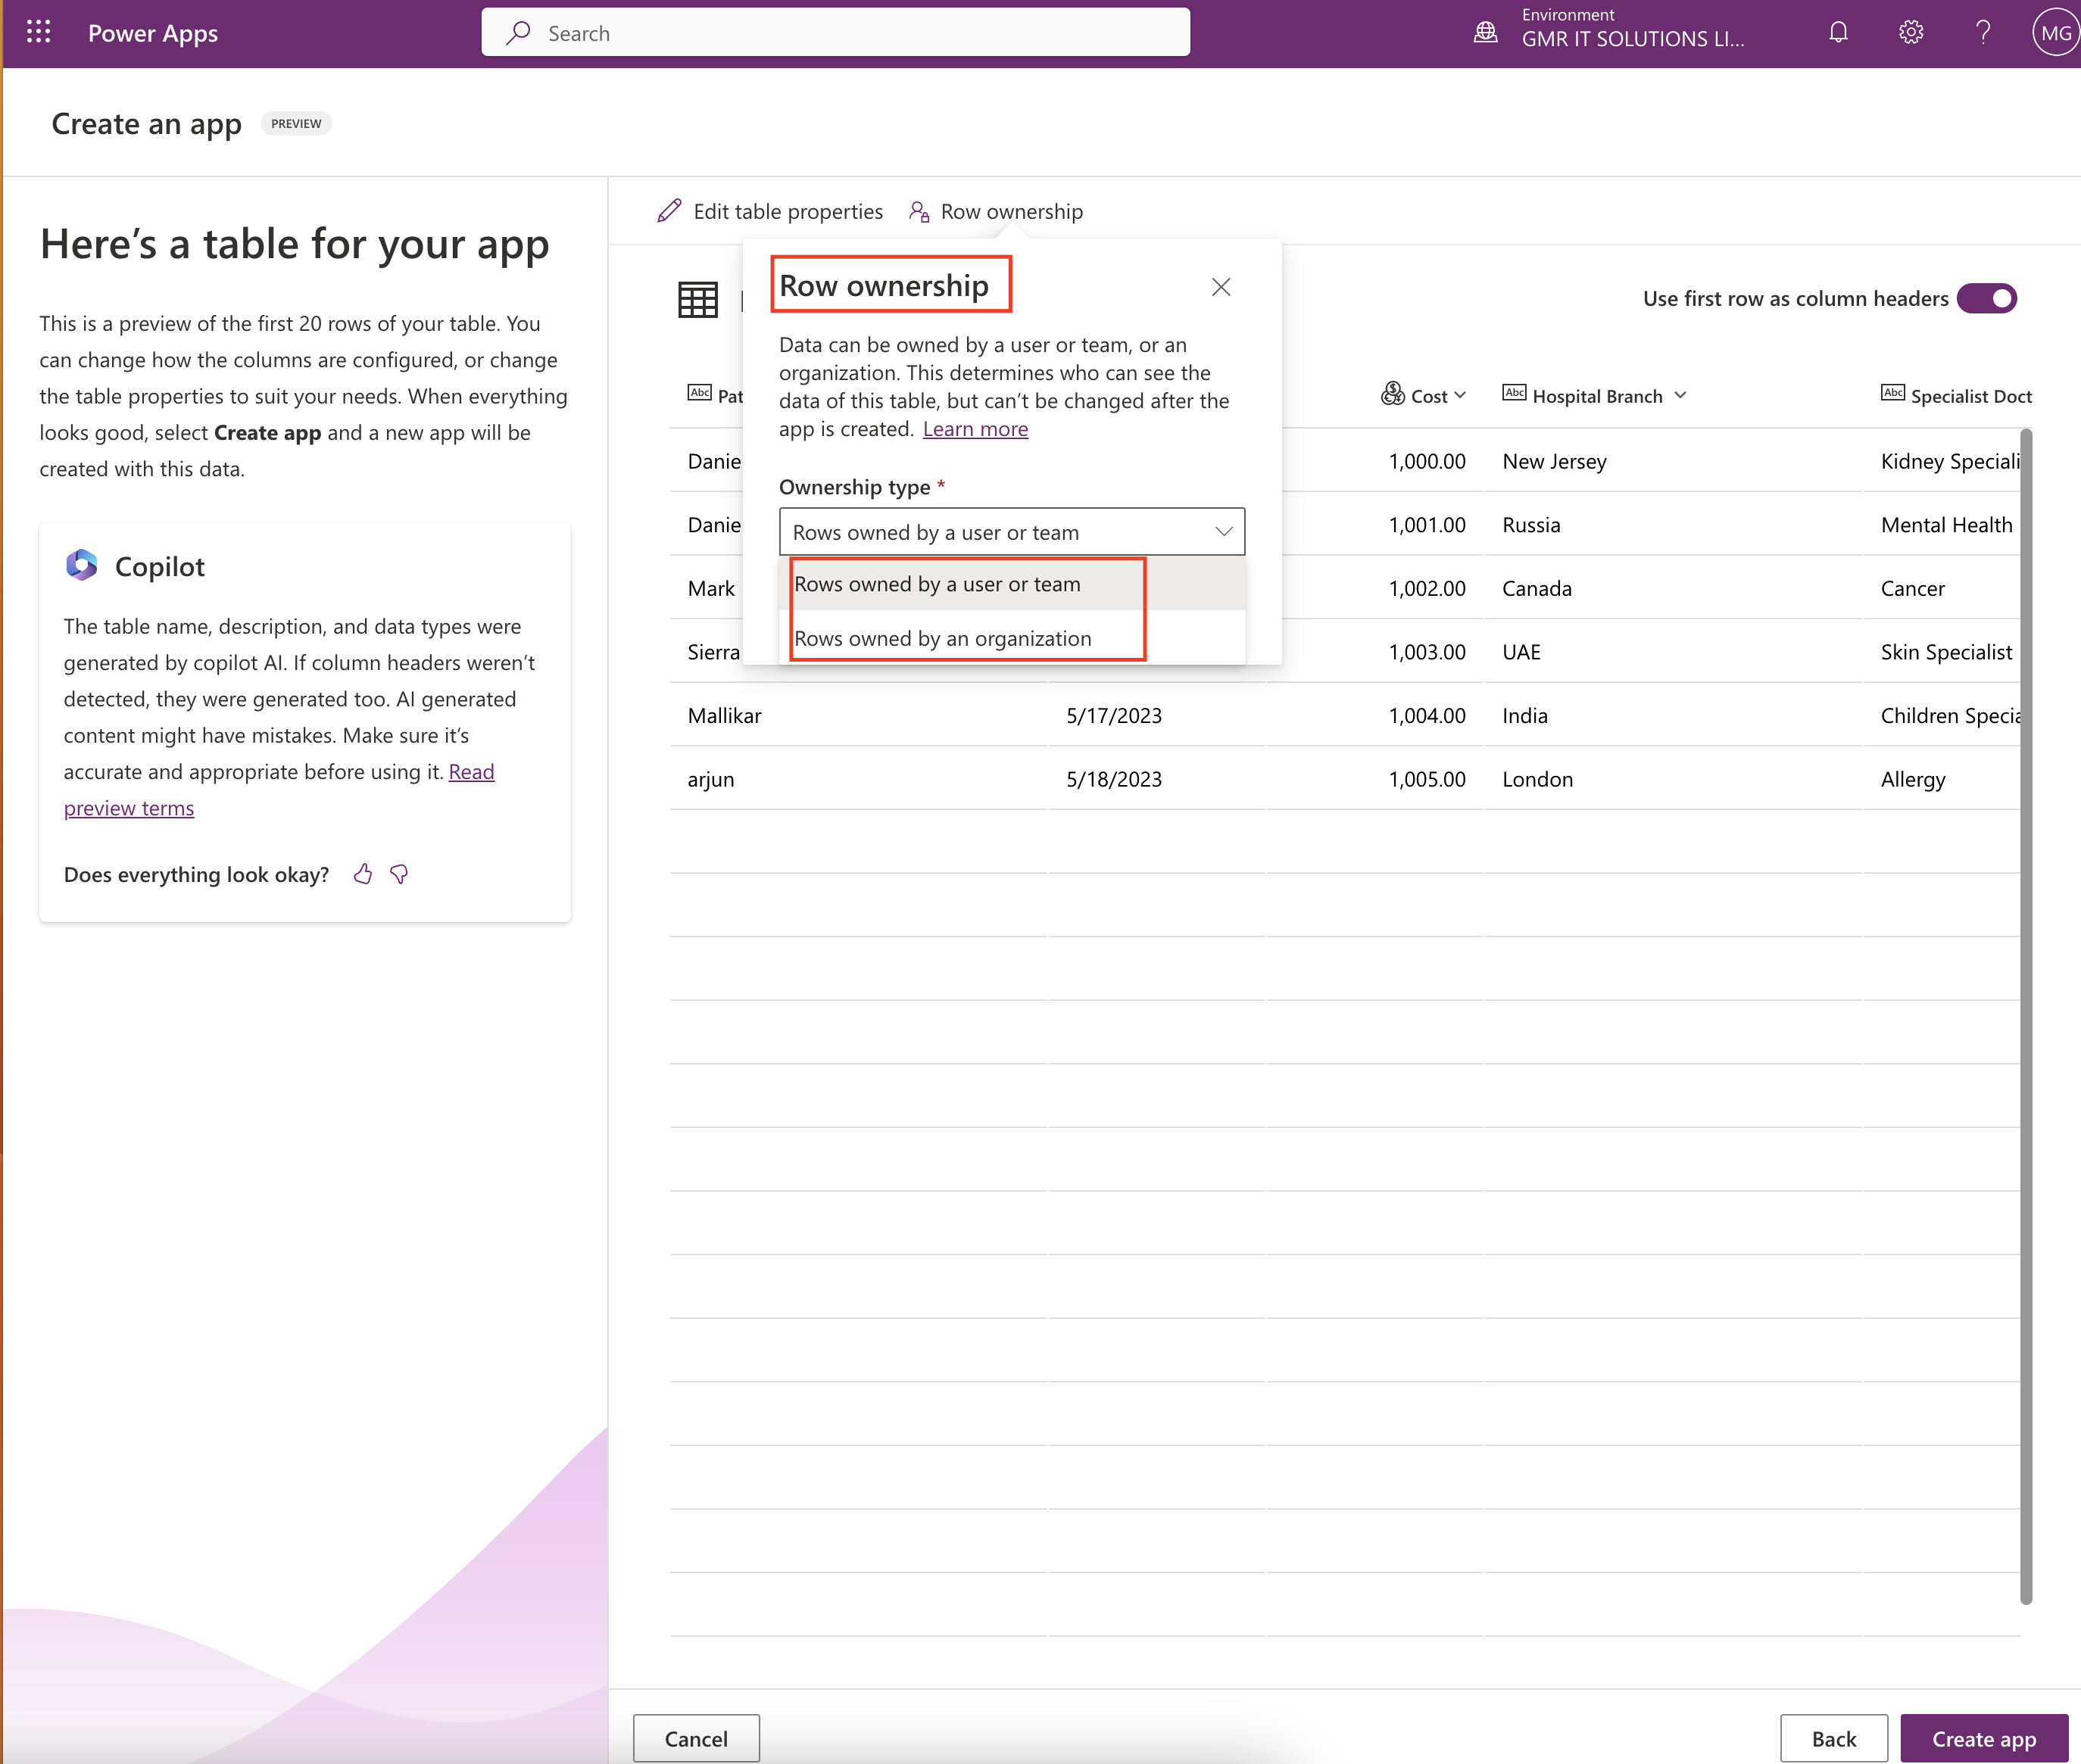
Row Ownership:

From the above screen shot the data can be owned by a user or team, or an organization. This is let us know who can see the data of this table. once app is created you can’t revert back.

Ownership type is selected and then click save.

Use first row as column headers:

This feature allow to choose the first row as a column name see above screenshot as an example.

Once all the configuration is updated then click ON “CREATE APP”

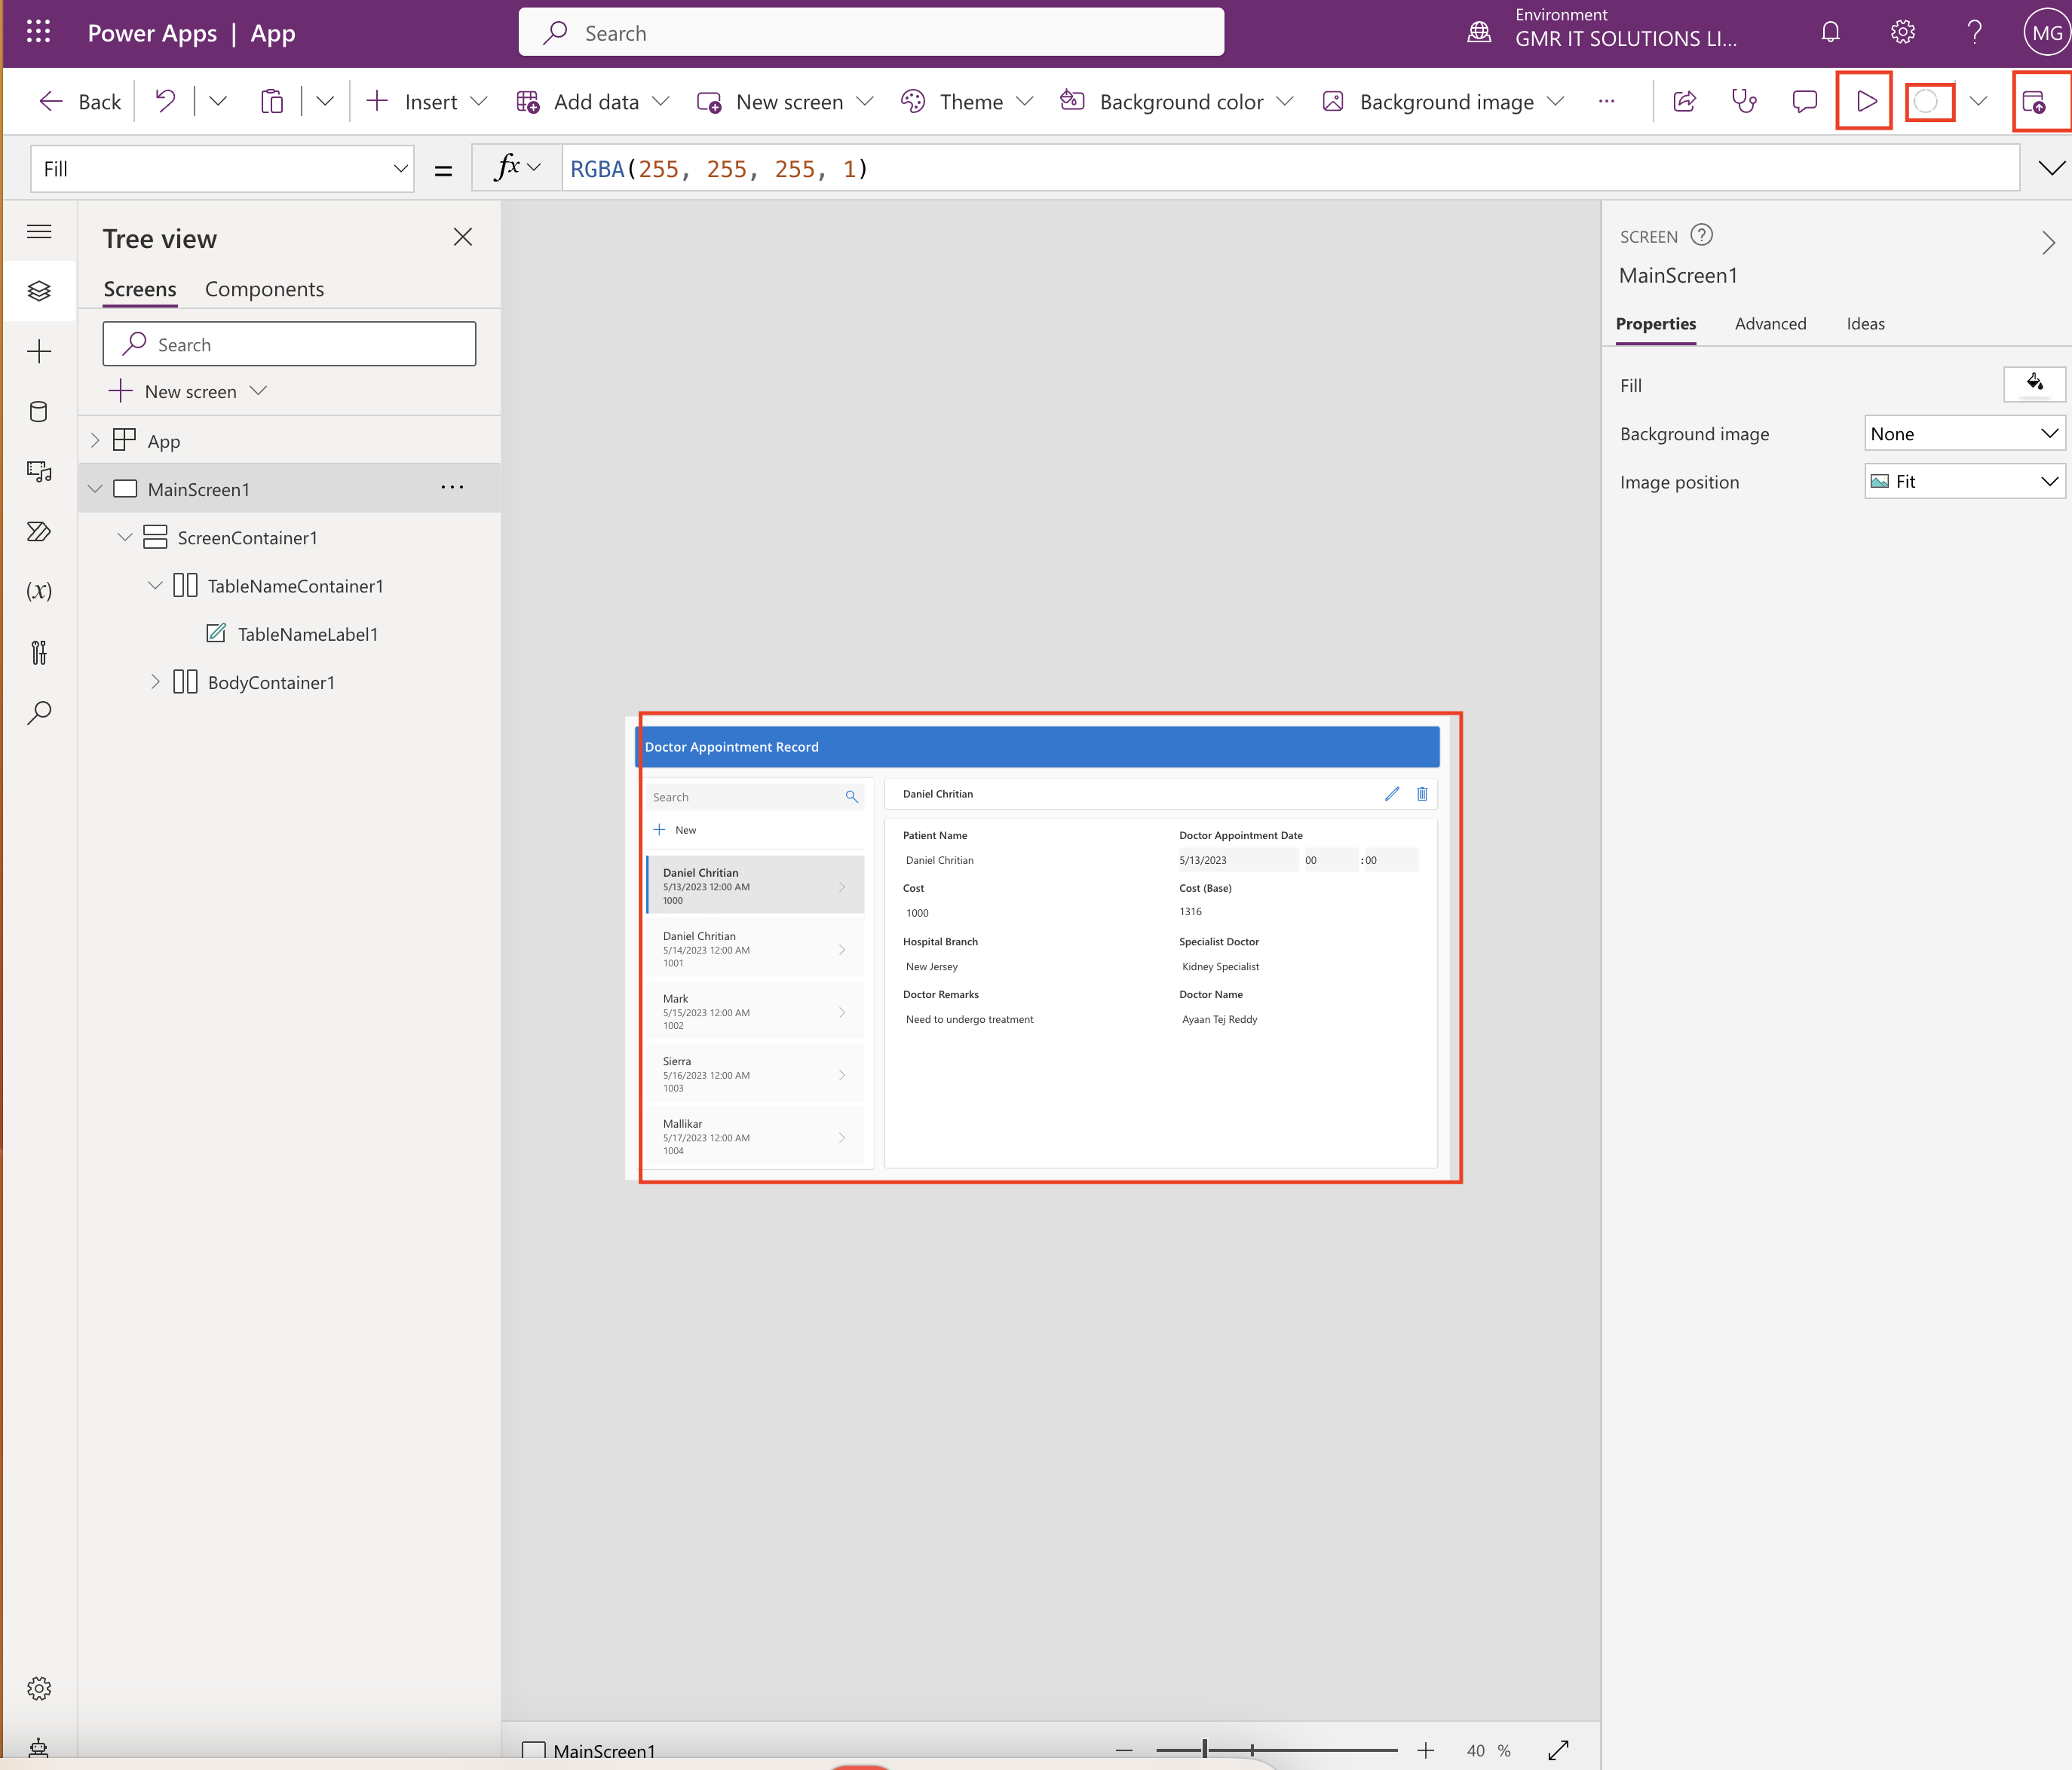
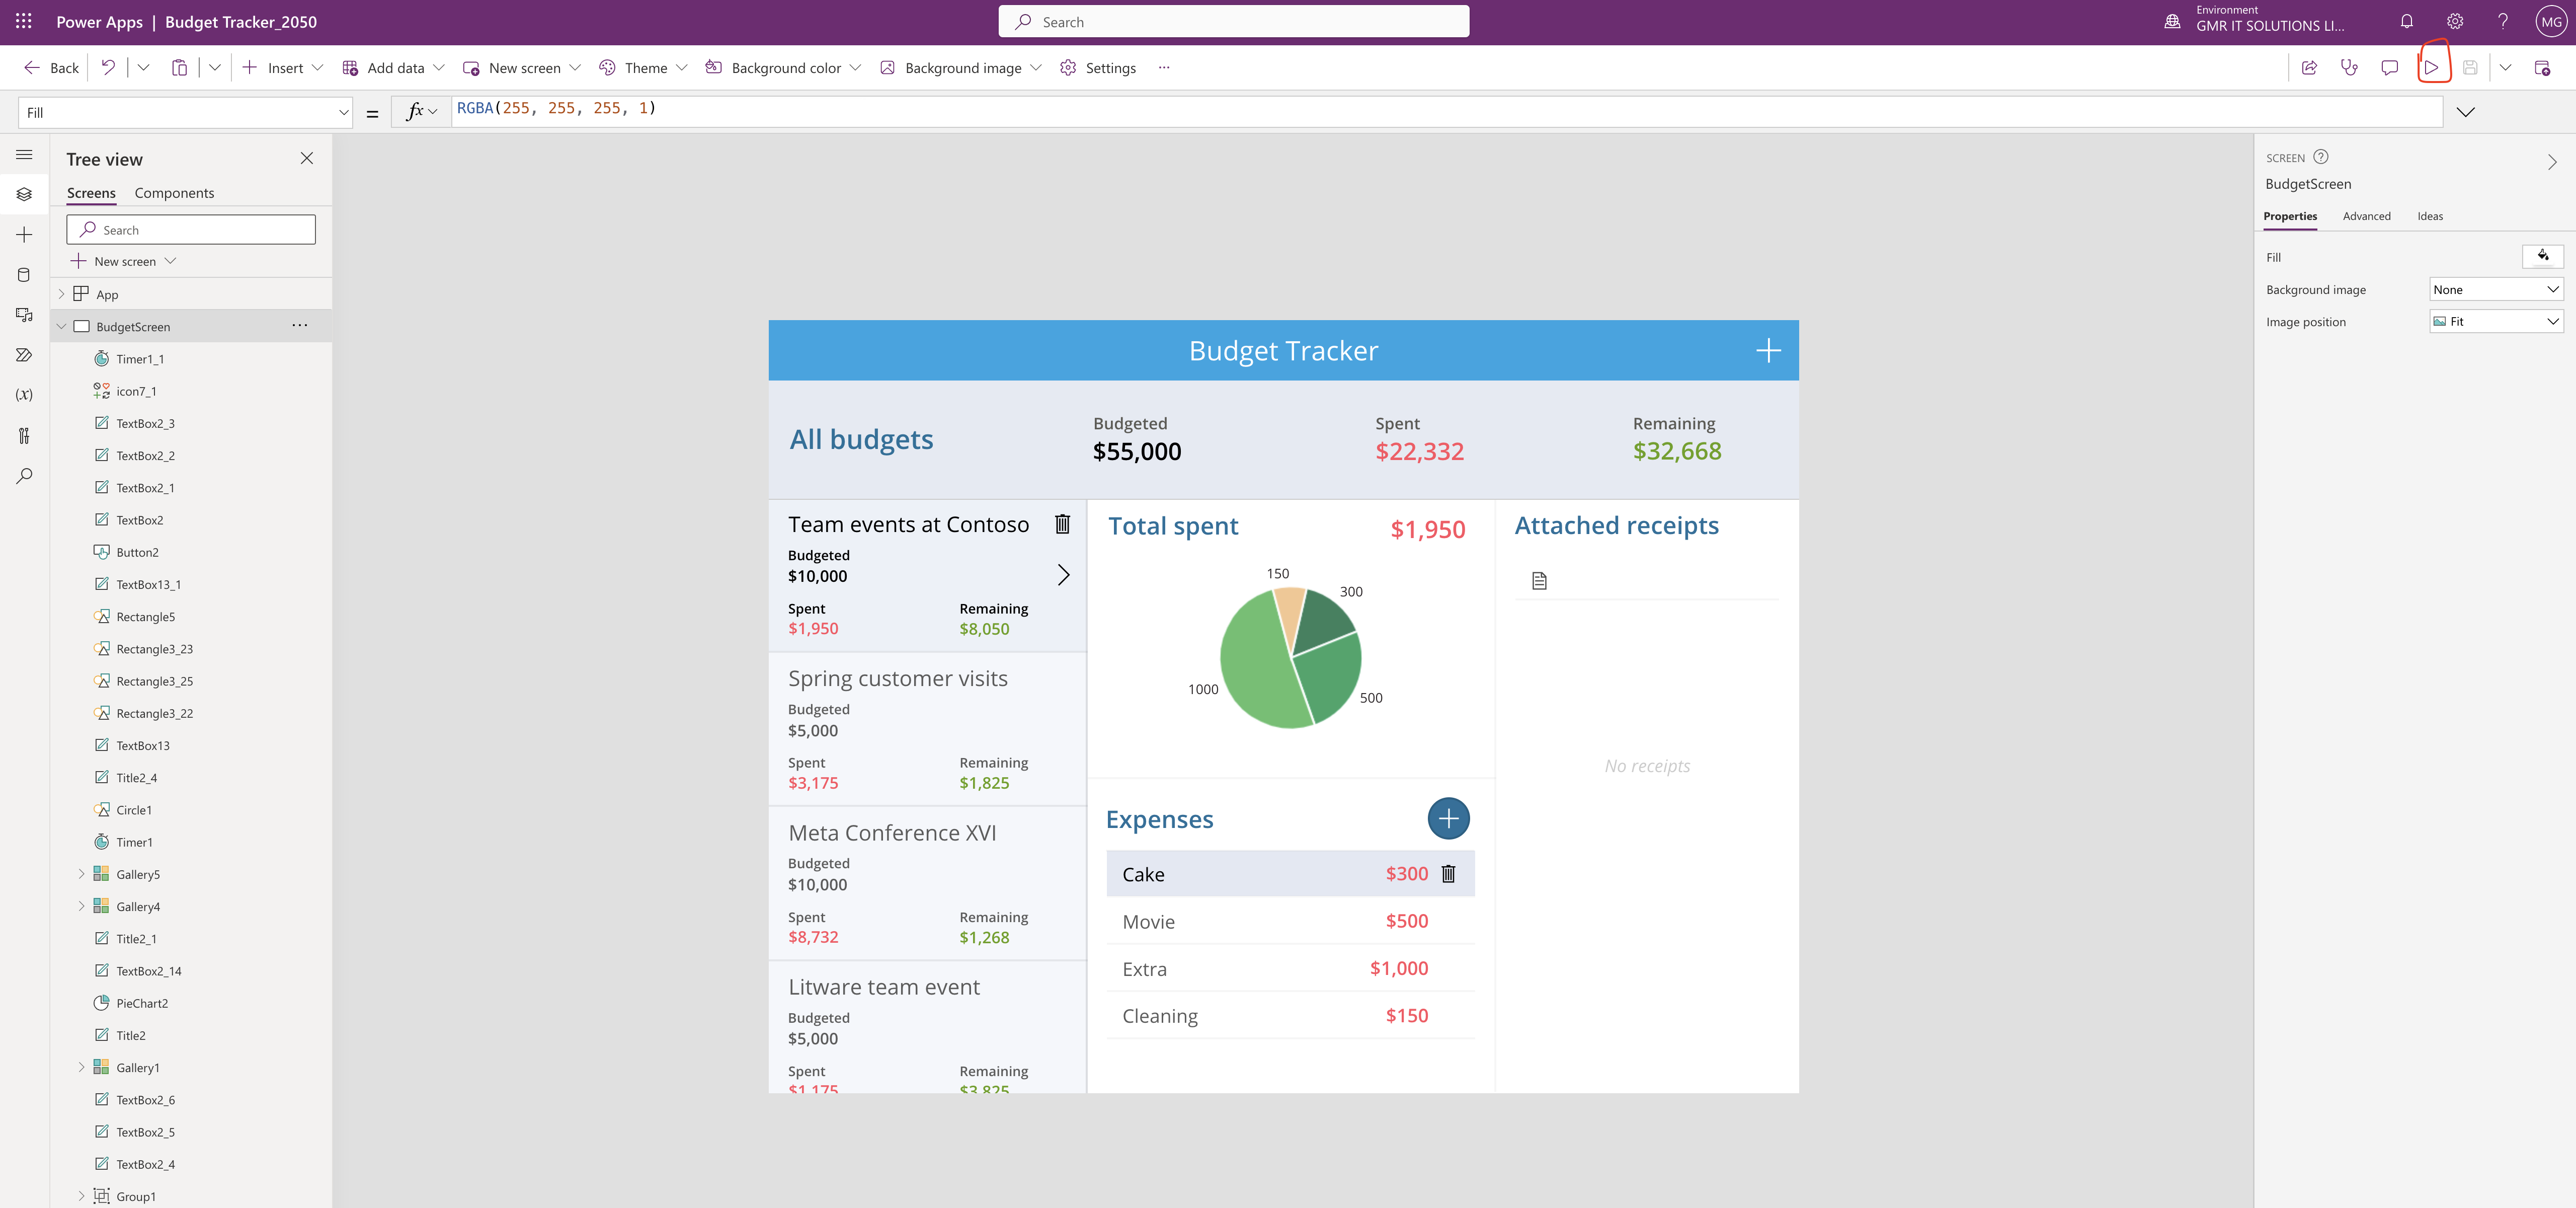
Then you can see the Canvas app and save it. You can Play and see with the play button highlighted on the screenshot,

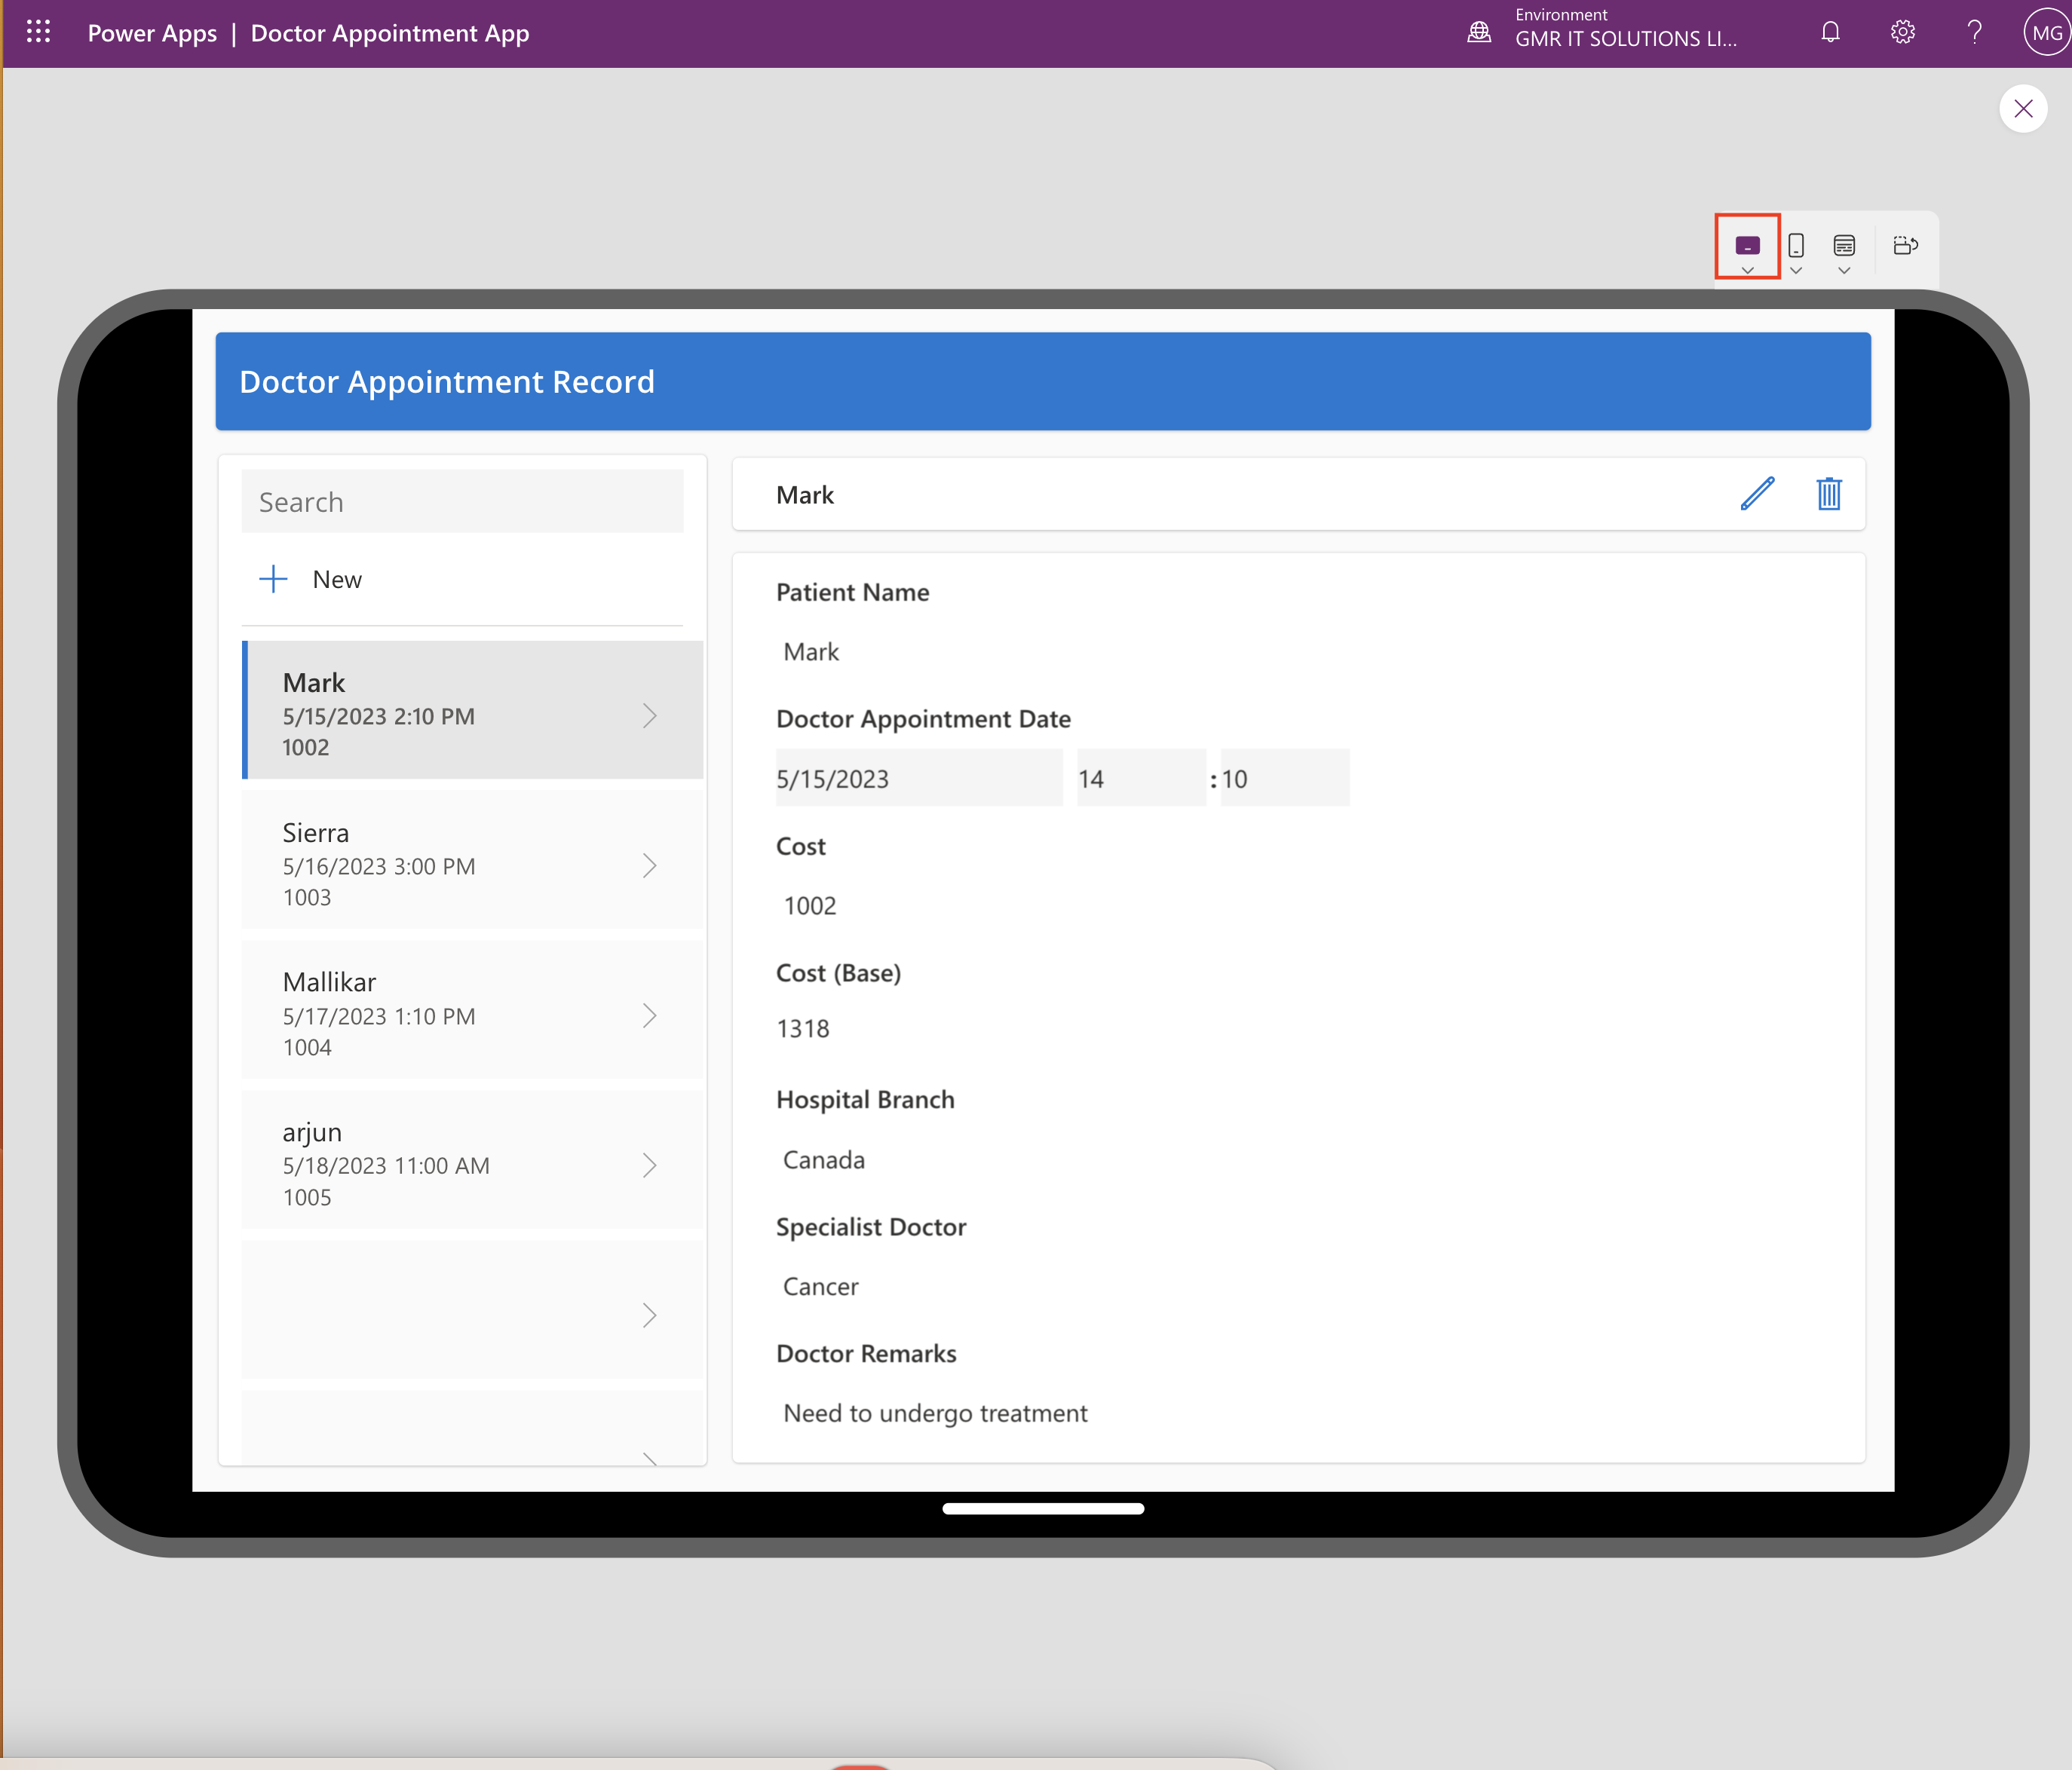
When the Canvas App is played as Apple iPad Air 2020 1180 x 820 FORMAT.

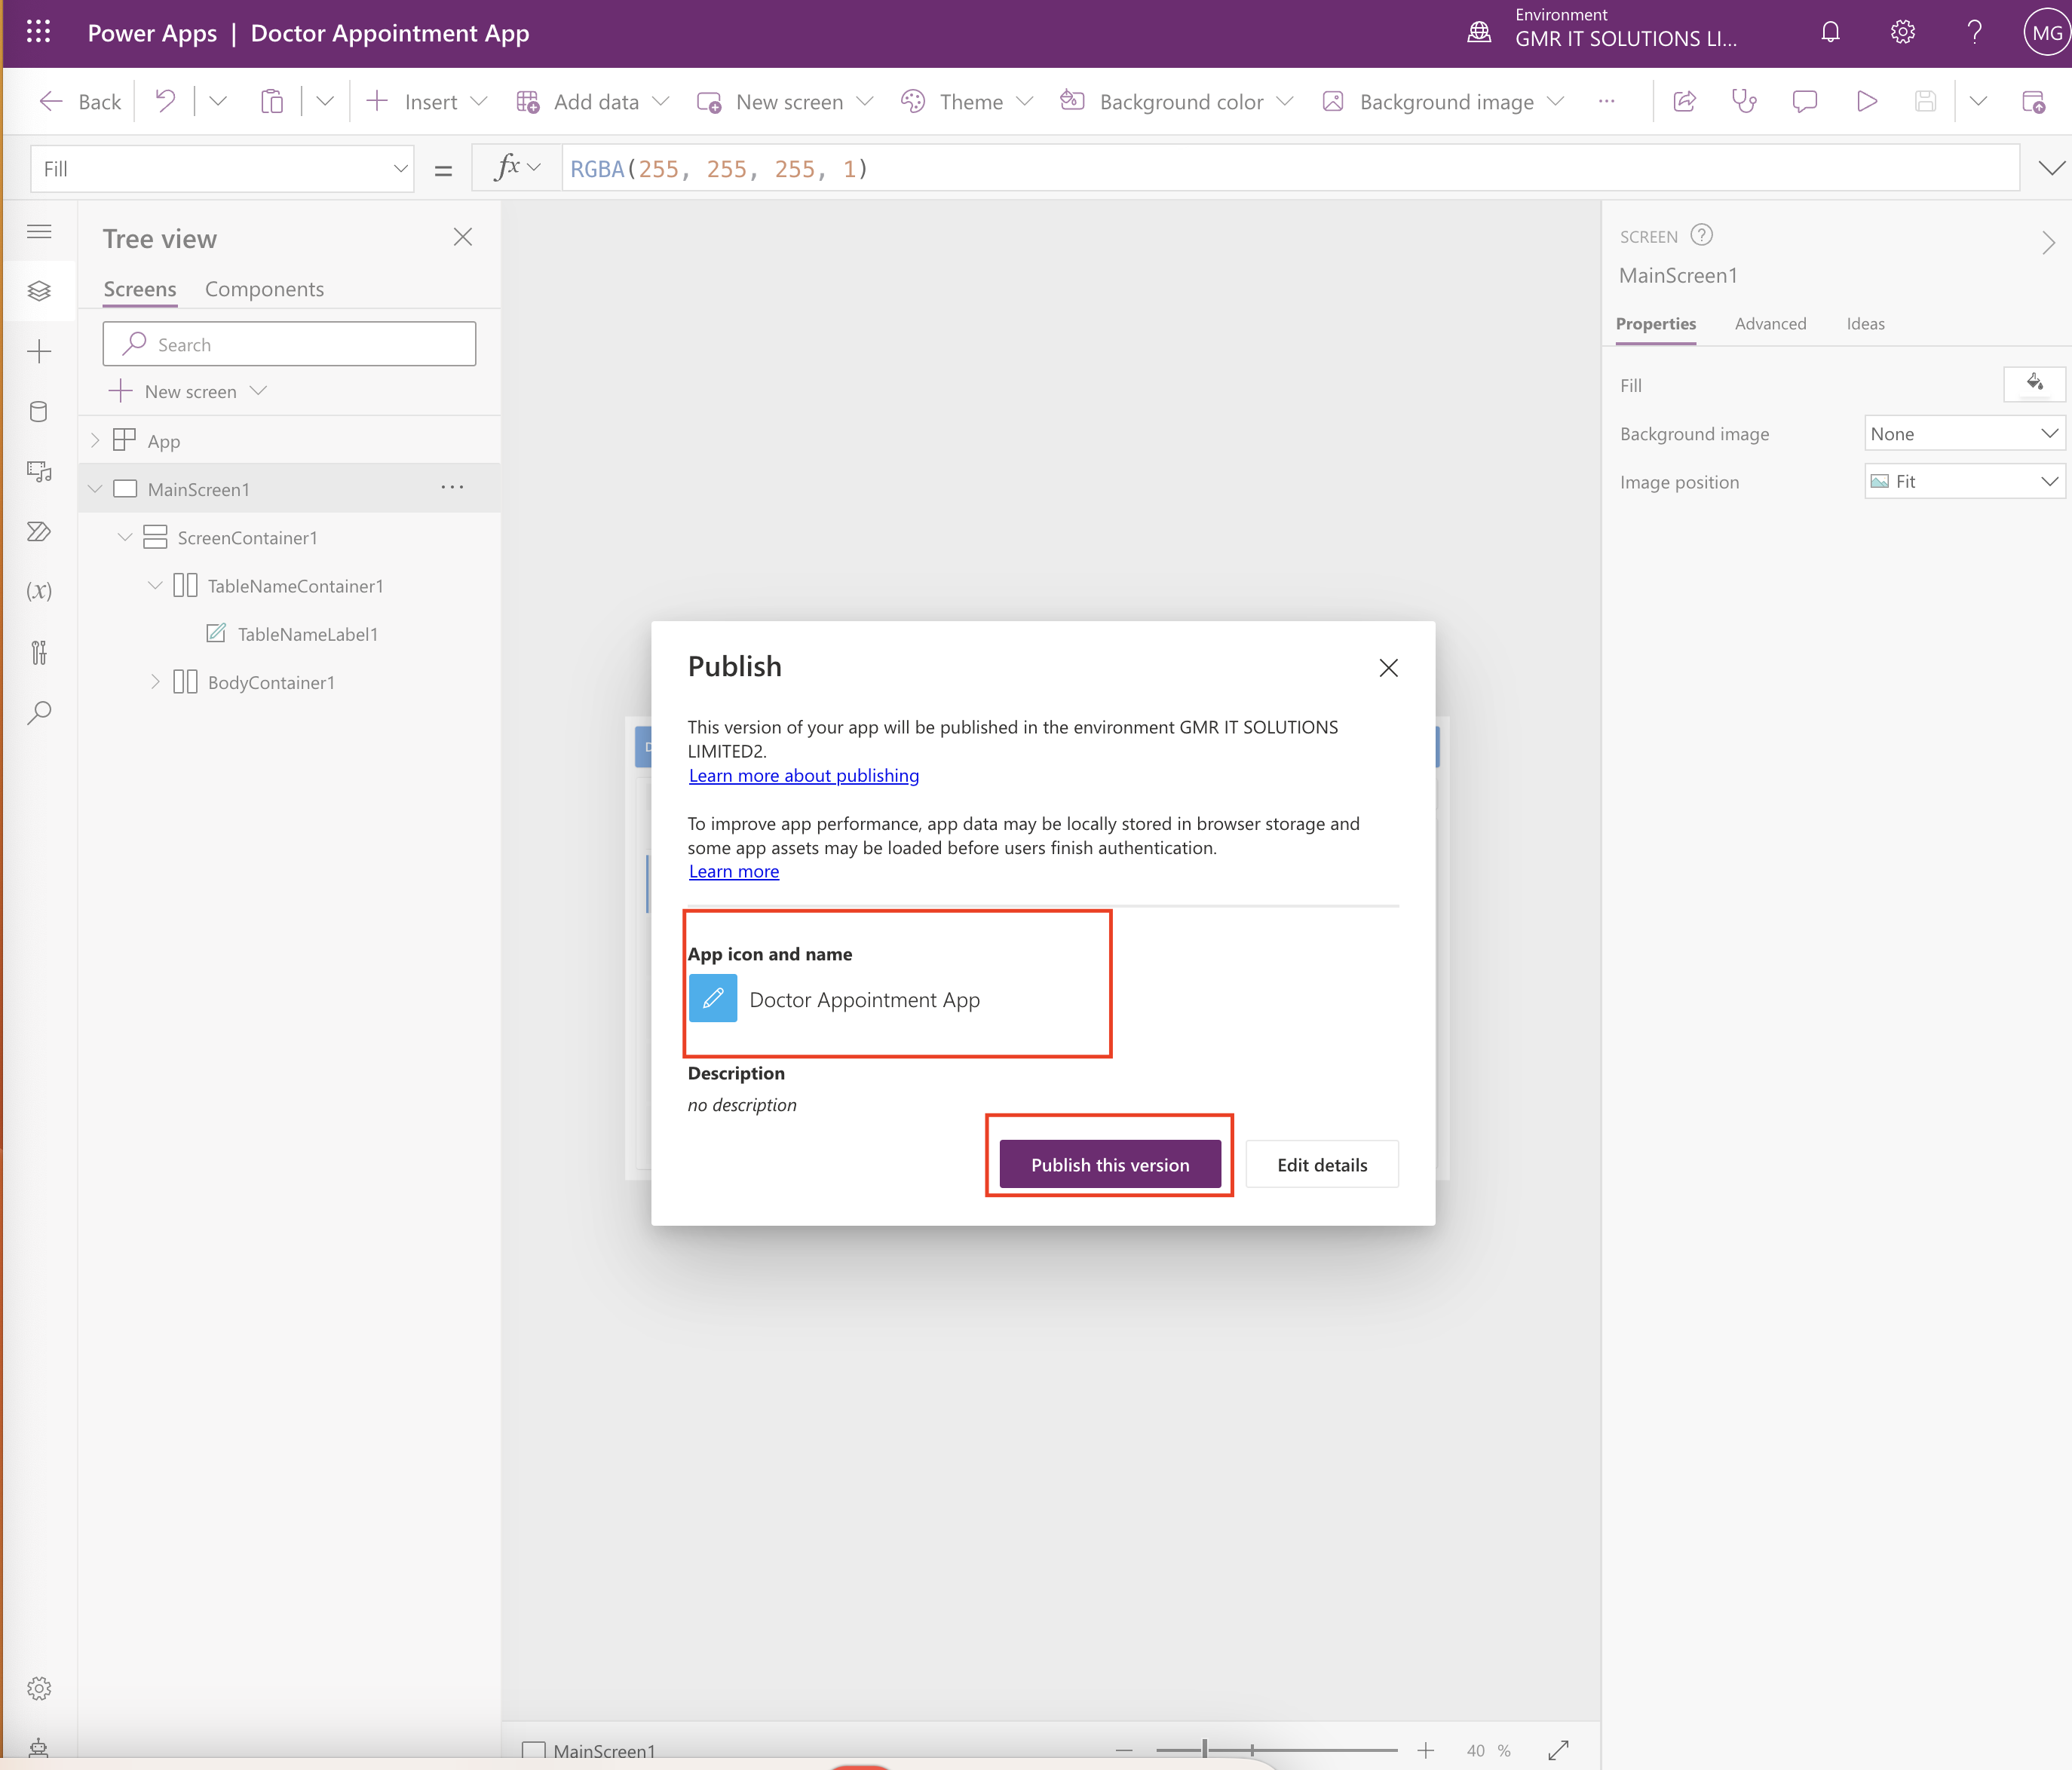
Finally you can EDIT the App name and publish the app.

Thats it for today.

I hope this helps.

Malla Reddy(@UK365GUY)
#365BlogPostsin365Days

Share this:

Elements in Cards Power Apps

Hello Everyone,

Today i am going to share the concept of Cards in Power Apps.

Lets gets started.

Power Apps are mini app and data from dataverse(for now) and we can include the workflow, very interactive, easy to use UI elements, so other applicationw can use as content.

Power Apps cards can add and use business logic through Power Fx, it can integrate with business data through Power Platform Connectors.

We can quickly build the app and share apps without any coding.

How to start creating Cards?

Login into www.make.powerapps.com

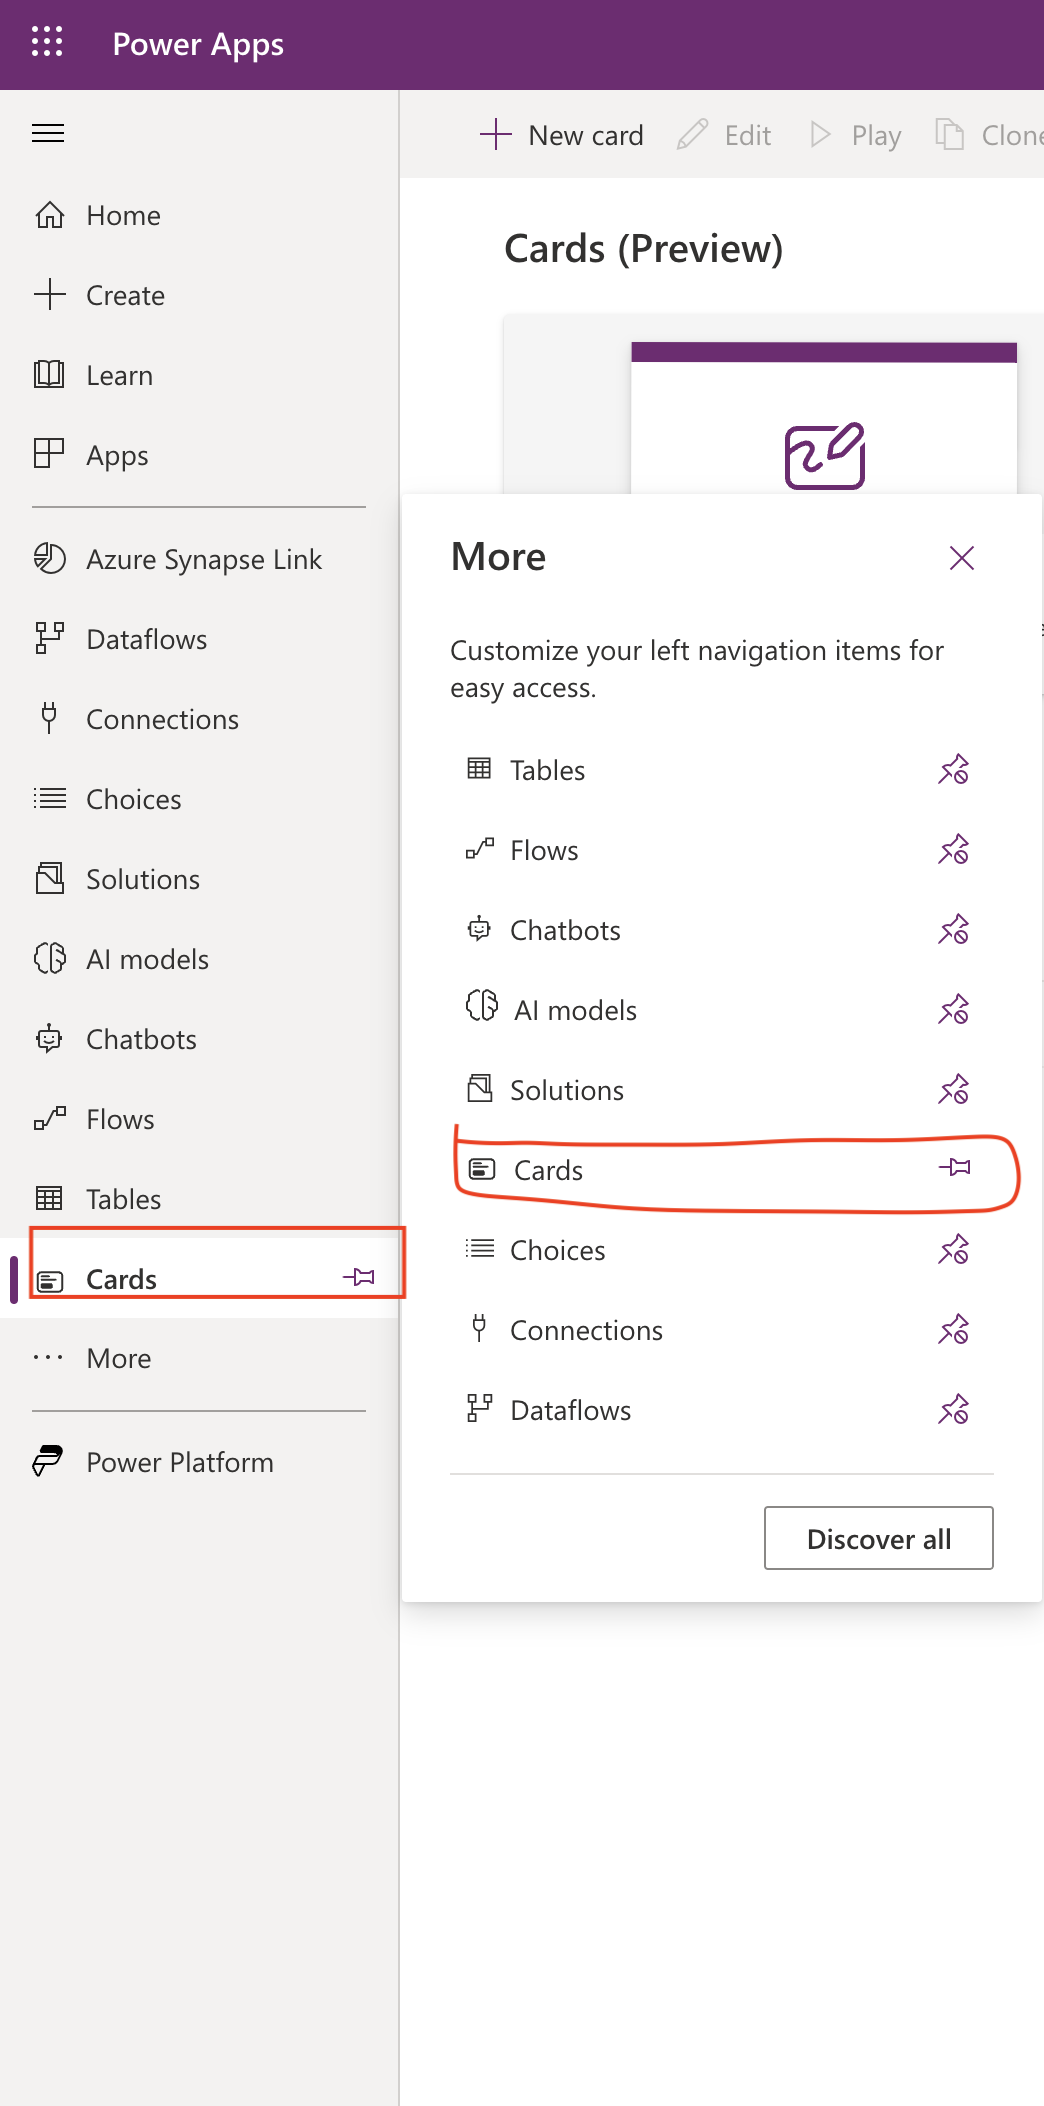
On the hand side of the menu click more and you can see the ‘Cards’ and then PIN it to the menu, so that next time you can directly see the Cards on the menu itself.

Click on Cards(Preview)

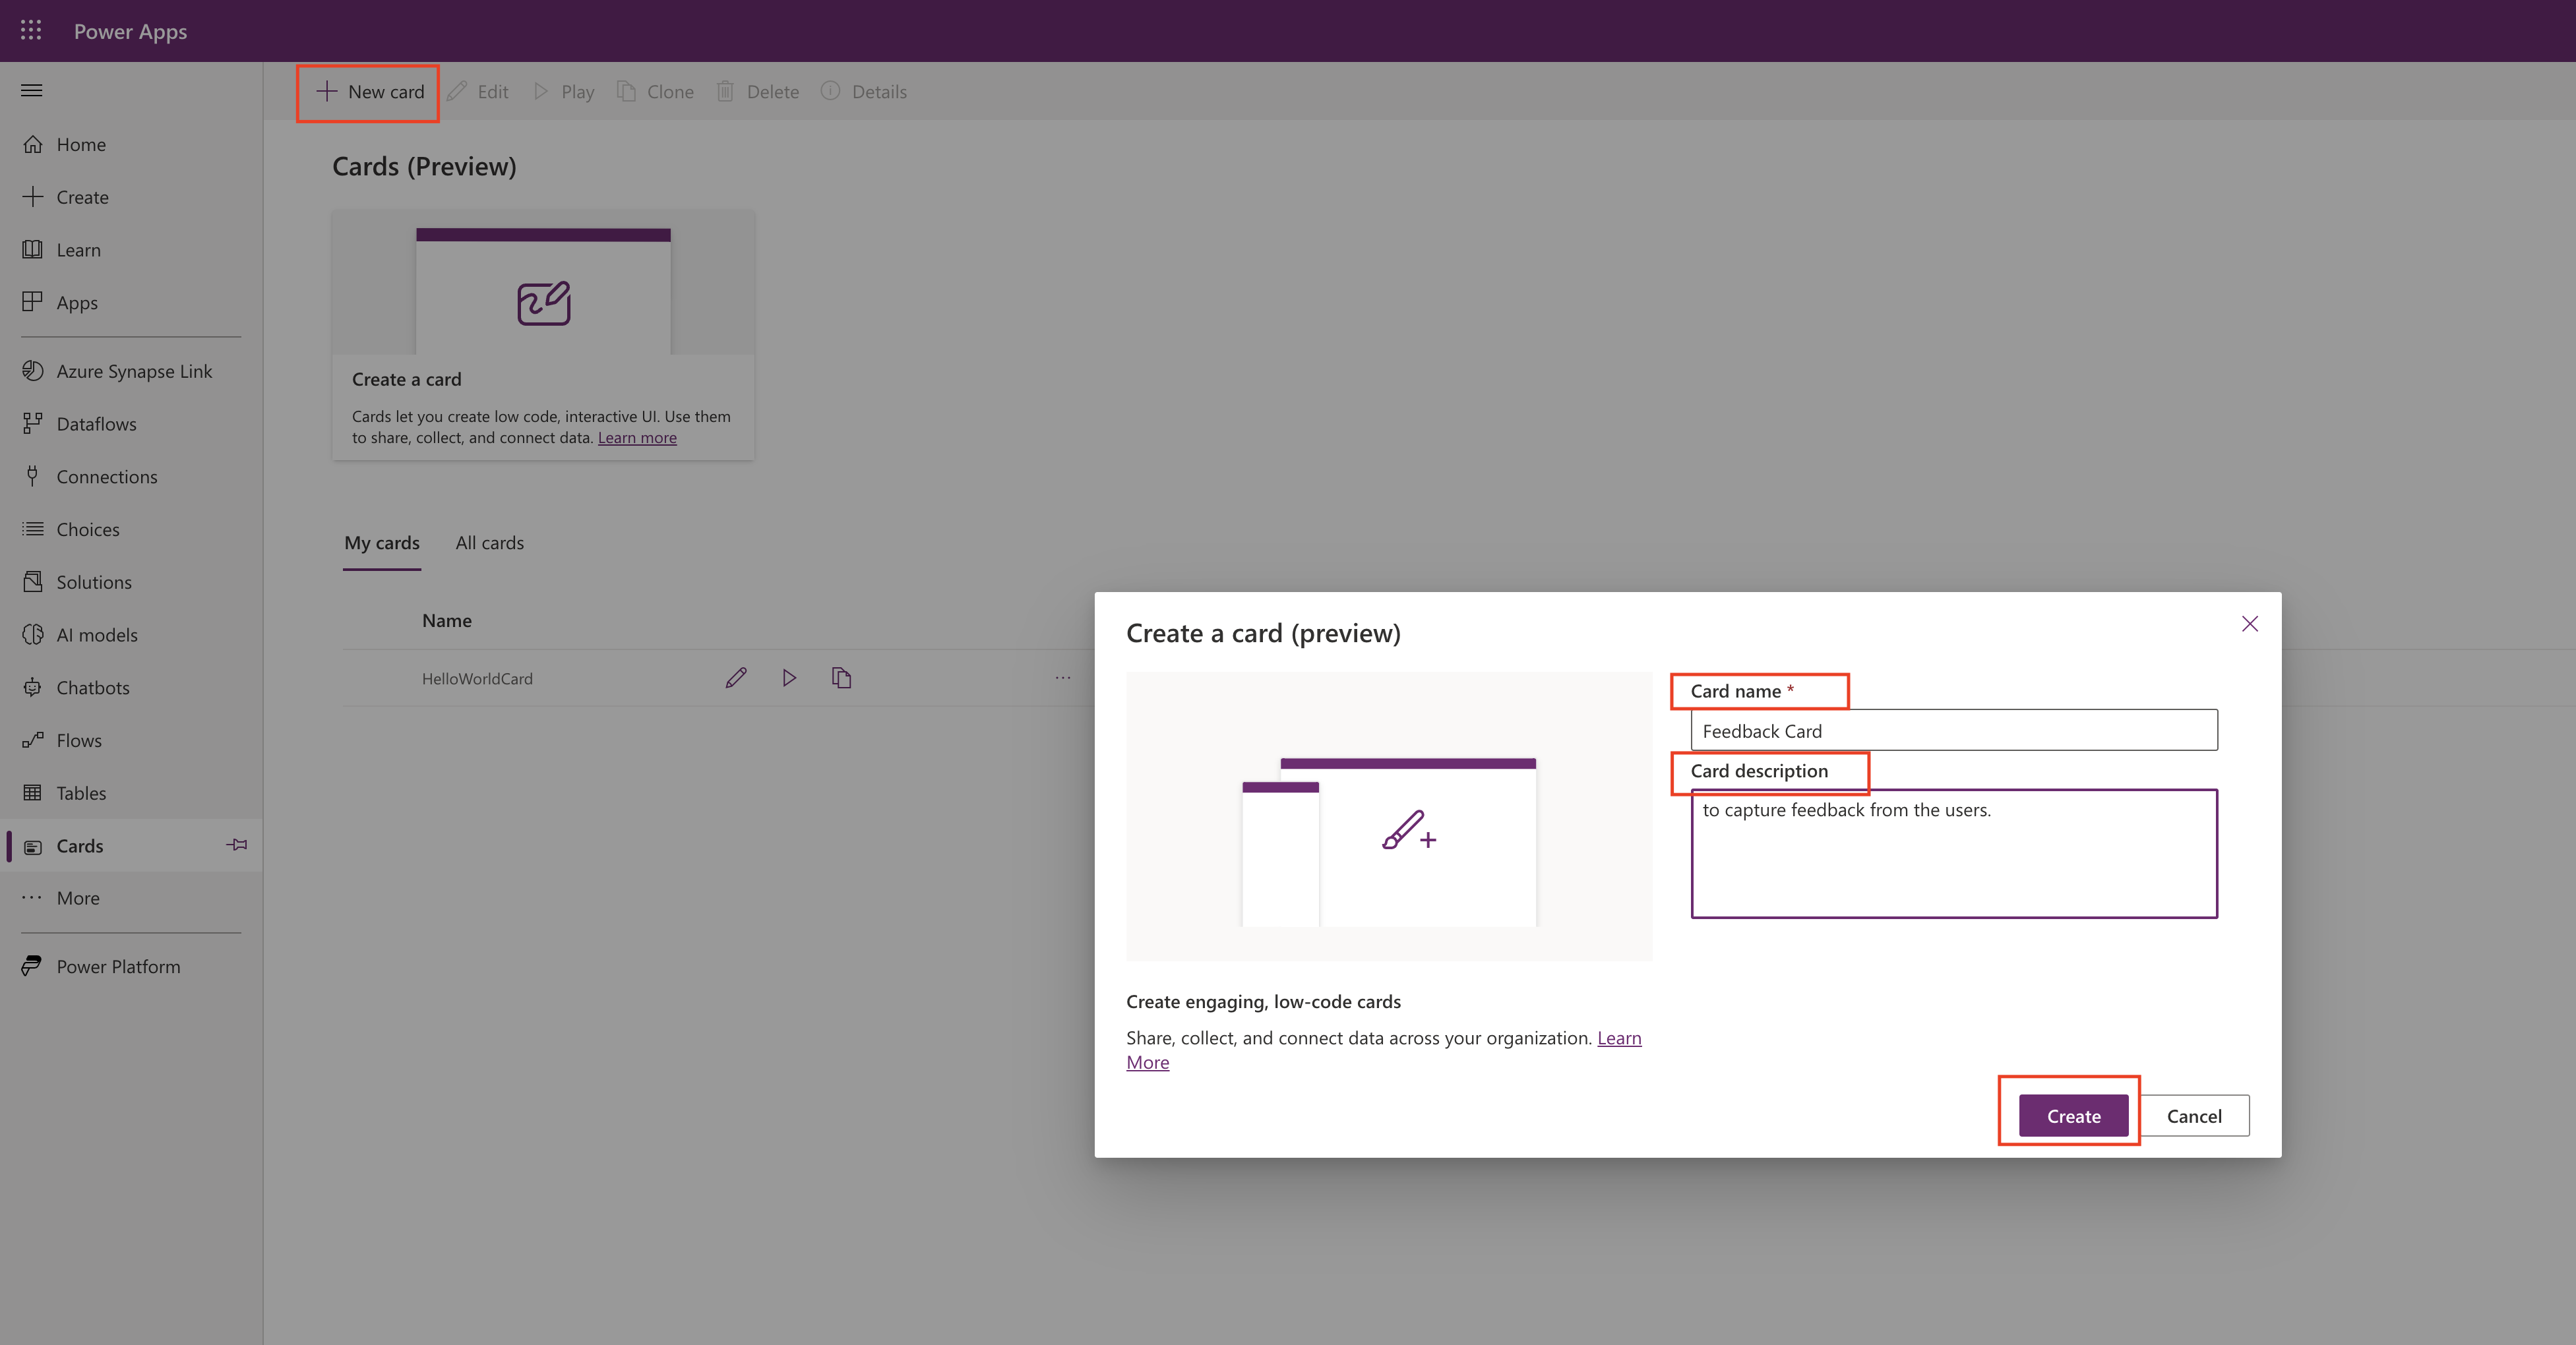
New Card:

You will be prompted with Card designer UI.

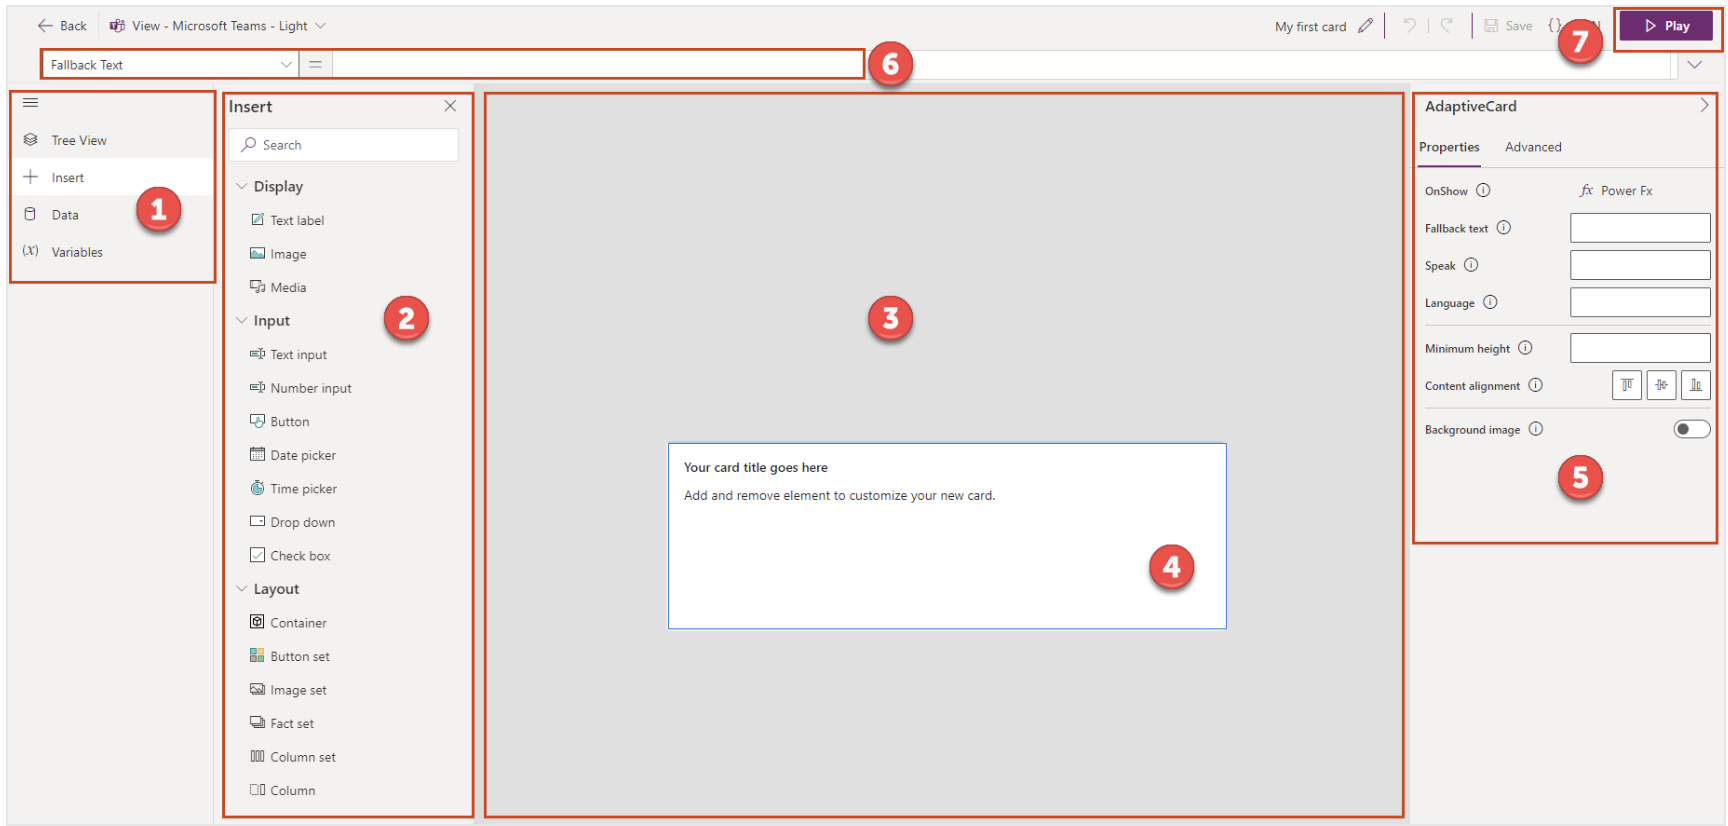
Card designer layout:

Main Menu
Tool Pane
Card Canvas
Card
Property Pane
Formula bar
Play button

Main Menu

We can use this menu to switch between the tools available in the card designer.

Tree View: Hierarchy and view the relationship between the elements

Insert: Add Controls

Data: Add connectors to incorporate data from the external sources.

Variable: Store and reuse data.

Card Canvas and Card:

This is where we can design the cards by adding connectors, variables to your card.

Note: Cards automatically adjust themselves to the location they are placed in and we can’t resize it.

Property Pane:

Property pane to modify an element by editing its properties.

Main properties as follows:

Name
Label or Text
Default value
Initially visible.

We can customize the font color, spacing etc..

Elements have advanced properties such as:

Repeat for every: Trigger whether or when an element should be repeated.
Show when: Trigger when to show the element.
Requires: Make the element dependent on certain features with a corresponding minimum version.

Power Fx expressions can be used in some properties, creating low code solutions that make cards more powerful.

Power Fx editor and Formula bar:

We can use Formula bar to enter the Power Fx expression to automate the process (for example when a button is clicked). So the formula bar even assists you as you’re writing an expression.

Limited Power Fx expressions are working on the cards at the moment, if you need to know click here

Thats it for today.

I hope this helps.
Malla Reddy(@UK365GUY)
#365BlogPostsin365Days

Share this:

Supercharge Your Power Apps with Custom Cards

Hello Everyone,

Today i am going to share my thoughts around the CARDS related to Power Apps.

Lets gets started.

Cards in Power Apps ?

Power apps is a powerful low code platform that allows you to create custom business applications quickly and easily. One of the key components of Power Apps is the concept of cards, which provide a flexible and interactive way to display data and capture user input.

While Power Apps offers several built-in card templates, you can take your app to the next level by creating custom cards tailored to your specific needs.

In this blog post, we will explore the benefits of custom cards and guide you through the process of creating and integrating them into your Power Apps Solutions.

1. Understanding Power Apps Cards:

Before diving into custom cards, it’s essential to have a solid understanding of Power Apps cards and their capabilities. Power Apps cards are the primary building blocks for desinging user interfaces in your applications.

They can be used to trigger actions. By default, Power Apps provides a range of cards templates, including display cards, edit cards, and form cards.

However, Custom cards offer additional flexibility and customizations options.

2. Advantages of Custom Cards:

Custom cards provide several advantages over the built in card templates in Power Apps. Here are some key benefits:

a.Tailored User Experience: With Custom cards, you can design the user interface to match your specific requirements, providing a seamless and intutive experience for your app users.

b.Reusability: Once you create a custom cards, you can reuse it across multiple screens and apps, saving time and effort in the long run.

c. Extensibilty: Custom cards allow you to extend the functionality of Power Apps by integrating with other services of incorporating custom logic and calculations.

3. Creating Custom Cards:

Creating custom cards in Power Apps involves a few essential
steps:

a. Designing the Card: Start by sketching out the layout and design of your card. Consider the data you want to display and the input controls you need to capture user input. User Power Apps design tools and features to create the visual elements of your custom card.

b.Configuring Properties: Once you’ve designed the visual elements, configure the properties of each elements to determine how it interacts with data and user input. Define data bindings, set up validations rules, and specify actions to be triggered when certain events occur.

c.Testing and Refinement: Its crucial to thoroughly test your custom card to ensure it functions as intended. Use Power Apps preview and debugging capabilities to identify and fix any issues. Iterate and refine your design based on user feedback and usabiltiy testing.

4.Integrating Custom Cards:

After creating your custom cards, you need to integrate them into your Power Apps solutions. Here are a few ways to do that:

a. Screen Layouts: Replace or add the custom cards to the appropriate screen layouts in your app. Configure the data sources and binding for the cards to display and capture the necessary information.

b.Navigation and Interaction: Define how users navigate to the screens containing your custom cards. Set up interactions between the cards and other elements in your app, such as buttons and menus.

c. Data Integration: Connect your custom cards to data sources, whether it’s local data or external systems. Leverage Power Apps connectors to retreive and update data seamlessly.

Conclusion:

Custom cards in Power Apps empower you to create tailor-made user interfaces and enhance the functionality of your applications. By undestanding the basics of cards, leveraging the benefits of custom cards, and following the steps outlined in this blog post. you can unlock the full potential of Power Apps and deliver powerful and engaging experiences to your users.

So, dive in, experiment, and let your creativity flow as you develop custom cards that tranform your Power Apps solutions into something truly remarkable.

I hope this helps.
Malla Reddy(@UK365GUY)
#365BlogPostsin365Days

Share this:

Resolve Power Platform relying on new cloud service dependency for data residency compliance by adding updating URLs to your firewall rules

Hello Everyone,

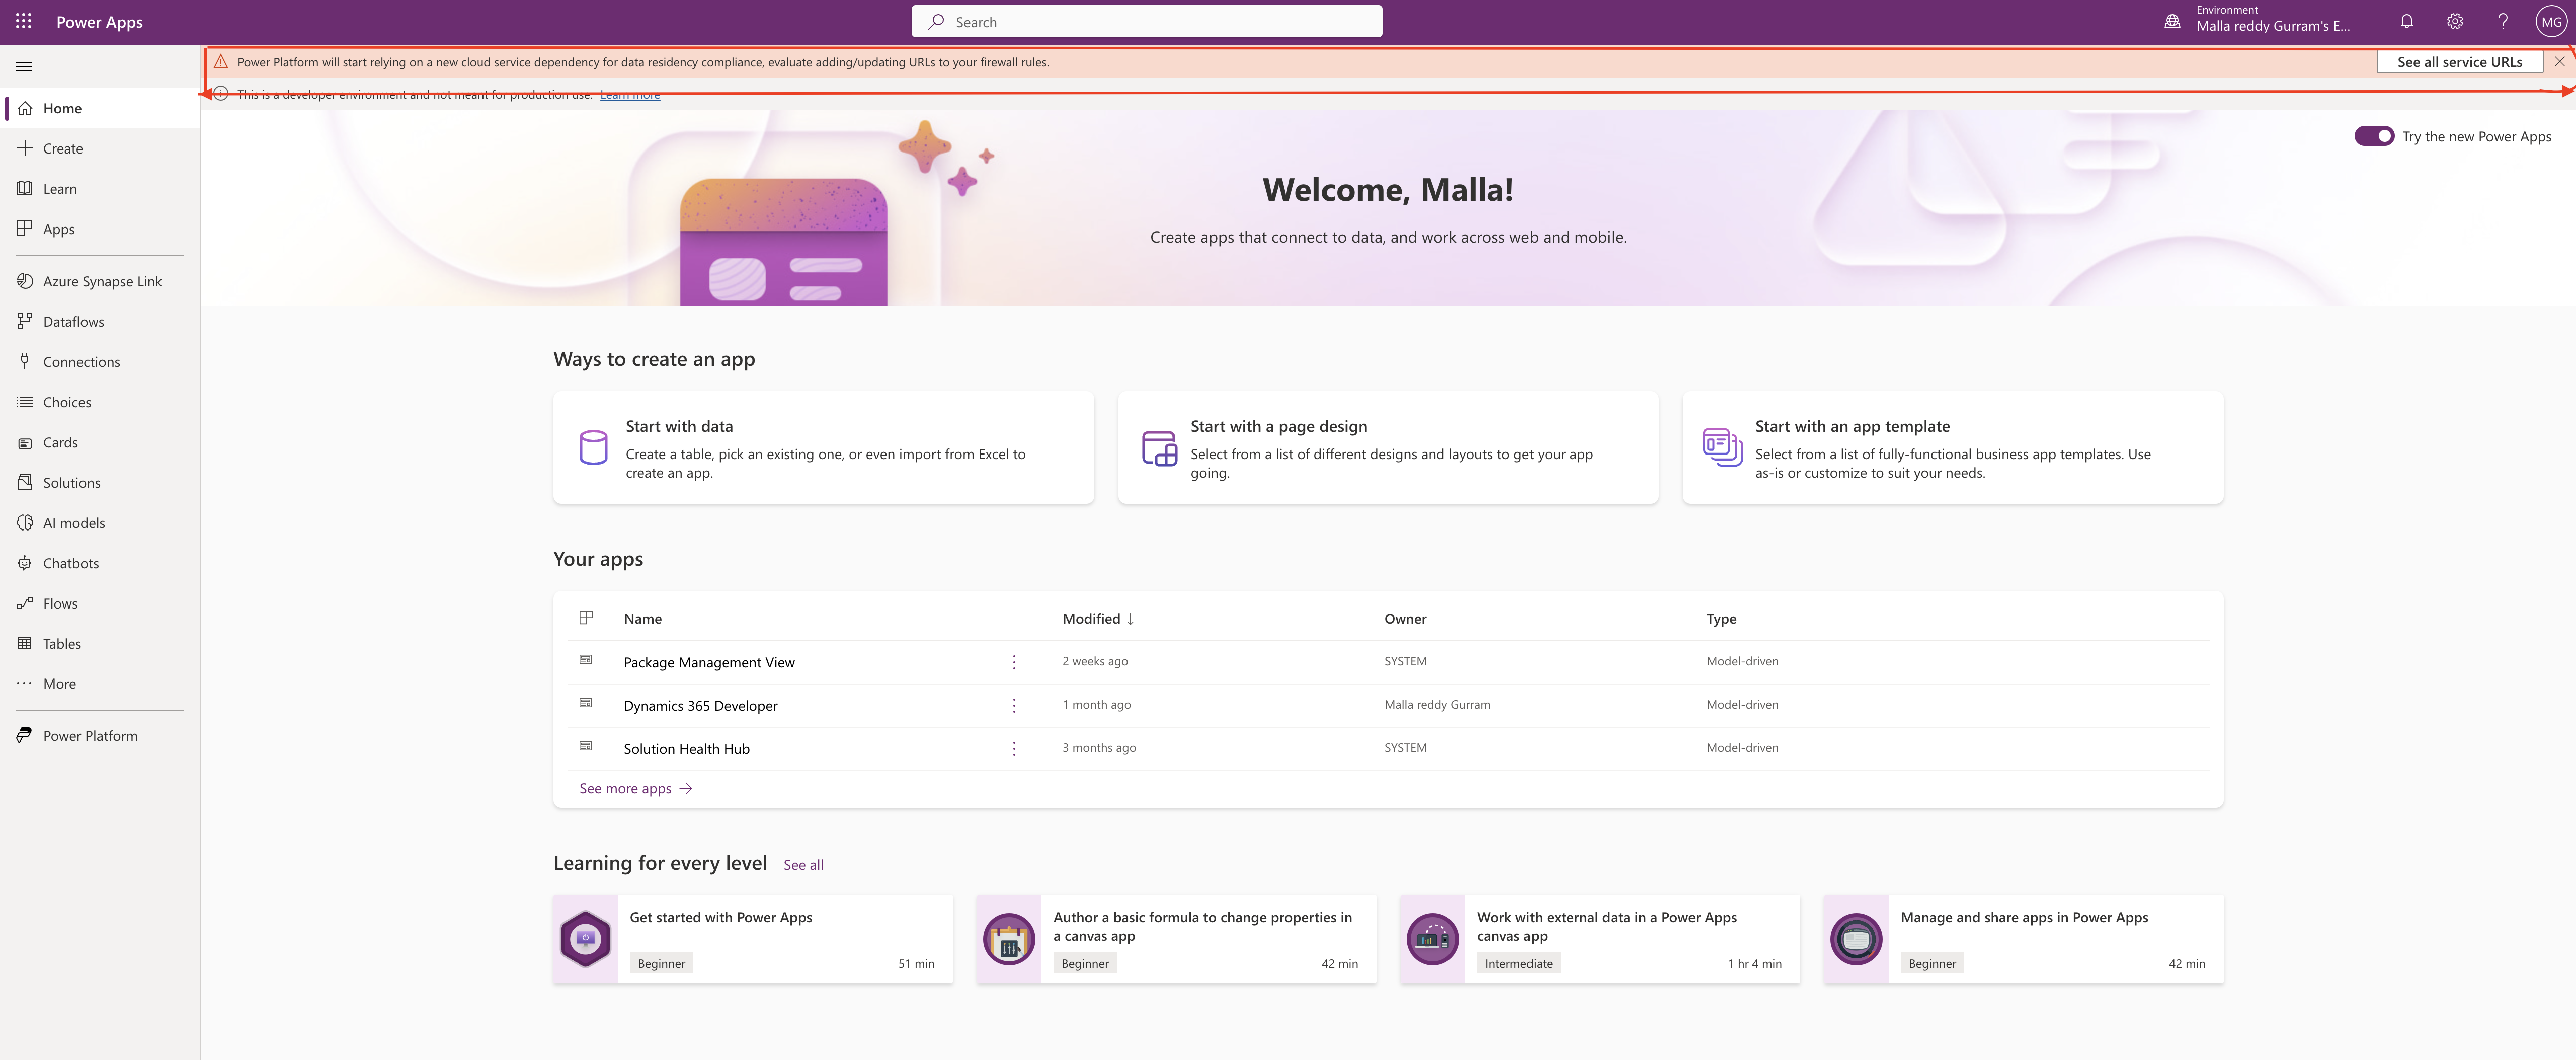
Today i am going to share how to resolve the Power Platform relying on a new cloud service dependency for data residency compliance, evaluate adding/updating URLs to your firewall rules.

In order to reslove any future login issues, we need to add the URLs to the allow list to ensure communication through firewall and other security issues.

Suppose you can’t access a service or specific URLs failed to load, a proxy or firewall might be configured to prevent you from accessing server resources.

You need to review your proxy settings and add the URLs to the allow lists according to your service requirement.

Also URLs for Dynamics 365 Services:

If you are accessing the Dynamics 365 Services then you need to add URLs to allow list to use ALL Dynamics 365 Apps like Dynamics 365 Sales, Dynamics 365 Customerr Service, Dynamics 365 Field Service, and Dynamics 365 Marketing.

Similarly IP addresses required for public or government clouds are available from microsoft doc,link for microsoft doc’s below.

For more information about the URLs to be added to allow list from Here

Thats it for today.
Malla Reddy(@UK365GUY)
#365BlogPostsin365Days

Share this:

New device picker(Preview) for Canvas App

Hello Everyone,

Today i am going to share new preview feature calked new device picker for canvas app.

Lets gets started.

Canvas App can work on desktop and or the mobile too. checking app responsiveness has been a challenge that required you to either resize your web browser window to approximate a mobile device or crack open dev tools to try out certain device sizes.

So now microsoft release new responsive device picker allows to check the look of the app in multiple devices view sizes either it is on the web or table or mobile.

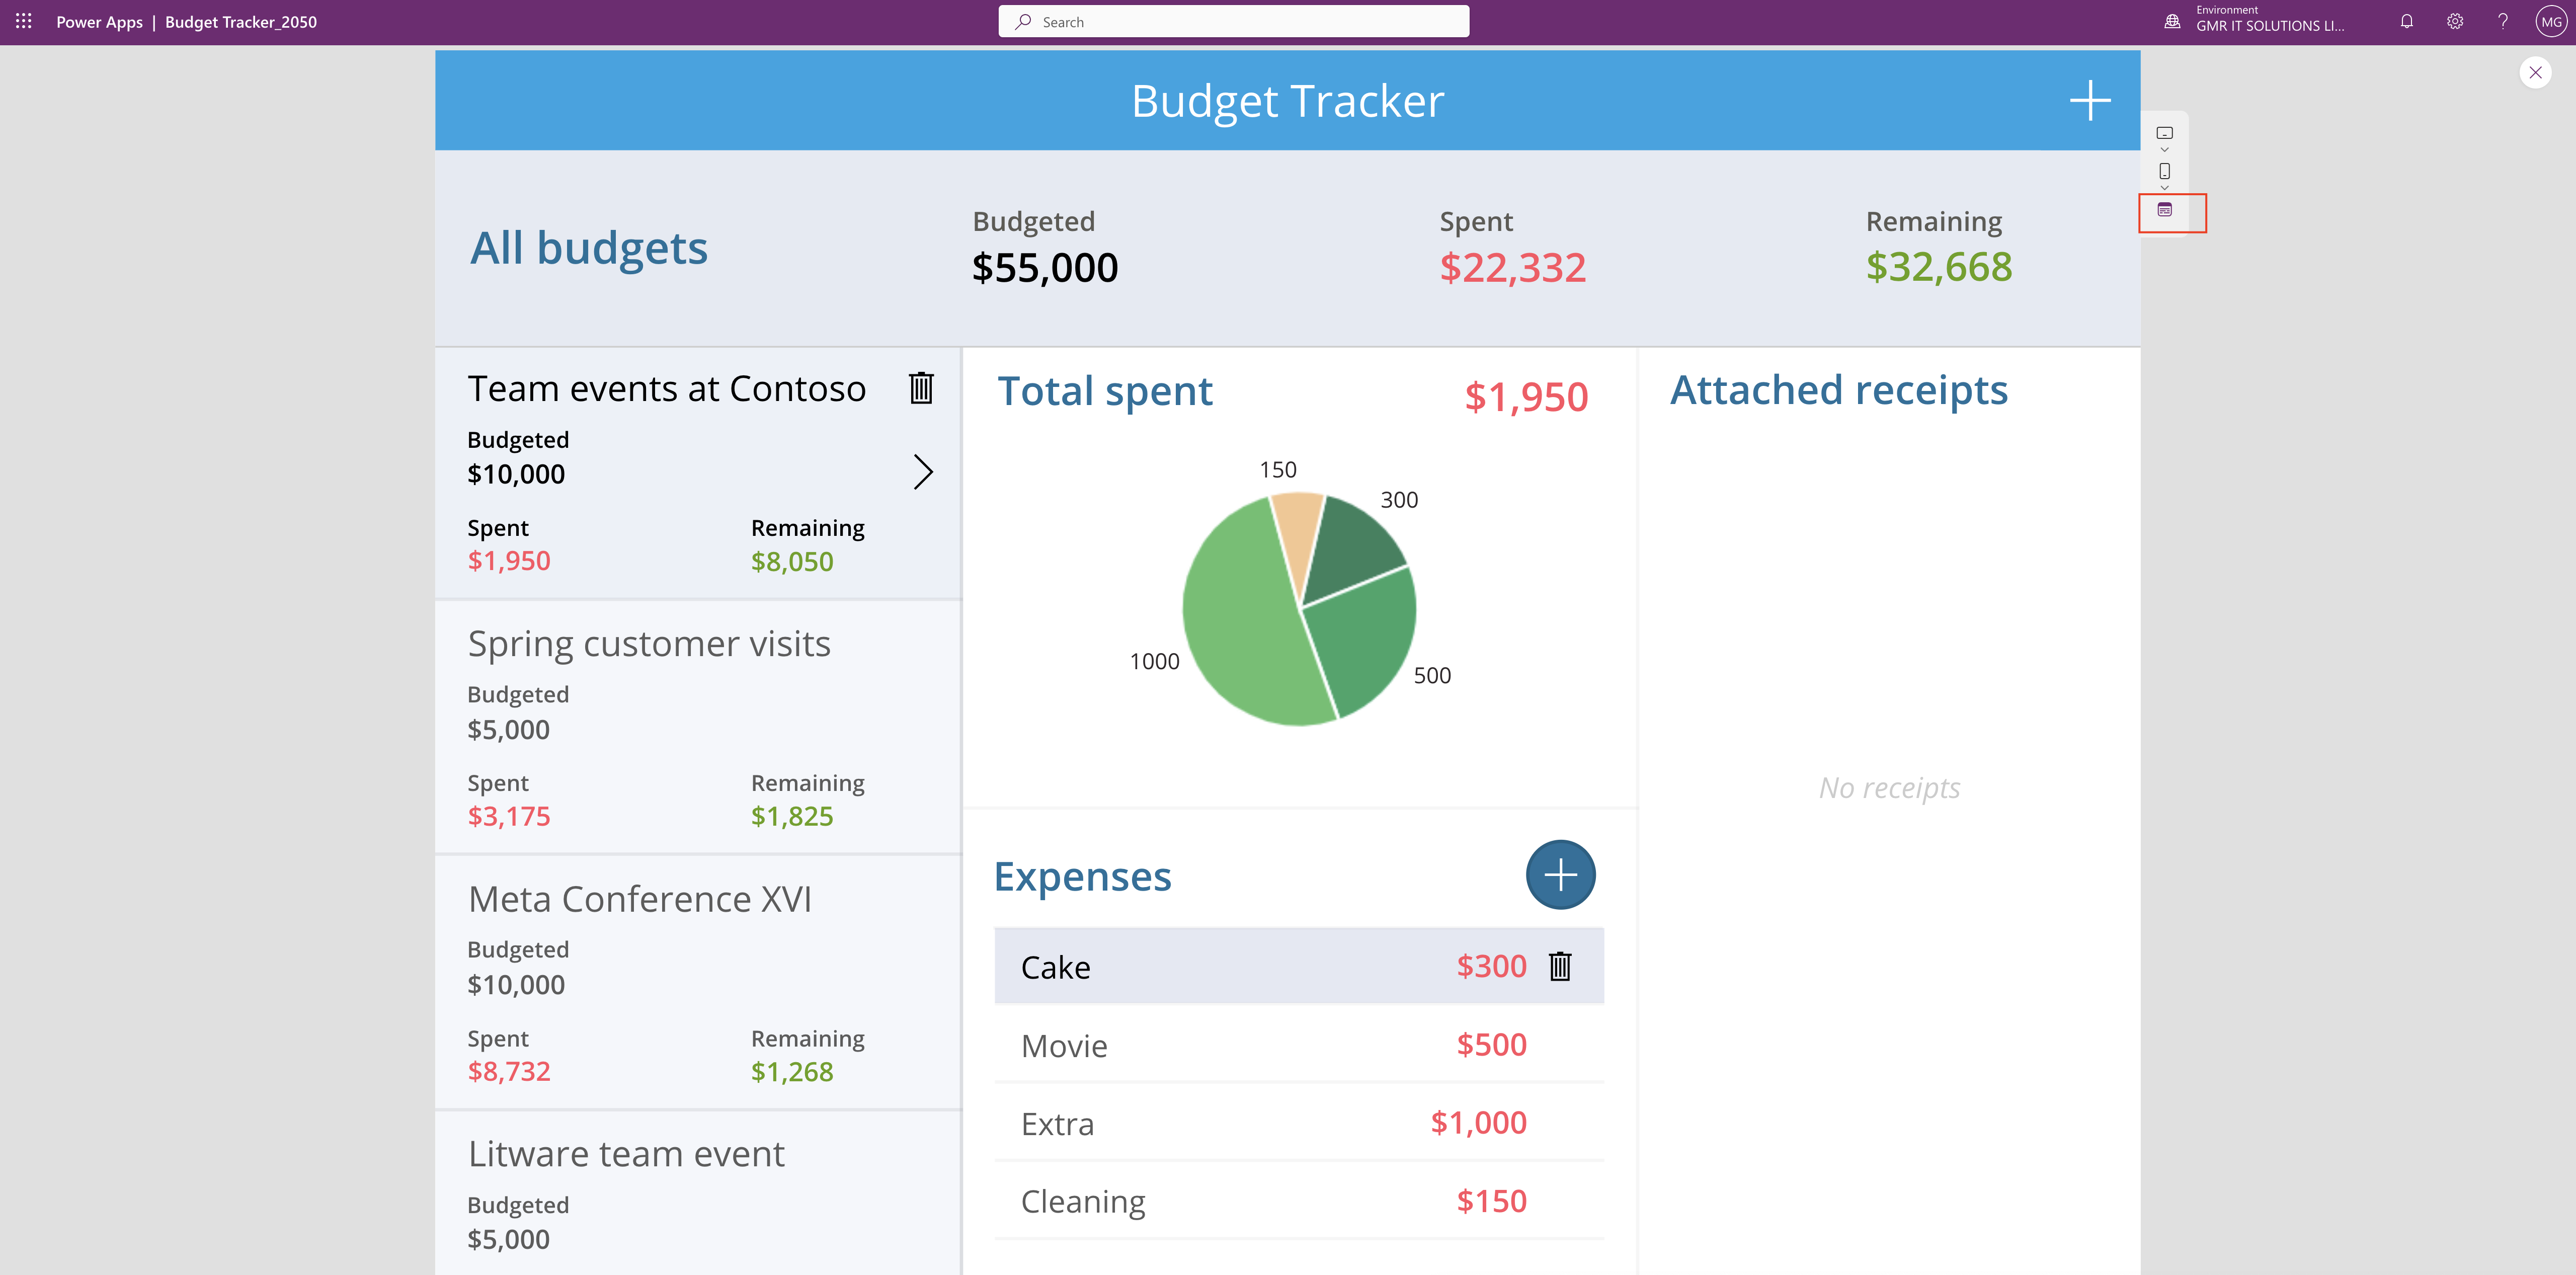
In order to see this feature open your canvas app and click play see below screenshot

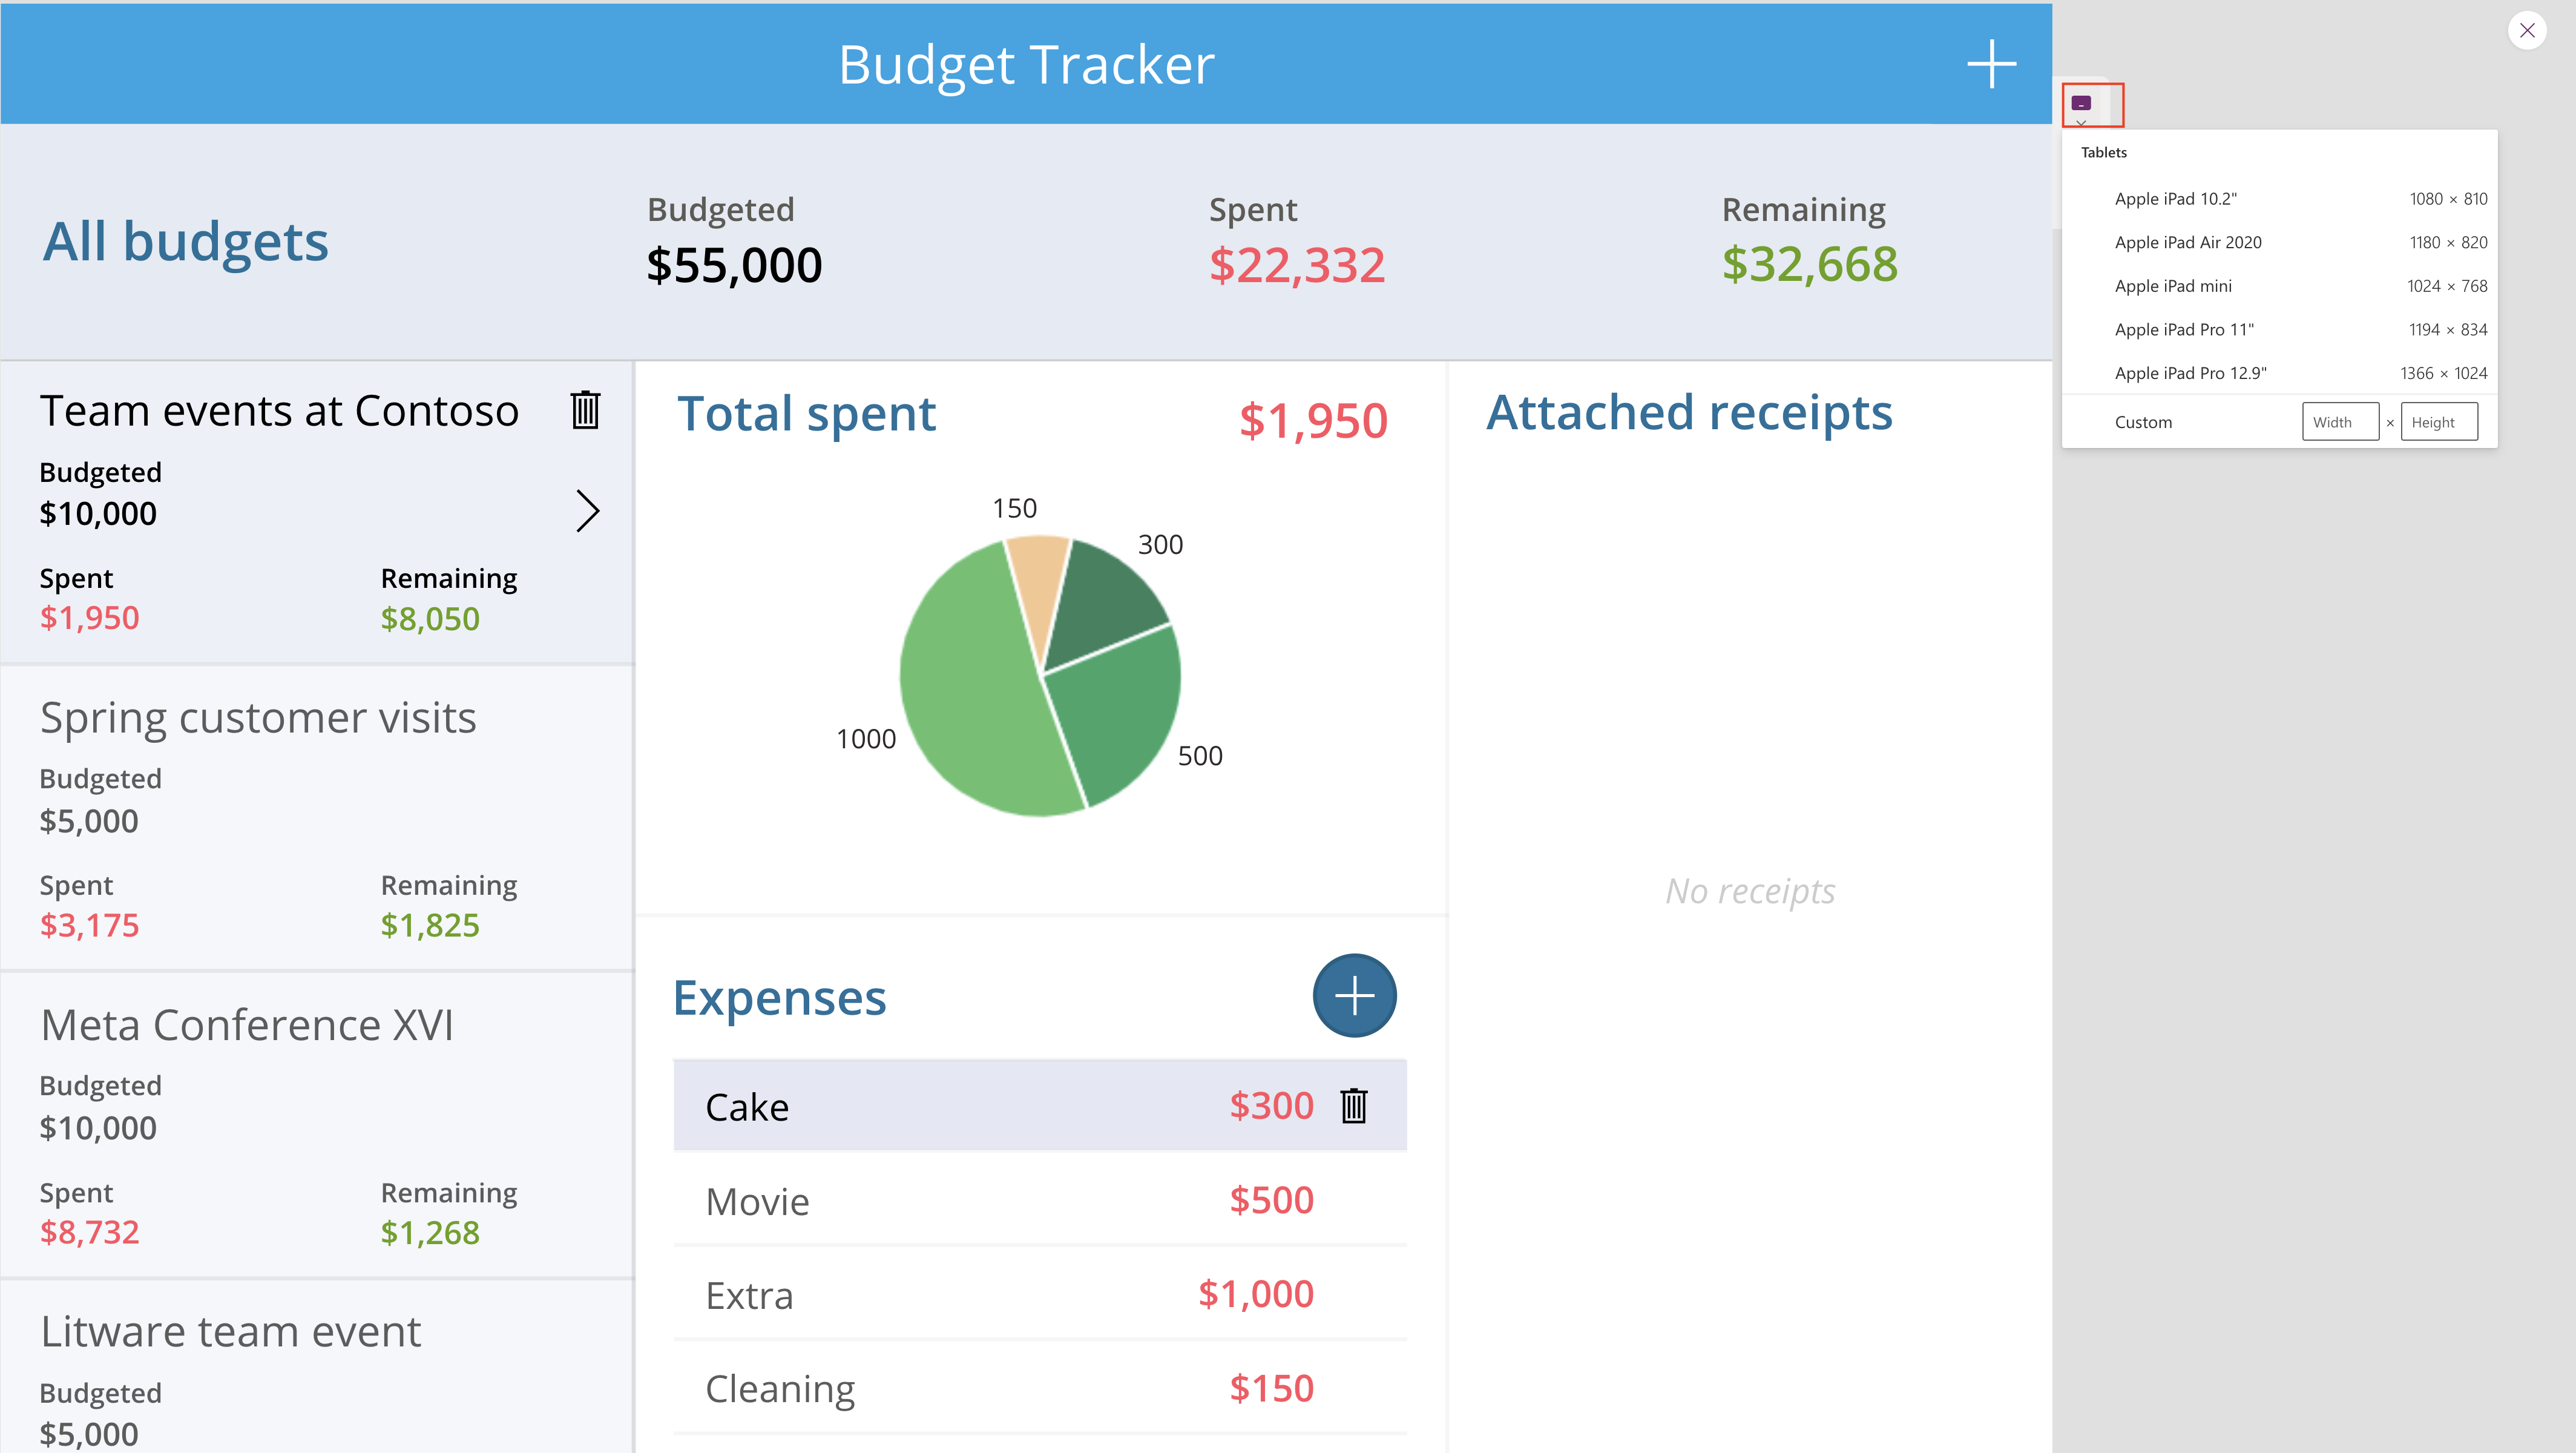
Tablets sizes:

When used in combination with auto layout containers or app authoring techniques, we can see how the content of your app will reflow as you switch through the different device types.

Moble sizes:

Final Browser Size:

I hope this helps.

Malla Reddy(@UK365GUY)
#365BlogPostsin365Days
Share this: