Menu Close

Blog

Slide 1

Microsoft Business Applications Blogposts, YouTube Videos and Podcasts

Helping Businesses with Technology

Slide 2

Microsoft Business Applications Blogposts, YouTube Videos and Podcasts

Helping Businesses with Technology

Slide 3

Microsoft Business Applications Blogposts, YouTube Videos and Podcasts

Helping Businesses with Technology

previous arrow
next arrow

TOP 20 BLOG ON THE WEB FOR 2018

Hi Everyone,

I would like to share my happy moments with the community:

Recently my blog has been awarded “top 20 Dynamics 365/CRM blogs in the world 2018”.

From Feedspot:

https://blog.feedspot.com/microsoft_dynamics_crm_blogs/

Many thanks for Feedspot team for recognizing my efforts in helping the Microsoft Dynamics 365/CRM Community in the form of blogging and other social medium channels.

Once again i am very happy that this is the second year i am receiving the ” top blogger award” from “Feedspot”.

Looking forward to helping  the  Microsoft Dynamics 365/CRM Community throughout my career.

All SMB’s and Enterprise Customers:
Development/Training/Support/Project specific/Licensing
Contact:
www.gmritsolutions.co.uk
Email: admin@gmritsolutions.co.uk

Share this:

Create an Power App using Data from Excel

Hi Everyone,

I would like to show how to create a simple App using a Excel Data.
First create the excel file
In the above excel file there two excel files Purchase sheet  and Supplier sheet.
Save the file on the “onedrive for business” 
As you can see from above image, onedrive for business,select that and save the file.
Open the powerapps website: https://powerapps.microsoft.com/en-us/
You should have an account to sign in otherwise you can sign up for free.
Once you are on the landing page click on the “create an app”..
Then you will be landed on the below web page:
Select the “OneDrive for Business Phone Layout” tile from the web page:
As you can see the excel file “supplierspending.xlsx” , select the file>
You will be prompted another web page, chose the table “Purchases”  and click “connect”:
Here you go the new app is been building on the fly:-)
Skip the “Welcome to PowerApps Studio” pop up>
As you can see the new app is ready on the power app design page and click on the preview the power app on the upper right hand side play symbol or F5.
The above image is the preview mode of the app. you can edit by clicking the view the item details and make changes click save.
 Also you can add new data into the table and it is automatically saved on the OneDrive for Business”.
Note on the excel  the auto save functionality will only work once the record is saved initially.
Once the new data entered on to the file and name the App, save the App,
As soon as you save the App, you will land on another web page 
As you can share the app with your team and restrict or give full access to the app, 
then the user who is being shared this app can see the App on the phone, can edit or view based on the access rights.
So finally the user can see or edit according on their mobile phone by clicking on the “Power App” icon..
I hope this helps.
SMB’s customers who needs Microsoft Dynamics 365/CRM Support/Development/Integrations/one of project work 
contact:
Share this:

Microsoft Dynamics 365 Global Administrator Unable to Approve Mailbox for CRM User

Hi Everyone,

Recently one of my client tenant had an issue:

Scenario: Microsoft Dynamics 365 Customer Engagement Application have only one License and one Global Administrator.

So there is a requirement to integrate Microsoft Dynamics 365 with Microsoft Dynamics 365 App for Outlook.

Microsoft Dynamics 365 Customer Engagement user(System Administrator) tried to approve email, test and enable mailbox, but the
                    “Incoming Email Status =  Fail”,
                    “Outgoing Email Status =  Fail”,
          “Appointment,Contacts and Task Status = Fail”,

So as a tenant Global Administrator tried to approve the Mailbox for the user, but because the Dynamics 365 license has not been assigned  for Global Administrator, the Application is throughing error..

“Insufficient permissions to approve mailbox”.

So there is a work around for this issue..

The system administrator himself assign the Global Administrator rights and obviously he had Microsoft Dynamics 365 User License.

Then the system administrator became a Global Administrator with Microsoft Dynamics 365 License and he should be able to approve the Mailbox for the user..

As you can see the Incoming Email Status = Success, Outcoming Email Status = Success, Appointment, Contacts and Task Status = Success.

The system Administrator can install Microsoft Dynamics 365 App for Outlook and sync the email contacts, leads and tasks with outlook.

I hope this helps..

 SMB’S  and Enterprise Customers requires Support/Development/one off project
Contact us @ www.gmritsolutions.co.uk
Email :           admin@gmritsolutions.co.uk

Share this:

Javascript Deprecated in Dynamics 365

Hello Everyone,

The following information is handy for developer when customizing Dynamics 365 with Javascript.

The following client APIs are Deprecated in the current release to reorganize the Xrm client, so replacement client API need to be used and the Deprecated Client APIs are continue to be supported unless the Microsoft issue the time limit to replace with new Client APIs

Deprecated:

For the replacement of the Xrm Client APIs please refer to Microsoft document
https://docs.microsoft.com/en-us/dynamics365/get-started/whats-new/customer-engagement/important-changes-coming#some-client-apis-are-deprecated

I hope this helps..
SMB’s Enterprise customers, if you need help on project/support/training/licenses, please contact us
www.gmritsolutions.co.uk
email: admin@gmritsolutions.co.uk

Share this:

Microsoft Dynamics 365 SDK download using Powershell

Hello Everyone,

Normally we download the Microsoft dynamics CRM SDK from Microsoft  website until Microsoft Dynamics 365 version 9.0.

From Version 9.0 we have two options to download the SDK

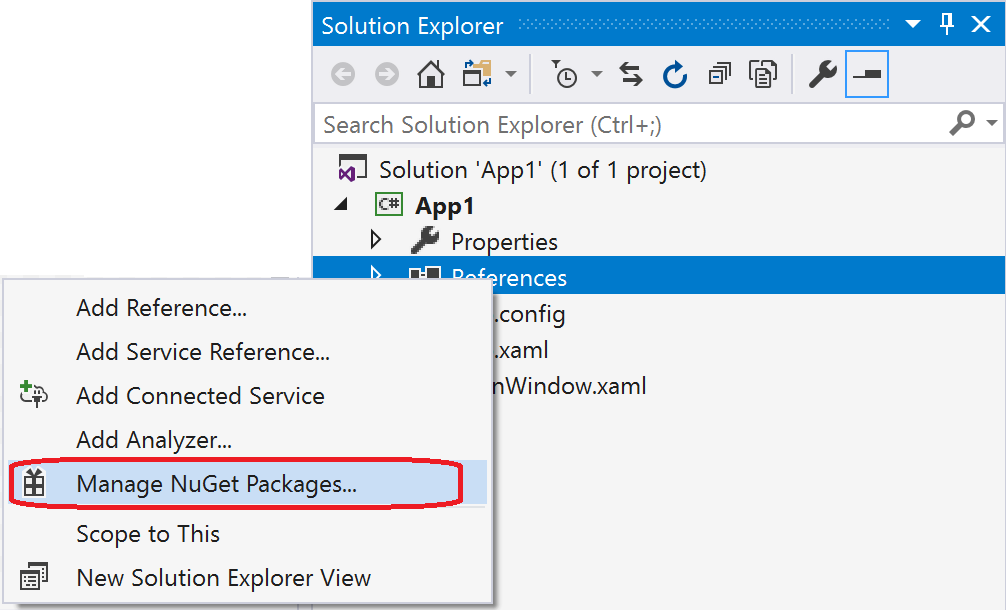
1) Using the visual studio Nuget package manager

Manage NuGet Packages command for project References

2)  using the Powershell:

I am gonna show how  to download it on to the local folder.

First create a folder in your local computer
Drive : D
Folder: Tool

So the path would be D:/Tools

Search for the “Powershell” on your computer start menu..
Change the directory to desired directory using cd..
  cd D:Tools

Copy the powershell script from Microsoft website

$sourceNugetExe = “https://dist.nuget.org/win-x86-commandline/latest/nuget.exe”
$targetNugetExe = “.nuget.exe”
Remove-Item .Tools -Force -Recurse -ErrorAction Ignore
Invoke-WebRequest $sourceNugetExe -OutFile $targetNugetExe
Set-Alias nuget $targetNugetExe -Scope Global -Verbose

##
##Download Plugin Registration Tool
##
./nuget install Microsoft.CrmSdk.XrmTooling.PluginRegistrationTool -O .Tools
md .ToolsPluginRegistration
$prtFolder = Get-ChildItem ./Tools | Where-Object {$_.Name -match ‘Microsoft.CrmSdk.XrmTooling.PluginRegistrationTool.’}
move .Tools$prtFoldertools*.* .ToolsPluginRegistration
Remove-Item .Tools$prtFolder -Force -Recurse

##
##Download CoreTools
##
./nuget install  Microsoft.CrmSdk.CoreTools -O .Tools
md .ToolsCoreTools
$coreToolsFolder = Get-ChildItem ./Tools | Where-Object {$_.Name -match ‘Microsoft.CrmSdk.CoreTools.’}
move .Tools$coreToolsFoldercontentbincoretools*.* .ToolsCoreTools
Remove-Item .Tools$coreToolsFolder -Force -Recurse

##
##Download Configuration Migration
##
./nuget install  Microsoft.CrmSdk.XrmTooling.ConfigurationMigration.Wpf -O .Tools
md .ToolsConfigurationMigration
$configMigFolder = Get-ChildItem ./Tools | Where-Object {$_.Name -match ‘Microsoft.CrmSdk.XrmTooling.ConfigurationMigration.Wpf.’}
move .Tools$configMigFoldertools*.* .ToolsConfigurationMigration
Remove-Item .Tools$configMigFolder -Force -Recurse

##
##Download Package Deployer
##
./nuget install  Microsoft.CrmSdk.XrmTooling.PackageDeployment.WPF -O .Tools
md .ToolsPackageDeployment
$pdFolder = Get-ChildItem ./Tools | Where-Object {$_.Name -match ‘Microsoft.CrmSdk.XrmTooling.PackageDeployment.Wpf.’}
move .Tools$pdFoldertools*.* .ToolsPackageDeployment
Remove-Item .Tools$pdFolder -Force -Recurse

##
##Remove NuGet.exe
##
Remove-Item nuget.exe

Then you can see on the screen shot SDK will be downloaded to the local folder:
As you can see the plugin registration tool, package deployment, CoreTools, ConfigurationMigration folder from  the image.
Then you start using the SDK for the development work.
I hope this helps..
SMB’s and Enterprise Customers need of Support/Development/Consultancy/Licenses 
Contact us 

Share this: