Menu Close

Blog

Slide 1

Microsoft Business Applications Blogposts, YouTube Videos and Podcasts

Helping Businesses with Technology

Slide 2

Microsoft Business Applications Blogposts, YouTube Videos and Podcasts

Helping Businesses with Technology

Slide 3

Microsoft Business Applications Blogposts, YouTube Videos and Podcasts

Helping Businesses with Technology

previous arrow
next arrow

ROLE BASED FORMS FOR CHILD BUSINESS UNITS DYNAMICS 365

One of the greatest features of the Microsoft Dynamics CRM platform is the ability to configure entity forms to be available only for specific security groups. While this works great, in principle, the story quickly becomes muddy when you start implementing it in organizations with a more complex security structure. In particular, when working with different business units.
As we know by now, when adding elements to a solution, we can only capture security roles from the root business unit. This is a limitation of the solution package, and we have ways to work around it for most situations. For example, if we want security roles to be solution aware, even though we need them in child business units, we create them in the root business unit. They are inherited to the child business units, and we can assign the users at the business unit where we need them to have the respective security roles.
Unfortunately, one overlooked aspect is the role based forms. While the scenario described above works fine for users and security roles, once we bring into our equation role based forms, the whole pyramid collapses. Lets look at an example.
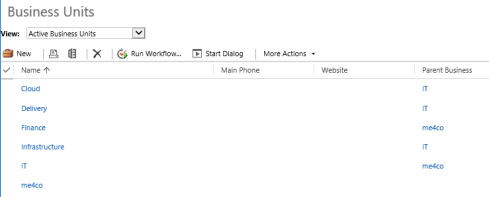
We’re going to start with a set of business units as described in the screenshot below.
businessunits
As we can see, we have the root business unit called very creatively me4co. Right below this, we have the following child business units: Finance and IT. And just to make it more interesting, we have the following three child business units underneath the IT business unit: Cloud, Delivery and Infrastructure.
Now let’s create a few security roles. Go back to Settings > Security and choose Security Roles. Here we see the default security roles on an organization, all under the root business unit. We’ll come back to this view in a moment.
Once we’ve seen the default security roles, let’s go and create some new roles in the context of a solution. So, go to Settings > Solutions. Create a new solution if one is not already available for playing with. In this solution go to Security Roles. Once there, create a New role and name it creatively role1. For business unit, leave the root business unit. Click on Save and Close. I’m not going to assign any permissions here, i’m just using it for demonstration purpose.
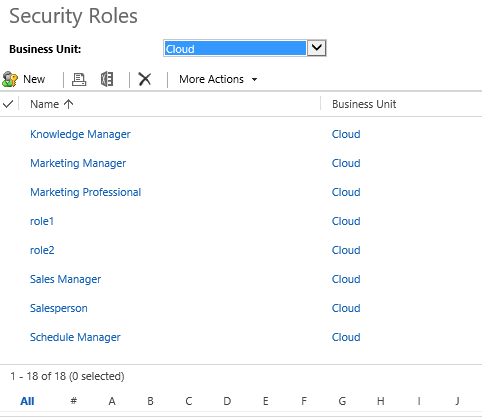
Same way as before, go ahead and create a new security role. Keeping in line with our extremely creative naming convention, name this one role2. Only this time, instead of leaving the default business unit, change it to Cloud. This is a 3rd level down business unit, having IT as parent, which in turn has me4co as parent (the default business unit). Again, hit Save and Close. Now, looking at the solution, this new role called role2 does not appear in the Security Roles part of this solution. This is because only Security Roles in the default root business unit are being captured in a Solution package. To verify that our newly create security roles was indeed created, navigate to Settings > Security > Security Roles. Select from the Business Unit drop-down the root business unit if not already selected, and observe that role2 is also missing. But if you change the business unit to Cloud, now you will also find role2 in the list. See the below screenshot.
securityroles
Now, with all these items setup and ready, let’s have a quick look at role based forms.
Go to Entities in your solution, select Add Existing, and select Contact.  When prompted to select entity assets, do not select anything, as we’ll just add a brand new view.

Entity Assets is a new feature added  with Dynamics 365, as part of enhancements to the Solution package model.

Click on Finish. Go to the Contact Forms, and add a new Main Form. Click on Save As, and name this form to RBF (short for role based form, but you can name it anything you want).Save and Close this form. In the Active Forms view for Contact, select this newly created form, and click on Enable Security Roles in the ribbon. The new screen that opens up allows you to choose a security role. Unfortunately, you only have a choice from the security roles created in the root business unit. No option to change the business unit selection. This relates to the fact that security roles in child business units are not captured in a solution package.

Conclusion: part of a Solution package, you cannot assign security roles to a role based form if the security role is not part of the root business unit.

But, if you really, really, really need to do this, you can still do it outside of a solution package. Do keep in mind that this configuration can not be ported to another organization through the use of a solution package. If you need this kind of configuration, you will have to manually implement if in all instances (dev, qa, uat, prod)… ugh…
Instead of doing this as part of the existing solution, let’s go back to Settings > Customizations. Select Customize the System instead. These customizations are applied directly to the root solution. Find the Contact entity, go to Forms and find the RBF form we’ve created earlier. Observe how the form created in an unmanaged solution is also present in the default solution.
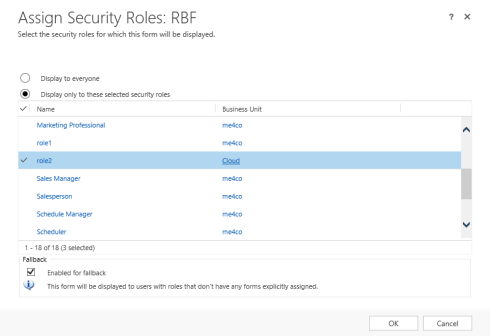
Now, when you click on the RBF form and select Assign Security Roles, you will find role2 in the list of roles, as shown in the screenshot below.
securityroles2
Once you Save and Publish your customizations, your newly created role based form is available as defined.
Use this approach with care, and only if really necessary. The fact that this configuration can not be captured in a context of a Solution package, and can not be ported to another environment/organization is a major downfall, and it goes against best practices regarding solution management and deployment models.
Enjoy!

Share this:

CREATE SANDBOX USING PRODUCTION COPY IN DYNAMICS 365 ONLINE

Here we can create two type of copies from production
1) Production to sandbox(full copy)
2) Production to sandbox(partial copy)

If you choose to make a full copy of the production instance then you need to look into the storage anywhere near the limit from the Dynamics 365 Admin Center..

FULL COPY OF PRODUCTION TO SANDBOX:

The advantage of full copy production to sandbox is that of replica of the production and everything is copied into sandbox (name it as UAT).

Copied functionality is everthing starting from entities, webresources, plugin, workflows, business process flow,  etc..

Here is an important point to discuss is that if you have development work to be done then it is good to  have a partial copy of the production as a sandbox(development environment).

PARTIAL COPY OF PRODUCTION TO SANDBOX:

The advantage of the copying of the partial copy is that its just copy the skeletion of the production instance no records are moved into the sandbox, just  like the brand new CRM but the all the customization of the production without the records and just the views, workflows, webresources etc…

So if you have a project to deliver then start from the partial copy of the sandbox and name it as development environment and create an another copy of the production to sandbox name it as UAT.

After successfull development work in the dev(sandbox) then deploy the  solution into the UAT, then test the functionality and deploy into the production..

I hope this helps::

Happy CRMing.


Share this:

BULK UPDATE OF THE PRIMARY CONTACT’S COMPANY NAMES IN ALL CONTACTS IN DYNAMICS 365

If you want to bulk update the primary contacts “company name” field value in all the contacts records.

Then the below code is helpful:

public void Execute(IServiceProvider serviceProvider)
        {
            // Obtain the execution context from the service provider.
            IPluginExecutionContext context =
                (IPluginExecutionContext)serviceProvider.GetService(typeof(IPluginExecutionContext));

            // Get a reference to the Organization service.
            IOrganizationServiceFactory factory =
                (IOrganizationServiceFactory)serviceProvider.GetService(typeof(IOrganizationServiceFactory));
            IOrganizationService service = factory.CreateOrganizationService(context.UserId);
            Entity entity;
            if (context.InputParameters != null)
            {
                entity = (Entity)context.InputParameters[“Target”];

                string fetchXML = @”<fetch version=’1.0′ output-format=’xml-platform’ mapping=’logical’ distinct=’false’>
              <entity name=’account’>
                <attribute name=’name’ />
                <attribute name=’primarycontactid’ />
                <attribute name=’telephone1′ />
                <attribute name=’accountnumber’ />
                <attribute name=’accountid’ />
                <order attribute=’name’ descending=’false’ />
                <filter type=’and’>
                  <condition attribute=’primarycontactid’ operator=’not-null’ />
                </filter>
                <link-entity name=’contact’ from=’contactid’ to=’primarycontactid’ alias=’PrimaryContact’>
                  <attribute name=’parentcustomerid’  />

                    <attribute name=’contactid’ alias=’contact’/>
                  <filter type=’and’>
                    <condition attribute=’parentcustomerid’ operator=’null’ />
                  </filter>
                </link-entity>
              </entity>
            </fetch>”;
           
                EntityCollection entityCollection = service.RetrieveMultiple(new FetchExpression(fetchXML));
                for (int i = 0; i < entityCollection.Entities.Count; i++)
                {
                 
                        Entity contact = new Entity(“contact”);
                        contact.Attributes[“parentcustomerid”] = new EntityReference(entityCollection.Entities[i].LogicalName, entityCollection.Entities[i].Id);
                        contact.Attributes[“contactid”] = entityCollection.Entities[i].GetAttributeValue<AliasedValue>(“PrimaryContact.contactid”).Value;
                        service.Update(contact);
                 
                   
                }
            }
            else
            {
                return;
            }
        }
========================================================================

Message : Update
Entity: Account
Attribute: email
Post-operation, Asynchronous,

I hope this helps:
Happy CRM ing:-)

Share this: