Menu Close

Blog

Slide 1

Microsoft Business Applications Blogposts, YouTube Videos and Podcasts

Helping Businesses with Technology

Slide 2

Microsoft Business Applications Blogposts, YouTube Videos and Podcasts

Helping Businesses with Technology

Slide 3

Microsoft Business Applications Blogposts, YouTube Videos and Podcasts

Helping Businesses with Technology

previous arrow
next arrow

{How to} Trigger email based on the customer behavior on Dynamics 365 Customer Insights Journey

Hello Everyone,

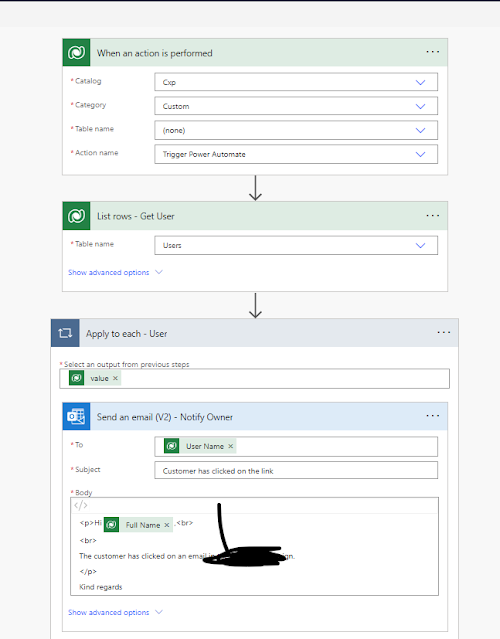
Today I am going to show how to trigger email to the Account Manager when an email is clicked by the customer using Power Automate Flow which will trigger based on the customer action on the email sent.

Let’s gets started.

Suppose there is a requirement to track the customer behavior on the marketing email sent to the potential customer and you want to get some customer insights on the behavior then continue reading this blog post.

“Trigger Power Automate” its based on the Journey

When an action is performed, based on the category of particular action.

Follow the above steps and add this Flow in your Customer Insights Journey.

Email will be sent each time customer clicks on it, notification email will be sent along with who have clicked on the email then Account Managers can follow up with customer to nuture to qualify them into sales pipeline.

That’s it for today.

I hope this helps.

Malla Reddy Gurram(@UK365GUY)
#365BlogPostsin365Days

Share this:

{Do you know} Dynamics 365 Customer Insights would consider business days five or seven days

Hello Everyone,

Today I am going to share my thoughts on the Dynamics 365 Customer Insights working days as five or seven days.

Let’s get’s started.

In Dynamics 365 Marketing, the concept of business days typically aligns with Standard working days, which are Monday through Friday. Let’s break it down:

1. Entity -Level Calendars:

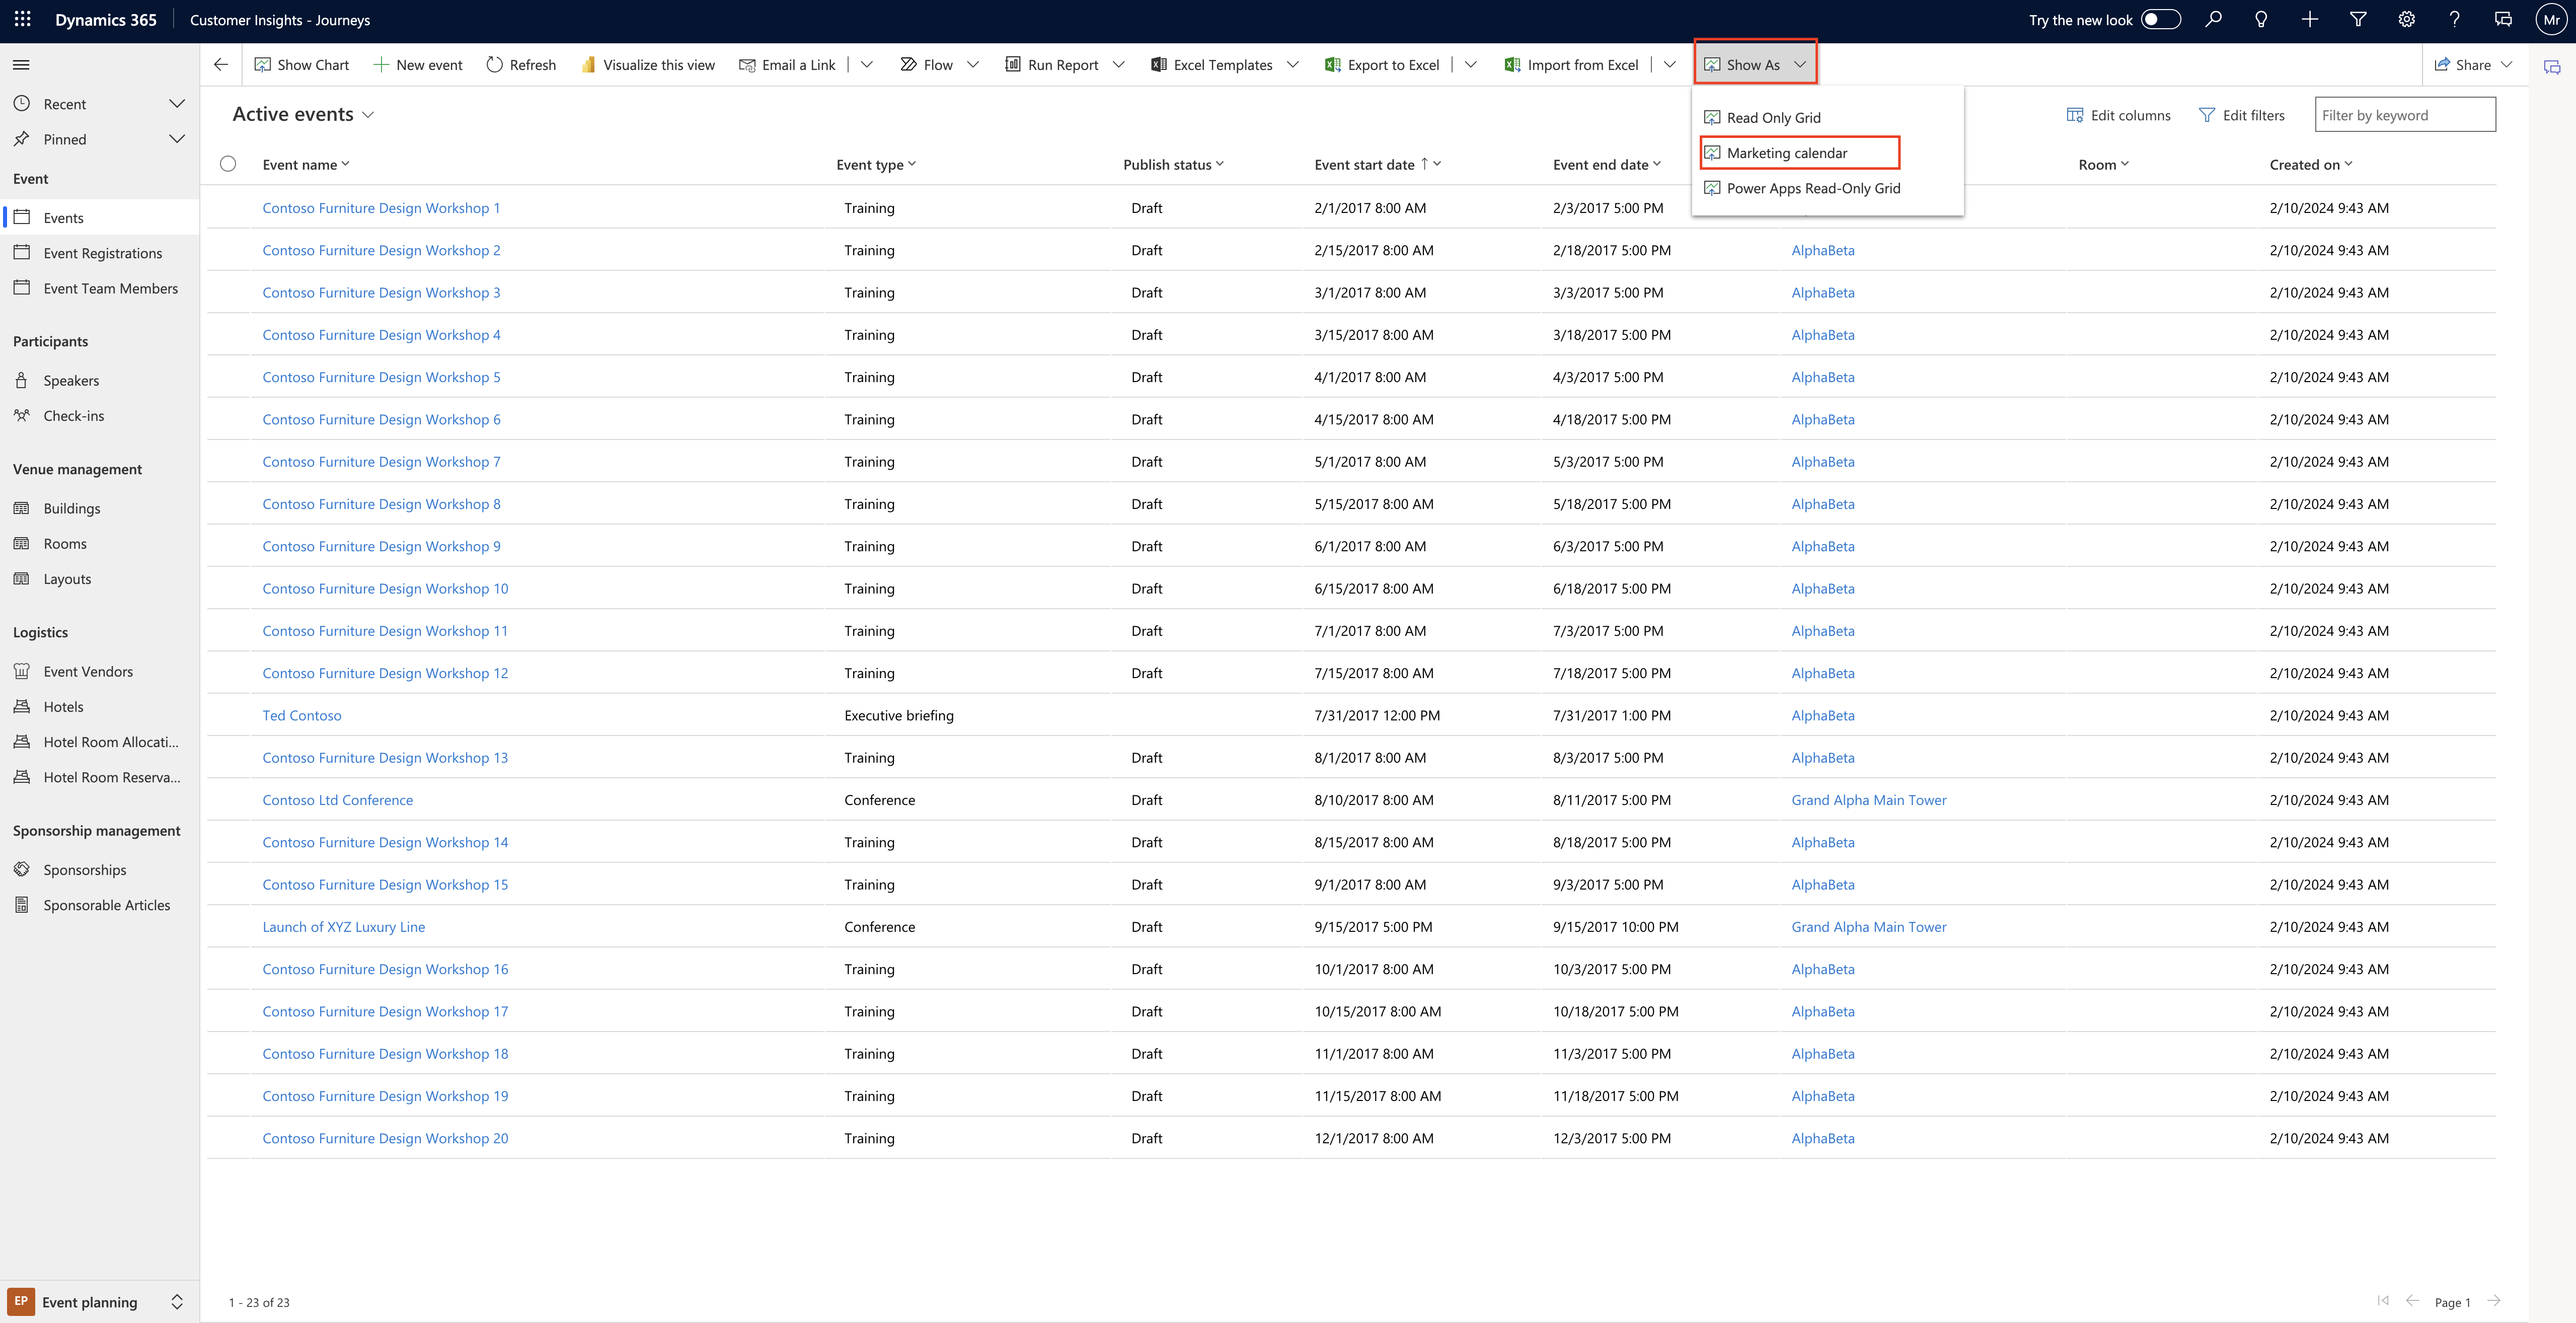
When you open an entity like events, customers journeys or the main marketing calendar, you’ll see a list view where you can switch between the calendar view and list view.

Relevant records (such as events or sessions) are plotted on the calendar based on their scheduled dates.

This types of calendar provides a system view selector for filtering the record shown.

2. Room-Level Calendars:

These calendars appear while viewing a specific record(e.g., a specific event).

They are integrated into the form view and might appear in their own tab or as a section alongside other settings.

Form-level calendars can only show and create records of one type of entity and are often related to the specific record where they appear.

3. Room-Reservation Calendar:

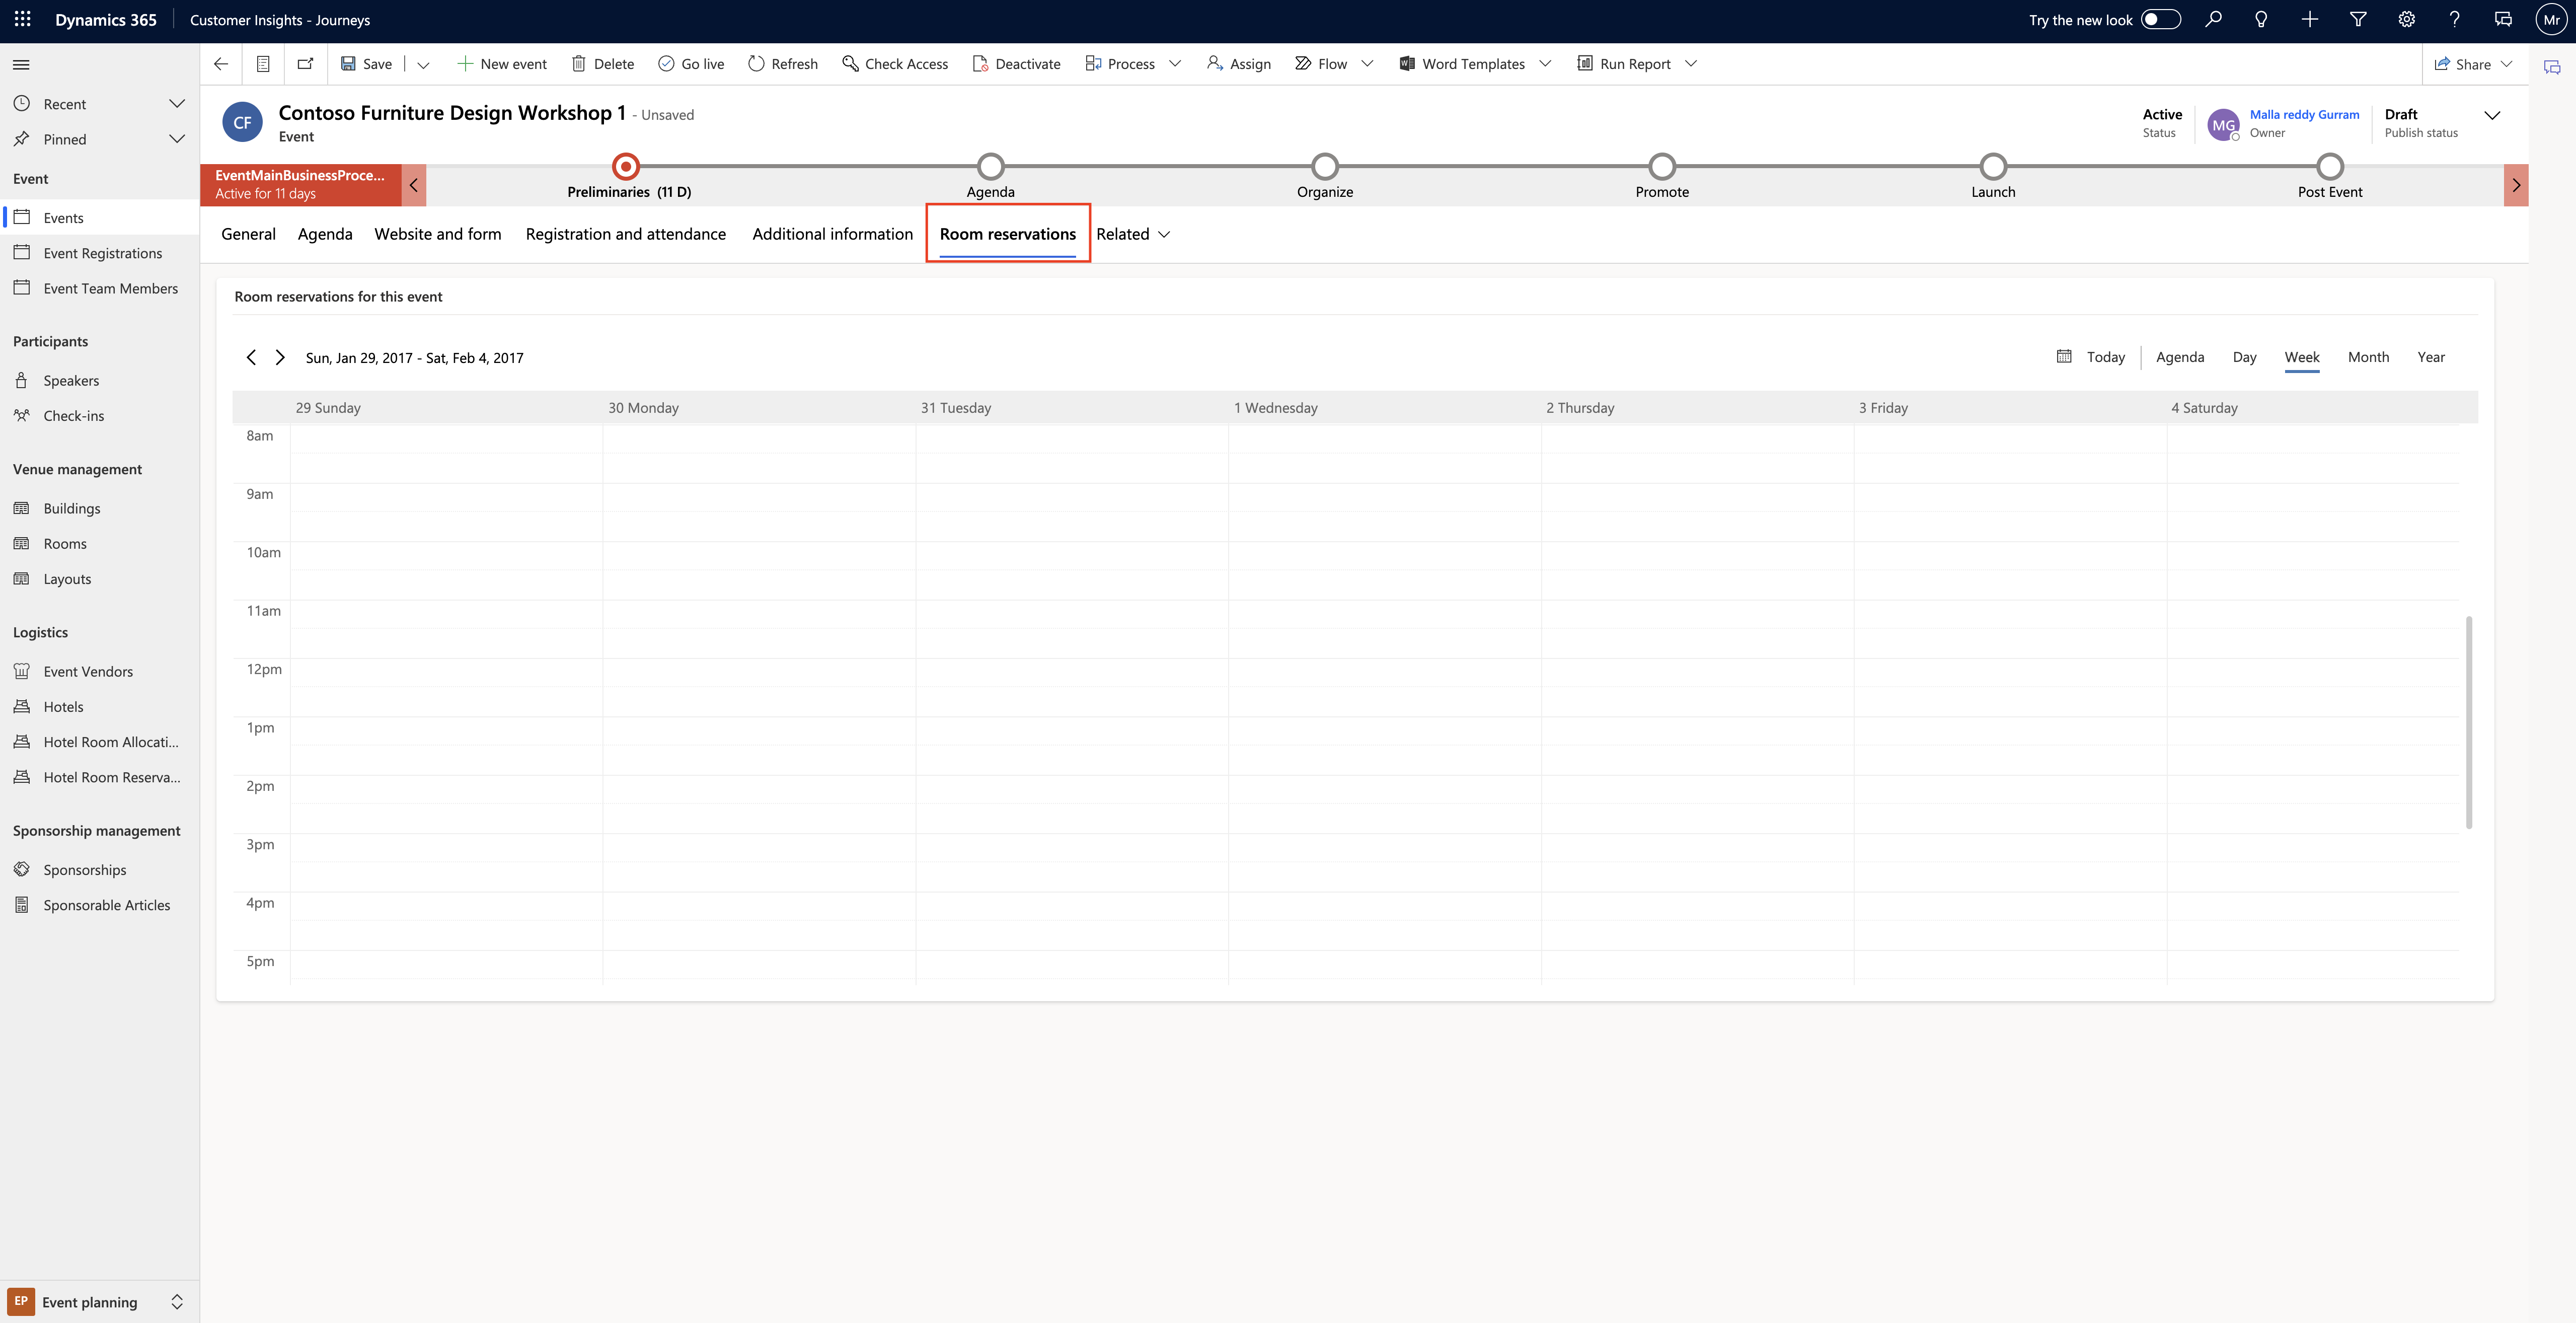
Specifically for event records, the room reservation calendar shows all room reservations assigned to the displayed event and its sessions.

Unreserved rooms are not shown, and the calendar is read-only( no session or reservation creation here).

4. Speaking Engagement Calendar:

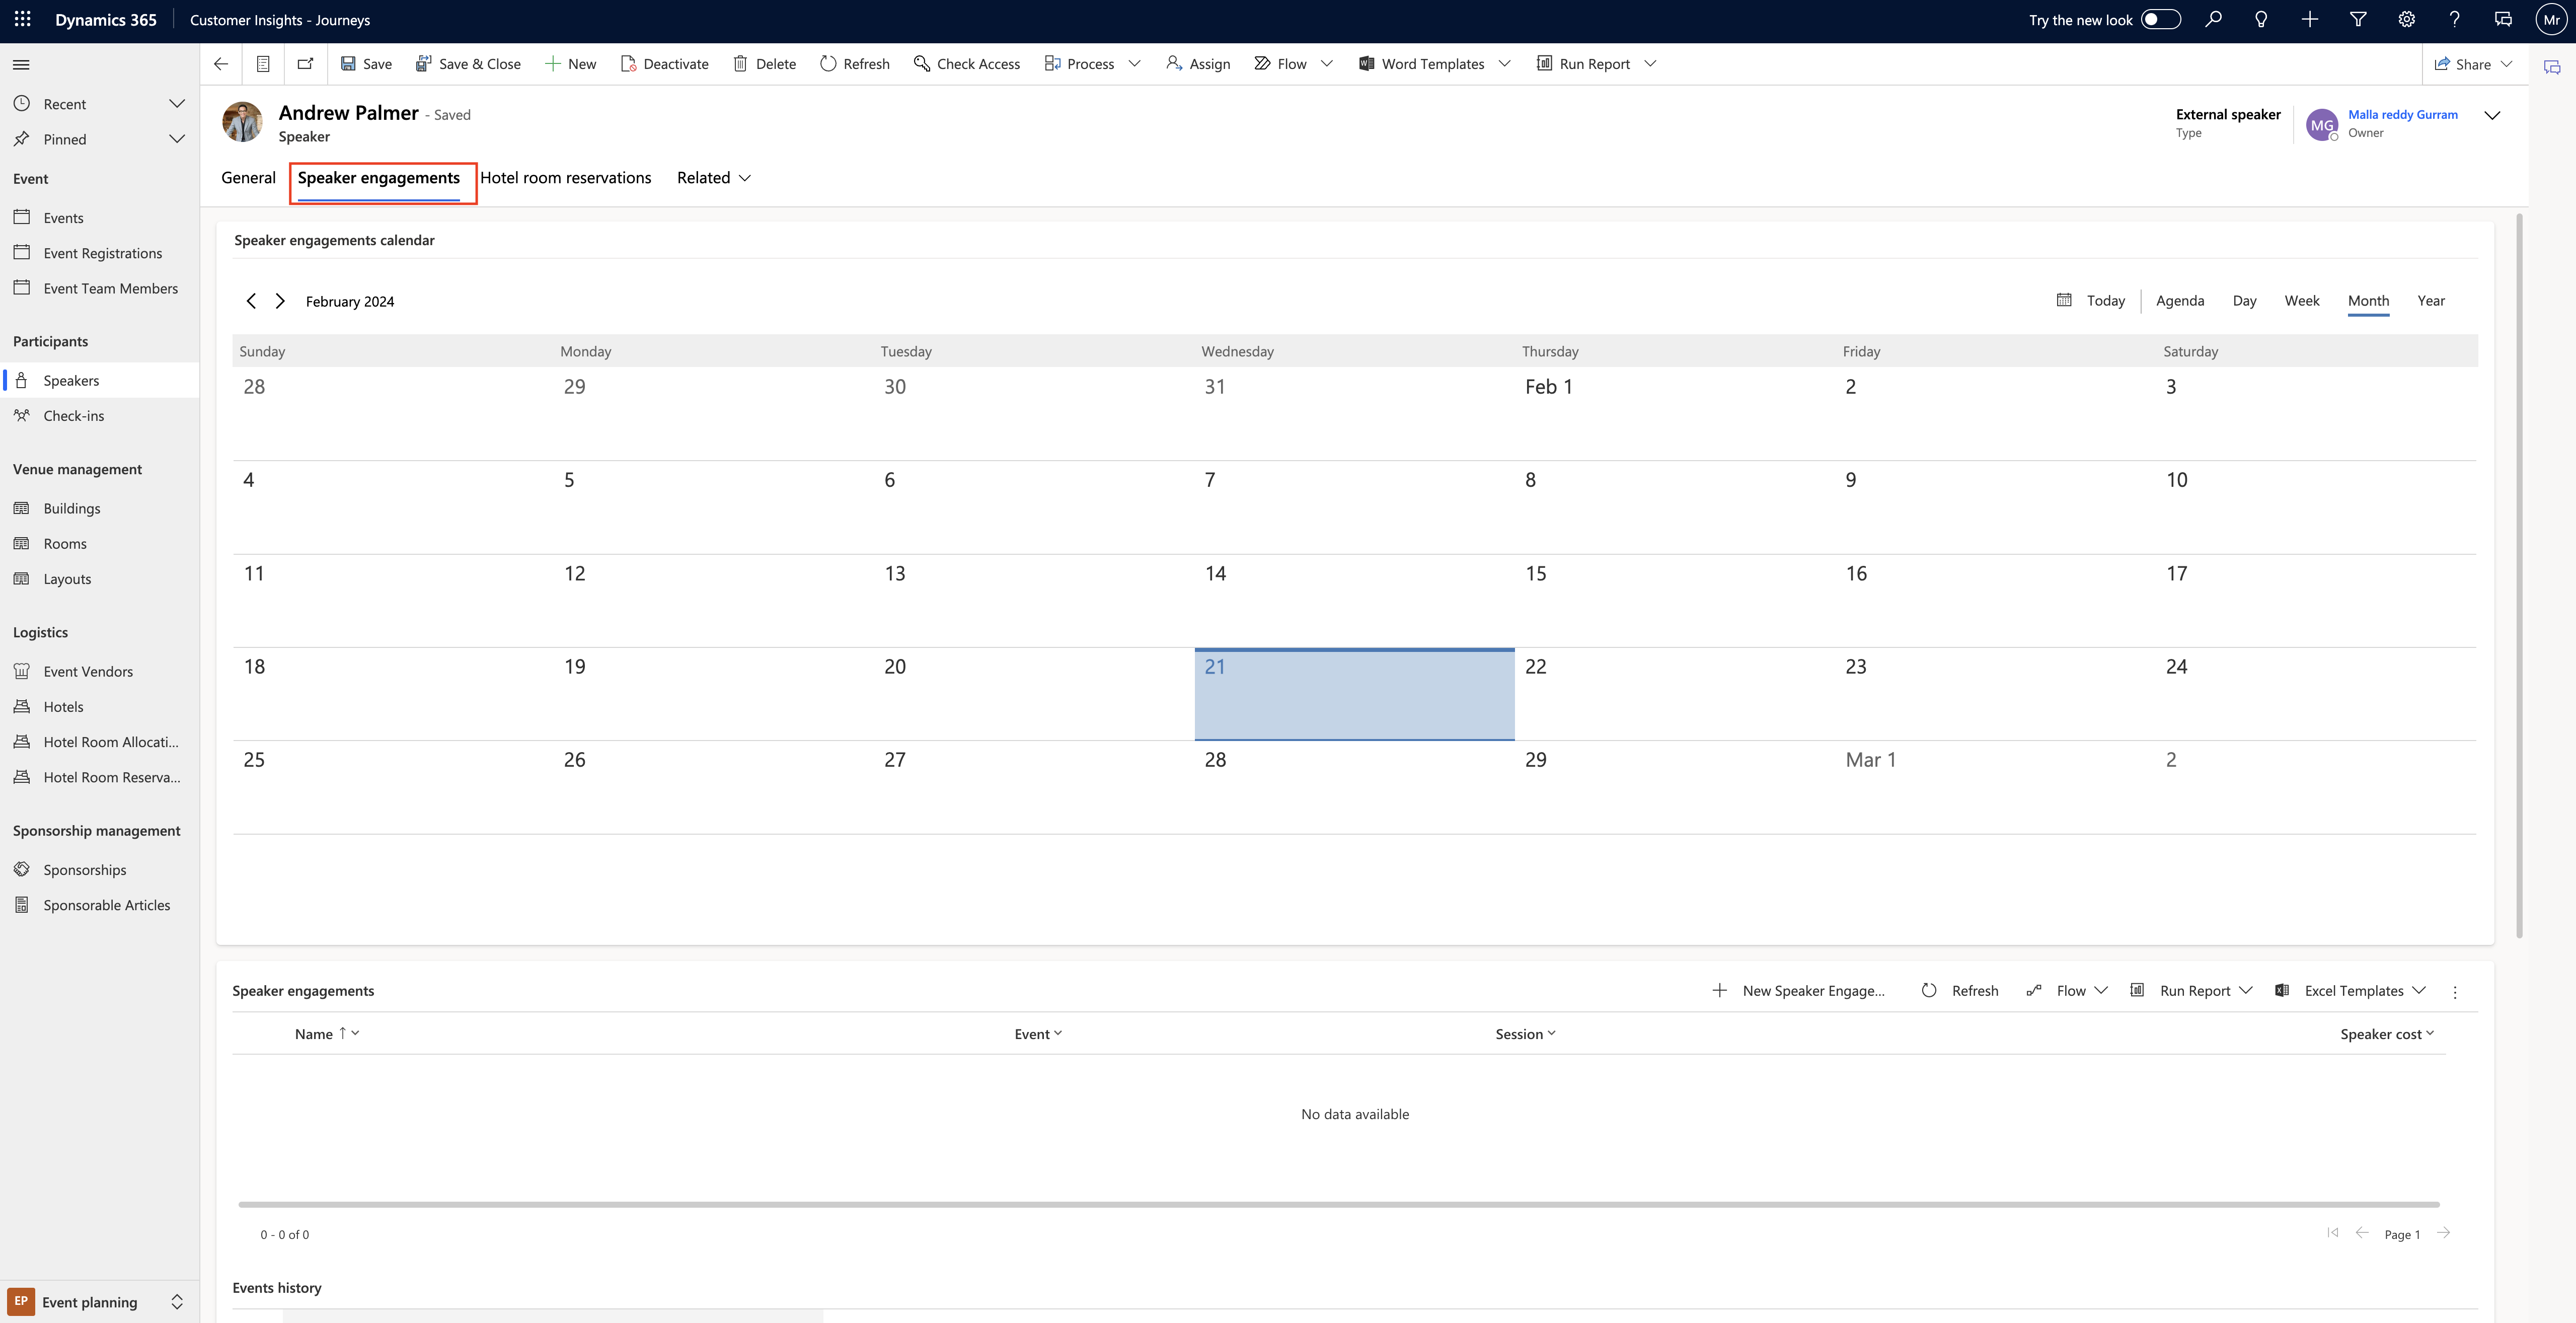
For speakers records, this form-level calendar displays all speaking engagements associated with the currently displayed speaker.

5. Custom Calendars:

System customizers can add custom calendars to nearly any entity or form.

These custom calendars can extend the funtionality beyond the basic types described above.

Now, regarding processing times, most requests within Dynamics 365 Customer Insights are typically handled in about three business days once all necessary information is available.

So, whether it’s configuring marketing calendars or handling other tasks, keep those business days in mind!.

That’s it for today.

I hope this helps.

Malla Reddy Gurram(@UK365GUY)
#365BlogPostsin365Days

Share this:

{How to} Build Lead Scoring model in Dynamics 365 Customer Insights

Hello Everyone,

Today I am going to share my thoughts on how to build lead scoring model in Dynamics 365 Customer Insights.

Let’s get’s started.

To create a lead scoring model in Dynamics 365 Customer Insights, follow these steps:

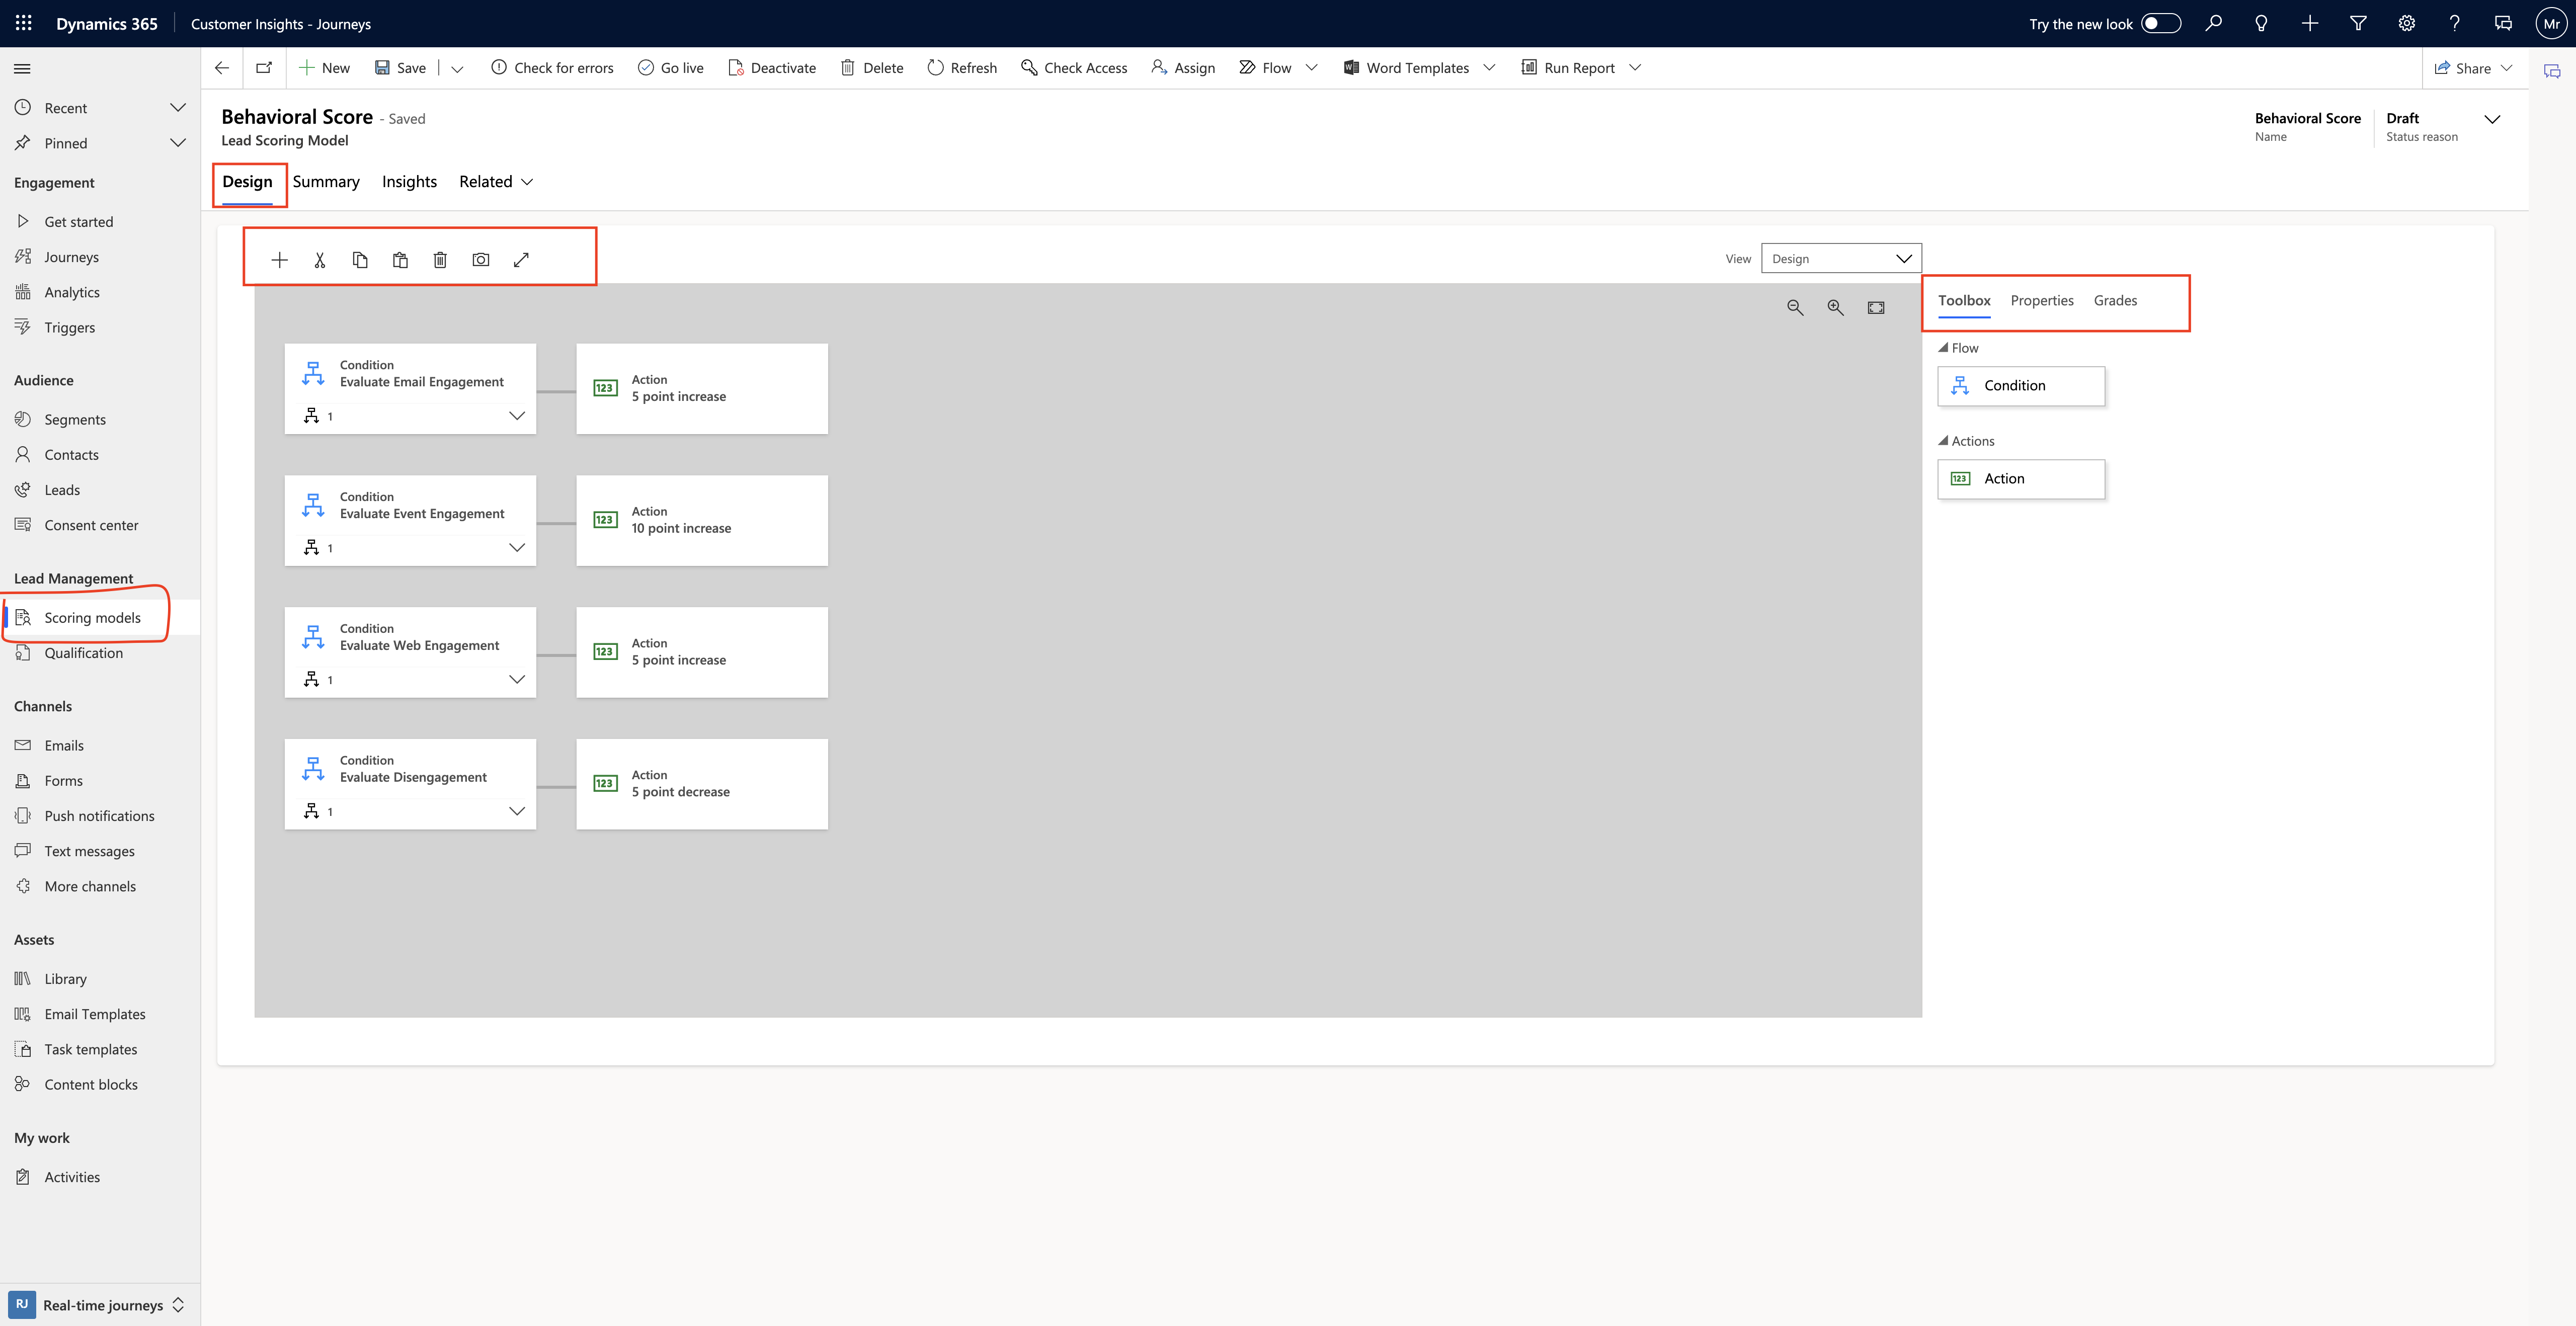
1. Navigate to Outbound marketing > Lead management > Scoring models. This will take you to a list of existing models.

2. On the command bar, select New. The New Lead Scoring Model page opens, with the Design tab shown. This designer is similar to other designers in Customer Insights – Journeys.

Here are some additional details to consider when creating lead -scoring models:

Lead -scoring prerequisites and requirements:

The Lead-scoring feature integrates various aspects of Customer Insights – Journeys, including contacts, leads, customer journeys, marketing forms, interactions and insights.

Only leads associated with parent contacts or accounts can be scored. Automatic lead scoring works for leads that have a parent contact or account associated with them.

For leads generated or updated by marketing forms configured to update both leads and contacts, the marketing form establishes the lead/contact pair.

Users can manually associate a lead with a parent contact or account using the inquiry stage of the lead to opportunity marketing sales process business process.

Scoring Interactions:

Dynamics 365 Customer Insights – Journeys calculates a score for each lead based on demographics details, firmographic details, and actions taken by the associated contacts(or for account-based leads, contacts belonging to the associated account).

Score interactions include opening an email, submitting a landing page, visiting your website or attending an event.

Each scoring model includes a sales-ready threshold. when a lead’s score passes this threshold, it gets marked as sales ready, triggering other events within Dynamics 365, such as advancing the lead through its business process or alerting tele prospectors or salespeople.

That’s it for today.

I hope this helps.

Malla Reddy Gurram(@UK365GUY)
#365BlogPostsin365Days

Share this:

{How to} Real time marketing customer journey send email notification to the manager based on customer clicks email on Dynamics 365 Marketing

Hello Everyone,

Today I am going to share my thoughts on how to send email notifications to the account manager based on the customers behavior.
Let’s get’s started.

To set up real-time email notifications for the manager based on customer clicks in Dynamics 365 Marketing, follow these steps:

1. Create a Trigger-Based Journey:

Navigate to Outbound marketing > Marketing Execution > Customer Journeys.

Click New on the command bar to create a new customer journey.

Choose to start from scratch.

In the customer journey designer, assemble the pipeline that defines each step of the journey.

2. Set Audience and Trigger:

Select Set audience (or click the “+” button).

Choose a segment that includes the contacts you want to target with your campaign. Ensure this segment contains fictional contacts with valid email addresses.

Add a trigger to the Journey. For example, you can use the Email link clicked trigger.

3. Create an Email Activity:

Add an Email tile to your journey.

Configure the email message you want to send. you can use a previously designed and published marketing email.

In your email. define all the links in a custom way using the CloudPageUrl function. Use this function with two parameters:

The ID of your Cloud Page.
The URL to redirect to.
An eventDefinitionName (e.g., “followupEmail”).

Example:

Click here

4. Send Email Notification to the Manager:
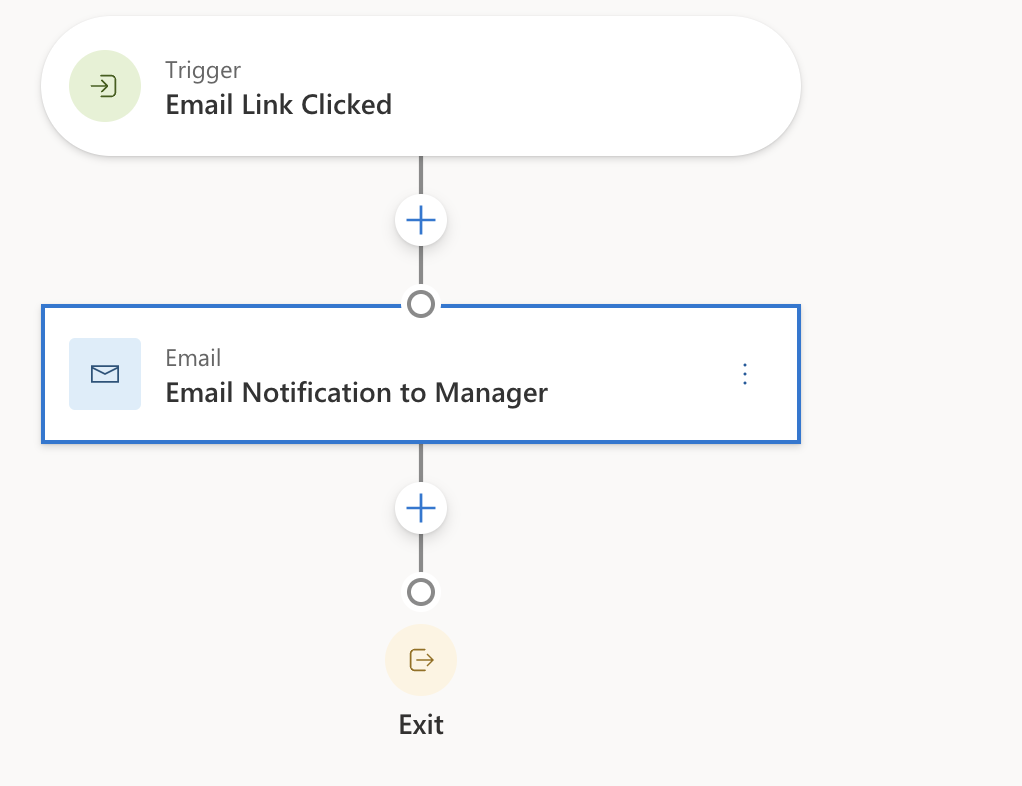
Add an Email tile after the trigger.

Configure this email specifically for the manager. Use the appropriate email address for the manager.

Notify the manager about the customer interaction by including relevant details in the email content.

5. Test and Activate:

Test your customer journet thoroughly to ensure it works as expected.

Once satisfied, activate the journey to start sending real-time email notifications to the manager based on customer interactions.

Remember that real-time journeys allow you to engage customer promptly when they interact with your emails.

That’s it for today.

I hope this helps.

Malla Reddy Gurram(@UK365GUY)
#365BlogPostsin365Days
Share this:

{Do you know} Where do they store customer information when a customer register for an event on Dynamics 365 Marketing

Hello Everyone,

Today I am going to share my thoughts on event registration, When a customer register for an event and where do they actually store customer information on Dynamics 365 Marketing.

Let’s get’s started.

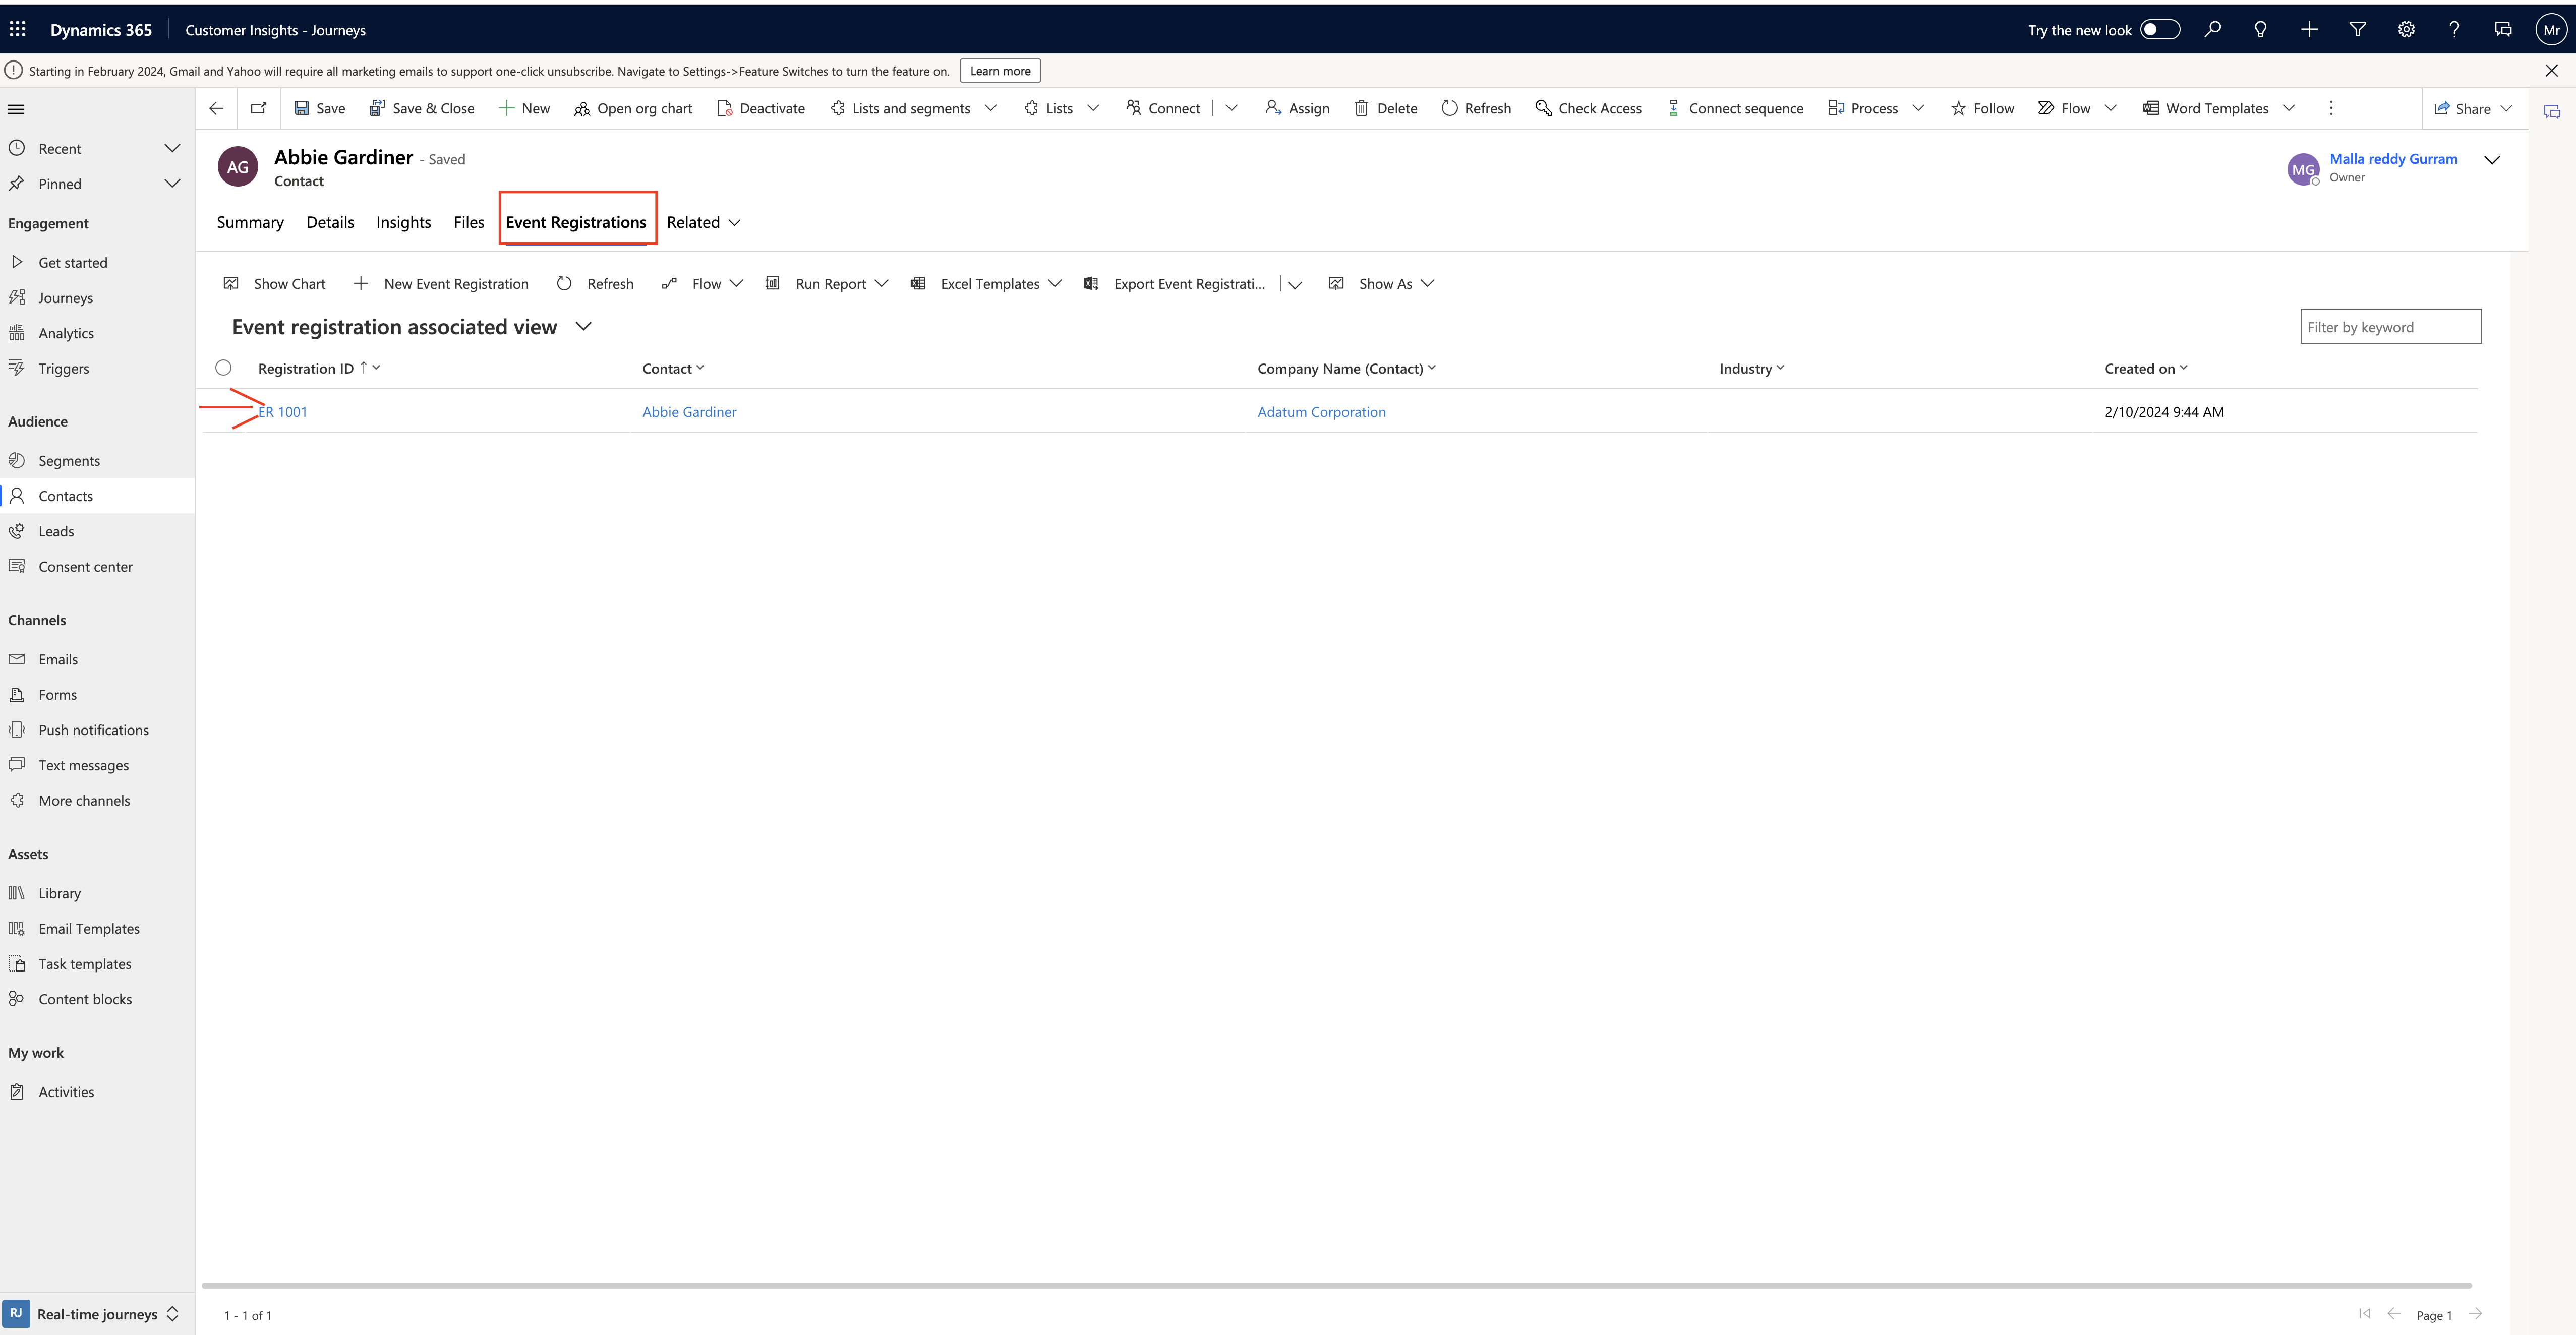
When a customer registers for an event on Dynamics 365 Marketing, the records are stored in the Event Registration section.

Here’s how it works:

1. Event Registration Records: Each time someone fills out an event registration form, their email address is checked to see if they already exist in Dynamics 365 as a Contact.

If not, a new Contact record is created for them, and an Event Registration is linked to that new Contact.

2. Event Management Work Area: To view all current registrations and pass assignments and to create them manually in the system, you can work in either of the following entities within the Events work area:

a) Events > Event > Event Registrations: Here: you can view and create registrations for all events.

b) Events > Event > Events: Open an event record and go to the Registration & Attendance tab to view and create registrations for the selected event.

To view or create individual session registrations, navigate to the Agenda tab of the event record and open a session listed there.

Remember, this process helps event managers evaluate resource needs, session capacities and attendees preferences. It ensures that attendees have reserved seats for the sessions they want to attend!.

That’s it for today.

I hope this helps.

Malla Reddy Gurram(@UK365GUY)
#365BlogPostsin365Days
Share this: