Menu Close

Blog

Slide 1

Microsoft Business Applications Blogposts, YouTube Videos and Podcasts

Helping Businesses with Technology

Slide 2

Microsoft Business Applications Blogposts, YouTube Videos and Podcasts

Helping Businesses with Technology

Slide 3

Microsoft Business Applications Blogposts, YouTube Videos and Podcasts

Helping Businesses with Technology

previous arrow
next arrow

{How to} enable Productivity Settings on Dynamics 365 Sales Insights

Hello Everyone,

Today i am going to show how to enable productivity settings and what are the useful setting that will get from Dynamics 365 Sales.

Let’s get’s started.

Login into Dynamics 365 Sales App.
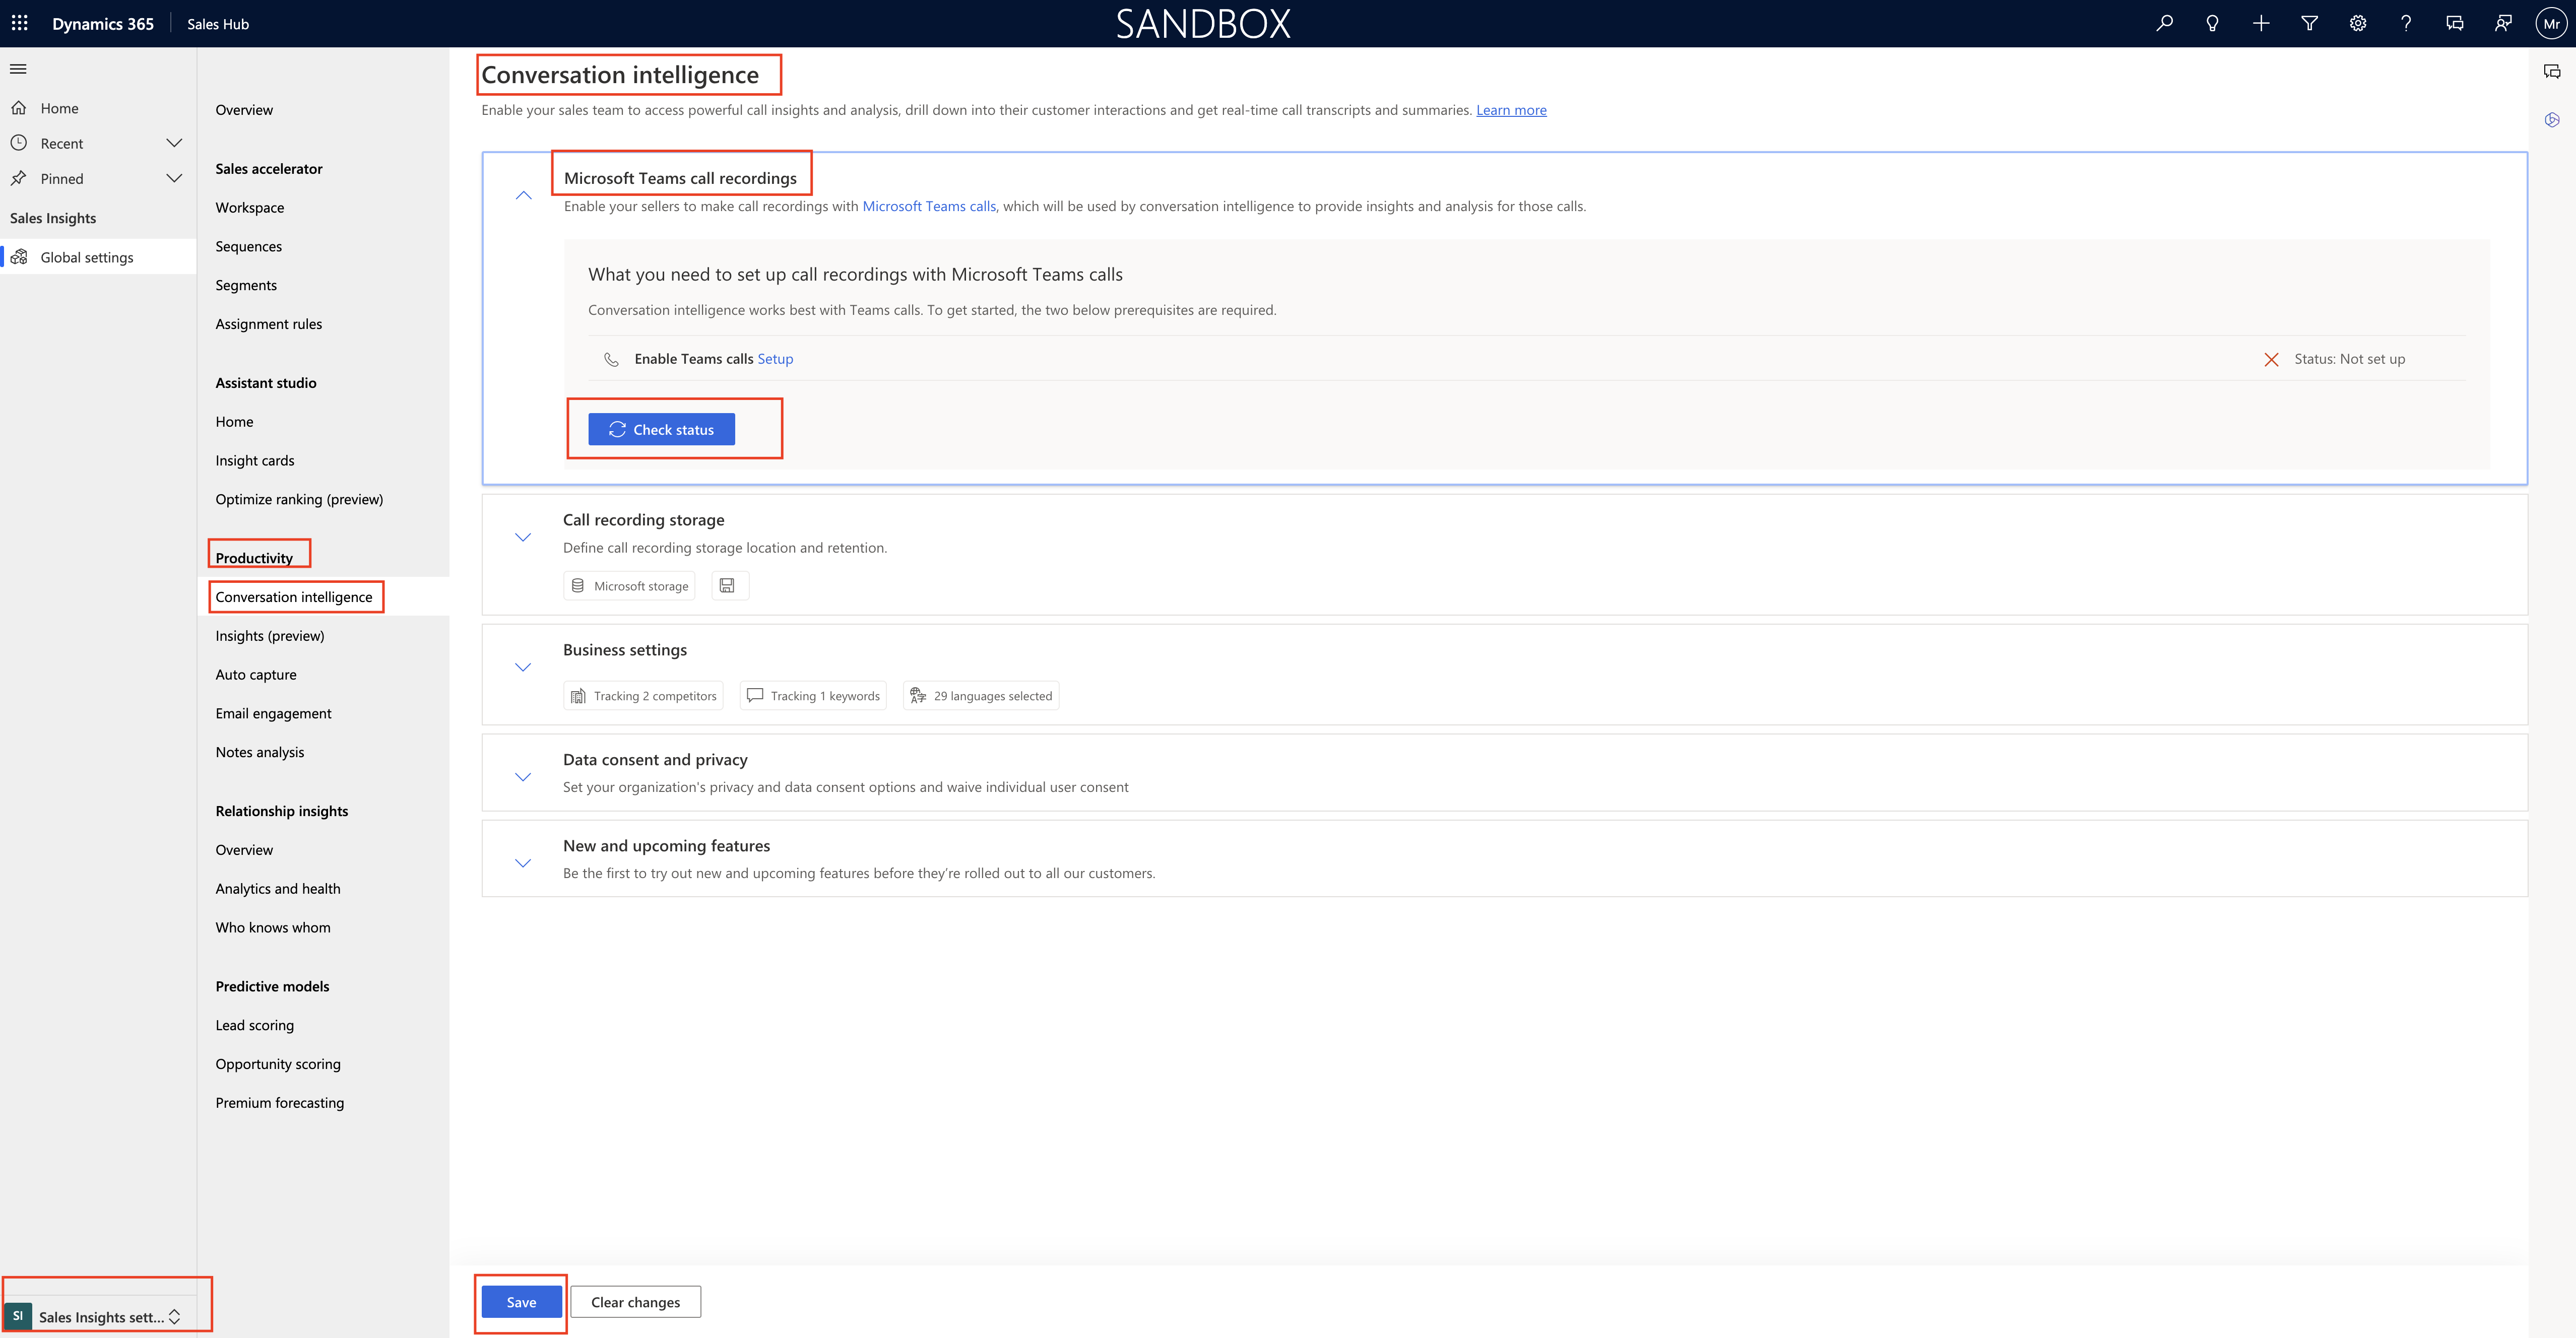
Conversation Intelligence:

Which enables your sales team to access powerful call insights and analysis, drill down into their customer interactions and get real time call transcripts and summaries.

Microsoft Teams Call Recording: Enable your sellers to make call recordings with Microsoft Teams calls, which will be used by conversation intelligence to provide insights and analysis for those calls.

Click on Enable Teams calls – setup
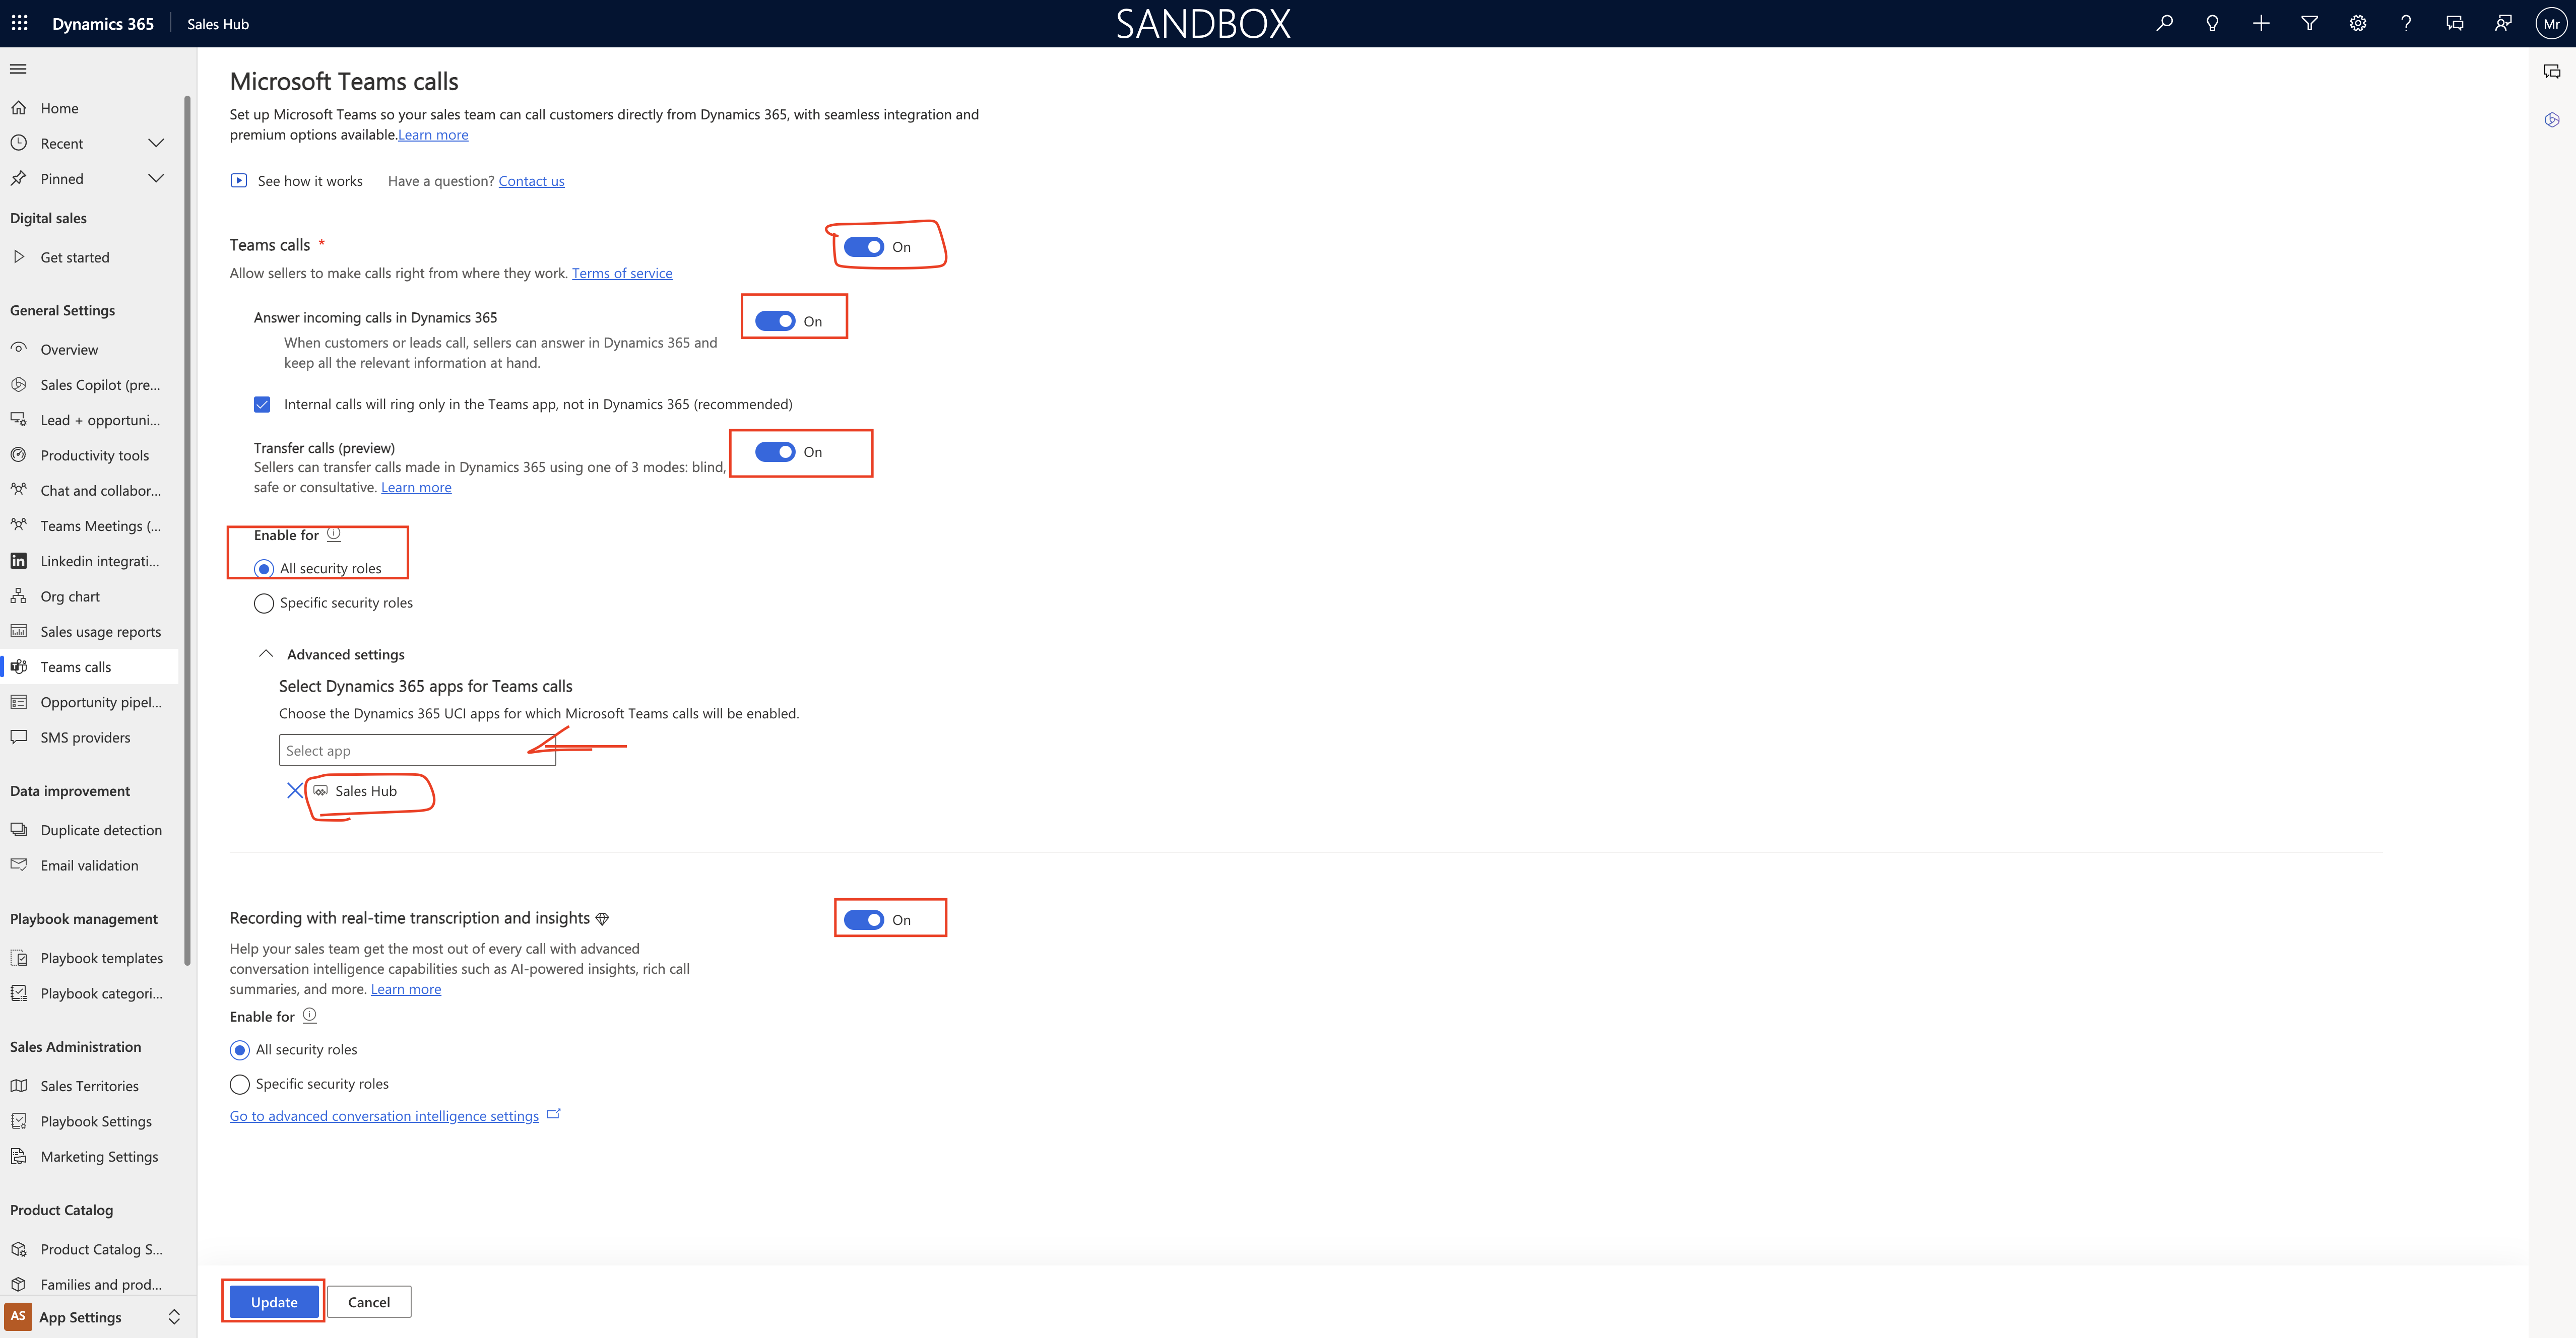
Teams calls : ON,

Allow sellers to make calls right from where they work.

Answer incoming calls in Dynamics 365 = ON

When customers or leads call, sellers can answer in Dynamics 365 and keep all the relevant information at hand.

Check the box: Internal calls will ring only in the Teams app, not in Dynamics 365 (recommended)

Transfer calls (Preview) = ON

Sellers can transfer calls made in Dynamics 365 using one of 3 modes: blind, safe or consultative

Enable for:

1. All Security roles
2. Specific security roles

Advanced settings:

Select Dynamics 365 apps for Teams calls: Search for Sales Hub.

Recording with real-time transcription and insights = ON

Enable for:

1. All security roles
2. Specific security roles.

Click on UPDATE.
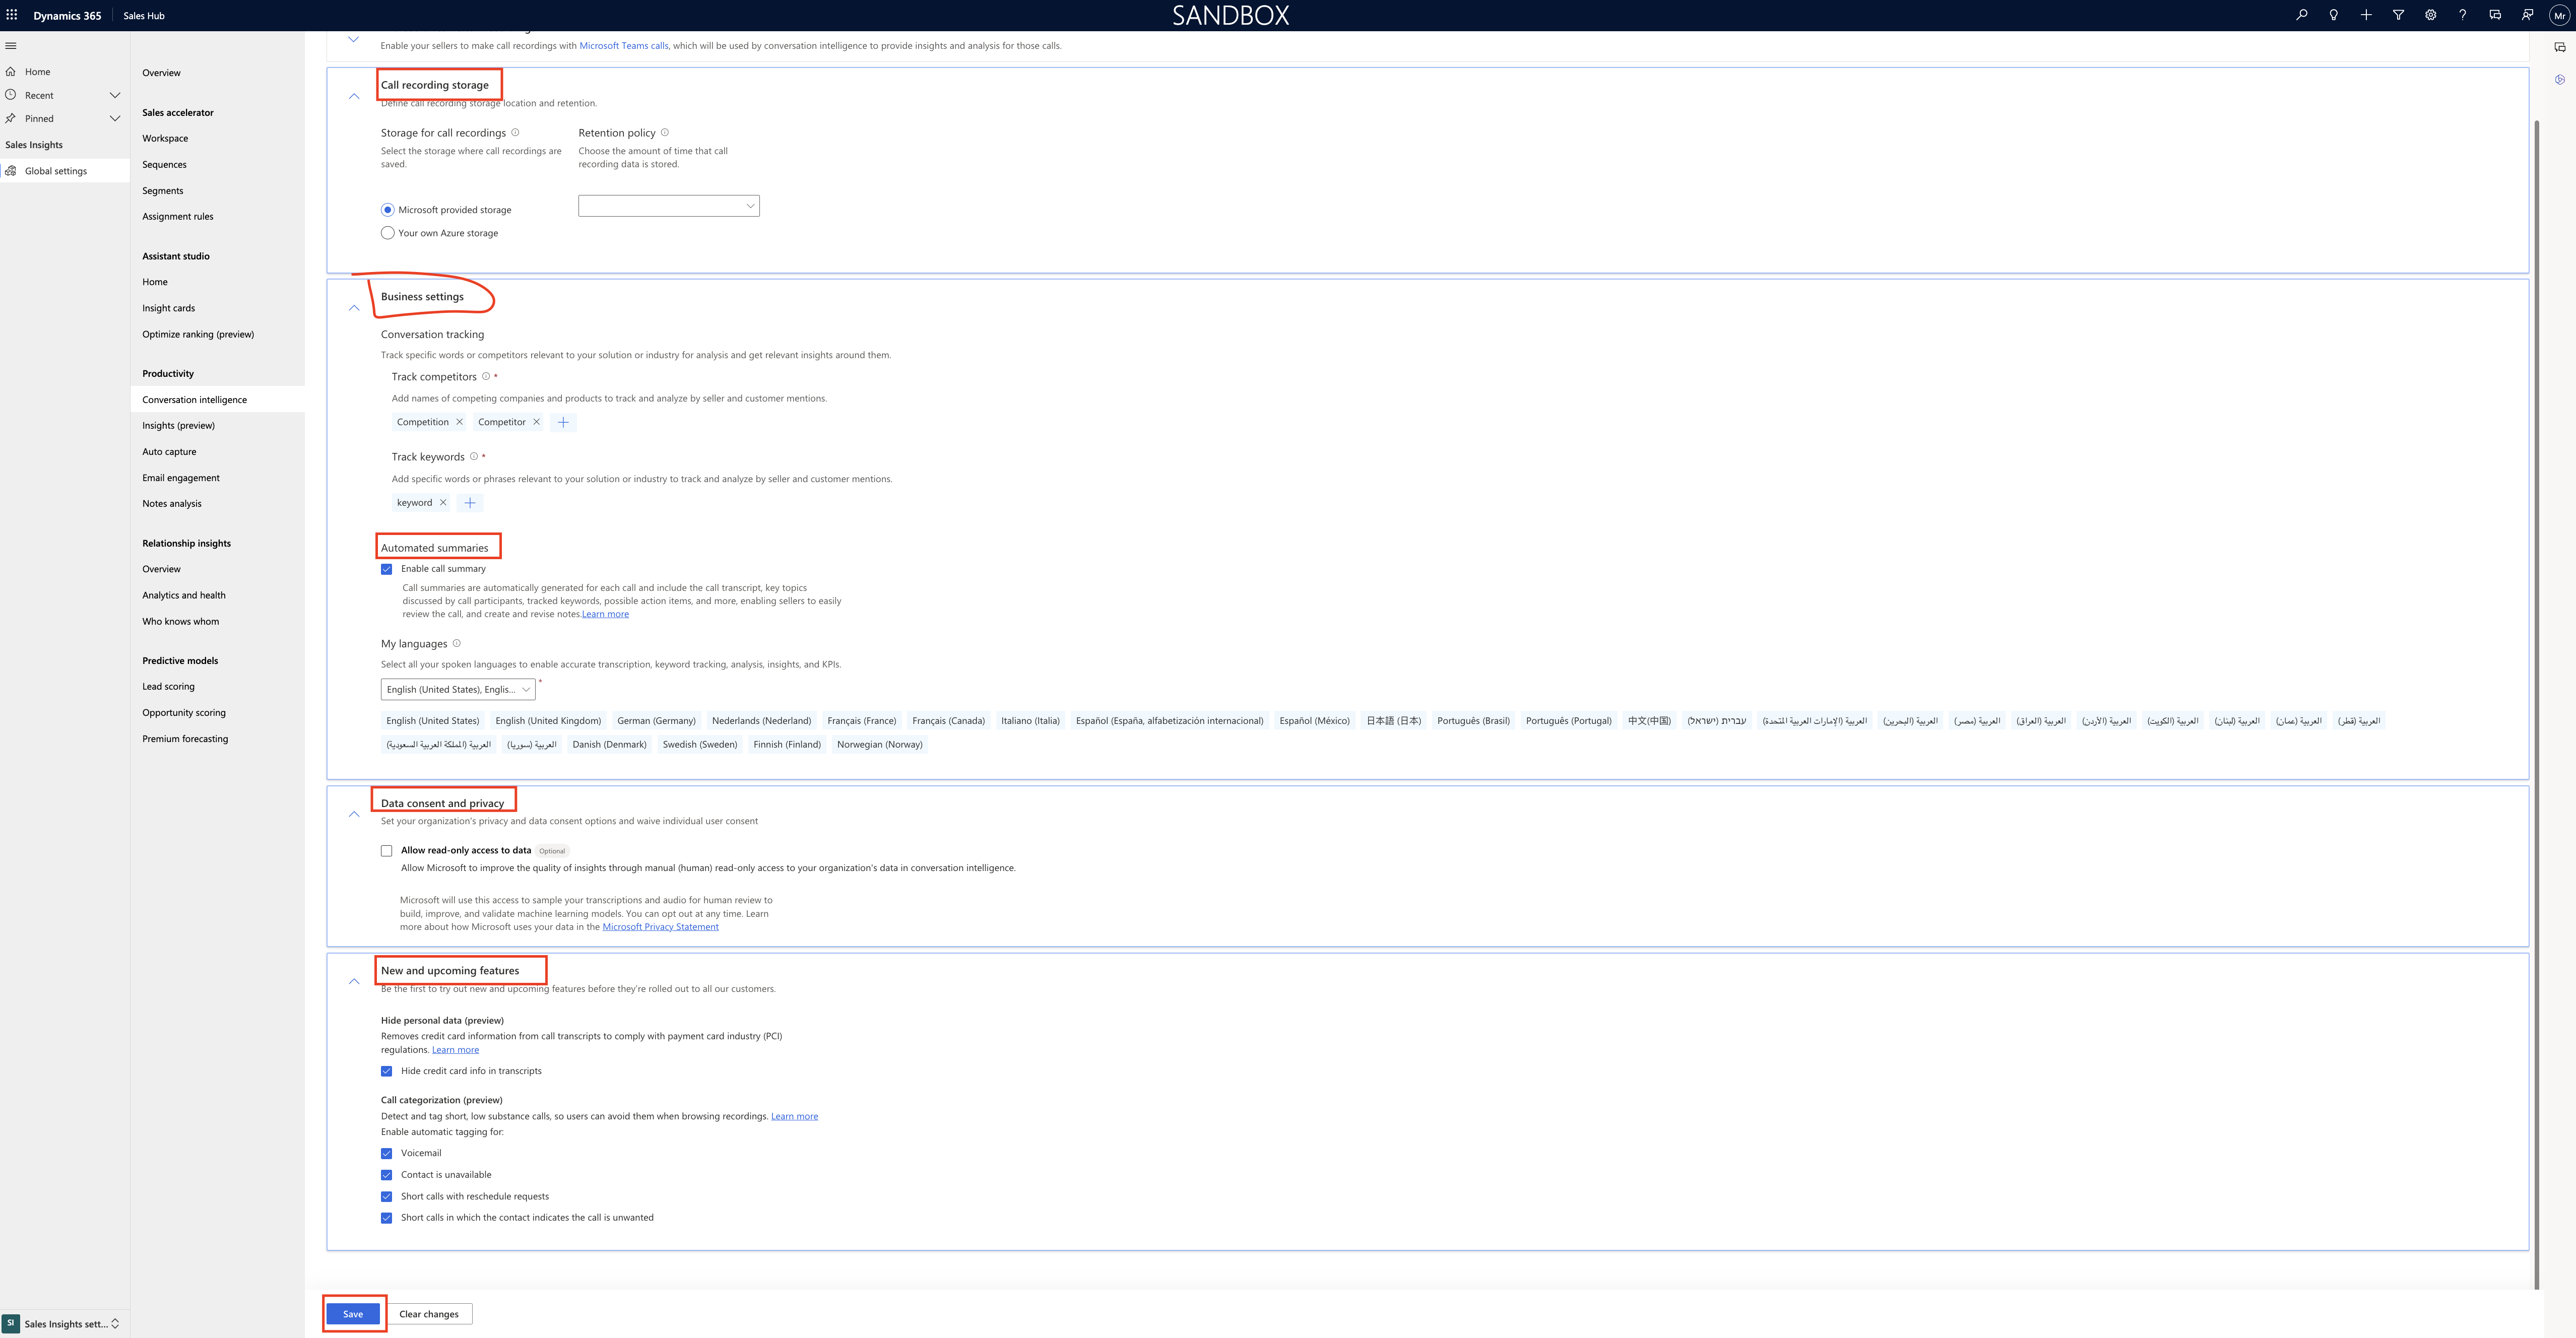
Call recording storage: which define call recording storage location and retention.

Storage for call recording: Select the storage where call recordings are saved.

Retention policy: choose the amount of time that call recording data is stored.

1. Microsoft provided storage
2. Your own Azure storage

Retention Policy: 30 day retention policy, 90 day retention policy.

Similarly Business settings:

Conversation tracking:

competition, competitor

Track keywords:

add specific keyword or phrases to your solution or industry to track and analyze by seller and customer mentions.

Automated summaries:

Enable call summary: Call summaries are automatically generated for each and include the call trancript, key topics discussed by call participants, tracked keywords, possible action items and more enabkling sellers to easily review the call, and create and revise notes.

My Languages: you can select the language to enable accurate transcription, keyword tracking, analysis, insights and KPI’s.

Data Consent and privacy:

Check the box to read only access to data.

New and upcoming features:

You can check the features before they’re rolled out to all your customers.

1. Hide credit card info in trancripts.

Call categorization(preview)
1. Voicemail
2. Contact is unavailable
3. Short calls with reschedule requests
4. Short calls in which the contact indicates the call is unwanted.

That’s it for today

I hope this helps
Malla Reddy(@UK365GUY)
#365BlogPostsin365Days

Share this:

{Resolved} The selected workflow has errors and cannot be published. Please open the workflow, remove the errors and try again.

Hello Everyone,

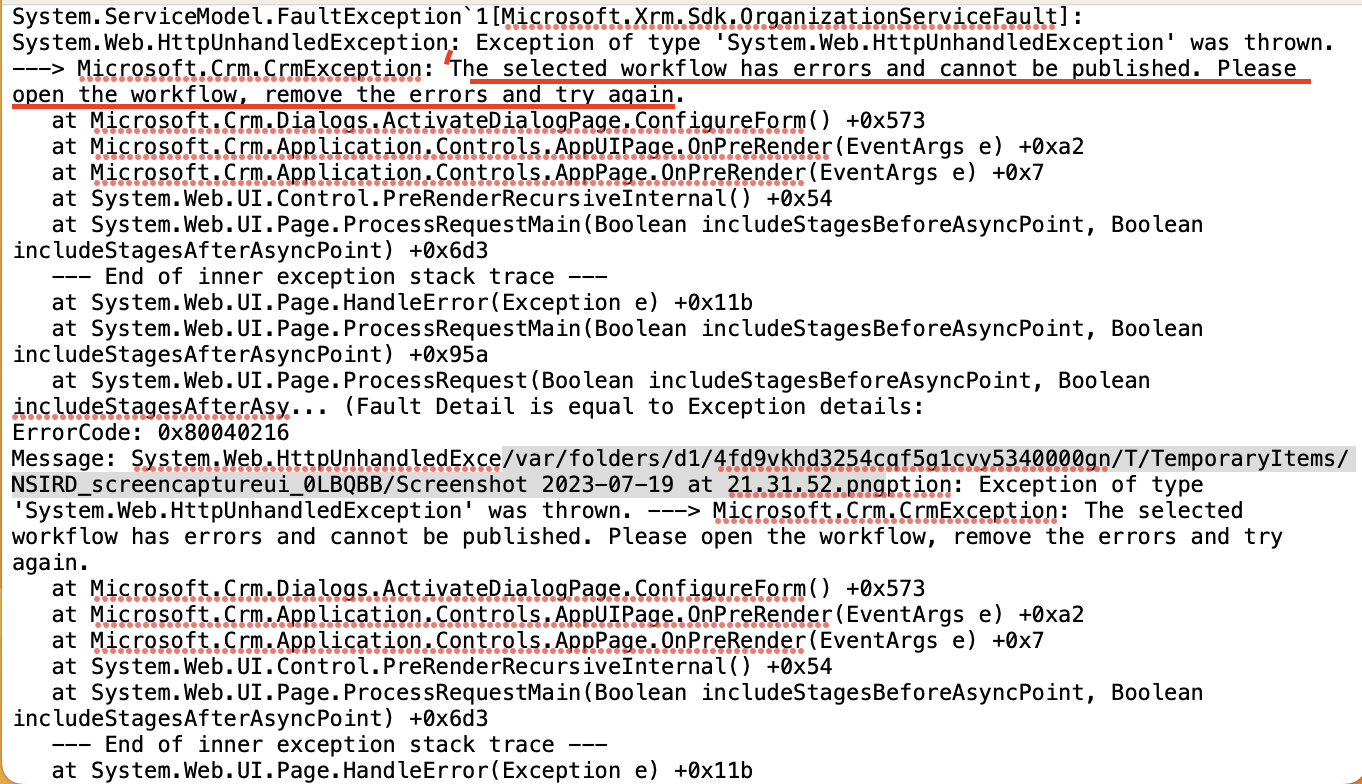
Today I am going to share how to resolve the error: “The selected workflow has errors and cannot be published. Please open the workflow, remove the errors and try again.”

Let’s gets started.

I got this error message while importing the solution into UAT from Dev as unmanaged.its because of the workflows has error messages.

“The selected workflow has errors and cannot be published. Please open the workflow, remove the errors and try again”

What is the error complaining all about?

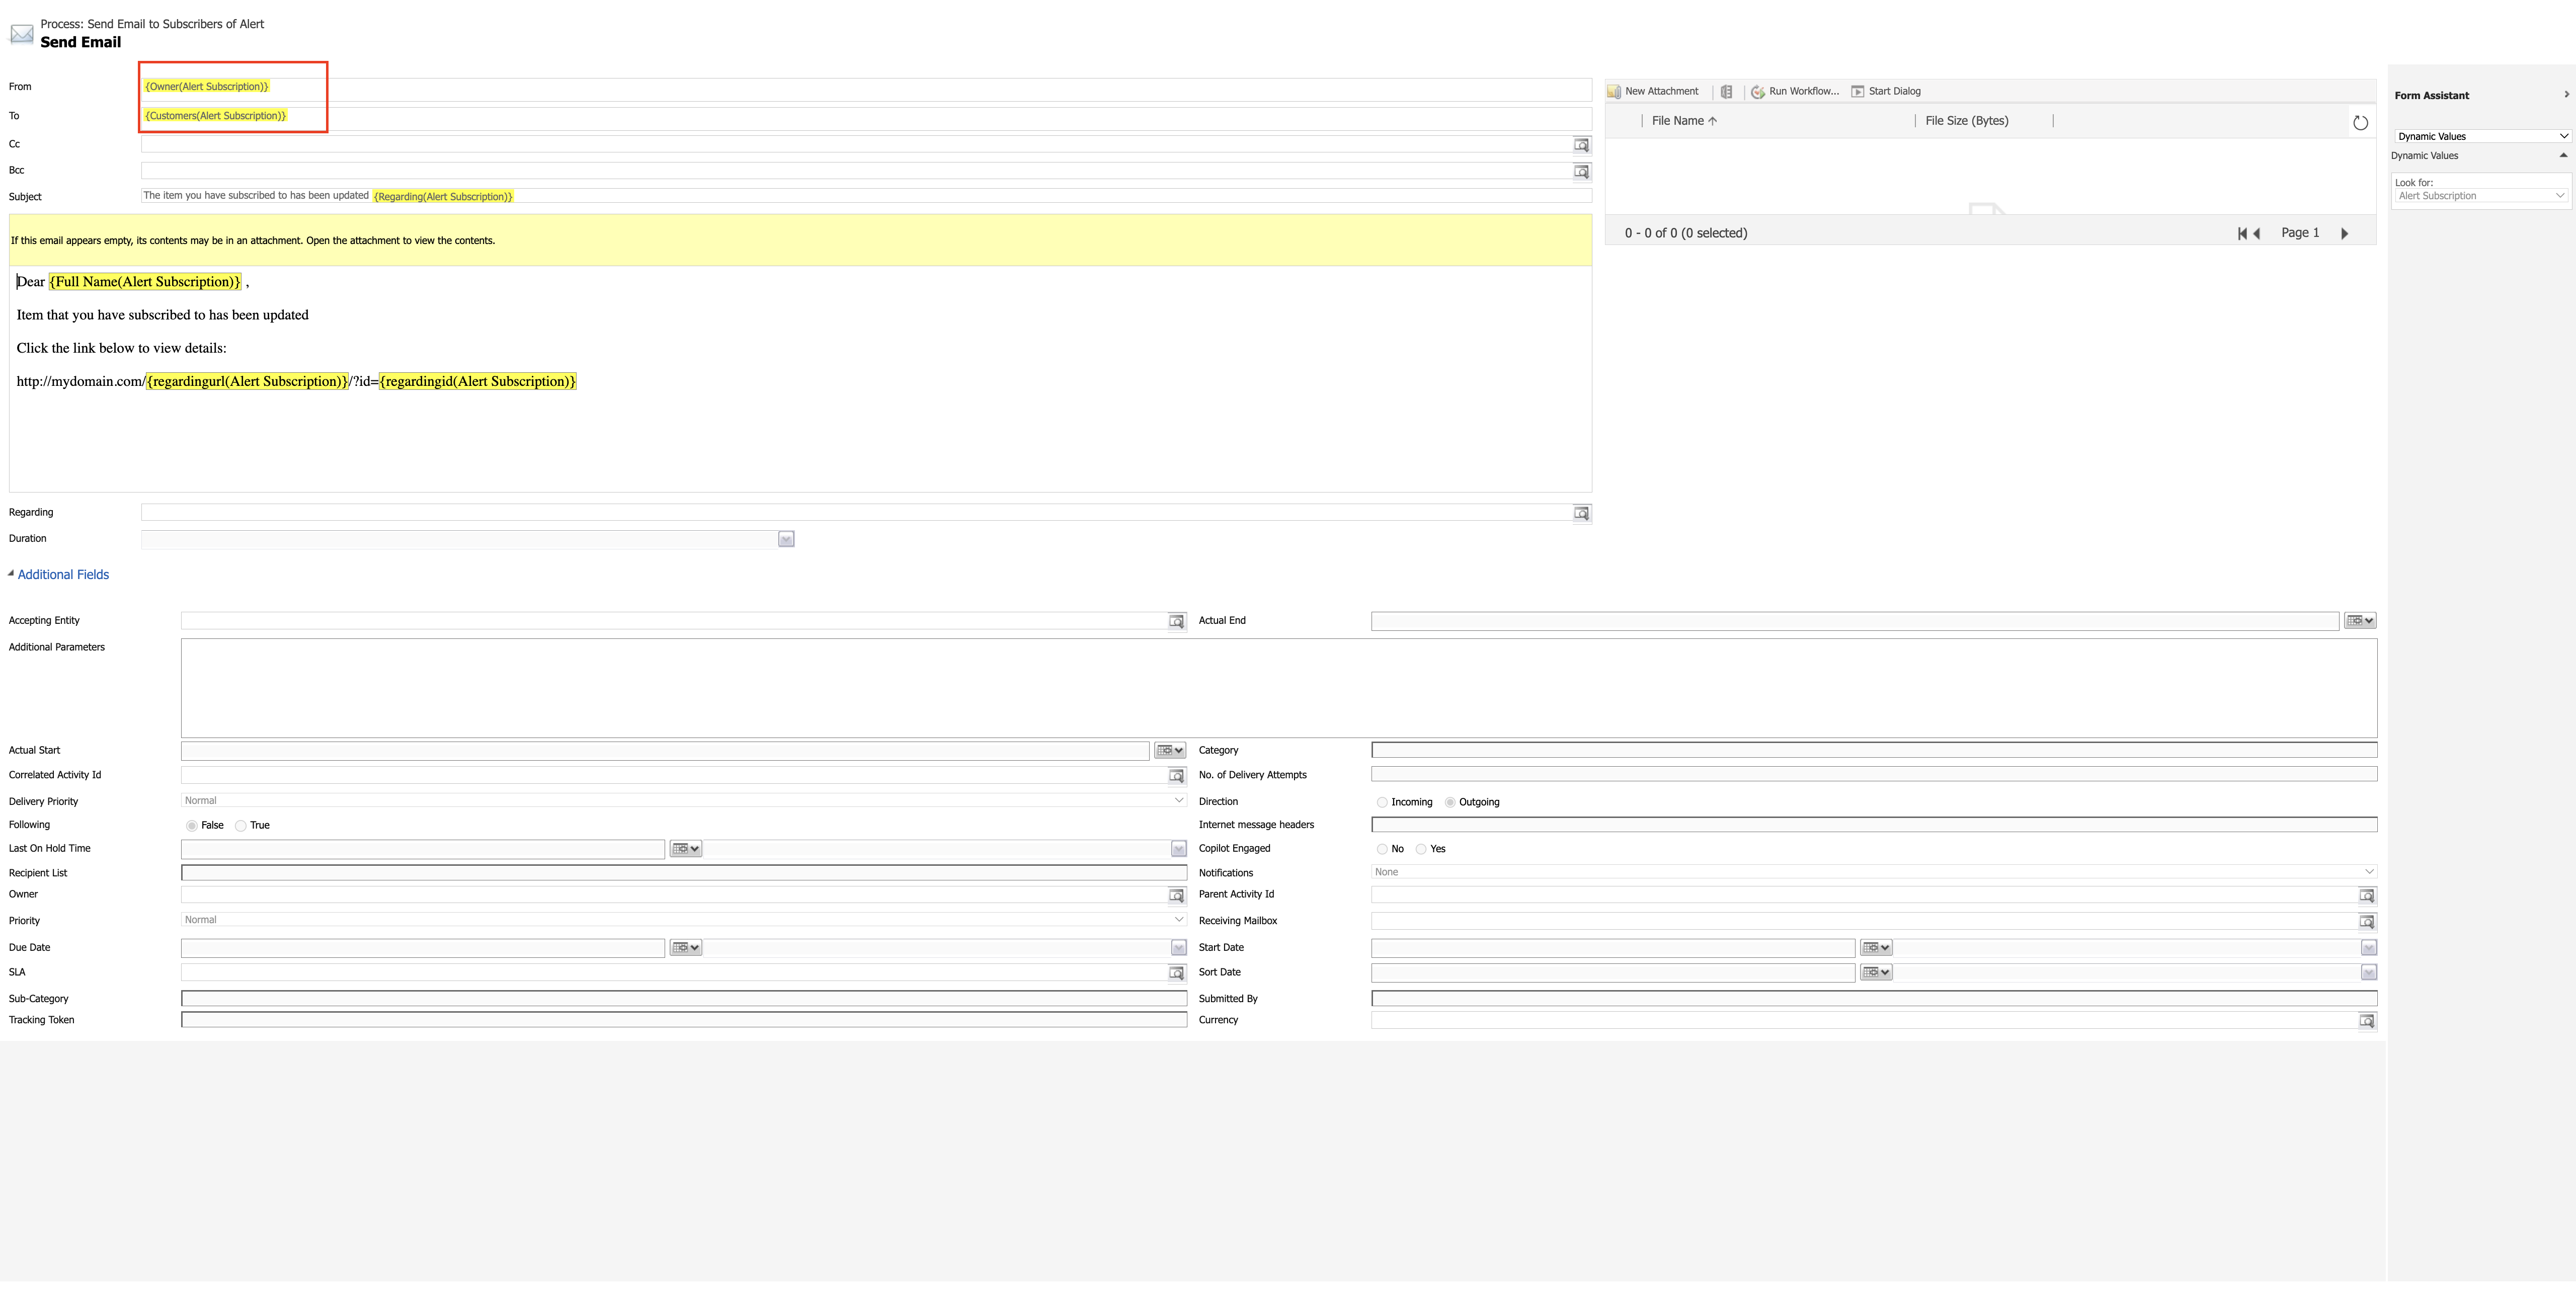
Solution: First make the workflows as draft state and publish all customizations and then start importing the solution into the UAT and after successful import, then open the solution and edit the workflows as below:

It is complaining about the workflow that has been manually selected users for email notifications users, business units and regions in my case.

So i have removed the users for the email notifications and reselected the same users, business units and regions.

Then i have activated the workflow.

It works for me.

That’s all for today.

I hope this helps
Malla Reddy(@UK365GUY)
#365BlogPostsin365Days
Share this:

{How to } download active users and active users by security role from Power Platform Admin Center

Hello Everyone,

Today i am going to share how to check most active users and active users by security role from power platform admin center.

Let’s get’s started.

Suppose you have a requirment to check most active users and active users by security role in your environment(Dataverse).

How do you check that ?

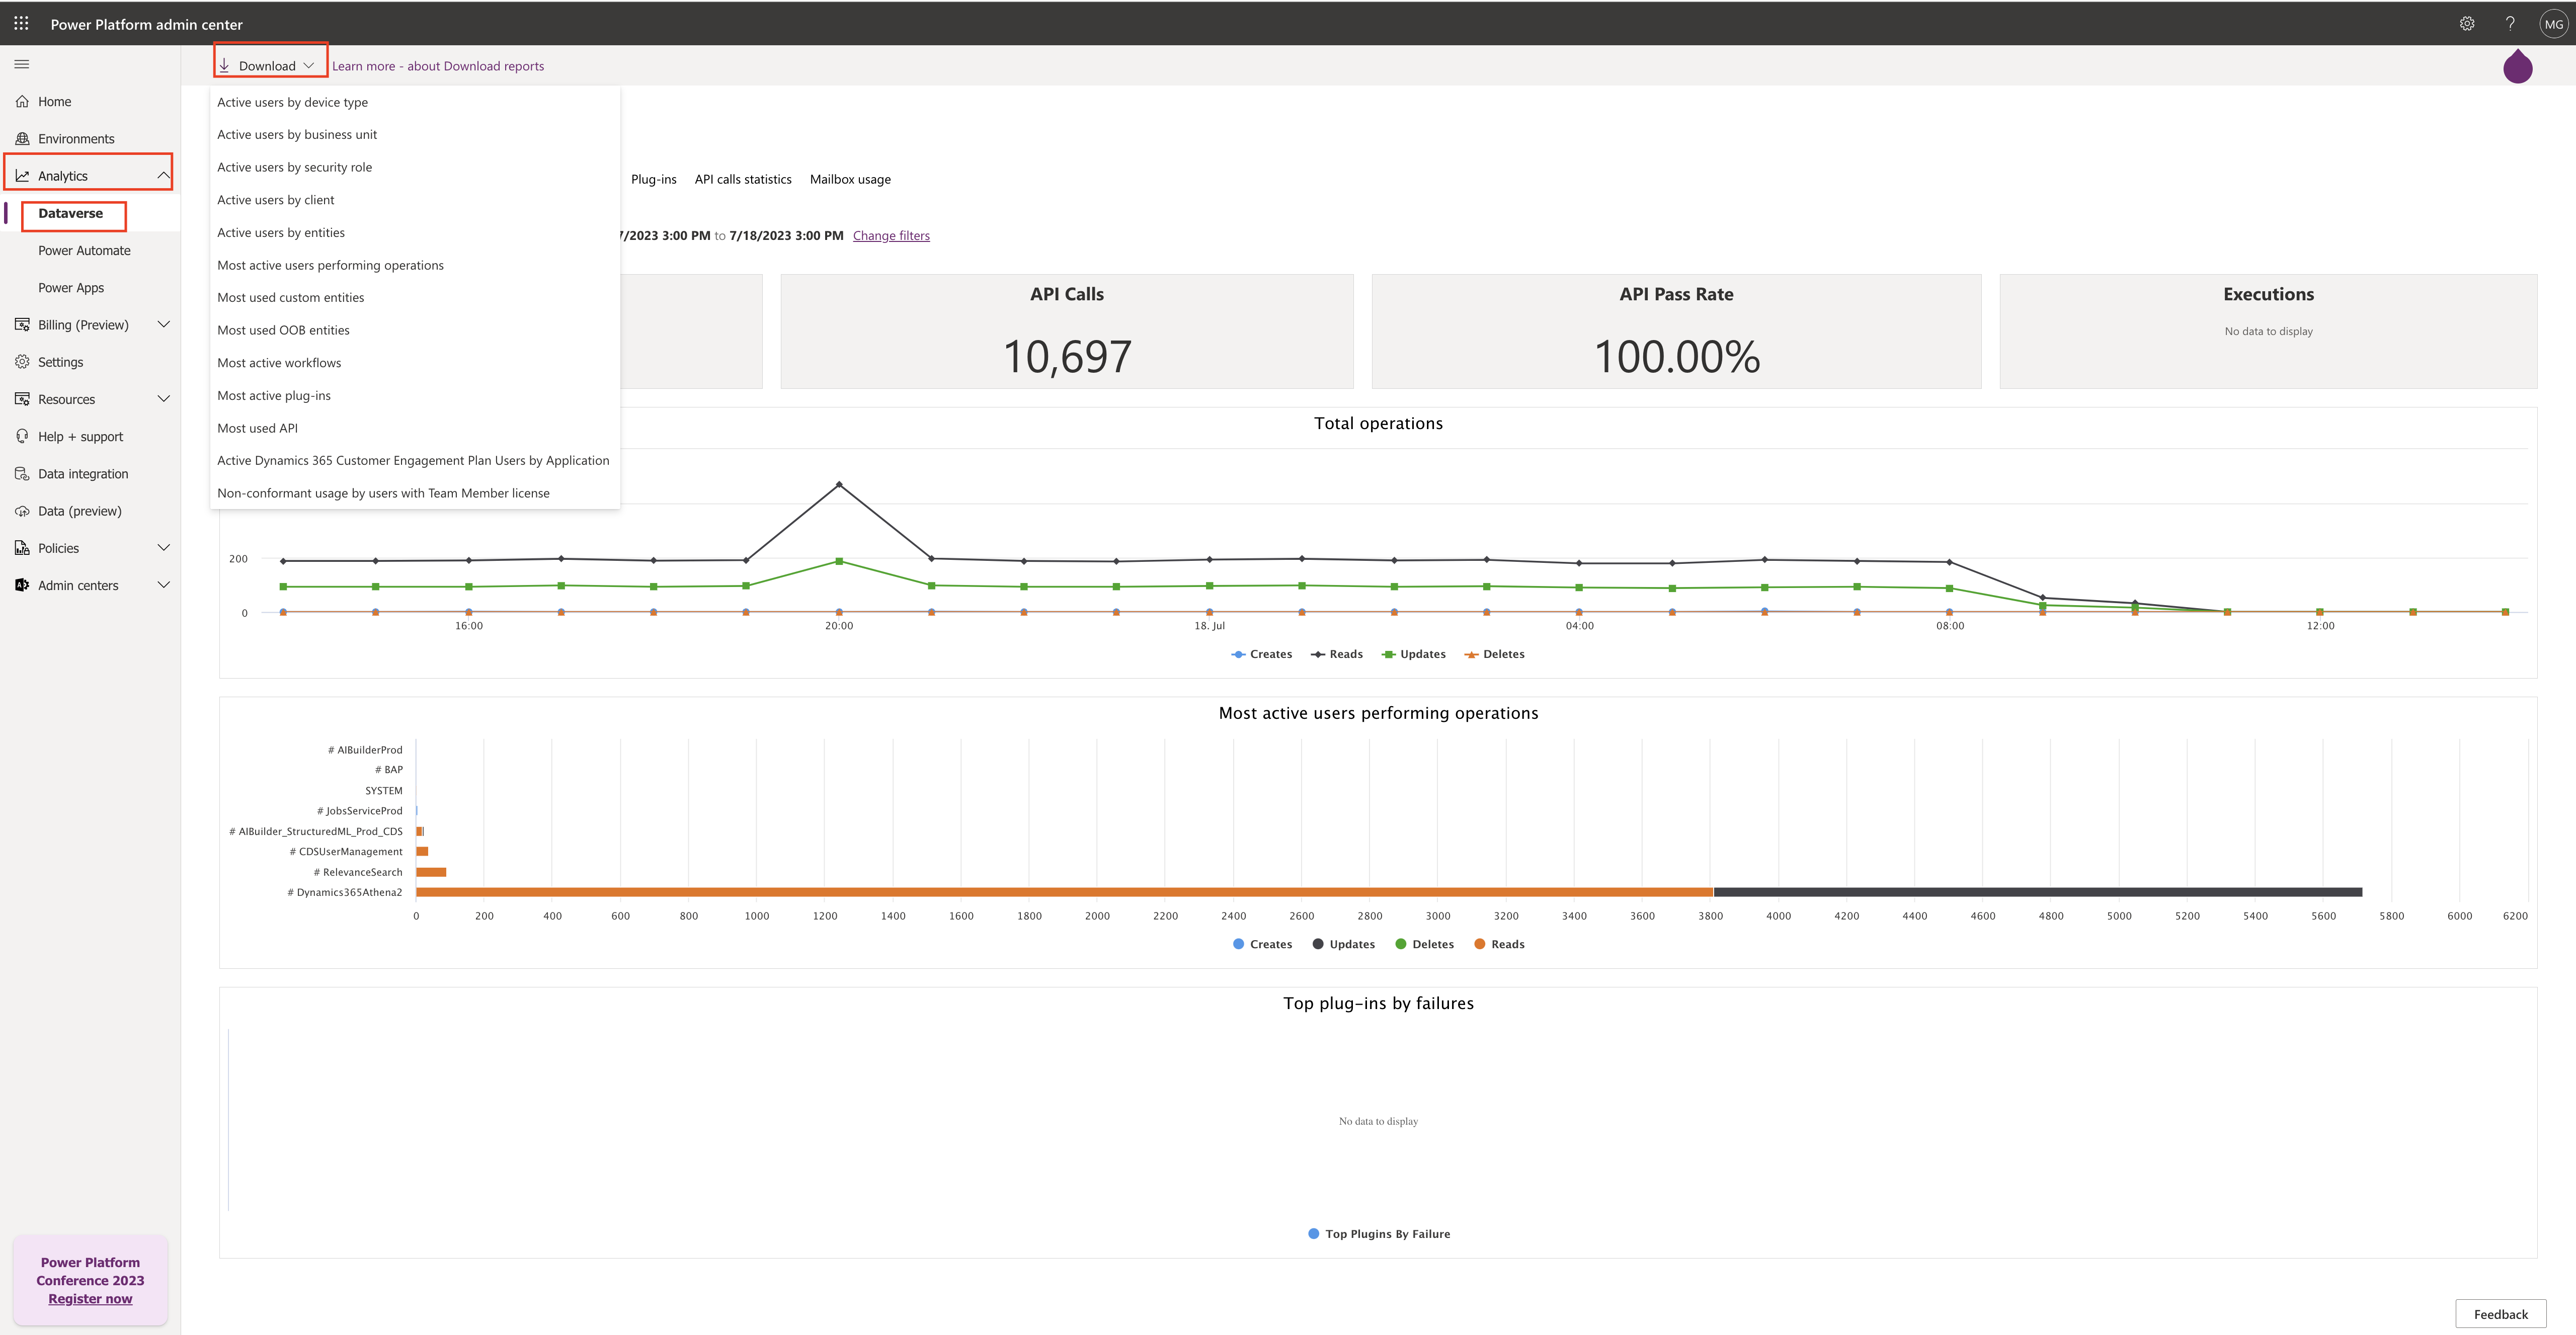
Login into Power Platform Admin Center

Expand the analytics and click on the dataverse.

In the drop down views: You can see the active users by device type, active users by business unit, by security role, by client, by entities, performing operations, custom entities, OOB entities, Most active workflows, plugins, used API.

Active Dynamics 365 Customer Engagement Plan Users by Application,

Non-conformant usage by users with Team Members License.

For more information click here

Thats it for today.

I hope this helps
Malla Reddy(@UK365GUY)
#365BlogPostsin365Days

Share this:

{How to } show Dynamics 365 Data in Teams meetings

Hello Everyone,

Today I am going to show how to show dynamics 365 data in teams meetings.

Let’s get’s started.

Login into Dynamics 365 Sales App.

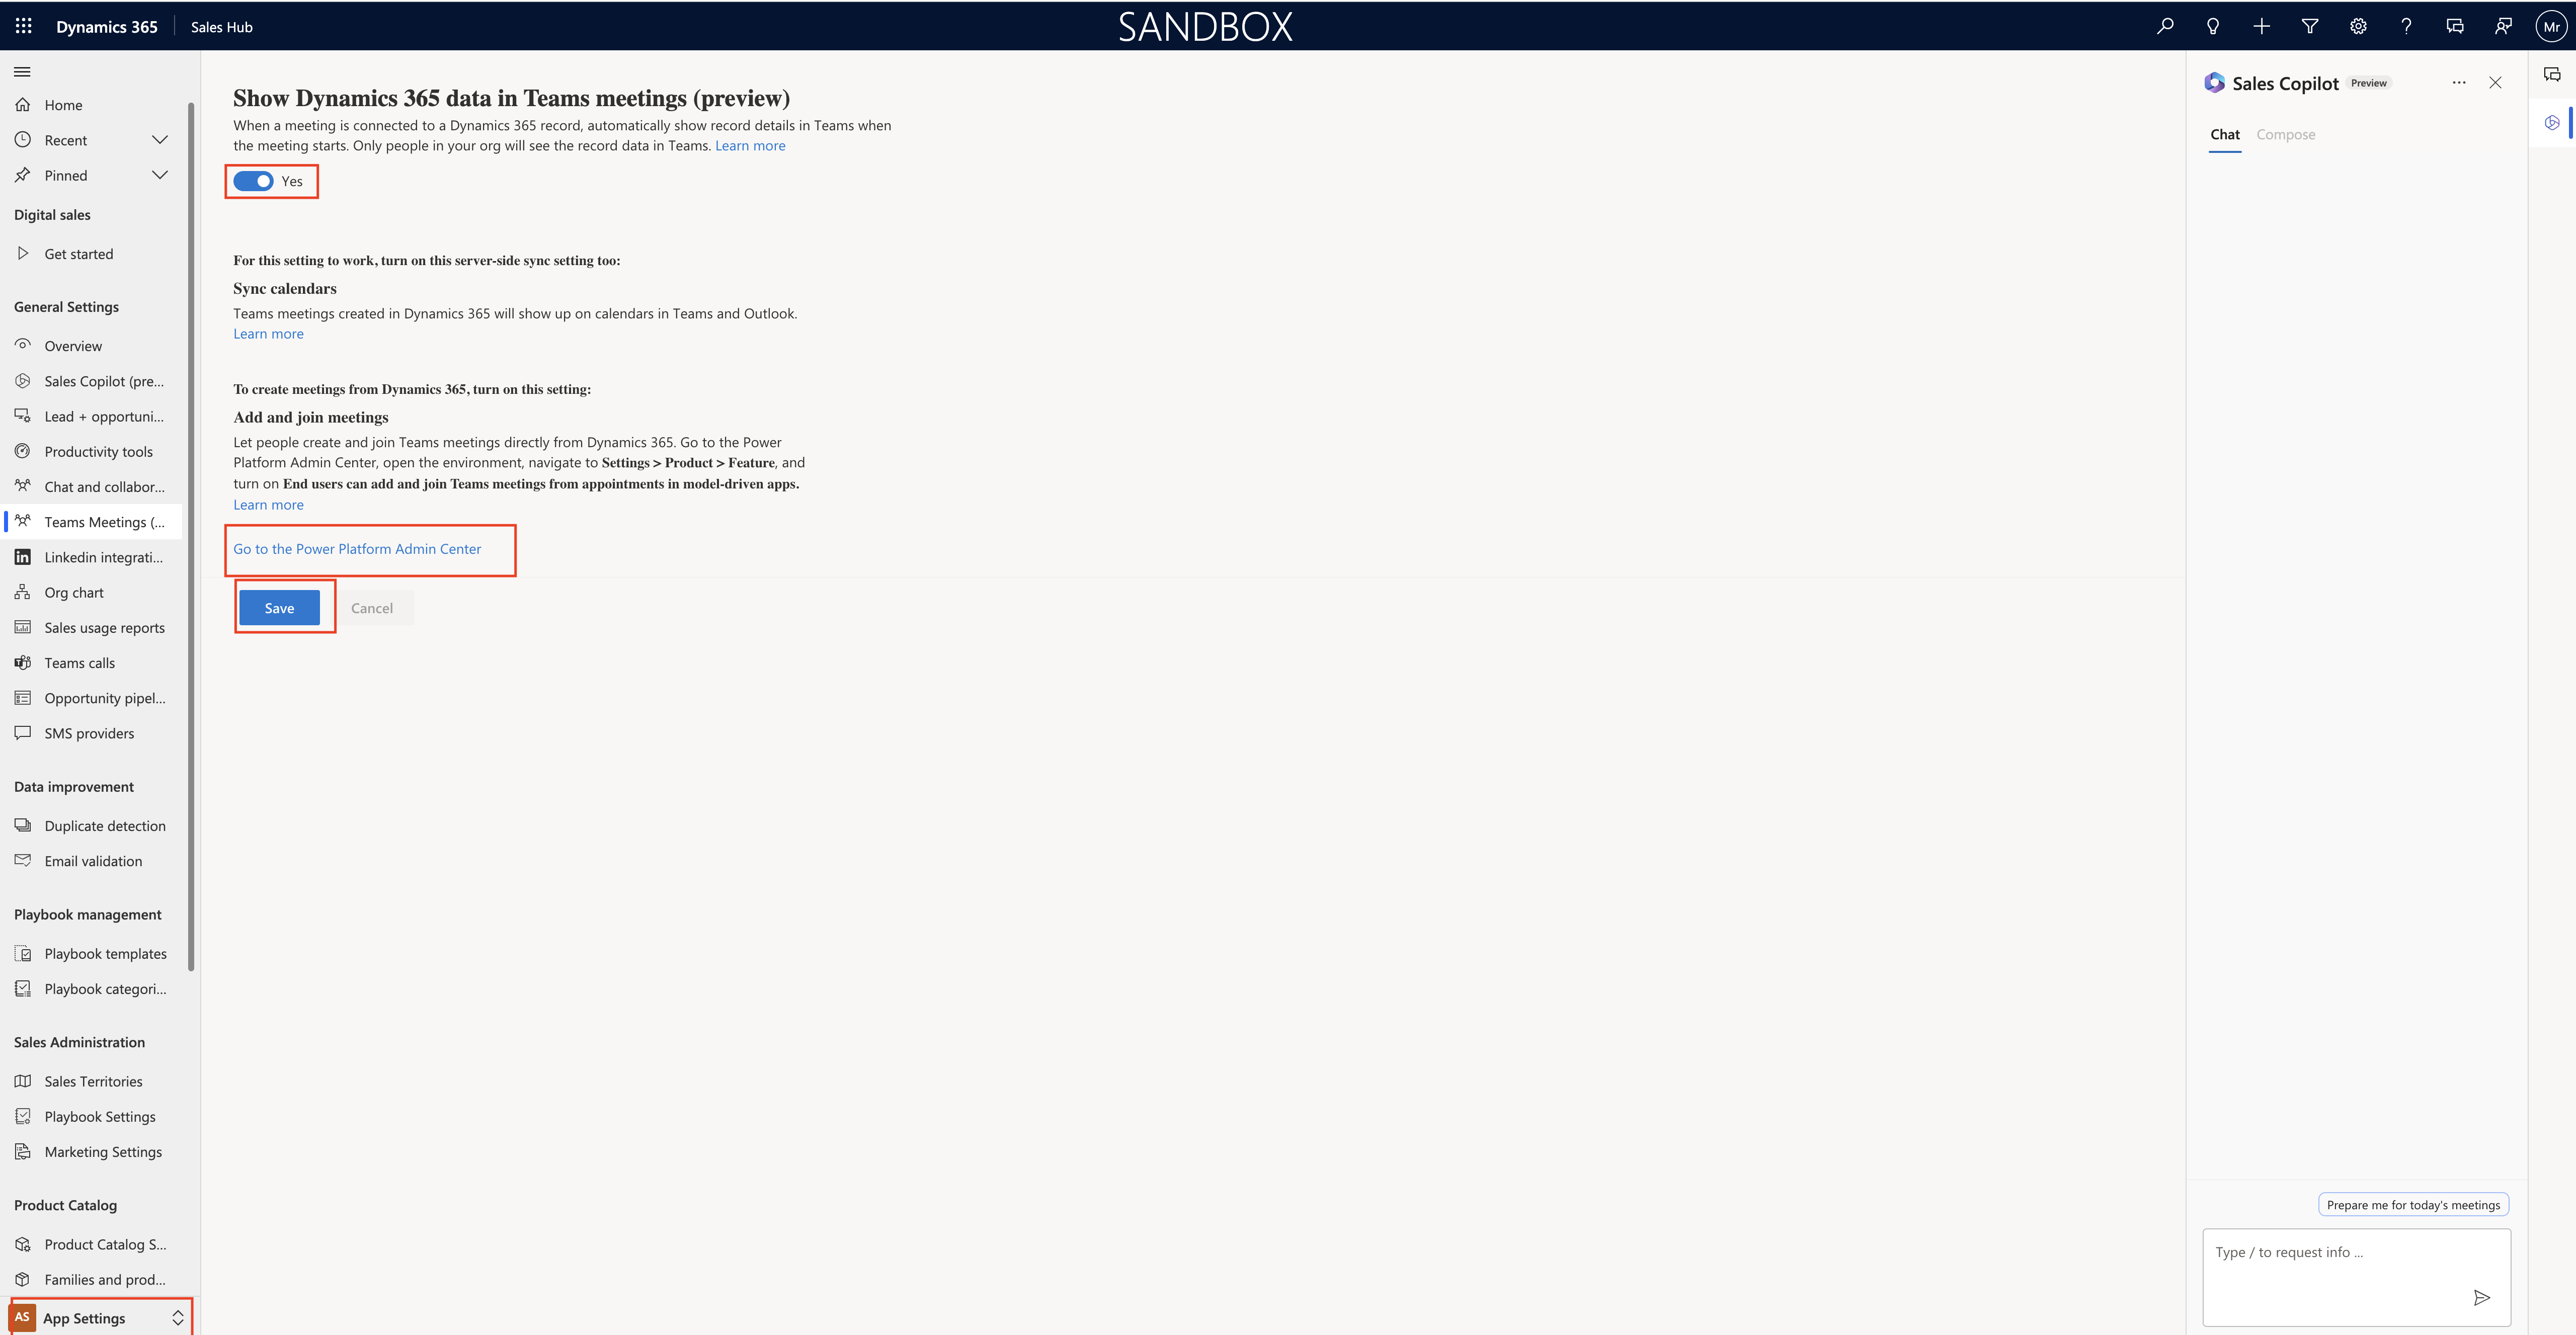
Click on App Settings.

Show Dynamics 365 data in Teams meetings(preview)

Suppose when a meeting is connected to a Dynamics 365 record, automatically show record details in Teams when the meeting start. Only people in your org will see the record data in teams.

Turn on this settings to YES.

Note: In order to make this settings work, turn on this server side sync settings too.

Synchronation of Calendars:

Teams meetings created in Dynamics 365 will show up on the calendars in Teams and Outlook.

To create meetings from Dynamics 365, turn on this settings:

Add and join meetings:

Lets people create and join Teams meetings directly from Dynamics 365. Go to Power Platform Admin Center, Open the environment.

Navigate to Settings > Products > Features and turn on End users can add and join Teams meetings from appointments in model driven apps.

Finally Save.

That’s it for today.

I hope this helps
Malla Reddy(@UK365GUY)
#365BlogPostsin365Days

Share this:

{How to} enable Microsoft Teams Collaboration and chat from Dynamics 365 Sales App

Hello Everyone,

Today I am going to show how to enable microsoft teams collaboration and chat from Dynamics 365 Sales App.

Let’s get’s started.

Login into Dynamics 365 Sales App.

Change the settings to “APP SETTINGS”.

Click on the “Chat and collaboration”

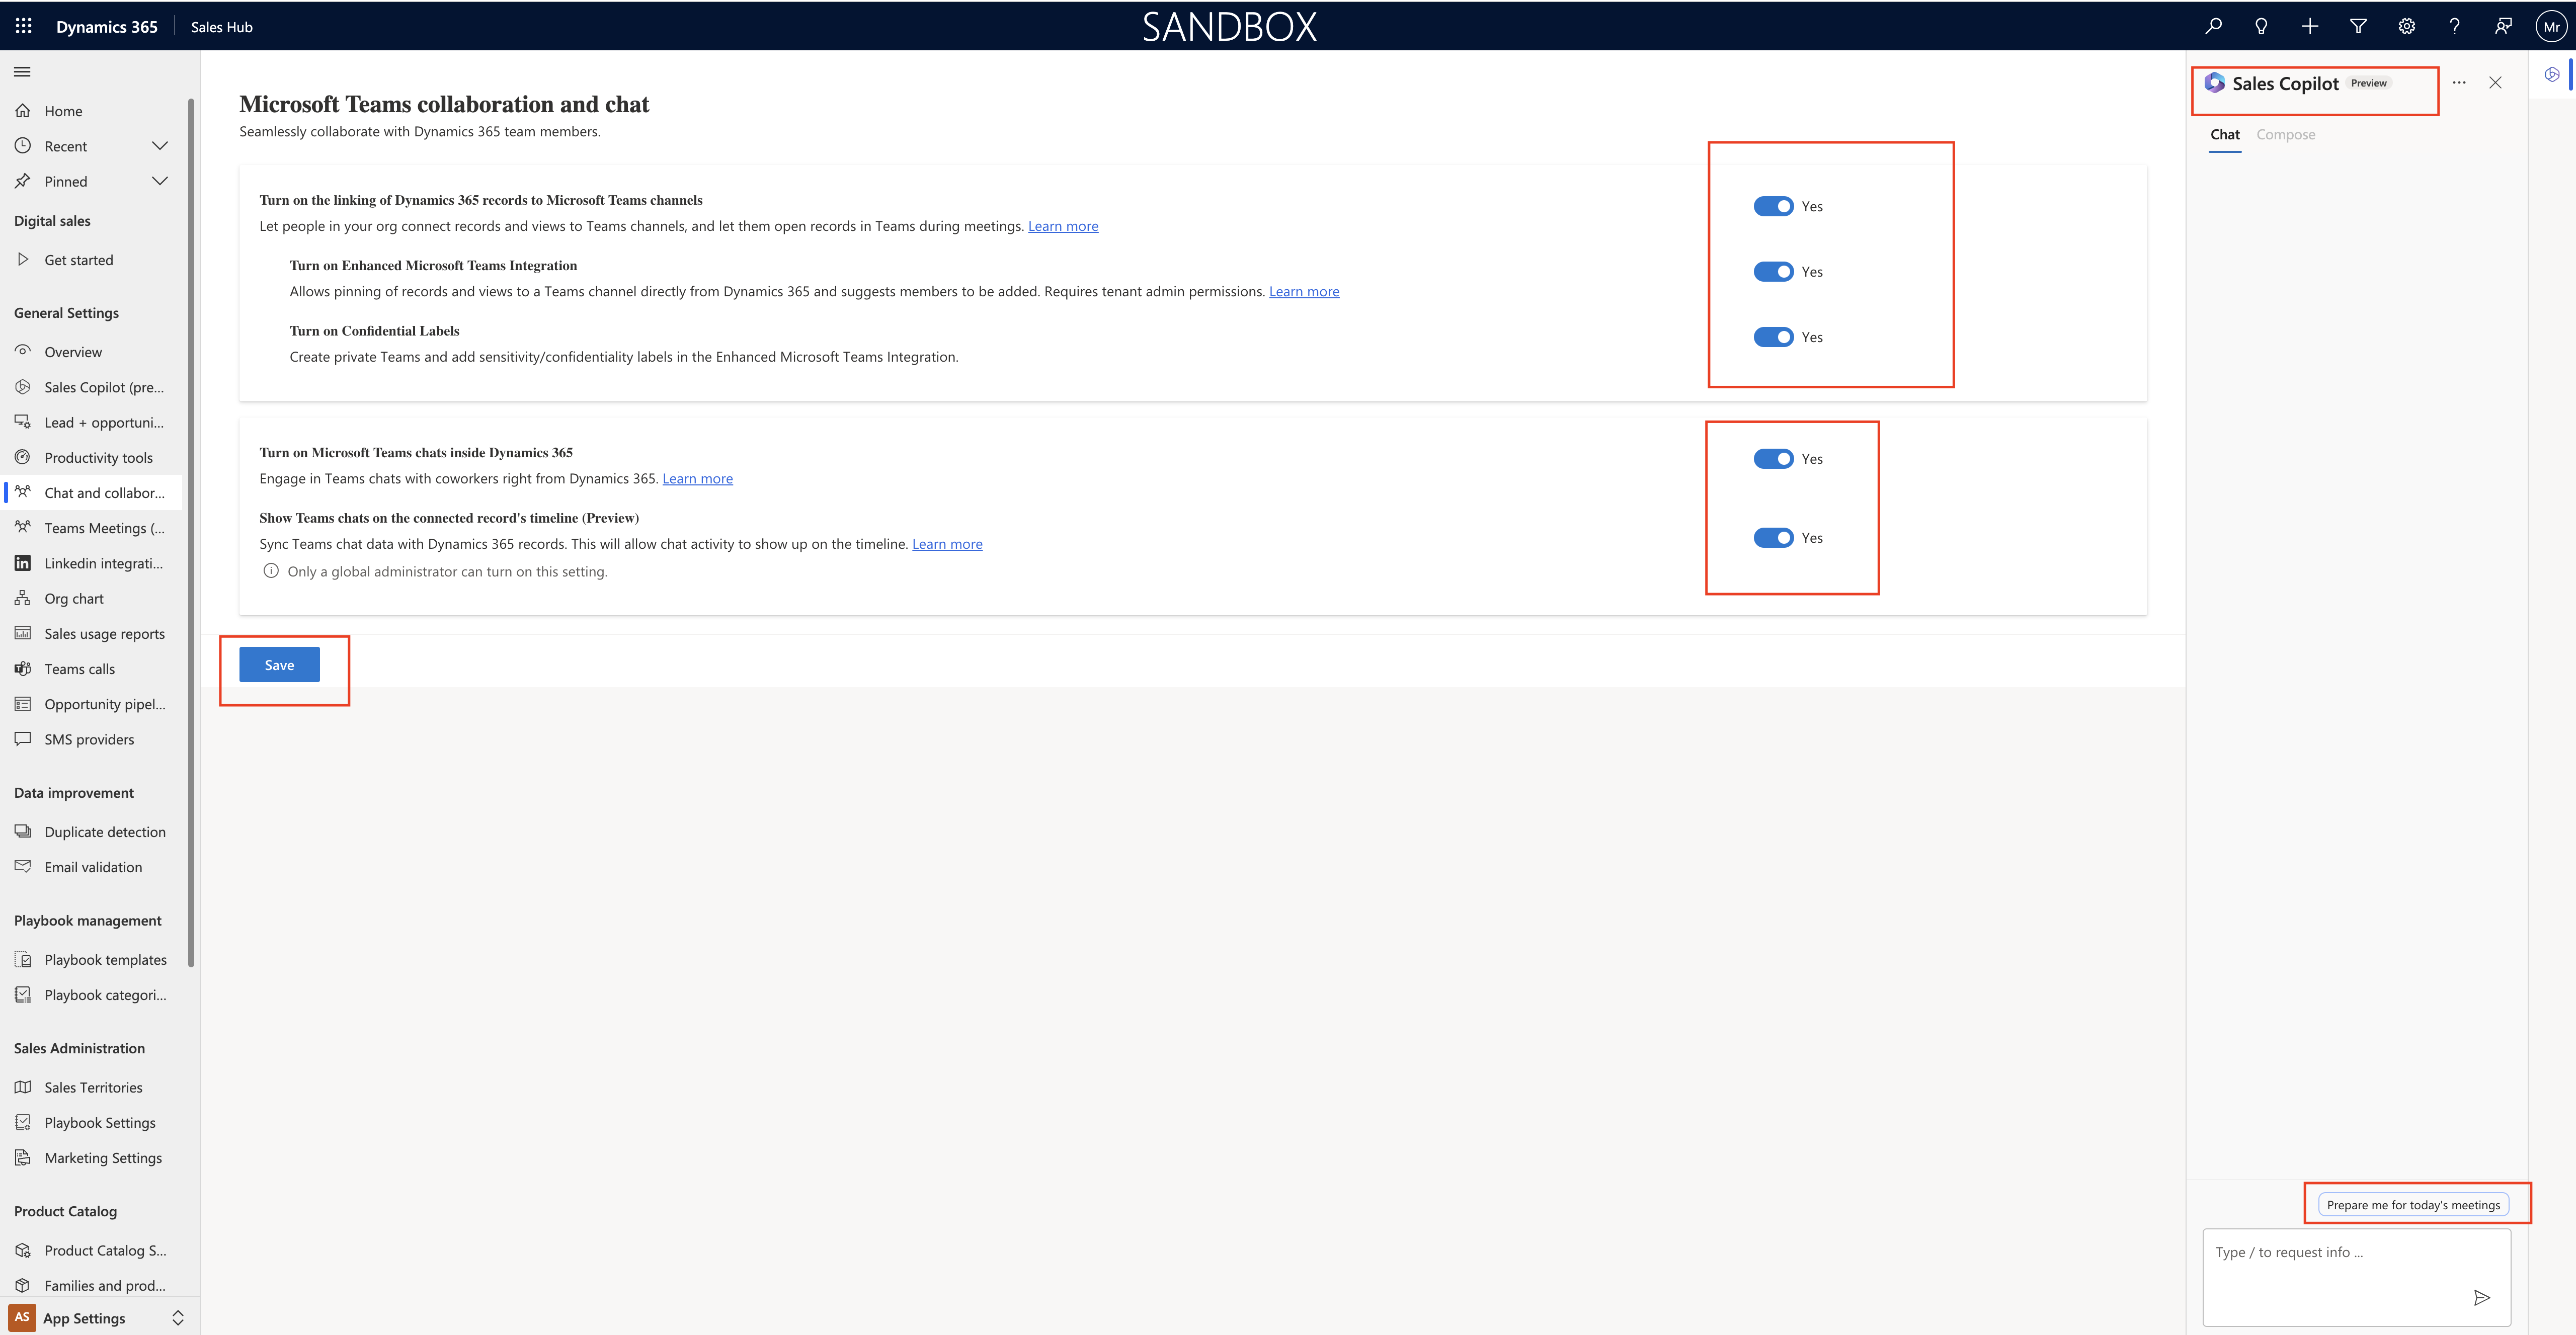
Microsoft Teams collaboration and chat – seamlessly collaborate with Dynamics 365 Teams members.

Some of the settings here you need to enable, lets see what they are ?

Turn on the linking of Dynamics 365 records to Microsoft Teams channels – Lets people in your org connect records and views to Teams channels, and let them open records in teams during meetings.

Turn on Enhanced Microsoft Teams Integration – Allows pinning of records and views to a teams channel directly from Dynamics 365 and suggests members to be added. Requires tenant admin permissions. When this settings turned on – tenant admin show approve or allow for this integration.

Turn on Confidential Labels – Create private Teams and add sensitivity/confidentiality labels in the Enhanced Microsoft Teams Integration.

Turn on Microsoft Teams chats inside Dynamics 365 – Engage in Teams chats with coworkers right from Dynamics 365 = ON.

Show Teams chats on the connected records timeline(Preview). – Sync Teams chat data with Dynamics 365 records. This will allow chat activity to show up on the timeline.

Note: Only a global administrator can turn on this settings.

Finally SAVE.

You can also enable Sales Copilot (preview) which allows to you to prepare for the upcoming meetings, just type in the questions you will get response appropriately if sales copilot is enabled on this Sales App.

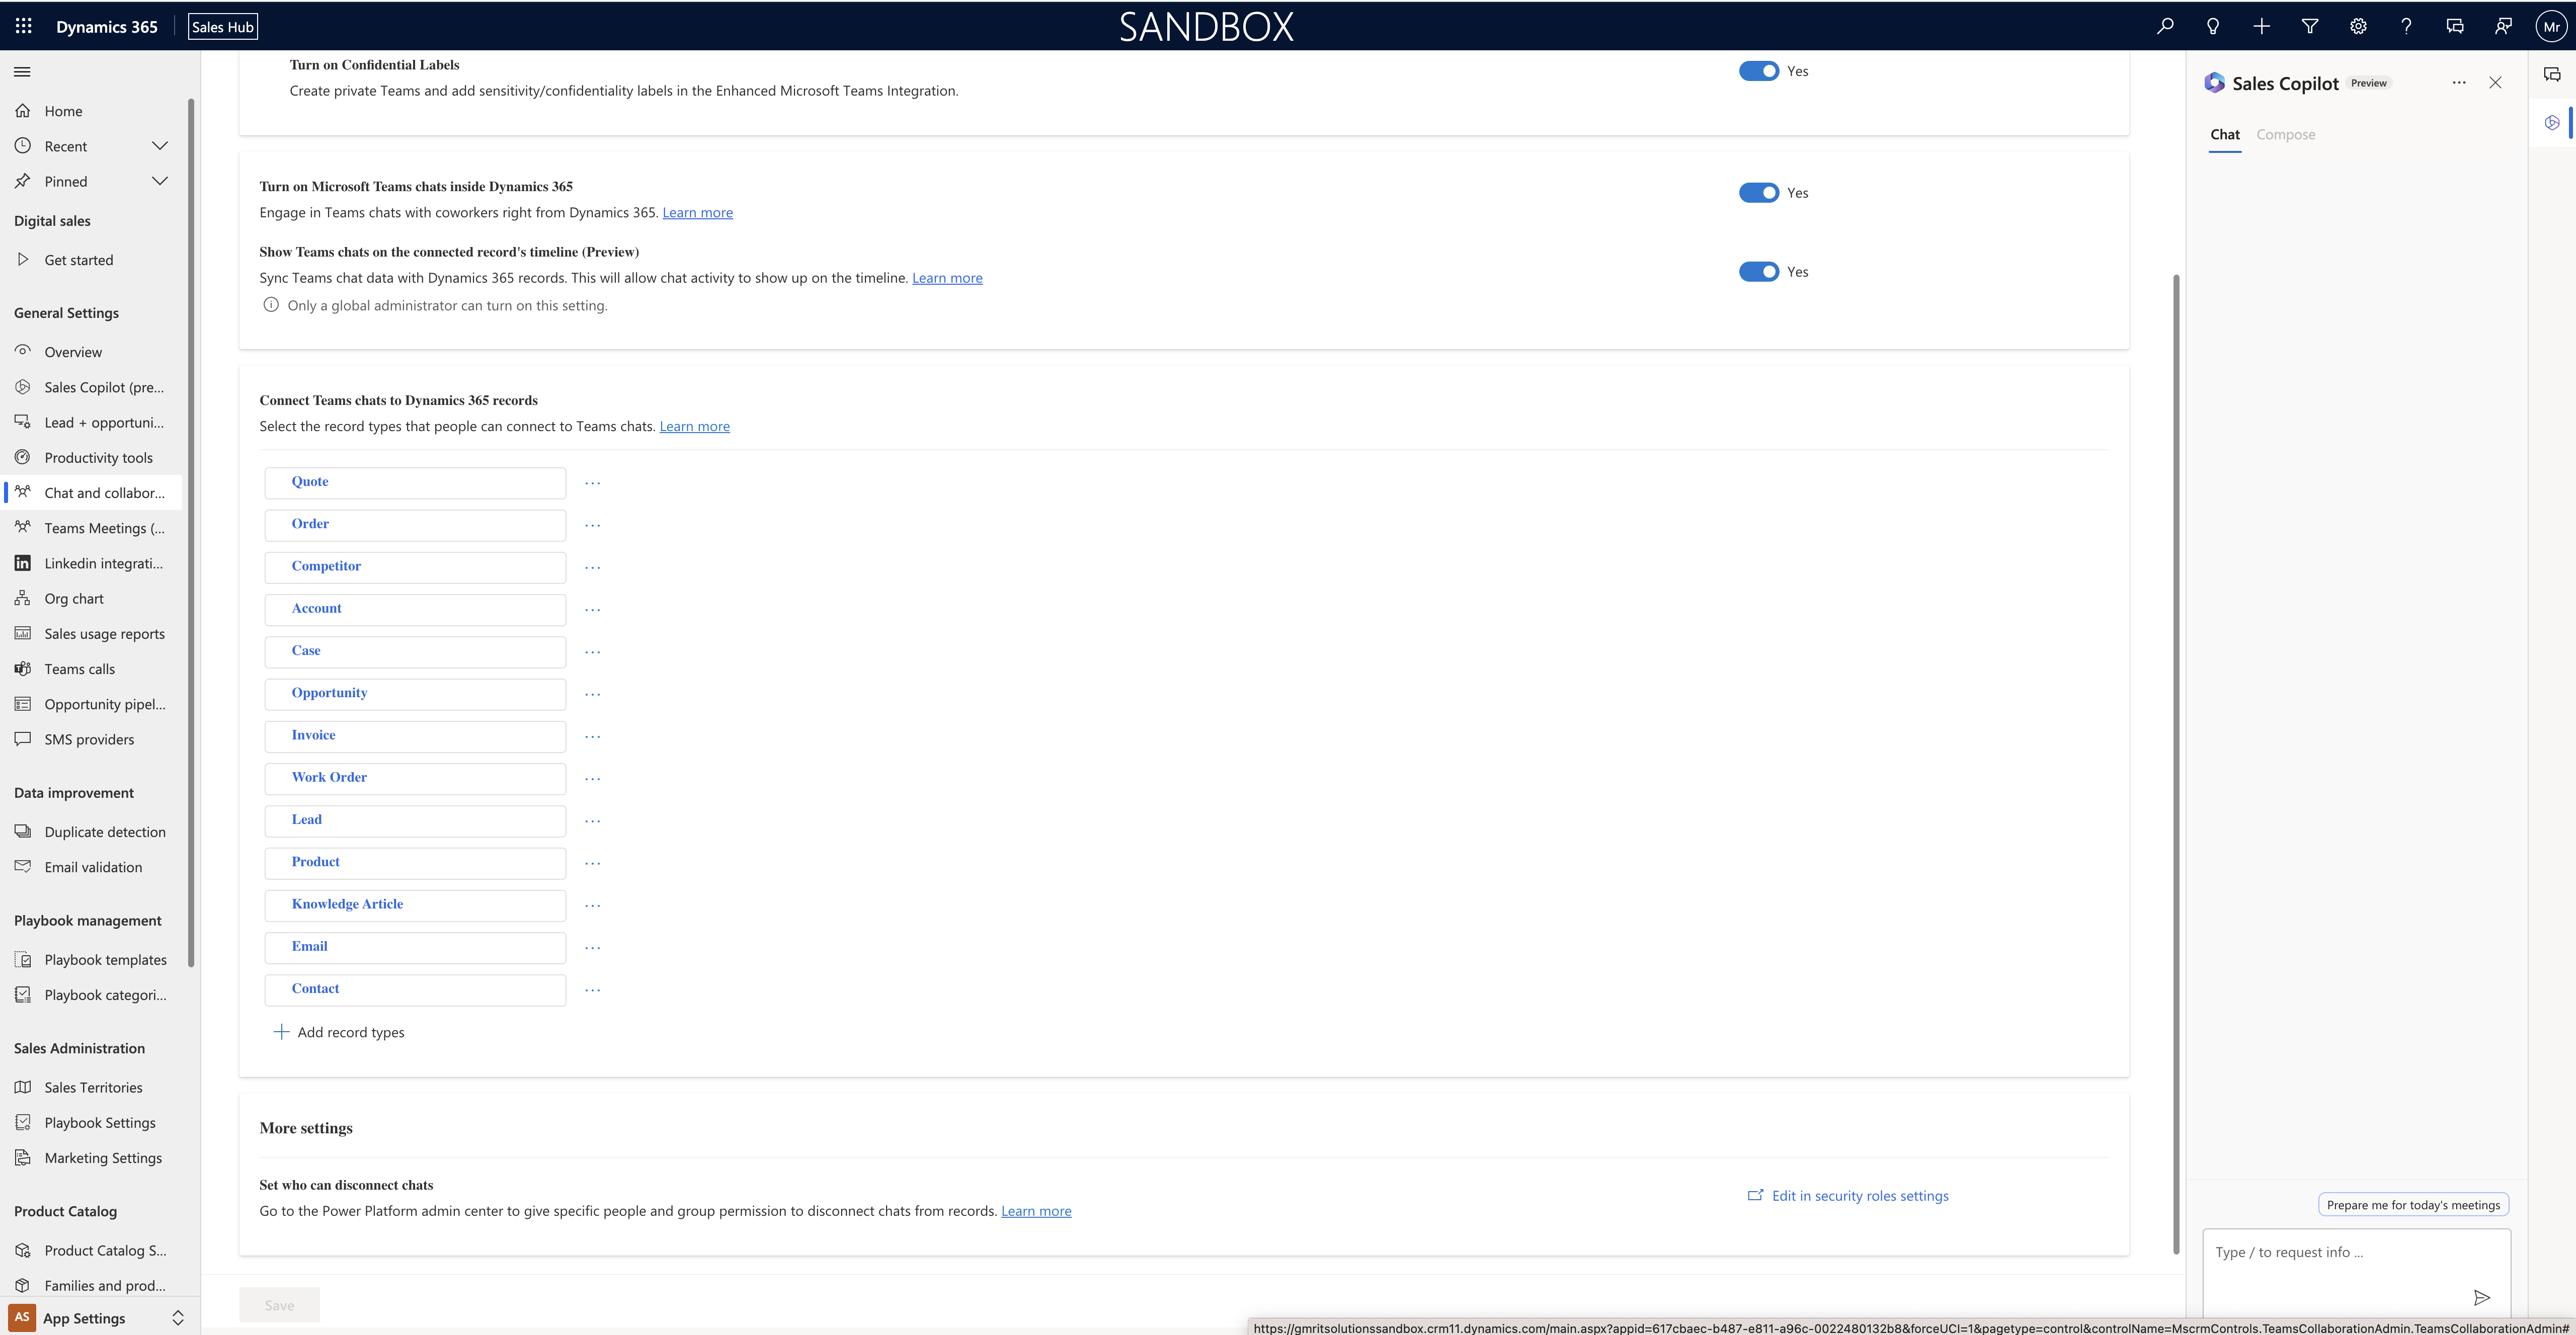
Final settings will be like this below screenshot.

That’s it for today.

I hope this helps.
Malla Reddy(@UK365GUY)
#365BlogPostsin365Days
Share this: