Menu Close

Category: Blog

{How to} Enable Customer support swarming(preview) on Dynamics 365 Customer Service Hub

Hello Everyone,

Today I am going to share my thoughts and how to enable Customer support swarming which is in preview on Dynamics 365 Customer Service Hub.

Let’s get’s started.

Customer support swarming in Dynamics 365 Customer Service allows agents to collaborate with experts across the organization to resolve complex cases more efficiently.

Here’s how you can enable it:

1. Prerequisites:

You need the Customer Service System Administrator role.

Agent using the swarm feature must have both a Dynamics 365 Customer Service Enterprise license and Microsoft Teams license.

Experts joining a swarm must also have a Teams license.

2. Guided Setup:

If you’re new to swarming, use the guided setup wizard:
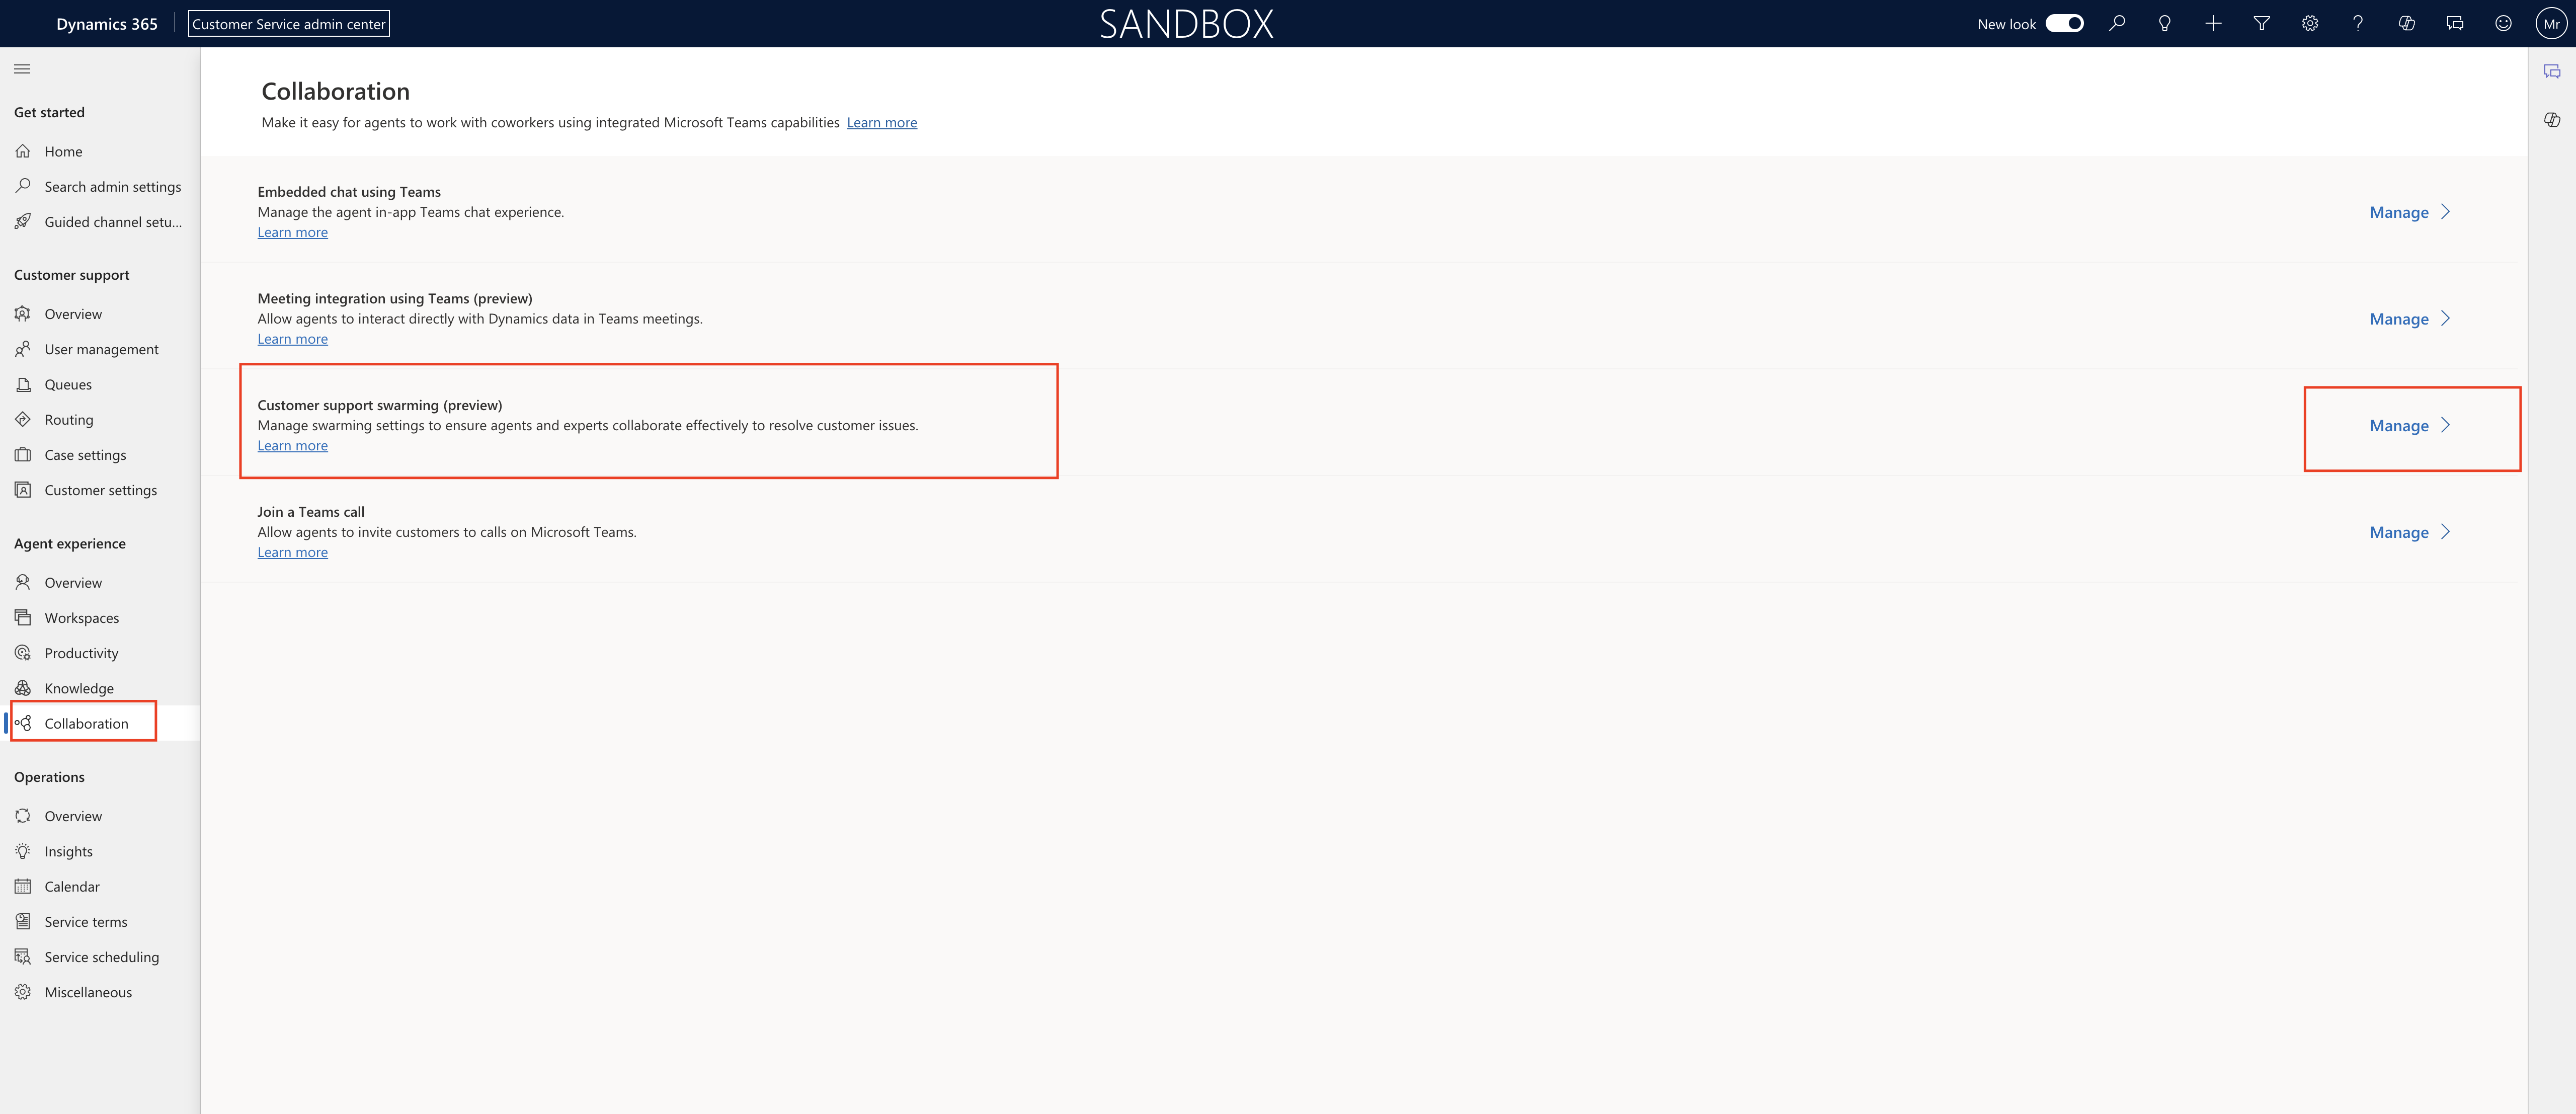
In the Customer Service admin center, go to the sitemap, then select Agent experience > Collaboration.

Next to Customer support swarming(preview), select manage.

Set the Swarming toggle to ON.

3. Manual Setup:

If you’re already set up swarming or want to skip the wizard.

Navigate to Service Management in the Customer Service Hub.

Under Collaboration, turn on Embedded chat using Teams first.

Then, enable Swarming using Teams.

Benefits of Swarming:

Improved first contact resolution.

Reduced average time to resolution.

Accelerated on the job training for agents.

Remember that swarming works with either the Microsoft Teams desktop or web apps.

Security Roles required:

Security role: Customer Service Representative:
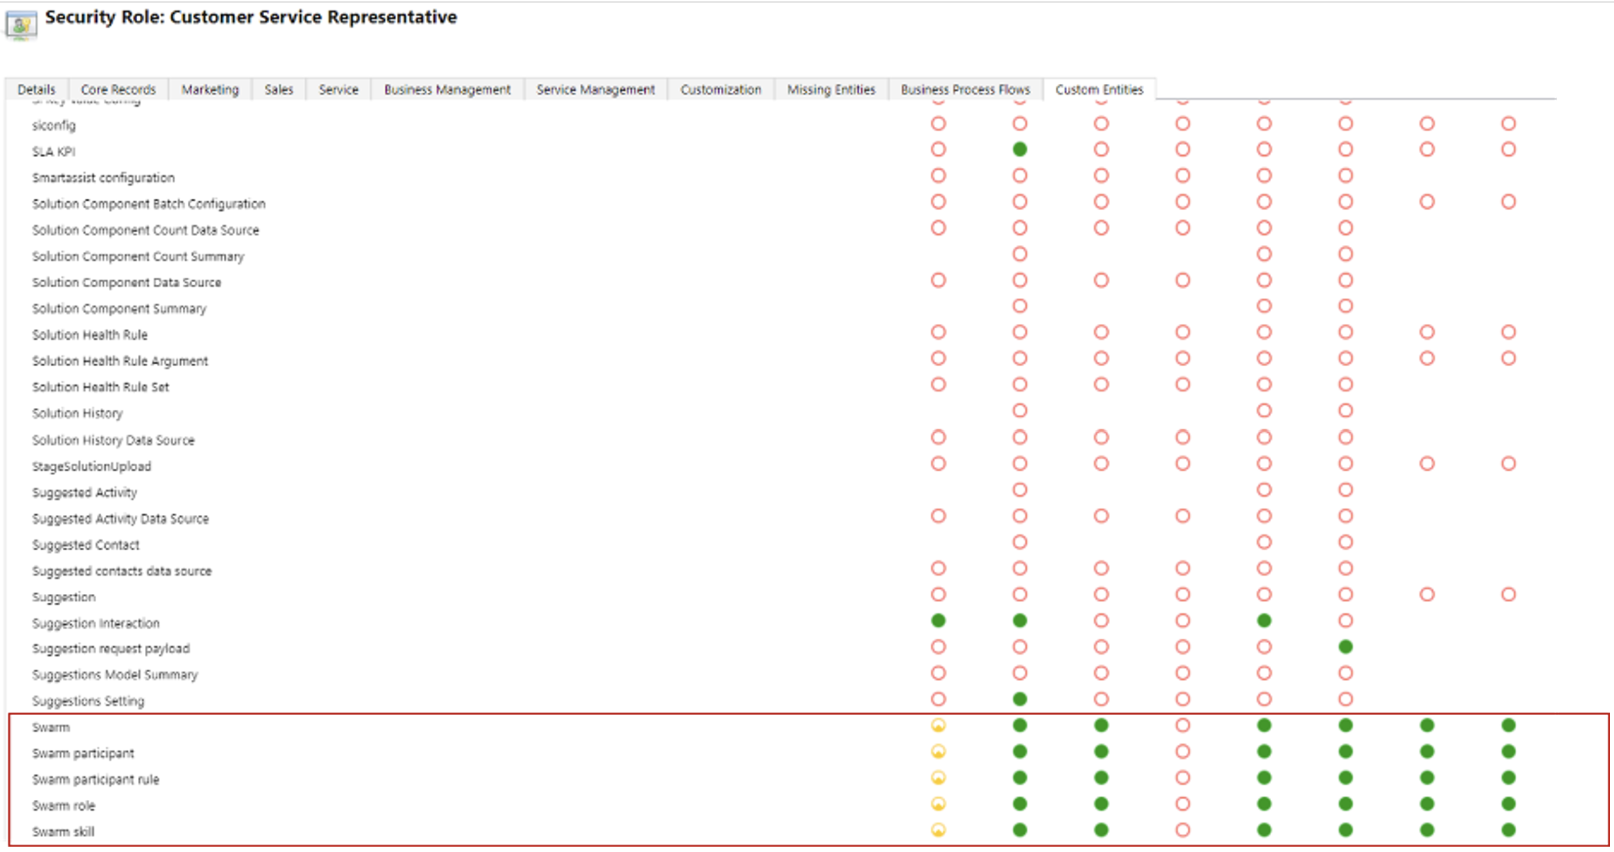
Swarm
Swarm participant
Swarm participant rule
Swarm role
Swarm skill

That’s it for today.

I hope this helps.

Malla Reddy Gurram(@UK365GUY)
#365blogpostsin365days

Share this:

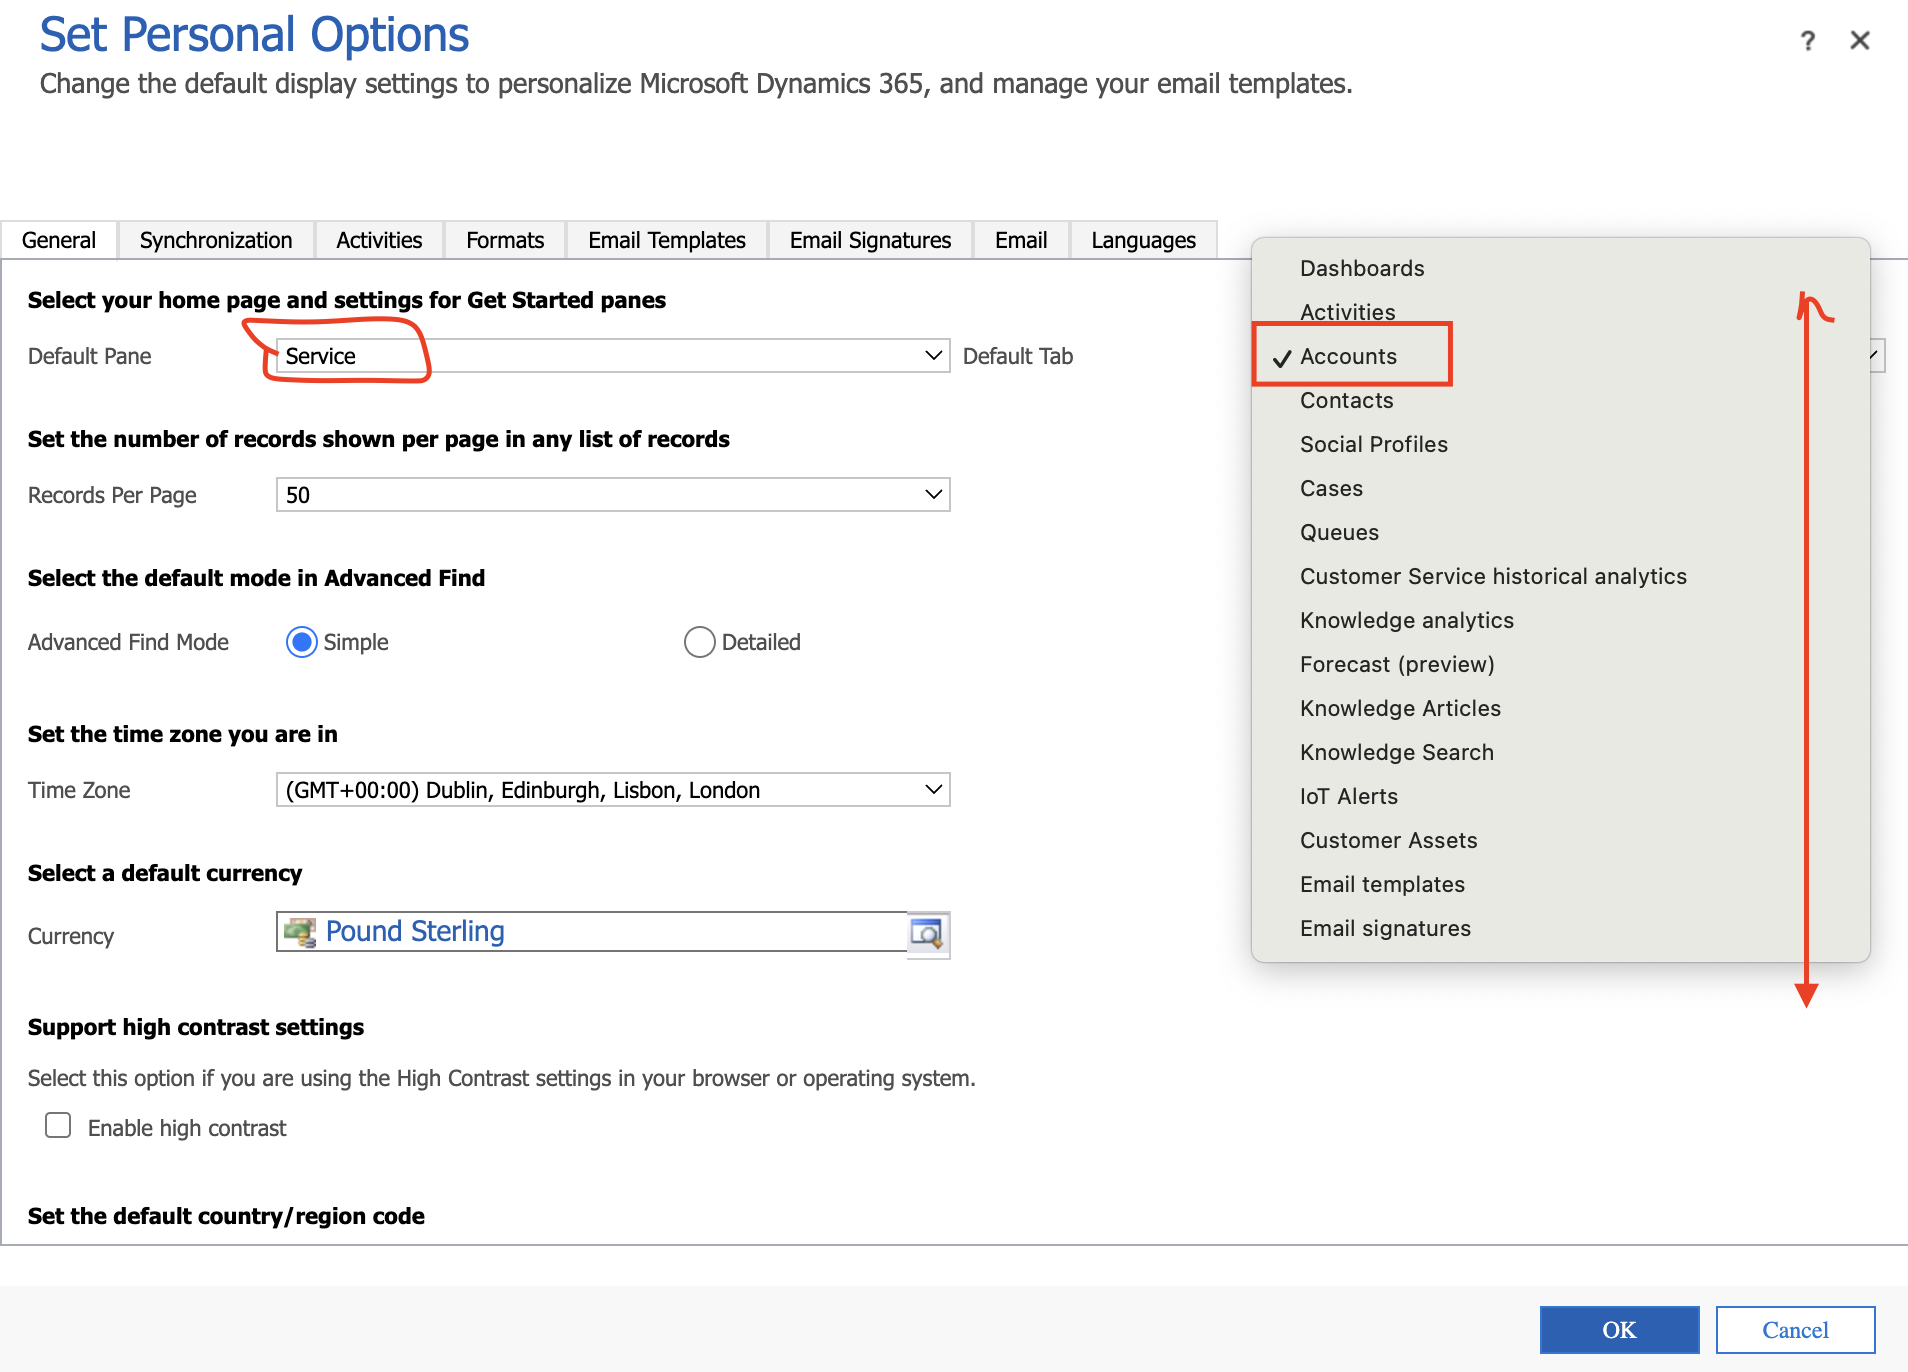
{How to) Set custom home page on Dynamics 365 Model Driven Apps

Hello Everyone,

Today I am going to show how to enable default tab for Home Page on Model Driven App.

Let’s get’s started.

Normally when you login into Model Driven App like Customer Service App or Sales App etc..
Dashboard is displayed.

But if we want to display change settings – how do you do that?

Login into Customer Service App and go to personal settings:

So you can change the settings as you want based on the requirement.

That’s it for today.

I hope this helps.

Malla Reddy Gurram(@UK365GUY)
#365blogpostsin365days

Share this:

{Do you know} Enable makers to create copilot AI columns during table or column creation in Dataverse

Hello Everyone,

Today I am going to share my thoughts on the preview feature: Enable makers to create Copilot AI columns during table or column creation in Dataverse.

Let’s get’s started.

Information workers face an overwhelming influx of data, dedicating significant time to reading and processing it daily.

Additionally, they invest substantial effort in preparing responses to inquiries.

With this innovative feature, data can be efficiently summarized into actionable information. Responses can be prioritized based on urgency (using sentiment analysis), categorized (through classification), and relevant details (such as email addresses or phone numbers) can be extracted.

Furthermore, the Microsoft Dataverse copilot generative AI functions enable automatic response generation.

This valuable copilot AI information can be defined and extended as part of the record, and users can query it seamlessly using copilot.

That’s it for today.

I hope this helps.

Malla Reddy Gurram(@UK365GUY)
#365blogpostsin365days
Share this:

{Do you know} Create virtual table to native table relationships in Dataverse

Hello Everyone,

Today i am going to share my thoughts on create virtual table to native table relationships on Dataverse.

Let’s get’s started.

This new feature empowers makers to build applications through lookups and filtering using the power of virtual tables.

Allows makers to build complex multi-table applications where virtual table to native table relationships can be defined.

Enabling virtual table relationships. The following capabilities will be enabled.

Simple lookup CRUD operations.

Filters (AND, OR ) and conditions (all operators)

Order by lookup field.

Multiple lookups (CRUD, filters, conditions, ordering)

Paging

Expansion types of join (inner, left outer,..):

Link without relationship
Retrieve all attributions
Order by(expanded field, combined clauses)
Filters (AND, OR) and conditions (all operators)
Paging
Multi-level expand
One-to-many expand scenarios

That’s it for today.

I hope this helps.
Malla Reddy Gurram(@UK365GUY)
#365blogpostsin365days

Share this:

{How to} Allow users to analyze data using an AI-powered chat experience on Dataverse

Hello Everyone,

Today I am going to show how to enable users to analyze data using an AI-powered chat experience on Dataverse.

Let’s get’s started.

How to enable AI powered chat experience otherwise known as Copilot for Model Driven App?

Let’s see that in action:

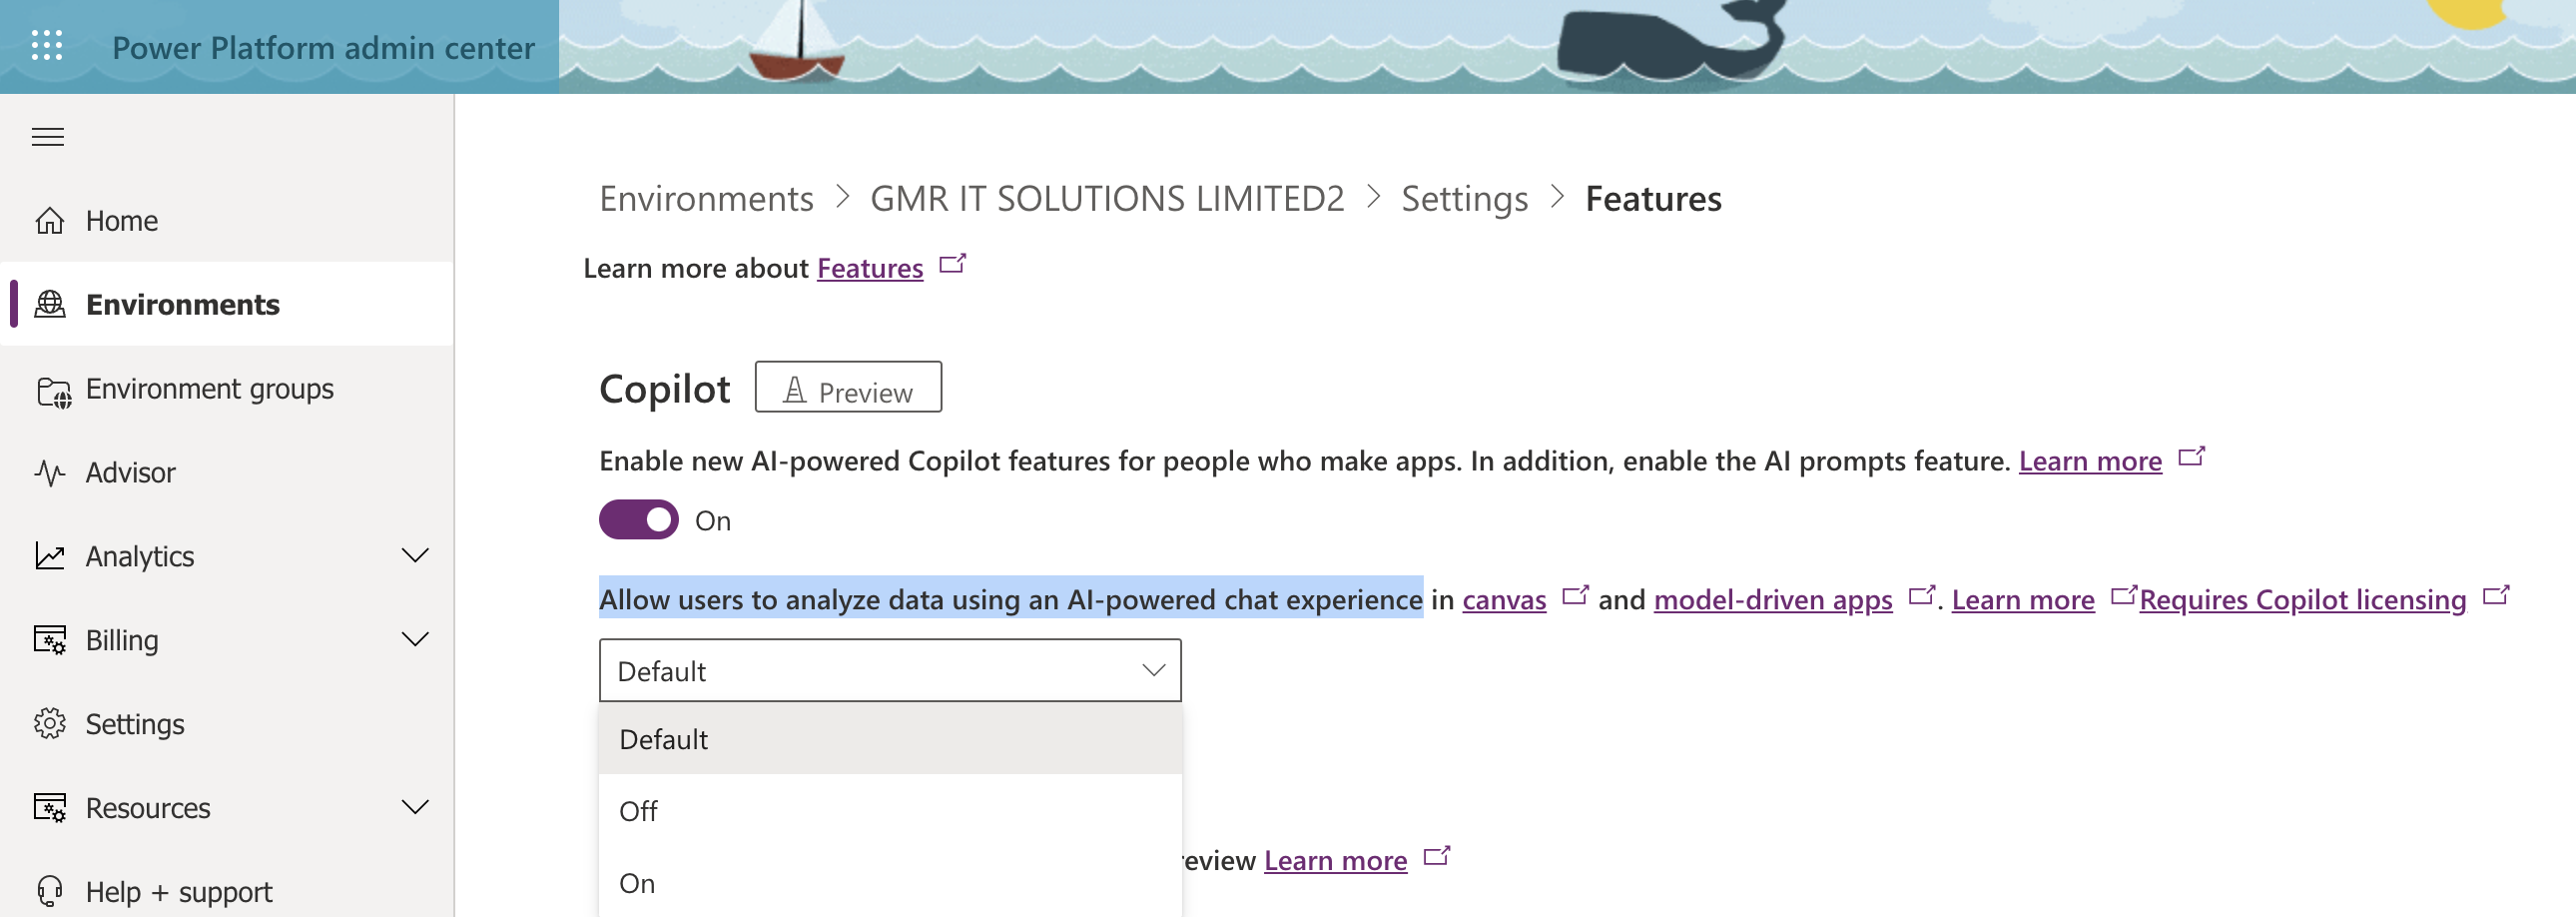
Login into www.powerplatform.microsoft.com

Choose the environment where you want to enable this feature.

Then > Settings > Features:

Now you have three options: by default enabled mode, OFF, or ON – options.

If your organisation want to enable this feature then you can turn ON for the model driven app.

Note: In order to use the Copilot you need to have license: As part of wave 1 release 2024 Copilot chat and form fill assistance are both generally available and on by default for Dynamics 365 Users.

So utilize this feature, you need below any of the following licenses:

Dynamics 365 Sales Enterprise or Sales Premiu,

Dynamics 365 Customer Insights

Dynamics 365 Field Service

Dynamics 365 Project Operations

Copilot chat: Allow end users to ask natural language questions about the data in their model driven apps and get instant answers.

Form fill assistance: Helps end users fill in complex forms in model driven apps by providing suggestions and guidance based on the data context.

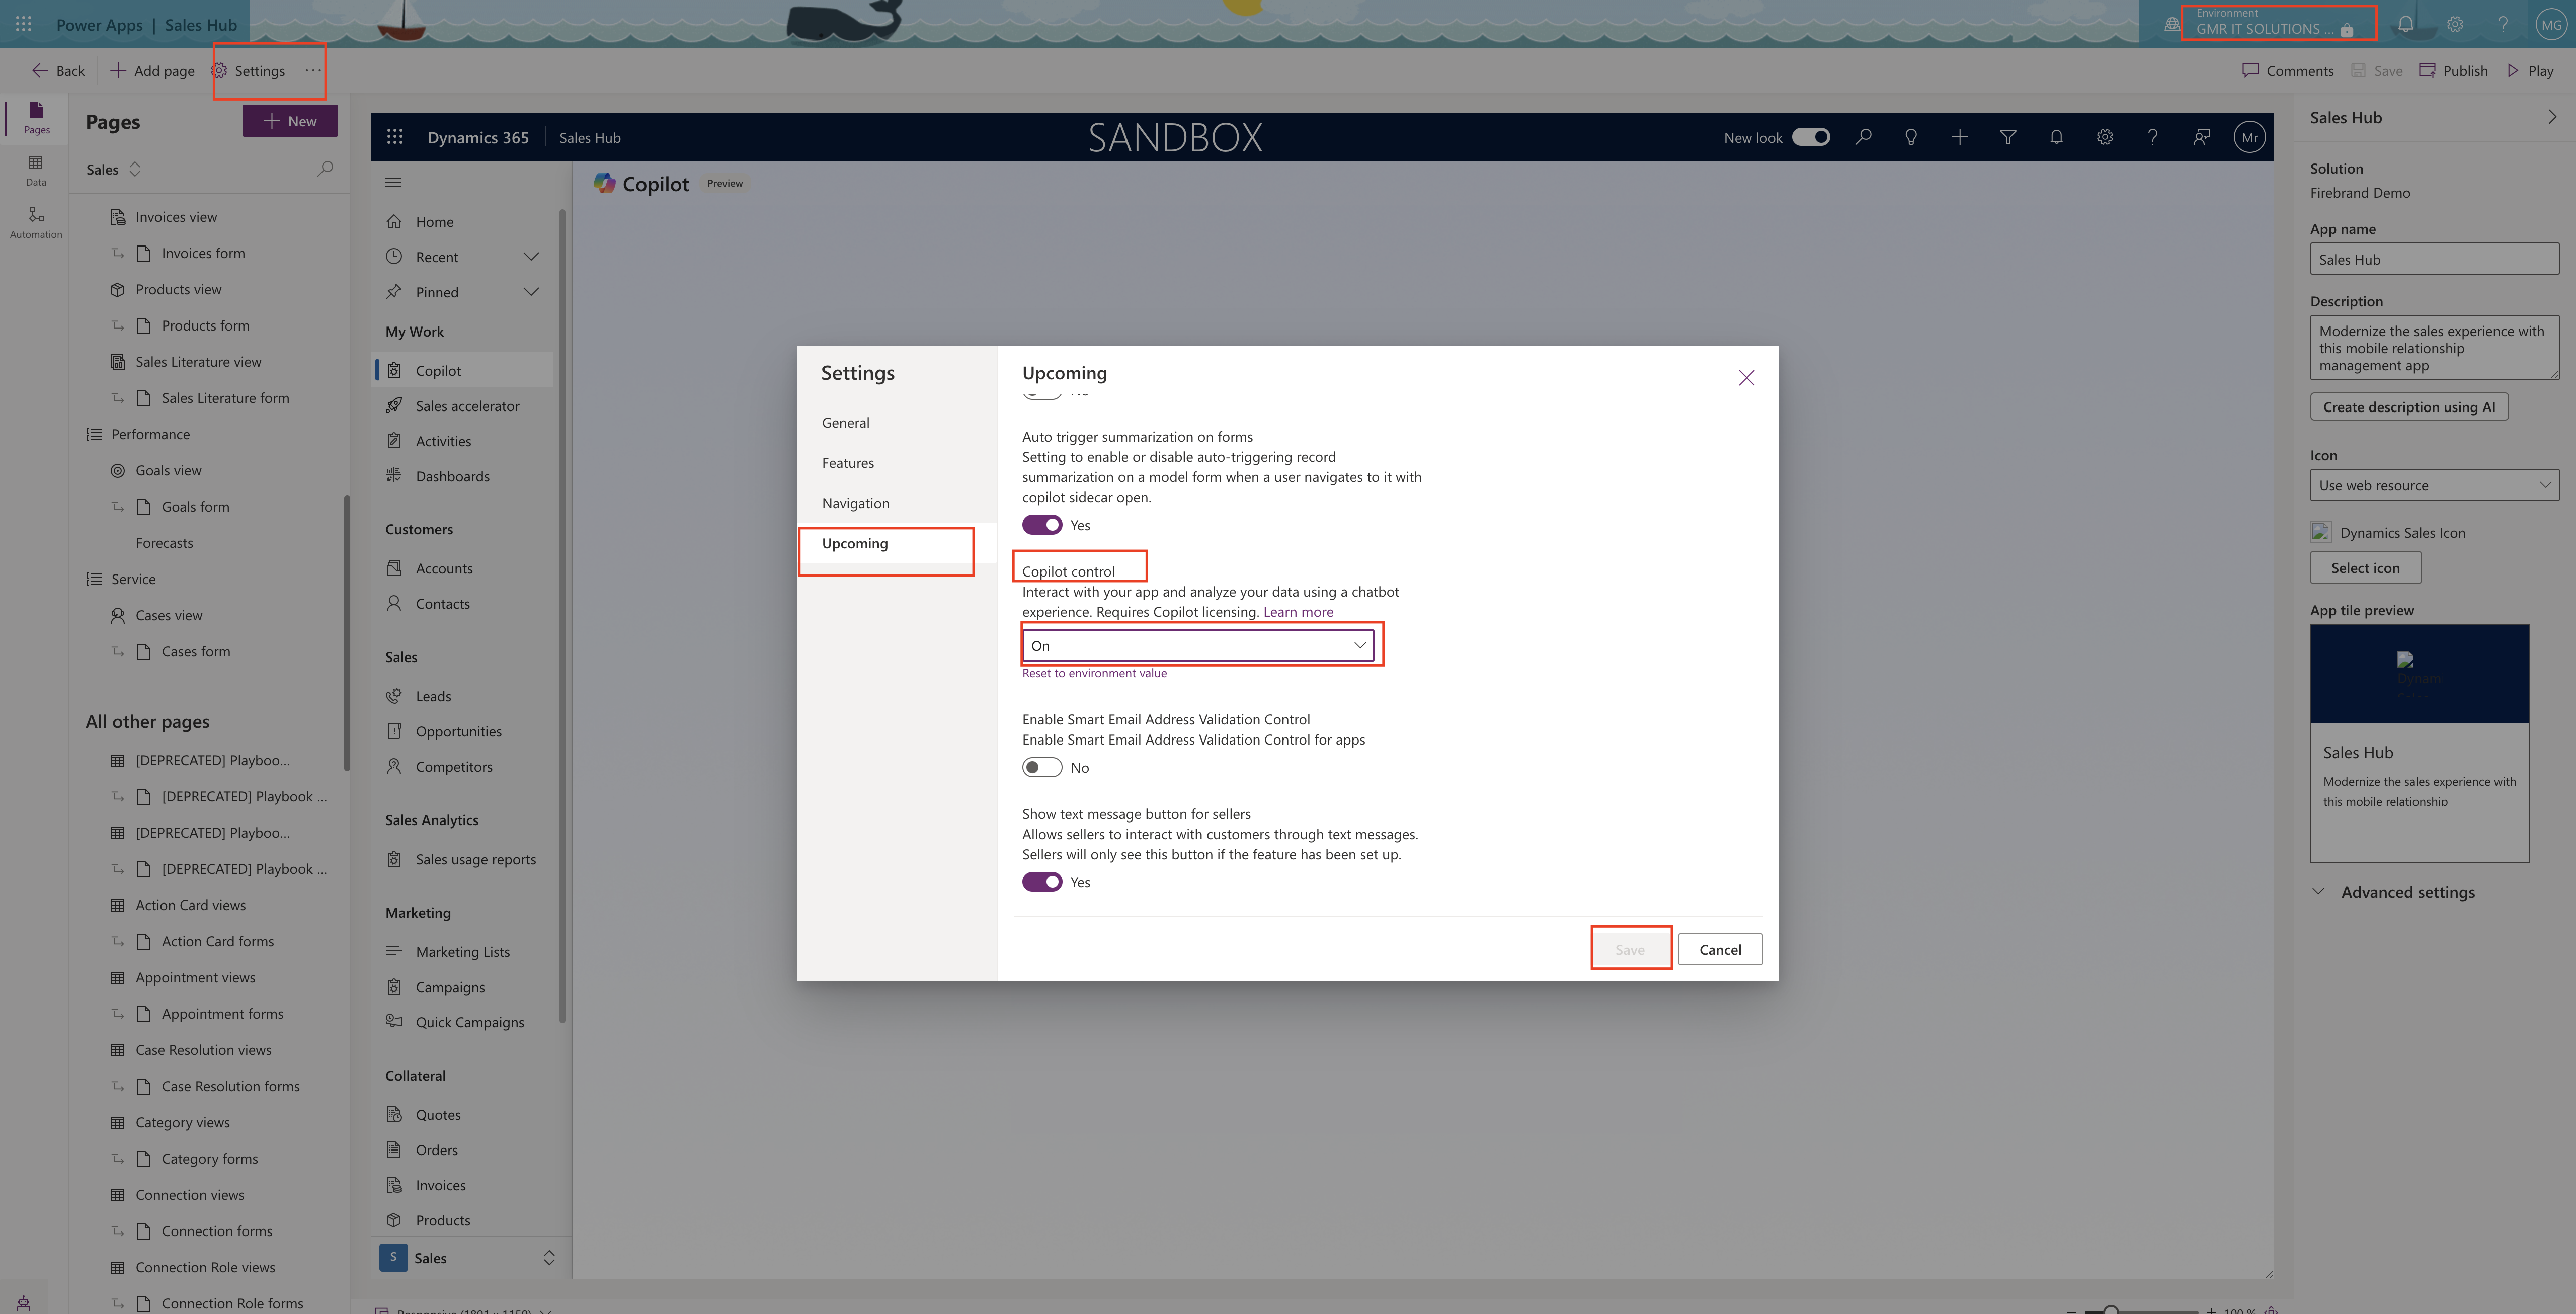
If you want to disable Copilot for a model -driven app:

Makers can disable Copilot for a specific model driven app, In the app designer, open the model driven app for Edit, and then select Settings on the command bar.

Selectt Upcoming on the Settings screen, set Copilot control to Default or Off, and then select Save.

Save and Publish the model driven app for the changes to make effect.

That’s it for today.

I hope this helps.

Malla Reddy Gurram(@UK365GUY)
#365blogpostsin365days

Share this: