How to Share Your Computer’s Files With a Virtual Machine

VirtualBox
The HTG Guide To Speeding Up Your Virtual Machines
Virtual machines are demanding beasts, providing virtual hardware and running multiple operating systems on your computer at once. Upgrading your… [Read Article]


net use x: \vboxsvrNAME
mount -t vboxsf NAME /mnt/folder

VMware


- Published 05/31/14
DID YOU KNOW?
BEST OF HOW-TO GEEK
- We will create a plug-in in the C# Class library, you can also use a portable class library.
- Add a class library project into the C# solution and name your class “MyDynamicPlugin”.

- Now add references to the 2 DLLs.
- Microsoft.Crm.Sdk.Proxy.dll
- Microsoft.Xrm.Sdk.dll
- And you will find both of the DLLs in the SDK/bin folder of your Microsoft SDK.
- And inherit the IPlugin interface.

- Implement the IPlugin Interface and you will get an Execute method with the IserviceProvider interface object as a parameter.
- Execute method: This method runs as an entry point for any plugin in Microsoft Dynamic CRM.
- IserviceProvider interface: This interface provides access to various services of dynamic, this interface has a method called GetService() that uses the reflection feature of .NET and allows us to get any type of service we want.

- This Execute method is all the code you need to fire before or after any event occurred.
For this article I will create a default Contact whenever anyone creates an account.
For example, If an employee of an organization creates an account then a default contact with basic details should be added to that account automatically (using a plug-In).
Procedure
Step 1
- IPluginExecutionContext context = (IPluginExecutionContext)serviceProvider.GetService(typeof(IPluginExecutionContext));
Step 2
- Using this Inputparamter we can get the entity and other types of dynamic CRM.
- Target is one of the main parameters of this IPluginExecutionContext object.
- All the plug-in events are first stored in this variable called “Target”.
- So when any events occur we need to check if this variable is there in our current context execution.
- And if so then we need to check if it’s an entity. Because for this article we will trigger a plug-in if a new account (Entity) is created.

Step 3
We can typecast it into an Entity and using its logicalname property we can determine if the current executing event is for an account Entity or not.
And if it’s an account entity we can write our creation of contact code here and associate that contact with the currently executing account.

Step 4: The last step is to create an Organizationservicefactory instance and we need to create a new plug-in, add a pluginexecutioncontext object ID to create an Organization service and based on that service client we can create our custom Event.
- IOrganizationServiceFactory servicefactory = (IOrganizationServiceFactory)serviceProvider.GetService(typeof(IOrganizationServiceFactory));
- IOrganizationService client = servicefactory.CreateOrganizationService(context.UserId);
- client.Create(createcontact);
Your Microsoft Dynamic CRM plug-in is created.
This is the sample code, you can find the attachment of this code with my article. 
Build your Project.
Important Step
Once you build your project, you need to generate a key that will act as certificate for your plug-in. Without this key you cannot deploy a plug-in onto a server.
To create a key, go to project property (ALT+ Enter) and go to the signing tab and check sign the assembly.
Select new in the drop down and add a key name and your dynamic CRM Password. And select save (CTRL+ S).
If you have done this then it will add a pfx encrypted key for your current project.
Rebuild your project
Procedure to deploy this assembly using SDkToolsPluginRegistrationPluginRegistration.exe.
Step 1
- Run it and Click Create New connection,
- Enter your Login Credentials for Connection with Dynamic CRM.
- The first time you login, you need to pass all the details of your CRM Account.
After logging in successfully, click Register > Register New Assembly.

Browse to the DLL you just created and click OK.
Step 3
- Now we need to add steps of this DLL execution.
- So select the assembly and again click Register > Register new Steps.
- Or just right-click the assembly you just added and select Register new Steps.

Message: It defines on which event you want to run the plug-in.
Example: Create.
Primary Entity: It define on which Entity execution you want to run the plug-in.
Example: account.
Event pipeline stage of Execution: It defines when you want to run the DLL, before the core operations or after the core operations.
Execution Mode: Execution can be synchronous by default or can be asynchronous (that will be handled further by the Dynamic CRM Queue manager).
Deployment: Server where every plug-in is deployed.
Offline where you can deploy it on Outlook for offline use.
Click Register New Step and whoo, it’s done.
Your assembly or plug-in is deployed on the server. Now go to Dynamic CRM and create an account, an automated contact will be added by default in that account without any manual entry from employees.
Remove Clickeu.tractionize.com pop-up ads (Removal Guide)

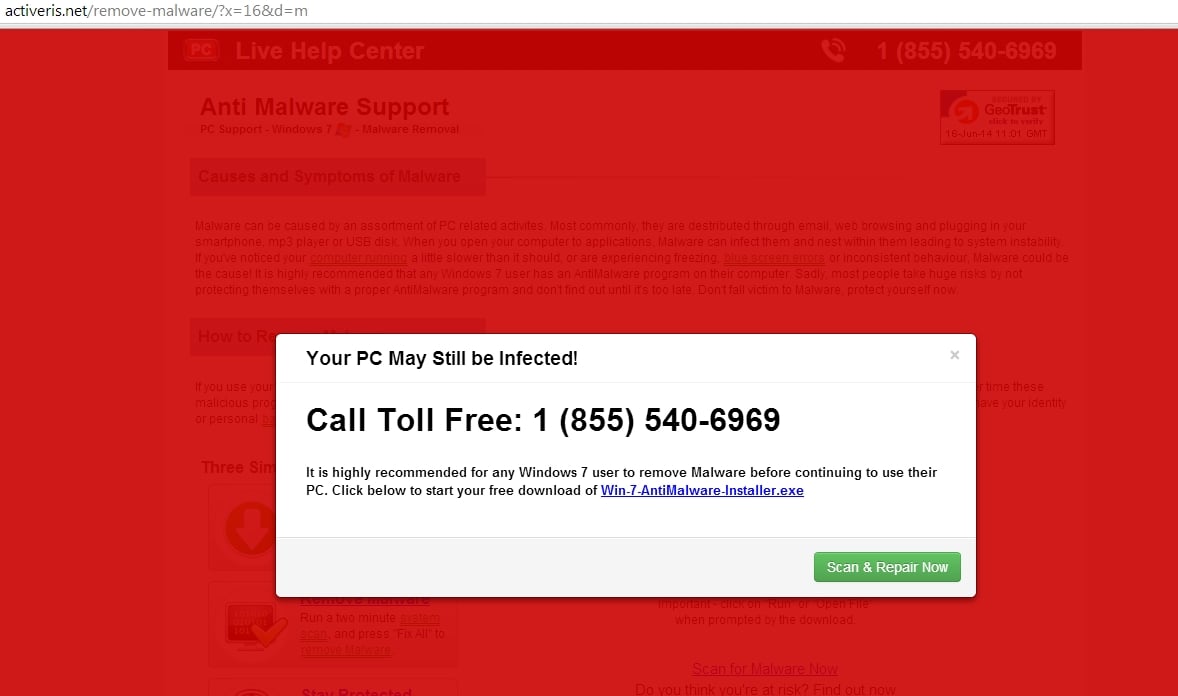
The Clickeu.tractionize.com pop-up ad happens regardless of the web browser or search engine, and if you are seeing ads from Clickeu.tractionize.com whenever you are doing a Google search or clicking on a link, then your computer may be infected with adware or a potentially unwanted program. This infection is designed specifically to make money. It generates web traffic, collects sales leads for other dubious sites, and will display advertisements and sponsored links within your web browser.
When an adware extension is installed on your computer, whenever you will open a new tab within Internet Explorer, Firefox and Google Chrome, an ad from Clickeu.tractionize.com will pop-up. This infection will also display advertising banners on the web pages that you are visiting, and as you browse Internet, it will show coupons and other deals available on different websites.
Always opt for the custom installation and deselect anything that is not familiar, especially optional software that you never wanted to download and install in the first place. It goes without saying that you should not install software that you don’t trust.
How to remove Clickeu.tractionize.com pop-up ads (Virus Removal Guide)
Please perform all the steps in the correct order. If you have any questions or doubt at any point,STOP and ask for our assistance.
STEP 1: Uninstall the adware program that is responsible for the Clickeu.tractionize.com pop-up ads
STEP 2: Remove “Clickeu.tractionize.com” pop-up ads from Internet Explorer, Firefox and Google Chrome
STEP 3: Remove “Clickeu.tractionize.com” adware with AdwCleaner
STEP 4: Remove “Clickeu.tractionize.com” pop-up virus with Malwarebytes Anti-Malware Free
STEP 5: Double-check for the “Clickeu.tractionize.com” infection with HitmanPro
STEP 1: Uninstall the adware program that is responsible for the Clickeu.tractionize.com pop-up ads
- To uninstall a program from Windows XP, Windows Vista or Windows 7, click the “Start” button, then click on the “Control Panel” menu option.
![Control Panel in Windows Start Menu [Image: Control Panel in Windows Start Menu]](https://malwaretips.com/blogs/wp-content/uploads/2014/01/windows-start-menu-control-panel.jpg)
If you are using Windows 8, simply drag your mouse pointer to the right edge of the screen, select Search from the list and search for “control panel” .Or you can right-click on a bottom left hot corner (formerly known as the Start button) and select Control Panel from there.![Type Control Panel in Windows 8 search box [Image: Type Control Panel in Windows 8 search box]](https://malwaretips.com/blogs/wp-content/uploads/2014/06/windows-8-uninstall.jpg)
- When the “Control Panel” window opens click on the “Uninstall a program” option under “Programs” category. This option is shown by the arrow in the image below. If you are using the “Classic View” of the Control Panel, then you would double-click on the “Programs and Features” icon instead.
![Click on Uninstall a program [Image: Uninstall a program]](https://malwaretips.com/blogs/wp-content/uploads/2013/03/uninstall-a-program-windows.jpg)
- When the “Programs and Features” or the “Uninstall a Program” screen is displayed, scroll through the list of currently installed programs and uninstall Discount Cow, V-bates, PriceMeter,Supra Savings, weDownload Manager, PureLead, Search Assist, Re-Markable, Zombie Alert,Wajam, Coupon Server, Lollipop, HD-Total-Plus, BlockAndSurf, Safe Saver, SupTab, Search Protect, Lollipop, Software Updated Version, DP1815, Video Player, Convert Files for Free, Plus-HD 1.3, BetterSurf, Trusted Web, PassShow, LyricsBuddy-1, PureLeads, Media Player 1.1,RRSavings, Feven Pro 1.2, Websteroids, Savings Bull, TidyNetwork, Search Snacks, MyPC Backup, Re-markit and any other recently installed unknown program from your computer.To view the most recently installed programs, you can click on the “Installed On” column to sort your program by the installation date. Scroll though the list, and uninstall any unwanted or unknown programs.
![Uninstall Clickeu.tractionize.com program from Windows [Image: Uninstall Clickeu.tractionize.com from Windows]](https://malwaretips.com/blogs/wp-content/uploads/2014/06/uninstall-malicious-program.jpg)
Depending on what program has installed the Clickeu.tractionize.com adware infection, the above program may have a different name or not be installed on your computer. If you cannot find any unwanted or unknown programs on your machine, then you can proceed with the next step.
STEP 2: Remove “Clickeu.tractionize.com” pop-up ads from Internet Explorer, Firefox and Google Chrome
Remove Clickeu.tractionize.com pop-up ads from Internet Explorer
- Open Internet Explorer, click on the “gear icon”
![[Image: icongear.jpg]](https://malwaretips.com/images/removalguide/icongear.jpg) in the upper right part of your browser, then click again on Internet Options.
in the upper right part of your browser, then click again on Internet Options.![Click on the Gear Icon then on Internet Options [Image: Internet Options in Internet Explorer]](https://malwaretips.com/blogs/wp-content/uploads/2014/03/Internet-Options-Internet-Explorer.jpg)
- In the “Internet Options” dialog box, click on the “Advanced” tab, then click on the “Reset” button.
![In the Advanced tab click on the Reset button [Image: Reset Internet Explorer]](https://malwaretips.com/blogs/wp-content/uploads/2014/03/Reset-Internet-Explorer.jpg)
- In the “Reset Internet Explorer settings” section, select the “Delete personal settings” check box, then click on “Reset” button.
![Click on the Reset button to revert IE to its default settings [Image: Reset Internet Explorer to its default settings to remove Clickeu.tractionize.com popup]](https://malwaretips.com/blogs/wp-content/uploads/2014/03/reset-button-Internet-Explorer.jpg)
- When Internet Explorer has completed its task, click on the “Close” button in the confirmation dialogue box. You will now need to close your browser, and then you can open Internet Explorer again.
![Click on the Close button [Image Reset Internet Explorer settings]](https://malwaretips.com/blogs/wp-content/uploads/2014/03/Close-button-Reset.jpg)
Remove Clickeu.tractionize.com pop-up ads from Mozilla Firefox
- In the upper-right corner of the Firefox window, click the Firefox menu button (
![Firefox Menu button [Image: Firefox Menu button]](https://malwaretips.com/blogs/wp-content/uploads/2014/04/Firefox-menu-button.png) ), then click on the “Help” (
), then click on the “Help” (![Firefox Help button [Image: Firefox Help button]](https://malwaretips.com/blogs/wp-content/uploads/2014/04/Firefox-Help.png) ) button.
) button.![Click on the Menu button then question mark button [Image: Click on the Menu button then Help]](https://malwaretips.com/blogs/wp-content/uploads/2014/04/Firefox-Help-button.jpg)
- From the Help menu, choose Troubleshooting Information.
If you’re unable to access the Help menu, type about:support in your address bar to bring up the Troubleshooting information page.![Troubleshooting Information in Firefox [Image: Troubleshooting Information in Firefox]](https://malwaretips.com/blogs/wp-content/uploads/2014/04/Firefox-Troubleshooting-Information.jpg)
- Click the “Reset Firefox” button in the upper-right corner of the “Troubleshooting Information” page.
![Reset Firefox to its default settings [Image: Reset Firefox to its default settings]](https://malwaretips.com/blogs/wp-content/uploads/2014/04/Reset-Firefox-button.jpg)
- To continue, click on the “Reset Firefox” button in the new confirmation window that opens.
![Click on the Reset Firefox button [Image: Click on the Reset Firefox button]](https://malwaretips.com/blogs/wp-content/uploads/2014/04/Reset-Firefox-to-default-settings.jpg)
- Firefox will close itself and will revert to its default settings. When it’s done, a window will list the information that was imported. Click on the “Finish“.
Remove Clickeu.tractionize.com pop-up ads from Google Chrome
- Click on the “Chrome menu button” (
 ) on the browser toolbar, select “Tools“, and then click on “Extensions“.
![Extensions menu in Chrome [Image: Extensions menu in Chrome]](https://malwaretips.com/blogs/wp-content/uploads/2014/03/Google-Chrome-extensions.jpg)
- In the “Extensions” tab, remove the HD-Total-Plus, SafeSaver, DP1815, Video Player, Convert Files for Free, Plus-HD 1.3, BetterSurf, Media Player 1.1, PassShow, LyricsBuddy-1,YClickeu.tractionize.com 1.2, Media Player 1.1, Savings Bull, Feven Pro 1.1, Websteroids,Savings Bull, HD-Plus 3.5 any other unknown extensions by clicking the trash can
![Remove an extension from Chrome [Image: Remove an extension from Chrome]](https://malwaretips.com/blogs/wp-content/uploads/2013/07/Trash-Can-Chrome.png) icon.
icon.
Basically, if you have not installed an extensions then you should remove it from your web browser.
If you cannot remove the Clickeu.tractionize.com extension, and under the trash can you can see the “Installed by enterprise policy” text, then you will need to follow our “Remove Installed by enterprise policy extension from Chrome” guide.![Remove Clickeu.tractionize.com Chrome extensions [Image: Remove Clickeu.tractionize.com Chrome extensions]](https://malwaretips.com/blogs/wp-content/uploads/2014/06/remove-chrome-extension.jpg)
STEP 3: Remove “Clickeu.tractionize.com” adware with AdwCleaner
- You can download AdwCleaner utility from the below link.
ADWCLEANER DOWNLOAD LINK (This link will open a new web page from where you can download “AdwCleaner”) - Before starting AdwCleaner, close all open programs and internet browsers, then double-click on the AdwCleaner icon.

If Windows prompts you as to whether or not you wish to run AdwCleaner, please allow it to run. - When the AdwCleaner program will open, click on the “Scan” button as shown below.
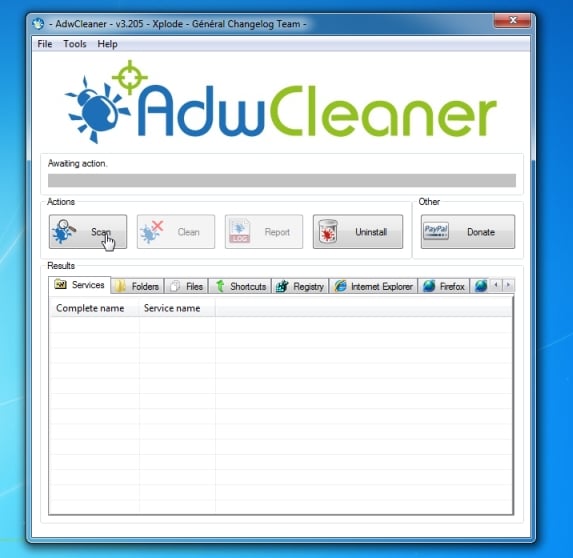
AdwCleaner will now start to search for the “Clickeu.tractionize.com” malicious files that may be installed on your computer. - To remove the “Clickeu.tractionize.com” malicious files that were detected in the previous step, please click on the “Clean” button.
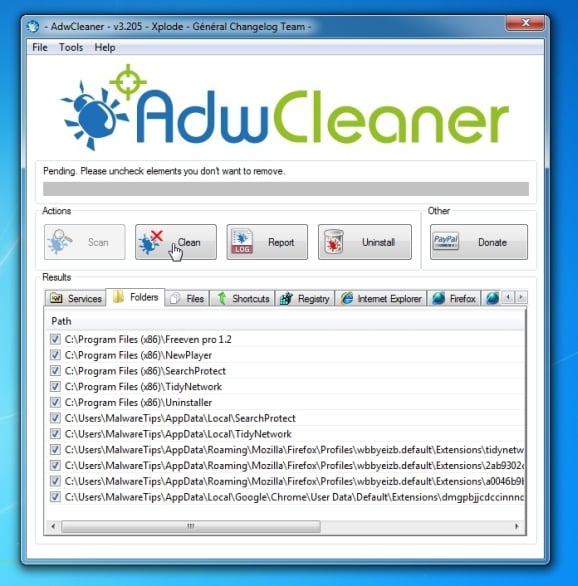
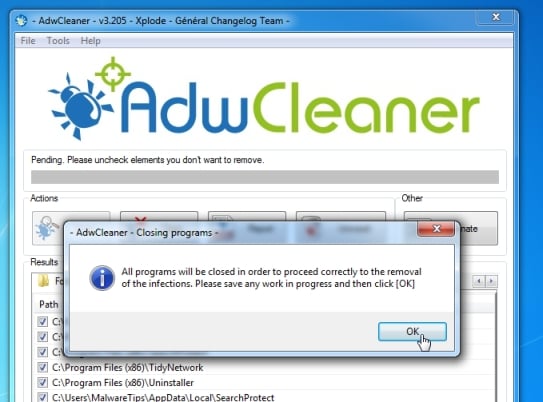
- AdwCleaner will now prompt you to save any open files or documents, as the program will need to reboot the computer. Please do so and then click on the OK button.
STEP 4: Remove “Clickeu.tractionize.com” popup virus with Malwarebytes Anti-Malware Free
It is important to note that Malwarebytes Anti-Malware works well and should run alongside antivirus software without conflicts.
- You can download download Malwarebytes Anti-Malware from the below link.
MALWAREBYTES ANTI-MALWARE DOWNLOAD LINK (This link will open a new web page from where you can download “Malwarebytes Anti-Malware”) - Once downloaded, close all programs, then double-click on the icon on your desktop named “mbam-setup-consumer-2.00.xx” to start the installation of Malwarebytes Anti-Malware.
![Malwarebytes Anti-Malware setup program [Image: Malwarebytes Anti-Malware setup program]](https://malwaretips.com/blogs/wp-content/uploads/2014/02/Malwarebytes-Anti-Malware-Setup.jpg)
 You may be presented with a User Account Control dialog asking you if you want to run this file. If this happens, you should click “Yes” to continue with the installation.
 - When the installation begins, you will see the Malwarebytes Anti-Malware Setup Wizard which will guide you through the installation process.
![Malwarebytes Anti-Malware Setup Wizard [Image: Malwarebytes Anti-Malware Setup Wizard]](https://malwaretips.com/blogs/wp-content/uploads/2014/02/malwarebytes-anti-malware-2-0-installation.jpg)
To install Malwarebytes Anti-Malware on your machine, keep following the prompts by clicking the “Next” button.![Malwarebytes Anti-Malware Final Setup Screen [Image: Malwarebytes Anti-Malware Final Setup Screen]](https://malwaretips.com/blogs/wp-content/uploads/2014/02/malwarebytes-anti-malware-2-0-final-screen.jpg)
- Once installed, Malwarebytes Anti-Malware will automatically start and you will see a message stating that you should update the program, and that a scan has never been run on your system. To start a system scan you can click on the “Fix Now” button.
![[Image: Click on the Fix Now button to start a scan]](https://malwaretips.com/blogs/wp-content/uploads/2014/02/malwarebytes-anti-malware-fix-now.jpg)
Alternatively, you can click on the “Scan” tab and select “Threat Scan“, then click on the “Scan Now” button.![Malwarebytes Anti-Malware Threat Scan [Image: Malwarebytes Anti-Malware Threat Scan]](https://malwaretips.com/blogs/wp-content/uploads/2014/02/malwarebytes-anti-malware-threat-scan-option.jpg)
- Malwarebytes Anti-Malware will now check for updates, and if there are any, you will need to click on the “Update Now” button.
![Click on Update Now to update Malwarebytes Anti-Malware [Image: Click on Update Now to update Malwarebytes Anti-Malware]](https://malwaretips.com/blogs/wp-content/uploads/2014/02/malwarebytes-anti-malware-2-0-update-now.jpg)
- Malwarebytes Anti-Malware will now start scanning your computer for the Clickeu.tractionize.com virus. When Malwarebytes Anti-Malware is scanning it will look like the image below.
![Malwarebytes Anti-Malware while performing a scan [Image: Malwarebytes Anti-Malware while performing a scan]](https://malwaretips.com/blogs/wp-content/uploads/2014/02/malwarebytes-anti-malware-scan.jpg)
- When the scan has completed, you will now be presented with a screen showing you the malware infections that Malwarebytes’ Anti-Malware has detected. To remove the malicious programs that Malwarebytes Anti-malware has found, click on the “Quarantine All” button, and then click on the “Apply Now” button.
![Remove the malware that Malwarebytes Anti-Malware has detected [Image: Remove the malware that Malwarebytes Anti-Malware has found]](https://malwaretips.com/blogs/wp-content/uploads/2014/02/malwarebytes-anti-malware-potential-threat-detected.jpg)
Please note that the infections found may be different than what is shown in the image. - Malwarebytes Anti-Malware will now quarantine all the malicious files and registry keys that it has found. When removing the files, Malwarebytes Anti-Malware may require a reboot in order to remove some of them. If it displays a message stating that it needs to reboot your computer, please allow it to do so.
![Malwarebytes Anti-Malware asking to reboot your computer [Image: Malwarebytes Anti-Malware while removing Clickeu.tractionize.com popup virus]](https://malwaretips.com/blogs/wp-content/uploads/2014/02/malwarebytes-anti-malware-remove-virus.jpg)
After your computer will restart, you should open Malwarebytes Anti-Malware and perform another “Threat Scan” scan to verify that there are no remaining threats
STEP 5: Double-check for the “Clickeu.tractionize.com” infection with HitmanPro
- You can download HitmanPro from the below link:
HITMANPRO DOWNLOAD LINK (This link will open a new web page from where you can download “HitmanPro”) - Double-click on the file named “HitmanPro.exe” (for 32-bit versions of Windows) or “HitmanPro_x64.exe” (for 64-bit versions of Windows). When the program starts you will be presented with the start screen as shown below.
![HitmanPro startup screen (Click Next) [Image: HitmanPro start-up screen]](https://malwaretips.com/blogs/wp-content/uploads/2014/03/hitmanpro-install.jpg)
Click on the “Next” button, to install HitmanPro on your computer.![HitmanPro installation options (Click Next) [Image: HitmanPro setup options]](https://malwaretips.com/blogs/wp-content/uploads/2014/03/hitmapro-start-scan.jpg)
- HitmanPro will now begin to scan your computer for Clickeu.tractionize.com malicious files.
![HitmanPro scanning for Clickeu.tractionize.com pop-up virus [Image: HitmanPro scanning for Clickeu.tractionize.com virus]](https://malwaretips.com/blogs/wp-content/uploads/2014/03/hitmanpro-scanning.jpg)
- When it has finished it will display a list of all the malware that the program found as shown in the image below. Click on the “Next” button, to remove Clickeu.tractionize.com virus.
![HitmanPro scan results (Click Next) [Image: HitmanPro scan results]](https://malwaretips.com/blogs/wp-content/uploads/2014/03/hitmanpro-scan-results.jpg)
- Click on the “Activate free license” button to begin the free 30 days trial, and remove all the malicious files from your computer.
![Click on the Activate free license button [Image: HitmanPro Activate Free License]](https://malwaretips.com/blogs/wp-content/uploads/2014/03/hitmanpro-activation.jpg)
If you are still experiencing problems while trying to remove “Clickeu.tractionize.com” pop-up virus from your machine, please start a new thread in our Malware Removal Assistance forum
using System;
using System.Collections.Generic;
using System.Linq;
using System.Text;
using Microsoft.Xrm.Sdk;
using Microsoft.Xrm.Sdk.Query;
namespace LeadRecordw
{
public class Class1
{
public static void Read()
{
Entity account = new Entity(“account”);
Entity cass = new Entity(“incident”);
Entity account2 = new Entity();
account2.LogicalName = “account”;
// read the values from the entity (any entity which is defined)
// read means, retrieve the entity’s fields name values from the entity is called as “reading” the values
account.Attributes.ContainsKey(“name”);
string accname = account[“name”].ToString();
DateTime date = (DateTime)account[“createdon”];
DateTime date2 = Convert.ToDateTime(account2[“createdon”]);
string accname1 = account2[“name”].ToString();
//optionset
OptionSetValue optname = (OptionSetValue)account[“new_accounttype”];
//lookup
EntityReference Parentaccount = (EntityReference)account[“parentaccountid”];
string parentname = Parentaccount.LogicalName;
Guid parentid = Parentaccount.Id;
int age = (int)account[“new_age”];
int age2 = Convert.ToInt32(account[“new_age”]);
}
public static void Write()
{
Entity contact = new Entity(“contact”);
contact[“name”] = “abc”;
contact[“new_age”] = 68;
DateTime aa = new DateTime(1999, 12, 09);
contact[“createdon”] = aa;
contact[“createdon”] = new DateTime(1999, 12, 09);
OptionSetValue ad = new OptionSetValue(12);
contact[“new_accounttype”] = ad;
}
public static void Main()
{
Entity account = new Entity(“account”);
string accname = account[“accountname”].ToString();
Entity csd = new Entity(“incident”);
csd[“incidentname”] = accname;
}
public static void read1()
{
Entity lead = new Entity(“lead”);
Entity lead1 = new Entity();
lead1.LogicalName = “lead”;
string sub = lead1[“subject”].ToString();
string name = lead1[“fullname”].ToString();
string jobtitle = lead1[“jobtitle”].ToString();
int businessphone = Convert.ToInt32(lead1[“telephone1”]);
int mobilephone = Convert.ToInt32(lead1[“mobilephone”]);
EntityReference parentaccountoflead = (EntityReference)lead1[“parentaccountid”];
string parentaccount = lead1.LogicalName;
Guid parentid = lead1.Id;
string email = lead1[“email”].ToString();
EntityReference parentcontact = (EntityReference)lead1[“parentcontactid”];
string parentcont = lead1.LogicalName;
Guid parentsid = lead1.Id;
string companyname = lead1[“companyname”].ToString();
string websiteurl = lead1[“websiteurl”].ToString();
string address = lead1[“address1_composite”].ToString();
string description = lead1[“description”].ToString();
int annualrevenue = Convert.ToInt32(lead1[“revenue”]);
int numbofemployyee = Convert.ToInt32(lead1[“numberofemployees”]);
OptionSetValue industry = (OptionSetValue)lead1[“industrycode”];
string SIC = lead1[“SIC”].ToString();
EntityReference currency = (EntityReference)lead1[“transcationcurrencyid”];
string curren = lead1.LogicalName;
Guid currenid = lead1.Id;
}
public static void Write2()
{
Entity contact = new Entity(“contact”);
contact[“fullname”] = “malla”;
contact[“jobtitle”] = “MANAGER”;
// here retrieve values from account entity then assign to contact entity fields.
Entity account = new Entity(“account”);
string accname = account[“name”].ToString();
Entity contat = new Entity(“contact”);
contat[“name”] = accname;
//contact[“fullname”] = accname;
DateTime date = new DateTime(2001, 12, 12);
contat[“new_date”] = date;
OptionSetValue acctype = new OptionSetValue(2);
account[“new_accounttype”] = acctype;
}
public static void Main1()
{
// here iam assigning the contact field name companyname = lead field name parent account for lead
Entity contact = new Entity(“contact”);
EntityReference compname = (EntityReference)contact[“parentcustomerid”];
string companyname = contact.LogicalName;
Guid companyid = contact.Id;
Entity lead = new Entity(“lead”);
lead[“parentaccountid”] = contact.Id;
}
public static void Read1()
{
Entity annotation = new Entity(“annotation”);
// annotation[“createdby”] = “mallareddy”;
Entity cad = new Entity();
cad.LogicalName = “incident”;
DateTime date = (DateTime)cad[“new_date”];
Entity cad1 = new Entity(“incident”);
int casid = Convert.ToInt32(cad1[“caseid”]);
string casename = cad1[“casename”].ToString();
OptionSetValue caseoption = (OptionSetValue)cad1[“caseoption”];
EntityReference caserefer = (EntityReference)cad1[“casereference”];
string casefer = cad1.LogicalName;
Guid caseferid = cad1.Id;
}
public static void Write3()
{
Entity account = new Entity(“account”);
account[“name”] = “kashmir”;
account[“address1”] = “london”;
OptionSetValue ad = new OptionSetValue(2);
account[“new_accountype”] = ad;
DateTime dat = new DateTime(2011, 12, 11);
account[“createdon”] = dat;
}
public static void Main3()
{
Entity contact = new Entity(“contact”);
string companyname = contact[“companyname”].ToString();
Entity cass = new Entity(“incident”);
cass[“casename”] = companyname;
}
public static void Read4()
{
Entity contact = new Entity(“contact”);
Entity csd = new Entity();
csd.LogicalName = “incident”;
Entity activity = new Entity();
activity.LogicalName = “activity”;
Entity account = new Entity();
string accname = account[“accountname”].ToString();
int accno = Convert.ToInt32(account[“accountnumber”]);
DateTime date = (DateTime)account[“new_date”];
EntityReference companyname = (EntityReference)account[“companynameid”];
OptionSetValue region = (OptionSetValue)account[“new_region”];
bool gender = (bool)account[“new_gender”];
EntityReference parentaccount = (EntityReference)account[“parentaccountid”];
string parentaccountname = account.LogicalName;
Guid parentaccountid = account.Id;
}
public static void Write6()
{
Entity acc = new Entity(“account”);
acc[“accountname”] = “Malla reddy”;
acc[“phone”] = 1234555;
acc[“new_weburl”] = “www.excitech.co.uk”;
Guid parentcusromerid = new Guid();
EntityReference accparentid = new EntityReference();
accparentid.Id = parentcusromerid;
accparentid.LogicalName = “account”;
acc[“parentaccountid”] = accparentid;
OptionSetValue region = new OptionSetValue(5);
acc[“new_region”] = region;
DateTime dat = new DateTime(2001, 12, 03);
acc[“new_date”] = dat;
}
public static void Main5()
{
Entity account1 = new Entity(“account”);
DateTime createdon = (DateTime)account1[“createdon”];
Entity lead = new Entity(“lead”);
lead[“datecreatedlead”] = createdon;
string accname = account1[“accountname”].ToString();
lead[“leadname”] = accname;
int accountnumber = Convert.ToInt32(account1[“accountnumber”]);
lead[“leadnumber”] = accountnumber;
//or
lead[“leadnumber”] = Convert.ToInt32(account1[“accountnumber”]);
}
public static void Retrieve(Guid id, IOrganizationService service)
{
Entity account = service.Retrieve(“account”, id, new Microsoft.Xrm.Sdk.Query.ColumnSet(“accountname”));
string accname = account[“accountname”].ToString();
Entity account1 = service.Retrieve(“account”, id, new Microsoft.Xrm.Sdk.Query.ColumnSet(“telephone1”));
int phone = Convert.ToInt32(account[“telephone1”]);
Entity account2 = service.Retrieve(“account”, id, new Microsoft.Xrm.Sdk.Query.ColumnSet(“fax”));
int fax1 = Convert.ToInt32(account[“fax”]);
Entity account3 = service.Retrieve(“account”, id, new Microsoft.Xrm.Sdk.Query.ColumnSet(“address1_addresstypecode”));
OptionSetValue address = (OptionSetValue)account[“address1_addresstypecode”];
Entity account4 = service.Retrieve(“account”, id, new Microsoft.Xrm.Sdk.Query.ColumnSet(“createdon”));
DateTime createdon1 = (DateTime)account[“createdon”];
Entity account5 = service.Retrieve(“account”, id, new Microsoft.Xrm.Sdk.Query.ColumnSet(“parentaccountid”));
EntityReference parentaccount = (EntityReference)account[“parentaccountid”];
string parentacc = account.LogicalName;
Guid parentaccid = account.Id;
Entity account6 = service.Retrieve(“account”, id, new Microsoft.Xrm.Sdk.Query.ColumnSet(“new_employeesworking”));
OptionSetValue employeeworking = (OptionSetValue)account[“new_employeesworking”];
//————————————————————————————————–
Entity account7 = service.Retrieve(“account”, id, new Microsoft.Xrm.Sdk.Query.ColumnSet(“new_name”, “new_age”, “emailaddress1”));
string accountname = account7[“new_name”].ToString();
int accage = Convert.ToInt32(account7[“new_age”]);
string email = account7[“emailaddress1”].ToString();
Entity account8 = service.Retrieve(“account”, id, new Microsoft.Xrm.Sdk.Query.ColumnSet(“new_age”, “new_bitfield”, “new_existingcustomer”));
int accountage = Convert.ToInt32(account8[“new_age”]);
OptionSetValue bitfield = (OptionSetValue)account8[“new_bitfield”];
OptionSetValue existingcustomer = (OptionSetValue)account8[“new_existingcustomer”];
Entity account9 = service.Retrieve(“account”, id, new Microsoft.Xrm.Sdk.Query.ColumnSet(“new_accounttype”, “address1_line1”, “new_employeesworking”, “new_lastmodifiedby”));
OptionSetValue acctype = (OptionSetValue)account9[“new_accounttype”];
string addressline = account9[“address1_line1”].ToString();
OptionSetValue employeeworking1 = (OptionSetValue)account9[“new_employeesworking”];
DateTime lastmodifiedby = (DateTime)account9[“new_lastmodifiedby”];
}
public static void read3()
{
Entity lead1 = new Entity(“lead”);
Entity lead = new Entity();
lead.LogicalName = “lead”;
string subject = lead[“subject”].ToString();
string fullname = lead[“fullname”].ToString();
string jobtitle = lead[“jobtitle”].ToString();
int businessphone = Convert.ToInt32(lead[“telephone1”]);
int mobilephone = Convert.ToInt32(lead[“mobilephone”]);
EntityReference parentaccountforlead = (EntityReference)lead[“parentaccountid”];
string email = lead[“email”].ToString();
EntityReference parentcontactforlead = (EntityReference)lead[“parentcontactid”];
string parentcontactname = lead.LogicalName;
Guid parentcontactid = lead.Id;
string company = lead[“companyname”].ToString();
string website = lead[“websiteurl”].ToString();
string Address1 = lead[“address1_composite”].ToString();
string description = lead[“description”].ToString();
OptionSetValue industry = (OptionSetValue)lead[“industrycode”];
int annualrevenue = Convert.ToInt32(lead[“revenue”]);// currency data type??
int noofemployees = Convert.ToInt32(lead[“numberofemployees”]);
string SIC = lead[“sic”].ToString();
EntityReference currency = (EntityReference)lead[“transcationcurrencyid”];
}
public static void Write3()
{
Entity contract = new Entity(“contract”);
contract[“contractnumber”] = 12333333;
contract[“title”] = “BSSYSTEMS”;
//EntityReference accparentid = new EntityReference();
//accparentid.Id = parentcusromerid;
//accparentid.LogicalName = “account”;
//acc[“parentaccountid”] = accparentid;
EntityReference customer = new EntityReference();
customer.LogicalName = “contract”;
contract[“customerid”] = customer; // doubt how to assign values of entity reference
EntityReference contractaddress = new EntityReference();
contract.LogicalName = “contract”;
contract[“serviceaddress”] = contractaddress; // ??
DateTime contractstartdate = new DateTime(1988, 12, 09);
contract[“activeon”] = contractstartdate;
DateTime contractenddate = new DateTime(1999, 12, 12);
contract[“expireson”] = contractenddate;
contract[“duration”] = 12;
}
public static void Main5()
{
Entity account = new Entity(“account”);
string accountnames = account[“accountname”].ToString();
Entity contract = new Entity(“contract”);
contract[“title”] = accountnames;
}
public static void Retreive(Guid id, IOrganizationService service)
{
Entity leaddetails = service.Retrieve(“leaddetails”, id, new Microsoft.Xrm.Sdk.Query.ColumnSet(true));
}
public static void RetreiveMuliple(IOrganizationService service)
{
QueryExpression query = new QueryExpression();
query.EntityName = “lead”;
query.ColumnSet = new ColumnSet(true);
query.Criteria.Conditions.Add(new ConditionExpression(“emailaddress1”, ConditionOperator.Equal, “malla@gmail.com”));
query.Criteria.Conditions.Add(new ConditionExpression(“fullname”, ConditionOperator.Equal, “malla”));
EntityCollection leadrecords = service.RetrieveMultiple(query);
foreach (Entity lead in leadrecords.Entities)
{
string email = lead[“subject”].ToString();
Console.WriteLine(email);
}
}
public static void RetreiveMultiple(IOrganizationService service)
{
QueryExpression query1 = new QueryExpression();
query1.EntityName = “contact”;
query1.ColumnSet = new ColumnSet(true);
query1.Criteria.Conditions.Add(new ConditionExpression(“fullname”, ConditionOperator.EndsWith, “das”));
query1.Criteria.Conditions.Add(new ConditionExpression(“telephone1”, ConditionOperator.EndsWith, “22”));
EntityCollection contactrecords = service.RetrieveMultiple(query1);
foreach (Entity contact in contactrecords.Entities)
{
string fullname = contact[“fullname”].ToString();
Console.WriteLine(fullname);
}
}
public static void RetreiveMultiple(IOrganizationService service)
{
QueryExpression query2 = new QueryExpression();
query2.EntityName = “account”;
query2.ColumnSet = new ColumnSet(true);
query2.Criteria.Conditions.Add(new ConditionExpression(“name”, ConditionOperator.DoesNotEndWith, “hsjs”));
query2.Criteria.Conditions.Add(new ConditionExpression(“telephone1”, ConditionOperator.DoesNotEndWith, “3222”));
EntityCollection accountrecord = service.RetrieveMultiple(query2);
foreach (Entity account in accountrecord.Entities)
{
string name = account[“name”].ToString();
Console.WriteLine(name);
}
}
public static void RetreiveMultiplesss(IOrganizationService service)
{
QueryExpression query3 = new QueryExpression();
query3.EntityName = “new_leaddetails”;
query3.ColumnSet = new ColumnSet(true);
query3.Criteria.Conditions.Add(new ConditionExpression(“new_name”, ConditionOperator.DoesNotContain, “his”));
query3.Criteria.Conditions.Add(new ConditionExpression(“new_age”, ConditionOperator.DoesNotContain, “12”));
query3.Criteria.Conditions.Add(new ConditionExpression(“new_email”, ConditionOperator.DoesNotContain, “mll@gmail.com”));
query3.Criteria.Conditions.Add(new ConditionExpression(“new_dob”, ConditionOperator.DoesNotContain, “23”));
query3.Criteria.Conditions.Add(new ConditionExpression(“new_rating”, ConditionOperator.DoesNotContain, “coolest”));
query3.Criteria.Conditions.Add(new ConditionExpression(“new_connection”, ConditionOperator.DoesNotContain, “sample”));
query3.Criteria.Conditions.Add(new ConditionExpression(“new_account”, ConditionOperator.DoesNotContain, “simple”));
EntityCollection leaddetailsrecord = service.RetrieveMultiple(query3);
foreach (Entity leaddetail in leaddetailsrecord.Entities)
{
int name = Convert.ToInt32(leaddetail[“new_age”]);
Console.WriteLine(name);
}
}
public static void RetreiveMultipleA(IOrganizationService service)
{
QueryExpression query4 = new QueryExpression();
query4.EntityName = “opportunity”;
query4.ColumnSet = new ColumnSet(“purchaseprocess”);
query4.Criteria.Conditions.Add(new ConditionExpression(“purchaseprocess”, ConditionOperator.DoesNotContain, “kls”));
EntityCollection Opportunity = service.RetrieveMultiple(query4);
foreach (Entity opportunity in Opportunity.Entities)
{
OptionSetValue purchaseprocess = (OptionSetValue)opportunity[“purchaseprocess”];
Console.WriteLine(purchaseprocess);
}
}
}
}

