Menu Close

Category: Blog

{How to} Increase lead conversions by routing to the correct sales representative

Hello Everyone,

Today I am going to show how to configure the Assignment rules for lead qualifications criteria to increase the lead conversions by routing to the correct sales rep.

Let’s get’s started.

As an Organisation want to win more deals and focus more on lead conversions and its all manual process in Dynamics 365 Sales and Customer Insights.

With the new feature called Asssignment Rules on Dynamics 365 Sales Hub App you can configure rules.

1. Login into Dynamics 365 Sales Hub.

2. Change the settings to Sales Insights Settings.

3. Click on Sales accelerator and then Work assignment
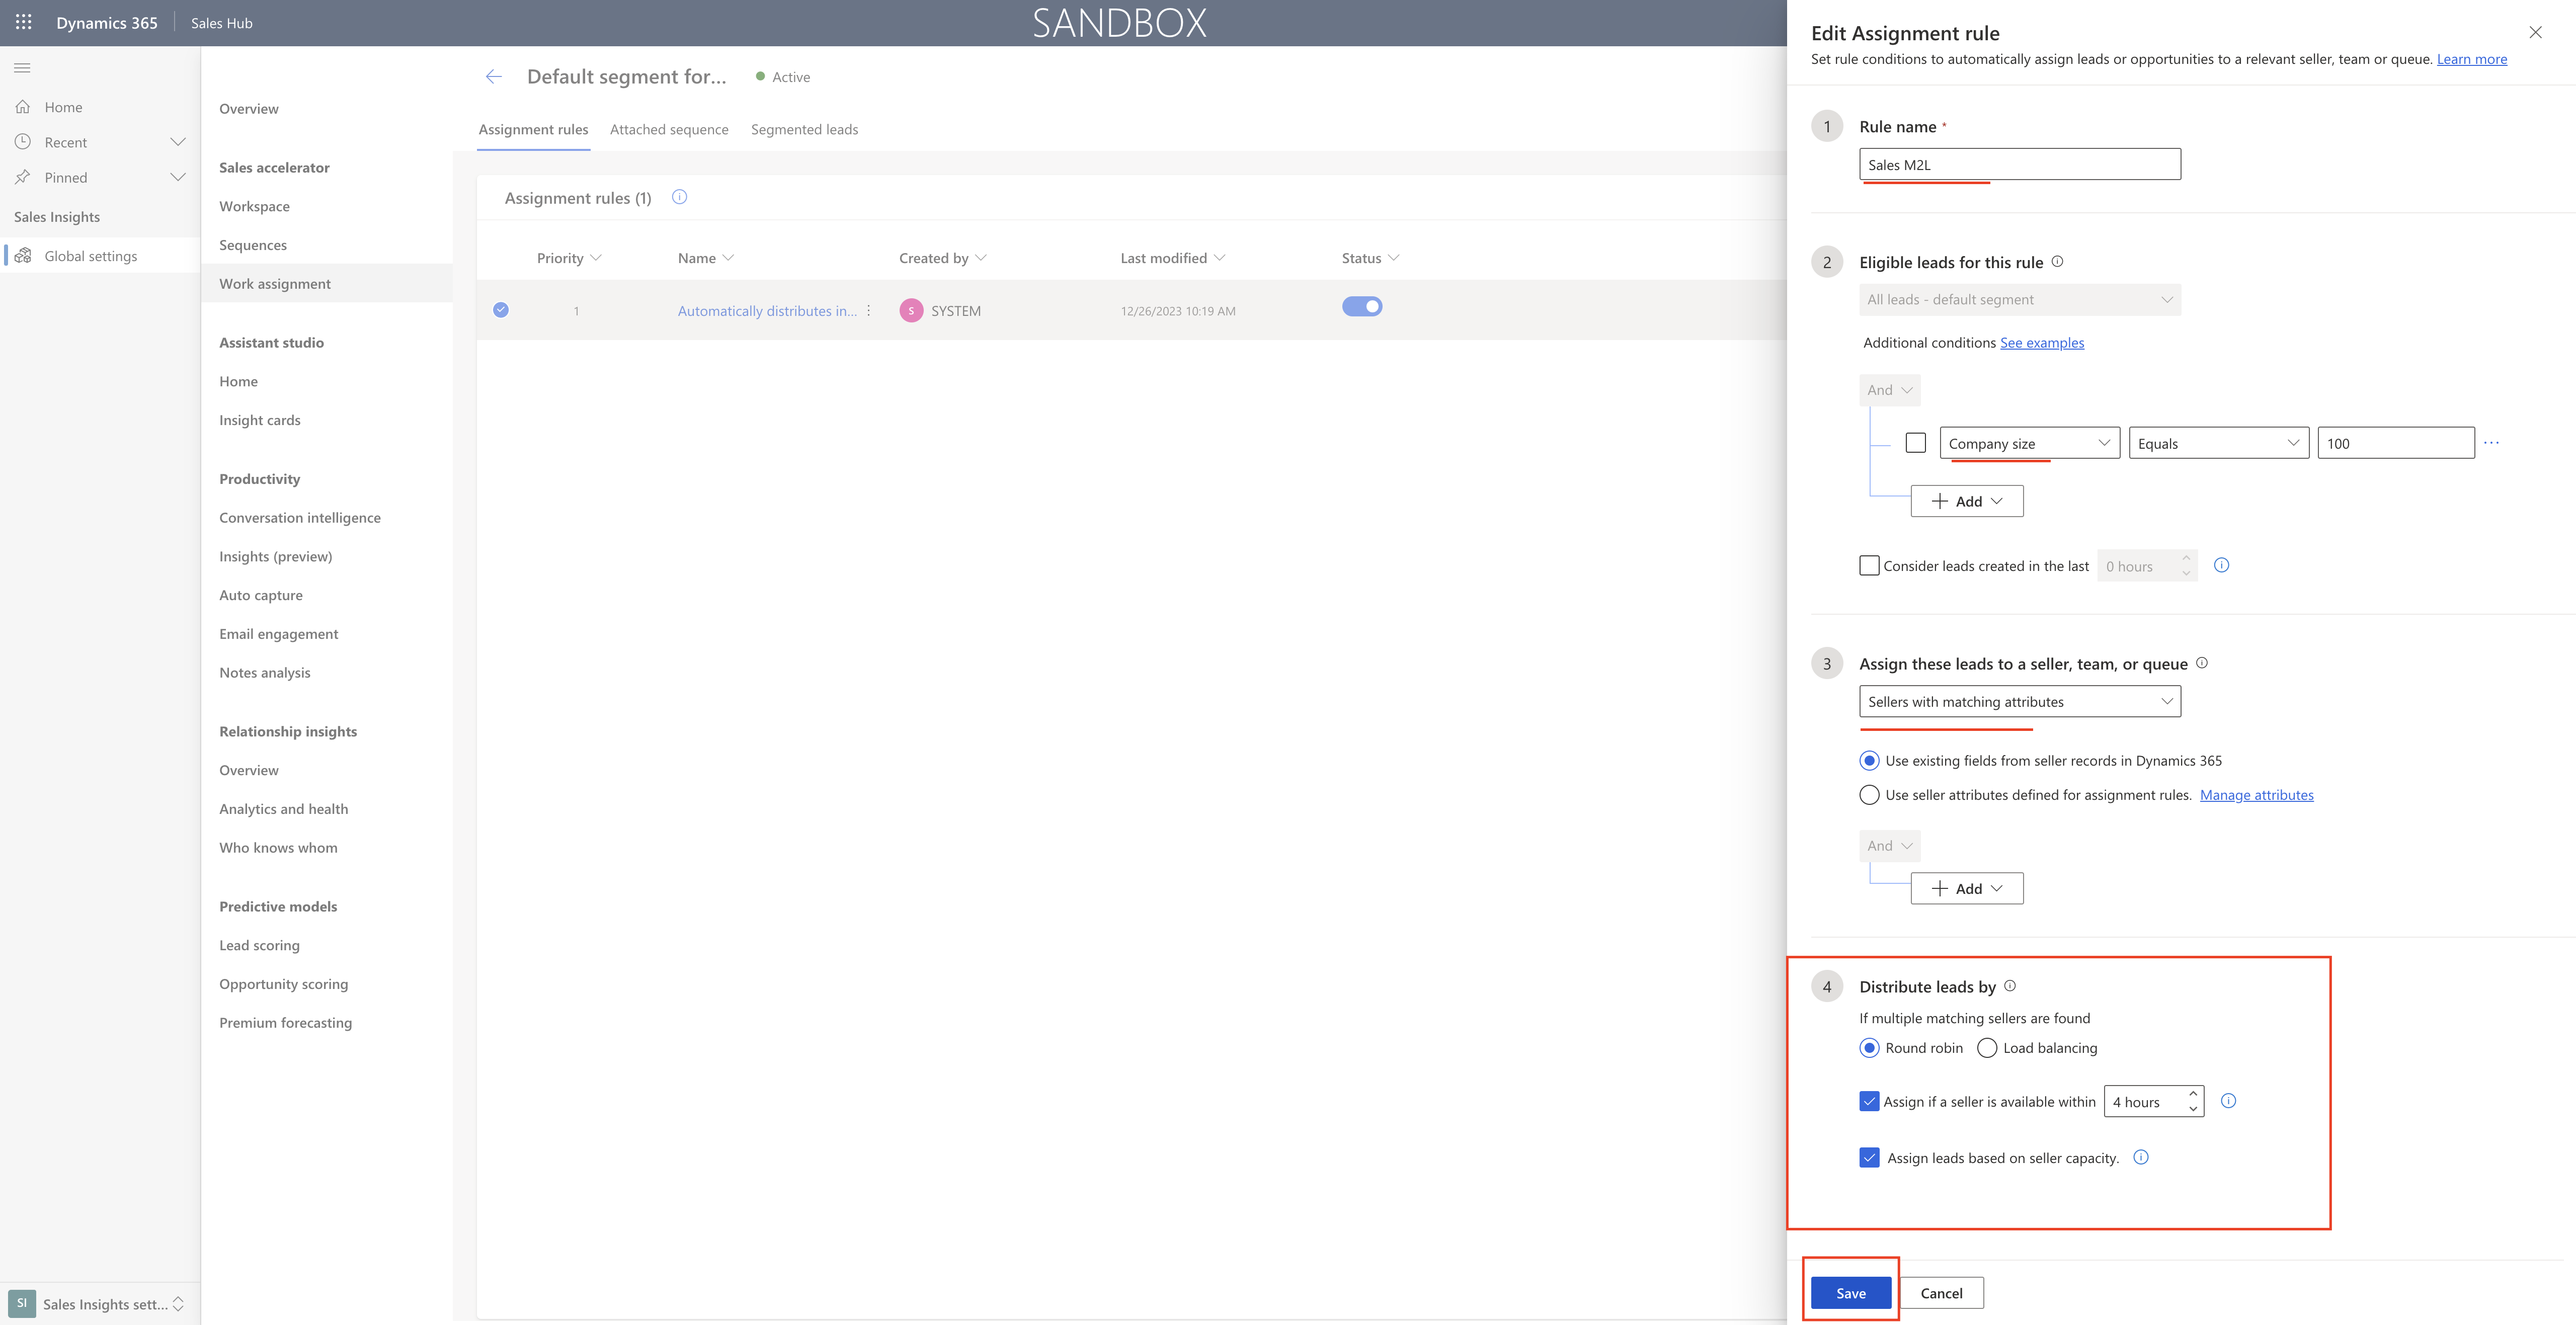
4. Activate the assignment rules.

Using Dynamics 365 Customer Insights – Journeys and Dynamics 365 Sales together, you can now easily route qualified leads identified by marketing team to a seller without customized solutions or intervention. It will boost marketing and sales teams productivity while maintaining focus on the right customers.

Feature:

Define lead qualification criteria based on scoring models.
Define qualification actions to update the relevant fields of the lead record when a lead meets the defined criteria.
Based on the qualification action, create automated assigment rules(available in Dynamics 365 Sales Premium or Dynamics 365 Sales Enterprise) based on your business needs, such as the sales rep’s capacity or matching attributes between the rep and lead.

That’s it for today.

I hope this helps.

Malla Reddy Gurram(@UK365GUY)
#365BlogPostsin365Days

Share this:

{Do you know} create brand profiles and create reusable themes on Dynamics 365 Marketing

Hello Everyone,

Today I am going to show how to add style to your brand profiles and create reusable themes on Dynamics 365 Marketing.

Let’s get’s started.

On Dynamics 365 Marketing you can create email templates but maintaining a consistent brand identity is key for building customer experience and increasing brand recognition.

However replicating brand guidelines in your marketing emails, forms and event registration pages is often time consuming and requires back and forth styling and formatting.

With the Copilot you can quickly create branded themes for your content and easily apply them to emails, forms and event registration pages.

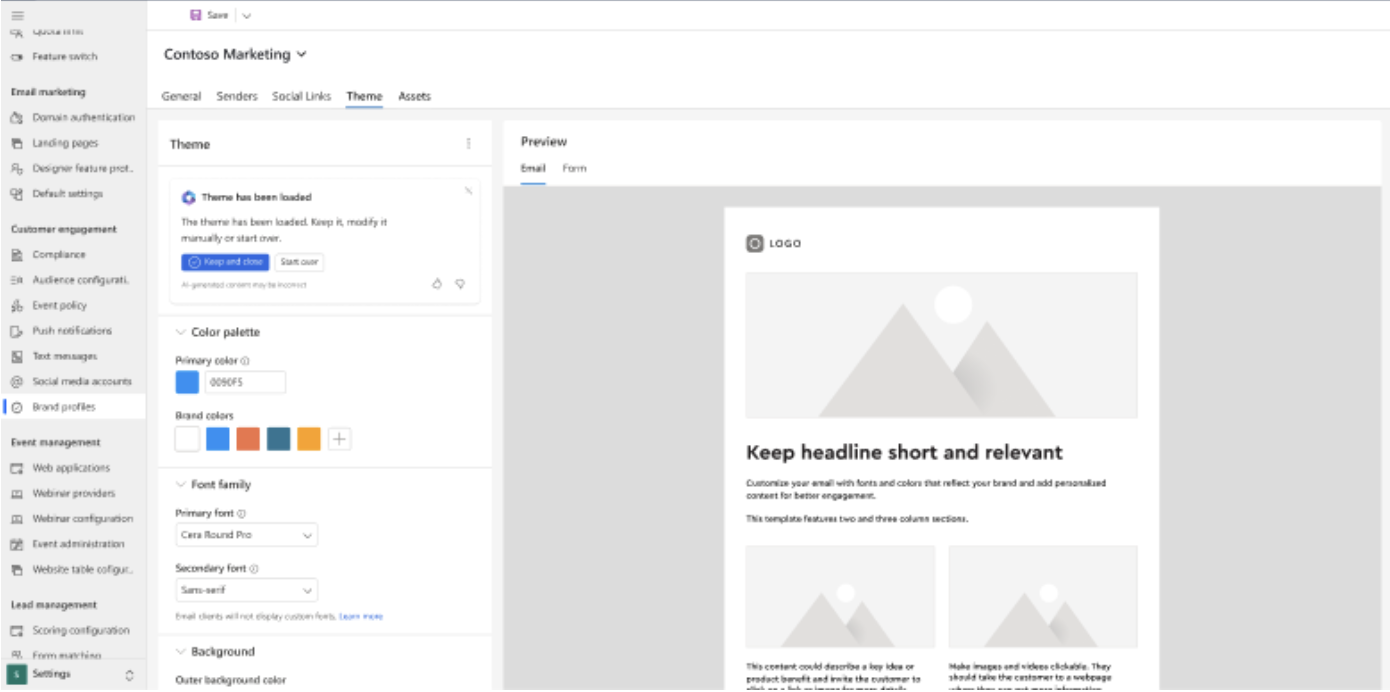
Login into Dynamics 365 Marketing.

Go to Brand Profiles and apply the styles to brand profiles to ensure consistent branding and save time when designing emails and templates.

Use your website URL to get design elements such as formats, font sizes and color palettes.

Fine tune and adjust elements to match your campaign or brand guidlines, save your themes and easily apply it to new or existing content.

That’s it for today.

I hope this helps.

Malla Reddy Gurram(@UK365GUY)
#365BlogPostsin365Days

Share this:

{How to} Audit the Power Apps logging activity

Hello Everyone,

Today I am going to show how to audit environmnt management operations.

Let’s get’s started.

Microsoft Purview and Microsoft Defender are solutions that allow customers to search and archive events that can be applied to compliance and security use cases.

How do you do that?

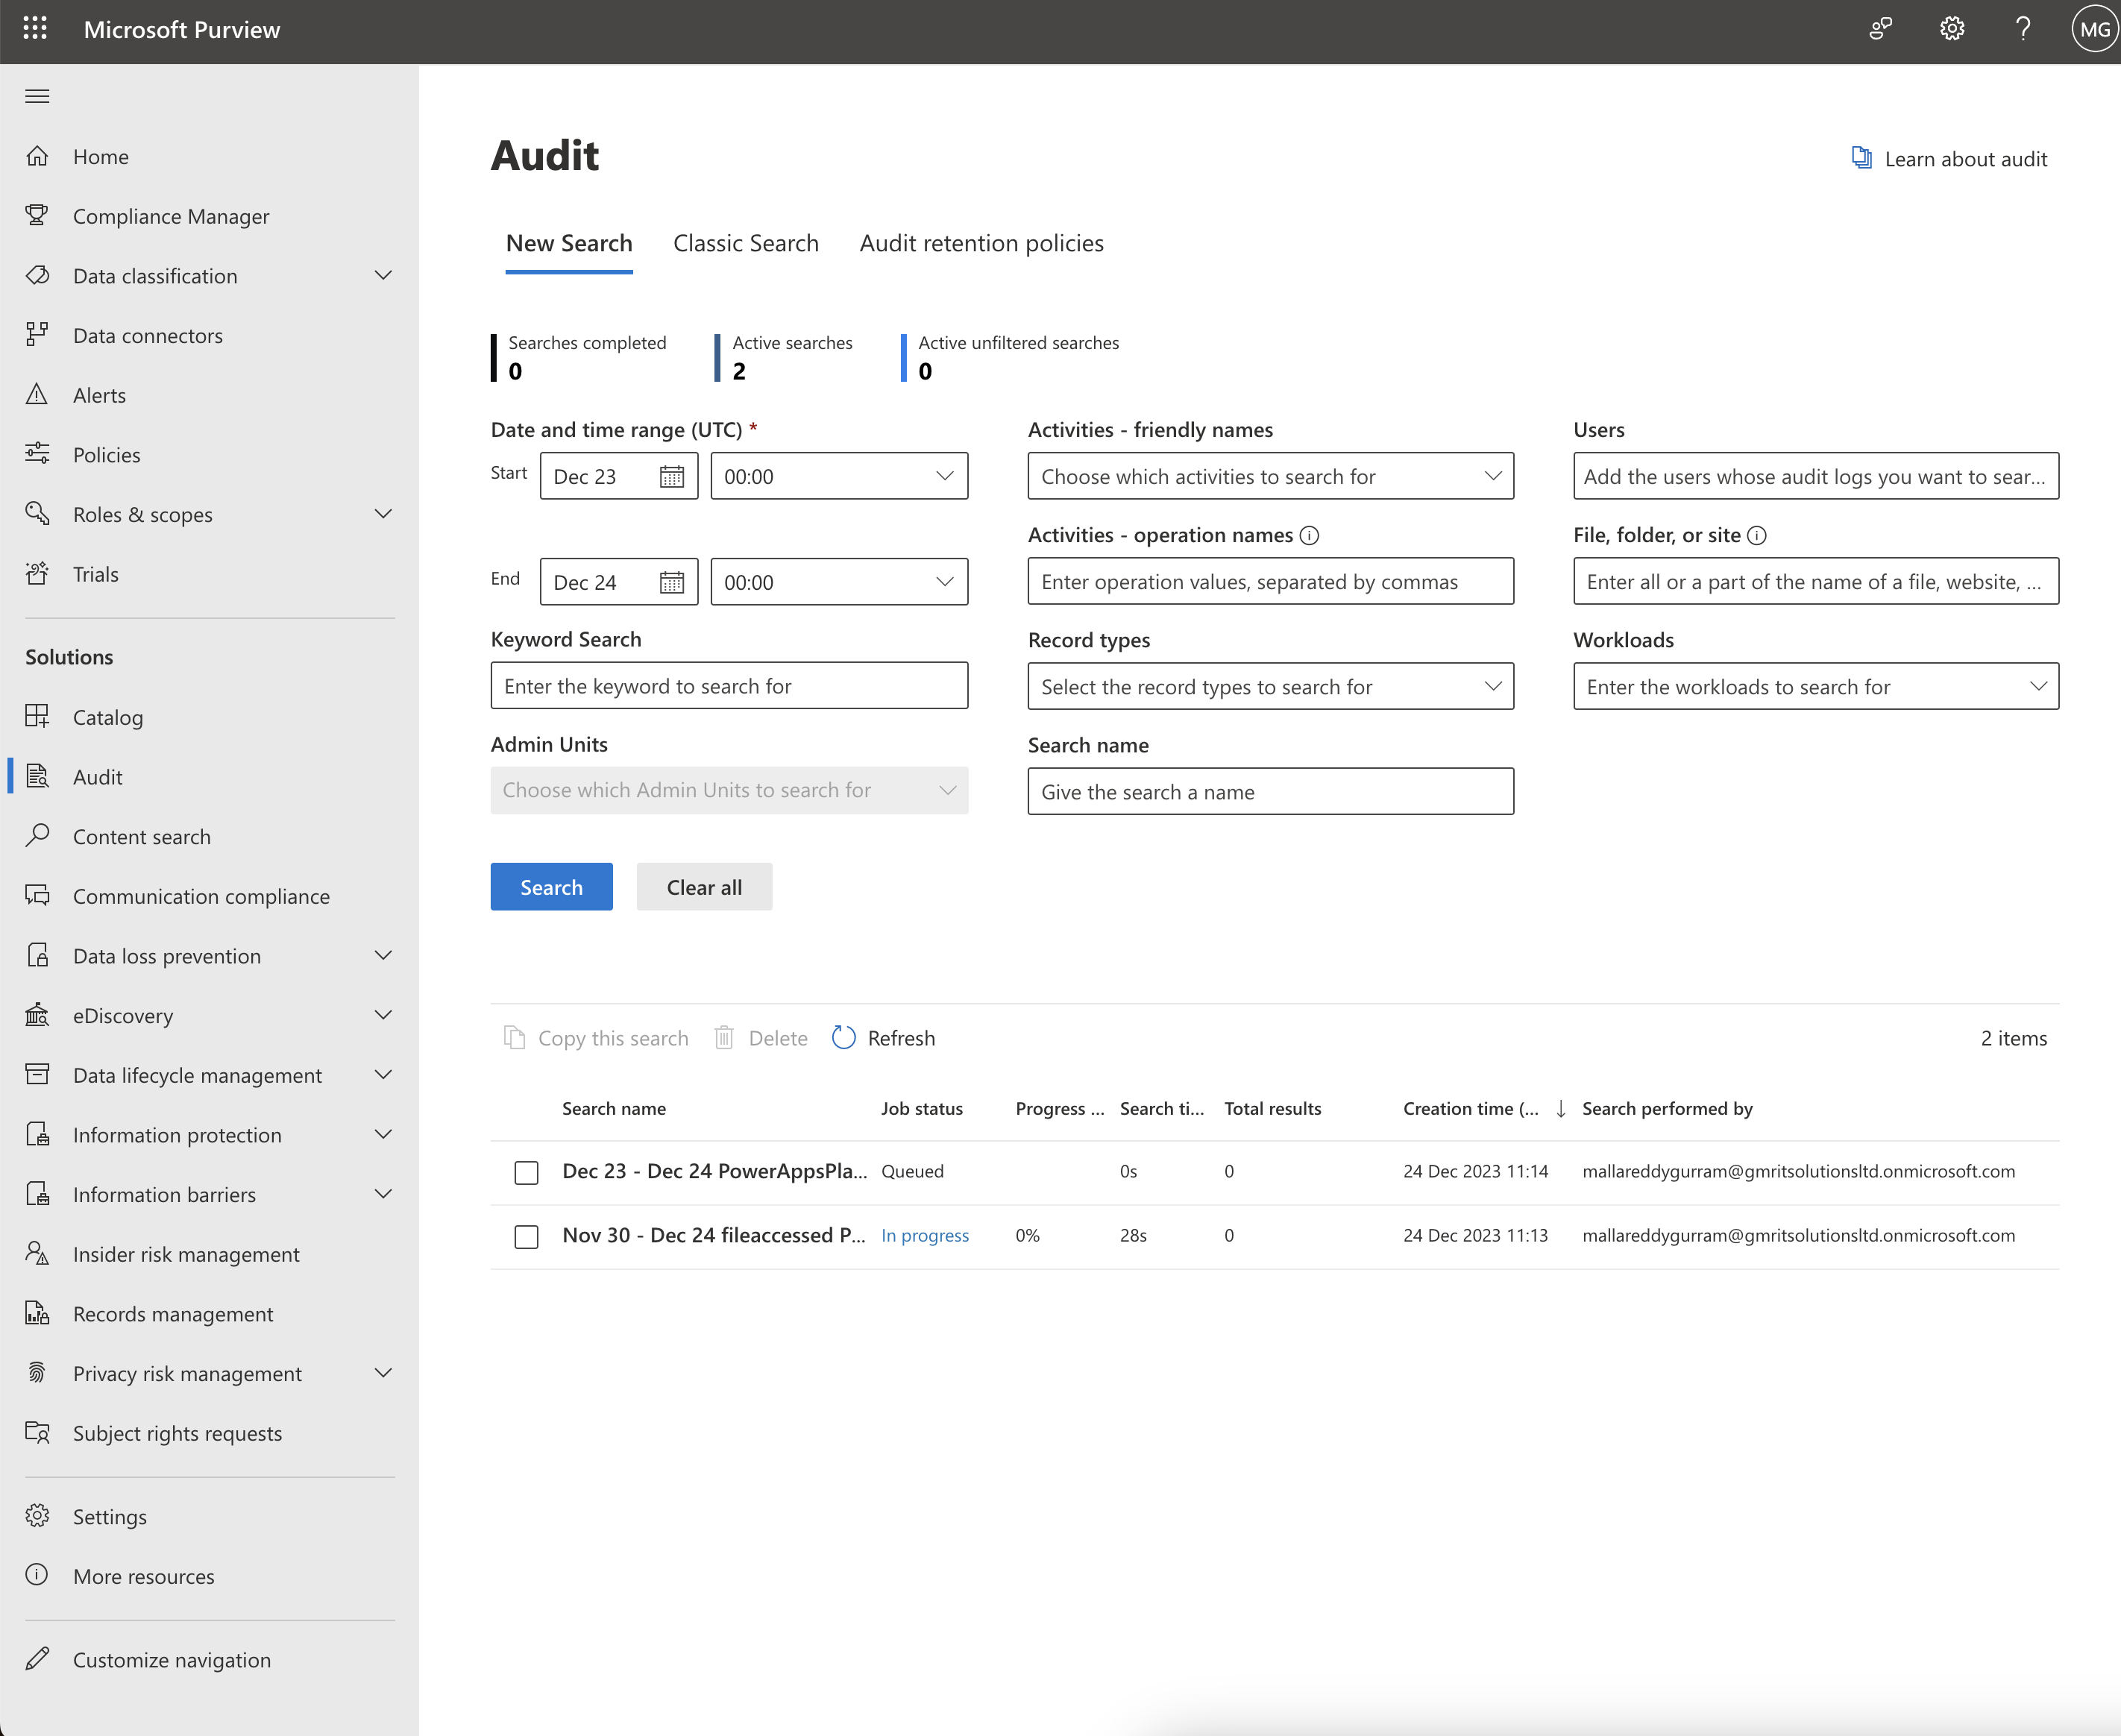
Power apps activities are tracked from the Microsoft Purview compliance portal.

Login to theMicrosoft Purview Portal

Select Search > Audit log search

Within the Audit Log Search window, Power Platform admins can search audit logs across many popular services including eDiscovery, Power BI, Exchange, Microsoft Entra ID, Microsoft Teams, customer engagement apps and Microsoft Power Apps.

Note: Microsoft Purview can be accessed by Admins.

That’s it for today.

I hope this helps.

Malla Reddy Gurram(@UK365GUY)
#365BlogPostsin365Days
Share this:

{How to } Direct new makers to their own developer environments in Power Platform Admin Center

Hello Everyone,

Today I am going to show how to route the new makers into their own developer environments.

Let’s get’s started.

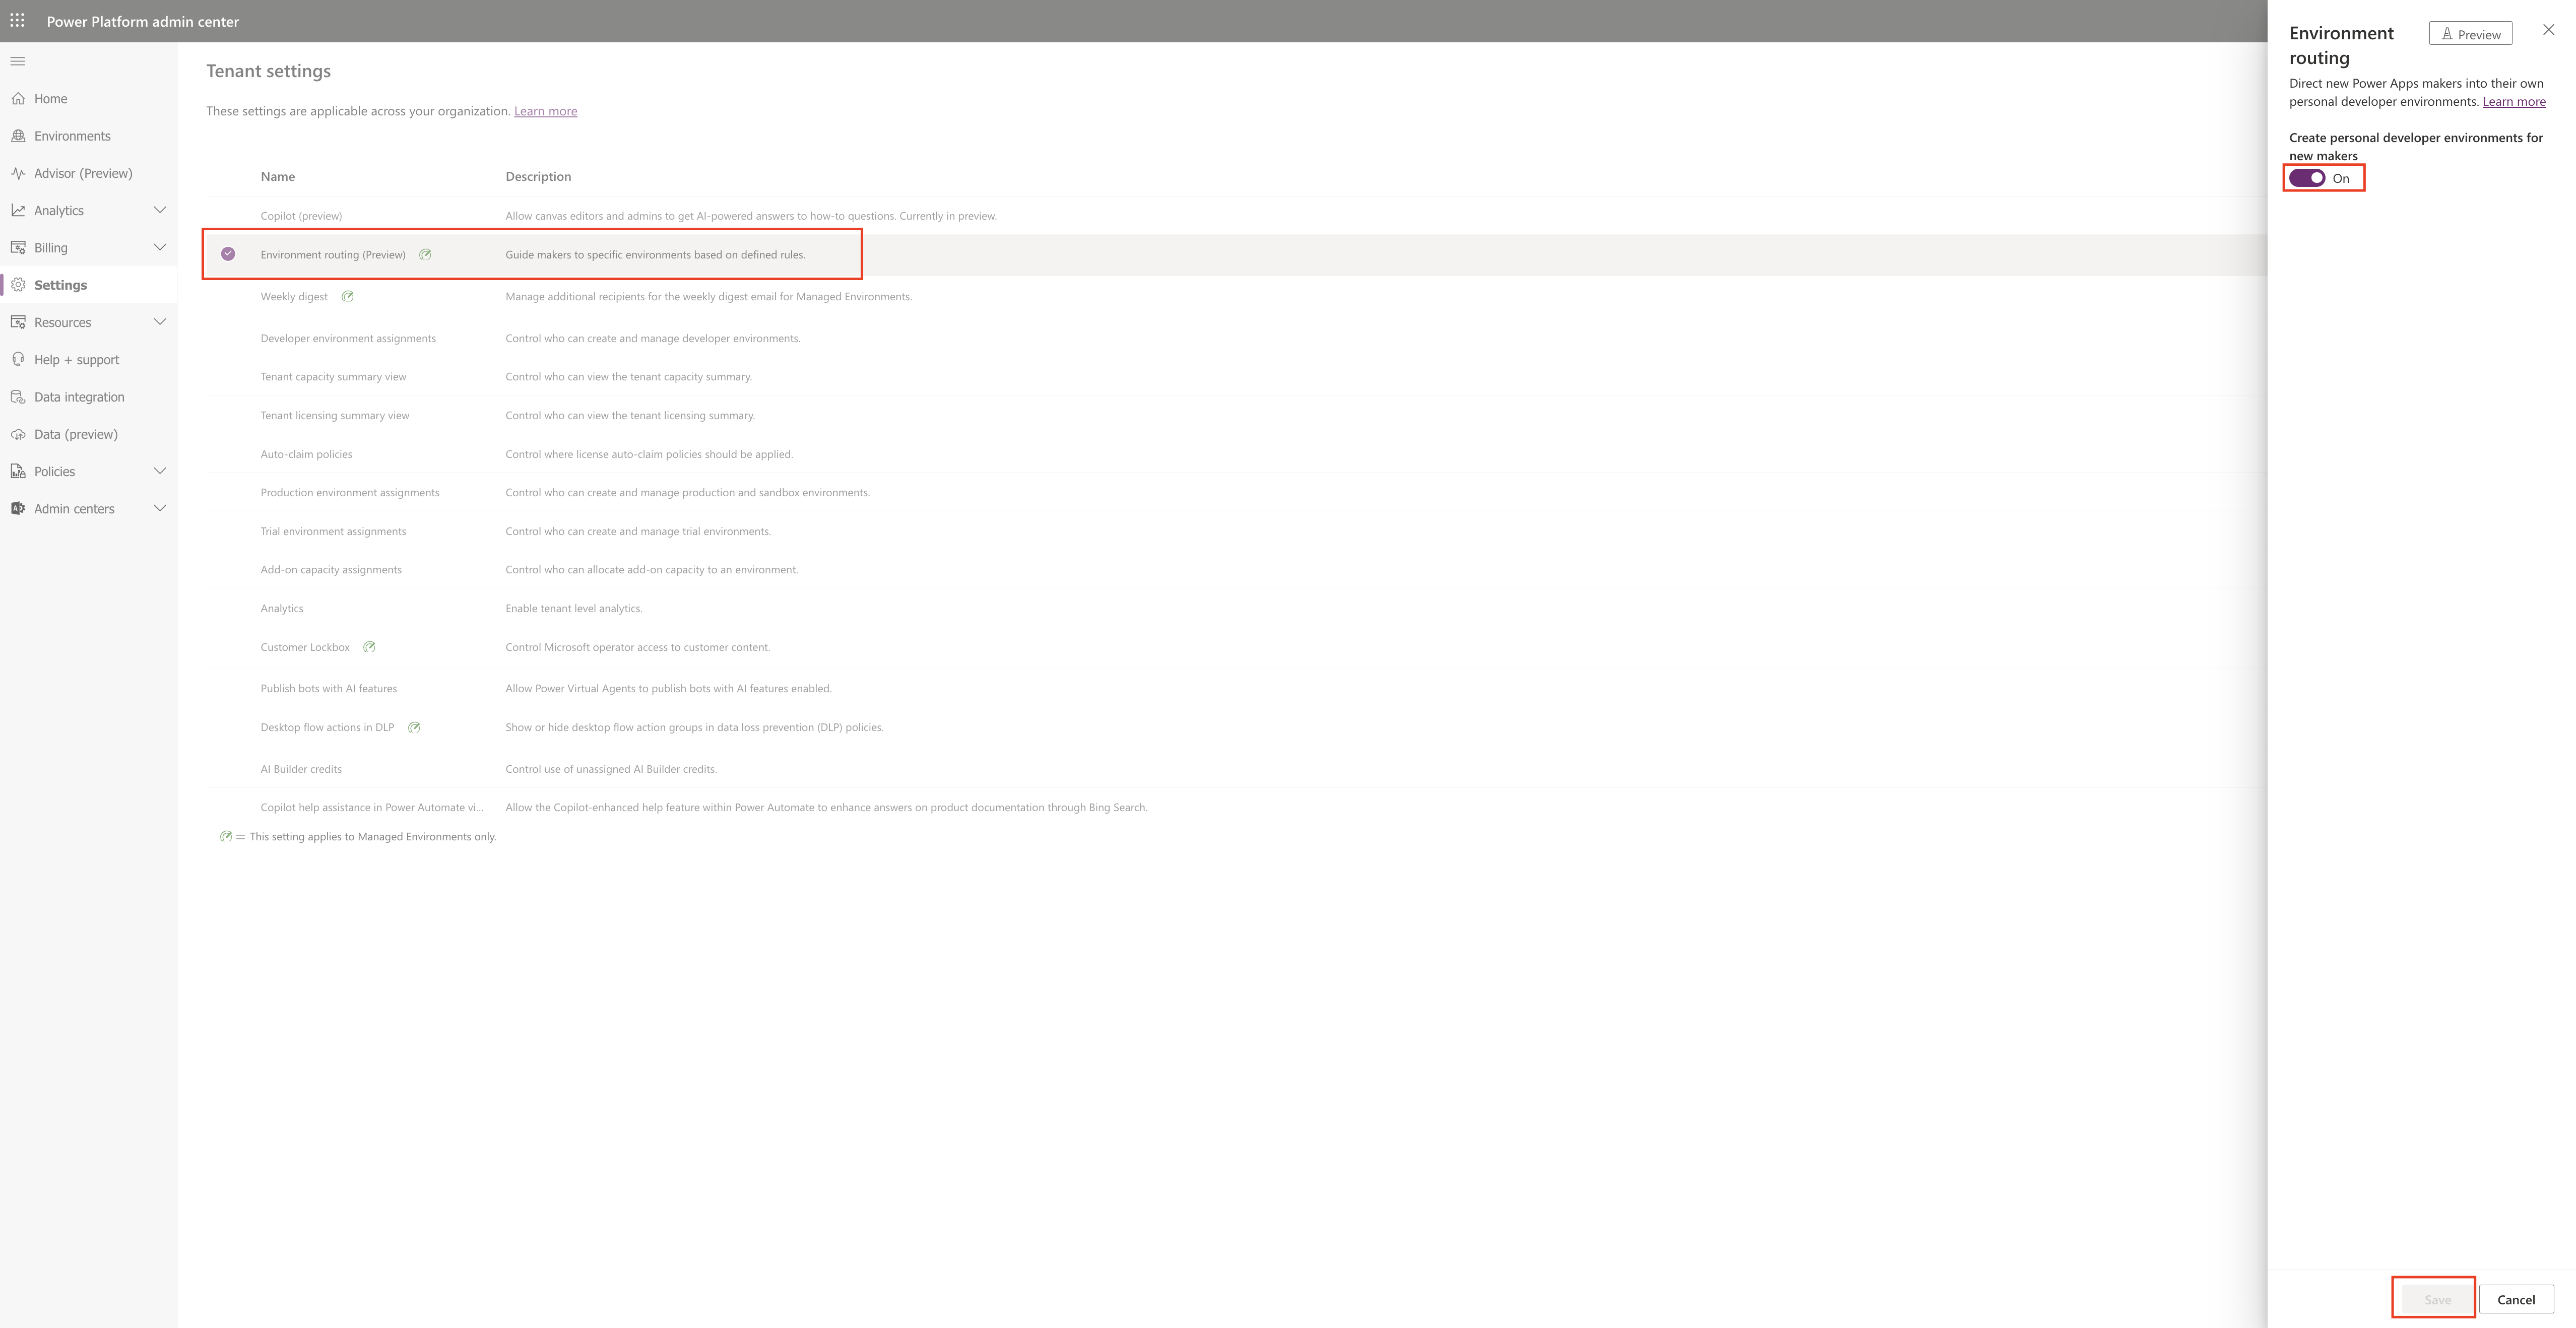
Login into Power Platform Admin Center(PPAC)

Go to the Settings.

On the tenant setting page select the Environment Routing(Preview).

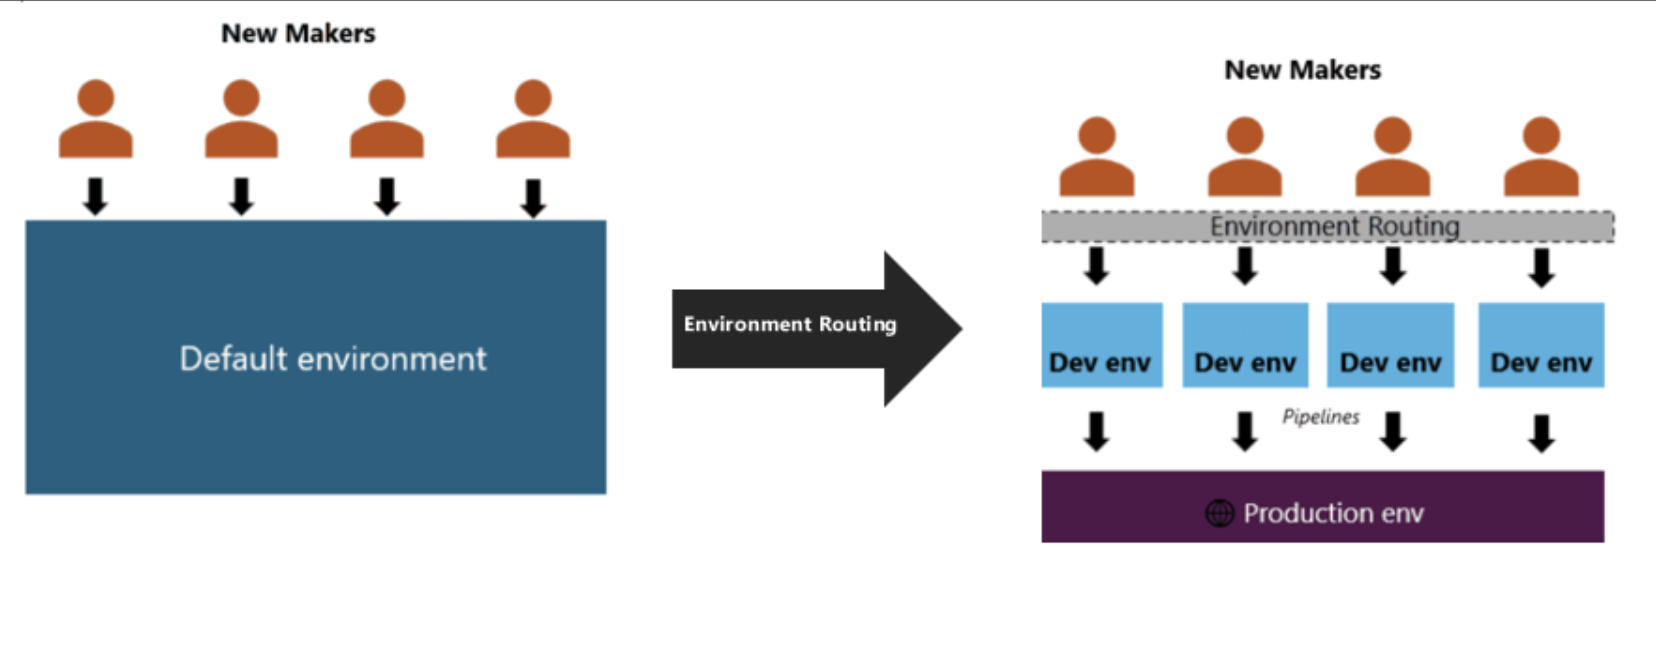
When a new makers login then they are routing to their respective environments.

Once the default environment routing is enabled and a new maker visits make.powerapps.com
for the first time, the maker opens their own, personal developer environment, instead of default environment. Personal, developer environments are makers own space, similar to OneDrive for personal productivity where they can start building apps and solutions in their own workspace.

Note: New makers don’t need to learn about which environment to work in since this happens automatically.

That’s it for today.

I hope this helps.

Malla Reddy Gurram(@UK365GUY)
#365BlogPostsin365Days

Share this:

{Do you know} Use Copilot to draft clear message into the text field Power Apps

Hello Everyone,

Today i am going to show new feature which you can use to input text by using copilot to define clear message.

Let’s get’s started.

Users can use Copilot to quickly generate well written text that can be used as input text into the text boxes in power apps.

With this feature users can save time and won’t make any mistakes if they aren’t native language.

So when a user try to quickly input data into text field in an app, they might worry about the formation of sentence to complete it, so with Copilot there will not be any grammatical errors with it.

That’s it for today.

I hope this helps.

Malla Reddy Gurram(@UK365GUY)
#365BlogPostsin365Days
Share this: