Menu Close

Category: Blog

{Did you know} Application Lifecycle Management Environment strategy

Hello Everyone,

Today i am to share my views on the ALM Environment Strategy.
Lets gets started.
ALM Principles: It needs individual environments for app or solution development and production.
So basically basic ALM can be performed with Development and Production environments.
Best practise is to have atleast one Test environment which is separate from development and production environment.
Some organisations use other environments like UAT(user acceptance testing) system integration testing(SIT) and training too.

Why development environment?

Because any development for app or solution can be done on it and also we check the changes. Separate environments helpful to reduce issues when a developer affects another while making changes.

Development environments?

You can discuss this like how many development environments required? here
Similarly you can provision environments from source code? here
What are the dependencies on my environments? here

ALM other considerations?

ALM should have a minimum of DEVELOPMENT, UAT AND PRODUCTION environments as any changes made on the development environment can be tested in the UAT and prior to deploying to Production.

Multiple geographical environments?

Power Platform have service updates frequently so service update schedule as environments are updated across the globe.
According to Microsoft there are total six stations, its defined by geographical location.
So any service update is done in sequencial order for example: station 3 service updates are applied before station 4.
i.e so its common for environments that are in different stations to have different versions at a certain point in time.

Things to be considered when importing the solution and environment version:

1. You can import newer version into an environment than the environment where the solution was exported.
2. We can’t import a solution into an environment that’s an older version than the environment where the solution was exported. Because there might be some missing components or required funtionality in the older environment.

Aligning environments with service update stations:

                                                                Image source Microsoft
Suppose we have a production environments in Canada and the United States. In that case your development environments should be in North America(station 5) and not in Canada (Station 2). so that your development environments will always be the same or an earlier version than your production environments, which will decrease solution import version conflicts.
I hope this helps.
Malla Reddy(@UK365GUY)
#365Blogpostsin365Days
Share this:

{How to} Resolve Relationship Mapping fields between Opportuntiy and Quote entities Dynamics 365 Sales

Hello Everyone,

Hope everyone doing good.
Today i am going to share simple OOTB feature which some of them aware but i want to bring this to my blog readers.
Scenario: Suppose there is a requirement to transfer some data from Opportunity to Quote when an Opportunity is qualified automatically.
Like When a lead is qualified some of the data will be automatically transferred to Opportunity, do you know how this is happening without any code written, its because of “Relationship Mapping” from the 1-N relationship between entities.
Lets see this in action.
So for this example i have created a business unit lookup field on the Opportunity entity, and also on the Quote entity same business unit lookup field is created.
Now i want to carry same field value of business unit of Opportunity to business unit of Quote.
Create a solution and add the opportunity and quote to it.
Steps taken:
1. Create a business unit lookup field on the opportunity


make sure select the target entity for the business unit field as ‘BUSINESS UNIT’
2. Similarly create the business unit lookup field on the Quote entity too, same as step 1.
3. Create a Relationship mapping.
4. Once Opportunity and Quote relationship selected, you need to open the relationship and click on the “mapping” on the left side of the screen,
Then mapping the fields like below screenshot.
5. Publish the changes on the solution.
6. Create an Opportunity fill the “busiess unit” as UK and qualify the  Opportunity

As you can see from the above screen when you qualify the opportunity prompt to create a  Quote.

Now you will see the Business unit has a value as UK on the next screen.

So its that simple to add relationship mapping and OOTB field mapping between the entities.

For more information please visit Microsoft Docs
I hope this helps.
Malla Reddy(@UK365GUY)
#365Blogpostsin365Days
Share this:

{Know} Tools Components and Process for Application Lifecycle Management

Hello Everyone,

Today i am going to share components, tools and processes required to implement ALM.
Lets gets started.
Environments: They serve as a container for all apps, its to store, manage and share your business data.
They serve as a container to separate apps that might have different roles, security requirement, or target audiences.
Note: Each environment will have one Microsoft Dataverse Database.
Also when we create a new environment, choose the Dynamics 365 apps like Dynamics 365 Sales, Service, which are required now or in future. If you dont want them then not to install which are not required otherwise they will create dependency issues when we deploy solutions between ennvironments.
Environments used in ALM:
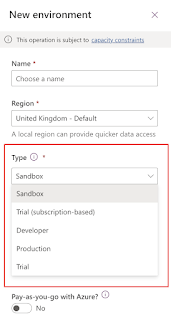
With the Power Platform admin center, you can create the environments:
Environments types:
Sandbox: Its a development environment, in other terms non production environment.
Production: Its a LIVE environment for your organisation, where business users will access day to day activities for sales, customer service, marketing, field service.
Developer: Power App Develper Plan gives access to Power Apps premium functionality, Dataverse, Power Automate for individual use. its a single user environment and its not used to run or share production apps.
Default: Its a default environment created for each tenant and shared by all users in that tenant.


Who should have access to these environments, Microsoft Power Platform Provides environment level admin roles to perform tasks.
Development environment will have App Makers and developers have access to it.
 
Test environment: Testing users and admins will have access to it.
 
Production environment: Admins and app user and they should have access privileges to perform the tasks.
 
Default: By default every users will have create and edit apps permissions, so create an environment for development activities and testing and production and provide appropriate permissions for them.
Solutions: Solutions are used to transfer apps and components from one environment to another, they only contain metadata and certain entities with configuration data.
Source Control:


Source control otherwise known as Version Control, when you makes any changes to the solution and deploy to other test or production environment, those changes by multiple users and it is maintained through source control to revert back to previous state if something is wrong.
Source Control helps businesses to achieve healthy ALM because the assests maintained in the source control system are single source of truth or otherwise a single point of access and modification for your solutions.
Source control process using a solution:
Two main paths we can use.
1. Export the unmanaged solution and place it as unpacked in a source control. so the build process imports the packaged solution as unmanaged into a temporary build environment(sandbox environment). then export the solution as managed and store it as a build artifact in your source control system.
2. Export the solution as unmanaged and also export the solution as managed and place both in the source control system. Although this method doesn’t require a build environment, it does require maintaining two copies of all components(one copy of all unmanaged components from the unmanaged solution and one copy of all managed components from the manage solution.
 

Automation:

Automation is a key part of the application lifecycle that improves the productivity, reliability, quality and efficiency of ALM. Automation tools and tasks are used to validate, export, pack, unpack and export solutions in addition to creating and resetting sandbox environments.

How the Source control being used by your development team

Consider how your development team will be work together as a team to build the project.
some tools and workflows – such as those provided in GIT, GITHUB, and Azure DevOps were designed for the express purpose of improving communication and software quality.
Note: Working with configurations in a solution system can create challenges for team development.
Organisations must orchestrate changes from multiple developers to avoid merge conflicts as much as possible, because source control systems have limitations on how merges occur.
Recommendation: Avoid multiple people make changes to complex components, such as forms, canvas apps at the same time.

Continuous integration and deployment:

You can use any source control system and build a pipeline to start with for continuous integration and continuous deployment(CI/CD).
We are discussing about the Azure DevOps, Github.
Github is a development platform used by millions of developers.
Azure DevOps provides developers services to support teams to plan work, collaborate on code development, and build and deploy applications.
You need the following:
1. A GitHub account, where you can create a repository
2. An Azure DevOps organisation
Licensing:
In order to use Power Platform, Power Apps, Power Automate, users will require a license such as per user or per app license or Dynamics 365 app license.
ALM Considerations:
When you consider ALM as an integral part of building apps on Microsoft Power Platform, it can drastically improve speed, reliability and user experience of the app. it also ensures that multiple developers writing code and citizen developers, can jointly contribute to the application being built.
I hope this helps
Malla Reddy(@UK365GUY)
#365blogpostsin365days
Share this:

{How to} make a copy of Dynamics 365 Field Service Model Driven App

Hello Everyone,

Today i am going to show how to create a model driven app from existing Dynamics 365 Field Service Model Driven App.
Lets gets started.
Suppose you have a requirement to create a Model Driven App  from existing MDA field service, need to add a custom entity into the sitemap, which should be included in the solution.


Select the environment and open it.
Then go to settings and click on solutions and create a new solution:


Click on Model Driven App, a new pop window will be displayed,
Fill in the Name, Unique Name and Optional descripition, select the CHECK box to use default image
and also CHECK box of Use existing solution to create the App.
Optional Welcome page check box, also Enable Mobile Offline and click on NEXT button.
A new window will pop up and select the “FIELD SERVICE ” Solution and also select the site from the drop down, you can configure site map later if you want to, then you need to check the box on the screen to do that later.


Then click on done.

A new Model Driven App will be created as seen from the screen shot.
Now i want to add my required entity to the site map and publish the map.
Check the newly created solution whether Model Driven App and XML solutions related to Field Service App created.
You can see the files added to the solution see from above screenshot.
Then publish the solution the changes.

Then check the new model driven app has been created on the App’s area.


Thats all for today.

I hope this helps.

Malla Reddy(@UK365GUY)

Share this:

{New} Scheduled Board view for Dynamics 365 Field Service

Hello Everyone,

Today i am going to share new scheduled board view on Dynamics 365 Field Service.
Lets gets started.


The first “+” to expand all resources bookings in the timeline.Similarly “-” symbol is to collapse the resource bookings.
Filters:


You can filter by Characteristics – Rating, Roles of the resource, resource by territories, Organisation units, Resource types, Teams, Business Units to schedule bookings.
View:
You can view the board hourly, daily, weekly, monthly.
List view or Gants view:
List view will show the resources list.
Where as Gants view:
Gant view shows the all resources and scheduled work orders on the board.
Calendar:


With the Calender view you can adjust the dates with it.
Booking manually on the scheduled board using the Book icon:

Detail Panel:


Detail Panel will work when you “resource” and click on detail panel, it will details related to the resource.
Legend:
Legend shows the booking status in color format, you can change these color from board settings too.


Booking status: Cancelled,  Commited, Completed, Hard, In Progress, On Break, Proposed, Scheduled, Soft, Travelling, Timelinen- Non Working Hours.
Booking Alert :
If there are any alerts related to bookings will be displayed here.
Map:
Map view will show the bookings and there distance, requirements, Routes, Organisatio Units, Traffic, Grayscale.
Board View Settings:
Board View Settings allows all time zone , time resolution, row height, show cancelled, apply territory filter, show booked percentage and all board settings.
When you click on all board settings:


Initial Public View will pop up, you can always change these settings according to your organisation requirements.
For example: When you expand Map, you can adjust the resource tooltips view to any view that is available like “active bookable resources(Default) or contact resources etc..
Simiraly you can make changes for scheduled assistant, Custom web resource where you can make custom customisation on the board.


Schedule Assistant:


Schedule assistant allows to make changes to the view on the scheduled board for search for, unavailable resources, Available color, Partially available color, Book based on, default available icon, default unavailable icon, default partially available icon.
Simiraly for rest like “Board color” as discussed previously, other, schedule types like work orders, appointment, project, none,
Requirement panel:
with the requirement panels, you can change the panel view by clicking the “+” icon and also apply filters too.
You can refresh the board by clicking the refresh icon show below, also you can expand the full browser view by clicking littel arrow icon.


Finally on the scheduled footer area you can see the


 Open requirements, Project and Unscheduled Work Orders.
The allow view change on the scheduled board is MAP view which will be on the right hand side of the Scheduled board and some look and feel icons and settings too.
I hope this arcticle have shown some quick glimpse of the Dynamics 365 Field Service Schedule Board.
Malla Reddy(@UK365GUY)
Share this: