Menu Close

Tag: #365blogpostin365days

{Customer Insights} Send all communications at particular time interval to reach customers with send scheduling feature

Hello Everyone,

Today I am going to share my thoughts on new feature of send scheduling to reach customers at the right moment on Dynamics 365 Customer Insights.
Let’s get’s started.

Send scheduling in Dynamics 365 Customer Insights allows you to deliver messages to your customers at the most opportunitic times. Here are the key details.

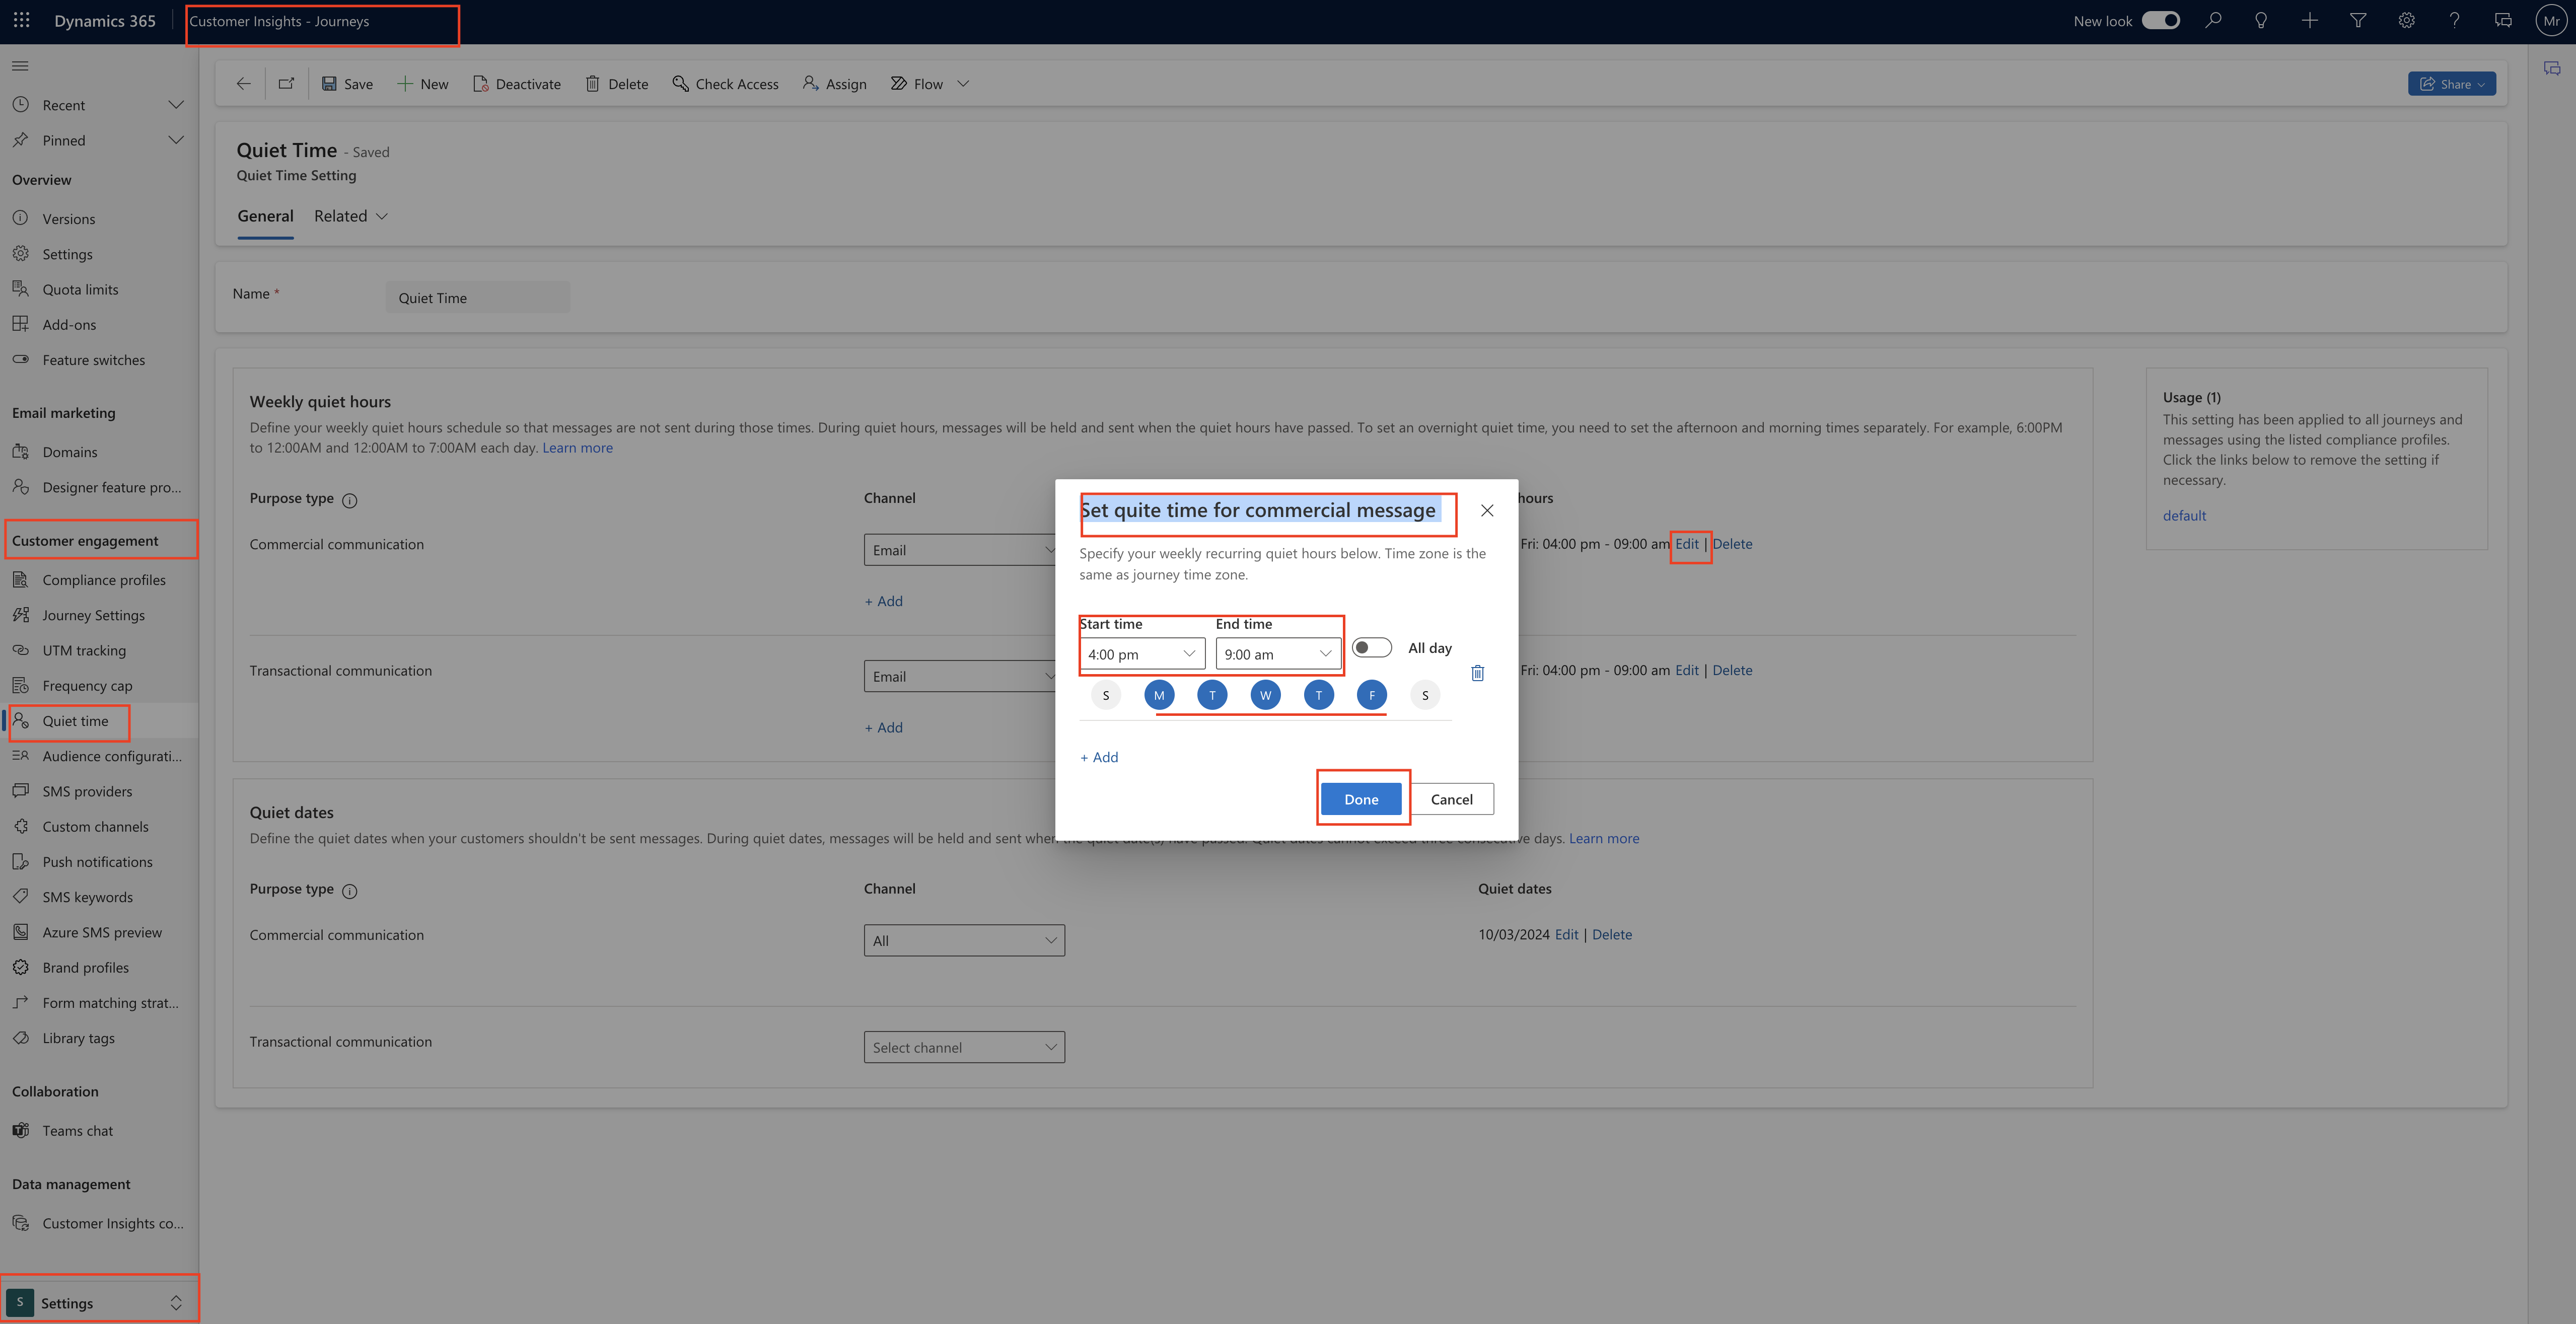
How do set the time scheduling on Customer Insights globally for all Joruneys?

Login into Dynamics 365 Customer Insights

Change to Settings and Click on Quiet Time under Customer Engagement.
1. Business Value:

Delivering messages at the right moment can significantly enhance customer engagement, conversion rates and overall revenue.

With send scheduling your messages reach customers precisely when they’re most likely to take action.

2. Feature Details:

In real-time journeys, you can easily schedule messages to be sent during specific time windows in a day or on specific days of the week.

Messages outside these send times are held until the next scheduled window.

Send times respect quiet times and frequency caps.

Align your communications with customers habits preferences and their most active hours to boost engagement.

Additionally you can use send scheduling to ensure messages are delivered when your business is ready to respond(e.g., during call center hours or when sales representatives are available).

Remember, delivering messages at the right time is like serving a perfectly ripe banana – it’s all about timing!.

That’s it for today.

I hope this helps.

Malla Reddy Gurram(@UK365GUY)
#365BlogPostsin365Days

Share this:

Dynamics 365 Customer Insights Seamlessly onboard customer data from your Delta Lake with no data integration

Hello Everyone,

Today I am going to share my thoughts on preview feature related to the onboard customer data from your delta lake with no data integration on Dynamics 365 Customer Insights.

Let’s get’s started.

Let’s explore how you can seamlessly onboard customer data from your Delta Lake to Customer Insights without the need for data integration.

Business Value: Data that is already prepared and stored in your Azure Data Lake in the Delta Lake format can be directly attached in Customer Insights. This elimates the need for additional data movement and formatting. Here are the key benefits:

1. Faster Processing: By avoiding intermediate processing and data preparation, you accelerate the processing time, leading to more regular and current insights.

2. Reduced Operations Management: With no additional transformation pipeline required, you save effort and cost associated with data conversion.

3. Resilence and Fault Tolerance: Delta format is more resilient and fault- tolerant. For instance, simultaneous updates and reads to a data partition are handled effectively, resulting in fewer data ingestion errors.

Features Details: With this features, you can:

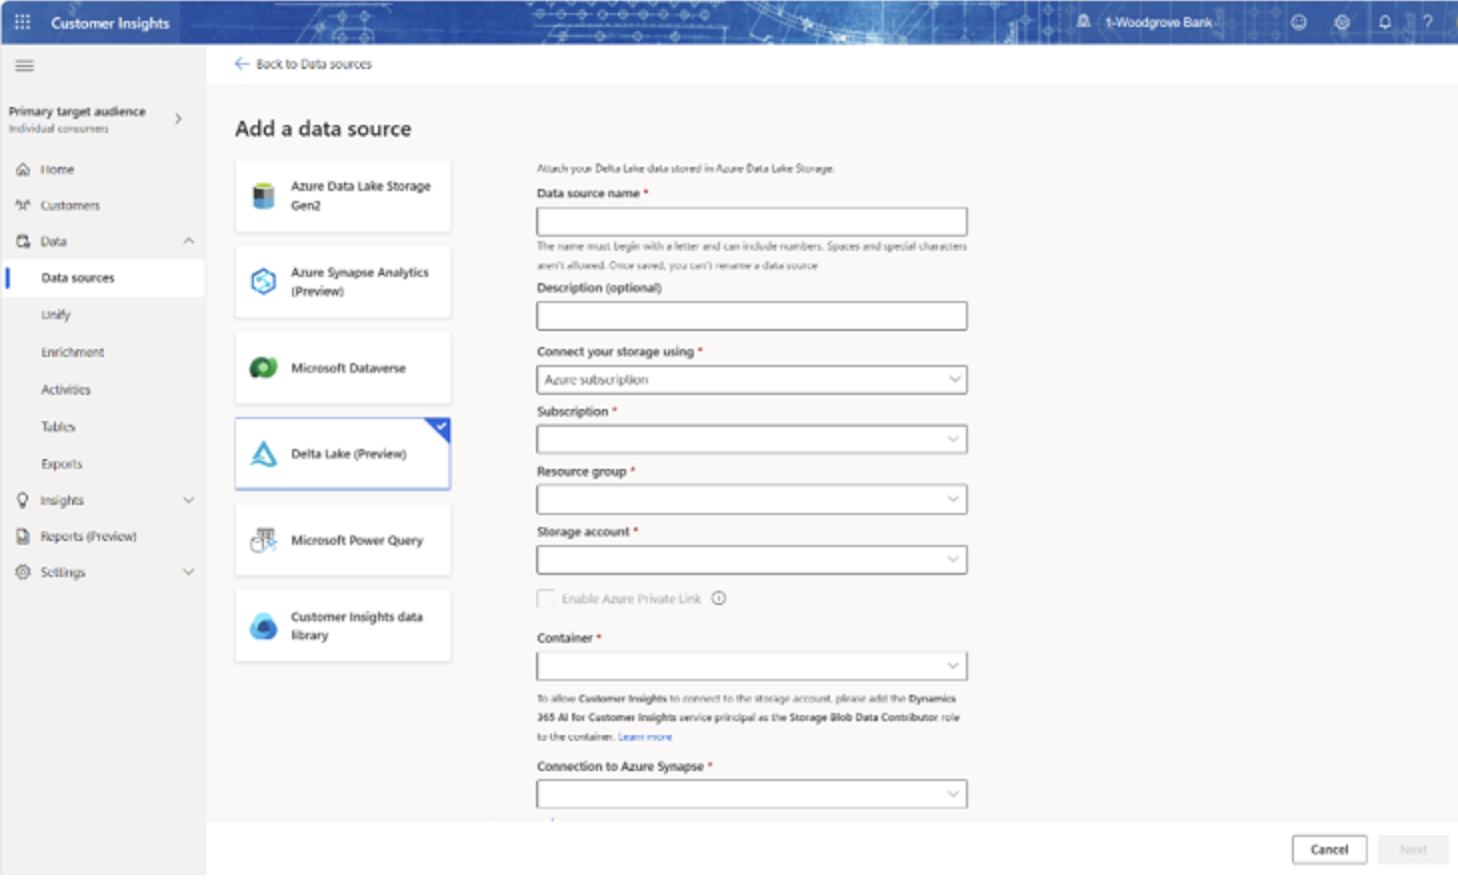
Attach Delta Lake Data: Easily attach your data stored in Delta Lake format as a data source in Customer Insights. No need for additional data movement or formatting.

Native Readability: Delta-formatted data can be read natively within Customer Insights.

Delta Lake Incremental Processing: Take advantage of incremental processing without any extra work. Data stored in Delta Lake format doesn’t require separate full or upsets folders.

To connect to data stored in Delta format from your Azure Data Lake Storage.

Remember, this seamless integratiob allows organizations to gain more frequent and up to date insights, empowering informed decisions and adaptability in dynamic business environments.

That’s it for today.

I hope this helps.

Malla Reddy Gurram(@UK365GUY)

#365BlogPostsin365Days
Share this:

{How to} Capture responses from external third party forms dynamics 365 customer insights

Hello Everyone,

Today I am going to share my thoughts on capture responses from external third party forms dynamics 365 customer insights.

Let’s get’s started.

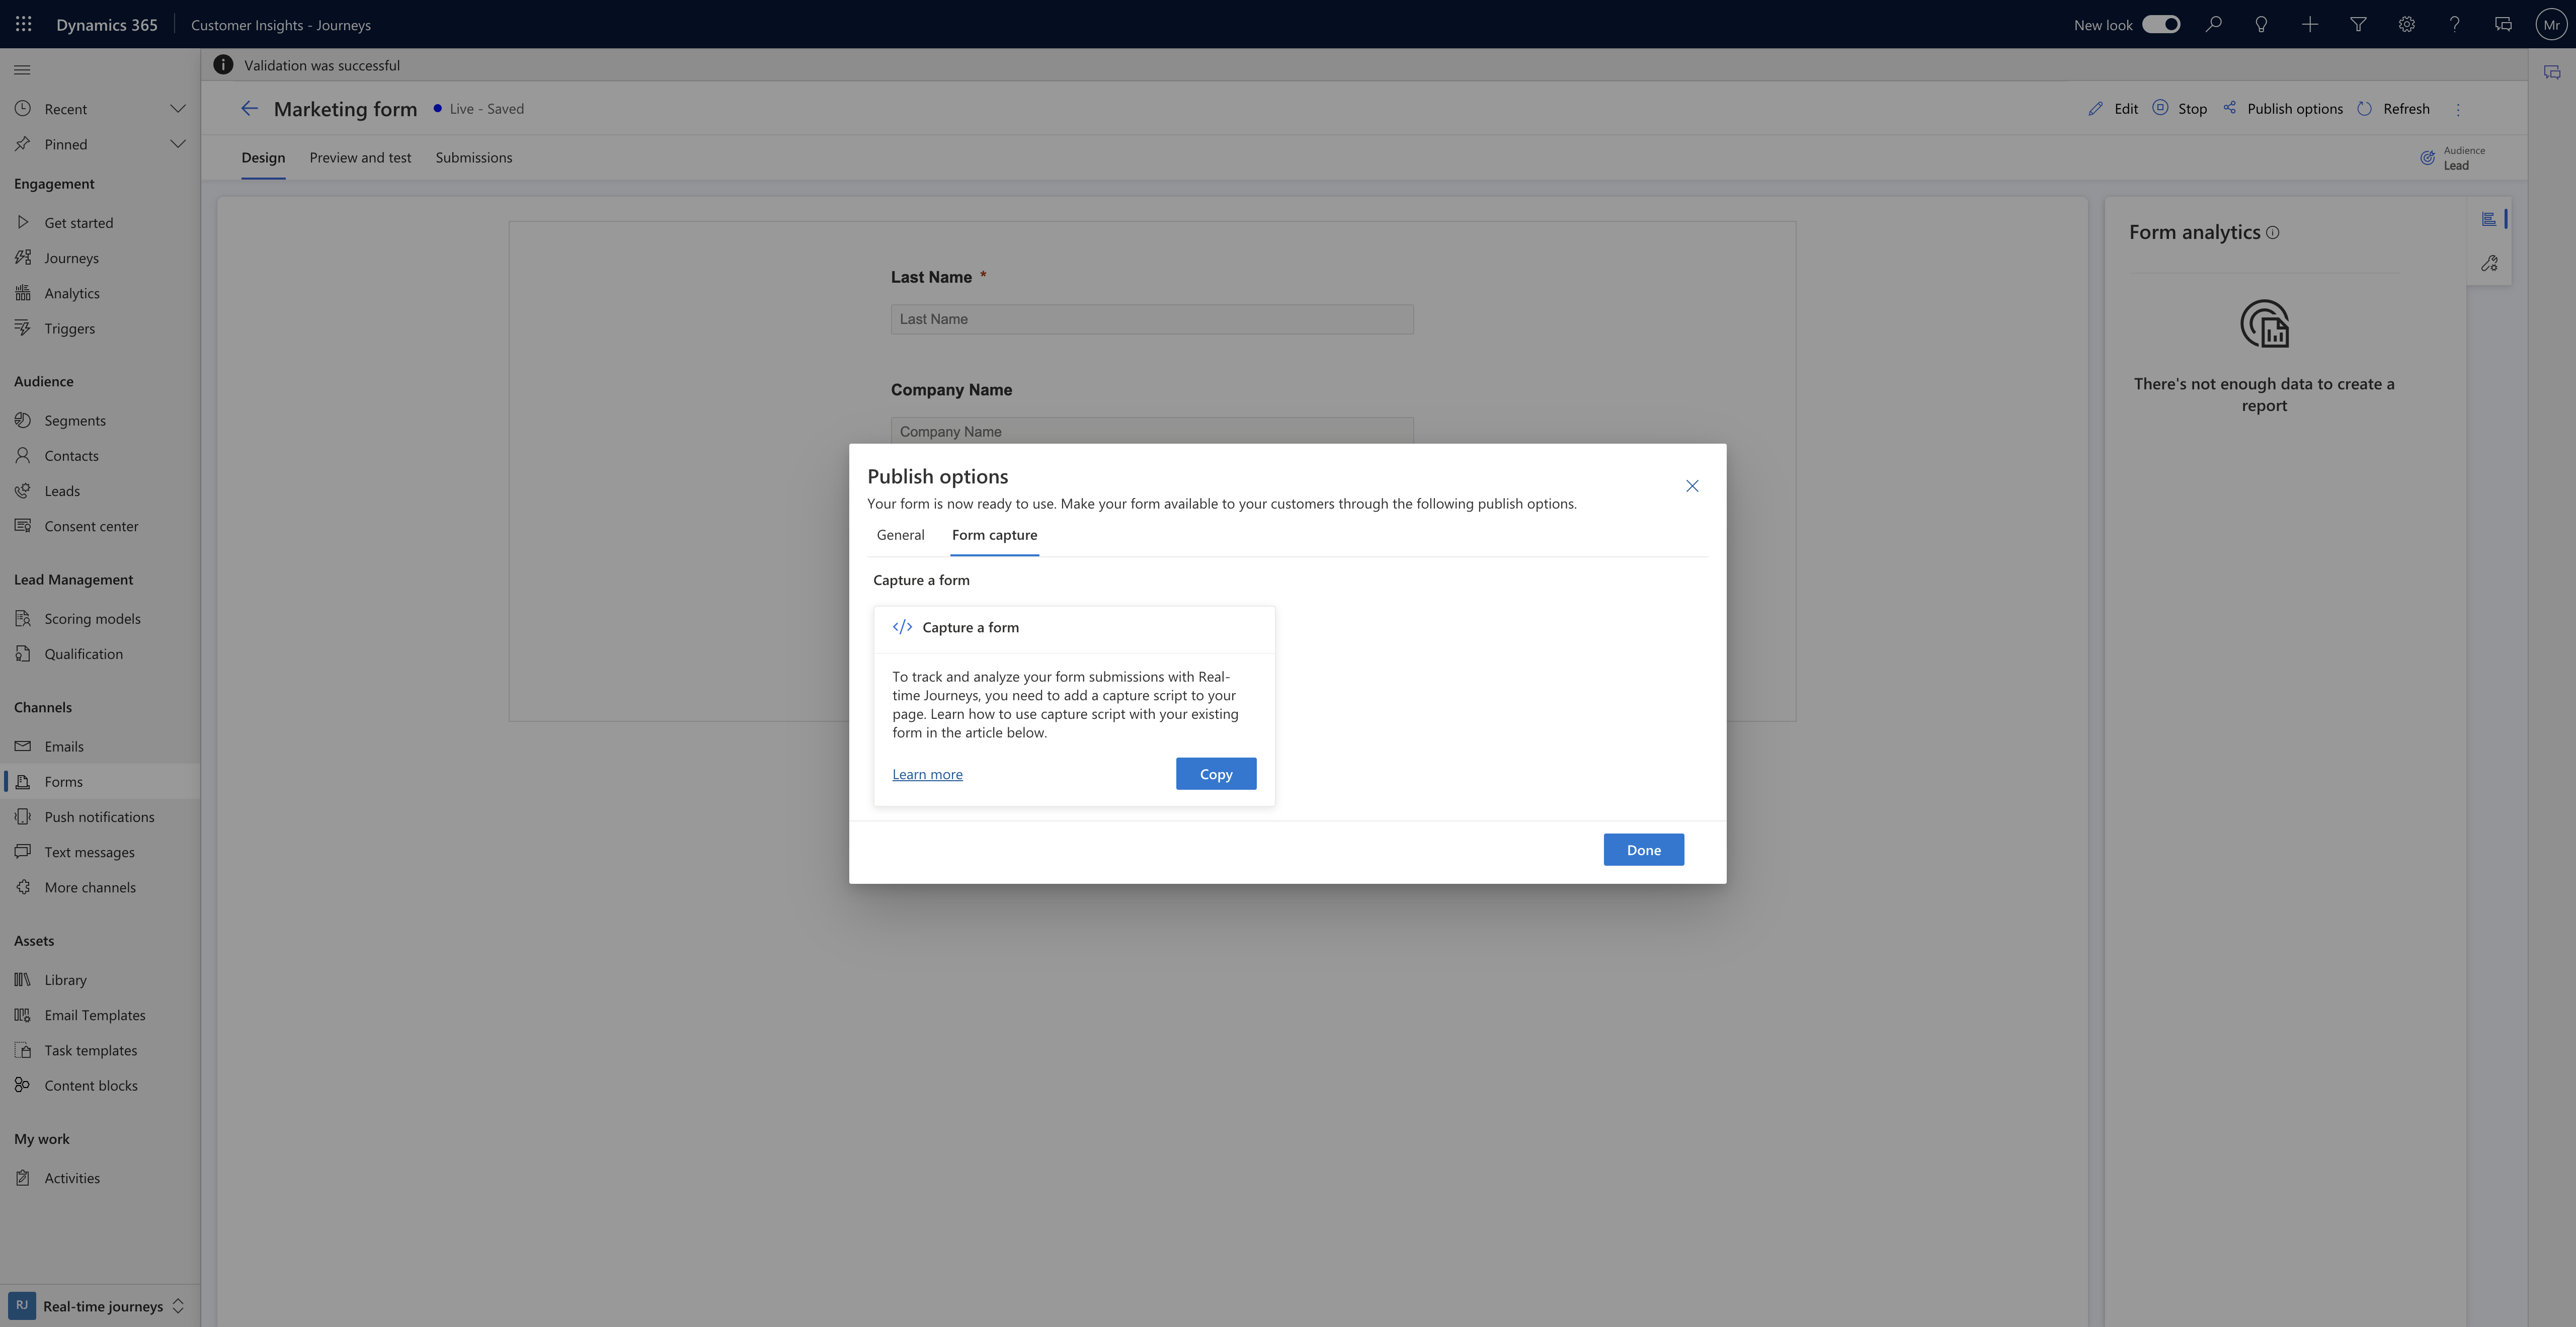
Certainly! In Dynamics 365 Customer Insights – Journeys, you can now capture form submissions from any external forms and use them to create new leads or contacts.

Here’s how it works:

1.Maximize Potential: If you have custom-built forms on your website, you can leverage them to generate more leads and contacts for your business.

The best part? You don’t need to recreate these forms within Customer Insights – Journeys.

2. Automatic Creation: When users submit forms on your website(whether they’re third-party forms), the system will automatically create new leads or contacts in Customer Insights – Journeys.

3. Mapping Fields: You can easily create JavaScript with mapping of your form fields to existing entity attributes. This ensures that the captured data aligns correctly with your existing records.

4. Embed the script: To implement this, embed the capture script into multiple pages containing the same form. This way, you can seamlessly collect data from various parts of your website.

By capturing responses from external forms, you empower yourself to better understand your audience, target them more accurately, and follow up effectively. It’s a powerful feature that seamlines your lead generation process!.

That’s it for today.

I hope this helps.

Malla Reddy Gurram(@UK365GUY)
#365BlogPostsin365Days

Share this:

{How to} Enable or Disable a frequency cap for your Journey Dynamics 365 Customer Insights

Hello Everyone,

Today I am going to show how to enable or disable a frequency cap for your Journey.

Let’s get’s started.

The frequency settings is enabled by default for all journeys. So once the frequency cap settings are enabled globally, the message will be capped.

So the users who are editing rights in the Journey will be able to decide if the cap should be bypassed for a specific Journey.

How to bypass the frequency cap:

Login into Customer Insights

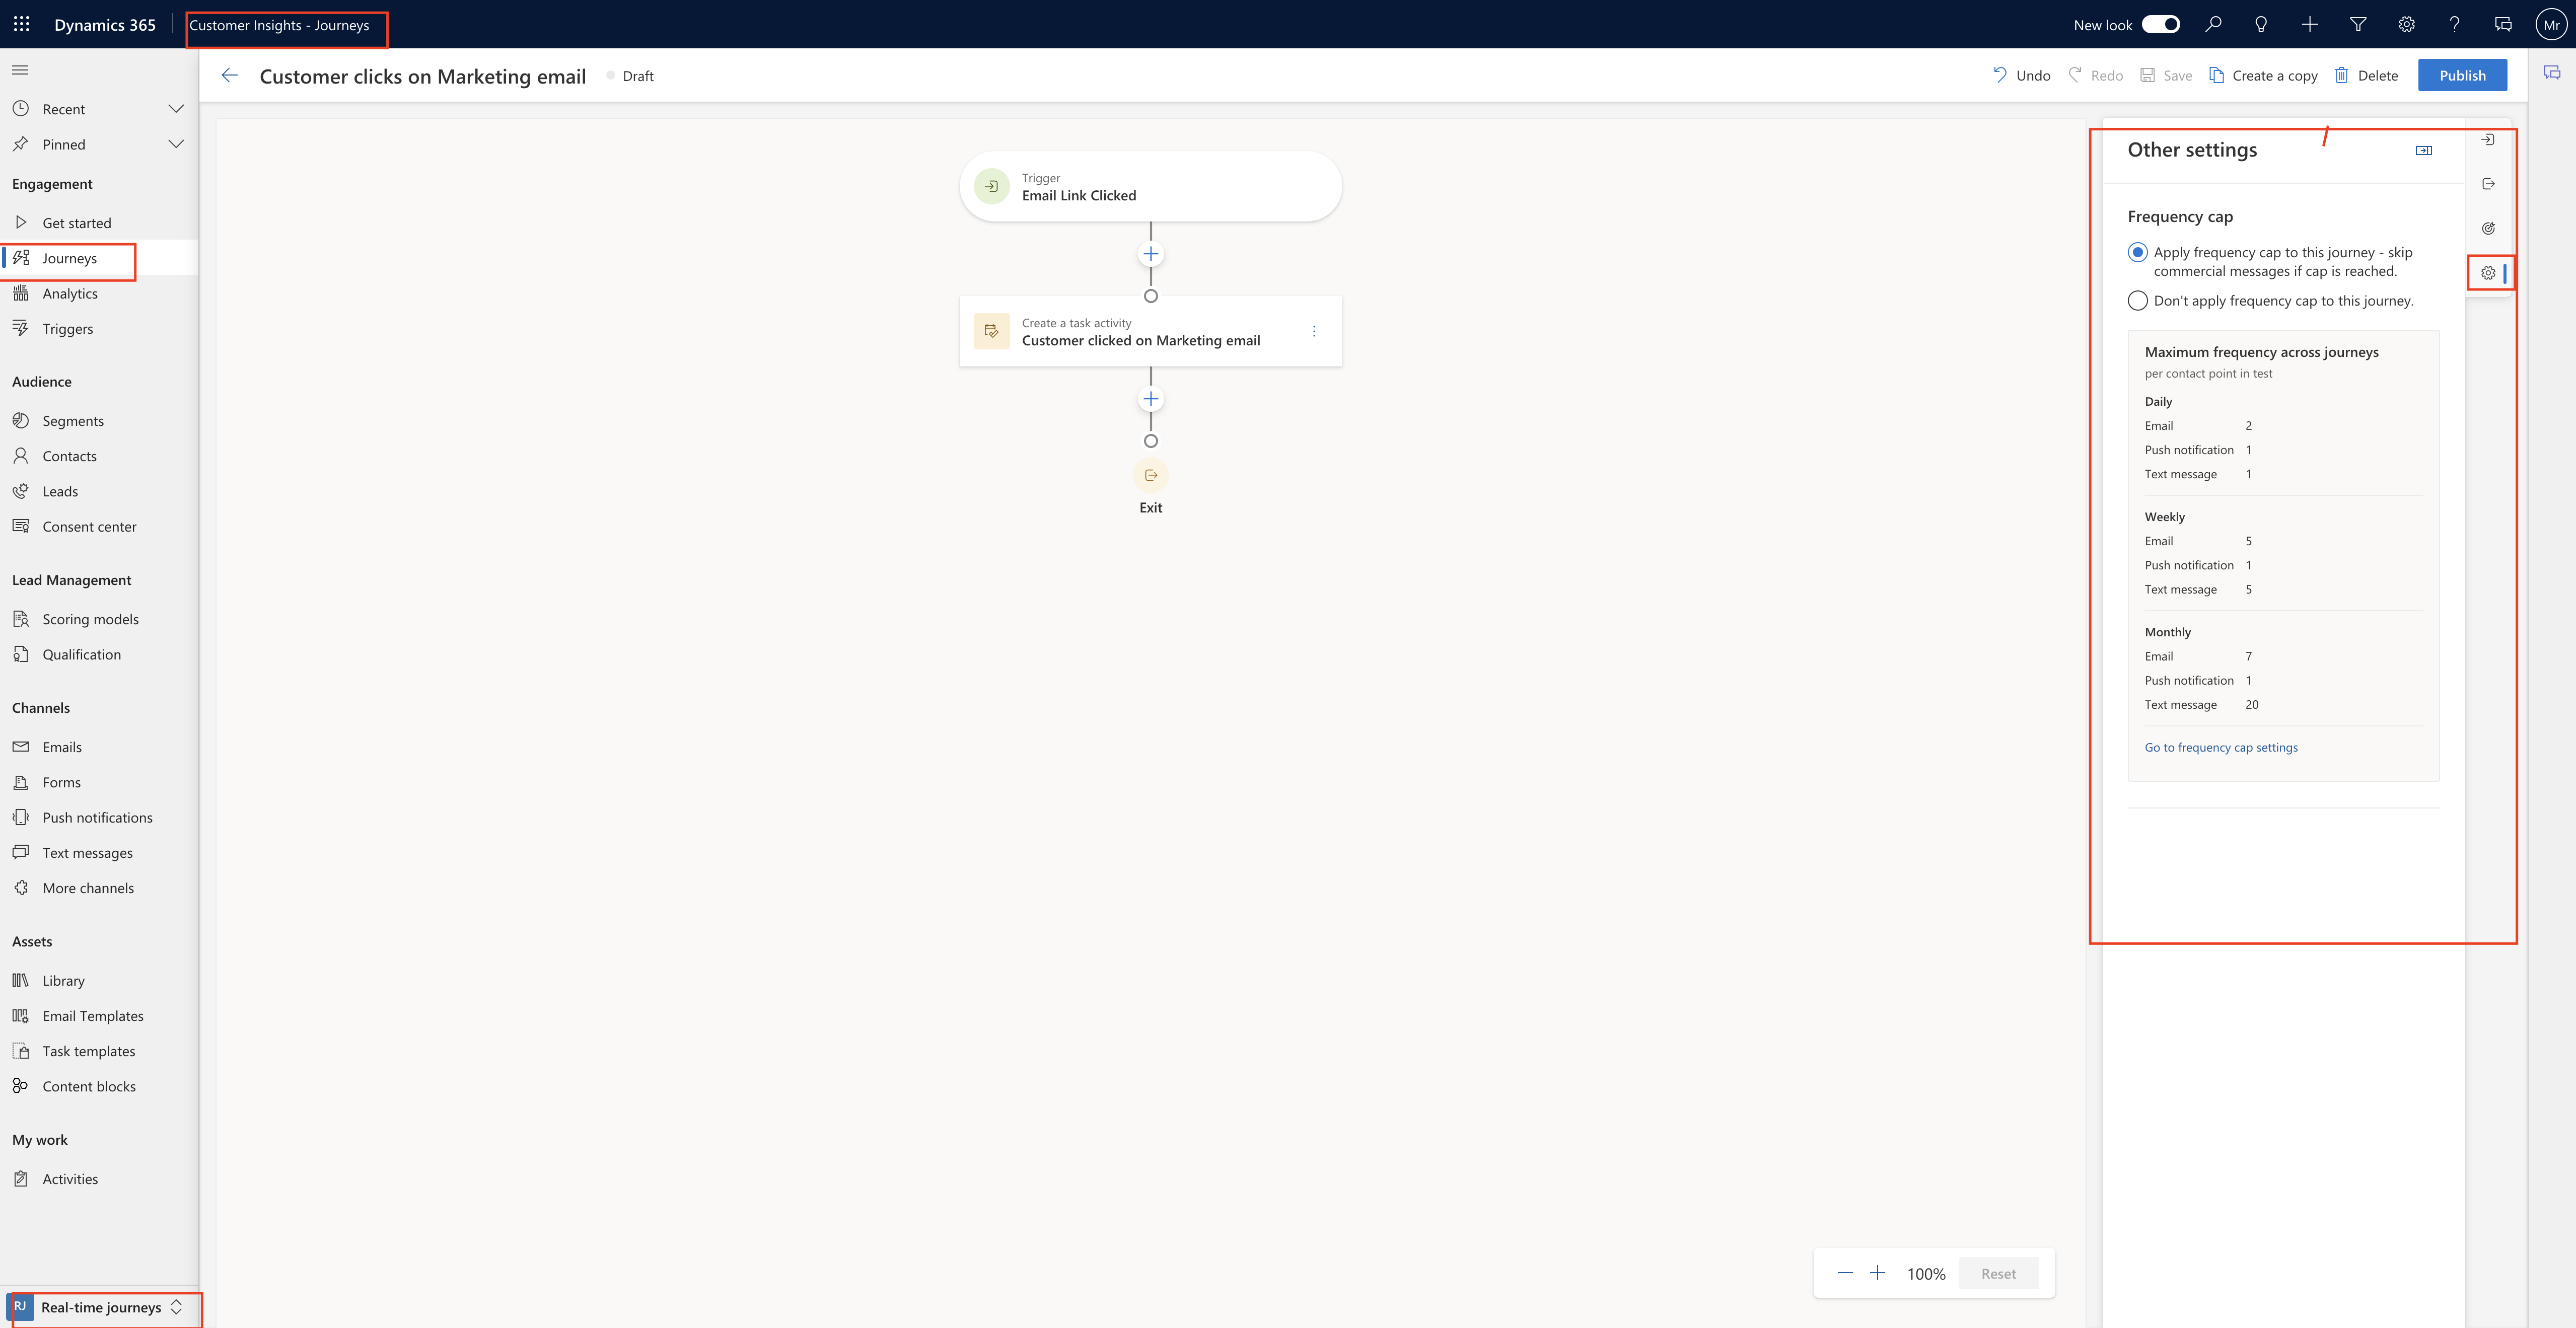
Go to the Journey and edit it and then click on the gear icon and you will see two options:

1. Apply frequency cap to this journey – skip commercial message if cap is reached.

2. Don’t apply frequency cap to this journey.

That’s it for today.

I hope this helps.

Malla Reddy Gurram(@UK365GUY)
#365BlogPostsin365Days
Share this:

{Do you know} Where do they store customer information when a customer register for an event on Dynamics 365 Marketing

Hello Everyone,

Today I am going to share my thoughts on event registration, When a customer register for an event and where do they actually store customer information on Dynamics 365 Marketing.

Let’s get’s started.

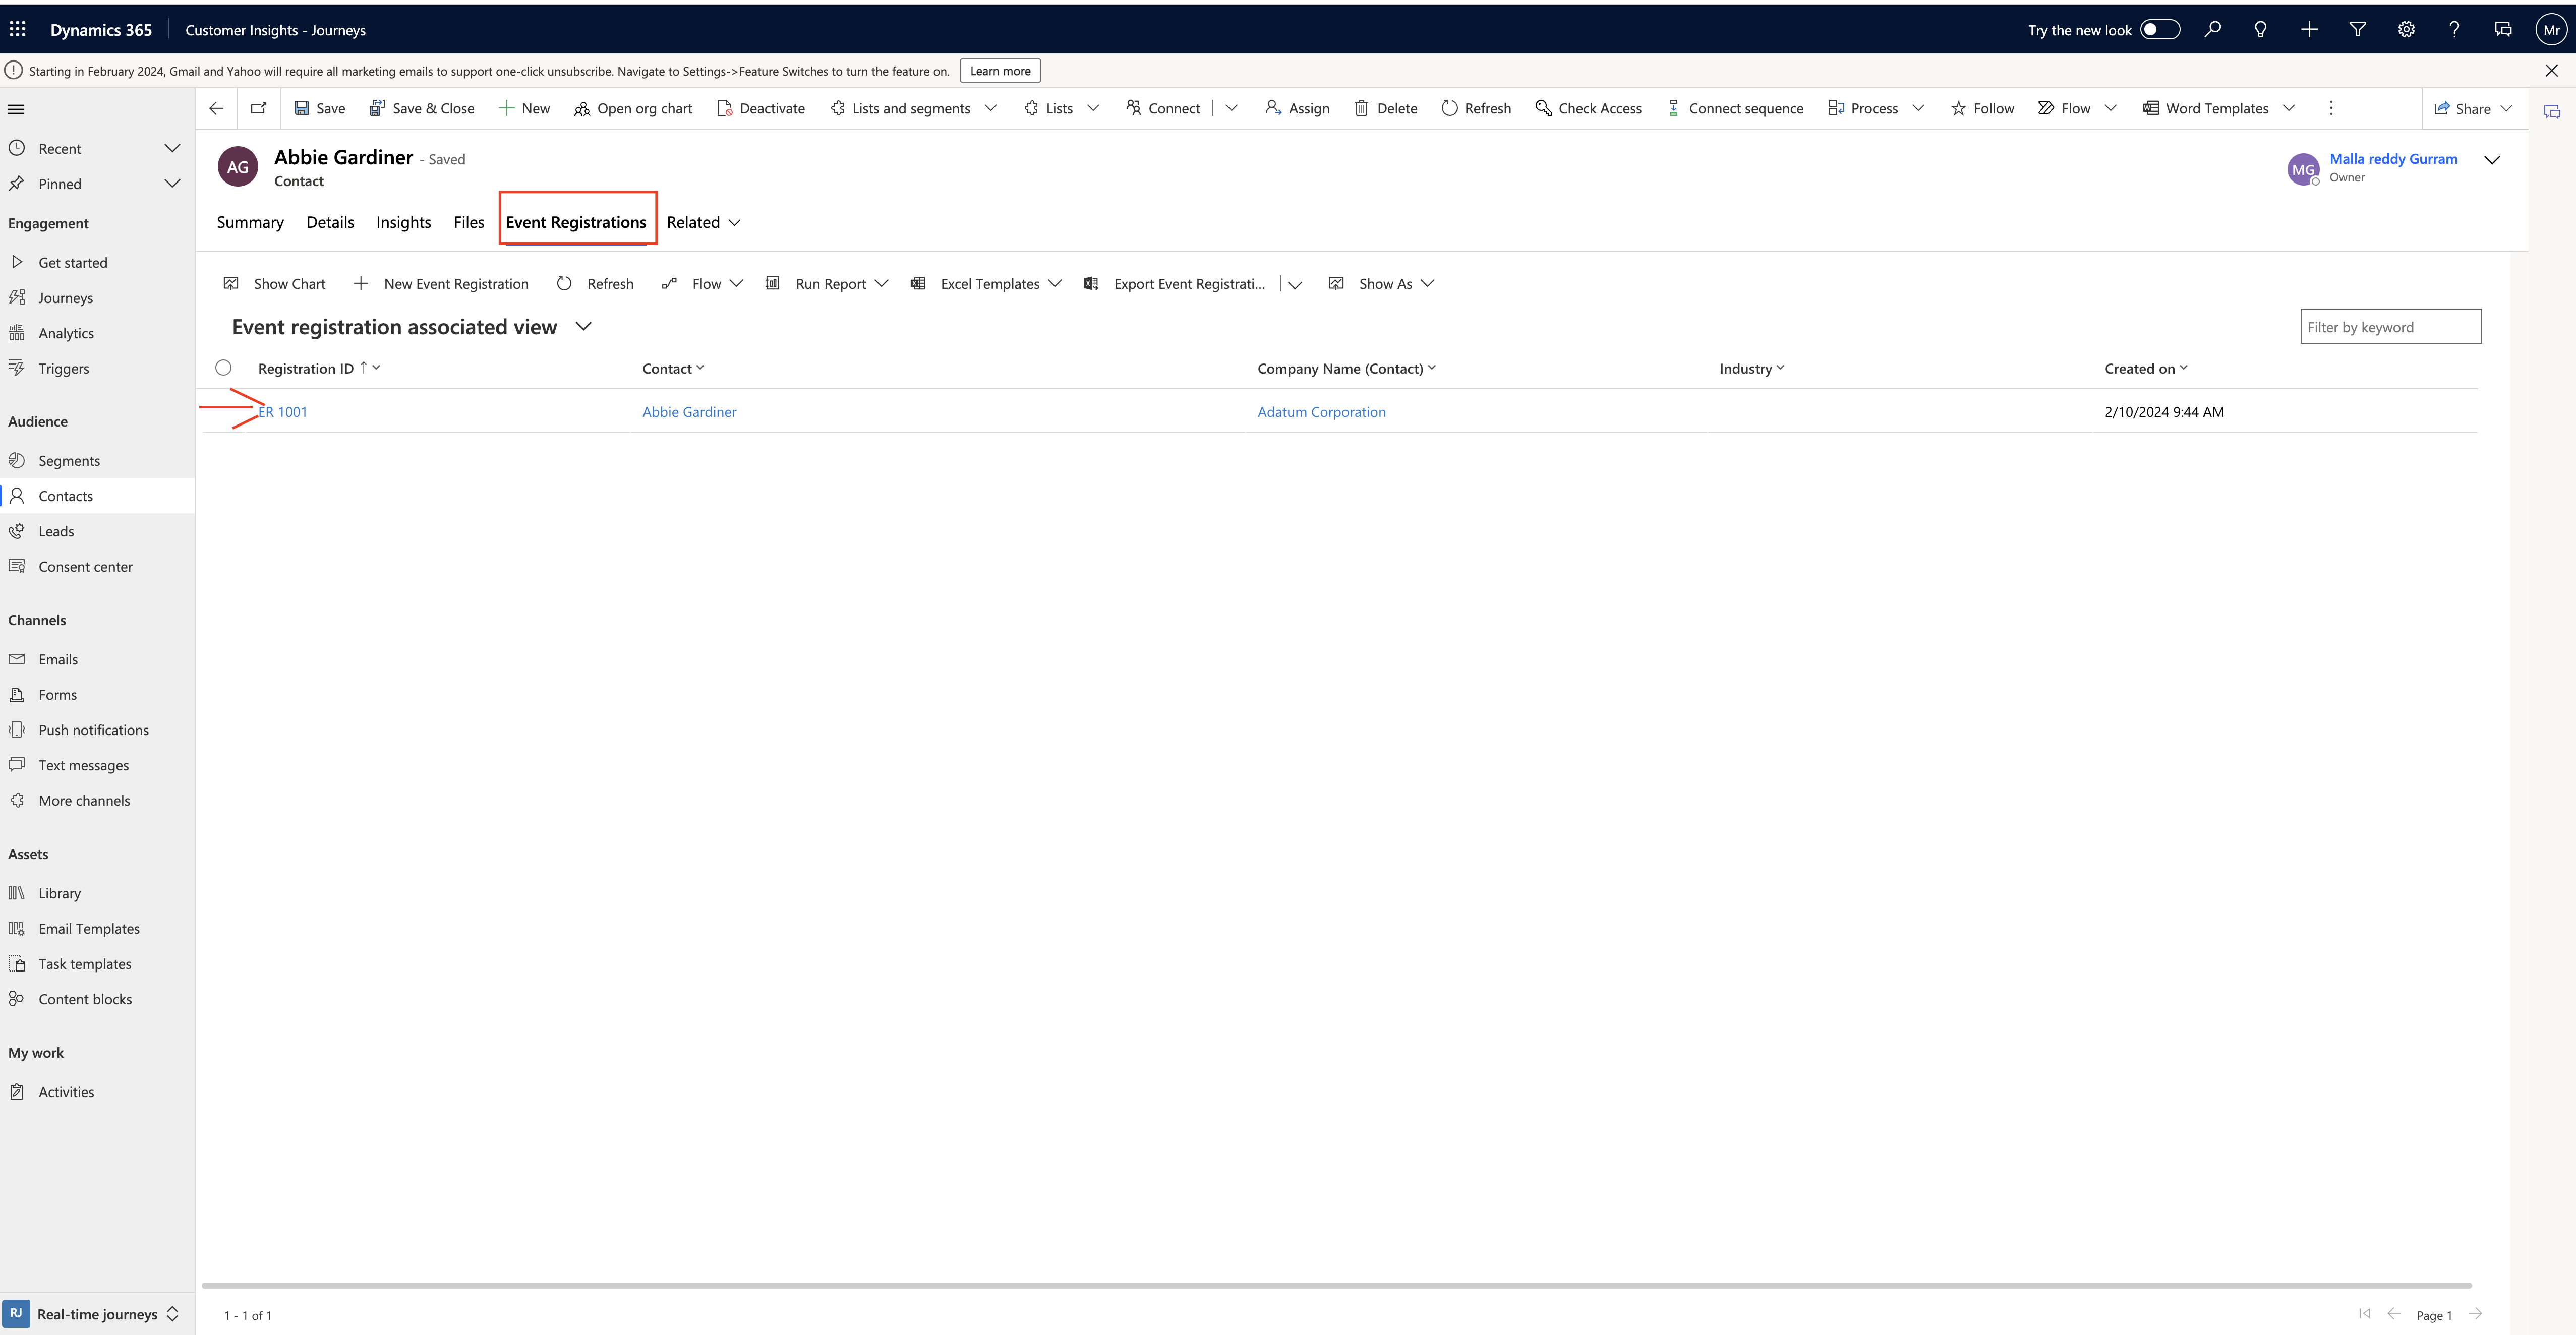
When a customer registers for an event on Dynamics 365 Marketing, the records are stored in the Event Registration section.

Here’s how it works:

1. Event Registration Records: Each time someone fills out an event registration form, their email address is checked to see if they already exist in Dynamics 365 as a Contact.

If not, a new Contact record is created for them, and an Event Registration is linked to that new Contact.

2. Event Management Work Area: To view all current registrations and pass assignments and to create them manually in the system, you can work in either of the following entities within the Events work area:

a) Events > Event > Event Registrations: Here: you can view and create registrations for all events.

b) Events > Event > Events: Open an event record and go to the Registration & Attendance tab to view and create registrations for the selected event.

To view or create individual session registrations, navigate to the Agenda tab of the event record and open a session listed there.

Remember, this process helps event managers evaluate resource needs, session capacities and attendees preferences. It ensures that attendees have reserved seats for the sessions they want to attend!.

That’s it for today.

I hope this helps.

Malla Reddy Gurram(@UK365GUY)
#365BlogPostsin365Days
Share this: