Menu Close

Tag: #365blogpostsin365days

{How to} Create Mobile Offline Profiles for Dynamics 365 Model Driven App Mobile Users

Hello Everyone,

Today I am going to show how to create Mobile Offline Profiles for Dynamics 365 Mobile App Users.

Let’s get’s started.

For Dynamics 365 Model Driven App Mobile App Users – to control the amount of data being downloaded to user’s device for offline access.

Dynamics 365 Mobile App users access to the data can be controlled using Mobile Offline Profiles.

How to create Mobile Offline Profiles?

1. Login into Power Platform Admin Center.

2. Select the environment and then Settings.

3. Enlarge Users + Permissions > Mobile Configuration

Click on Mobile Configuration and Create Mobile Offline Profile.

Add the tables for offline accesss

Also the users who are going to access the offline access.

Once the table and users added to the profile then it would be like this below image.

Then publish the profile

The security role for the users and team needs read permissions for the UserMobileOfflineProfileMembership and TeamMobileProfileMembership privileges.

Enable Mobile Offline and Select the Mobile Offline Profile

That’s it for today.

I hope this helps

Malla Reddy Gurram(@UK365GUY)
#365BlogPostsin365Days

Share this:

{How to} Prevent Social data entering into Dynamics 365 Model Driven Apps

Hello Everyone,

Today I am going to show to prevent social data into Dynamics 365 CE.

Let’s get’s started.

Now you can prevent Social media data entering into Dynamics 365 CE.

How do you do that ?

Login into Power Platform Admin Center.

Select the environment you want to enable this feature.

Then click on Settings > Features.

Turn ON – Prevent social data in Dynamics.

This will prevent the social data entering into Dynamics 365 CE from the social fields which are created on the forms.

That’s it for today.

I hope this helps.
Malla Reddy Gurram(@UK365GUY)
#365BlogPostsin365Days

Share this:

{How to} Enable your environment data and objects on M365 Copilot

Hello Everyone,

Today I am going to show how to enable your environment data and objects on to the M365 Copilot.

Let’s get’s started.

Login into Power Platform Admin Center.

Settings > Features > M365 Copilot – TURN ON.

Then you are able to share dataverse data on M365 related apps.

That’s it for today.

I hope this helps.

Malla Reddy Gurram(@UK365GUY)
#365BlogPostsin365Days

Share this:

{How to} Turn ON Full map display latitude and longitude pins and shapes for Dynamics 365 Field Service

Hello Everyone

Today I am going to show how to turn on the Map and address services from Power Platform Admin Center.

Let’s get’s started.

Login into Power Platform Admin Center.

Then select the environment and settings.

Features:

When you turn on the Allow map display, latitude and longitude pins and shapes it is limited accessibility for the maps.

Where as when you turn on Full then it will allow map routing, address input control and pins loaded from addresses, Requires agreement to the terms and conditions.

That’s it for today.

I hope this helps.

Malla Reddy Gurram(@UK365GUY)
#365BlogPostsin365Days

Share this:

Hello Everyone,

Today I am going to show how to turn on Preferred Solution on Power Platform.

Let’s get’s started.

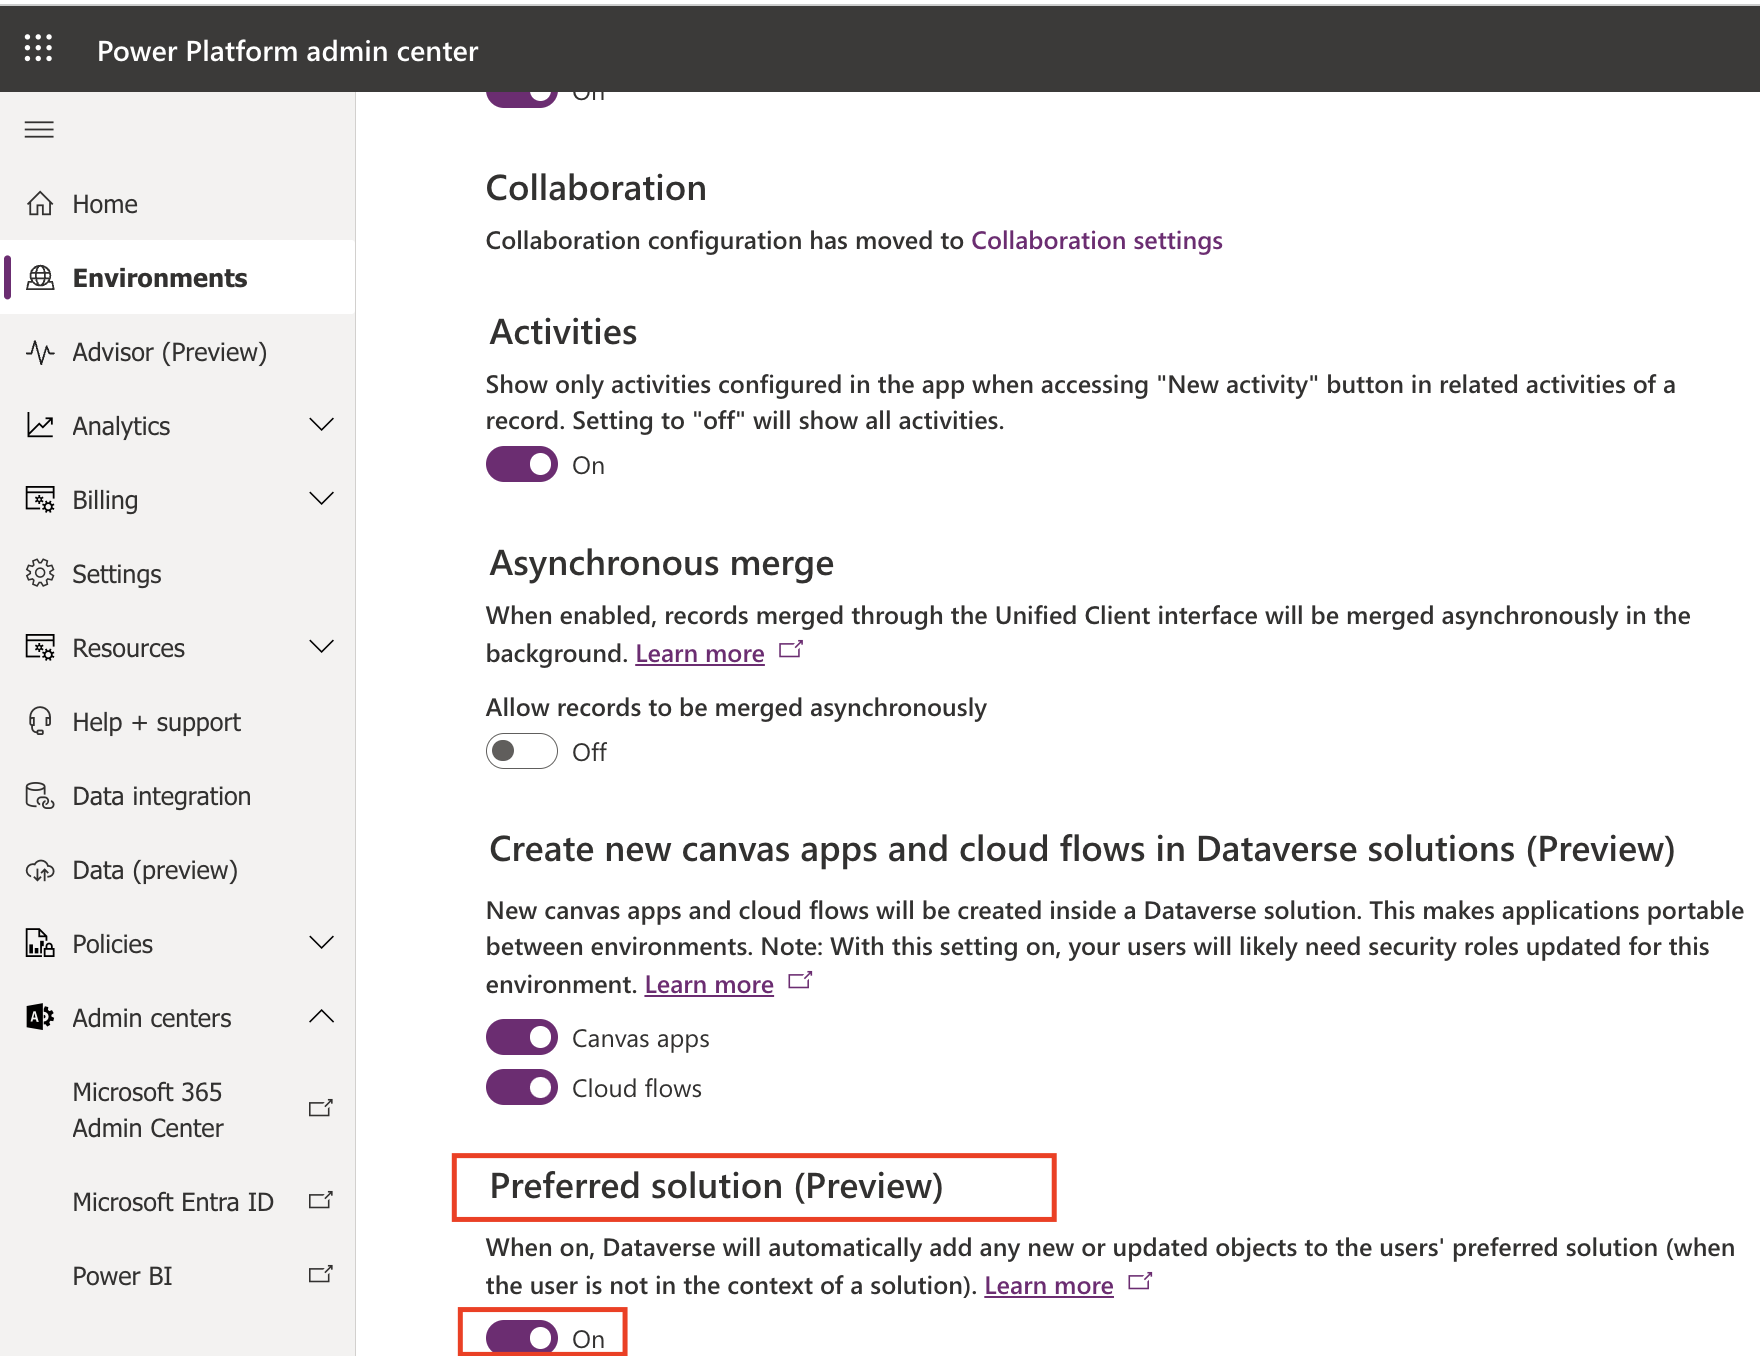
Login into Power Platform Admin Center.

Select the environment and then go to settings.

Click on Features.

Turn on Preferred Solution

When on, Dataverse will automatically add any new or updated objects to the user’s preferred solution when the user is not in the context of solution.

Then login into www.make.powerapps.com

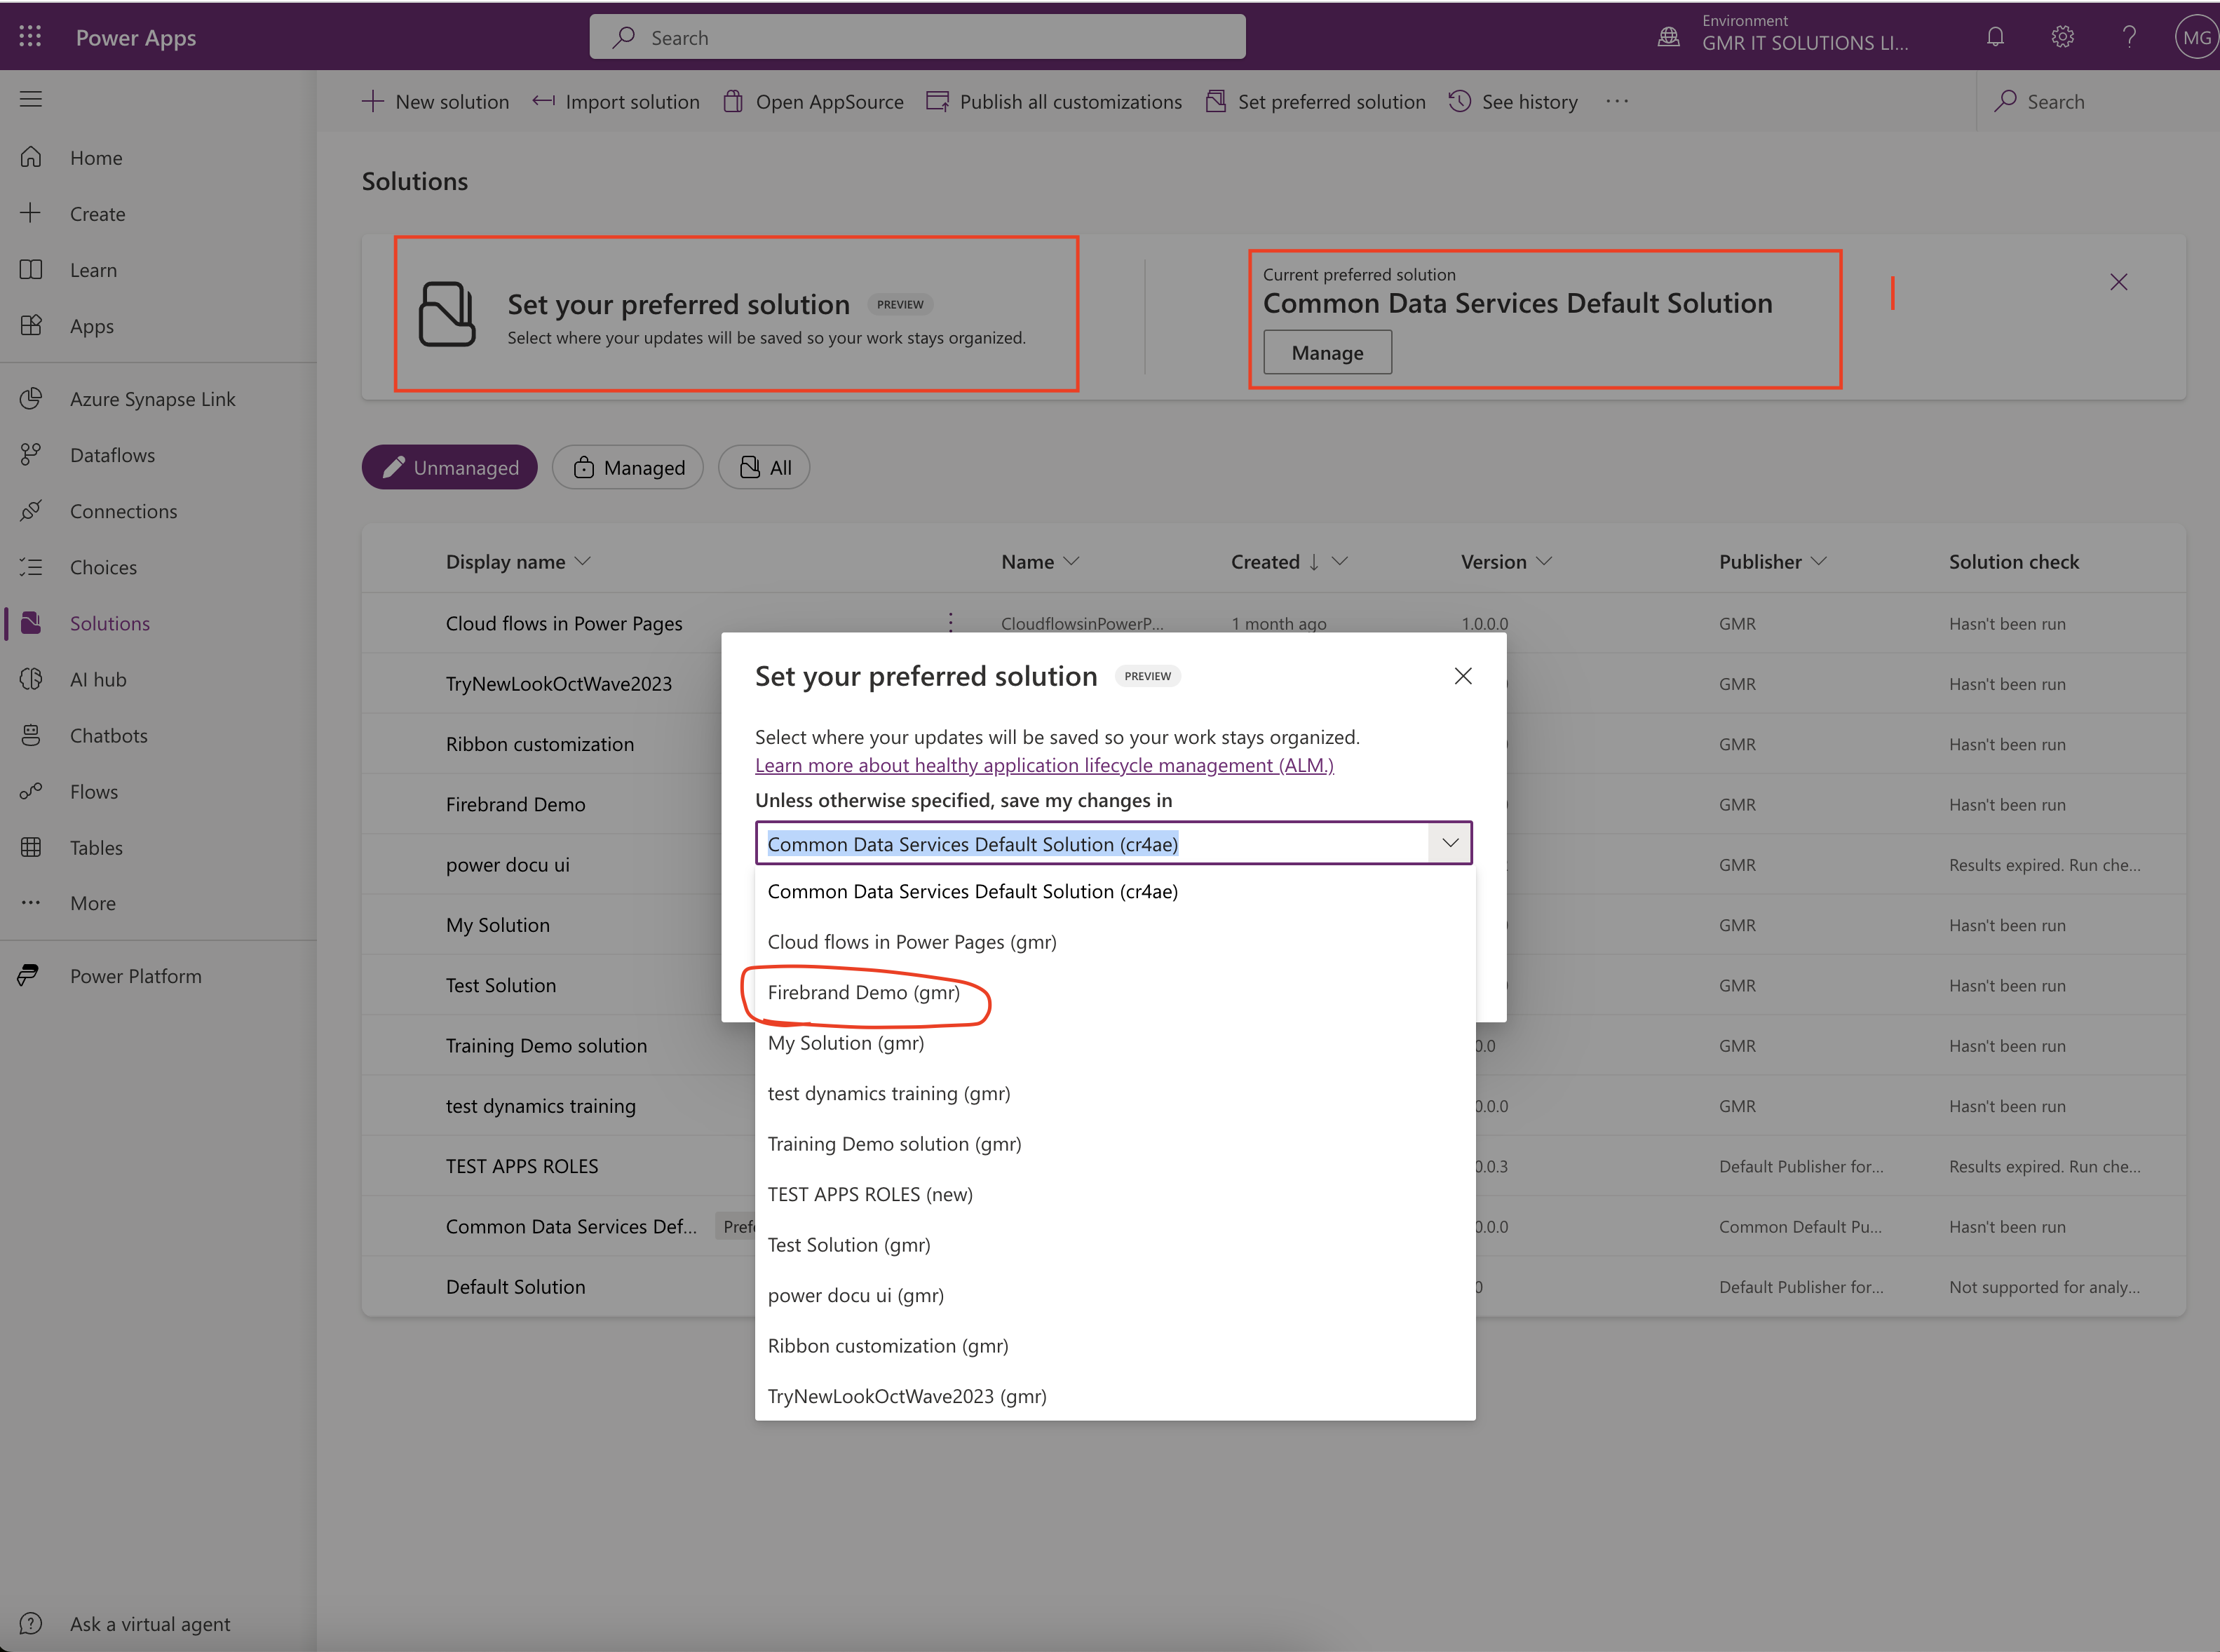
Then go to the solutions.

You will see two new changes:

1. Set your preferred solution

2. Common Data Service Default Solution.

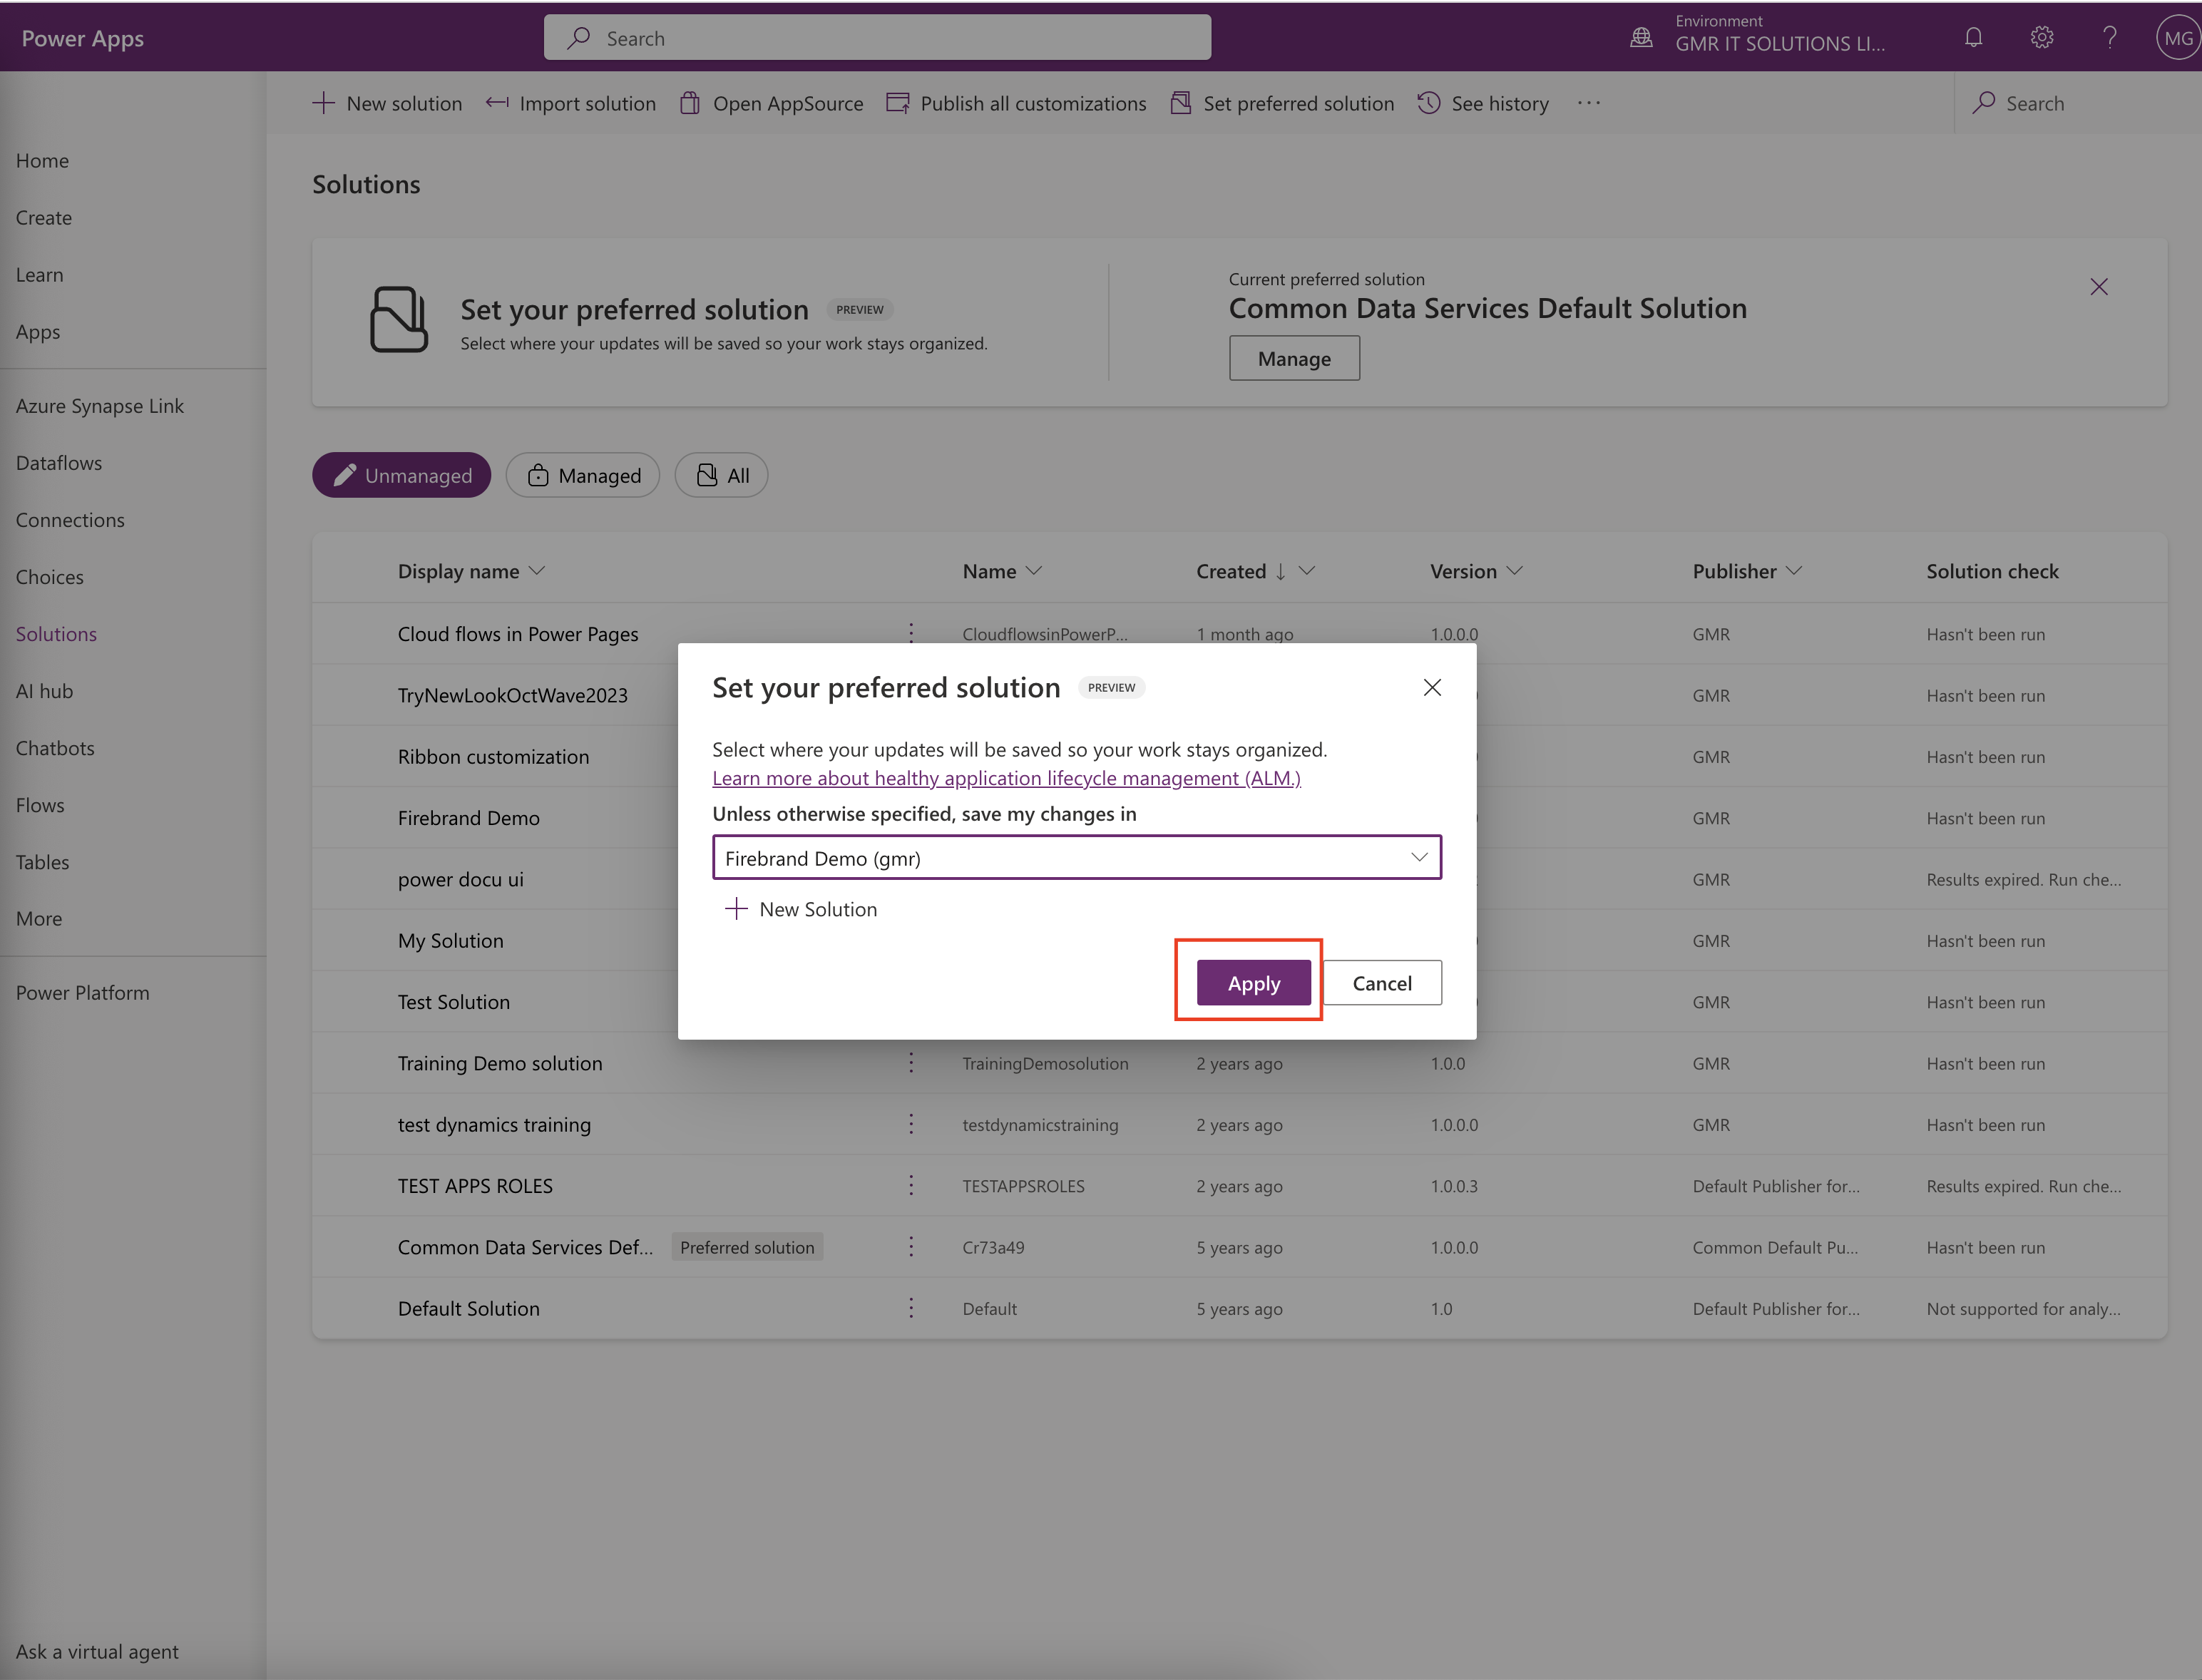
In order to make your solution as preferred click on Common Data Service Default Solution – MANAGE.

Choose your solution and click Apply.

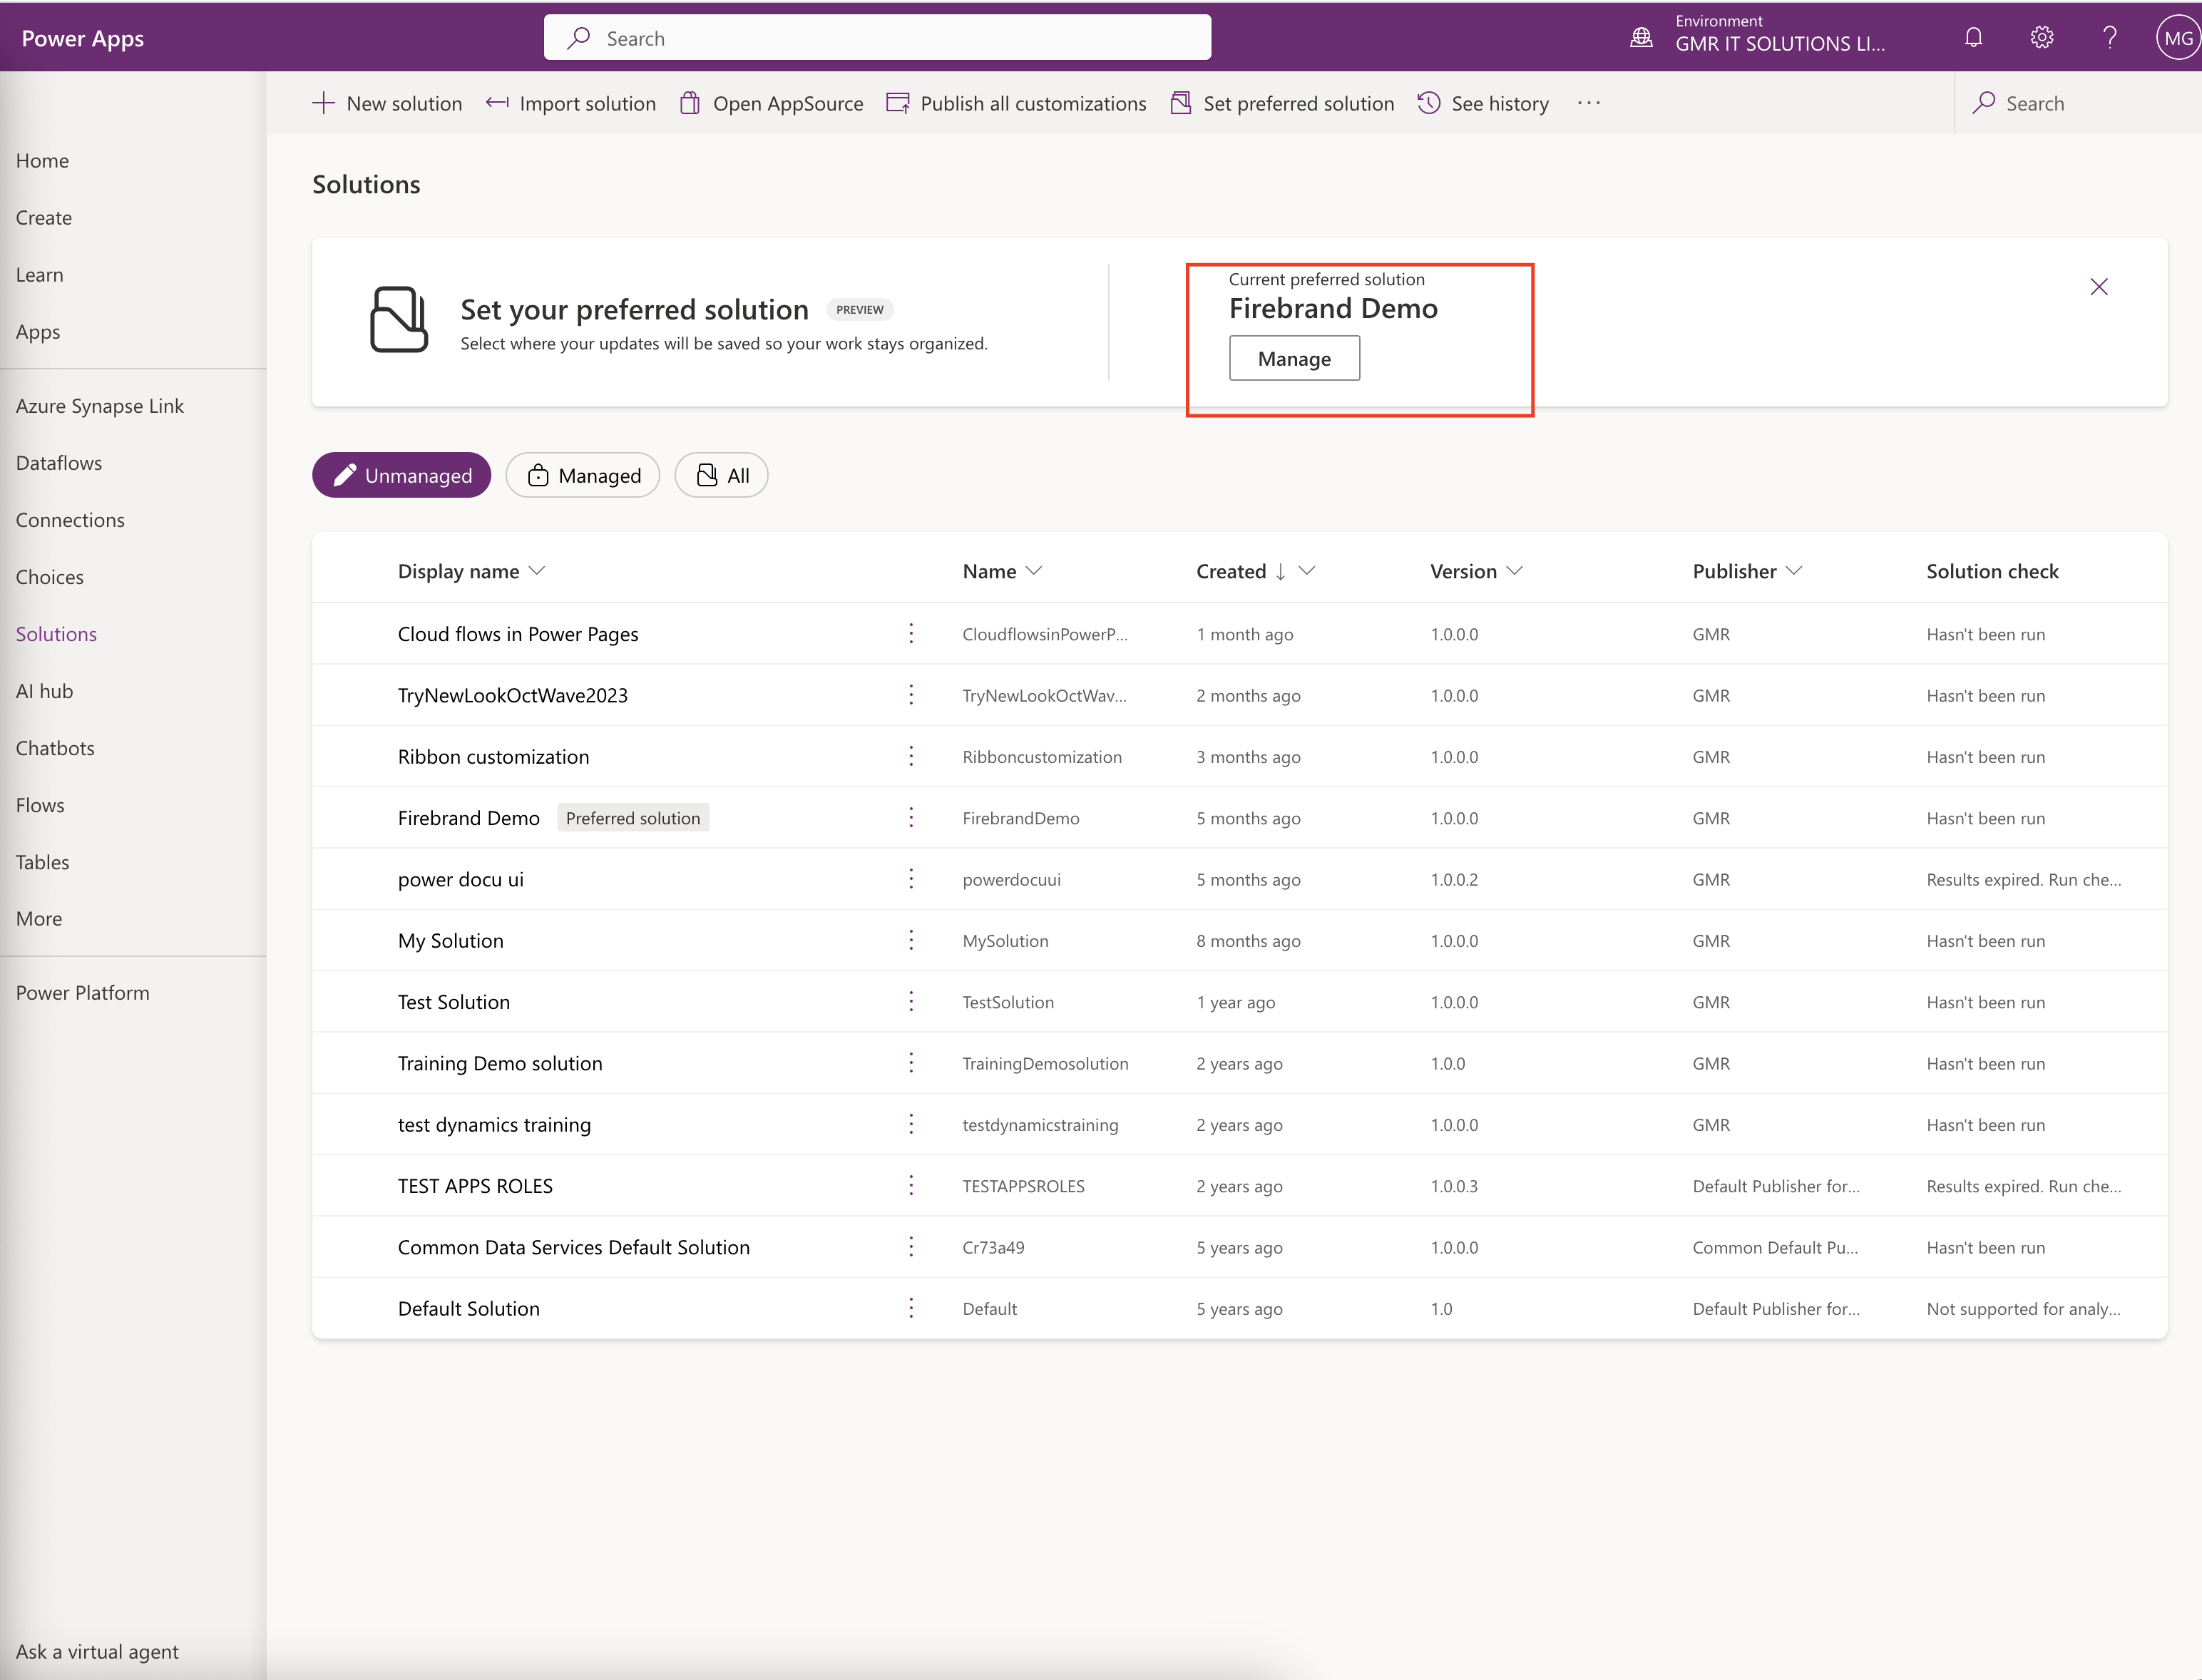
Then your current chosen Solution will be preferred.

That’s it for today.

I hope this helps.

Malla Reddy Gurram(@UK365GUY)
#365BlogPostsin365Days

Share this: