Menu Close

Tag: #365blogpostsin365days

{Do you know} how many ways you can refresh an environment in Dynamics 365 Marketing

Hello Everyone,

Today I am going to show how many ways you can refresh a Dynamics 365 Marketing environment.

Let’s get’s started.

1.Login into Power Platform Admin Center.

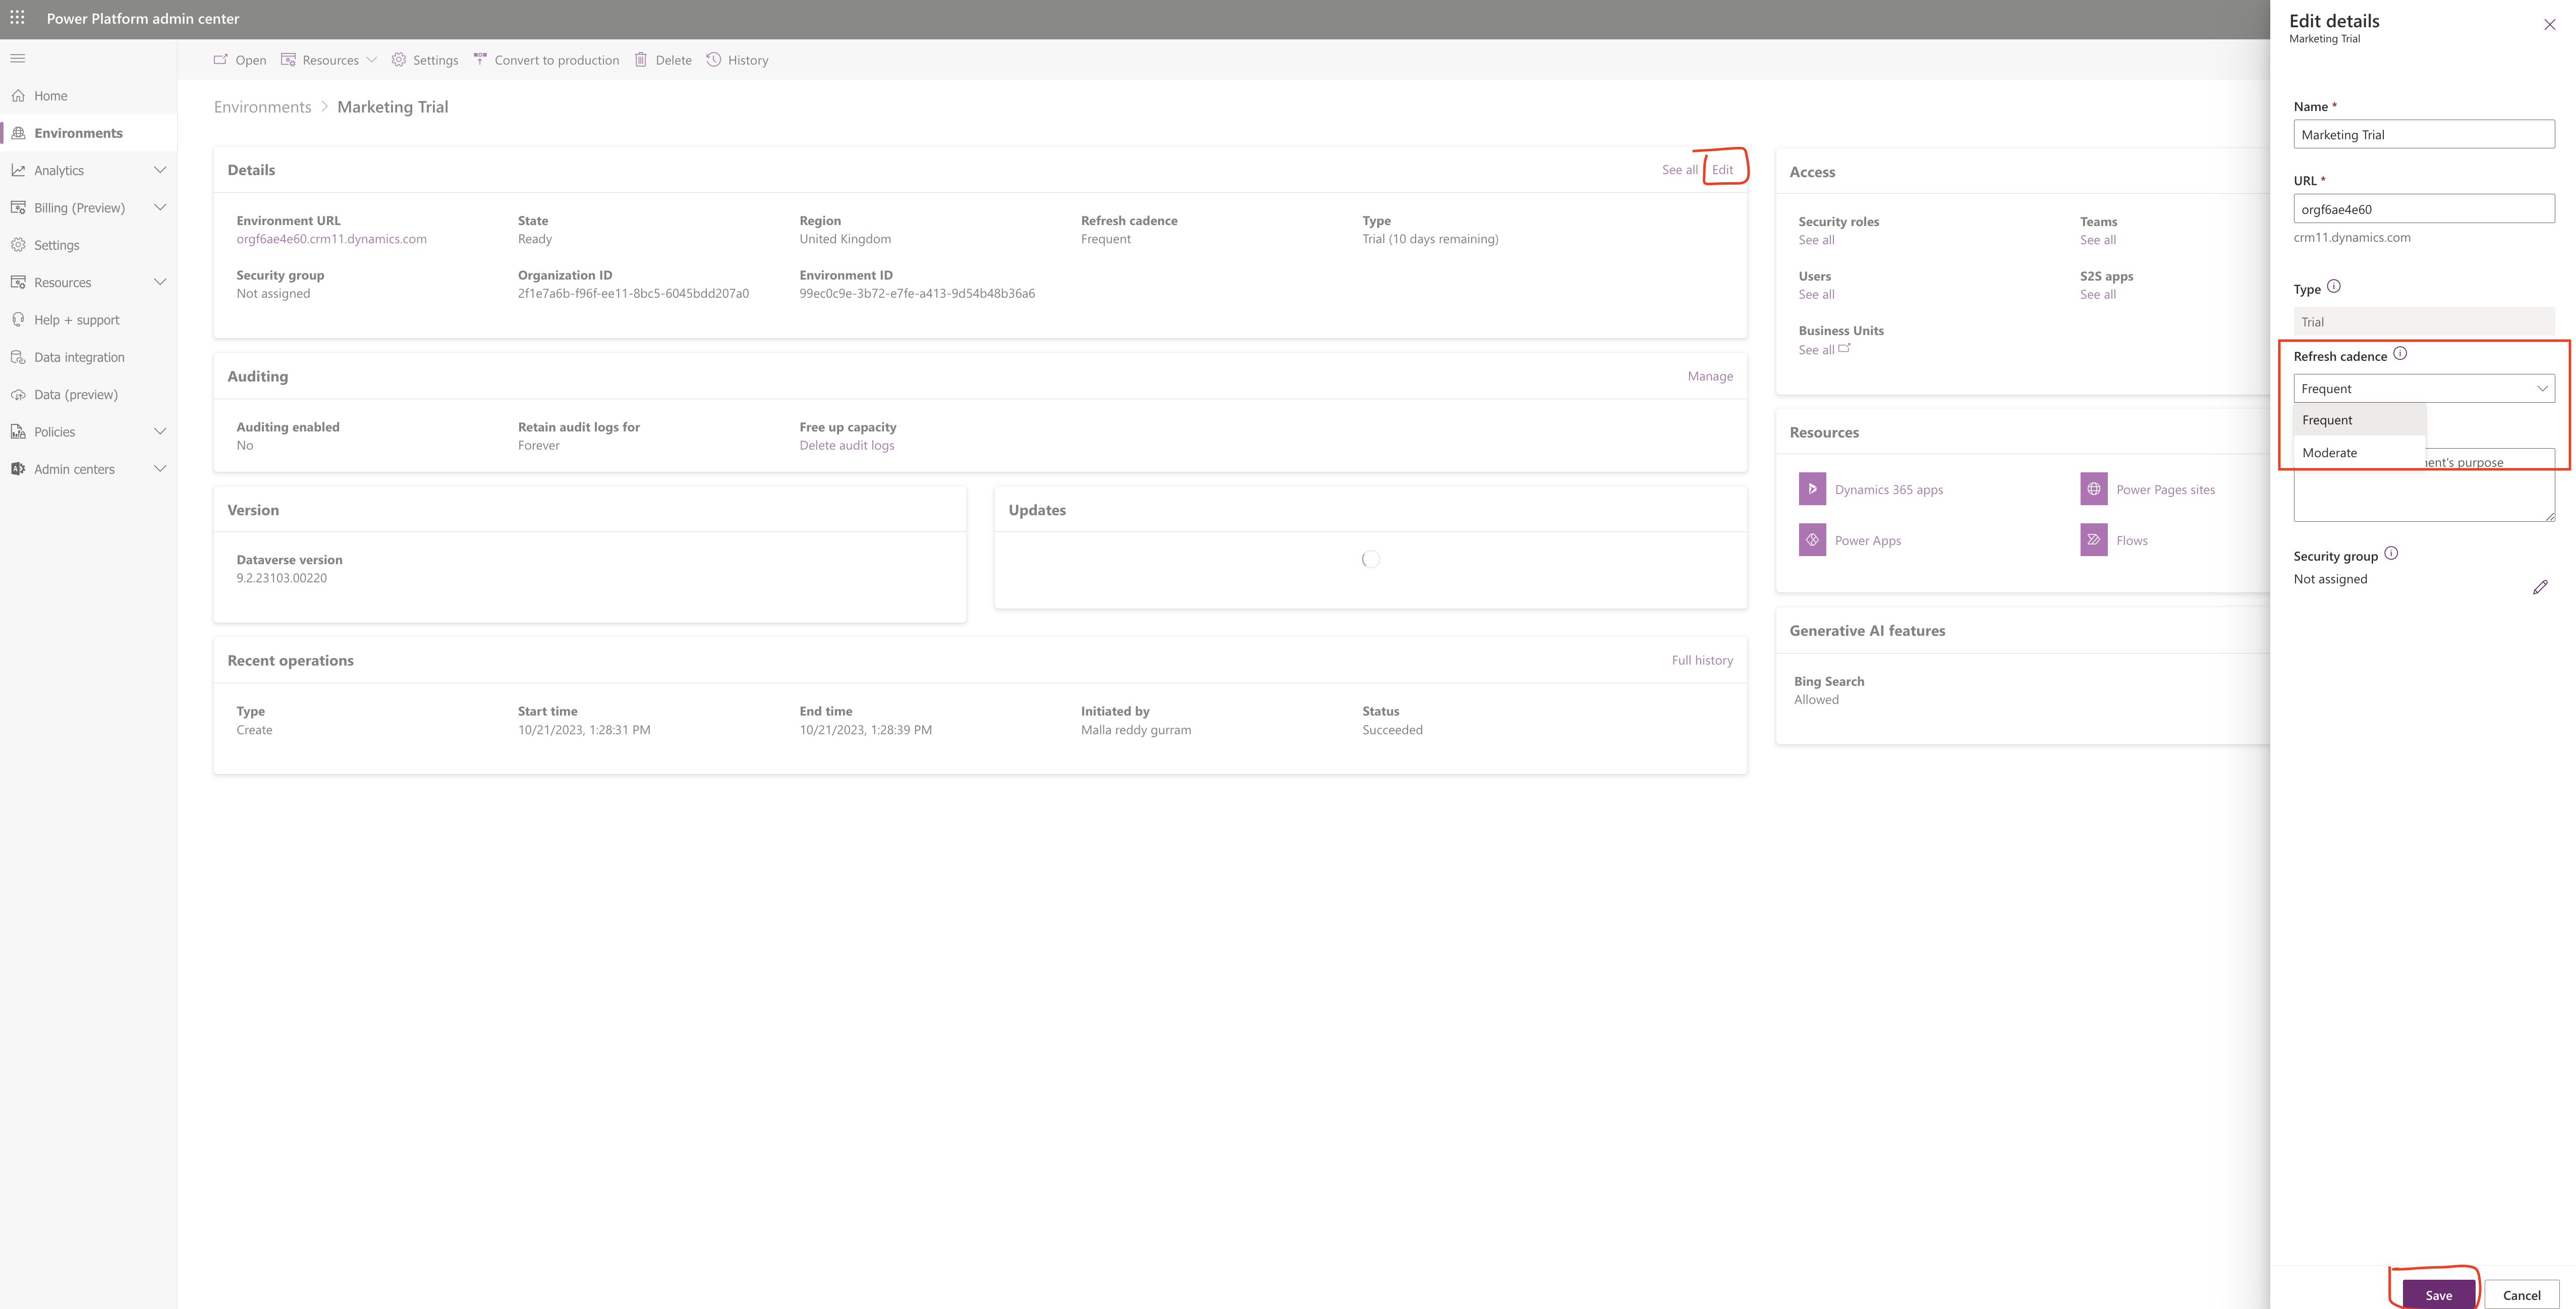
2. Choose the environment and click on edit.

There are two ways you can refresh the Dynamics 365 App,

Refresh Cadence: Indicates how often you would like Power Platform updates for your environment.

1. Frequent: Regular update

2. Moderate: Quarterly as an example

That’s it for today.

I hope this helps.

Malla Reddy Gurram(@UK365GUY)
#365BlogPostsin365Days

Share this:

Build Segments using everyday words with Copilot in Customer Insights

Hello Everyone,

Today i am going to share my view on building segments using everyday words with copilot in Customer Insights.

Let’s get’s started.

To build segments in Dynamics 365 Customer Insights using Copilot, you’ll want to follow these steps:

1. Access customer insights:

Log in to your Dynamics 365 Customer Insights account.

2. Navigate to segments:

Once logged in find the segments section, its usually in the main menu or dashboard.

3. Start a new segment:

Look for an option to create a new segment. This might be a New or Create button.

4.Use Everyday words:

Instead of technical jargon, try to describe your segment using everyday language. Copilot can understand natural language, so express your criteria in a way that makes sense to you.

5. Specific Criteria:

In the segment creation process, you’ll come across fields to specify criteria. Copilot can assist by suggesting relevant criteria based on the data available. For example you might say, “Show me customers who made a purchase in the last 30 days.

6. Refine and Review:

Copilot can help refine your segment by offering suggestions. if it suggests something you didn’t think of, go ahead and incorporate it into your criteria.

7. Save and Test:

Once you’re satified with your segment definition, save it some platforms allow you to test your segment if it captures the right audience.

8. Deploy:

If everything looks good, deploy your segment. this could involve using it for targeted marketing, analysing data, or any other relevant business process.

Remember the key is to communicate your criteria in a way that makes sense to you, and Copilot will assist in translating that into the necessary technical details.

If you have specific criteria in mind. feel free to share and we can work on expressing it in everyday languagae.

That’s it for today.

I hope this helps.

Malla Reddy Gurram(@UK365GUY)
#365BlogPostsin365Days

Share this:

{How to} Enable Enanced Desktop Flow Schema from the environment settings Power Platform

Hello Everyone,

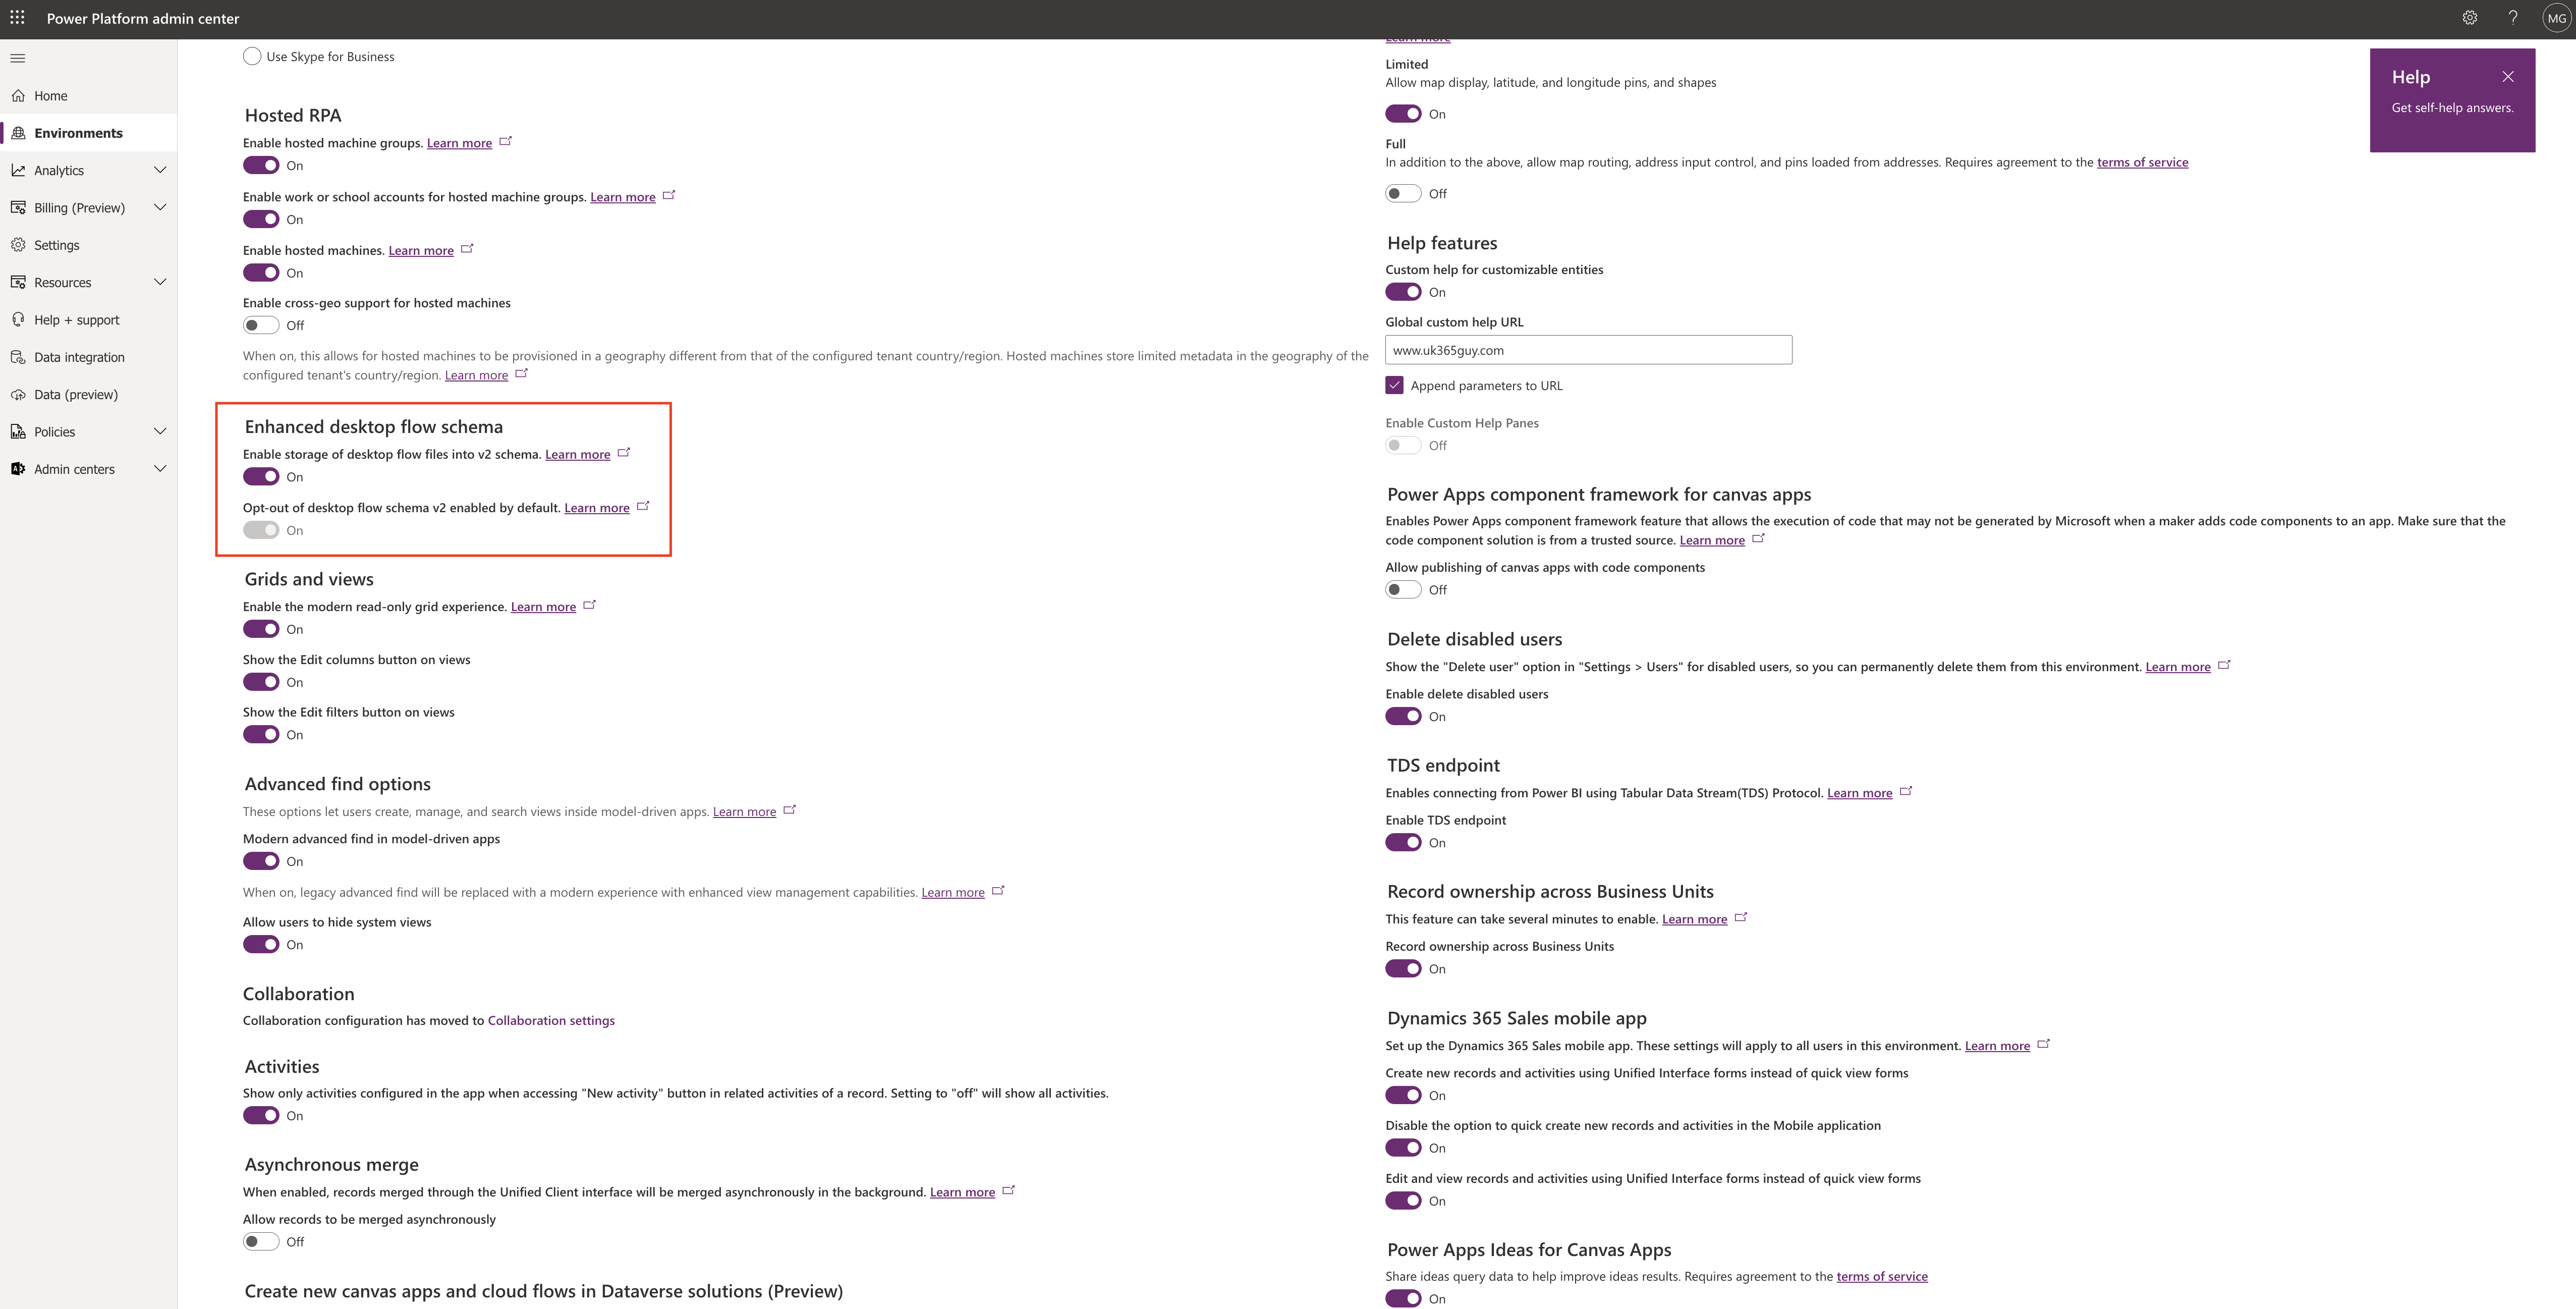
Today I am going to show how to enable desktop flow schema on Dynamics 365 Environment settings.

Let’s get’s started.

Login into Power Platform Admin Center.

Choose the environment and then settings and then click on Features.

So you can enable storage of desktop flow files into v2 schema.

What it does?

Convert desktop flows stored in the v1 schema to the v2 schema by end of 2024, as then the v1 schema will be deprecated.

You need Power Automate for desktop v2.29 or later to author and run desktop flows using environments where the v2 schema is enabled. This environment ensures desktop flow makers and attended an unattended users can take advantage of the new functionality.

By default Schema v2 enabled.

Starting January 2024 v2 schema will be automatically enabled for all environments. Although not recommended the option to opt out of the auto enablements is available in the Power Platform admin center.

By turing the opt-out on, we will delay the enablement of v2 schema on this particular ennvironment.

Later in 2024, v2 schema will be turned on for all environments without the option to disable the feature. As a best practise, we recommend that you enable the feature in advance so users can benefit from the product enhancements, which come with it.

That’s it for today.

I hope this helps.

Malla Reddy Gurram(@UK365GUY)
#365BlogPostsin365Days

Share this:

{How to} set default environment routing for makers n Power Platform

Hello Everyone,

Today I am going to show how to set default environment routing for maker on Power Platform.
Let’s get’s started.

Normally when a power apps makers login into maker portal they will land on default environment.

Default environment routing is a premium governance feature.

So with this new feature once enabled power apps makers will be defaulted into the their own personal developer environments.
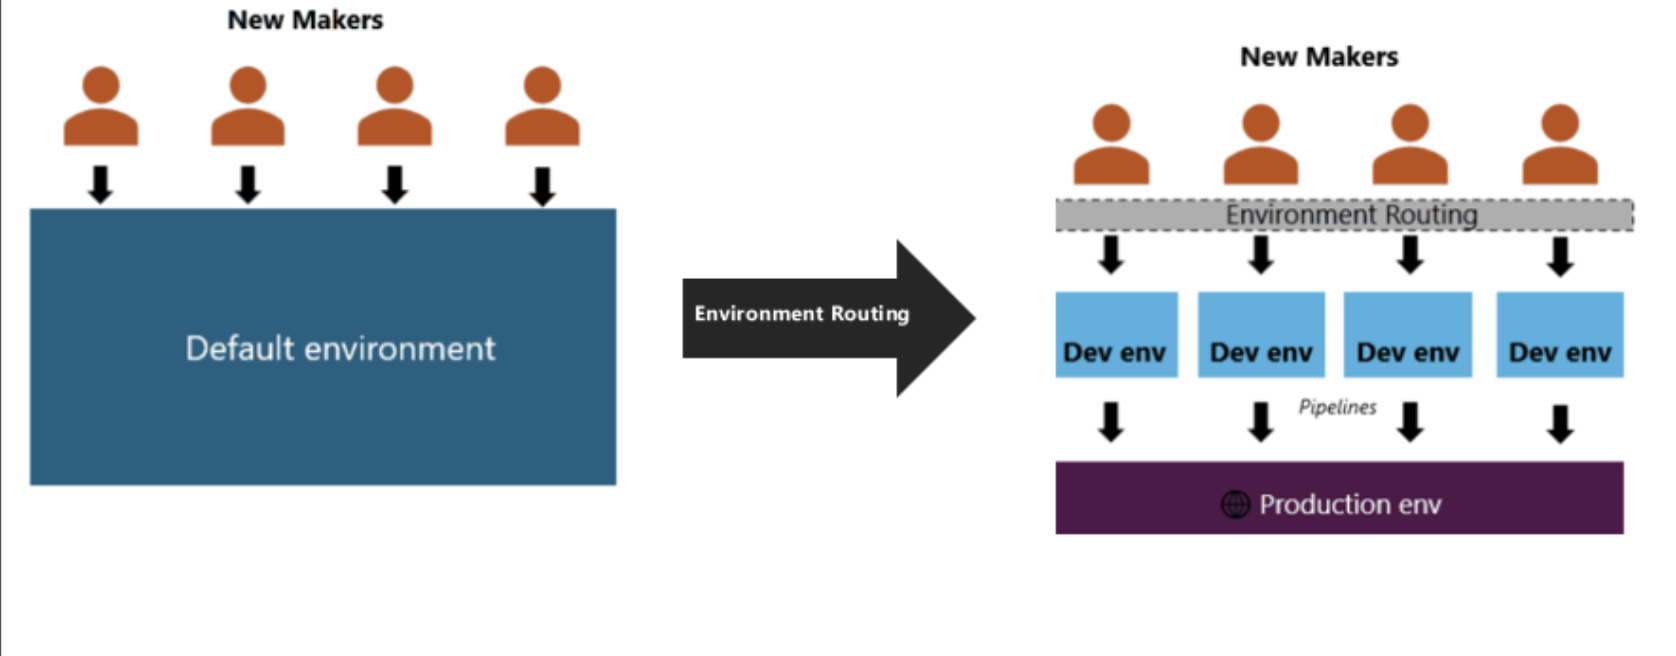
With these settings enabled Power Platform admins don’t need to worry that the makers are working on default environment, they will be landing on their own developer environment.

Prerequisties:

Default environment routing is a tenant level admin settings that:

1. Is enabled by Power Platform admins only.

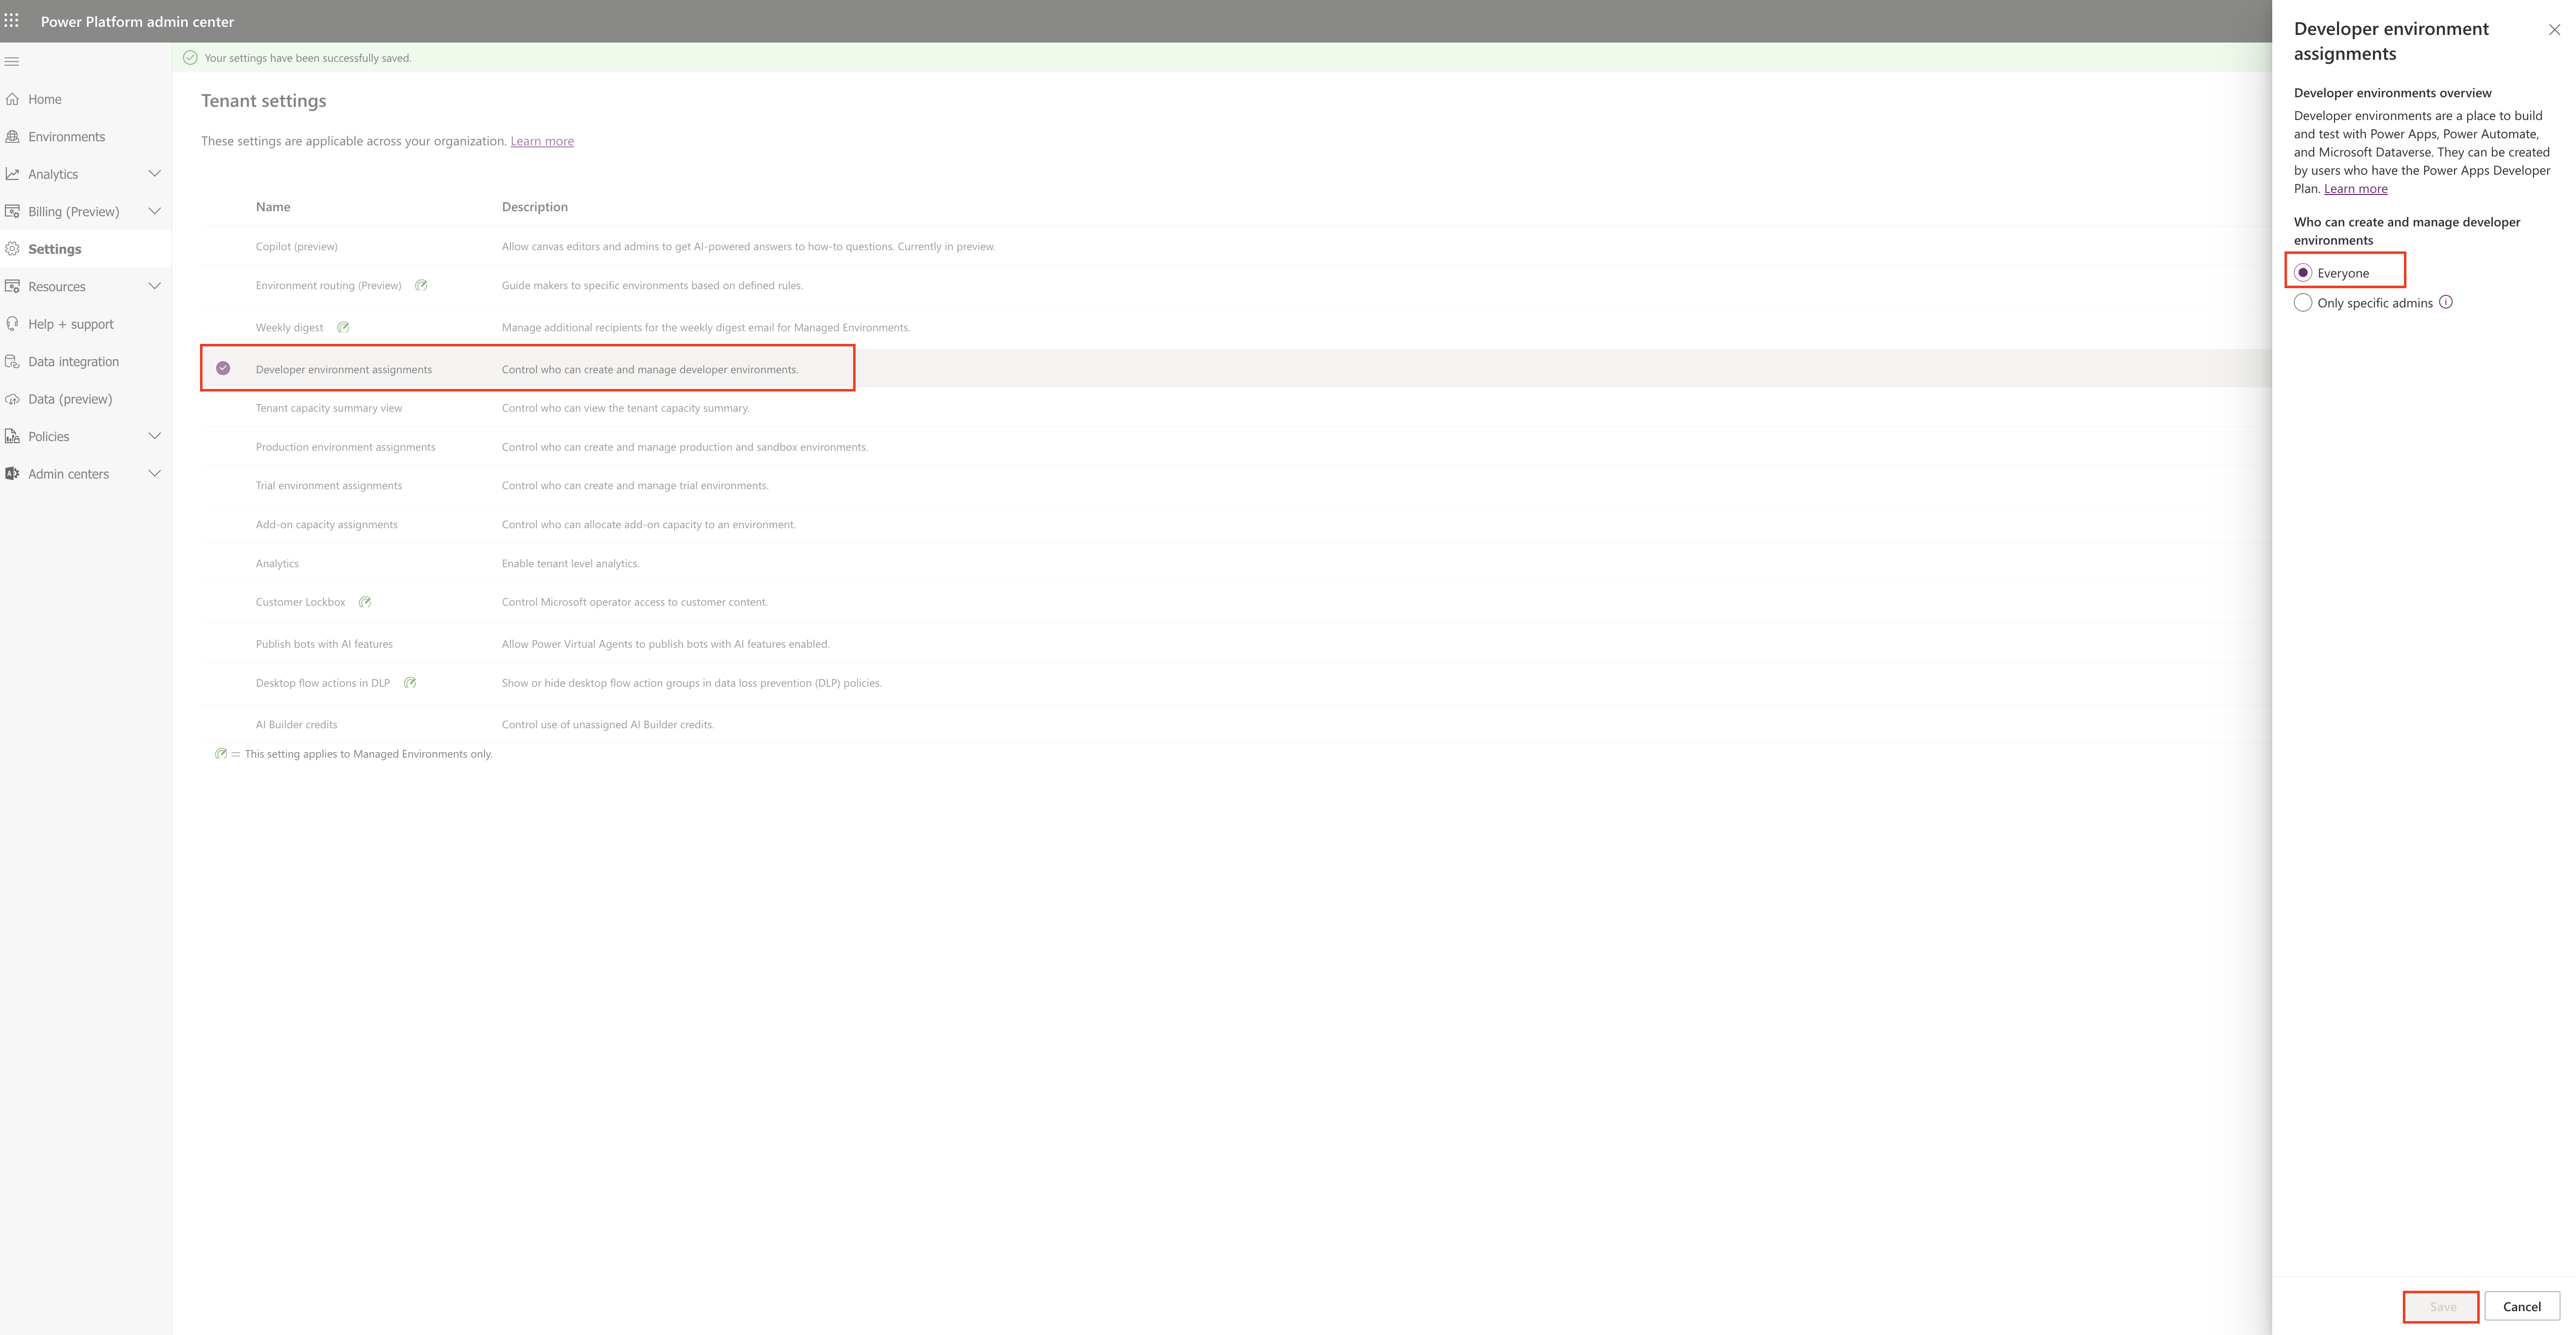
2. Requires that the Developer environment assignment setting is enabled for everyone.
3. Requires the use of Managed Environments, since all the newly created environments are managed . Users in a MANAGED developer environment must have premium licenses to run Power Platform assets.

How to enable it.

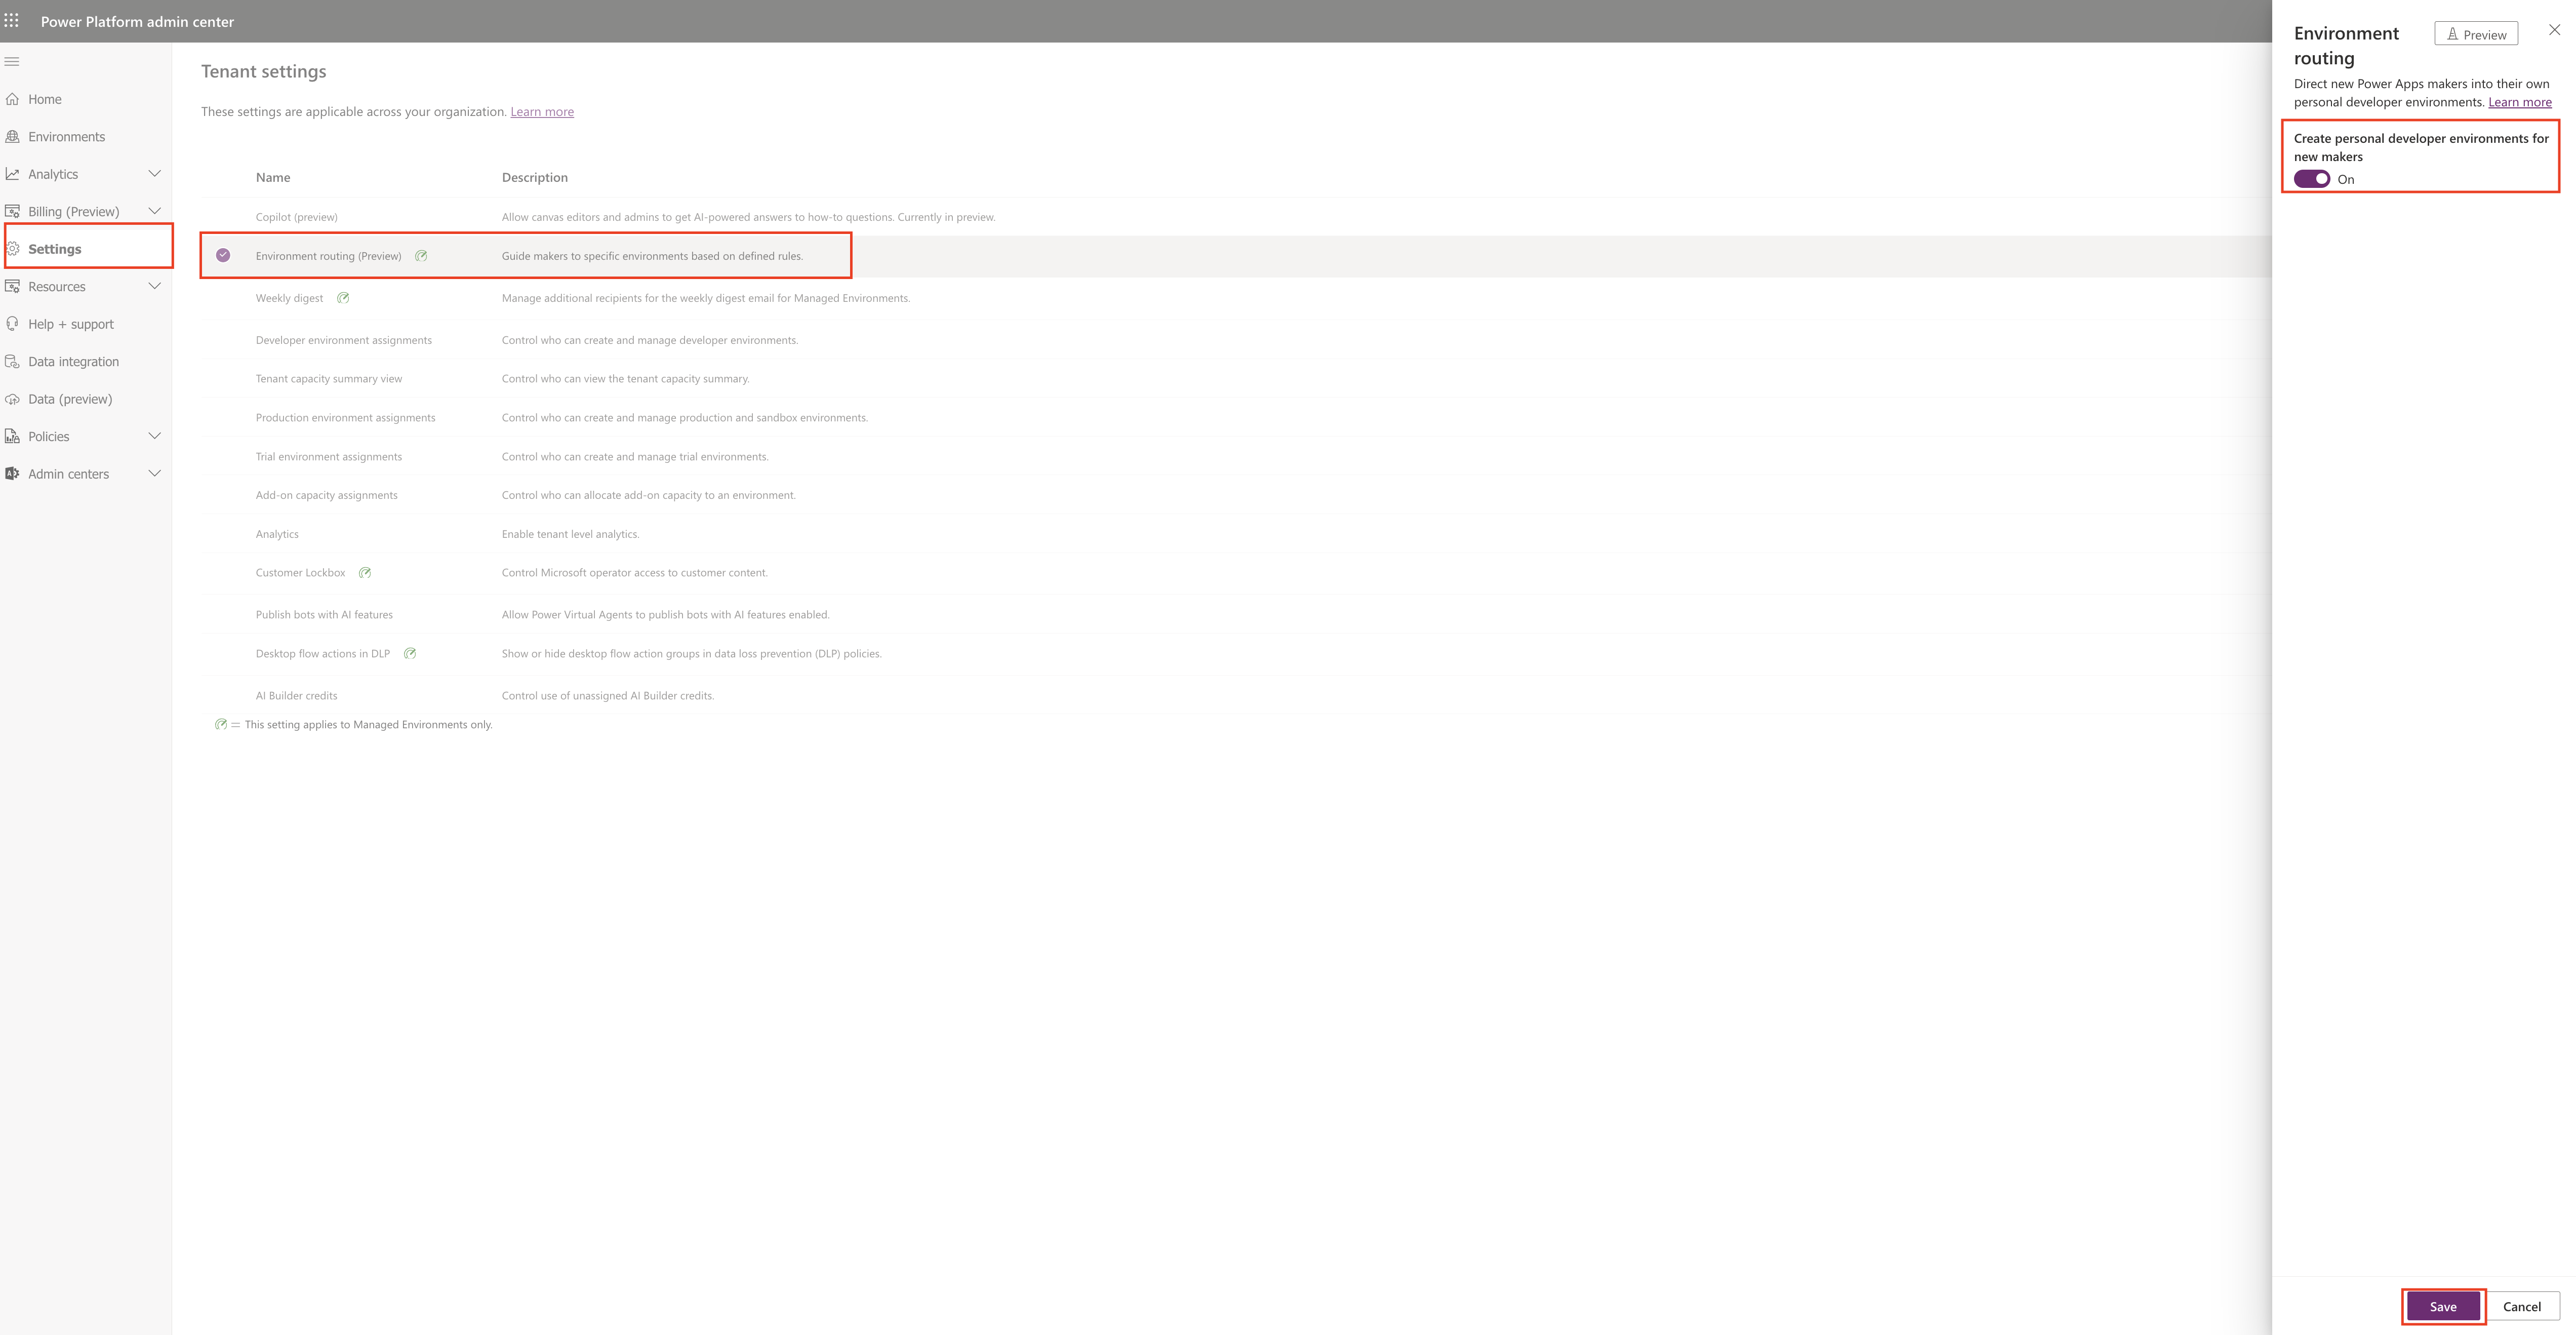
Login into Power Platform Admin Center.

Settings > Tenants Settings.

Environment routing(preview).

In the Environment routing pane, turn on the Create Personal developer environments for new makers option ON.
You can also enable this feaure with PowerShell.

1. Run the following commands in PowerShell.

a. Log in to your tenant account.

POWERSHELL:

$Add-PowerAppsAccount -Endpoint “prod” -TenantID <Tenant\_ID>

b. Retrieve and store your tenant settings in tenantsettings:

POWERSHELL:
$tenantSettings = Get-TenantSettings

c. Set the enableDefaultEnvironmentRouting flag to True.

POWERSHELL:

$tenantSettings.powerPlatform.governance.enableDefaultEnvironmentRouting = $True

Set-TenantSettings -RequestBody $tenantSettings

When trying to enable an environment routing tenant settings keep the following in mind.

1. If the Developer environment assignments property is set for only specific admins, the command fails and an error message is displayed. To change this, go to Power Platform admin center > Tenant Settings > Developer environment assignments and set it to Everyone.

2. If the tenant ‘s default environment isn’t managed, the command fails and an error message is displayed.

That’s it for today.

I hope this helps

Malla Reddy Gurram(@UK365GUY)

#365BlogPostsin365Days
Share this:

{How to} enable Finance and Operations in Dataverse

Hello Everyone,

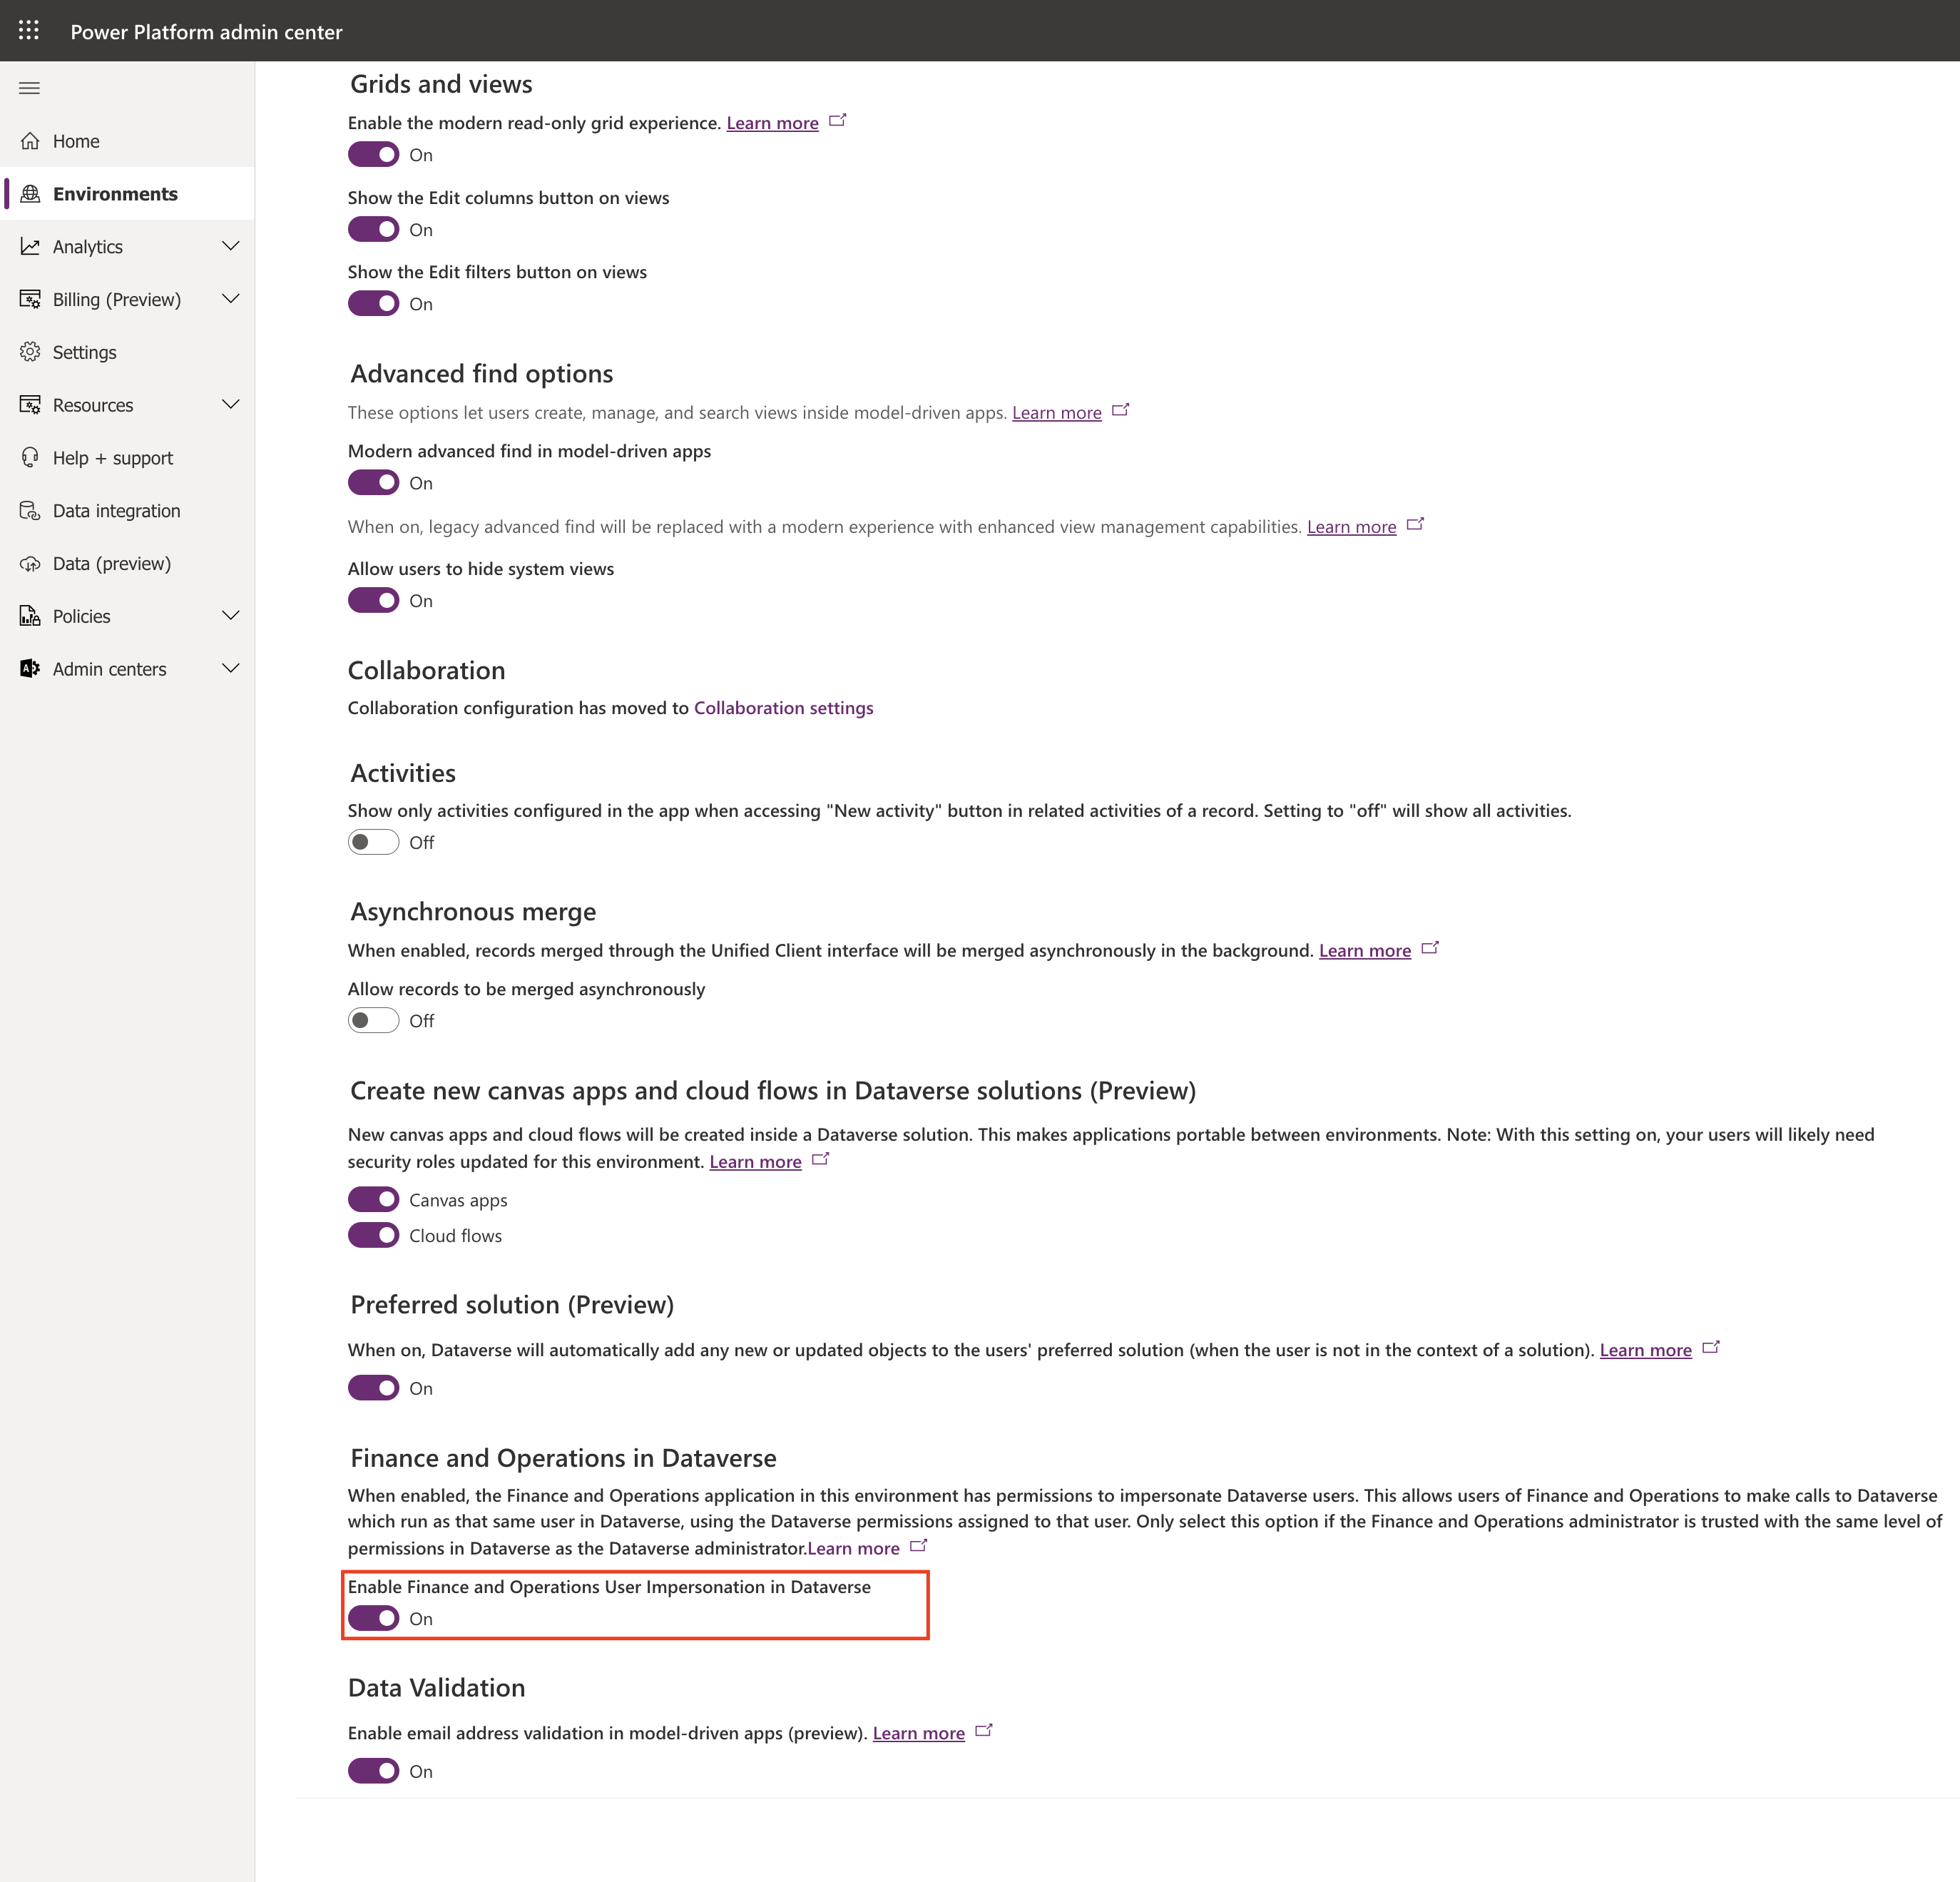
Today i am going to show how to enable Finance and Operations User Impersonation in Dataverse.

Let’s get’s started.

Login into Power Platform Admin Center.

Choose the environment and then settings and then Features.

Finance and Operations in Dataverse = ON;

By default it is turned OFF.

When enabled the Finance and Operations application in this environment has permissions to impersonate Dataverse users. This allows users of Finance and Operations to make calls to Dataverse which runs as that same user in Dataverse, using the Dataverse permissions assigned to that user. Only select this option of the Finance and Operations administrator is trusted with the same level of permissions in Dataverse as the Dataverse administrator.

That’s it for today.

I hope this helps.

Malla Reddy Gurram(@UK365GUY)
#365BlogPostsin365Days
Share this: