Menu Close

Tag: #365blogpostsin365days

How do you know your Dynamics 365 Apps have updates available

Hello Everyone,

In my previous post i have shown how to do update of Dynamics 365 Apps.

Today i am going to show how to find out your Dynamics 365 Apps have updates available ?

Login into www.admin,powerplatform.microsoft.com

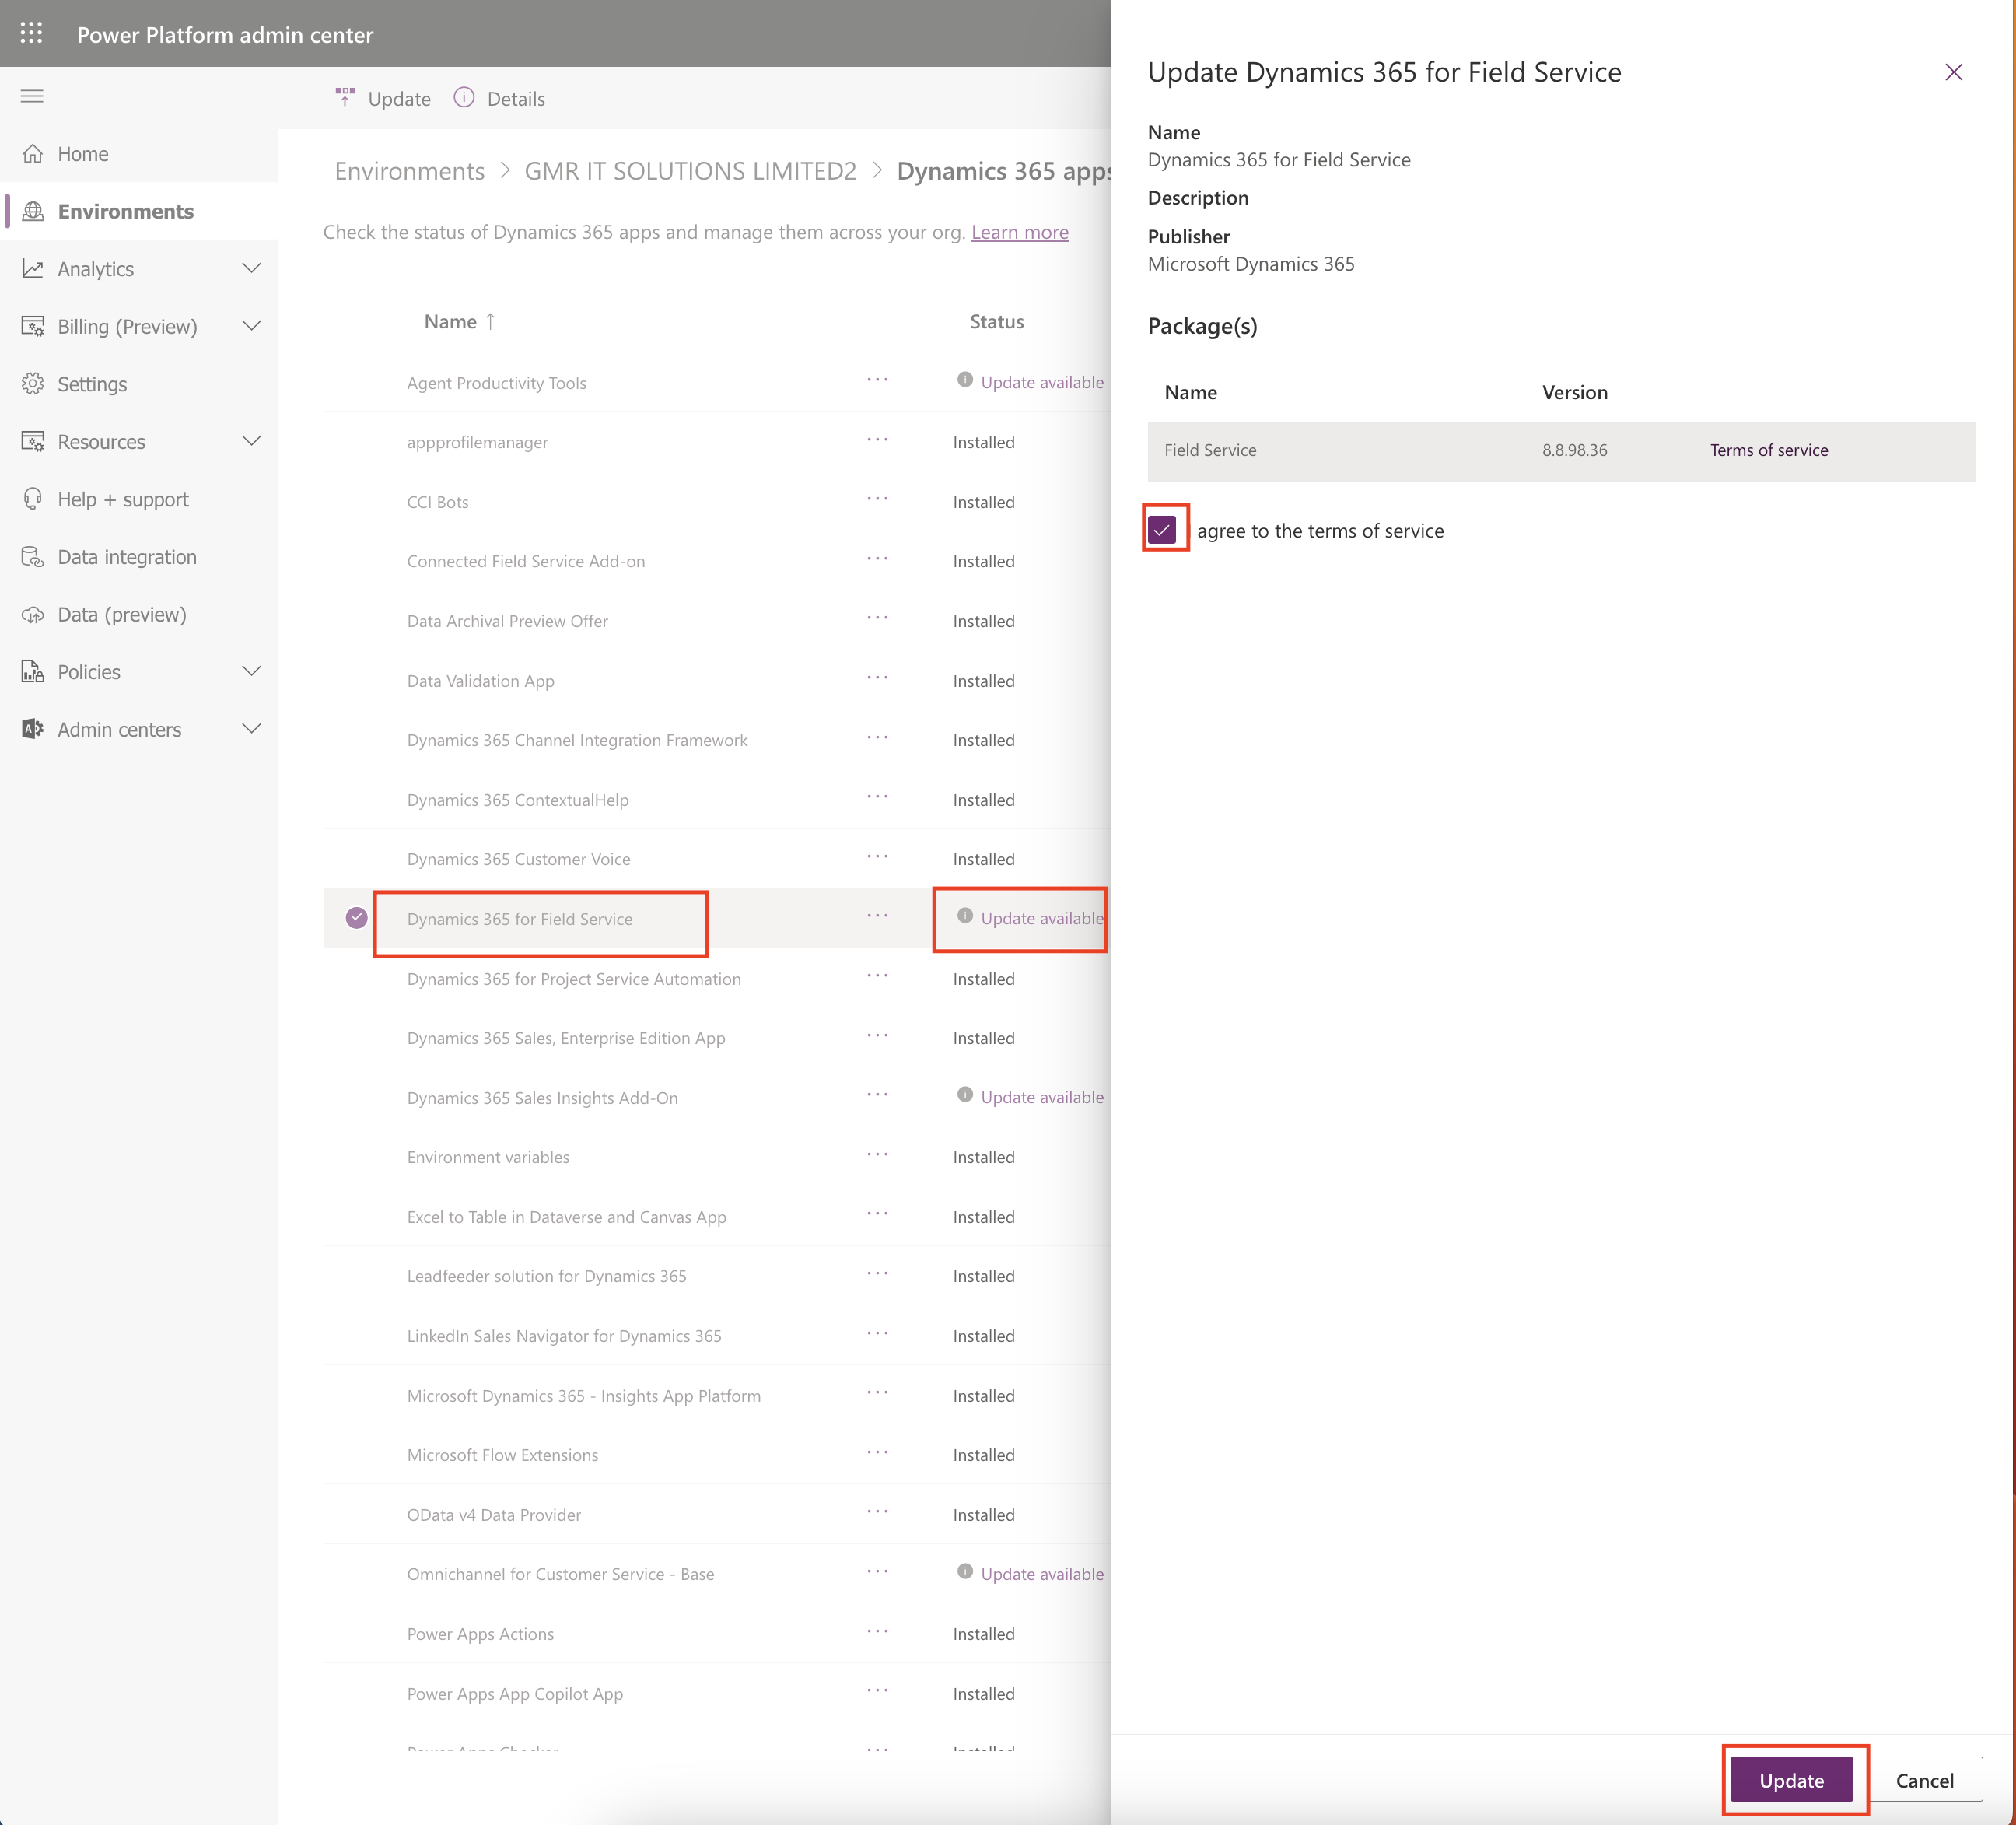
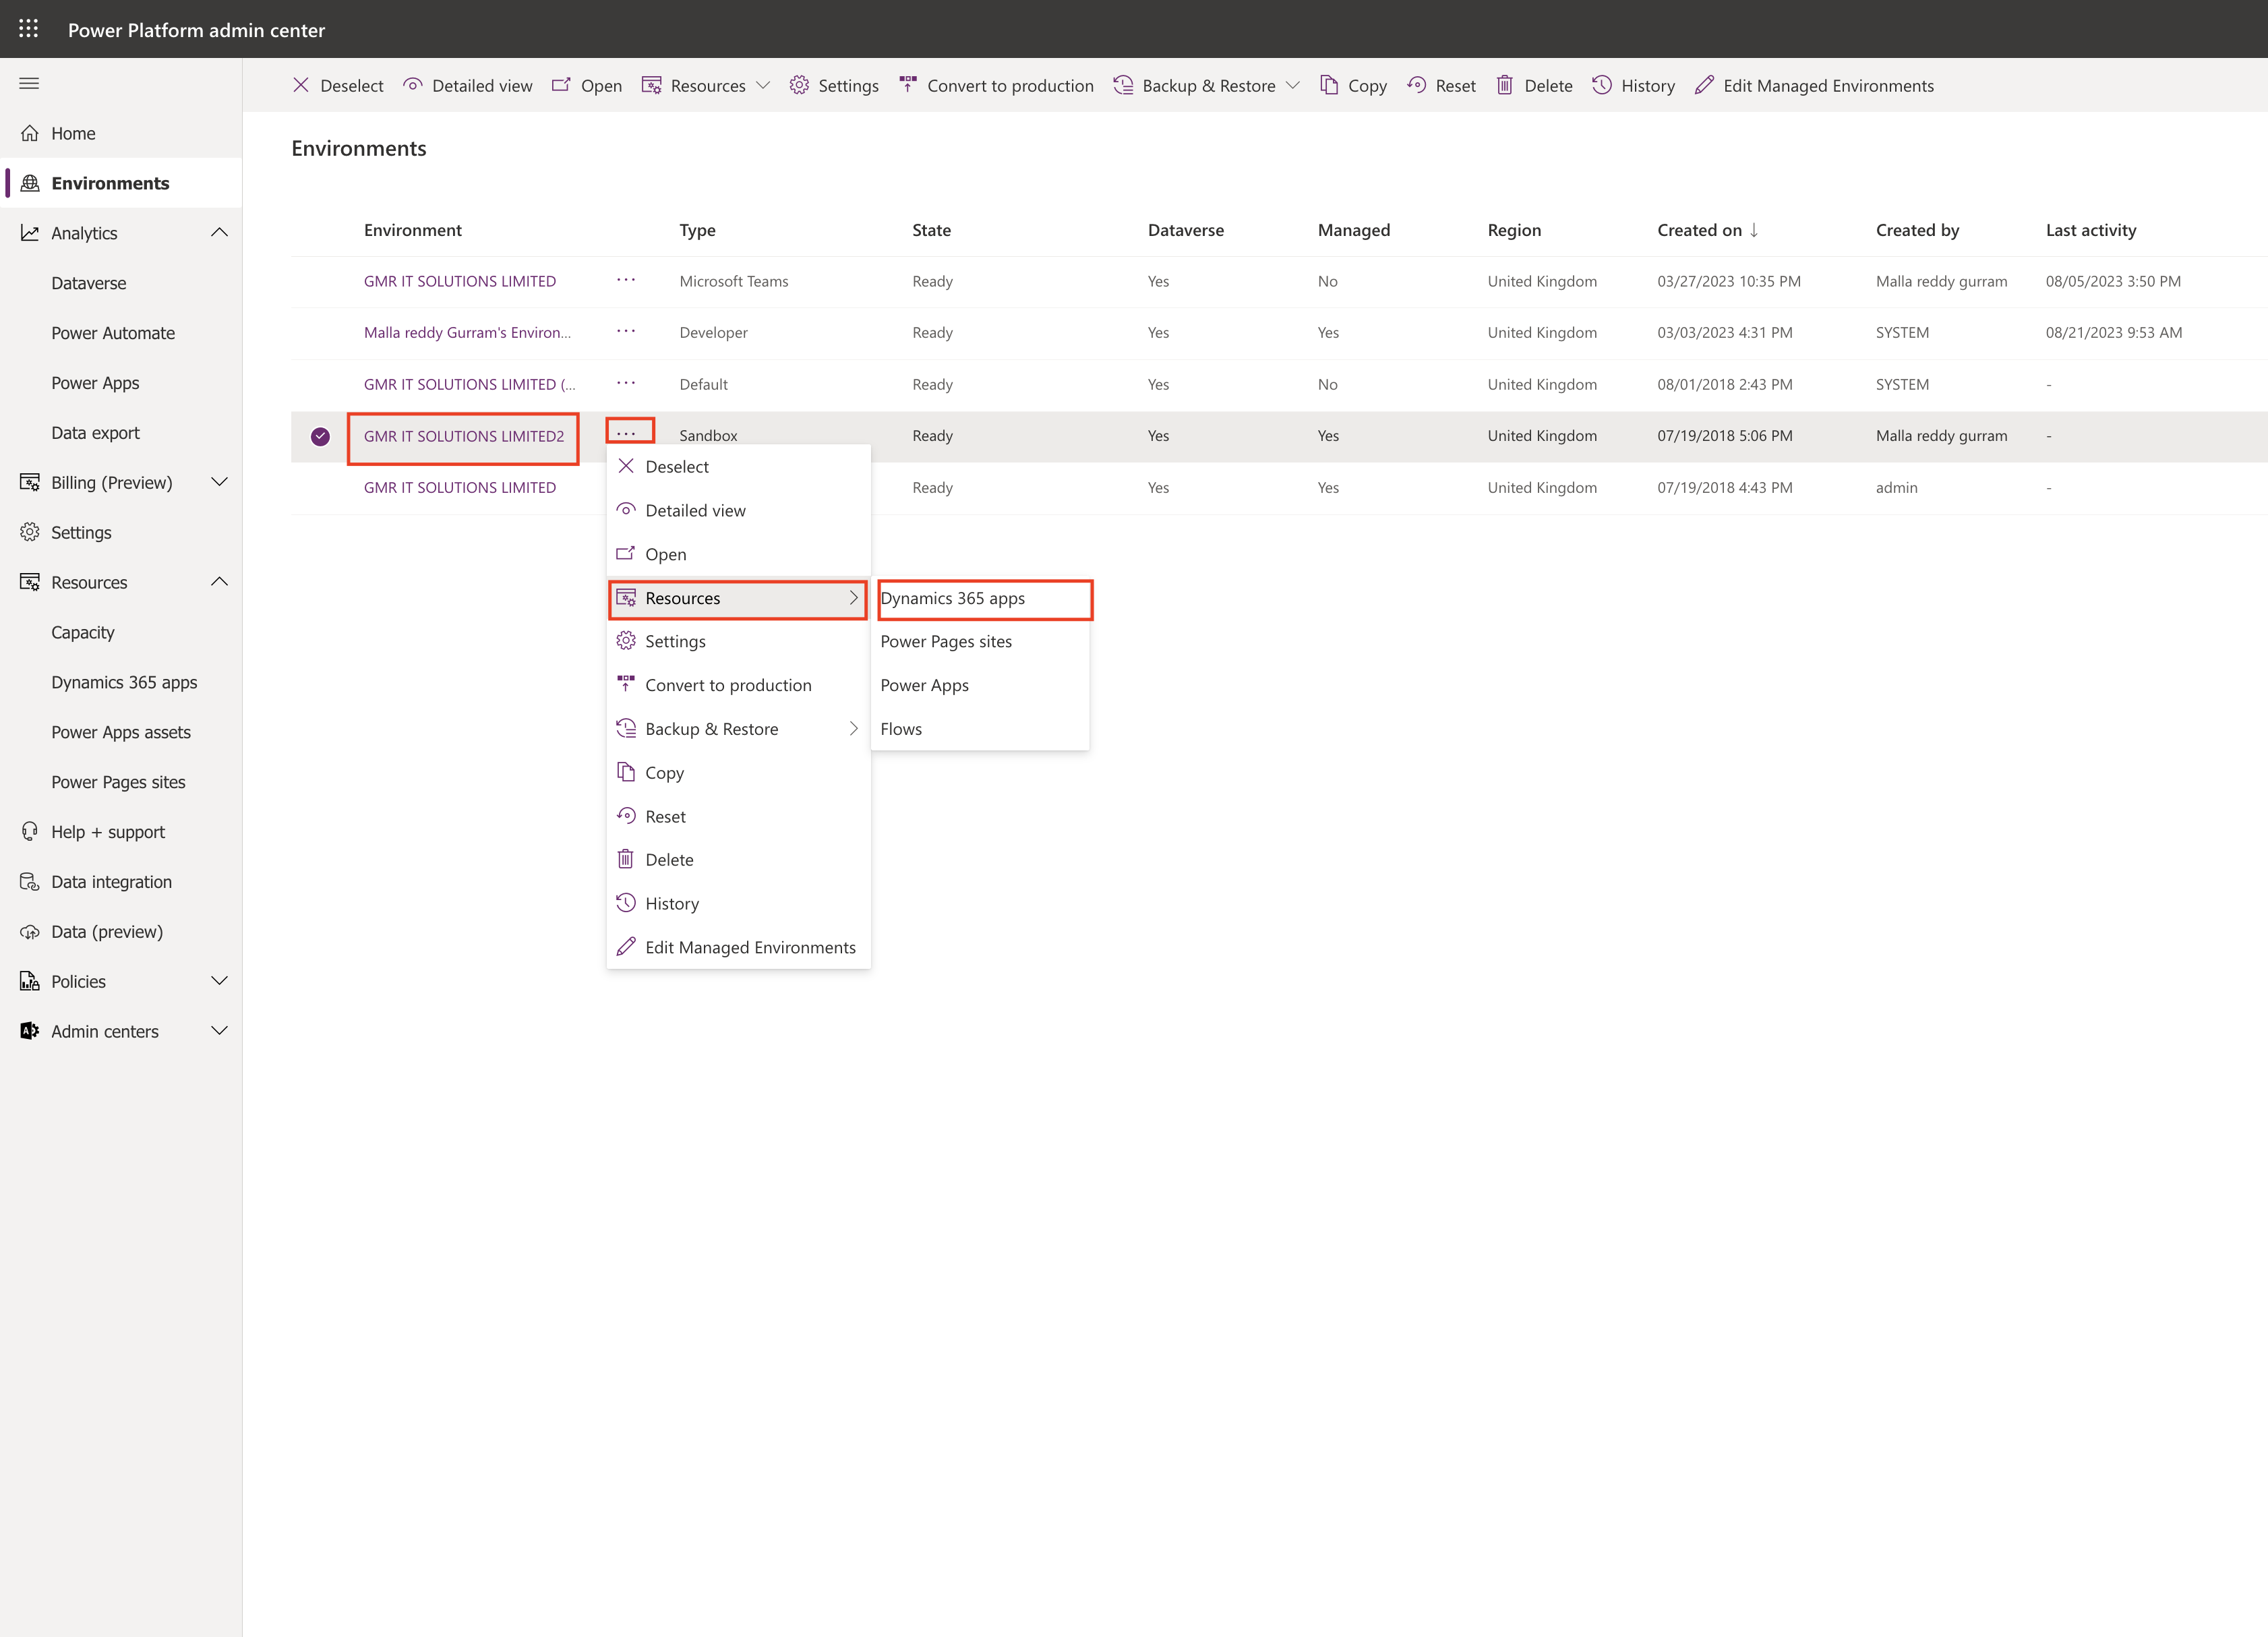
Choose the Environment and click on Dynamics 365 Apps and look for Dynamics 365 for Field Service as as an example.

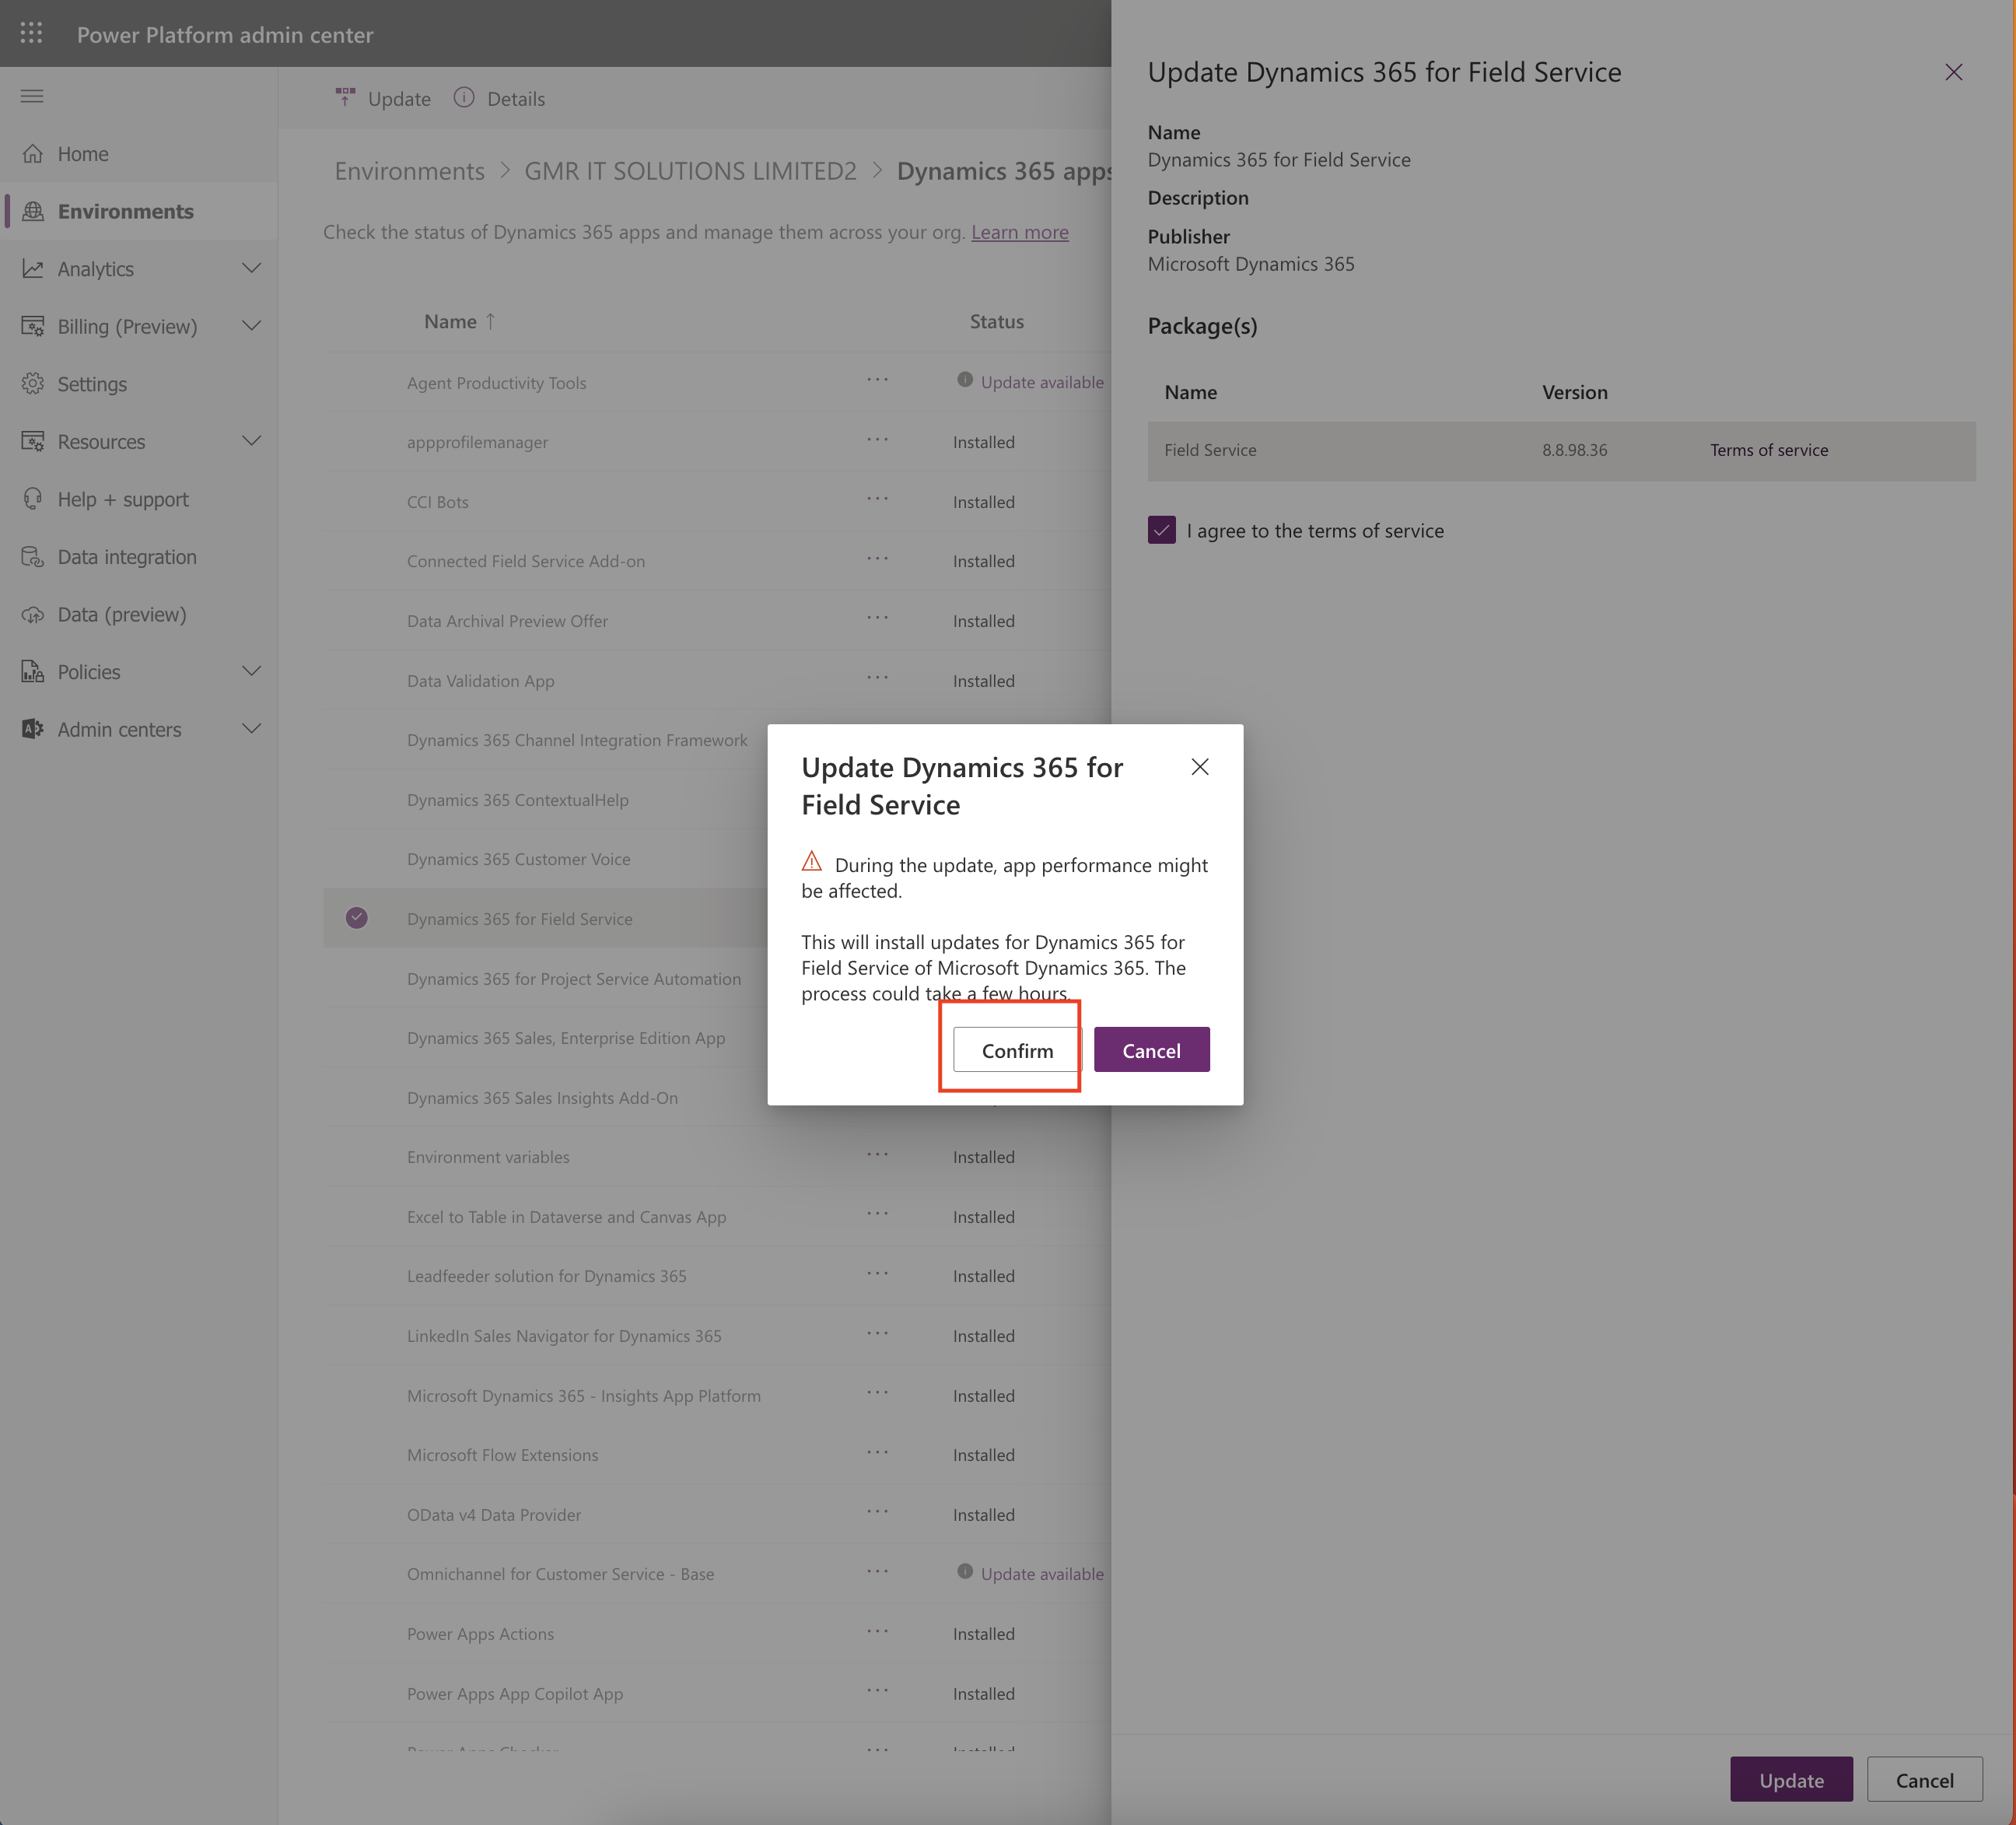
Click on Update available for Dynamics 365 Field Service and Confirm the update.

Update intitiated and it will take few hours to update.

That’s it for today.

I hope this helps.
#365BlogPostsin365Days

Share this:

{How to} update Power Apps App Copilot App in Environments

Hello Everyone,

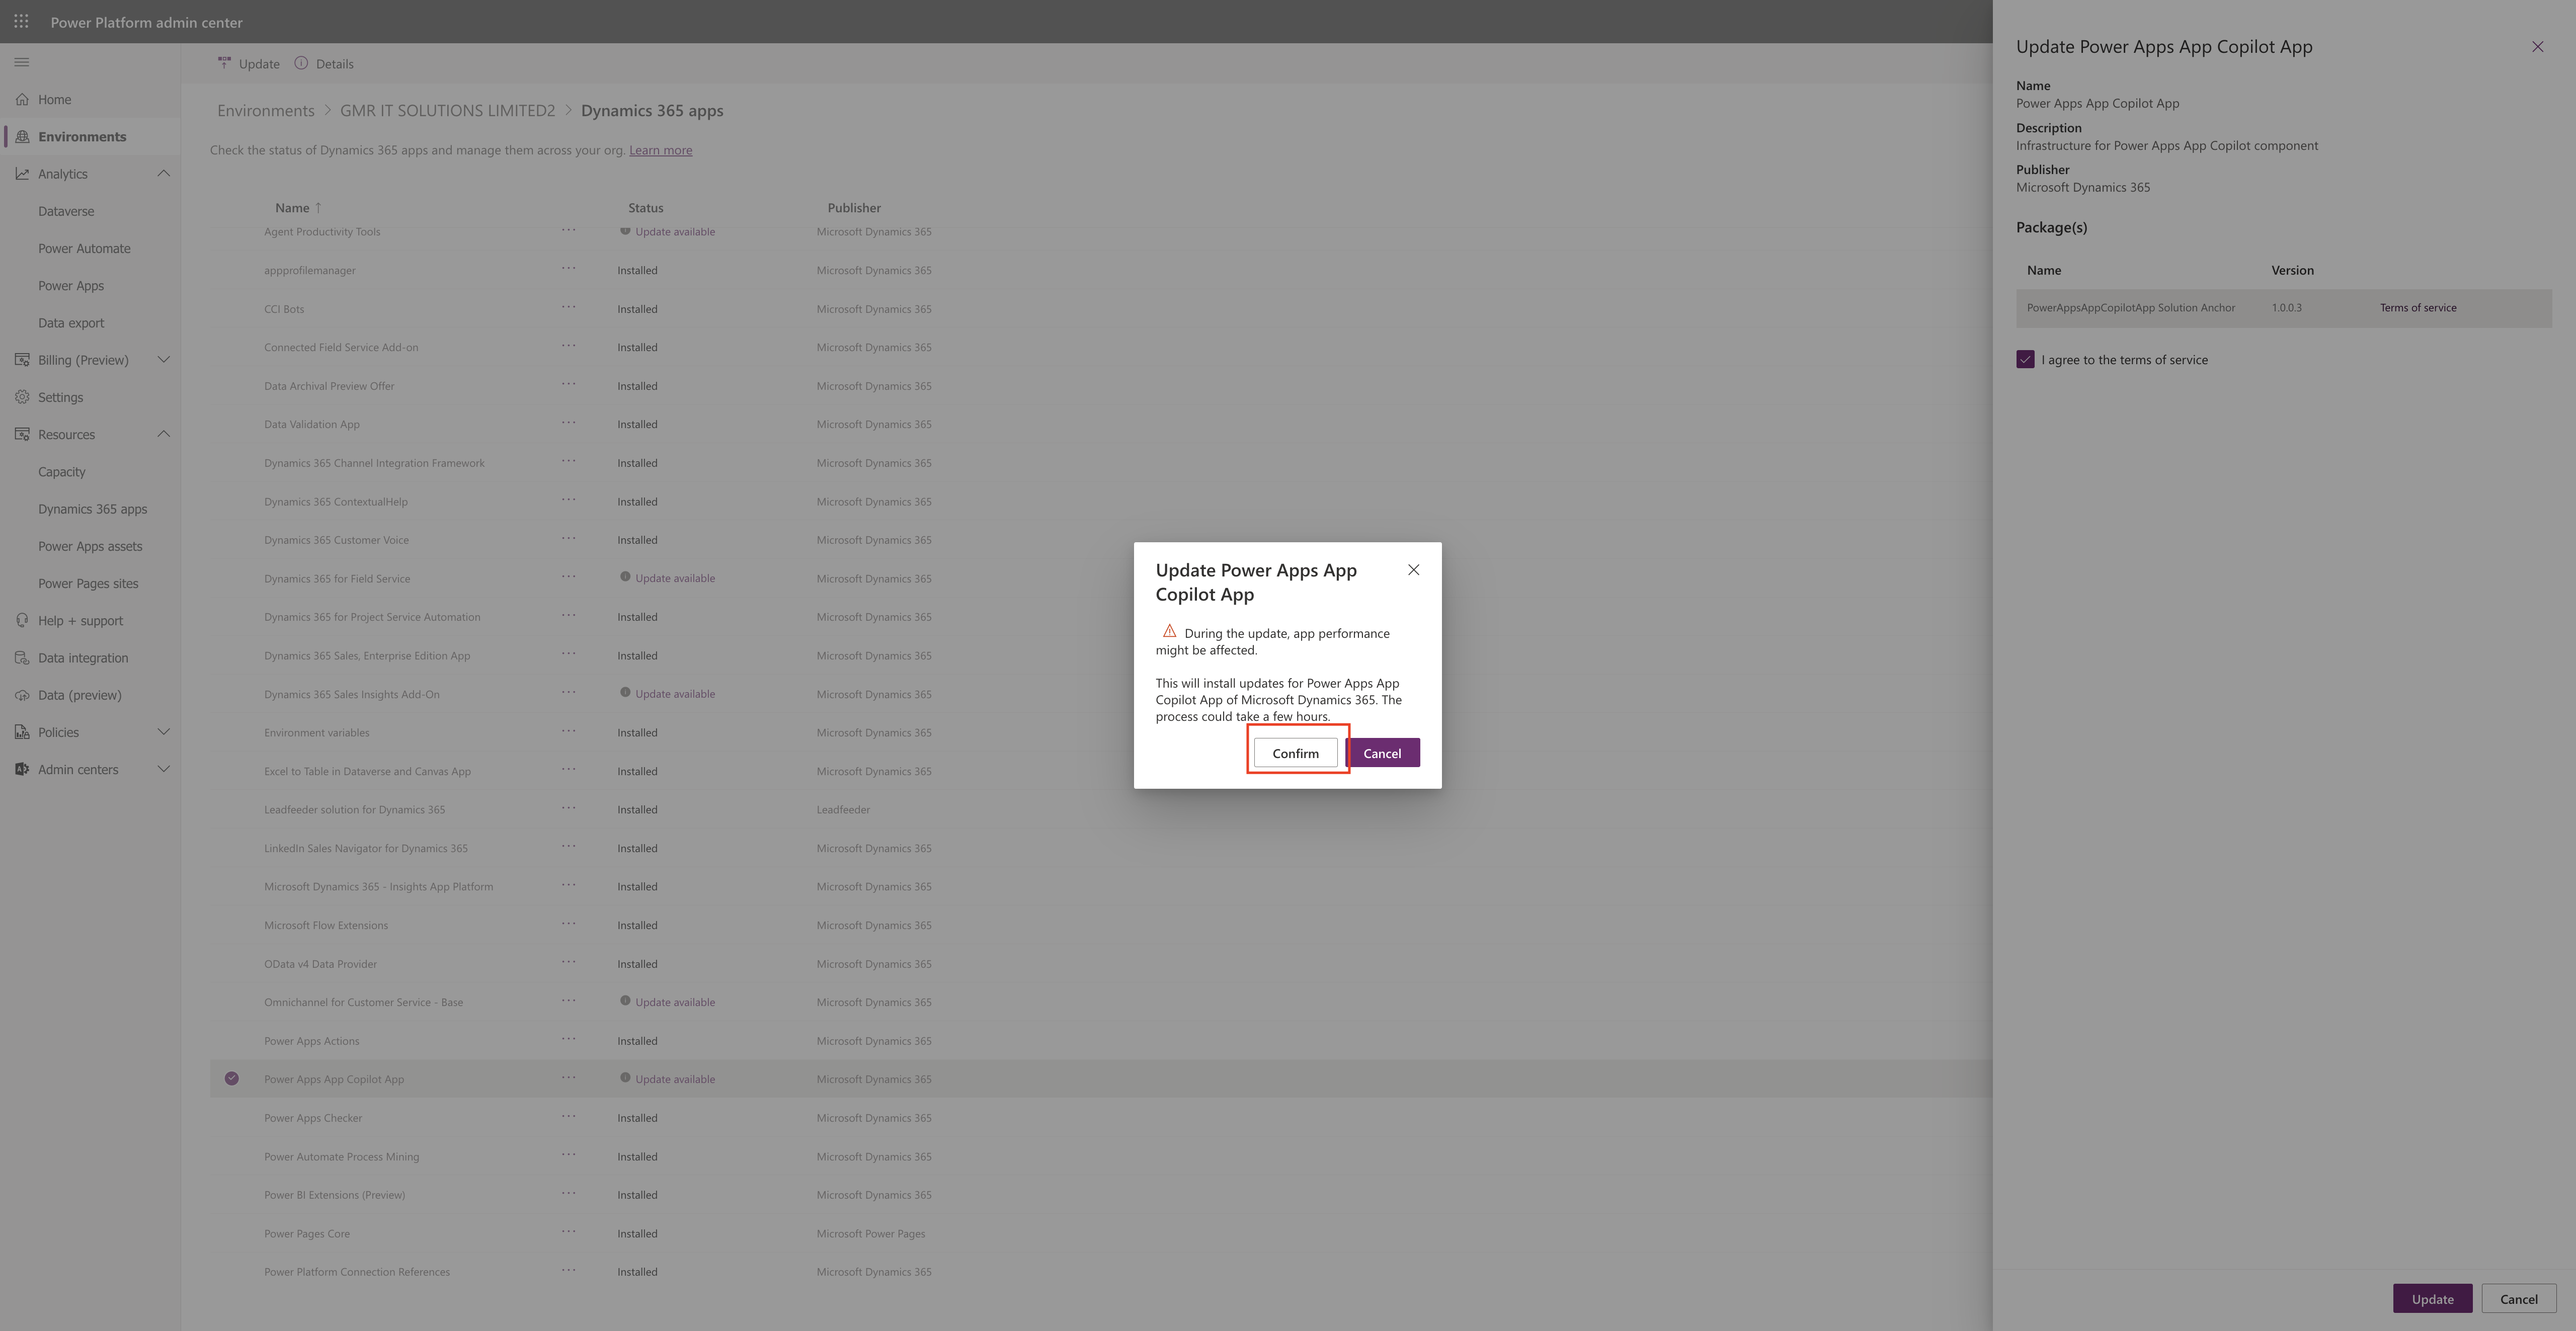
Today i am going to show how to update the Dynamics 365 Apps in Environment. In this example i am i will show how to update the Power Apps App Copilot App .

Login into Power Platform Admin Center.

Click on the environments and choose the environment that you would like to update the App, choose the Dynamics 365 Apps.

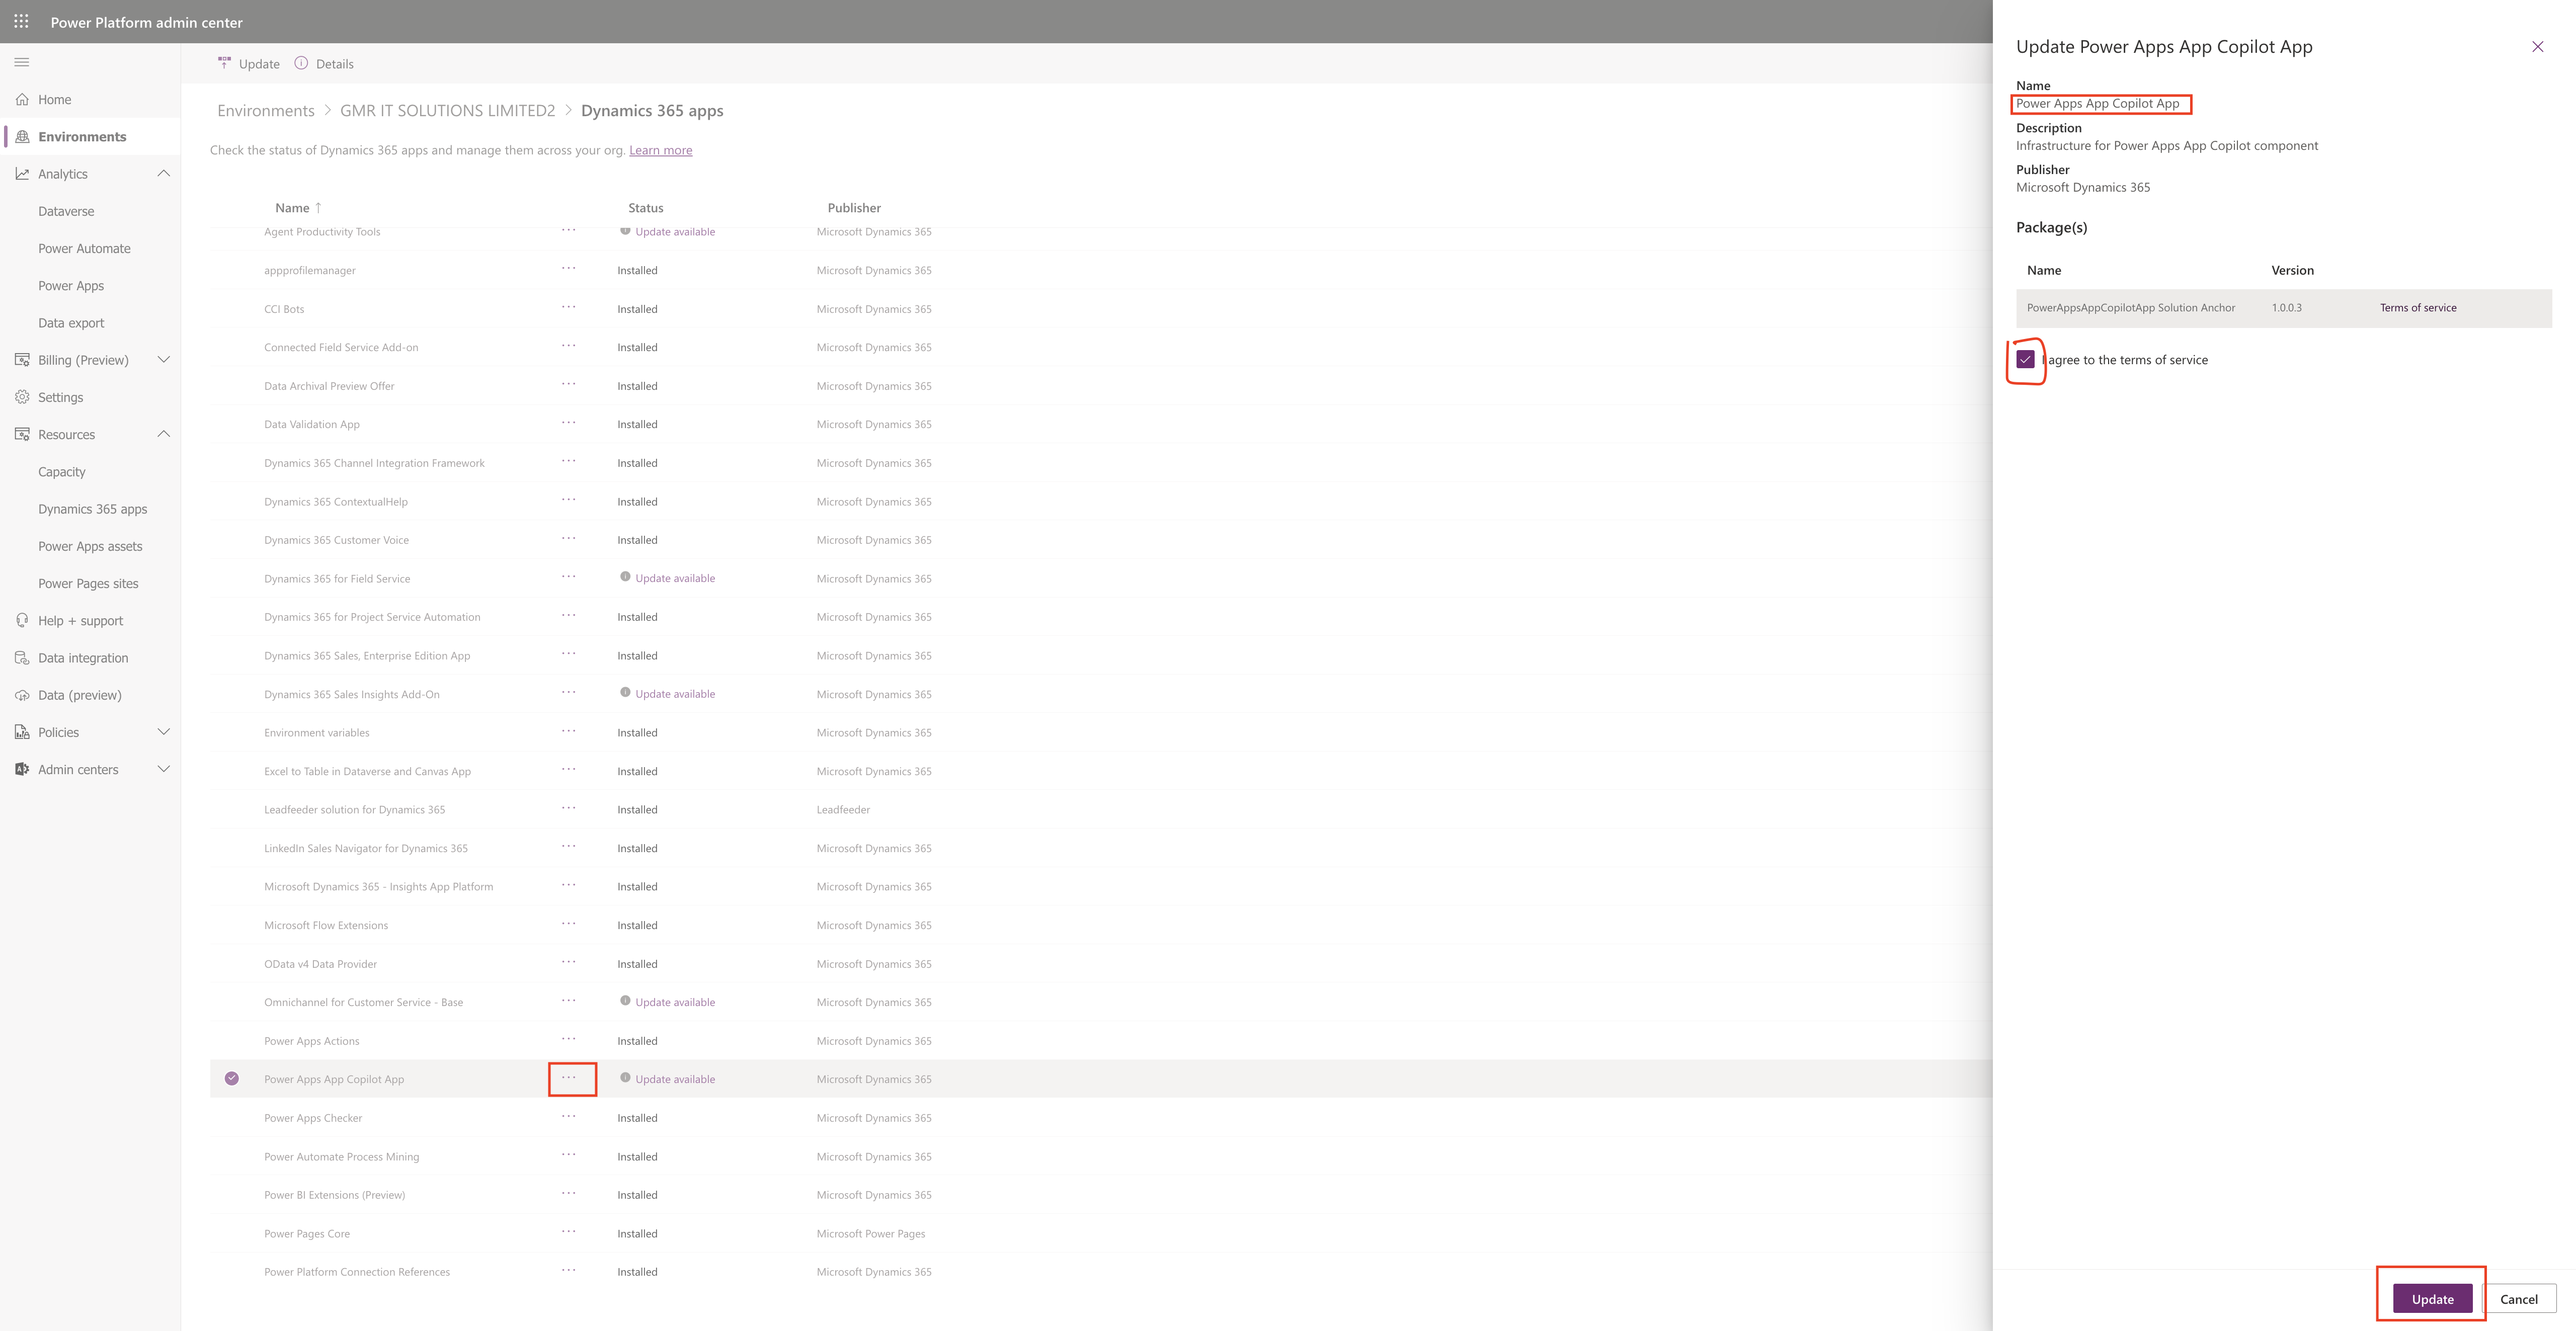
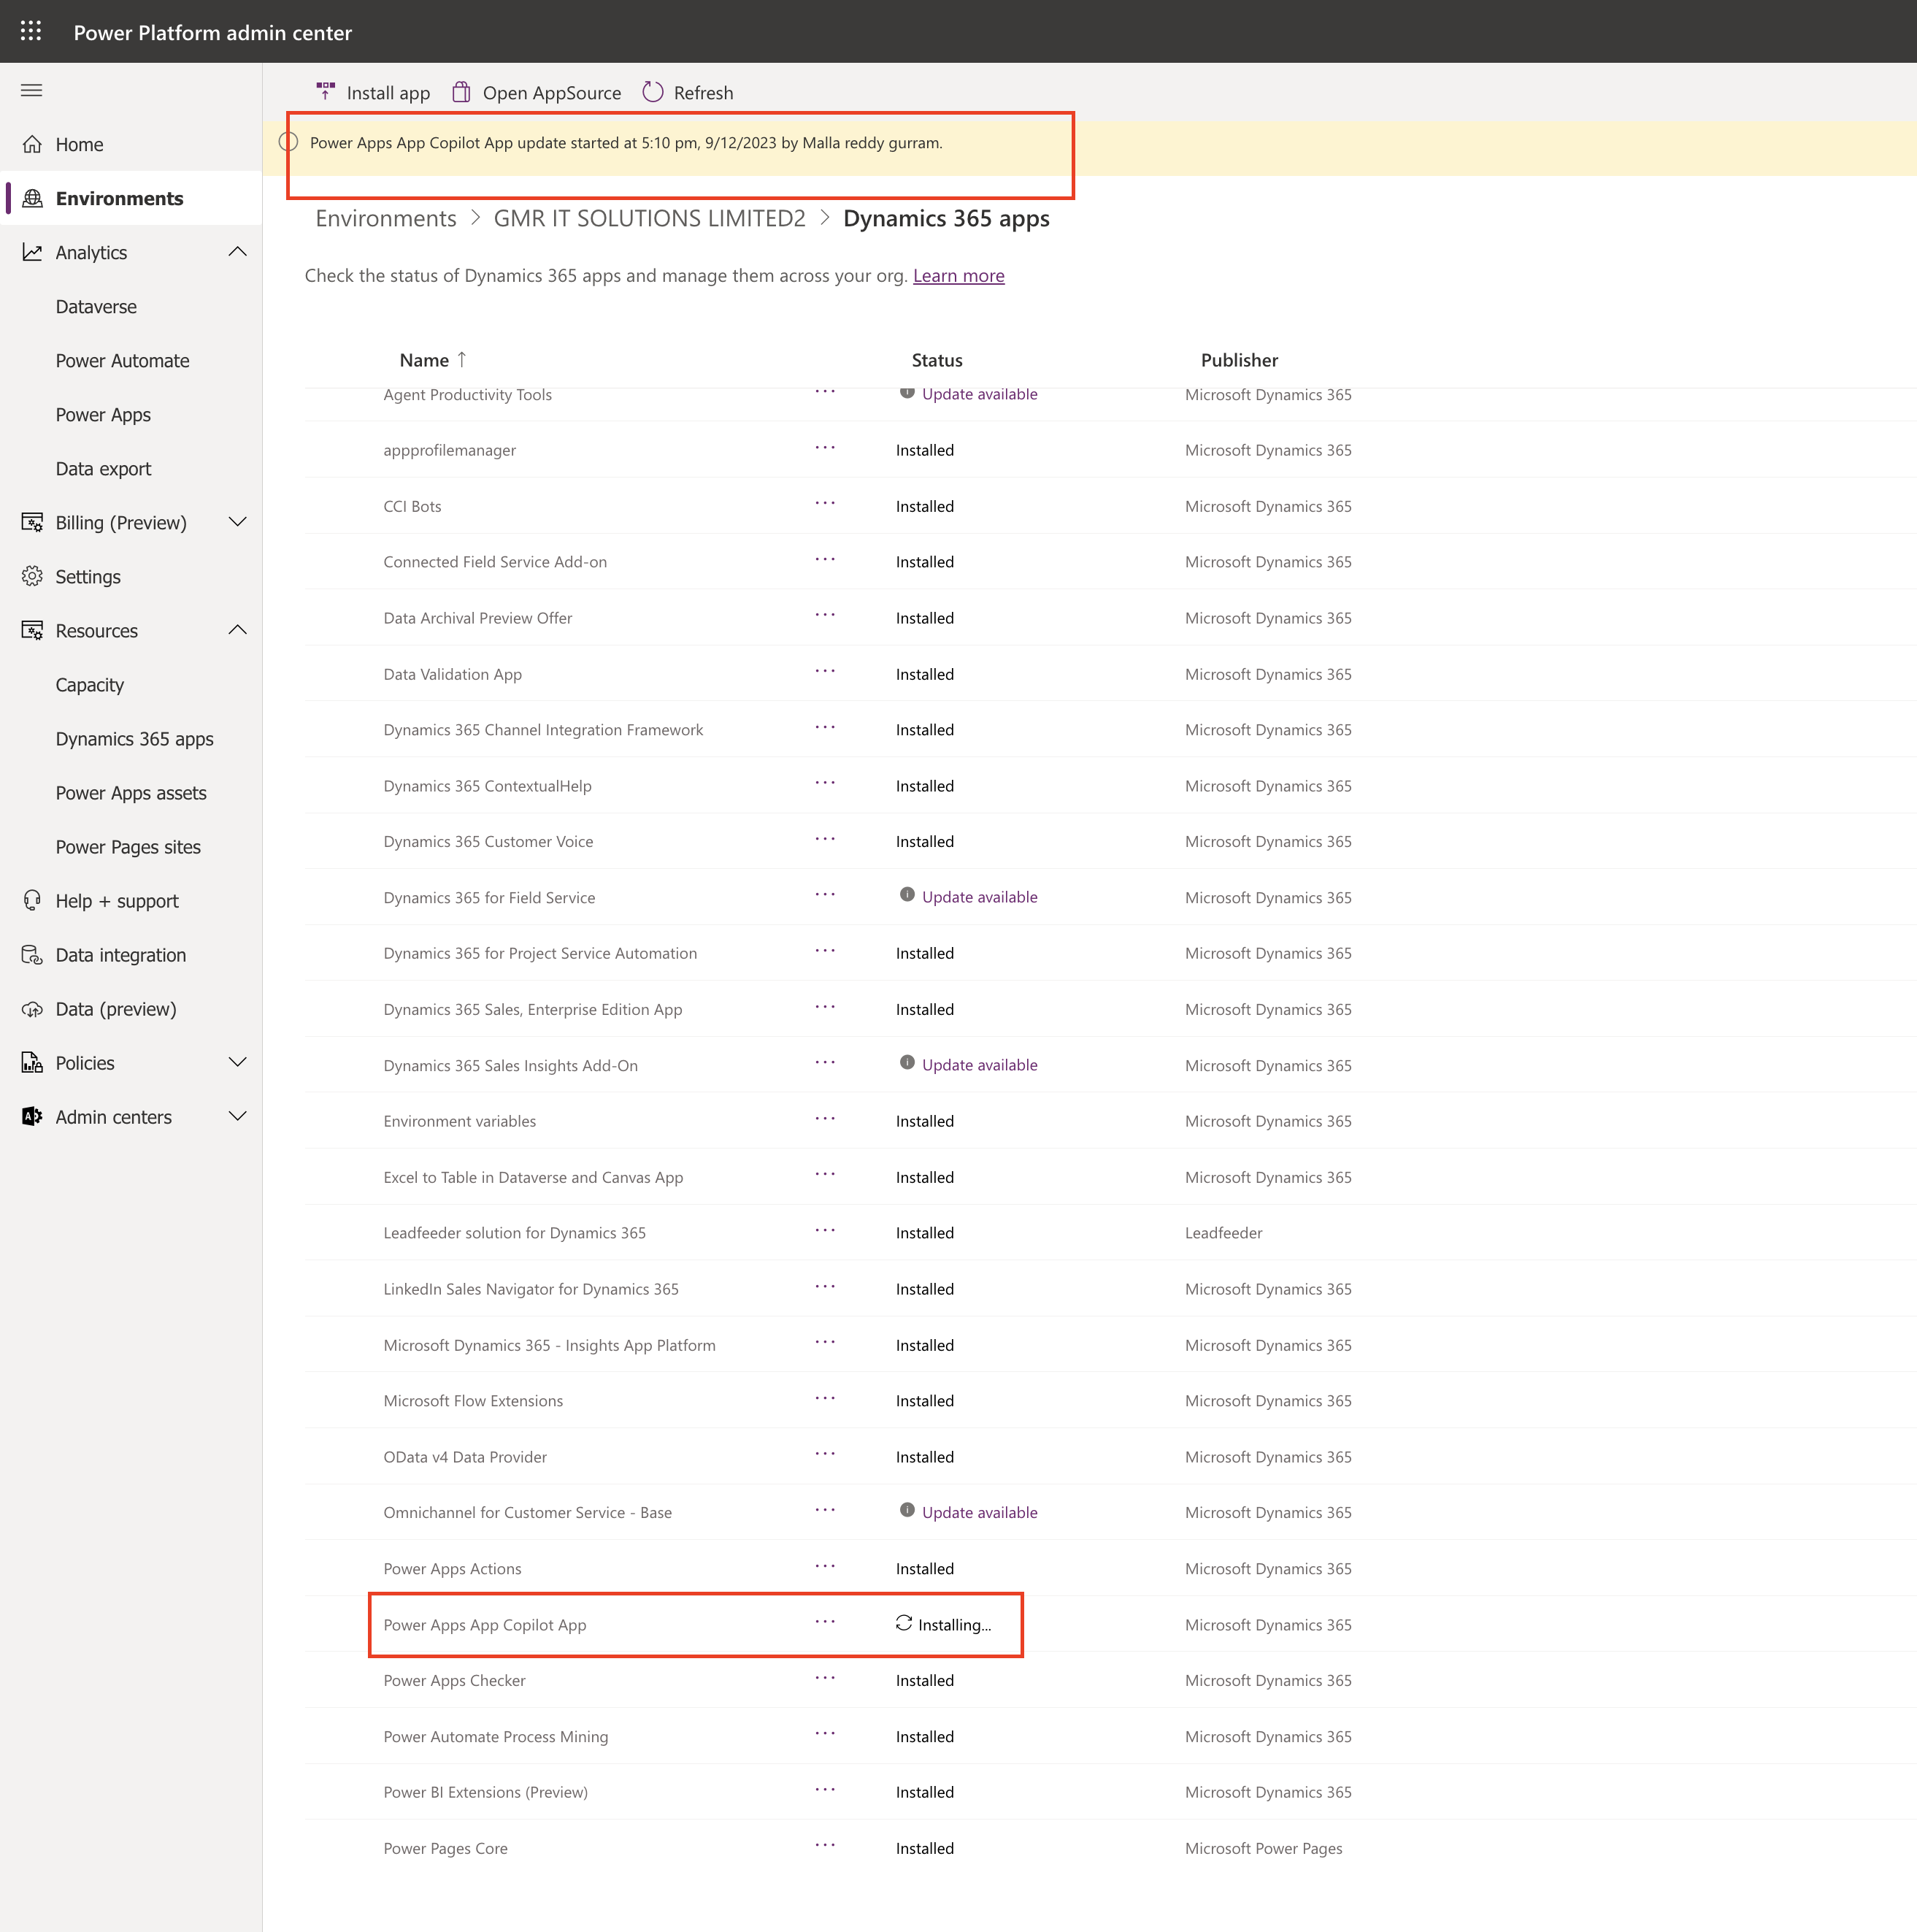
Choose the Power Apps App Copilot App and click on the “…” and choose the UPDATE and agree the terms and conditons of Microsoft and click UPDATE.

Update Power Apps App Copilot App – Click Confirm.

Update will take effect in an couple of hours time.

That’s it for today.

I hope this helps
Malla Reddy Gurram(@UK365GUY)

Share this:

New Microsoft Certifications Path for Power Platform and Dynamics 365

Hello Everyone,

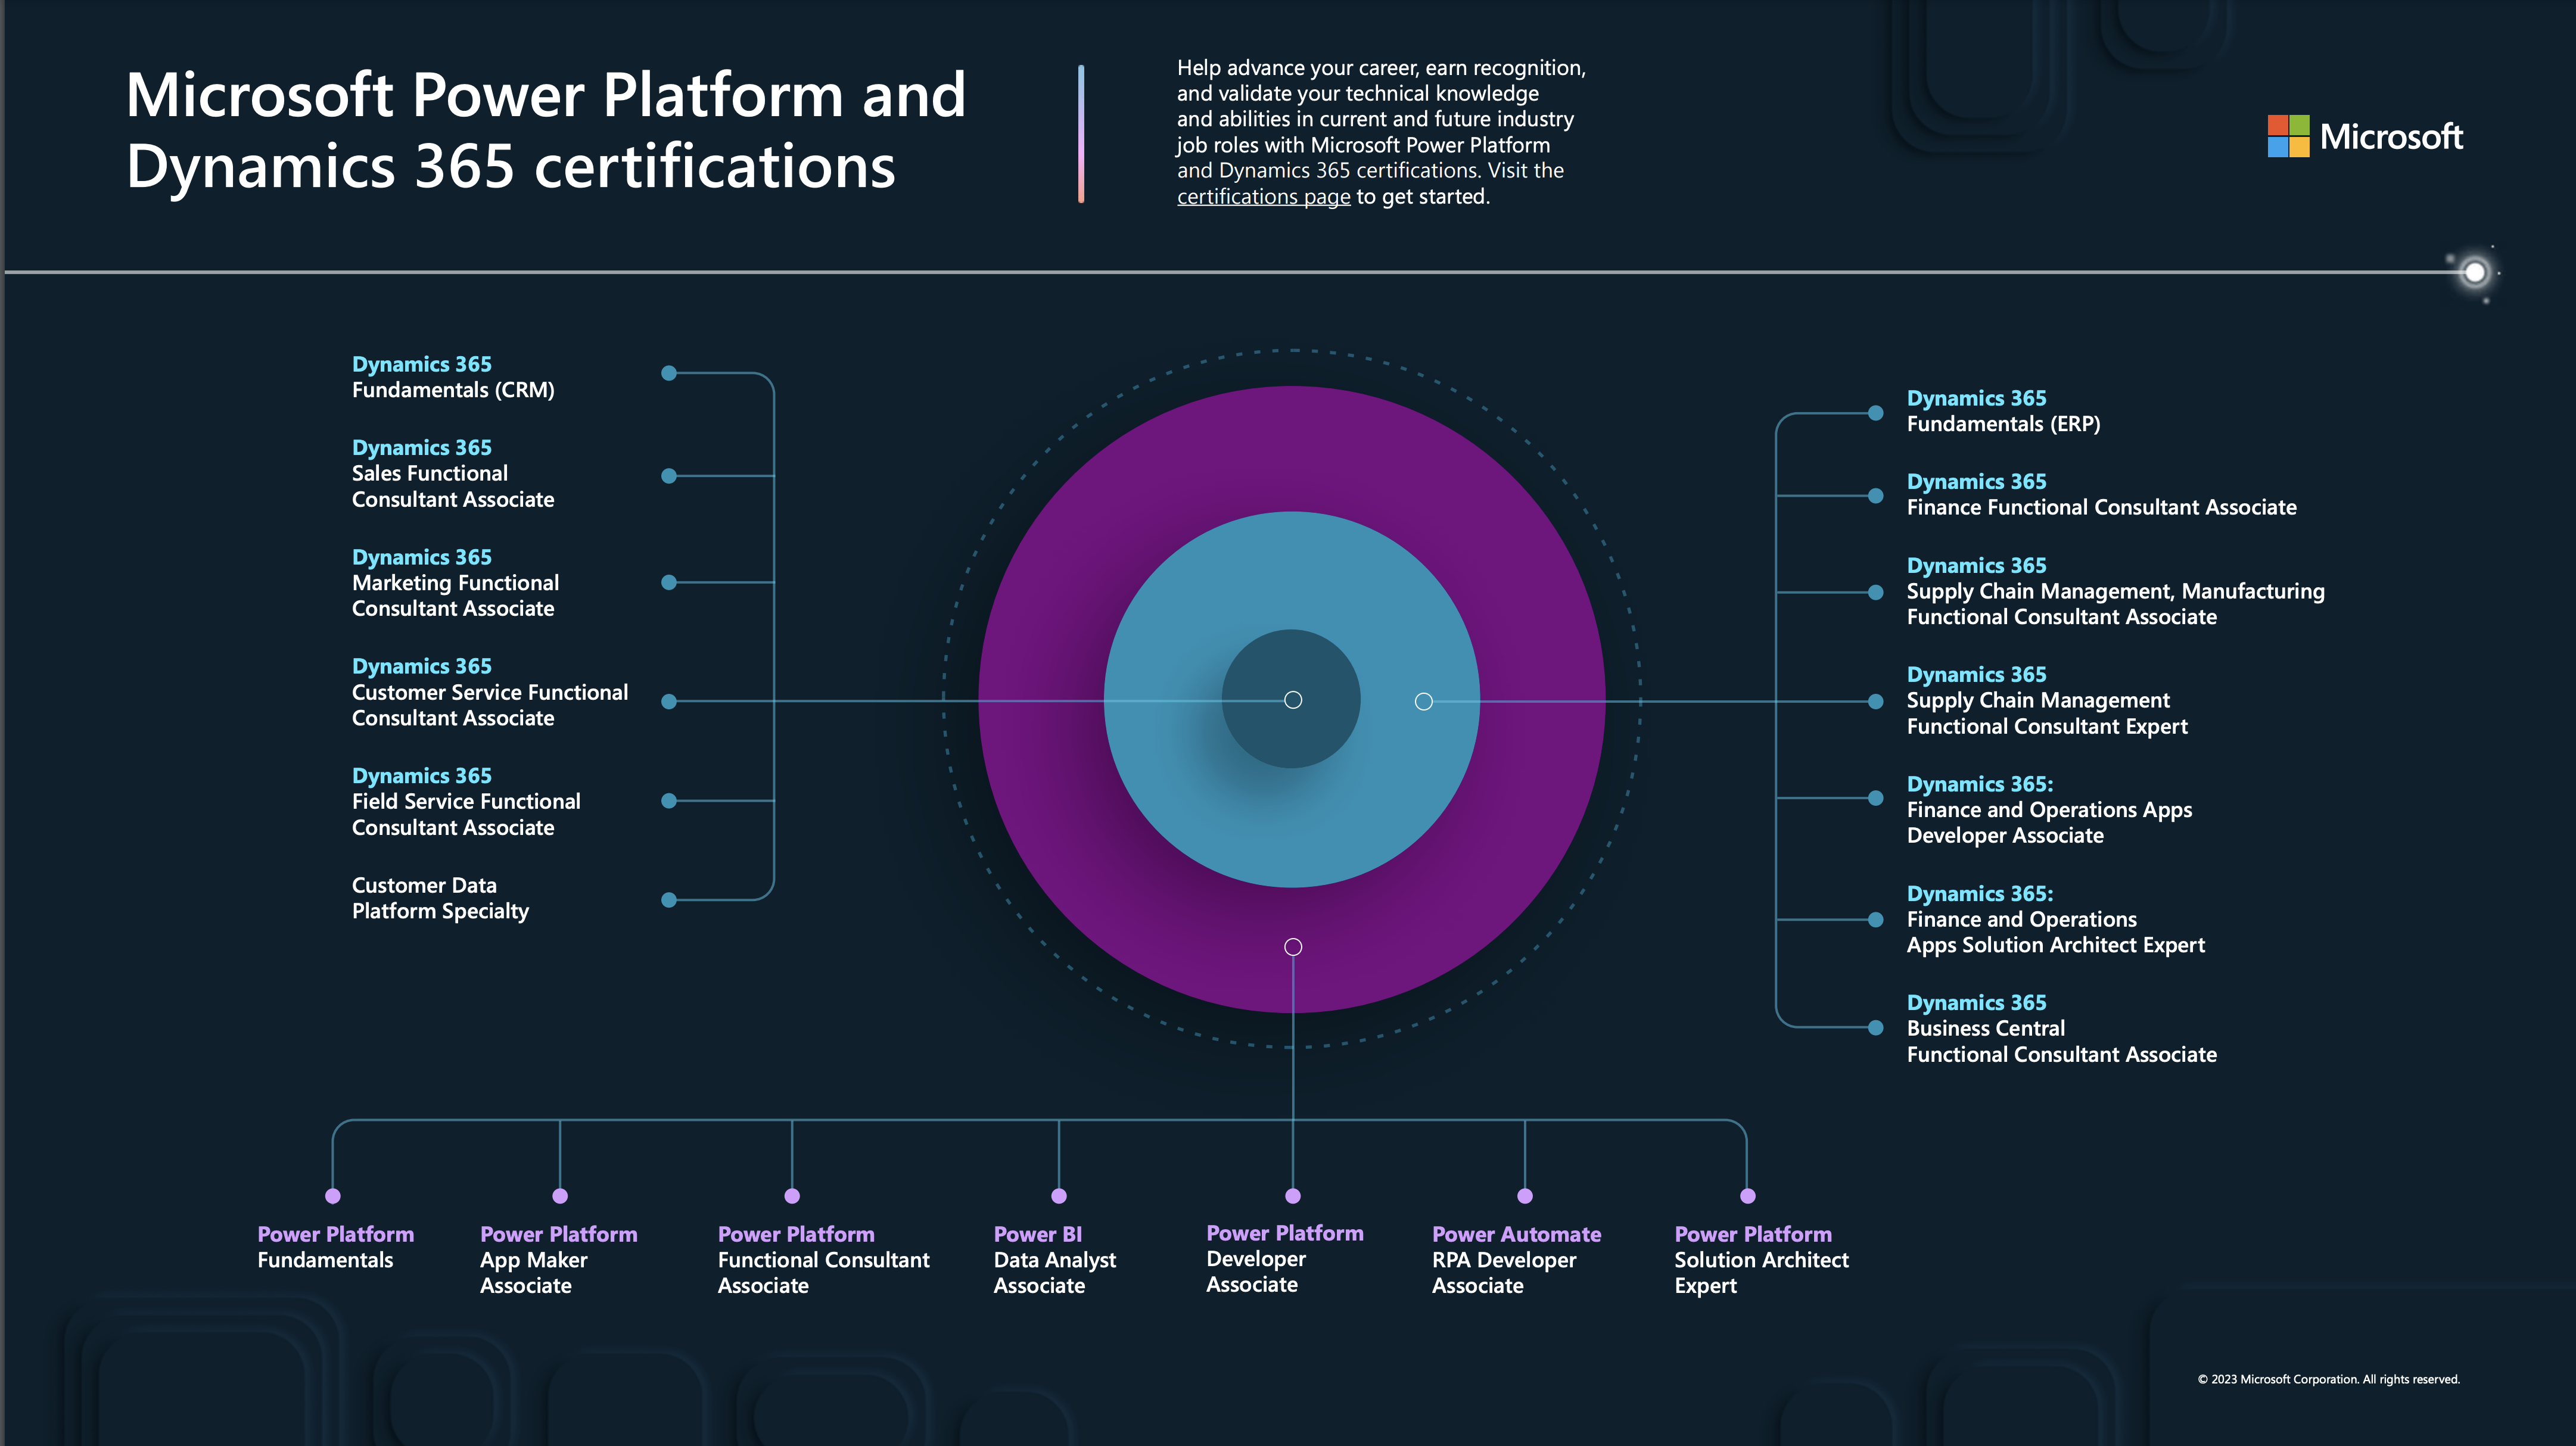
Today i am going to show Microsoft Certification path for Power Platform and Dynamics 365.

May be you are new to Microsoft Domain or New to Power Platform or Dynamics 365 or Azure or Microsoft 365 and you would like to start your certification journey.

Then this blog is for you. Please click here to see the certification path.

That’s it for today.

I hope this helps.

Malla Reddy Gurram(@UK365GUY)

Share this:

{How to} Simplify address entry with smart autocomplete using Bing Maps Dynamics 365

Hello Everyone,

Today i am going to show how to enabel email address suggestions with smart autocomplete using Bing Maps Dynamics 365.

Let’s get’s started.

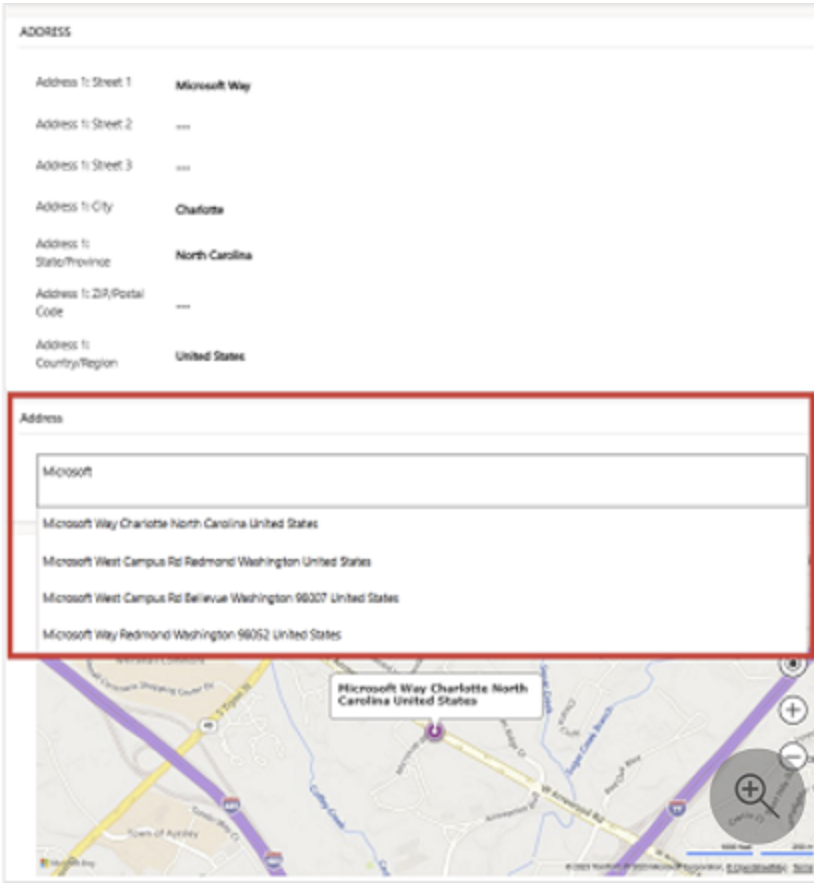
Suppose you are entering the address in the address field and you can see the suggested addresses as they type. So it minimize manual input and saving valuable time.

This leads to increased productivity, enabling users to focus on core selling tasks and customer interactions.

Also this feature enhances data accuracy by leveraging the reliable address information of Bing Maps, reducing errors and ensuring precise communication.

How do we enable it?

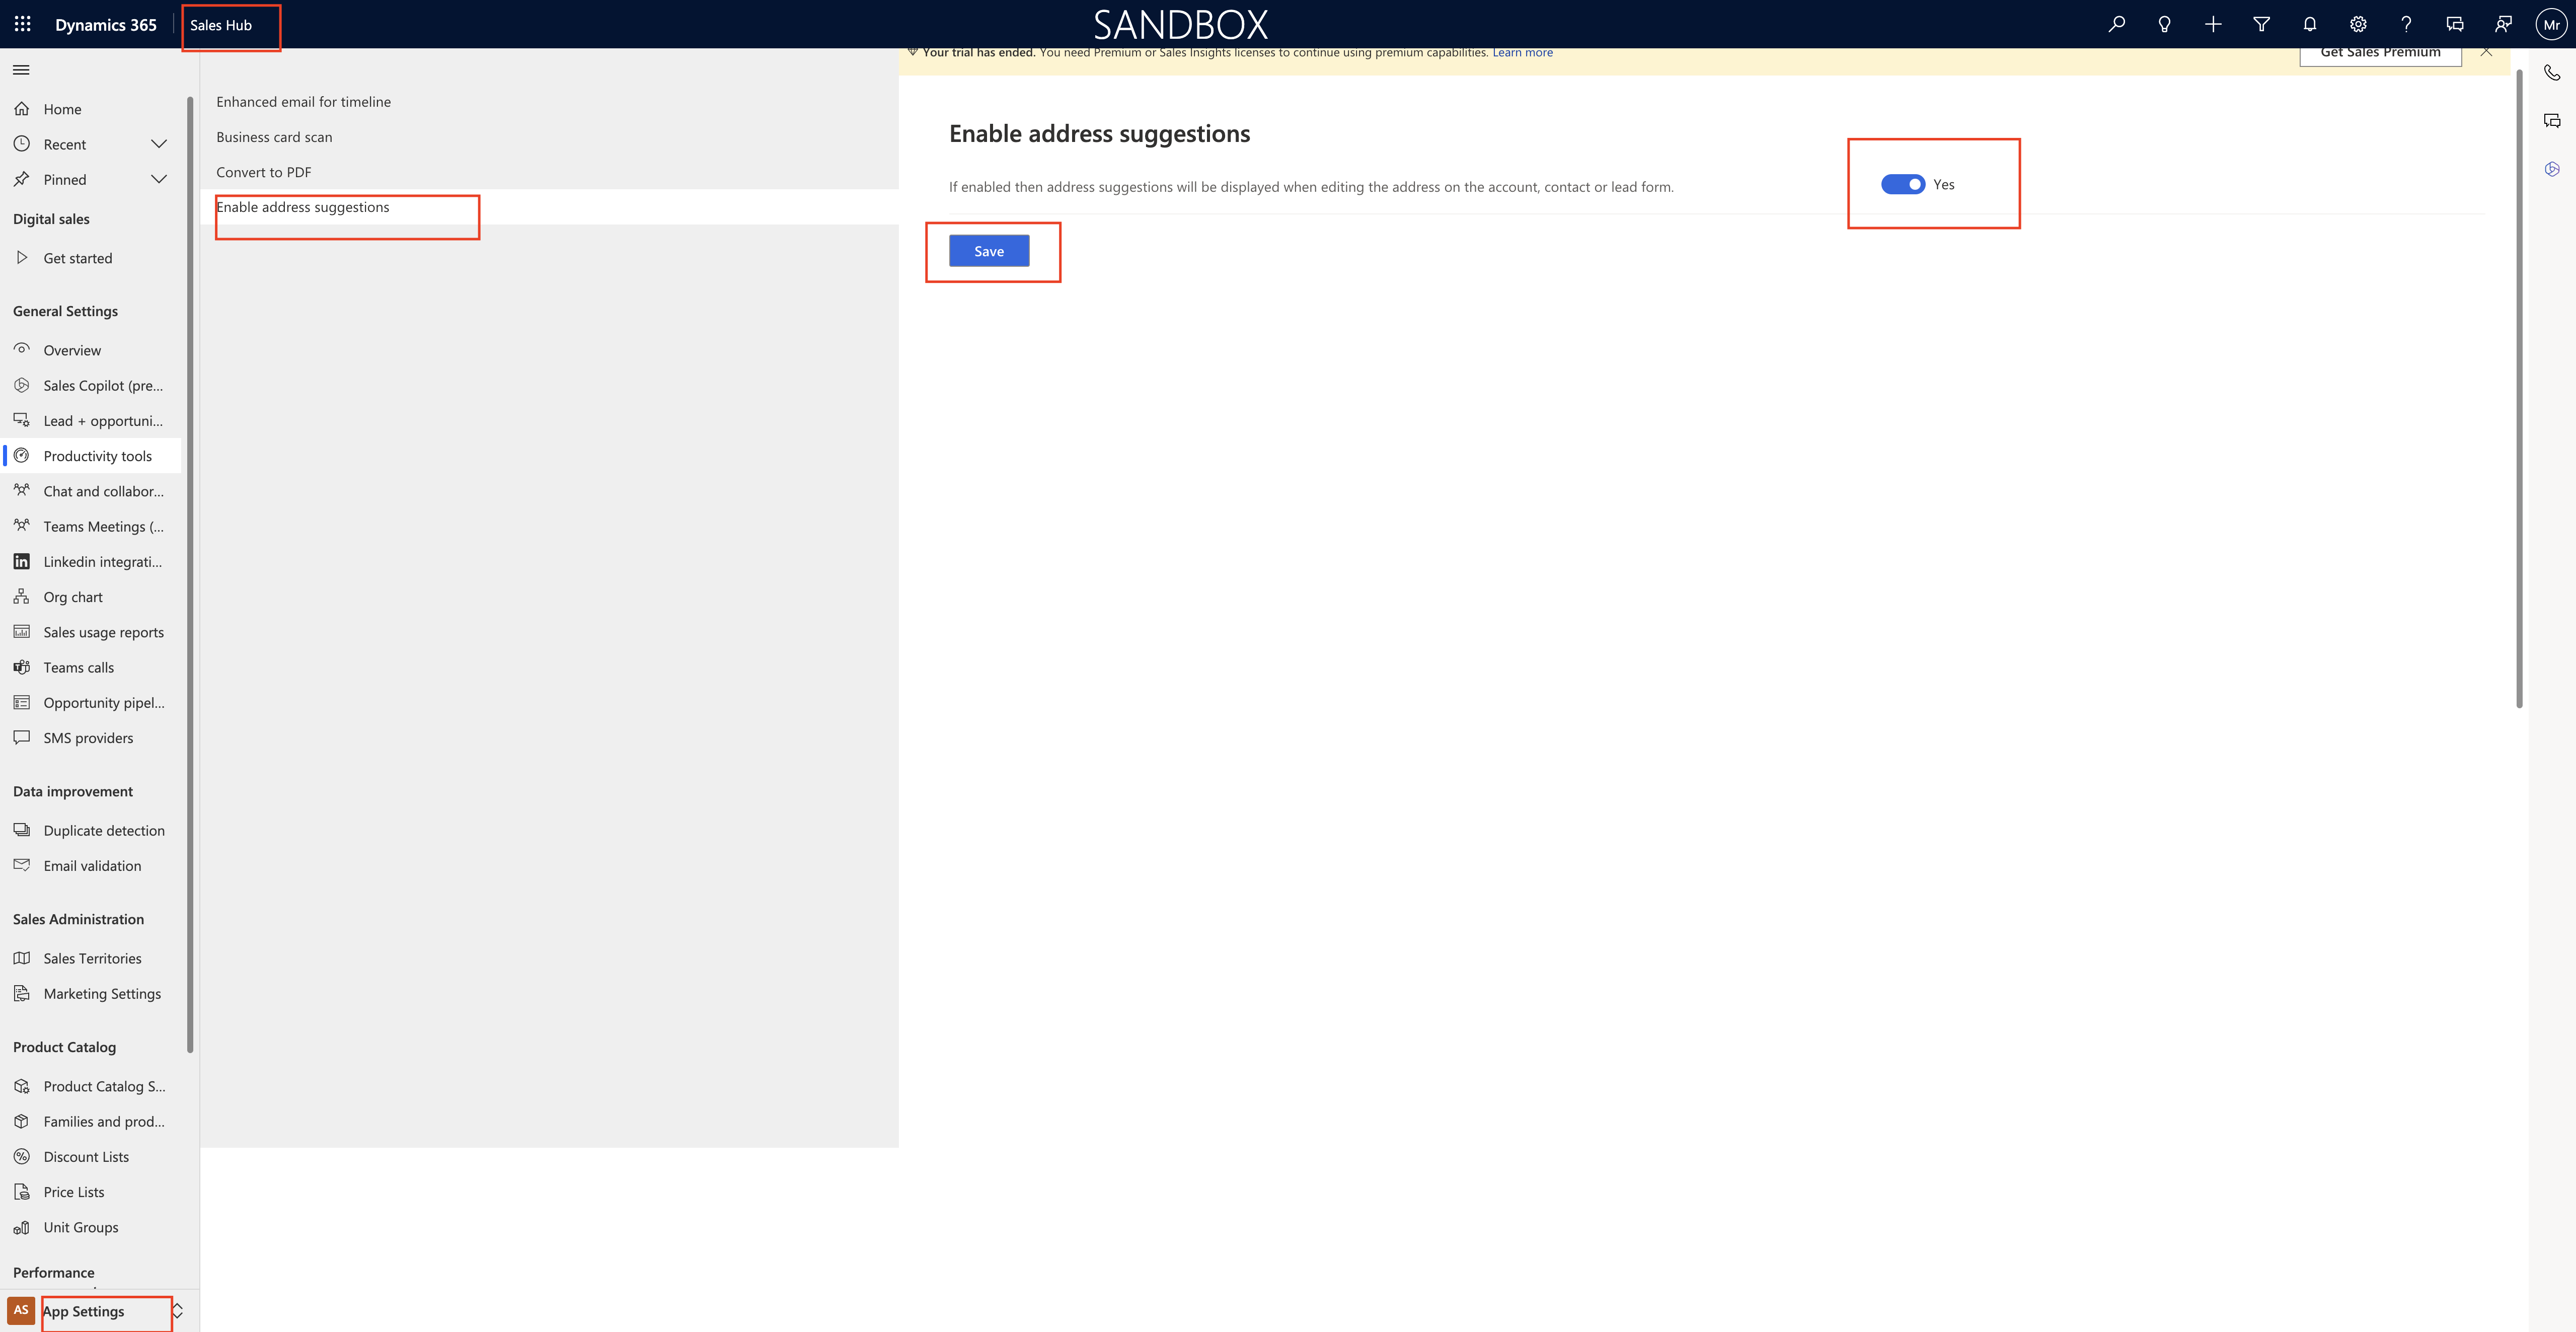
Open your Sales Hub and change the settings to APP SETTINGS.

Turn on the Enable address suggestions to ON AND SAVE.

This features will work on Account, Contact, Lead and within the sales insights forms.

That’s it for today.

I hope this helps.

Malla Reddy Gurram(@UK365GUY)
#365BlogPostsin365Days

Share this:

{How to} Hide + button on global ribbon menu in Dynamics 365

Hello Everyone,

Today i am going to show how to hide the global ribbon button “+” on Dynamics 365.

Let’s get’s started.

Suppose you had a requirement to hide the + sign button on Global Ribbon on Dynamics 365 from your organisation business stakeholders, then how do you do that?

Hiding the “+” (New Record) button on the global ribbon in Dynamics 365 involves modifying the Ribbon Workbench or using a Custom Javascript web resources to control the visibility of the button. Here the general steps to achieve this:

1. Access Ribbon Workbench:

Install and Open the Ribbon Workbench tool in your Dynamics 365 environment. you can find this tool in the Dynamics 365 Solutions area.

2. Select the entity:

Choose the entity for which you want to hide the “+” button in the global ribbon.

3.Edit the Ribbon:

In the Ribbon Workbench, locate the RibbonDiffXml for the entity you selected. This is where you can customize the ribbon.

4. Find the “+” Button Element:

Locate the “+” (New Record) button element in the ribbon XML. This button is typically named “Addnew” or something similar.

5. Modify the Visibility Rule:

Modify the visibility rule for the “+” button to hide it. You can use a Custom JavaScript Function or set the “CmrRule” to false. For example, you can use JavaScript like this:

In this example, you would create a JavaScript web resource

(‘your_javascript_webresource’) with a function called ‘hideAddButton’ that return ‘false’ to hide the button.

6. Publish Changes:

Save your changes in Ribbon Workbench.
Publish the customizations to make the changes effective.

7. Test:

After publishing, refresh your Dynamics 365 oganization and navigate to the entity to see if the “+” button in the global ribbon is now hidden.

Keep in mind that modifying the ribbon involves some advanced cutomization, and it’s crucial to have the necessary permissions and a good understanding of how to use Ribbon Workbench or JavaScript for this purpose. Also, make sure to back up your customizations before making changes to easily revert them if needed.

Thats it for today.

I hope this helps.

Malla Reddy Gurram(@UK365GUY)
#365BlogPostsin365Days

Share this: