Menu Close

Tag: #Dataverse

{Do you know} Now you can access Power Platform Admin Center from Maker Portal

Hello Everyone,

Today i am going to share simple trick to access Power Platform Admin Center.

Lets gets started.

Normally how do we access Power Platform Admin Center ?

Its from Here

But from Maker Portal too we can access PPAC.

How ?

Login into Make.Powerapps.com

Then click on Power Platform on the left side of the navigation.

You will see nice designs of Power Platform Tools: Power Automate, Power BI, Power Pages, Power Virtual Agent, Power Platform Admin Center.

Click on Power Platform Admin Center

Thats it for today.

I hope this helps.
Malla Reddy(@UK365GUY)
#365BlogPostsin365Days

Share this:

How to Configure Model Driven App Behavior settings from Power Platform Admin Center

Hello Everyone,

Today i am going to share how to configure behavior setting for model driven app from power platform admin center.

Lets gets started.

Have you ever wondering how the record save function works from user point of view?

1. Auto save

It’s from the Behavior settings “Auto Save”, by default it’s ON. Auto save works every 30 seconds, if you want dont auto save to happen Auto Save to OFF.

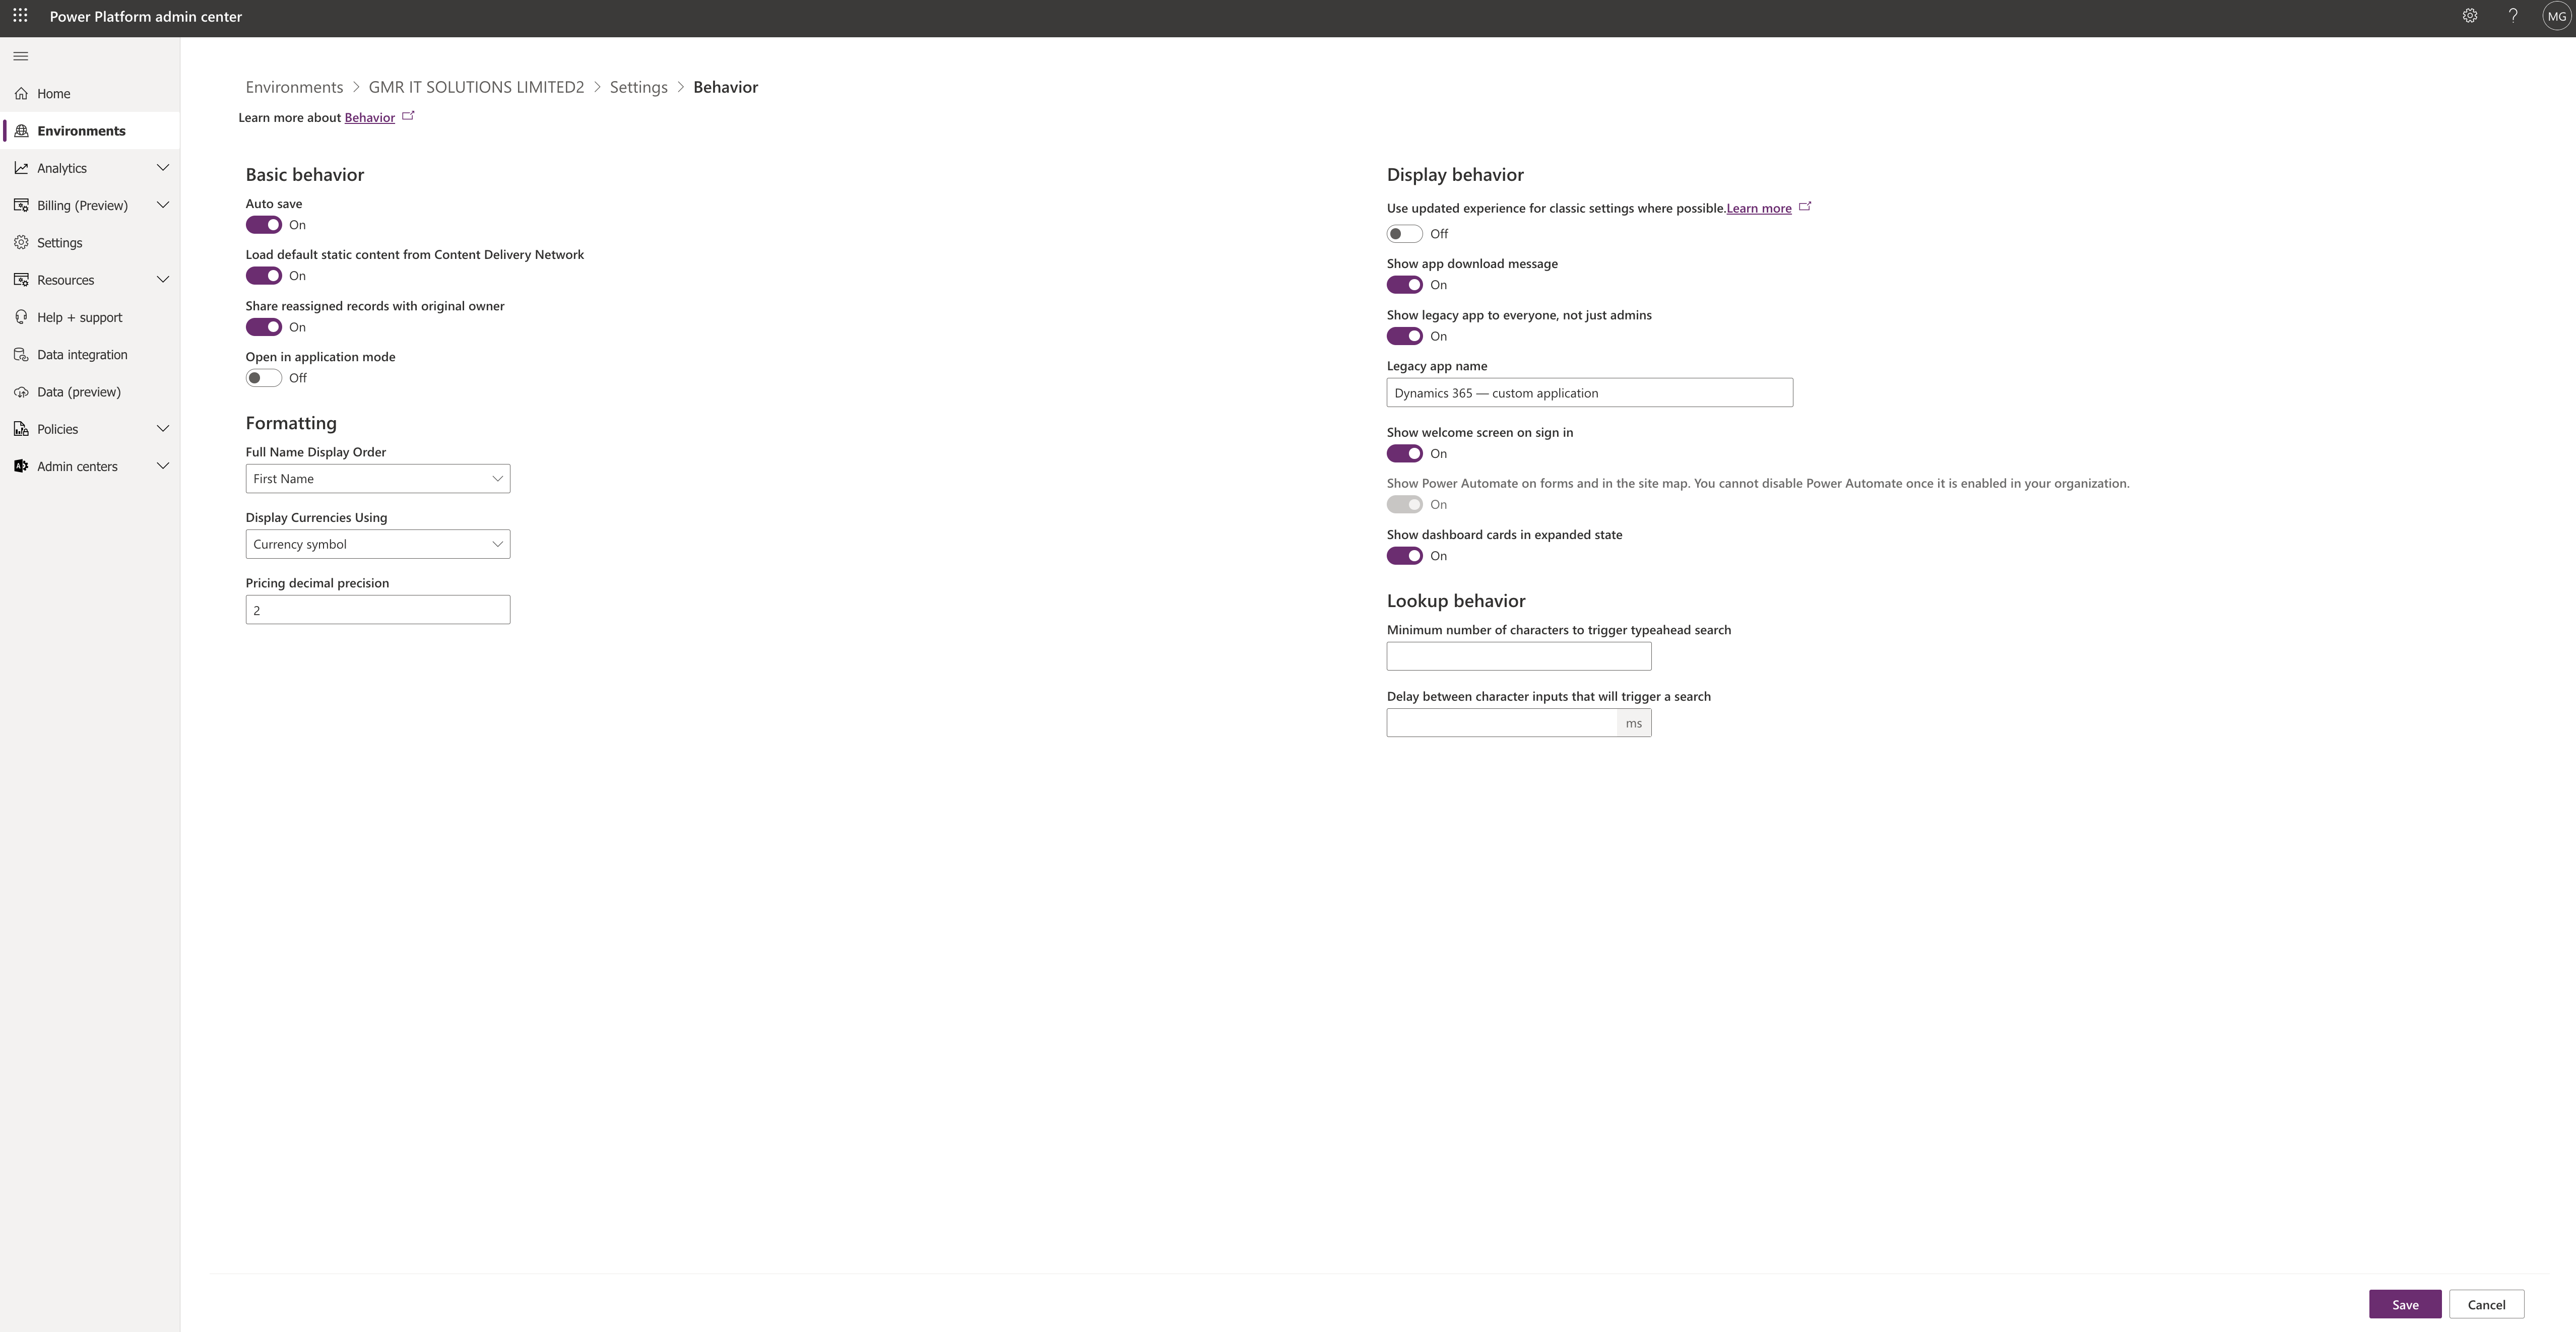
2. Load default static content from Content Delivery Network

Canvas apps will load out of the box static content from azure content delivery(CDN) service.

3. Share reassigned records with original owner

when it is turned on users can reassign the shared records with original owner.

4. Open in application mode

Default its Off, Select ON to enable application mode, When its ON, The Model Driven Apps can be opened in a browser without Menu, navigation or toolbars.

When we hide these parts of the browser causes customer engagement apps to appear like a separate application rather than a website.

Formatting:

Full name display order:

By default: First Name, You can select the order you want your customer and user names to be displayed.

Display Currencies using:

Default: Currency symbol : which shows how to display currencies, either by a currency symbol, which is the default setting, or by currency code.

currency symbol $ AND currency code could be USD.

Pricing decimal precision:

Default 0, you could select how many decimal points to use for a currency.

Display behavior

1. Use updated experience for classic settings where possible.

This settings will be default to NO, it will be turned ON for new environments created after Oct 2021. If it is ON then the users will be redirected to modern experience.

2. Show app download page.

Default ON: If ON users will see a message regarding downloading the dynamics 365 for tablets app.

3. Show legacy app to everyone, not just admin

Default: ON. The legacy web app, also known as Dynamics 365 Custom, is hidden from end users when a new environment is provisioned. it is always visible to those with System Administrator and System Customizer roles and other roles with same privileges.

4. Legacy app name.

Default On: If ON, users will see a message regarding downloading the Dynamics 365 for tablets app.

5. Show welcome screen on sign in.

Defaulted to ON. If you don’t want to appear welcome screen you may turn OFF.

6.Show Microsoft Power Automate on forms and in the site map.

Default ON. Select ON to enable embedded Power Automate flows in your organisation.

7. Show dashboard cards in expanded state

By default Off, Select On to see the detailed card form in a dashboard. If set to Off, Only the header and minimal details are displayed in the card form.

Lookup behavior:

1.Minimum number of characters to trigger typehead search.

When you search in the search bar : this setting will allow to how many characters required to type in to trigger automatic typehead search.

2. Delay between character inputs that will trigger a search

With this settings you can delay interval in milliseconds that will be introduced in lookups before a search is executed.

This is used for Lookup performance, where the underlying environment database has huge amounts of data, default value: 250ms.

Thats it for today.

I hope this helps
Malla Reddy(@UK365GUY)
#365BlogPostsin365Days

Share this:

Create virtual table in Dataverse to connect external data source

Hello Everyone,

Today I am going to share my experience with virtual tables which can be connected from SQL or Sharepoint to create a virtual table.

Lets gets started.

What is Virtual Table?

Virtual table is an intersect table between two different systems, i.e replica of the data source table(SQL or Sharepoint) in Dataverse.

Previously if you want to connect to external data source, you are supposed to integrate the two systems, like sharepoint or SQL Server data source into the Dataverse.

Now no more coding required to integrate the data source into Dataverse from SQL or Sharepoint, Many thanks to Microsoft.

Note: When a virtual table is created inside the Dataverse from SQL or Sharepoint, the data stored in Dataverse virtual table is not considered towards Dataverse storage even millions of records exists in SQL or Sharepoint.

You can make relationship between virtual table and dataverse tables no issues at all.

Lets see how to create virtual table.

Login into Make.Powerapps.com

Create a virtual table from either ” Table” or from the “Solution”.

Click on the new table chervon and select New table from external data.

New window will be prompted so make a connection either sharepoint or sql server, in this example i am going to make sharepoint connection, provide your sharepoint url and credential and make a connection if successful a green right tick will appear and then click next.

Now we have made a connection and the next screen will show the sharepoint lists available in the connection and make a selection and click “next” see below screen.

As you can see from the above screenshot its clearly asking for sharepoint list and also check the box for configure table and column names that will be used in Dataverse.

Next Configuration step:

Update the table name and details of the table columns before it is created in Dataverse.

Display name, Plural name, Schema name and Primary key will auto created from the data source.

External columns will be displayed once you are happy with the columns and click next.

Final step is to Review and Finish:

Make sure the external data source and dataverse table are correct, if not you can edit from here, if you are happy then click finish.

Virtual table will be created in Dataverse refer to above screenshot and you can start using this table in reporting or any other business.

I hope this helps.
Malla Reddy(@UK365GUY)
#365BlogPostsin365Days

Share this: