Menu Close

Tag: #dynamicscrmblogs

Create virtual table in Dataverse to connect external data source

Hello Everyone,

Today I am going to share my experience with virtual tables which can be connected from SQL or Sharepoint to create a virtual table.

Lets gets started.

What is Virtual Table?

Virtual table is an intersect table between two different systems, i.e replica of the data source table(SQL or Sharepoint) in Dataverse.

Previously if you want to connect to external data source, you are supposed to integrate the two systems, like sharepoint or SQL Server data source into the Dataverse.

Now no more coding required to integrate the data source into Dataverse from SQL or Sharepoint, Many thanks to Microsoft.

Note: When a virtual table is created inside the Dataverse from SQL or Sharepoint, the data stored in Dataverse virtual table is not considered towards Dataverse storage even millions of records exists in SQL or Sharepoint.

You can make relationship between virtual table and dataverse tables no issues at all.

Lets see how to create virtual table.

Login into Make.Powerapps.com

Create a virtual table from either ” Table” or from the “Solution”.

Click on the new table chervon and select New table from external data.

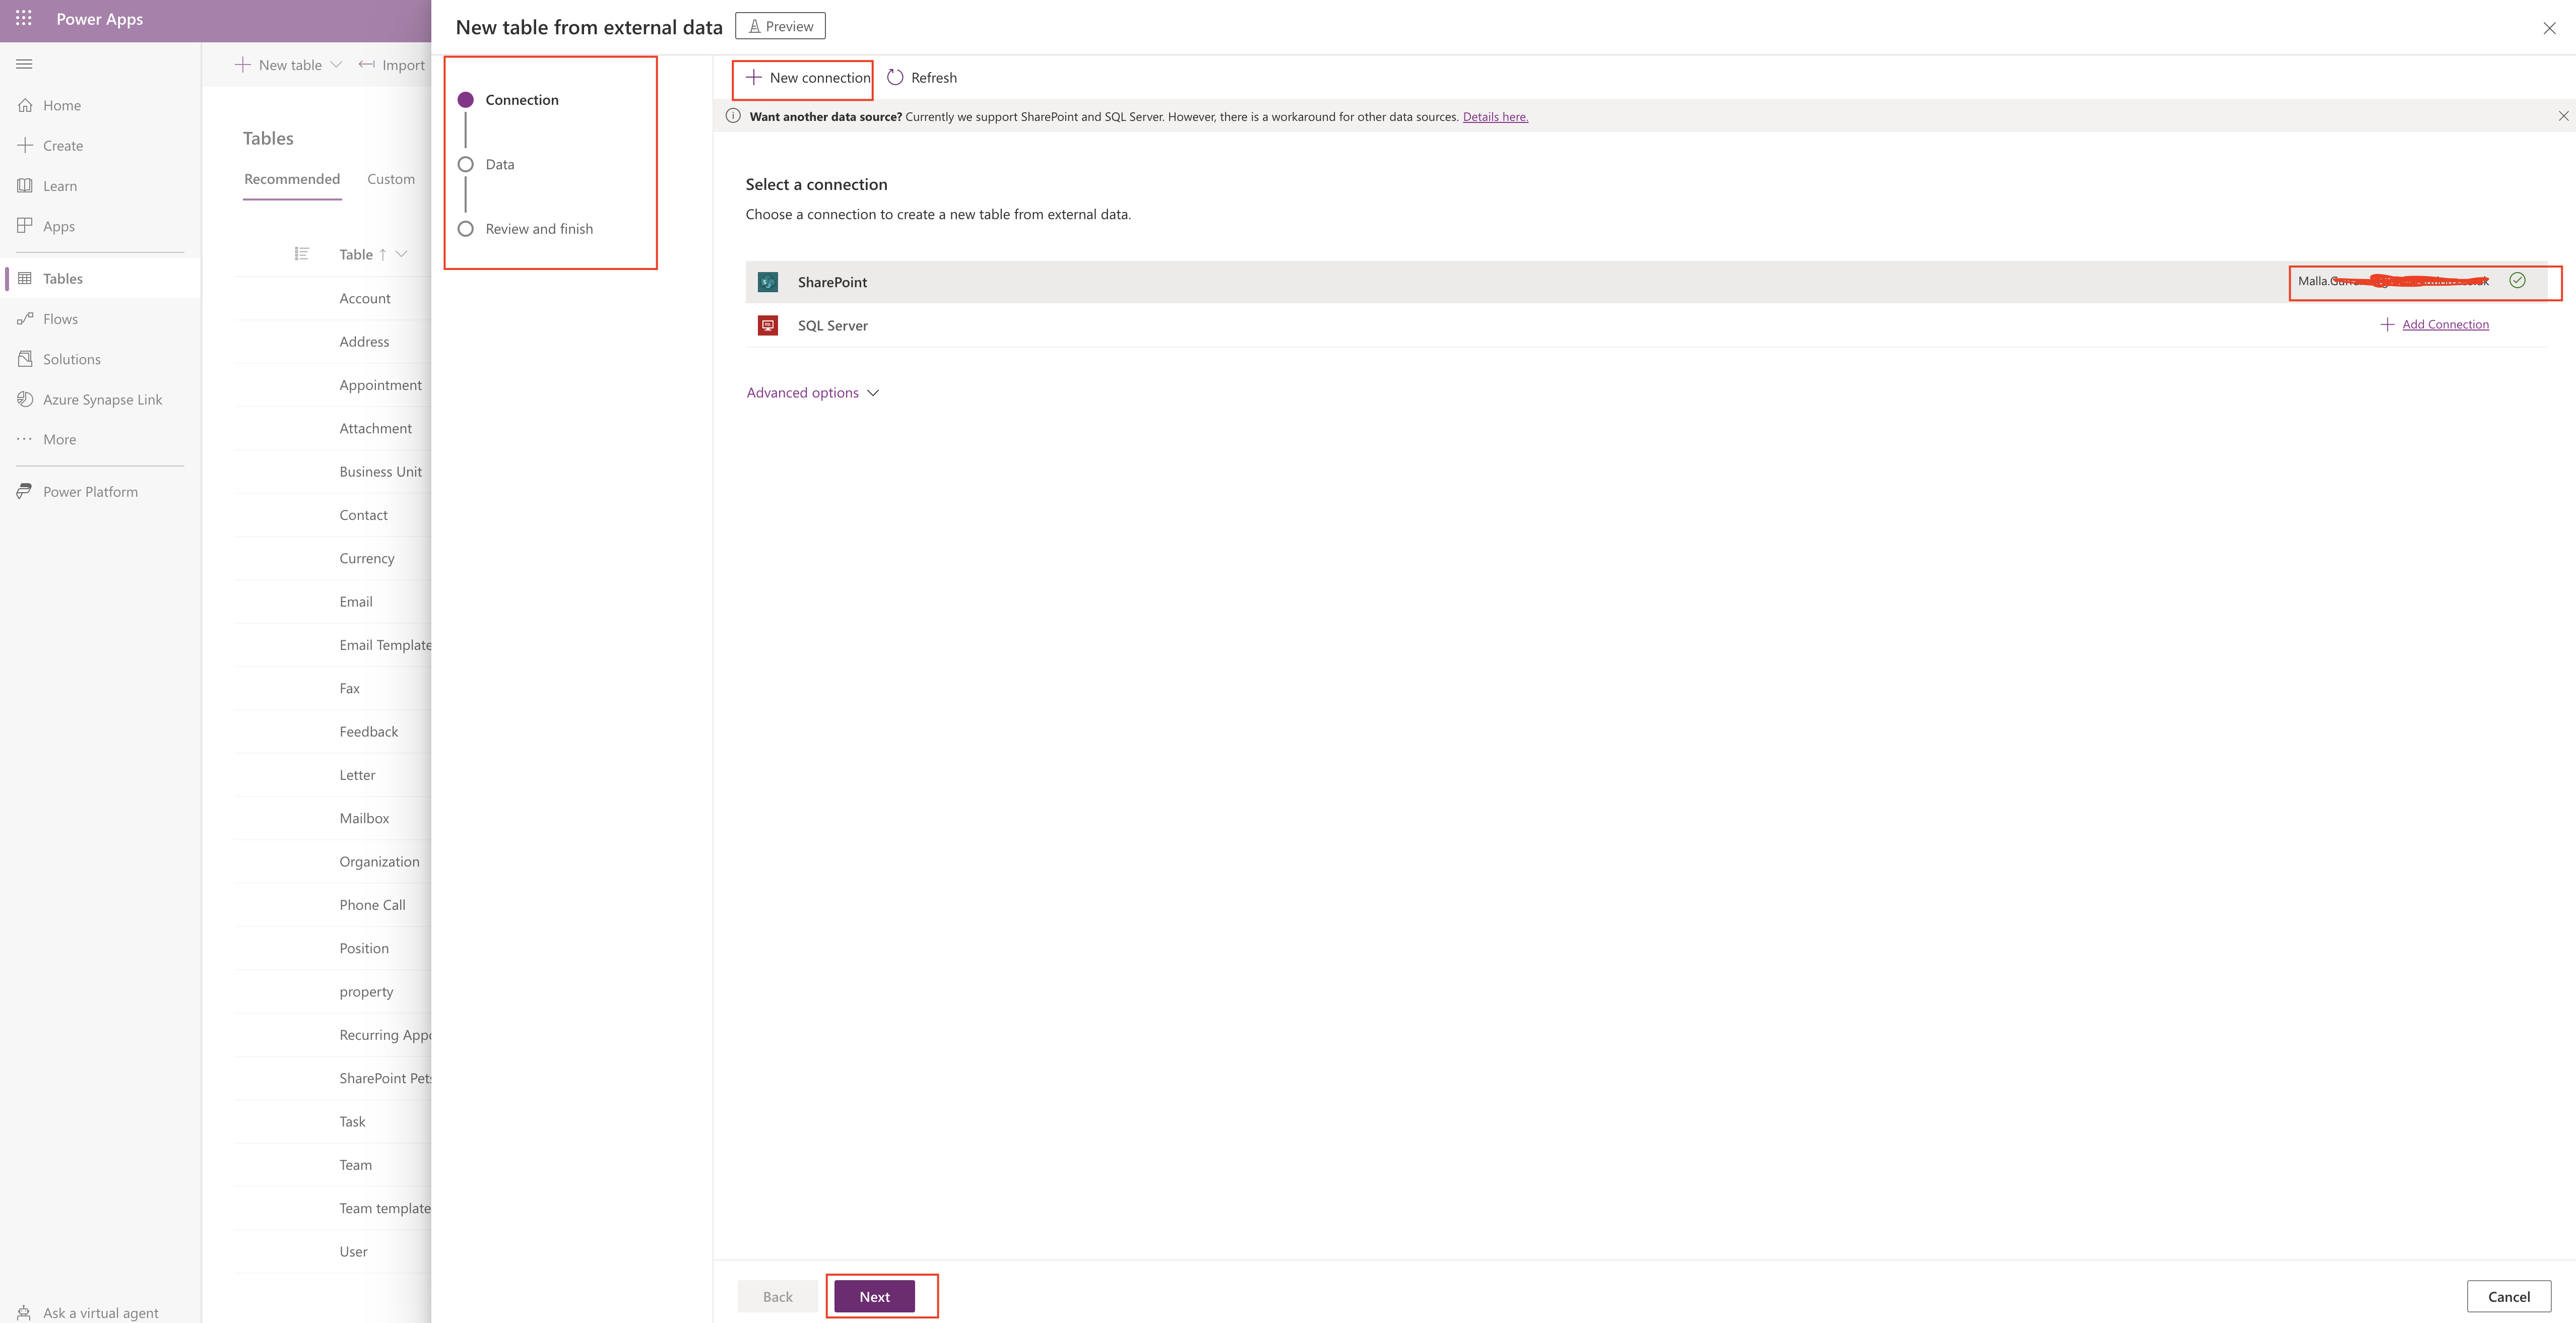
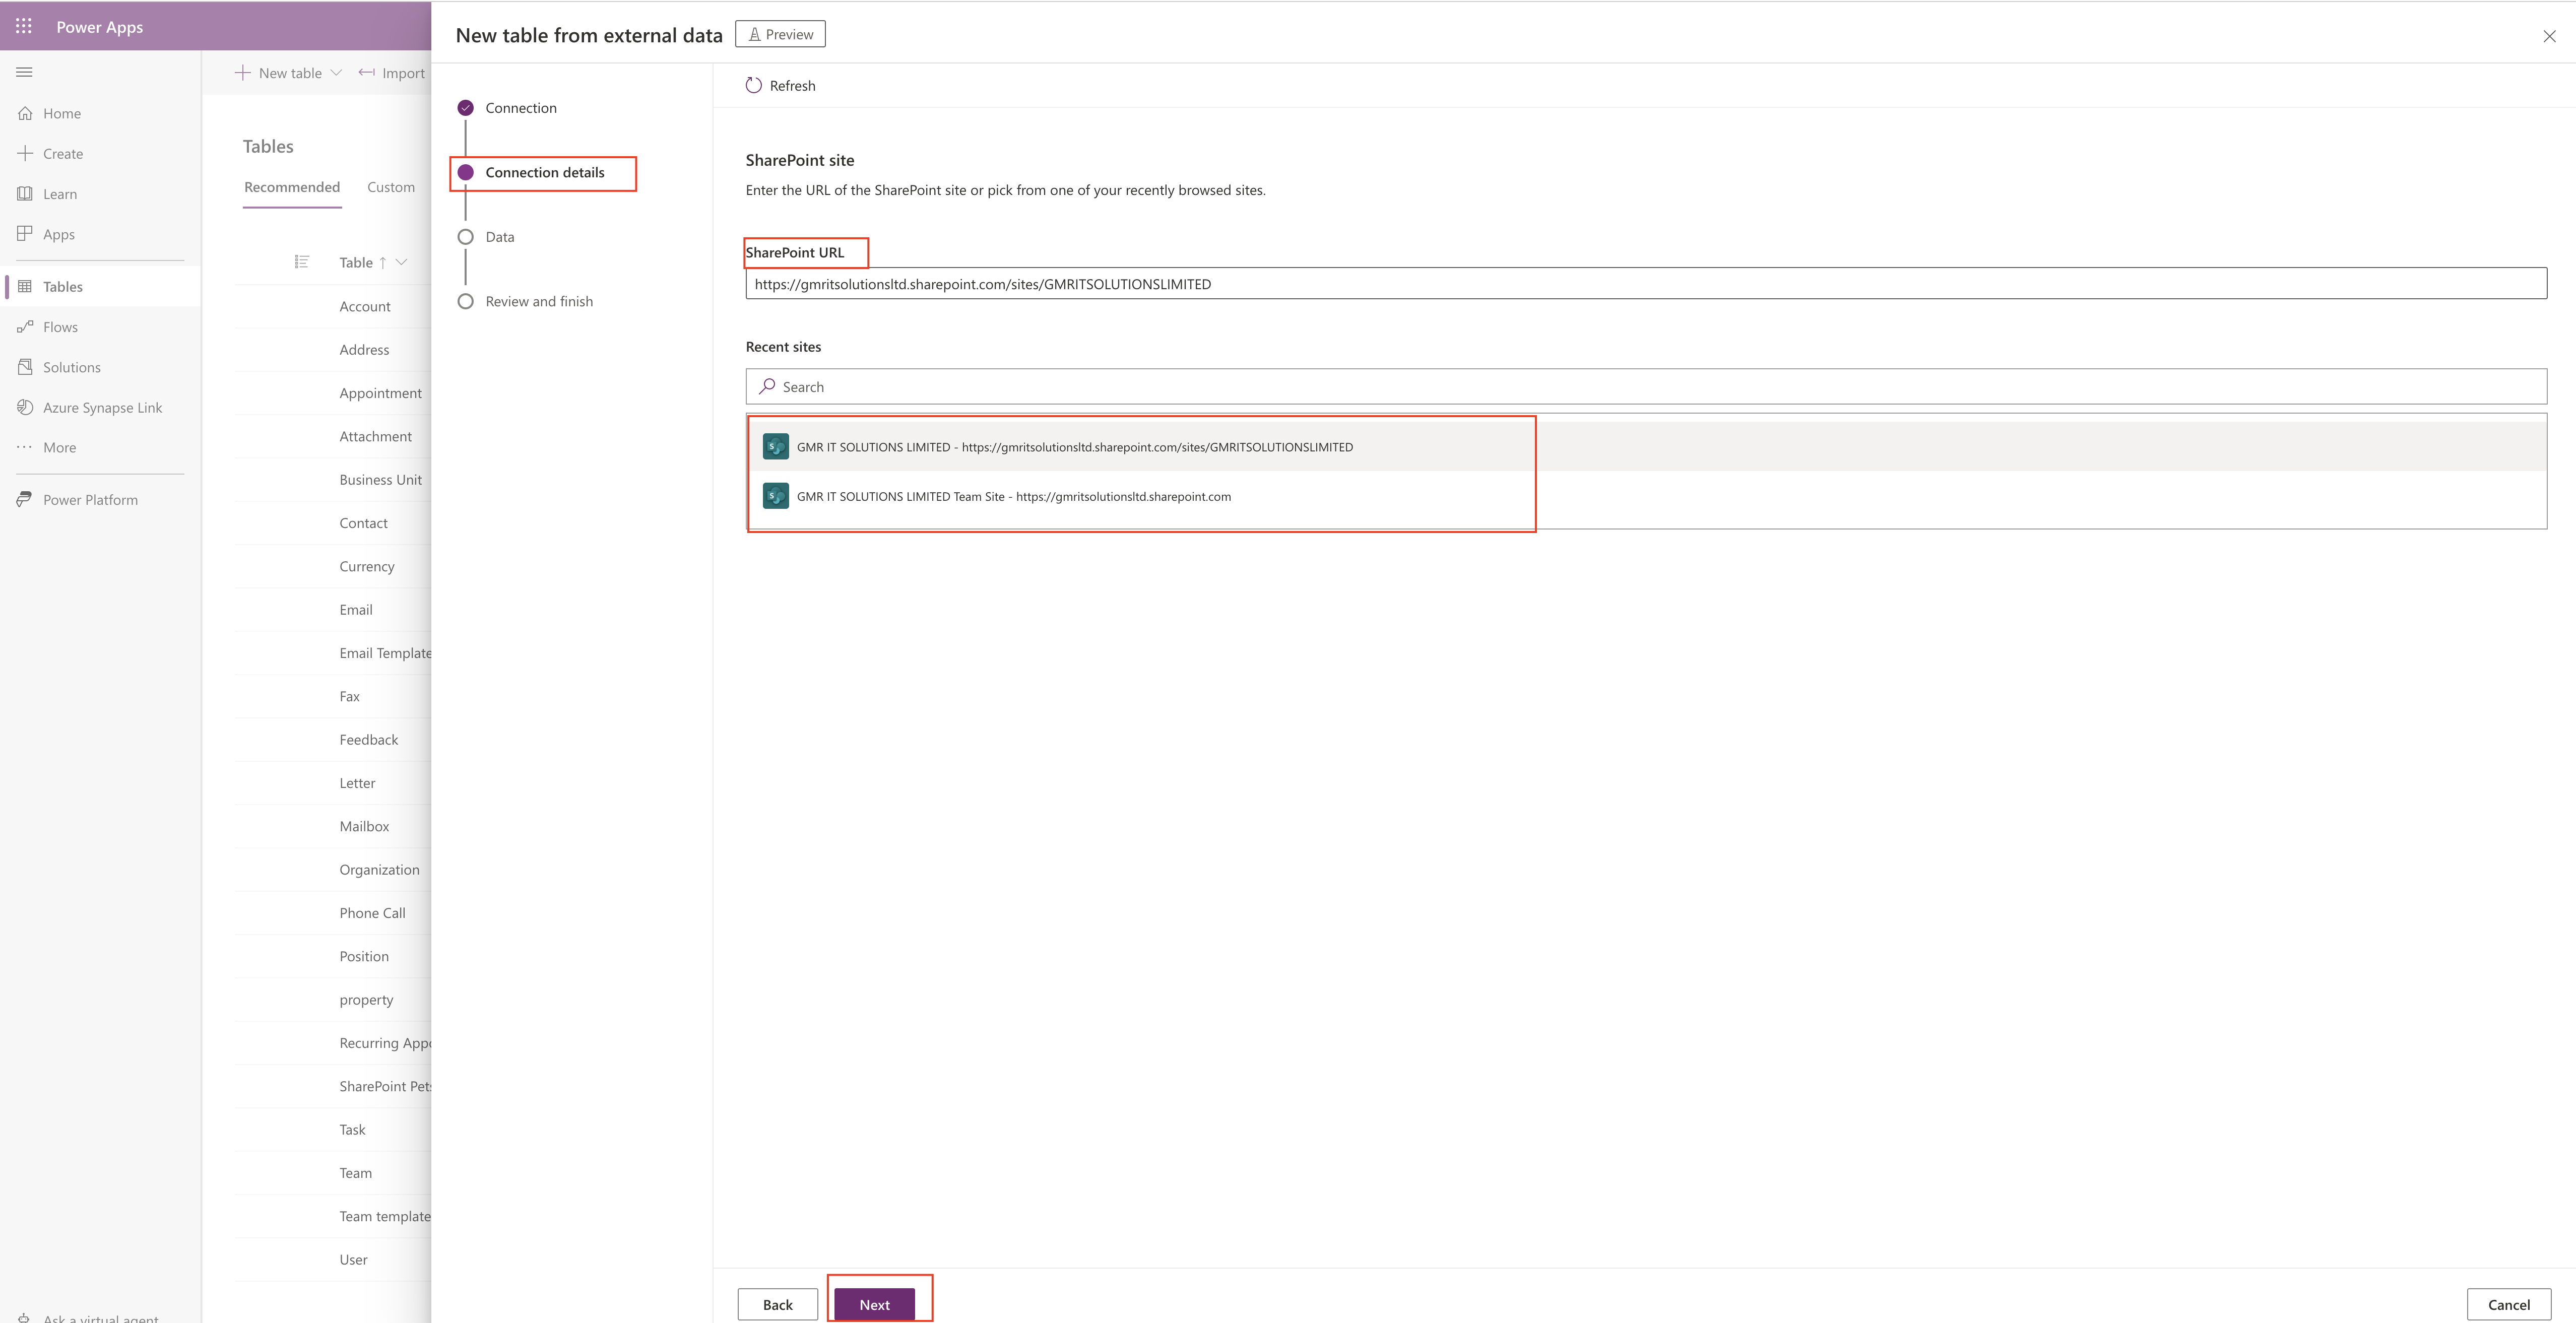
New window will be prompted so make a connection either sharepoint or sql server, in this example i am going to make sharepoint connection, provide your sharepoint url and credential and make a connection if successful a green right tick will appear and then click next.

Now we have made a connection and the next screen will show the sharepoint lists available in the connection and make a selection and click “next” see below screen.

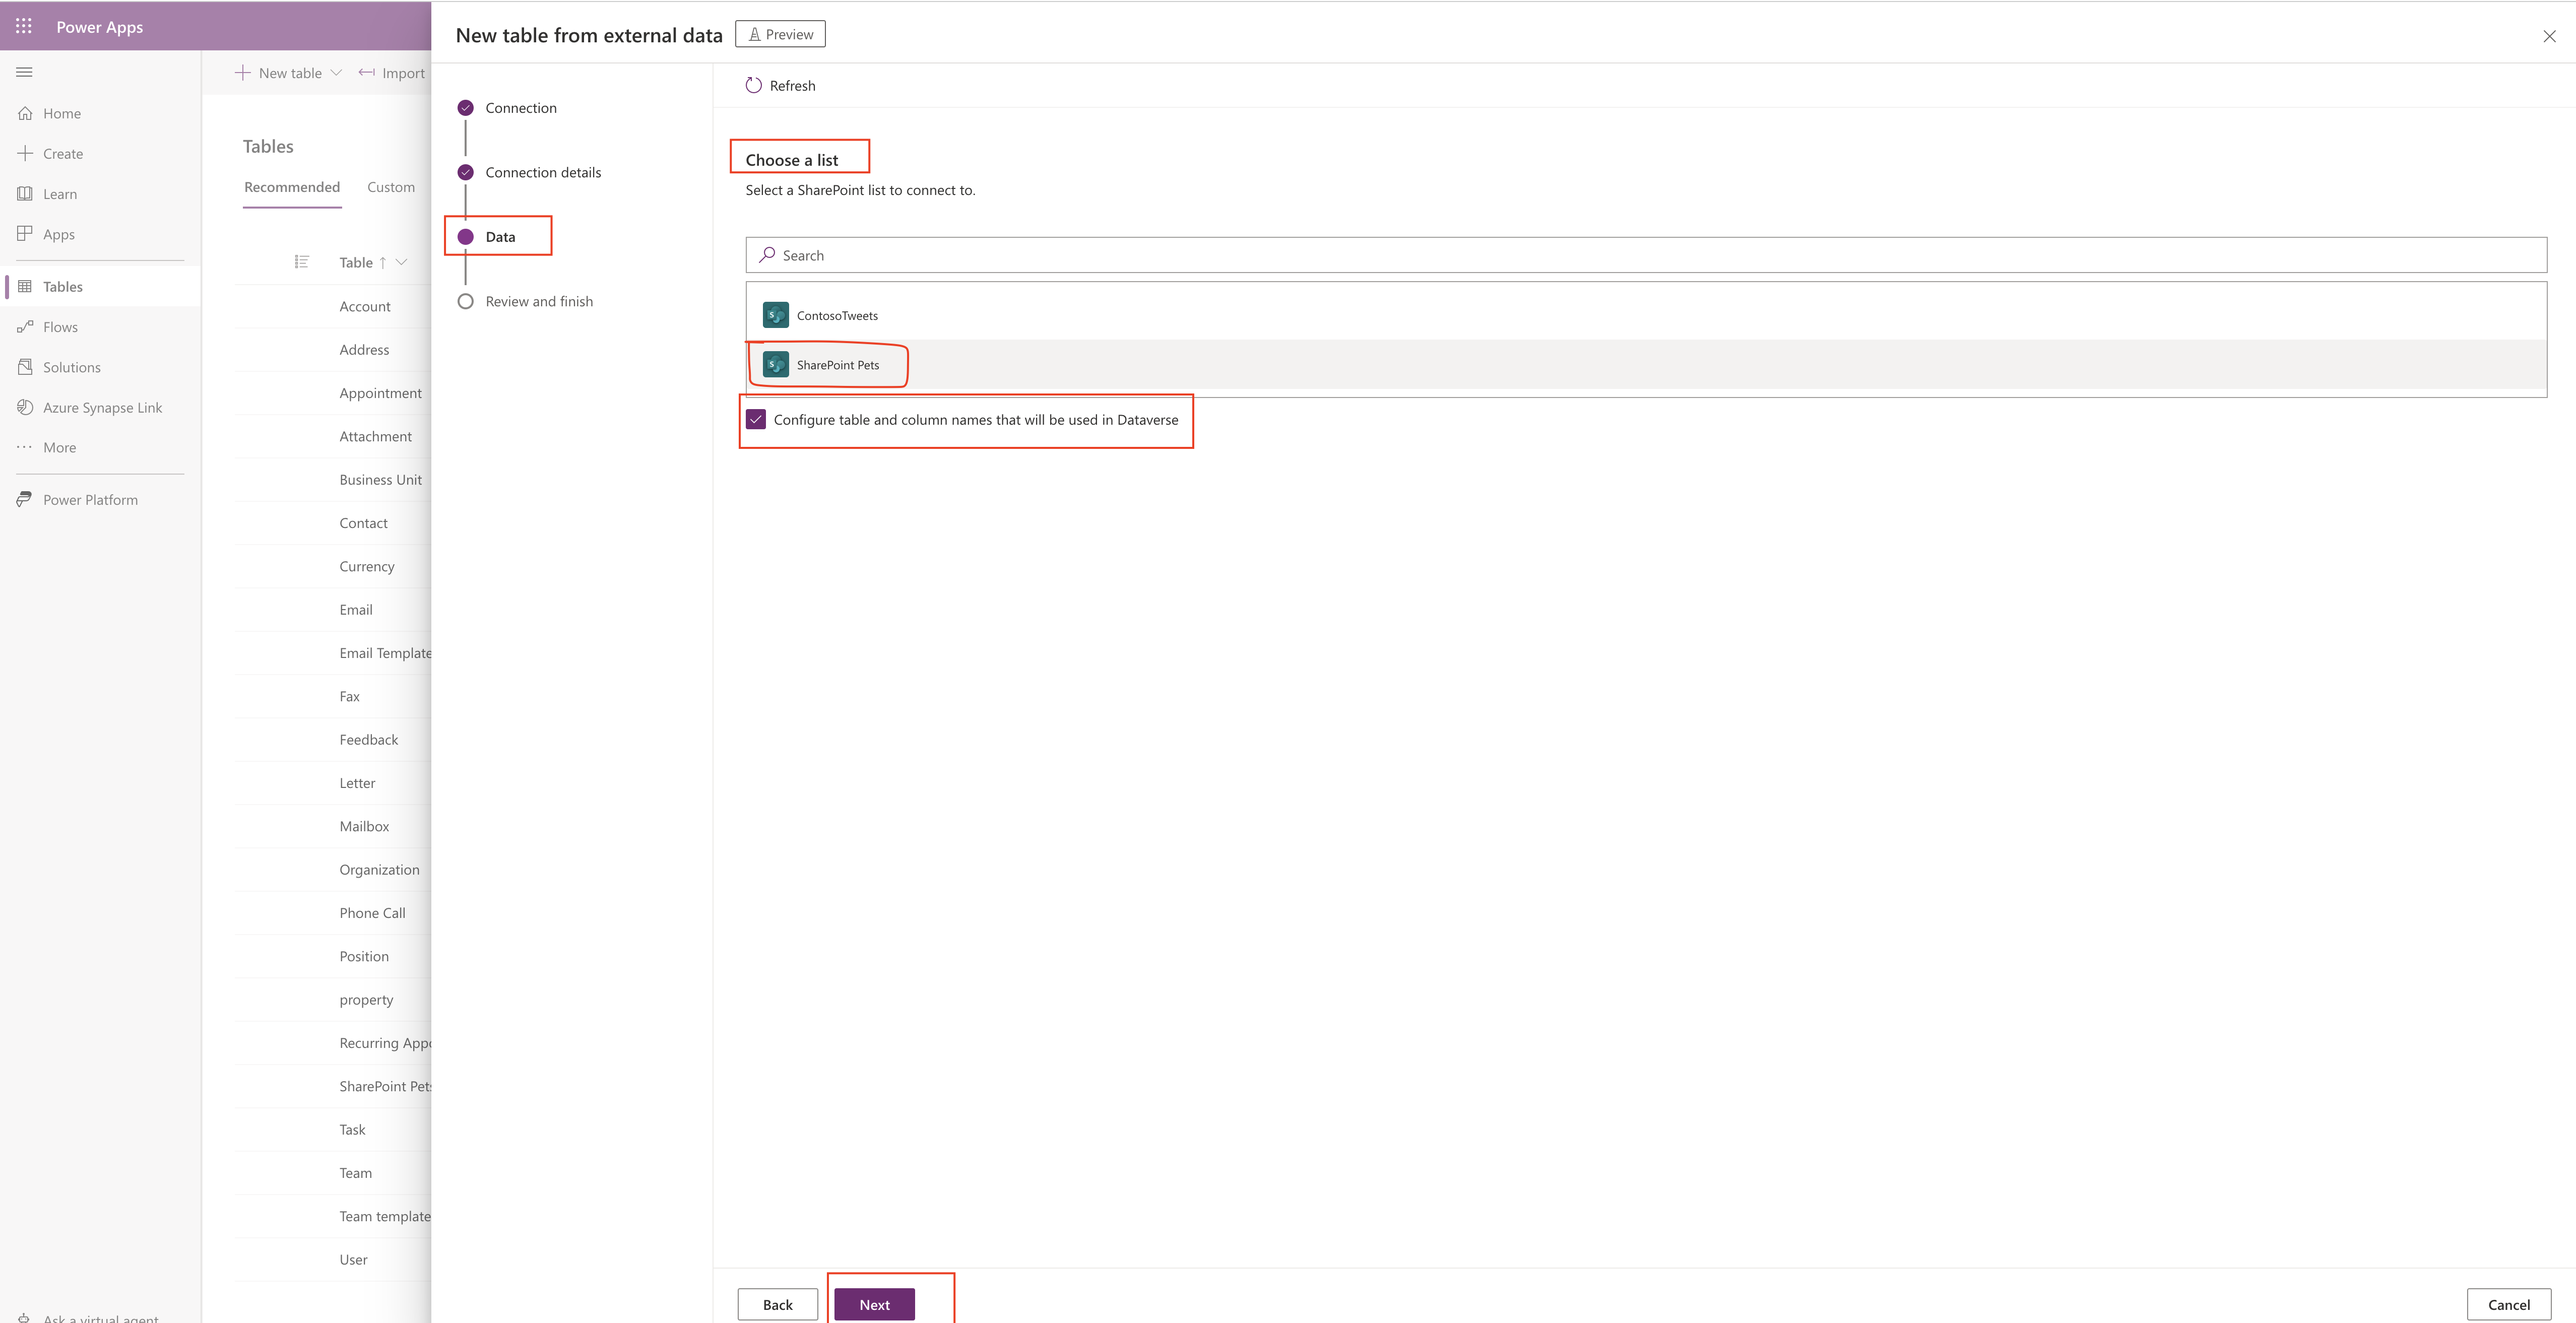
As you can see from the above screenshot its clearly asking for sharepoint list and also check the box for configure table and column names that will be used in Dataverse.

Next Configuration step:

Update the table name and details of the table columns before it is created in Dataverse.

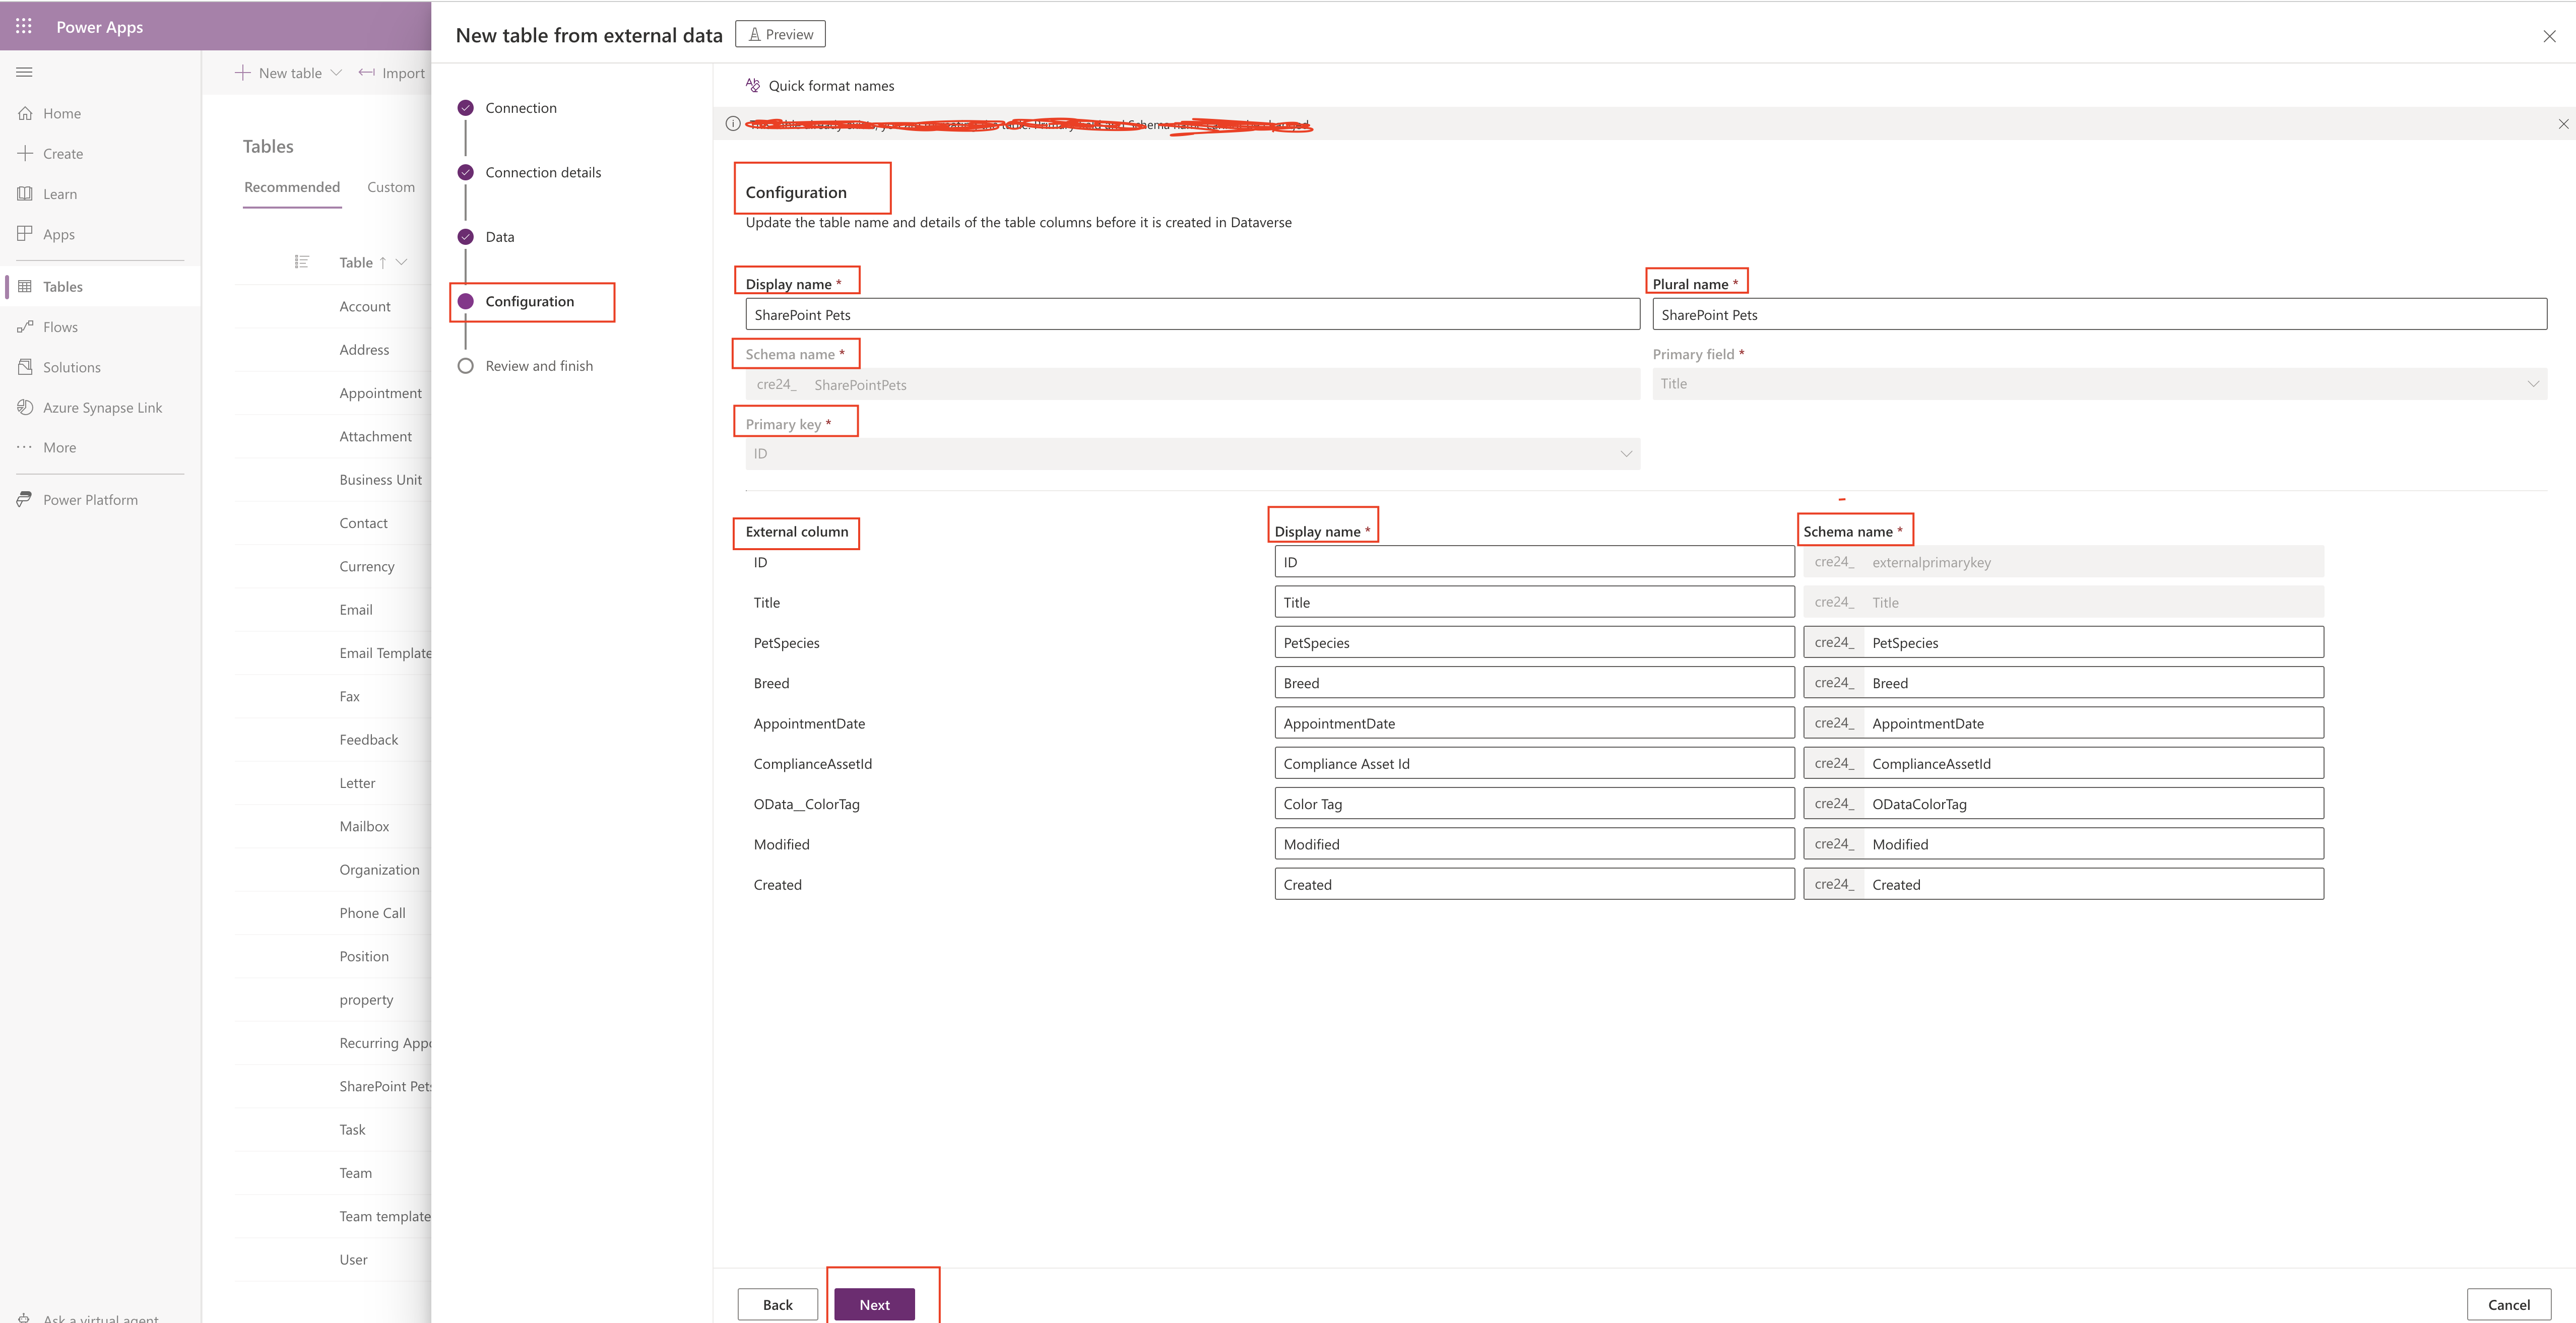
Display name, Plural name, Schema name and Primary key will auto created from the data source.

External columns will be displayed once you are happy with the columns and click next.

Final step is to Review and Finish:

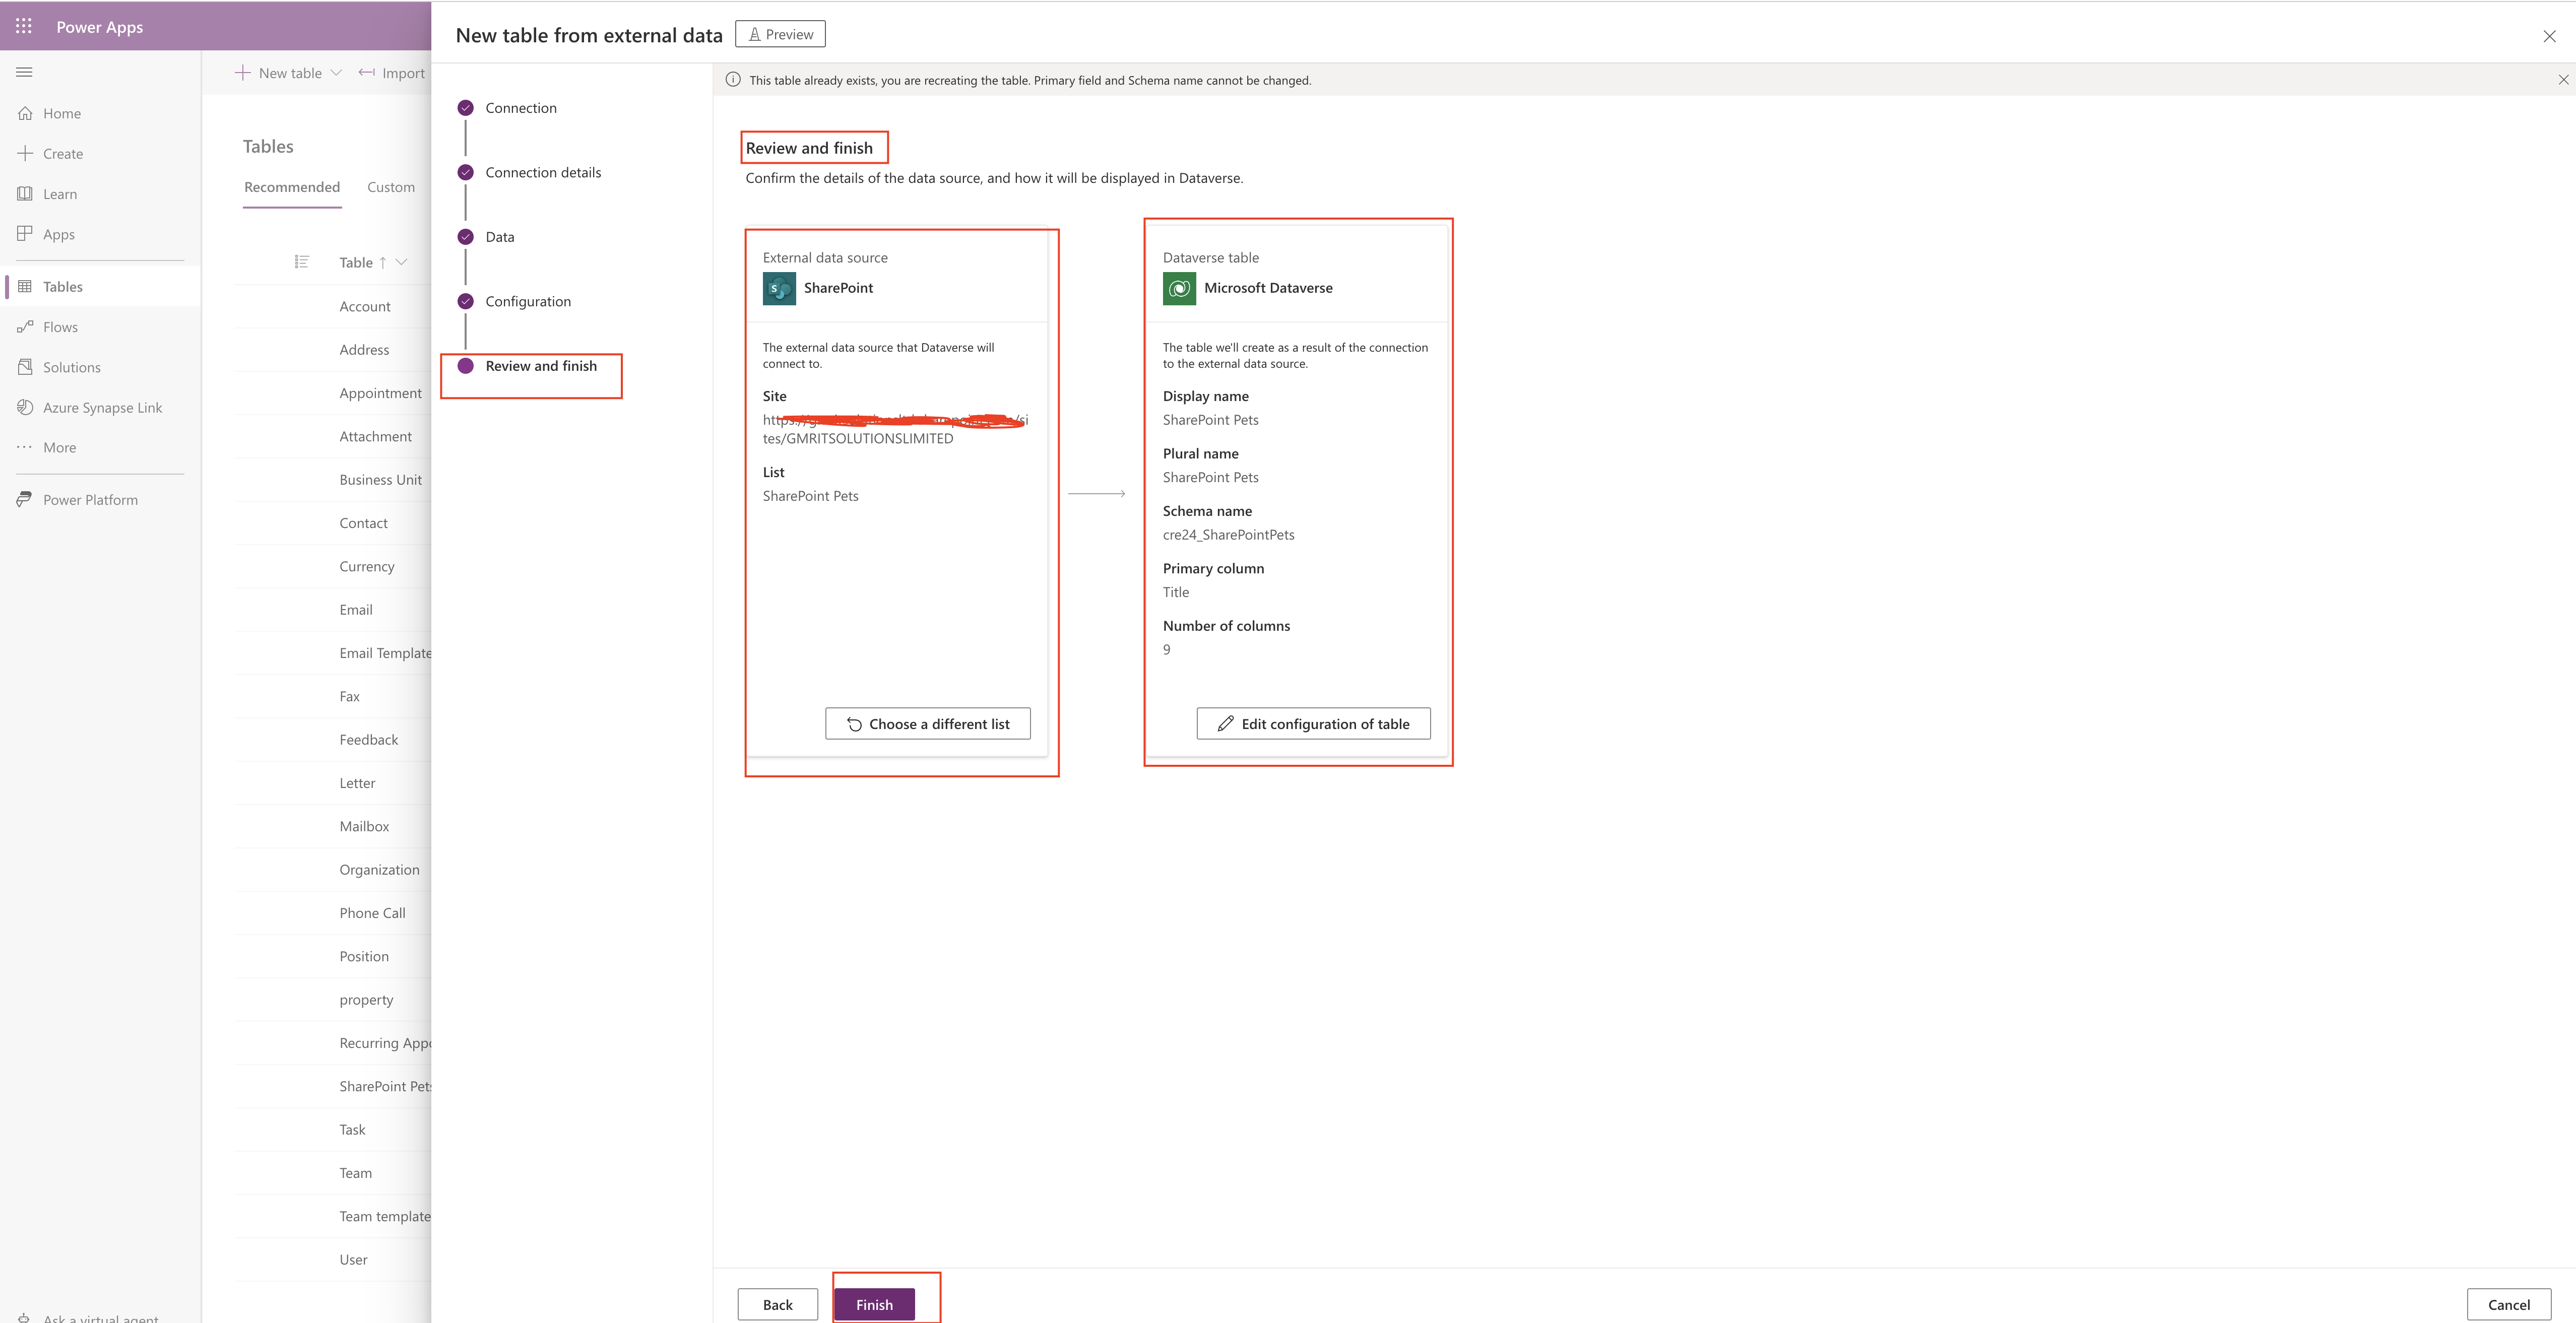
Make sure the external data source and dataverse table are correct, if not you can edit from here, if you are happy then click finish.

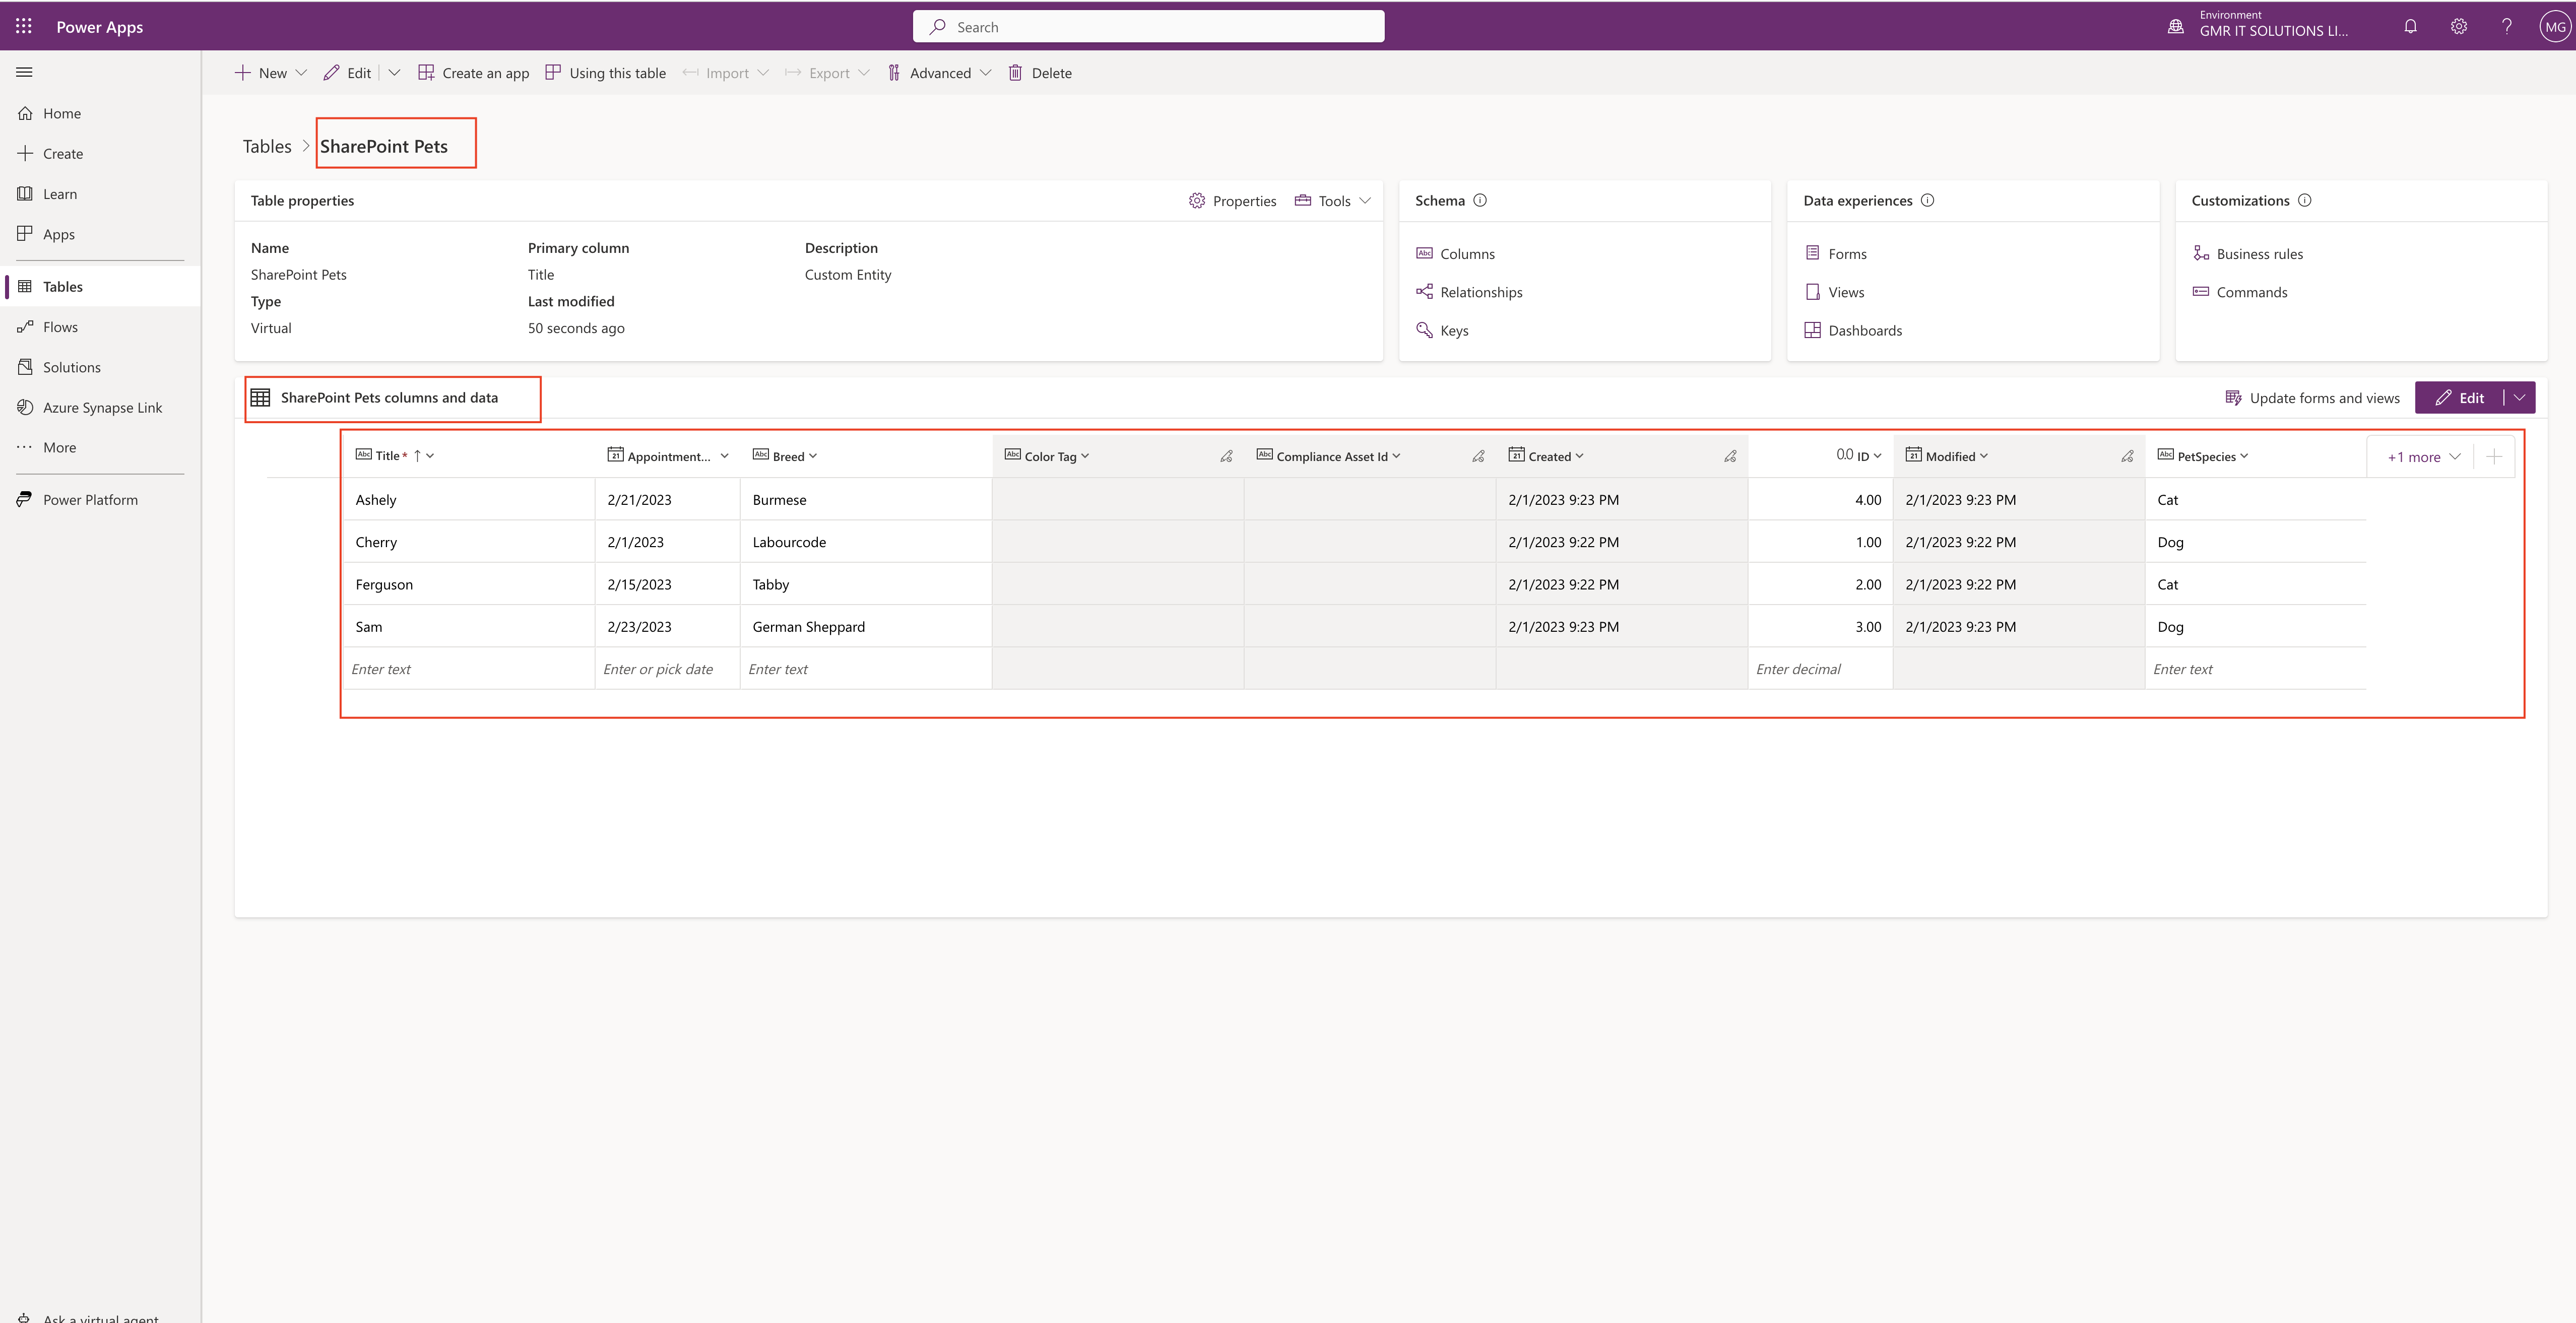
Virtual table will be created in Dataverse refer to above screenshot and you can start using this table in reporting or any other business.

I hope this helps.
Malla Reddy(@UK365GUY)
#365BlogPostsin365Days

Share this:

Billing Preview on Power Platform Admin Center

Hello Everyone,

Today i am going to share new preview feature related to billing – Licenses Preview.

To see the new feature:

Login into Power Platform Admin Center

Click on Billing(Preview) and Licenses(Preview) will be displayed underneath the billing.

The page is displaying a summary of environments in your tenant requiring licensing attention.

Then the Licenses(Preview) will be displayed, there will be toggle button which is “Include standard environments”

Whats that mean is the environments which have licenses will be called as standard environments and rest of them like the trial and community environment not considered as standard environments.

From the above screenshot it says 3 licenses there for these environments.

When you click on “Environments” Tab

The page will be displaying license consumption in the selected environment

Select the environment

I have chosen: GMR IT SOLUTIONS LIMITED2 – SANDBOX

It is displaying the Power Apps licensing overview of the License types like D365, Power Apps Trial.

It will also display whether it is managed environment or not.

If you select the default environment :

It will show whether it is a managed environment if not you can enable managed environments.

Managed Environments: If you make this a Managed Environment, any user currently using M365 Licenses only, will require standalone Power Apps and Power Automate licenses.

For more information click here

Thats it for today.

I hope this helps
Malla Reddy(@UK365GUY)
#365BlogPostsin365Days

Share this:

How to configure Tenant Settings on Power Platform Admin Center

Hello Everyone,

Today i am going to show how to configure Tenant Settings from Power Platform Admin Center.

Let’s get’s started.

The following Settings are applicable through out your organisation.

Login into PPAC

1. Copilot(Preview): Which allows canvas editors and admin to get AI – Powered answers to how to questions. Its in Preview in some regions.

You can test the preview by creating a tenant and environment region as USA.

More about the preview environment here

Click Save.

2. Weekly Digest: Manage additional recipients for the weekly digest email for Managed Environments.

You can send weekly email notifications to the tenant administrators or system administrators about the resource usage. Which can be used for analysis purposes.

Also make sure tenant level analytics is enabled.

Note: All Power Platform and Dynamics 365 Administrators also receive weekly updates.

Click Save.

3. Developer Environment assignments:

Control who can create and manage developer environments like everyone in the organisation who have system admin rights or only specific admins who are like tenant admins or dynamics 365 administrators or power platform administrators.

Click Save.

4. Production environment assignments:

Control who can create and manage production and sandbox environments.

It may be Everyone in the organisation with administrator privileges or only specific people with appropriate rights.

Click Save.

5. Trial Environment assignments:

Control who can create and manage trial environments like everyone with administrator rights or only specific people with administrator privileges.

Click Save.

6. Add-on capacity assignments:

Specifies who can set add on capacity to the environment any environment admin or only specific admins.

Click Save.

7. Analytics:

Tenant – Level analytics turn ON.

This analytics provides statistics and data from environments across all regions in your tenant and copies it into the default environment region for tenant level reporting.

Click Save.

8. Customer Lockbox:

Control Microsoft Operator access to customer content.

Accessti to Customer Lockbox for Microsoft Power Platform and Dynamics 365 requires users in the environments where the lockbox policy is enforced to have any of these subscriptions.

1. Microsoft 365 or Office 365/E5/G5
2.Microsoft 365 A5/E5/G5 Compliance.
3. Microsoft 365 F5 Security & Compliance
4. Microsoft 365 A5/F5/G5 Insider Risk Management

Customer Lockbox policy will be enforced only on environments that are activated for Managed Environnments for more info click Here

Click Save

9. Storage Consumption Warning Thresold:

Control tenant level storage consumption warning thresold.

By setting this thresold you will receive warning when storage consumption reaches particular thresold.

Click Save.

10. Publish bots with boosted conversations:

It will allow power virtual agents to publish bots that can create real time responses from a knowledge source chosen by canvas editors. this feature is in preview now.

Click Save.

11. Deskop flow actions in DLP:

When it is enabled the desktop flow action groups will be visible when creating or editing DLP policies.

Note: Desktop flows in non managed environments are not governed by DLP policies.

Click Save.

Note: Managed Environment only settings are as follows:

Weekly digest
Customer Lockbox
Desktop flow actions in DLP

Thats it for today.

I hope this helps
Malla Reddy(@UK365GUY)
#365BlogPostsin365Days

Share this:

How to set the time zone you are in Microsoft Dynamics 365 Model Driven Apps

Hello Everyone,

Today i am going to share quick tip of how to see same date on Model Driven App as your colleagues.

Suppose your employeer have international footprints so as the employees too work from different countires, so one employee might be working from UK and another is from USA.

One of the customer service team member from USA complained about the date difference when compared to United Kingdom customer service.

So the personal Settings may vary for the employees working time zones. But the USA Employee want to see as UK Employee.

In that case just need to adjust the USA Employee – Personal Options from the Dynamics 365 CE App.

Login into Model Driven App.

Then Set Personal Options will be displayed, set the time zone to UK

That’s it for today.

I hope this helps
Malla Reddy(@UK365GUY)
#365BlogPostsin365Days

Share this:

How to go directly on to Model Driven App from browser

Hello Everyone,

Today i am going to share quick tip of url which will helps to go directly to the Model Driven Apps.

Suppose your organisation may be using Dynamics 365 Customer Engagement Apps like sales, customer service, field service, Project Operations, Marketing etc..

You want to quickly select the App without manually navigation through the Power Platform Admin Center.

Simply use the Dynamics 365 URL :

https://gmritsolutionssandbox.crm11.dynamics.com/main.aspx?forceUCI=1&pagetype=apps

Share this: