Menu Close

Tag: #powerautomate

{How to create } views and forms directly from maker portal

Hello Everyone,

Today i am going to show how to create the views and forms directly from the maker portal.

This is Part 5 Series

Lets gets started.

Use Case:

Customers building apps for Dynamics 365 frequently use this template, use data from Dataverse tables.

Login into www.maker.powerapps.com
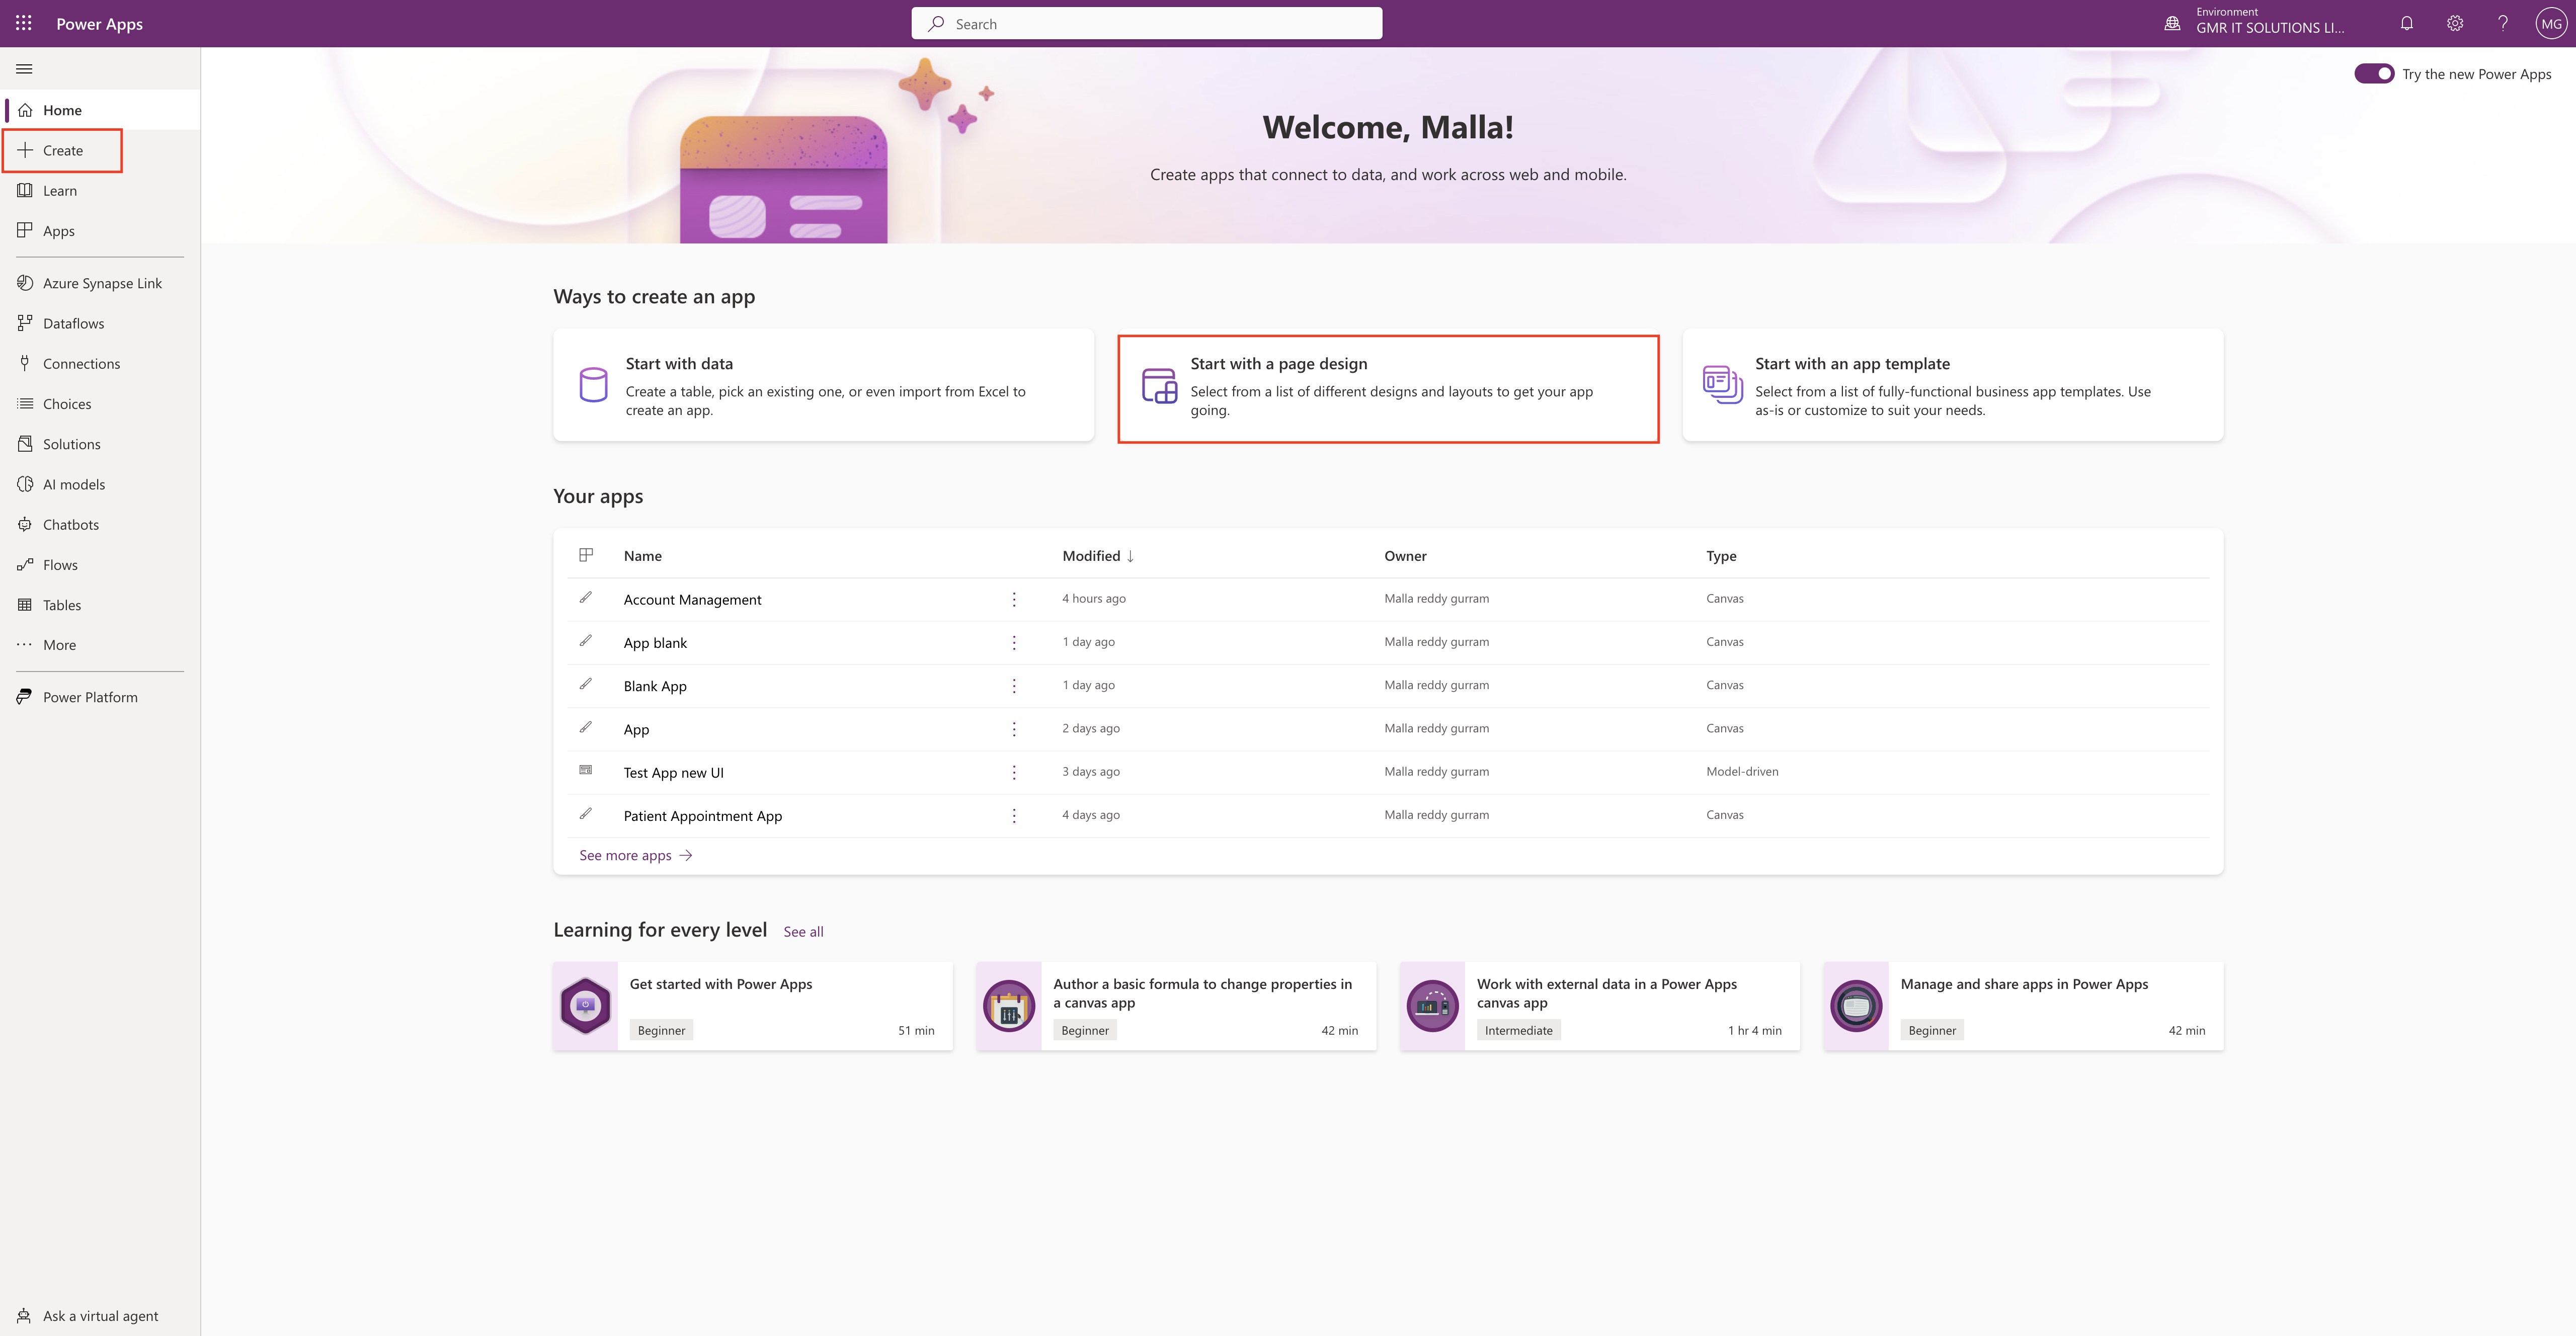
Select the “Start with a page design”.
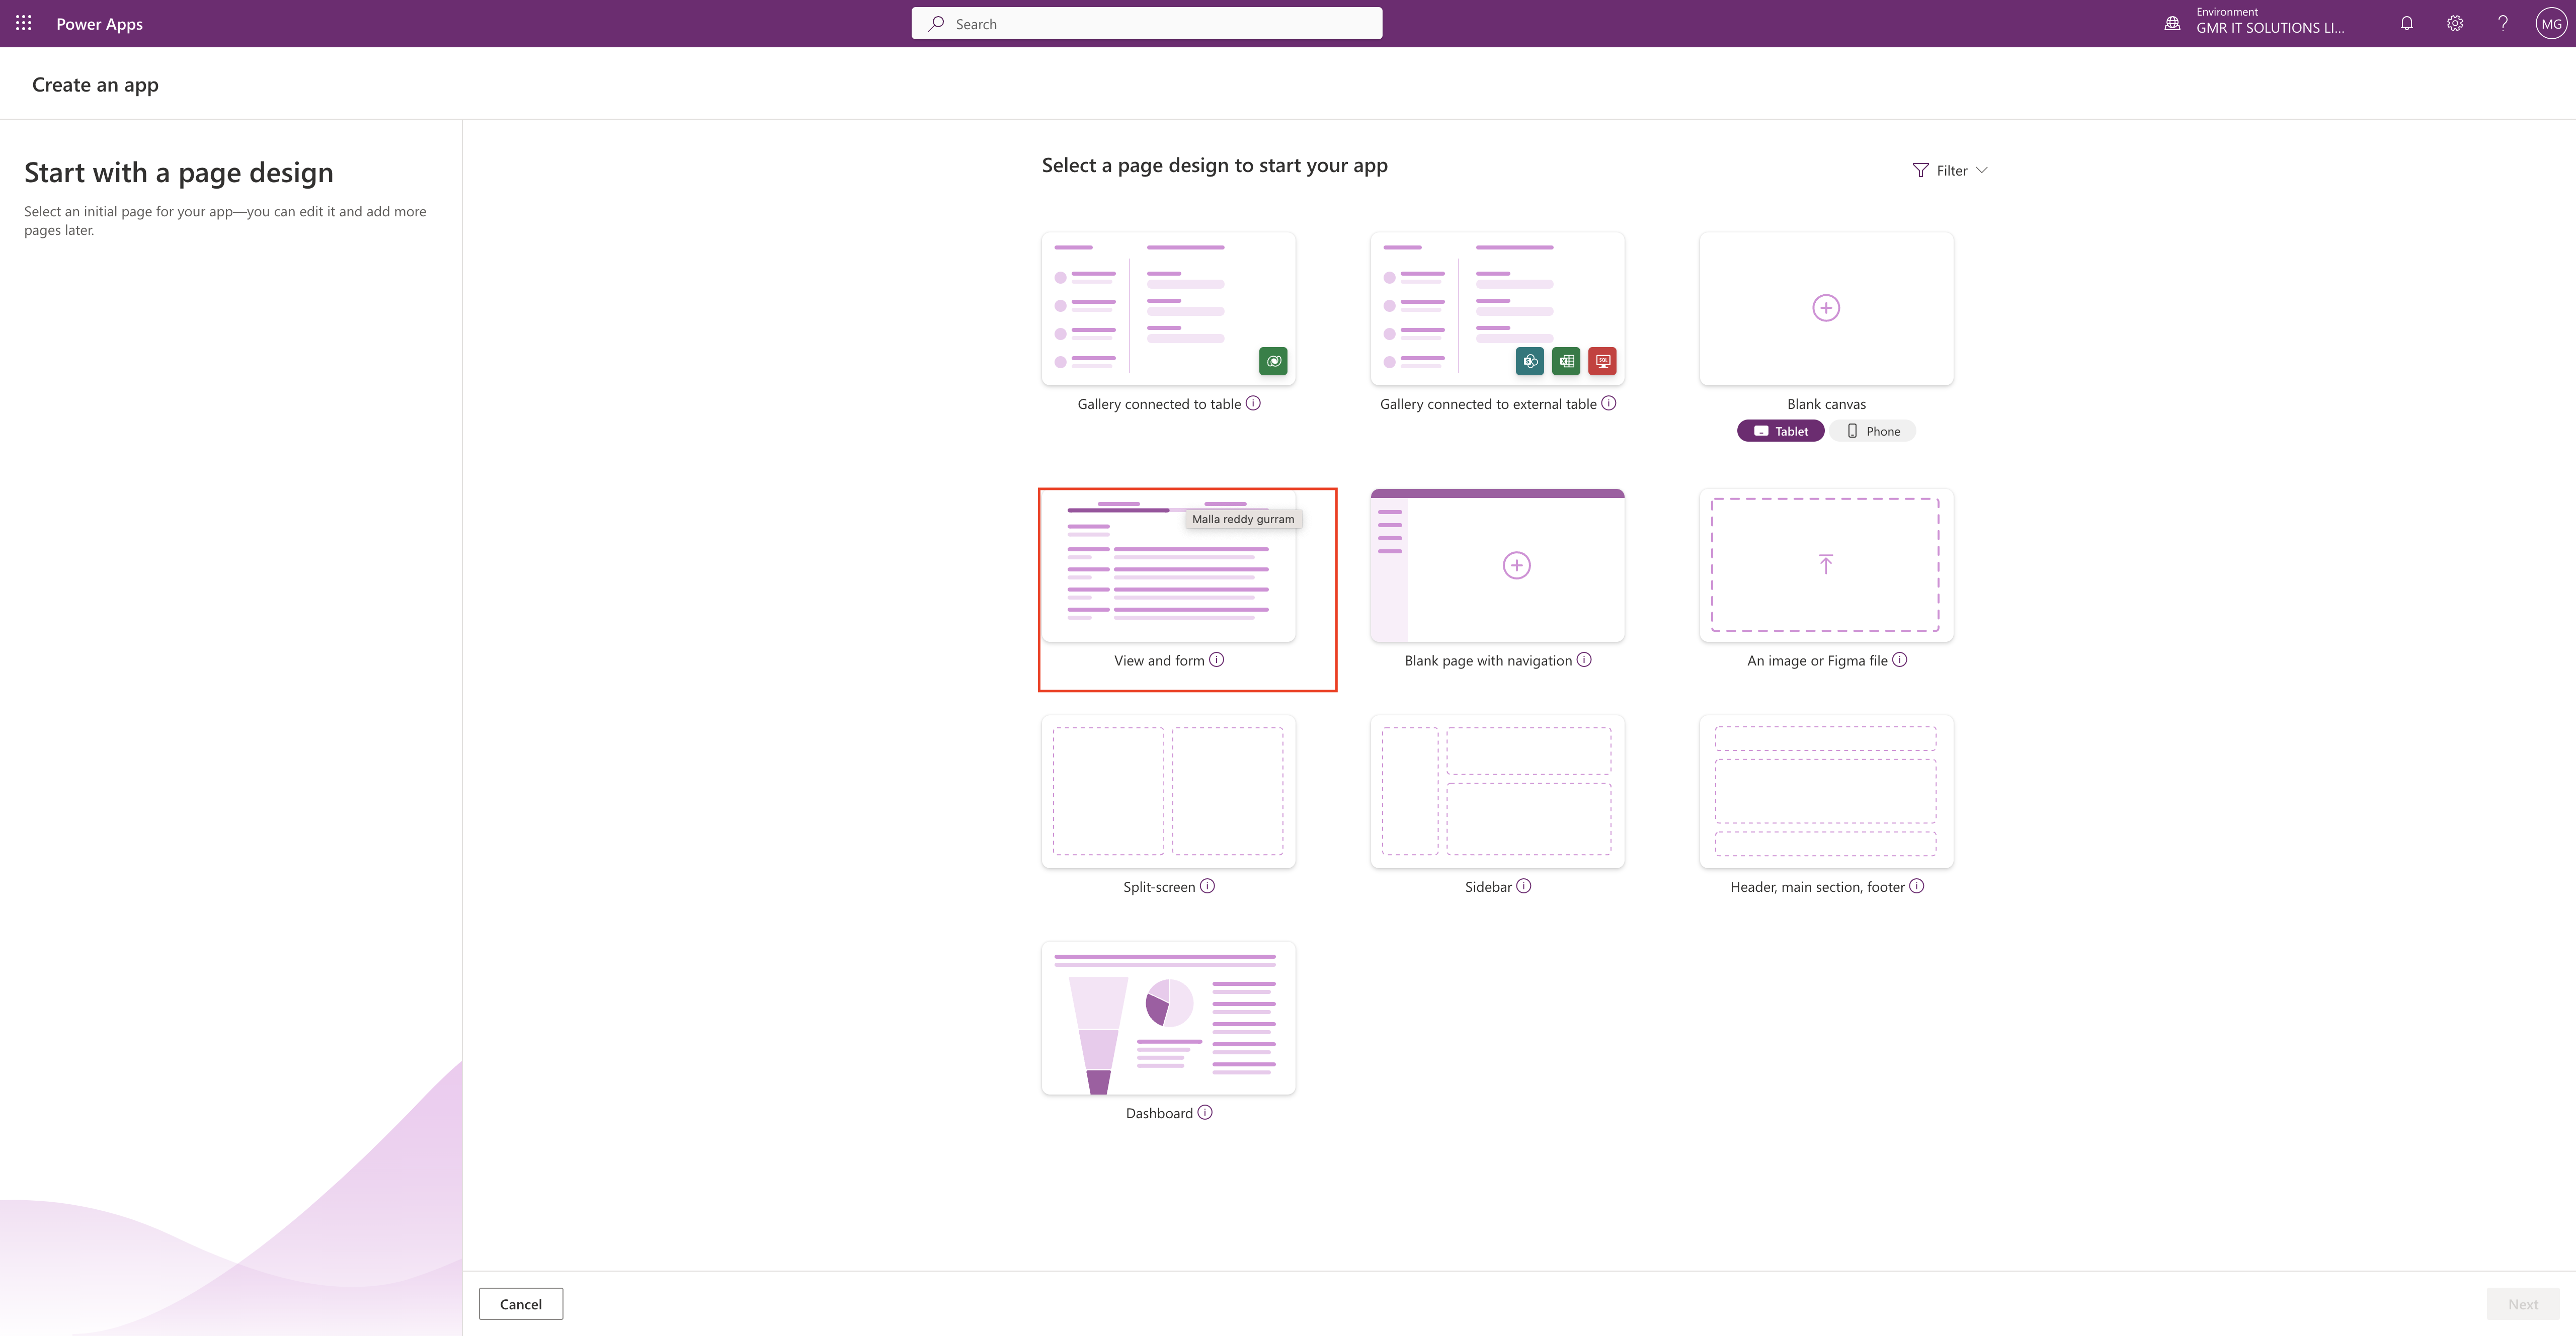
Then select the View and form:

Create a collection of pages that you’ll connect to data.

For each data table you connect, you’ll get
1.One page with up to eight different data views of a table.
2.One page with a main form for adding and updating table rows.
3.Additional forms that make working with data easier: quick view, create and card forms.

For more information about building your first model driven app here

When you select the View and form then it will prompt to give it a name for your MODEL DRIVEN APP.
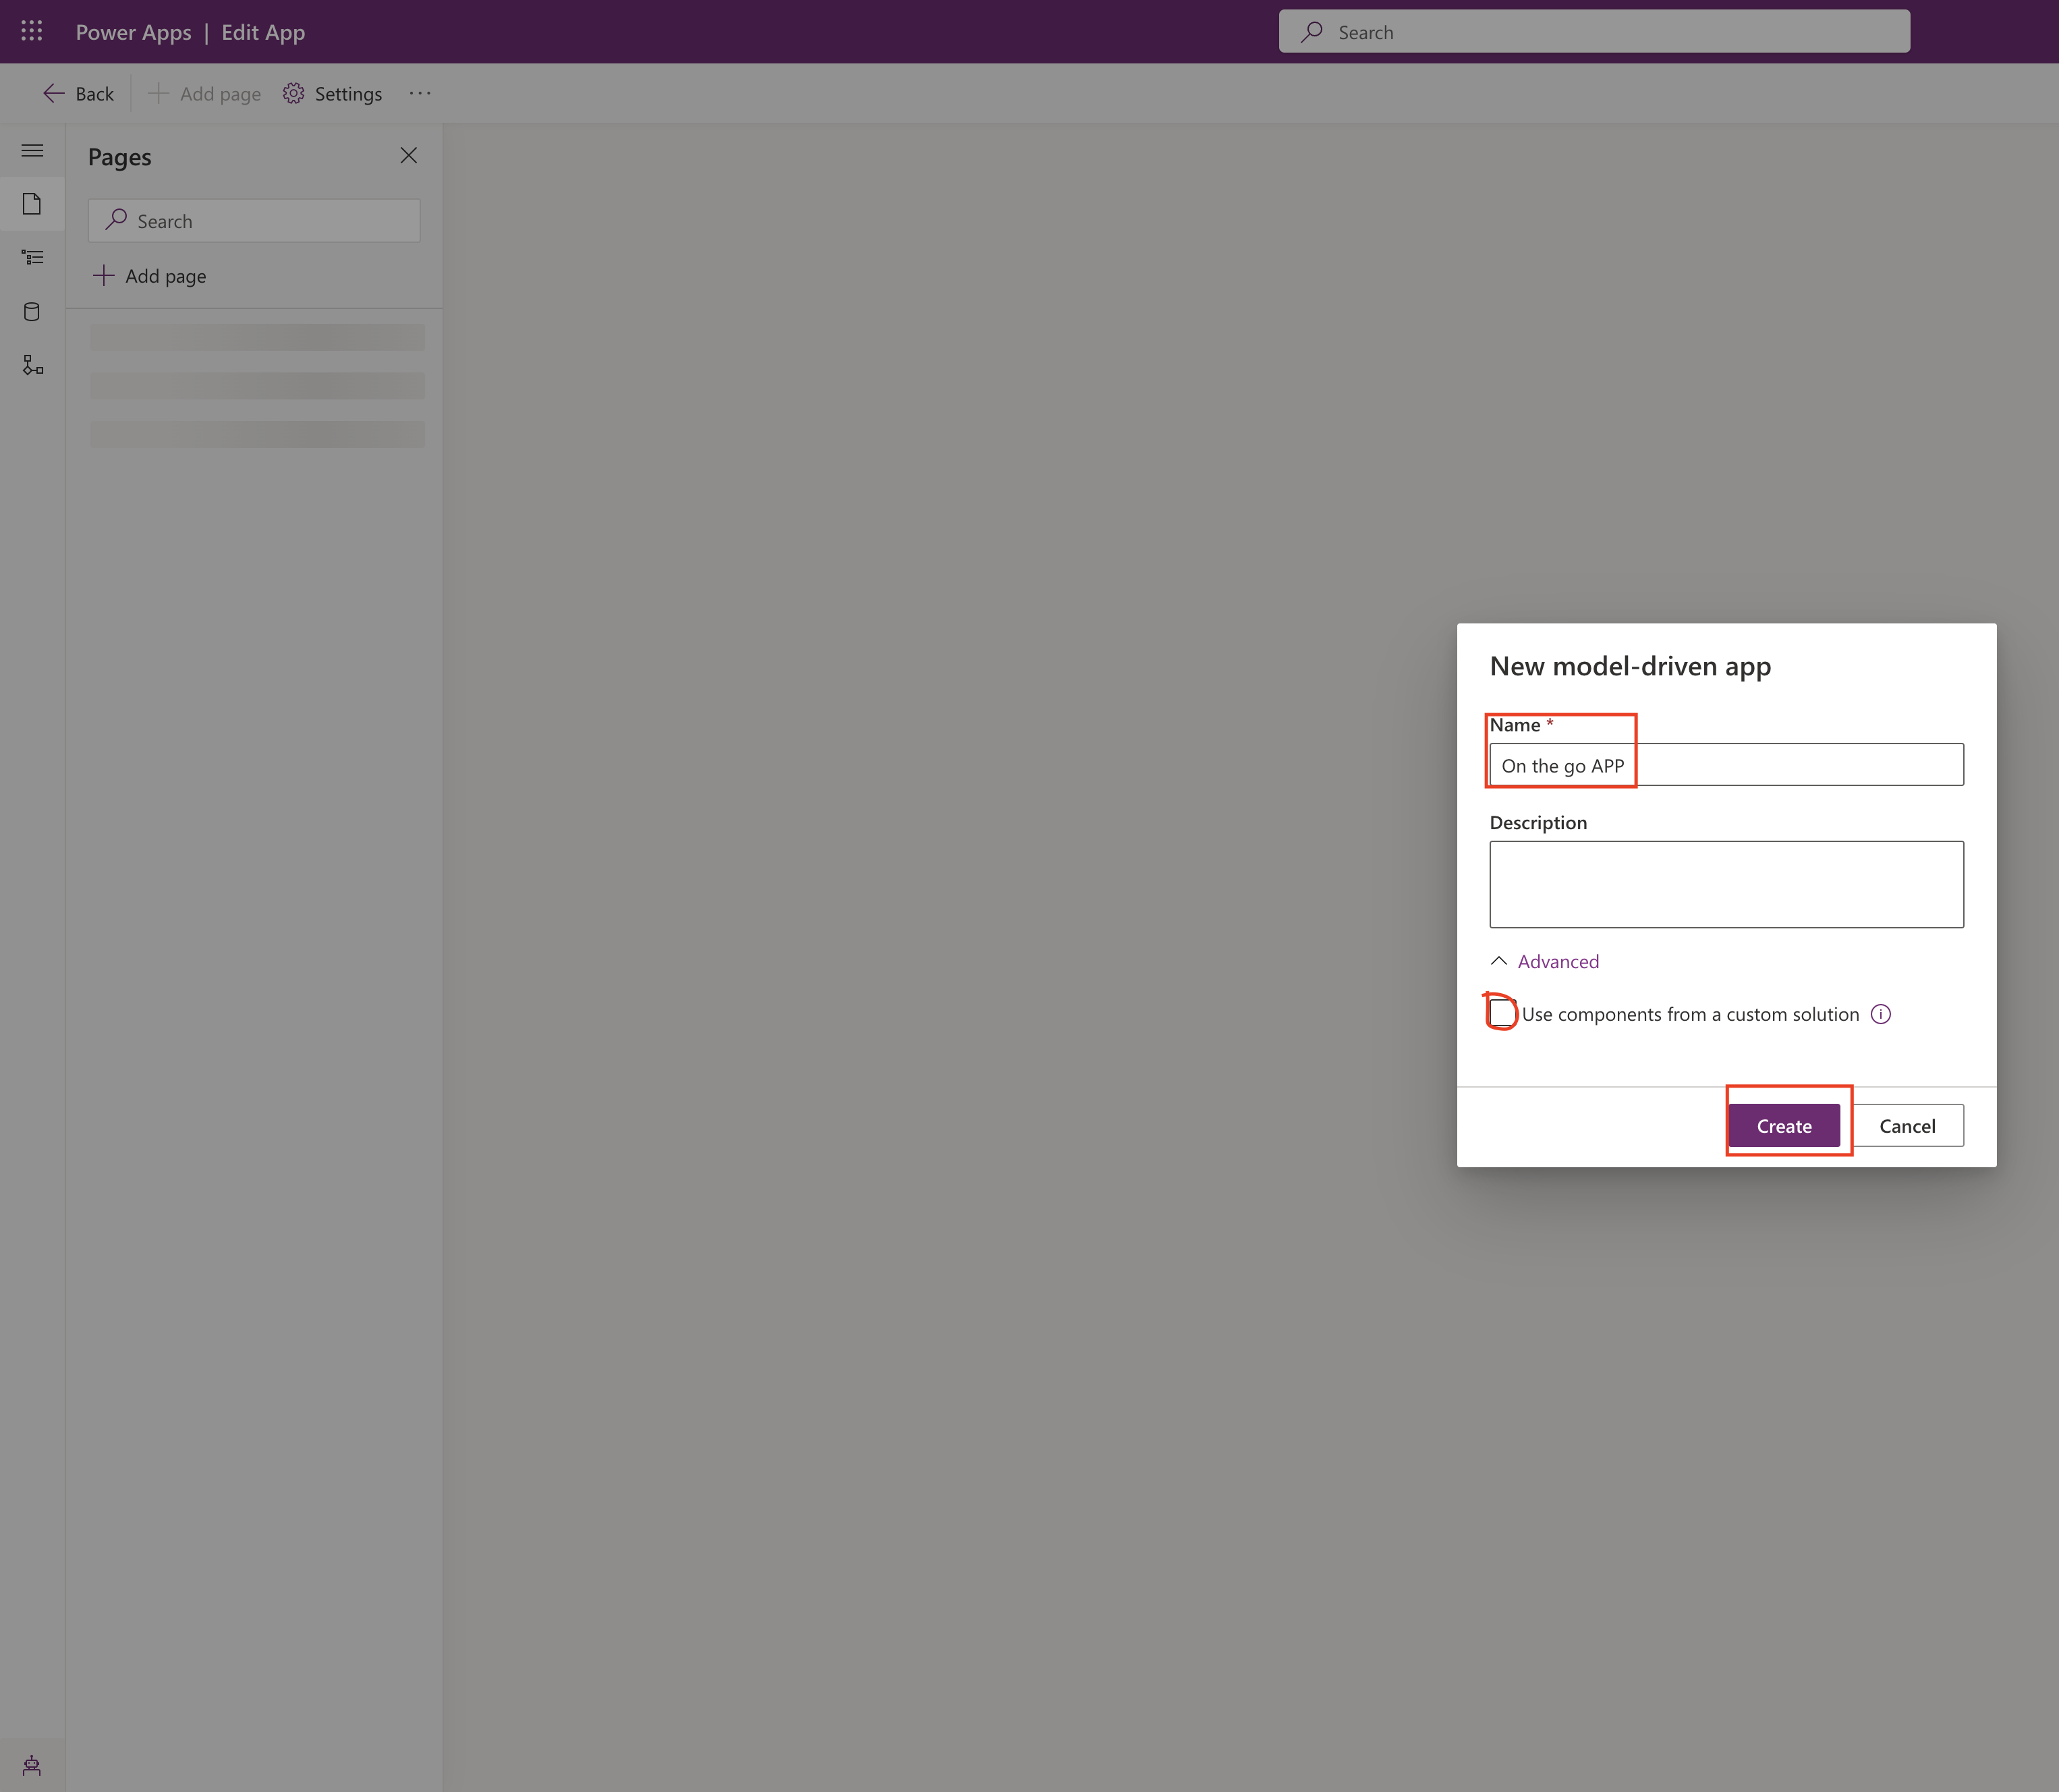
You can select the custom solution as well to use components on View and form, refer to the above screen shot.

Click CREATE.
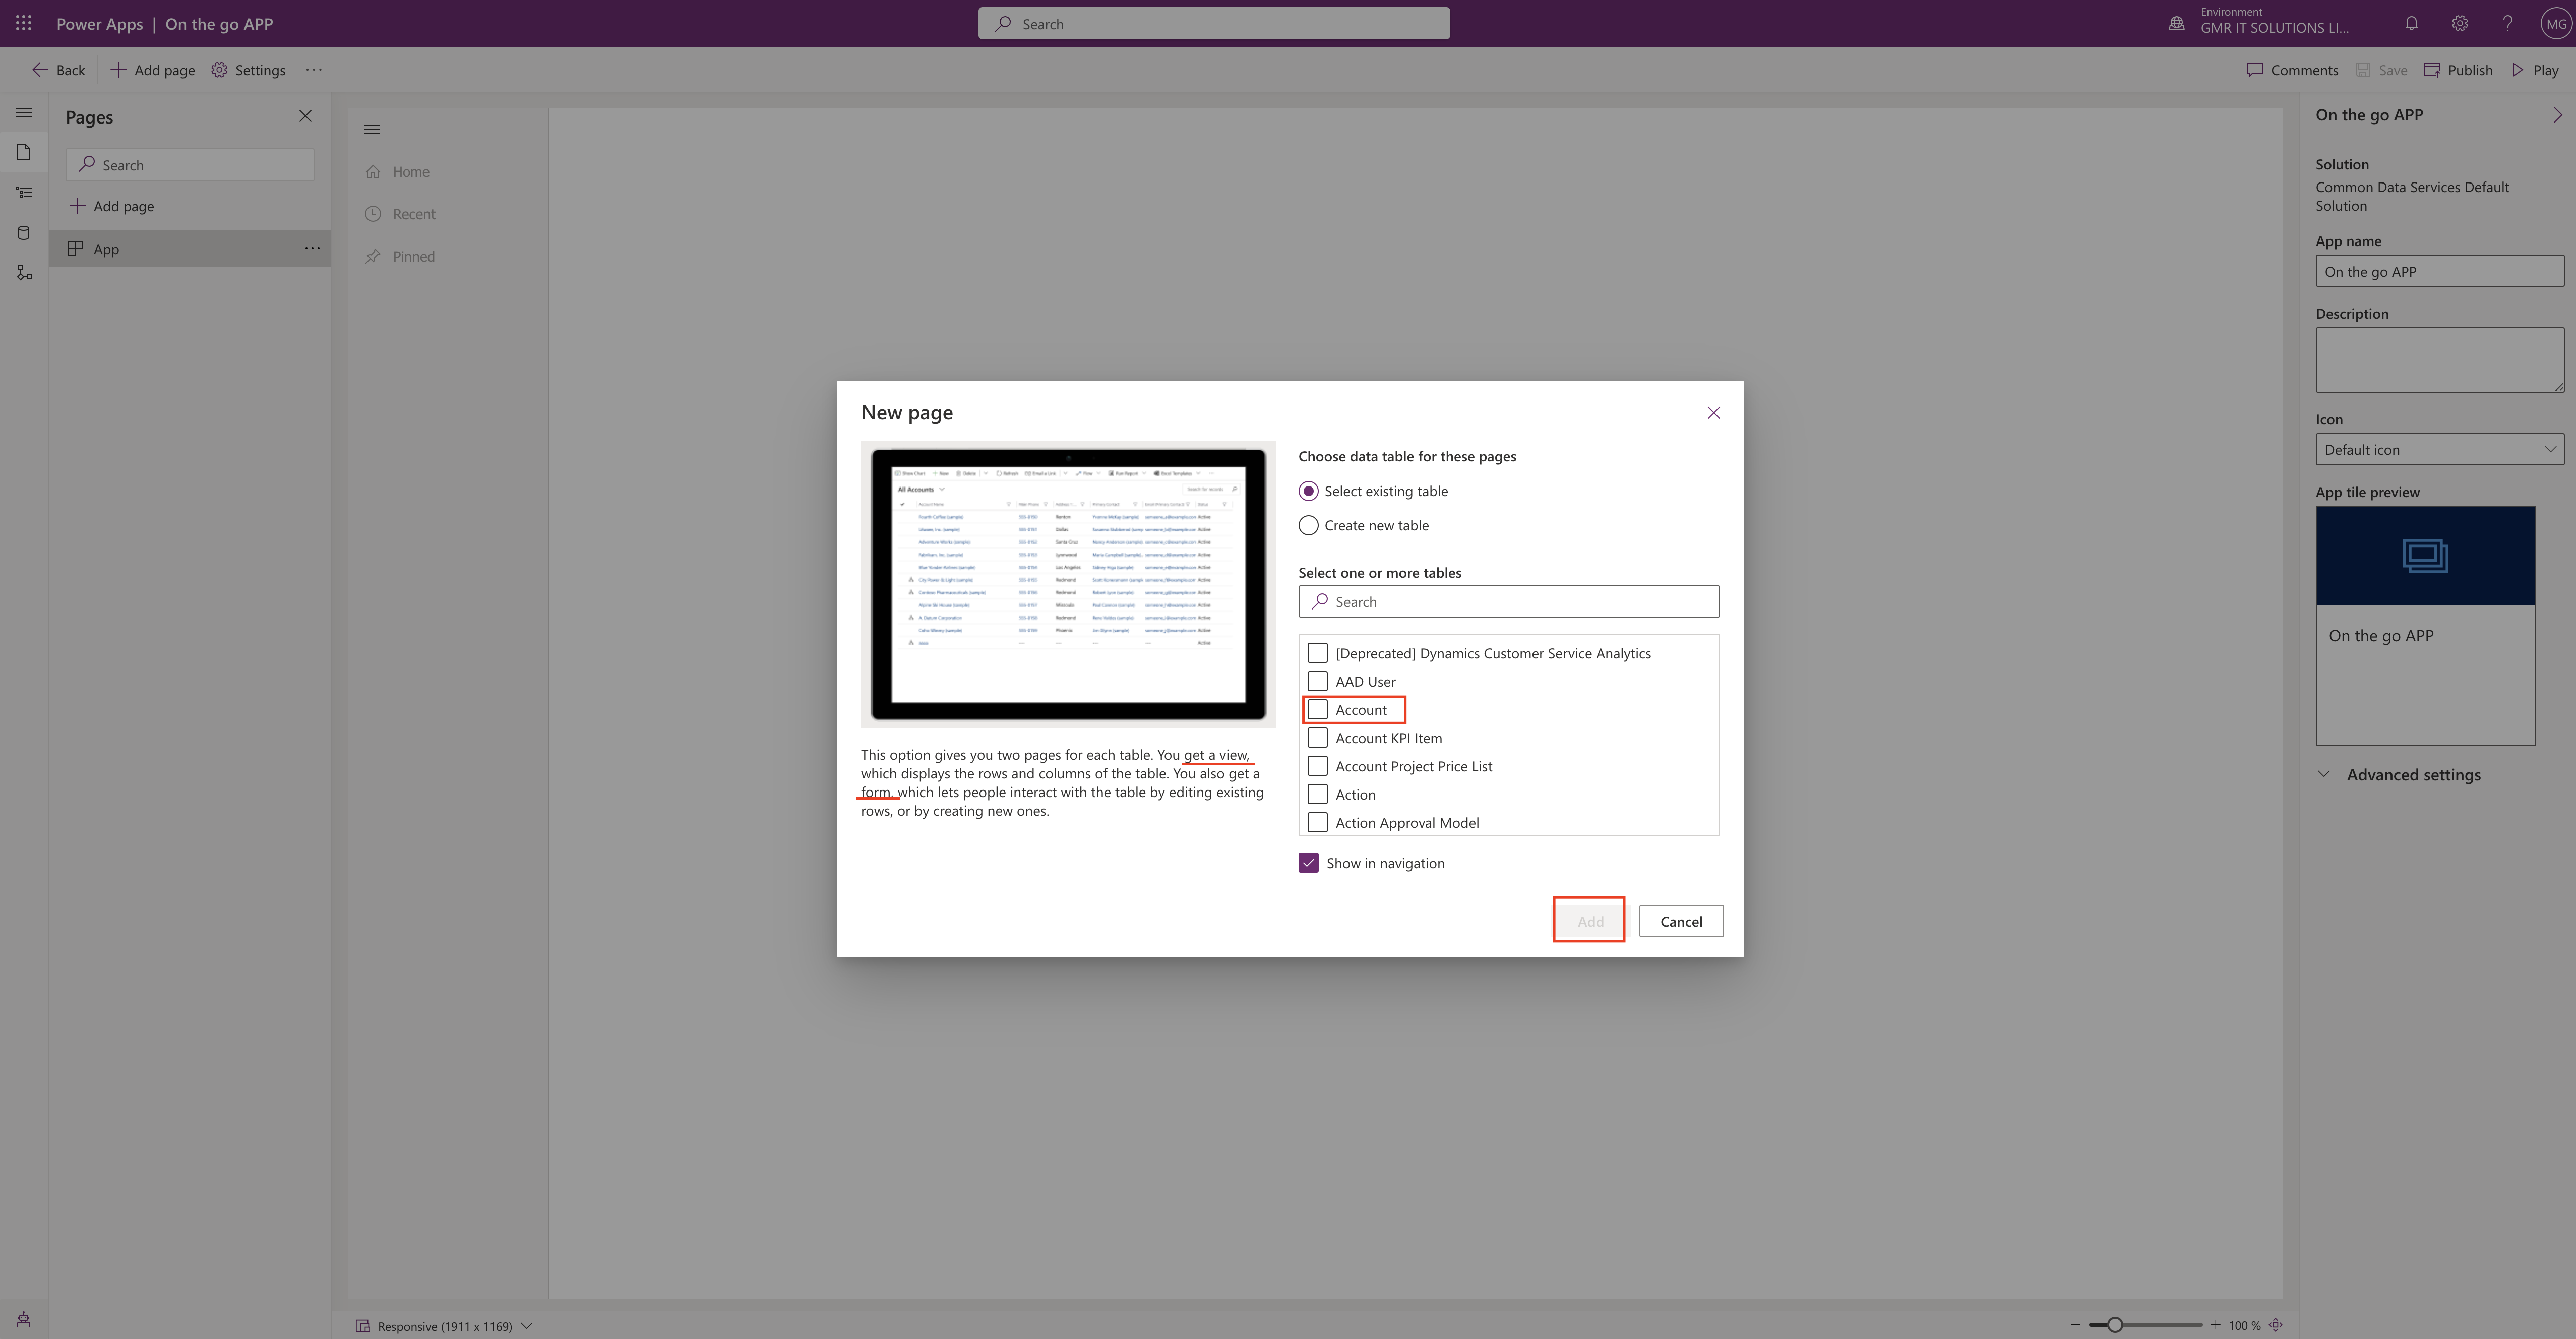
New screen will be displayed which will give two pages for each table.

1. You get a view, which displays the rows and columns of the table.

2. You also get a form, which lets people interact with the table by editing existing rows, or by creating new ones.

Select the “Account” from the screen and click “ADD”. (Refer to the above screenshot).

Then new model driven app will be created in design mode:
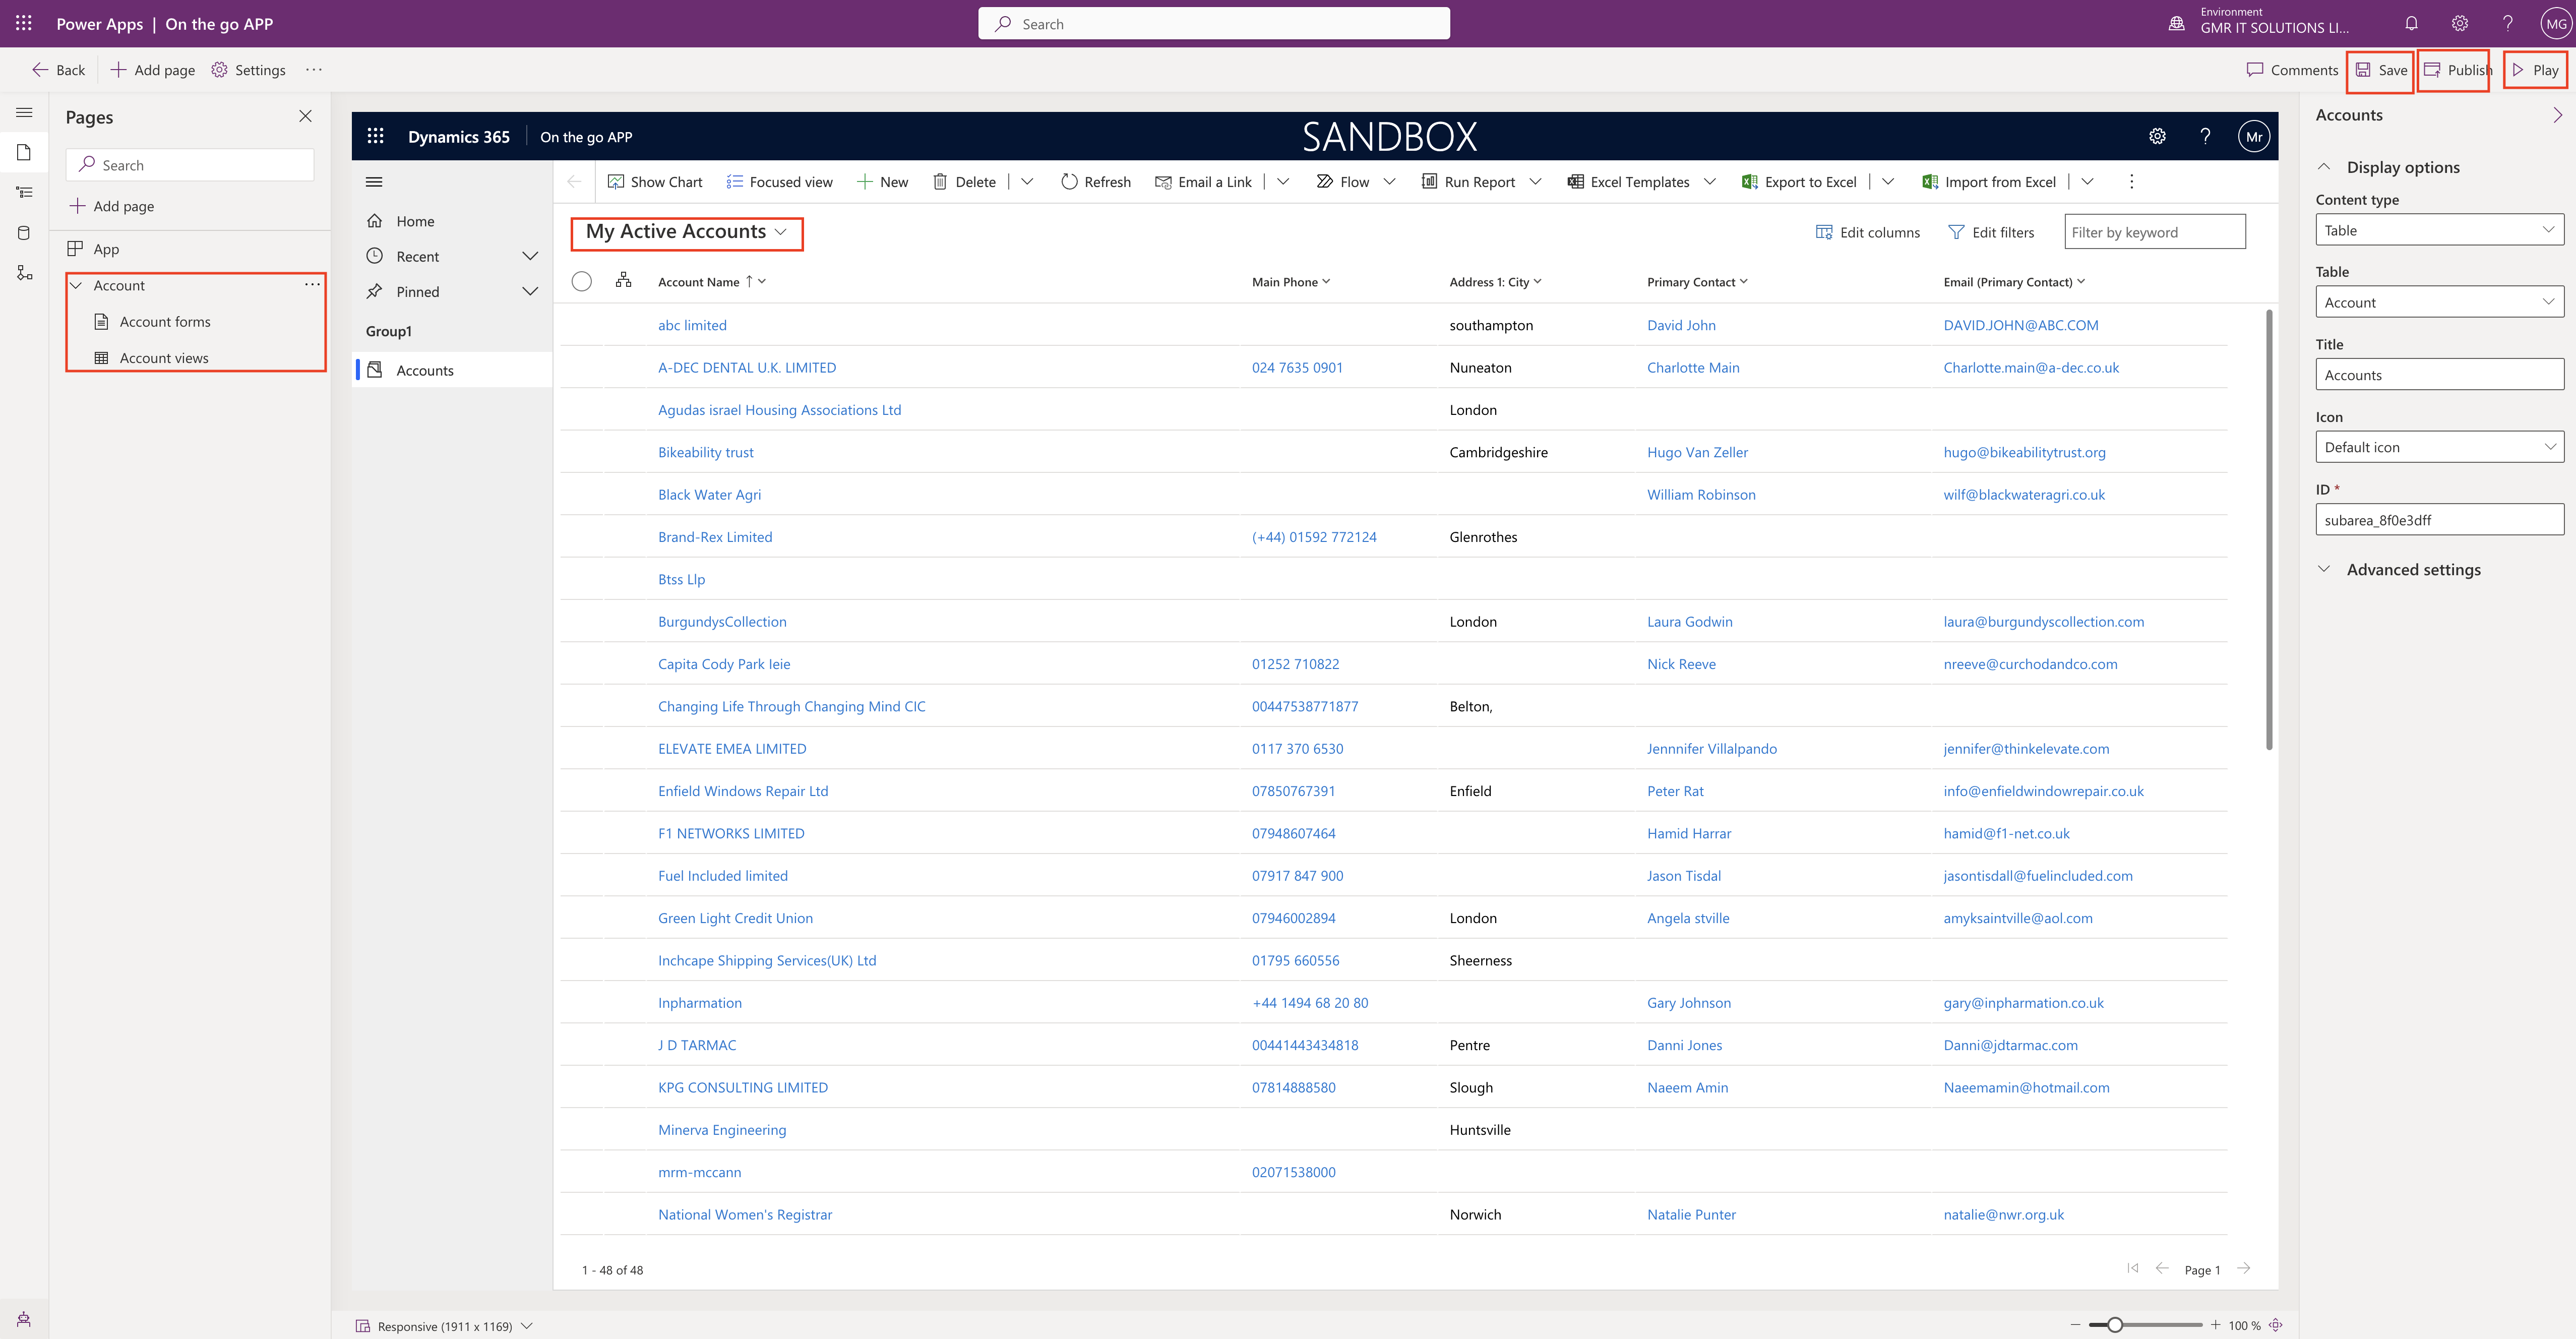
Now you can see the two pages on the left hand side of the model driven app.

1. Account forms

2. Account views

You can change the view from the ” My Active Accounts” DROPDOWN.

Click on Save, and the Publish and then PLAY.

Then MODEL DRIVEN APP will be in play mode.

You can create a new account by clicking on the +NEW button on the site map.

Thats it for today.

I hope this helps.

MallaReddy(@UK365GUY)
#365BlogPostsin365Days

Share this:

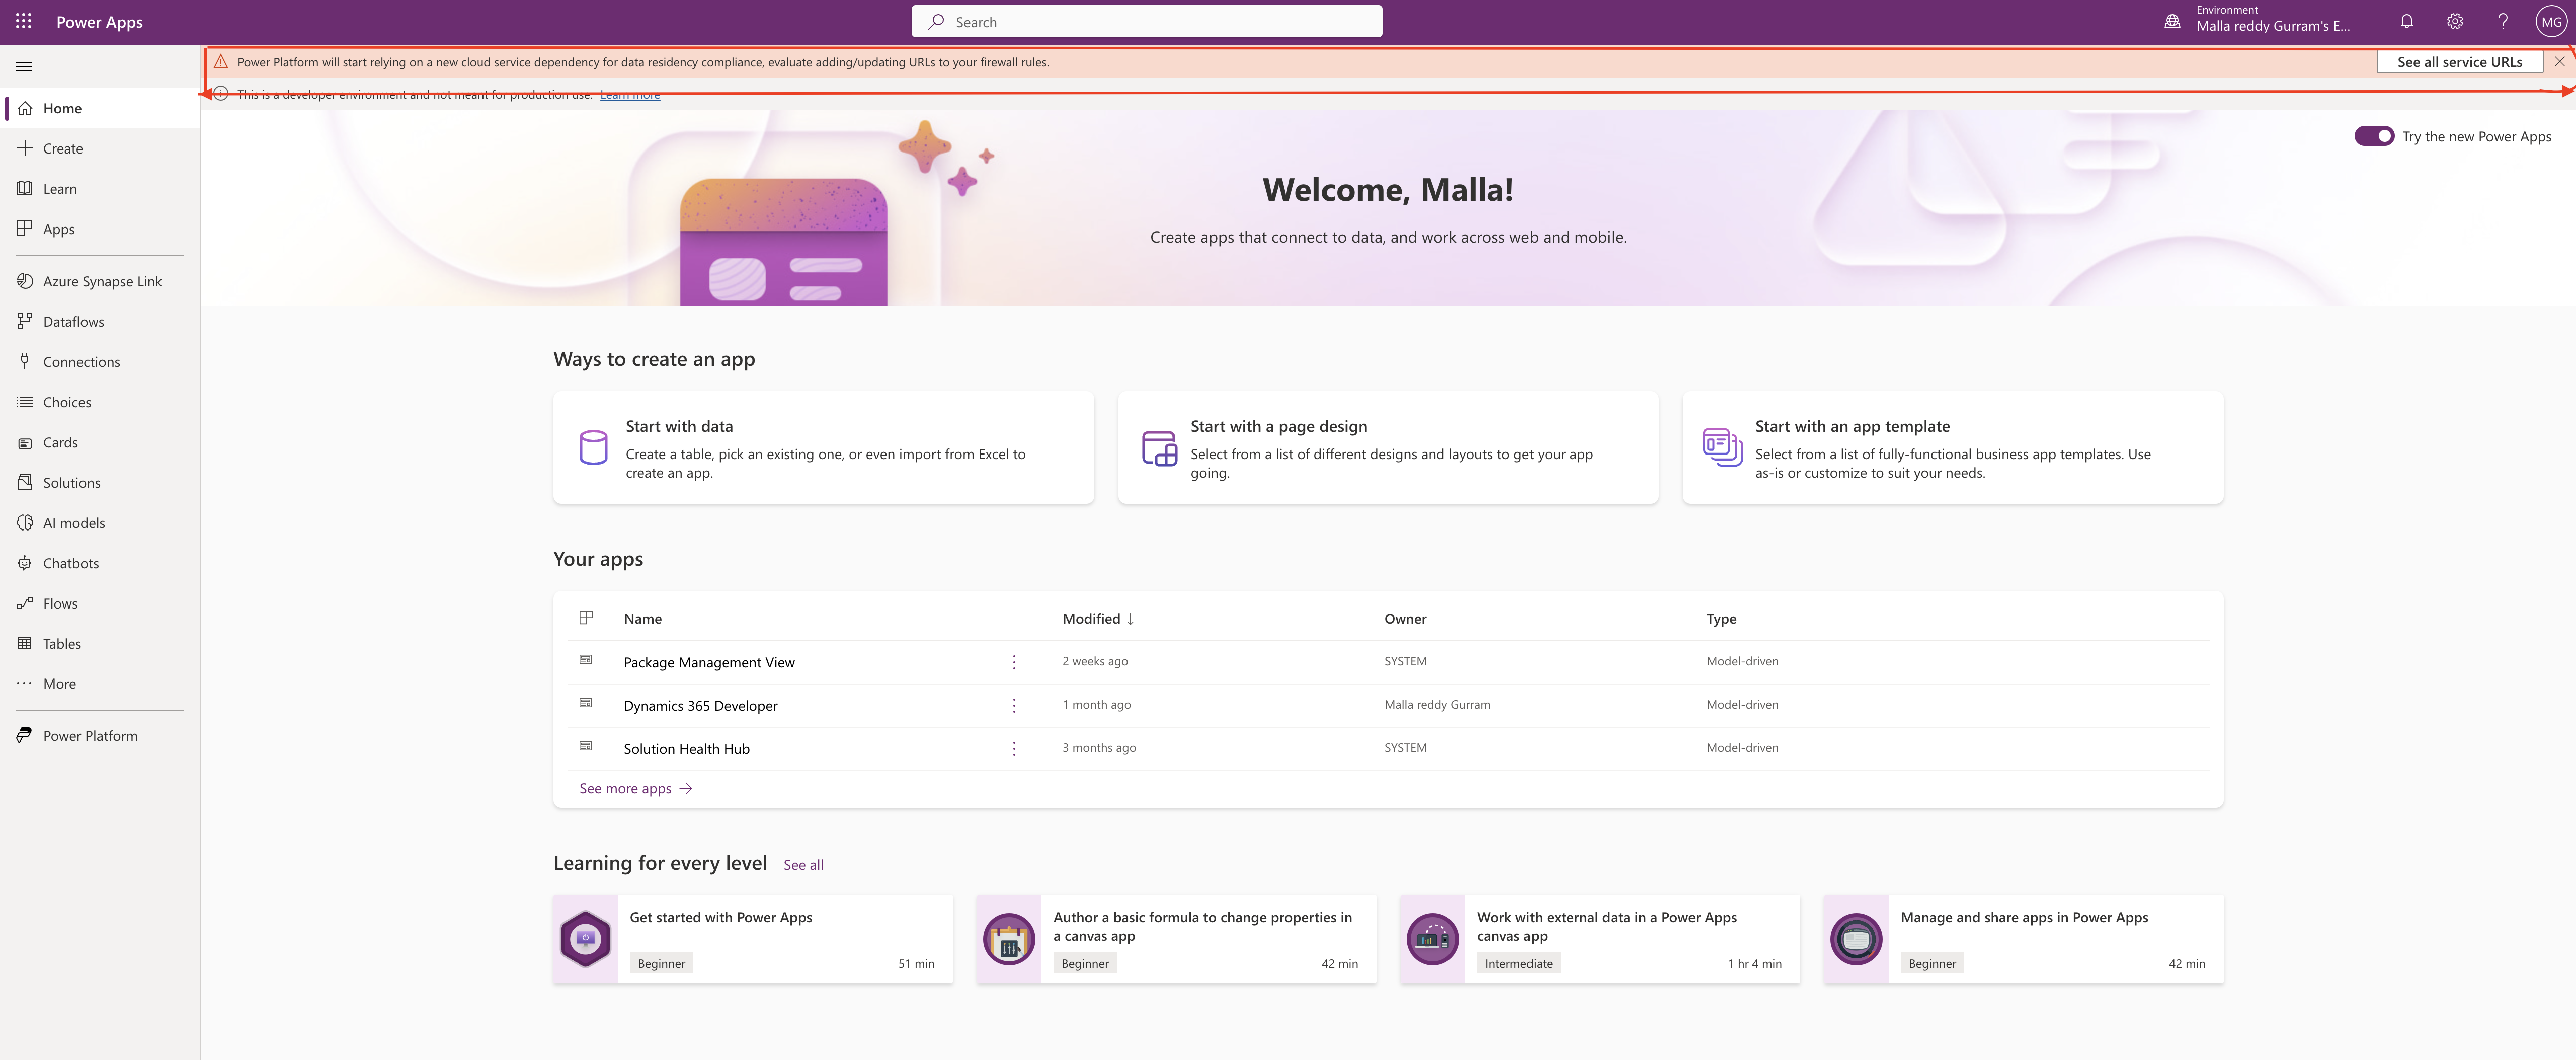
Resolve Power Platform relying on new cloud service dependency for data residency compliance by adding updating URLs to your firewall rules

Hello Everyone,

Today i am going to share how to resolve the Power Platform relying on a new cloud service dependency for data residency compliance, evaluate adding/updating URLs to your firewall rules.

In order to reslove any future login issues, we need to add the URLs to the allow list to ensure communication through firewall and other security issues.

Suppose you can’t access a service or specific URLs failed to load, a proxy or firewall might be configured to prevent you from accessing server resources.

You need to review your proxy settings and add the URLs to the allow lists according to your service requirement.

Also URLs for Dynamics 365 Services:

If you are accessing the Dynamics 365 Services then you need to add URLs to allow list to use ALL Dynamics 365 Apps like Dynamics 365 Sales, Dynamics 365 Customerr Service, Dynamics 365 Field Service, and Dynamics 365 Marketing.

Similarly IP addresses required for public or government clouds are available from microsoft doc,link for microsoft doc’s below.

For more information about the URLs to be added to allow list from Here

Thats it for today.
Malla Reddy(@UK365GUY)
#365BlogPostsin365Days
Share this:

New device picker(Preview) for Canvas App

Hello Everyone,

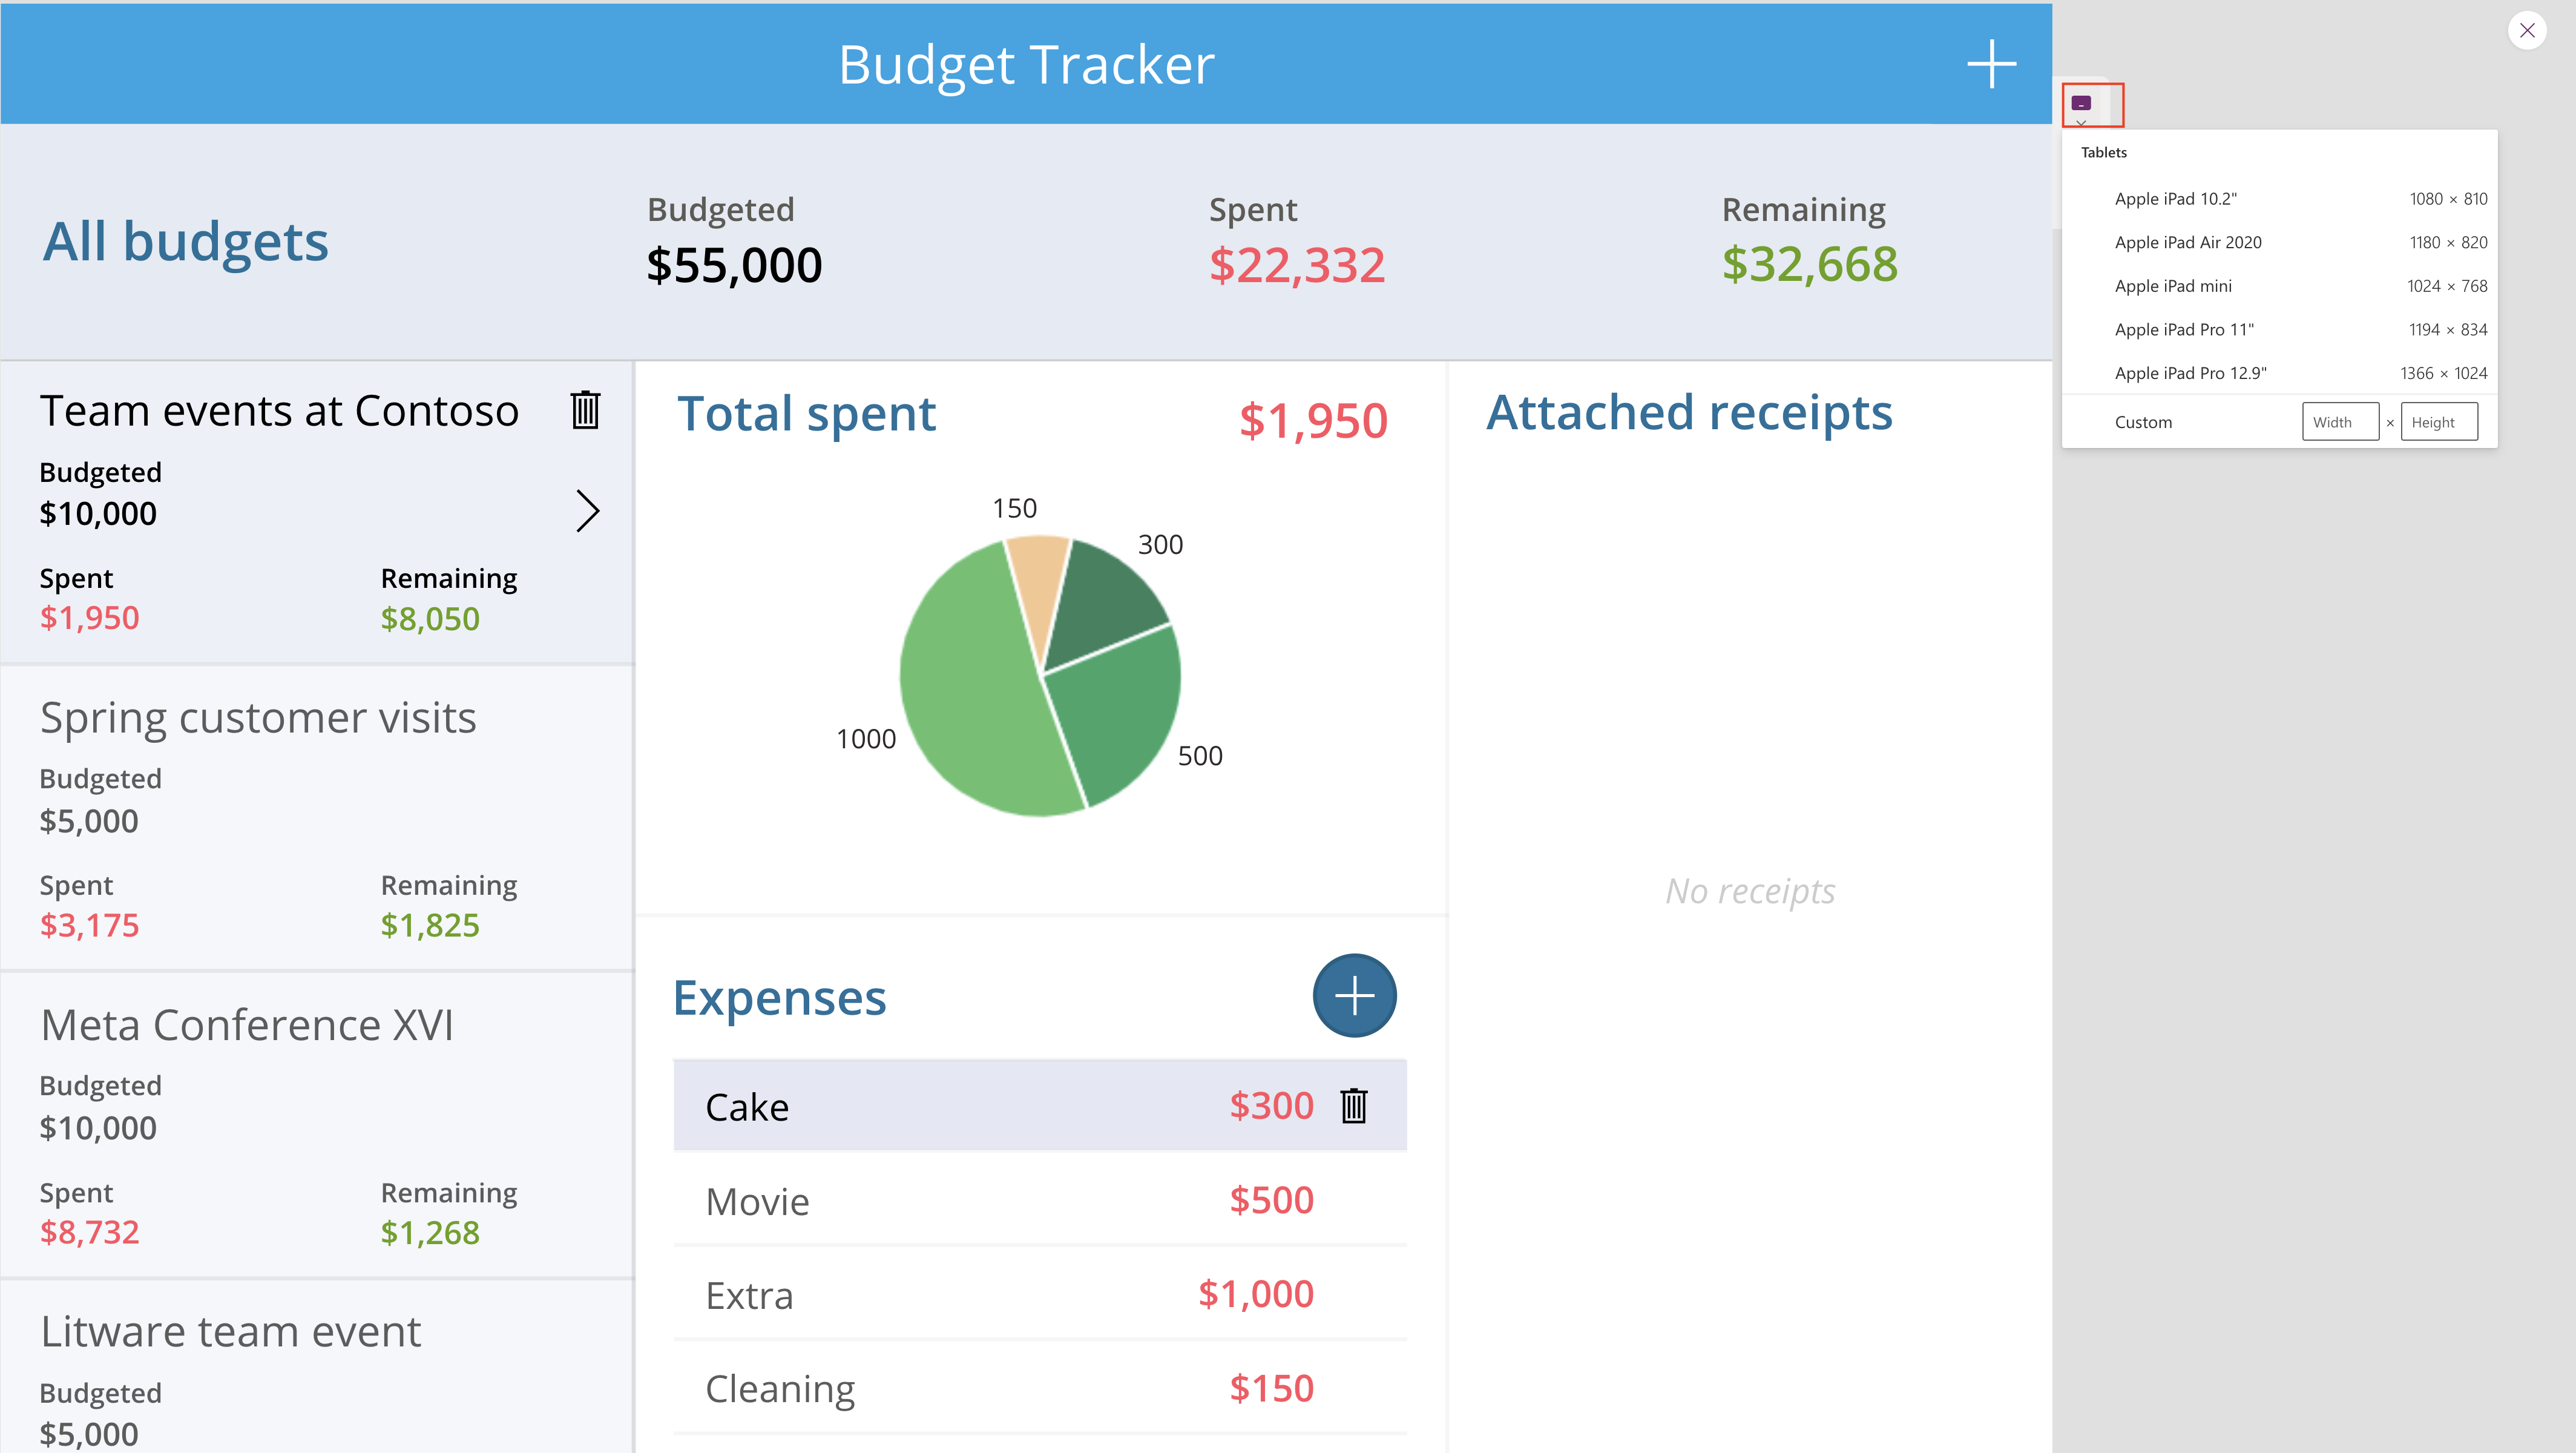
Today i am going to share new preview feature calked new device picker for canvas app.

Lets gets started.

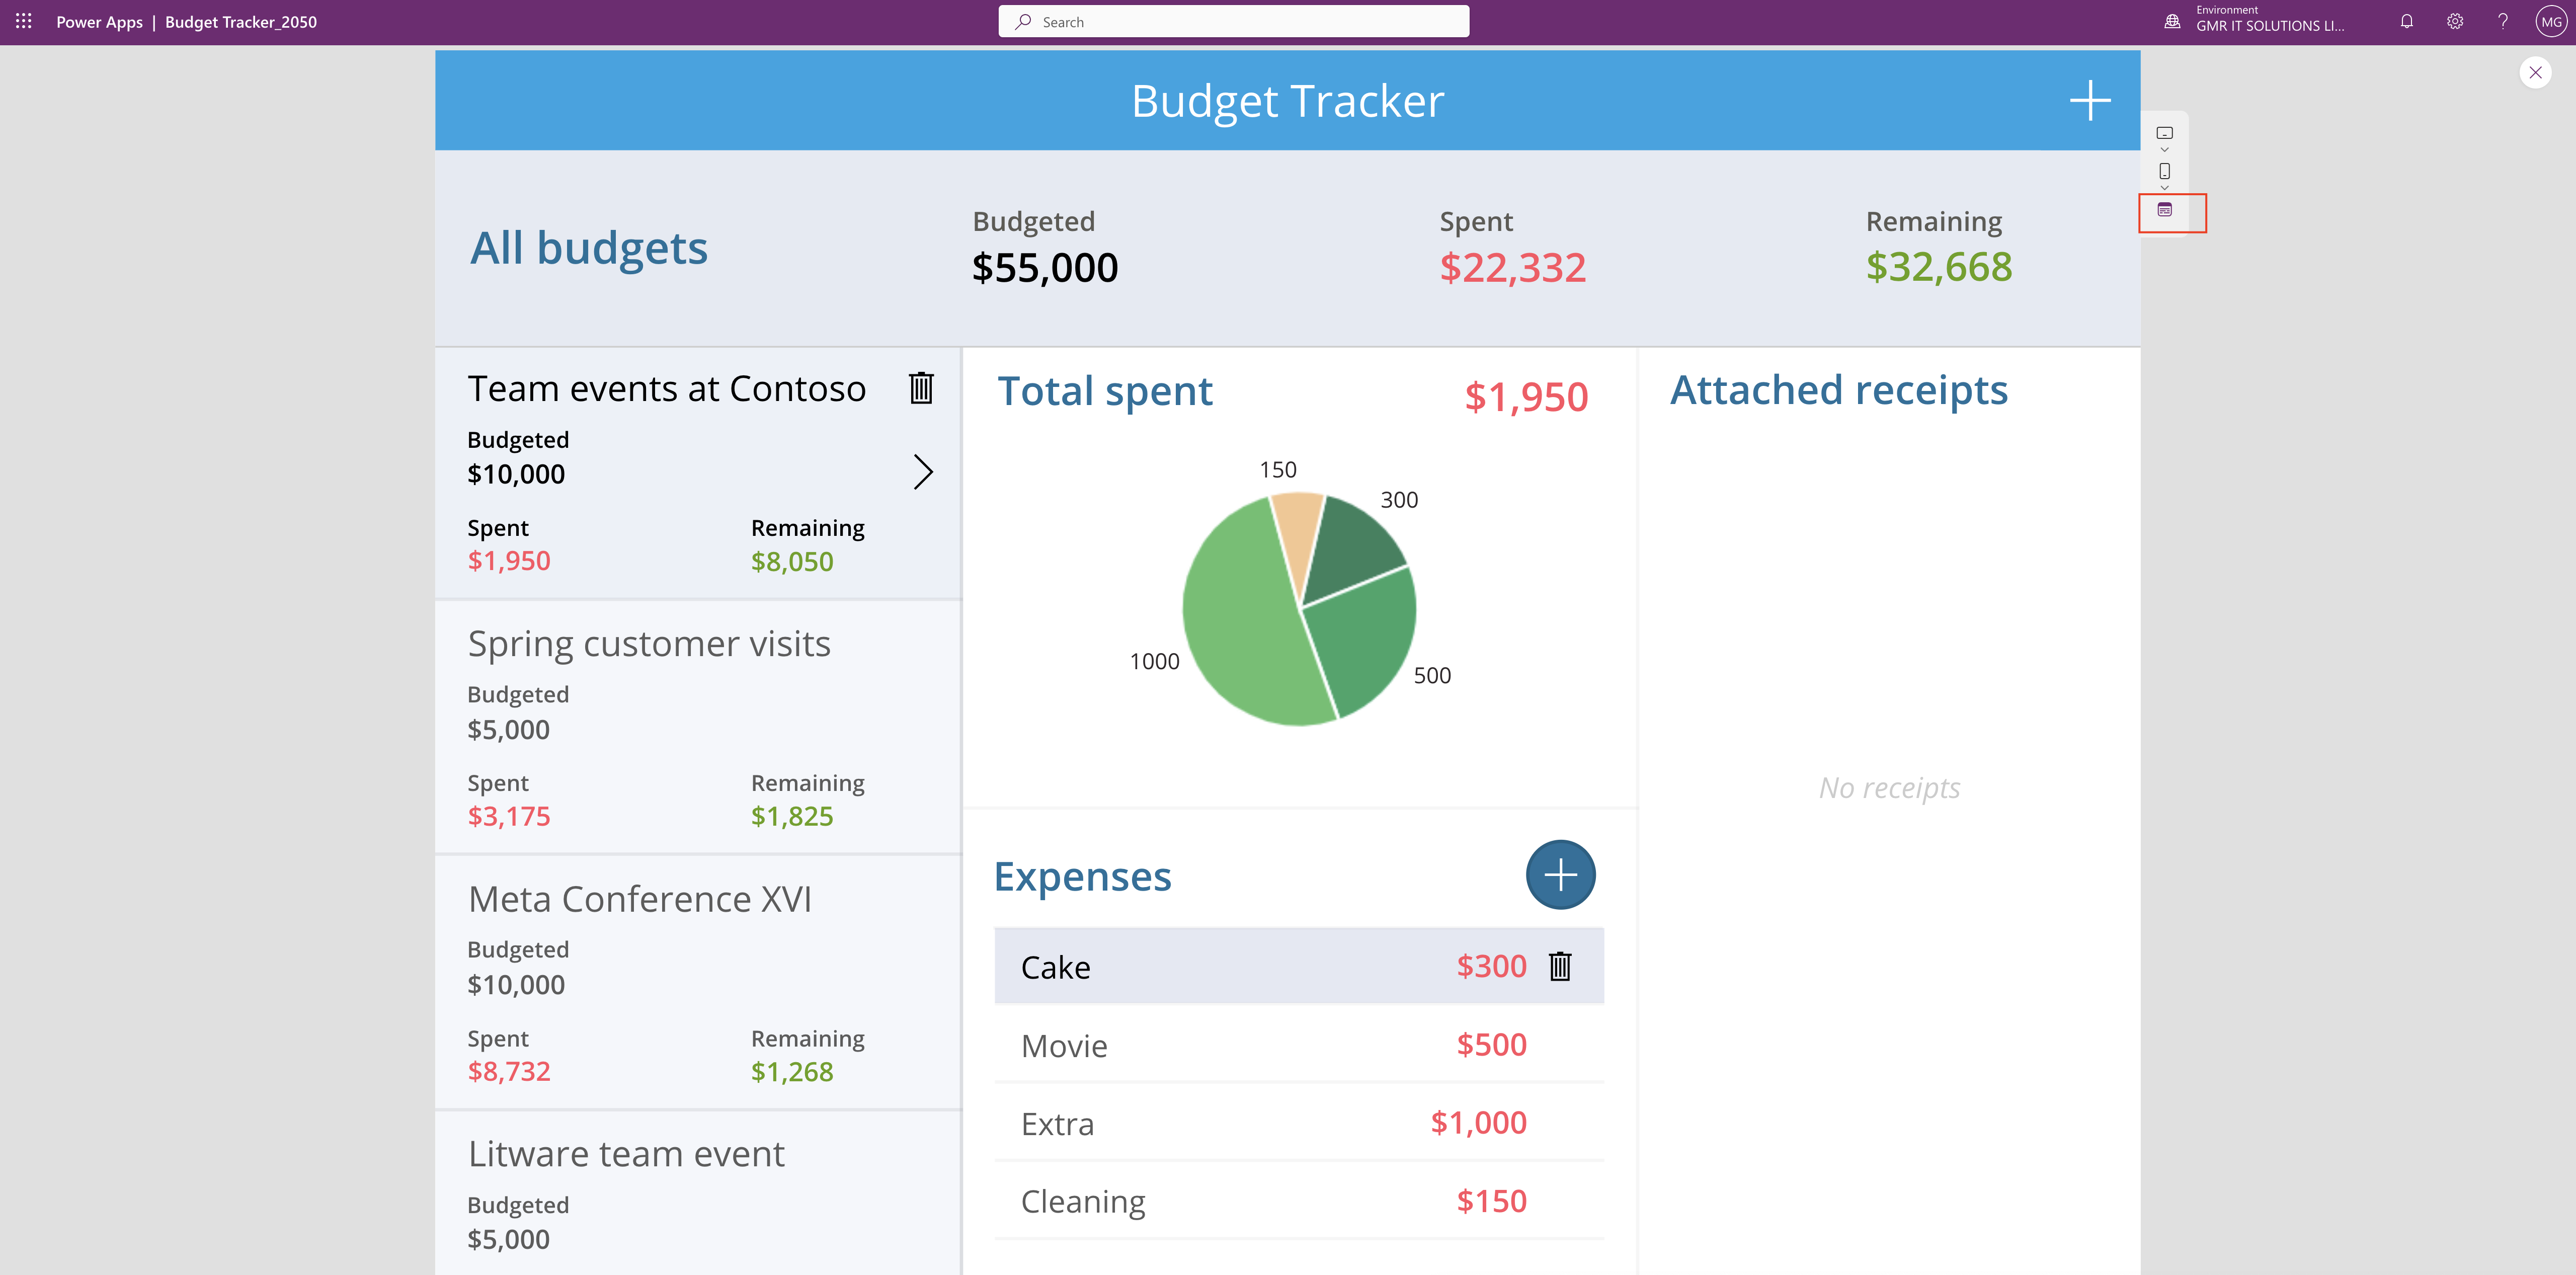
Canvas App can work on desktop and or the mobile too. checking app responsiveness has been a challenge that required you to either resize your web browser window to approximate a mobile device or crack open dev tools to try out certain device sizes.

So now microsoft release new responsive device picker allows to check the look of the app in multiple devices view sizes either it is on the web or table or mobile.

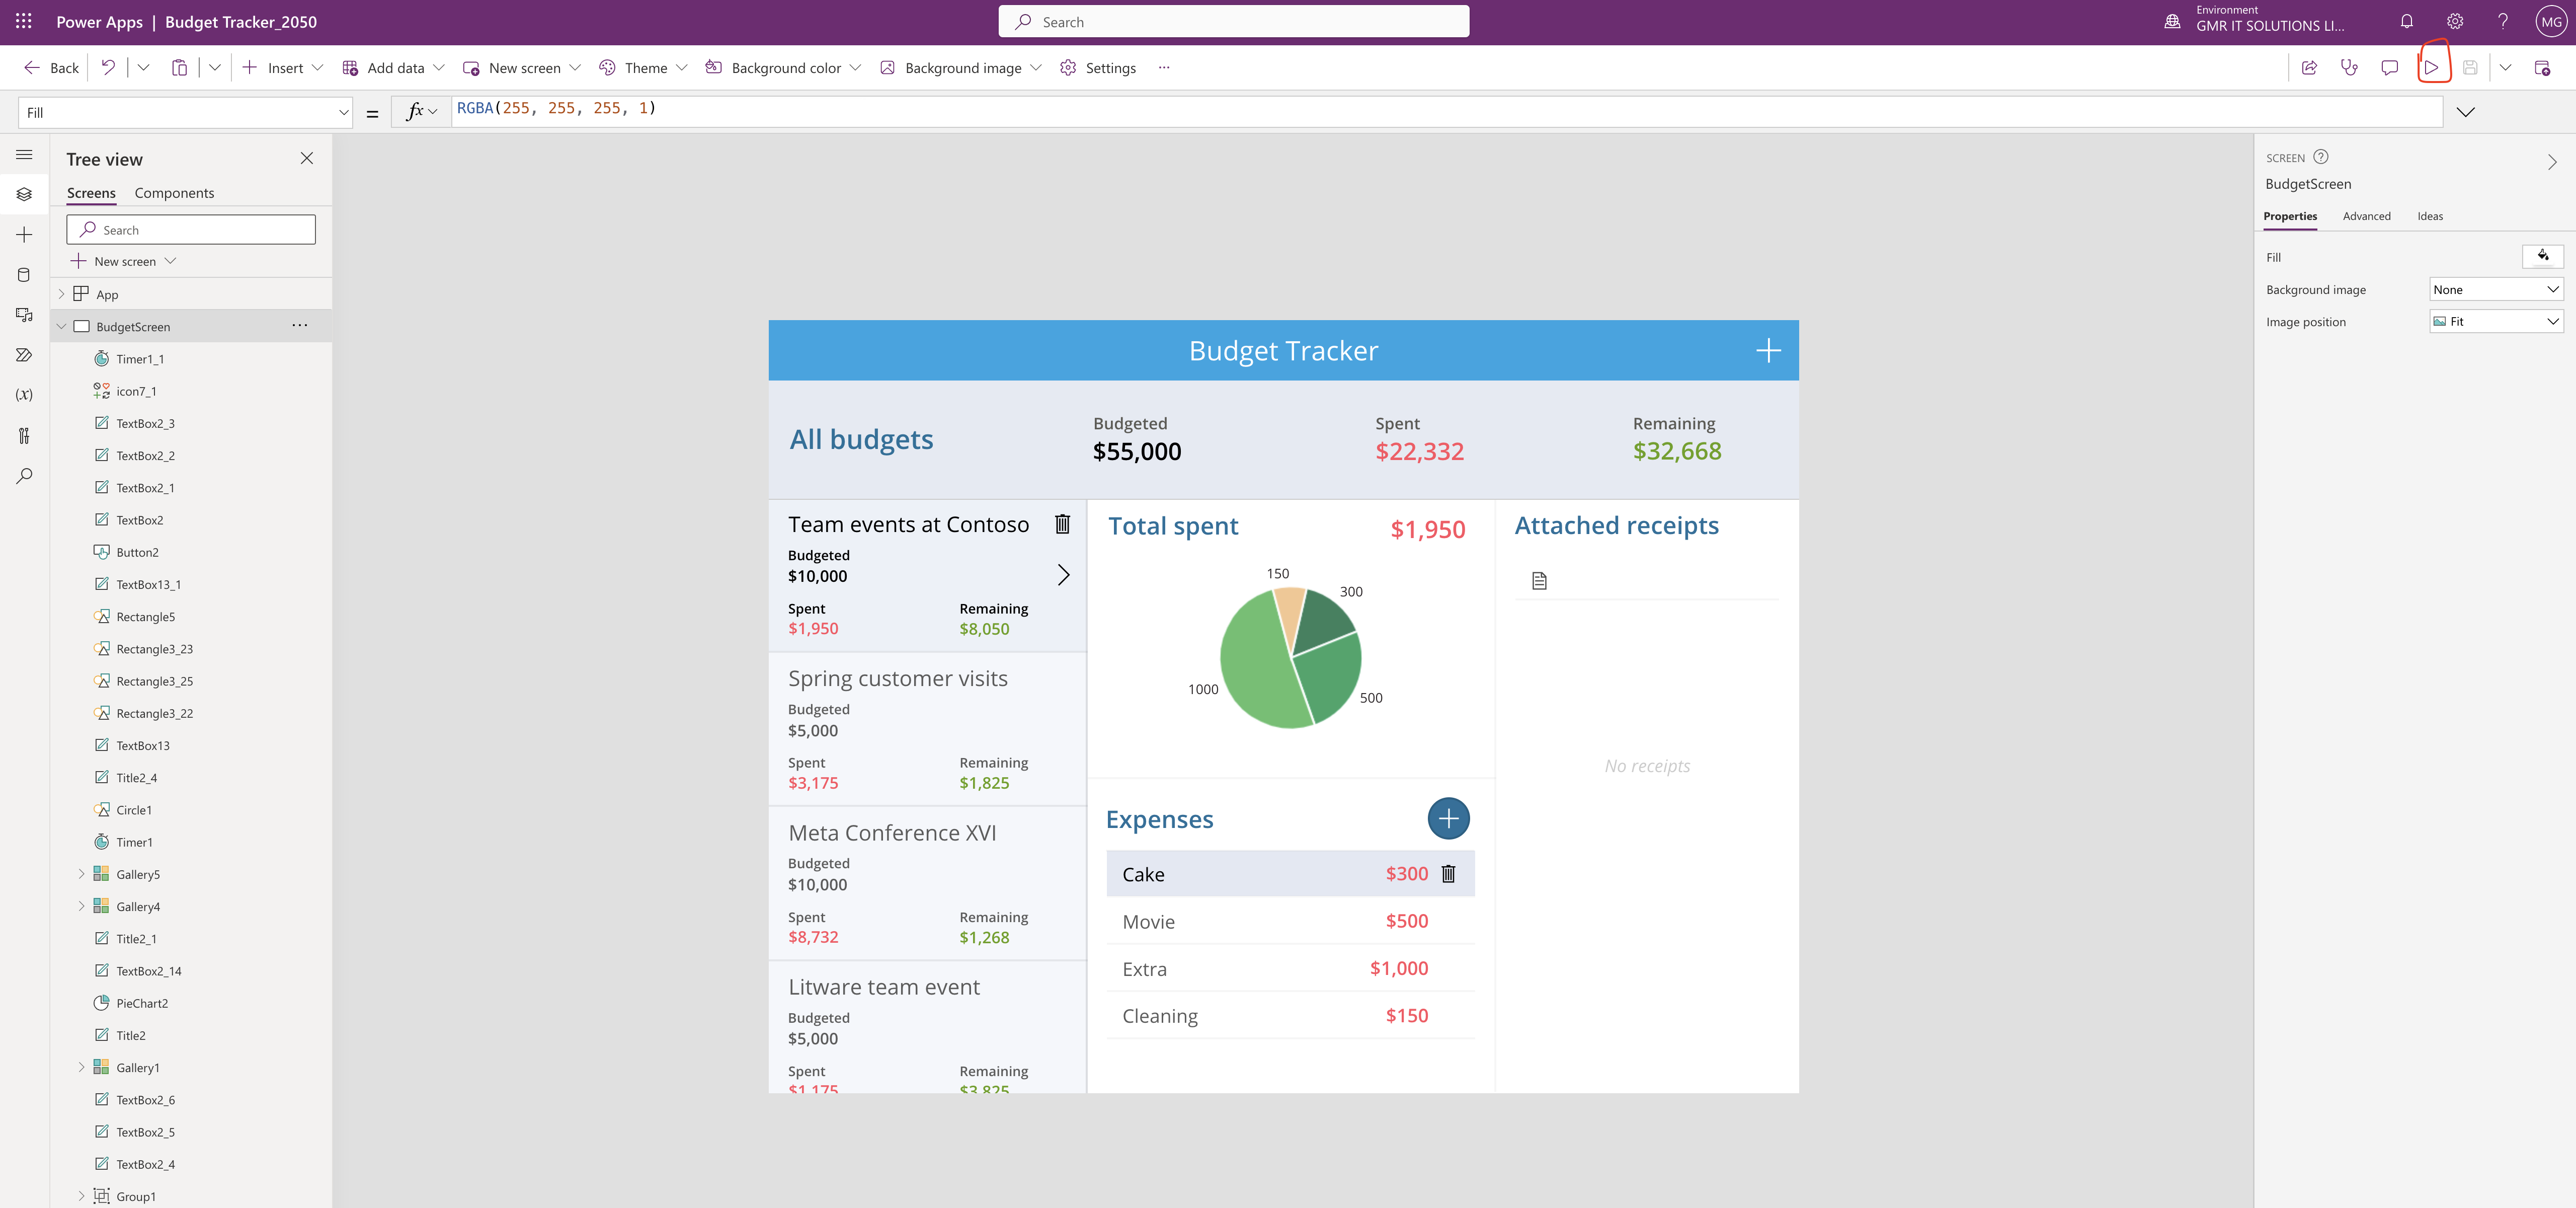
In order to see this feature open your canvas app and click play see below screenshot

Tablets sizes:

When used in combination with auto layout containers or app authoring techniques, we can see how the content of your app will reflow as you switch through the different device types.

Moble sizes:

Final Browser Size:

I hope this helps.

Malla Reddy(@UK365GUY)
#365BlogPostsin365Days
Share this:

How to share Canvas App or Model Driven App to co workers and request premium license from Maker Portal

Hello Everyone,

Today i am going to share how to share canvas app to other users in your organisation and how to request premium license.

Lets gets started.

Login into www.make.powerapps.com

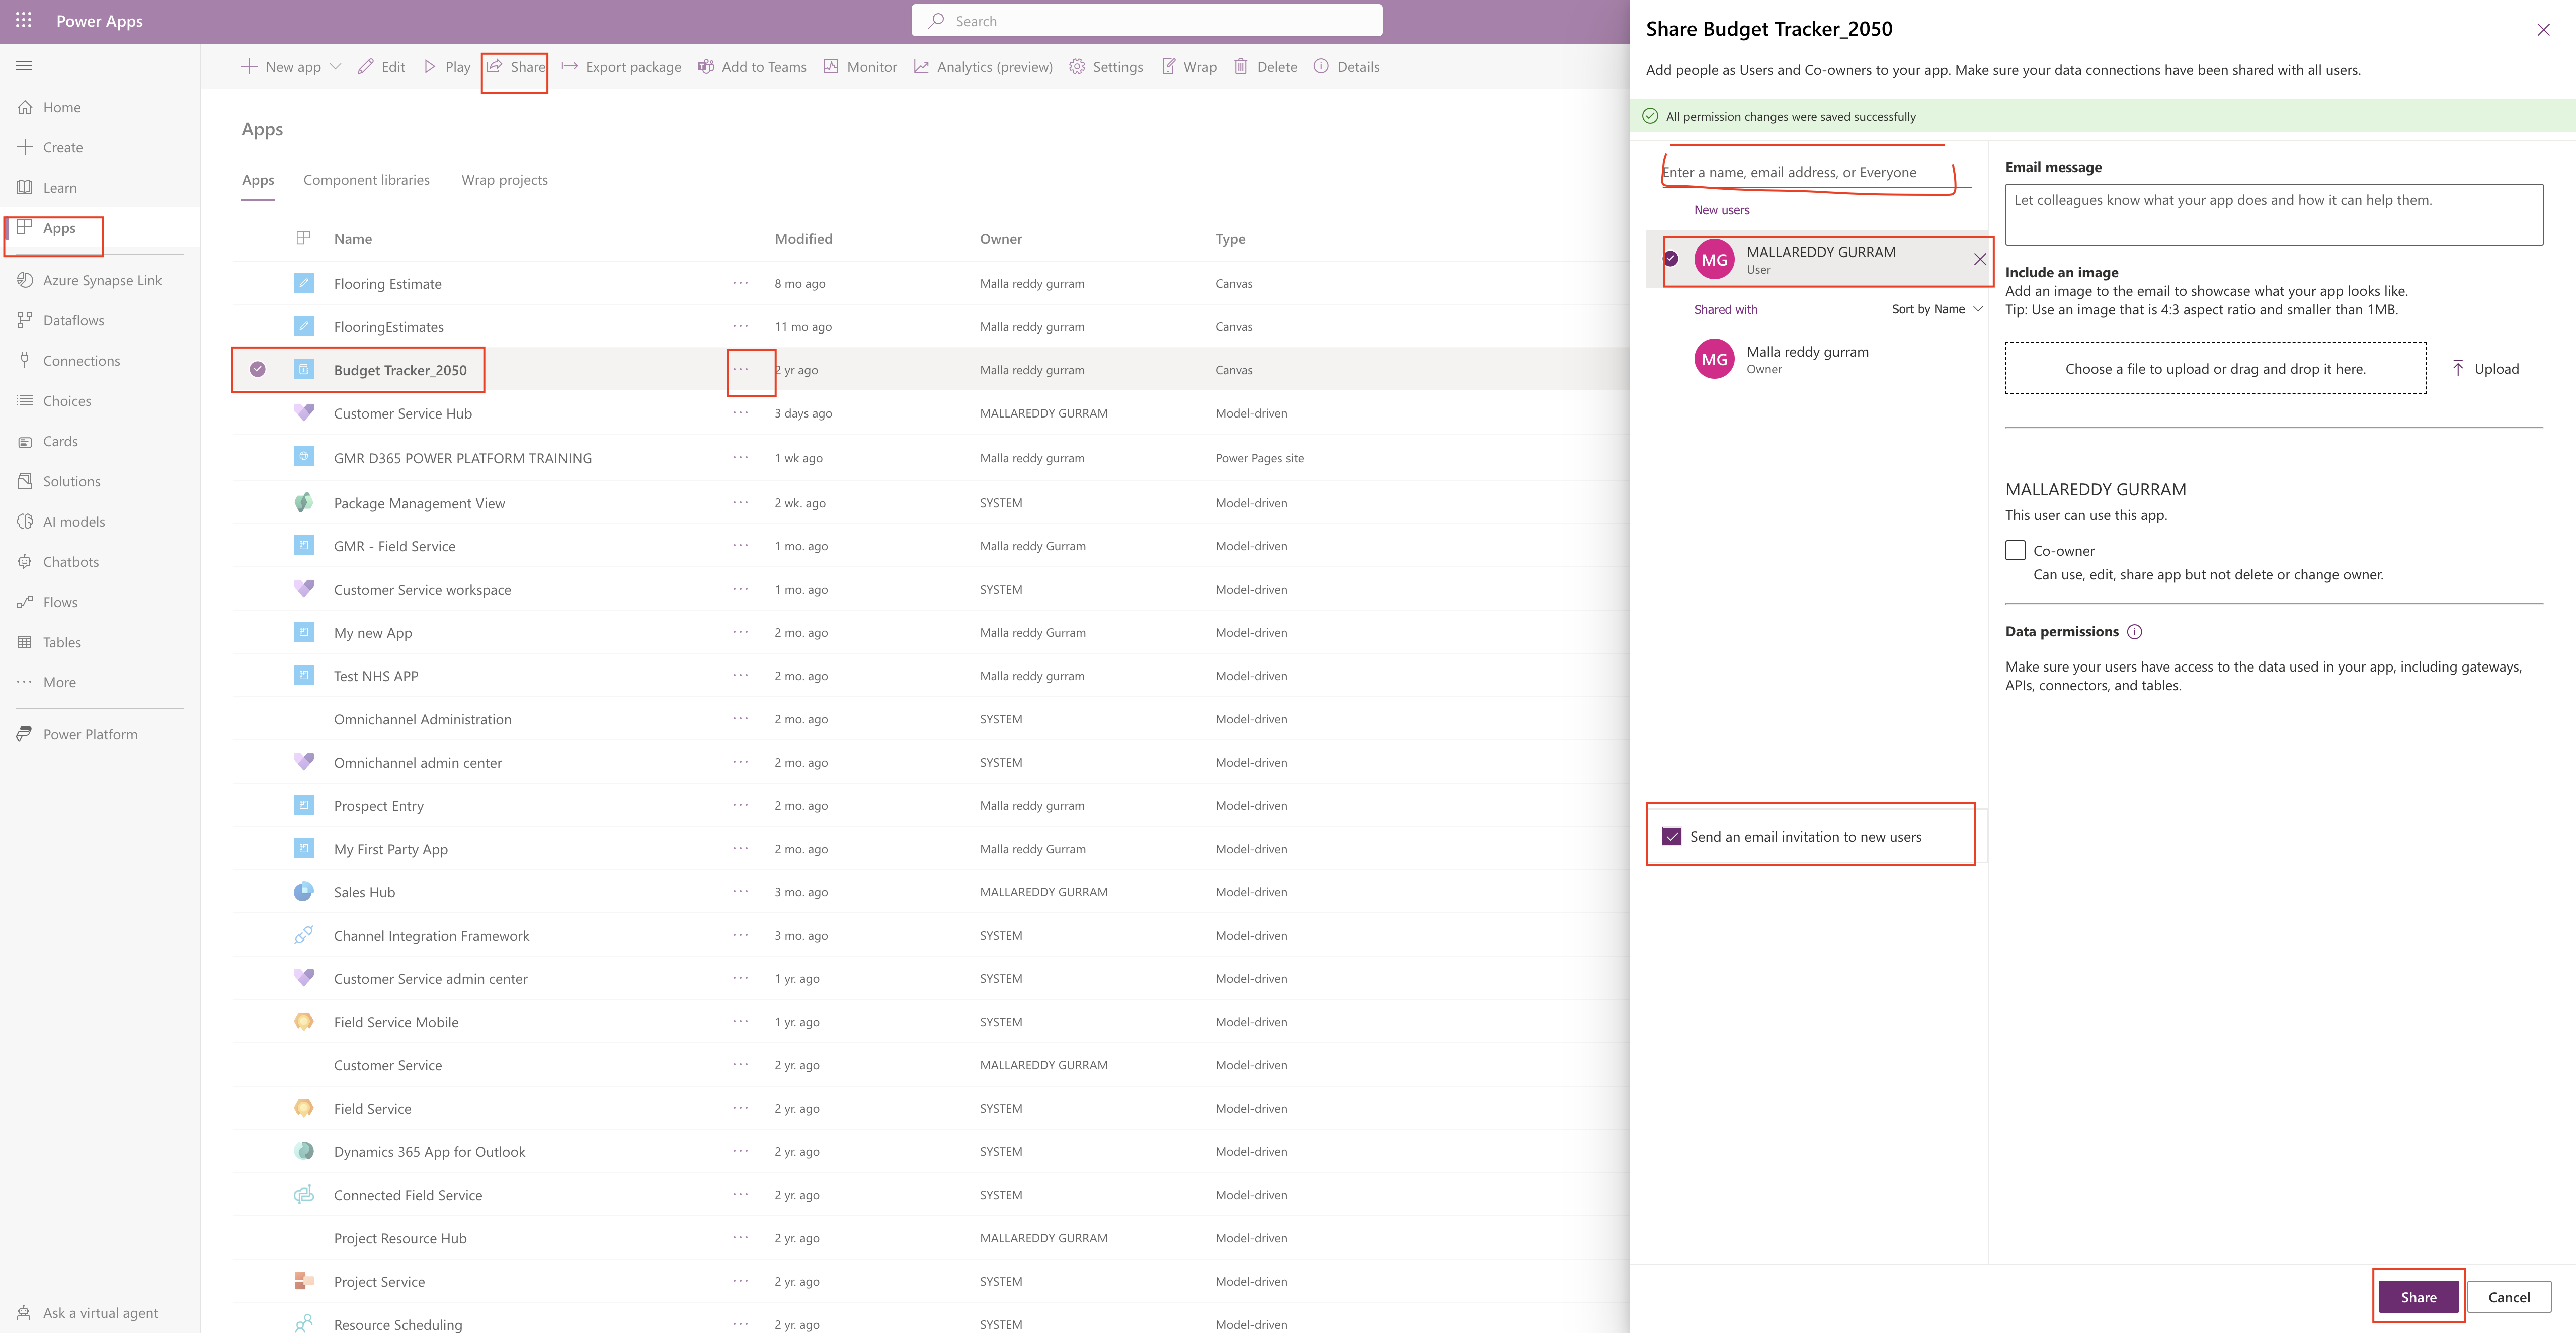
Click on the Apps on the left side of the menu.

Select the canvas app you want to share with the user and then a new window will appear on right hand side of the screen.

In the search bar search for name of the user you would like to share this canvas app and select the user.

You can embed a email message while sharing this canvas app all about.

Also you can embed nice image to show case the canvas app in the email too.

You can also have an option of making the user as co owner and then finally share the app.

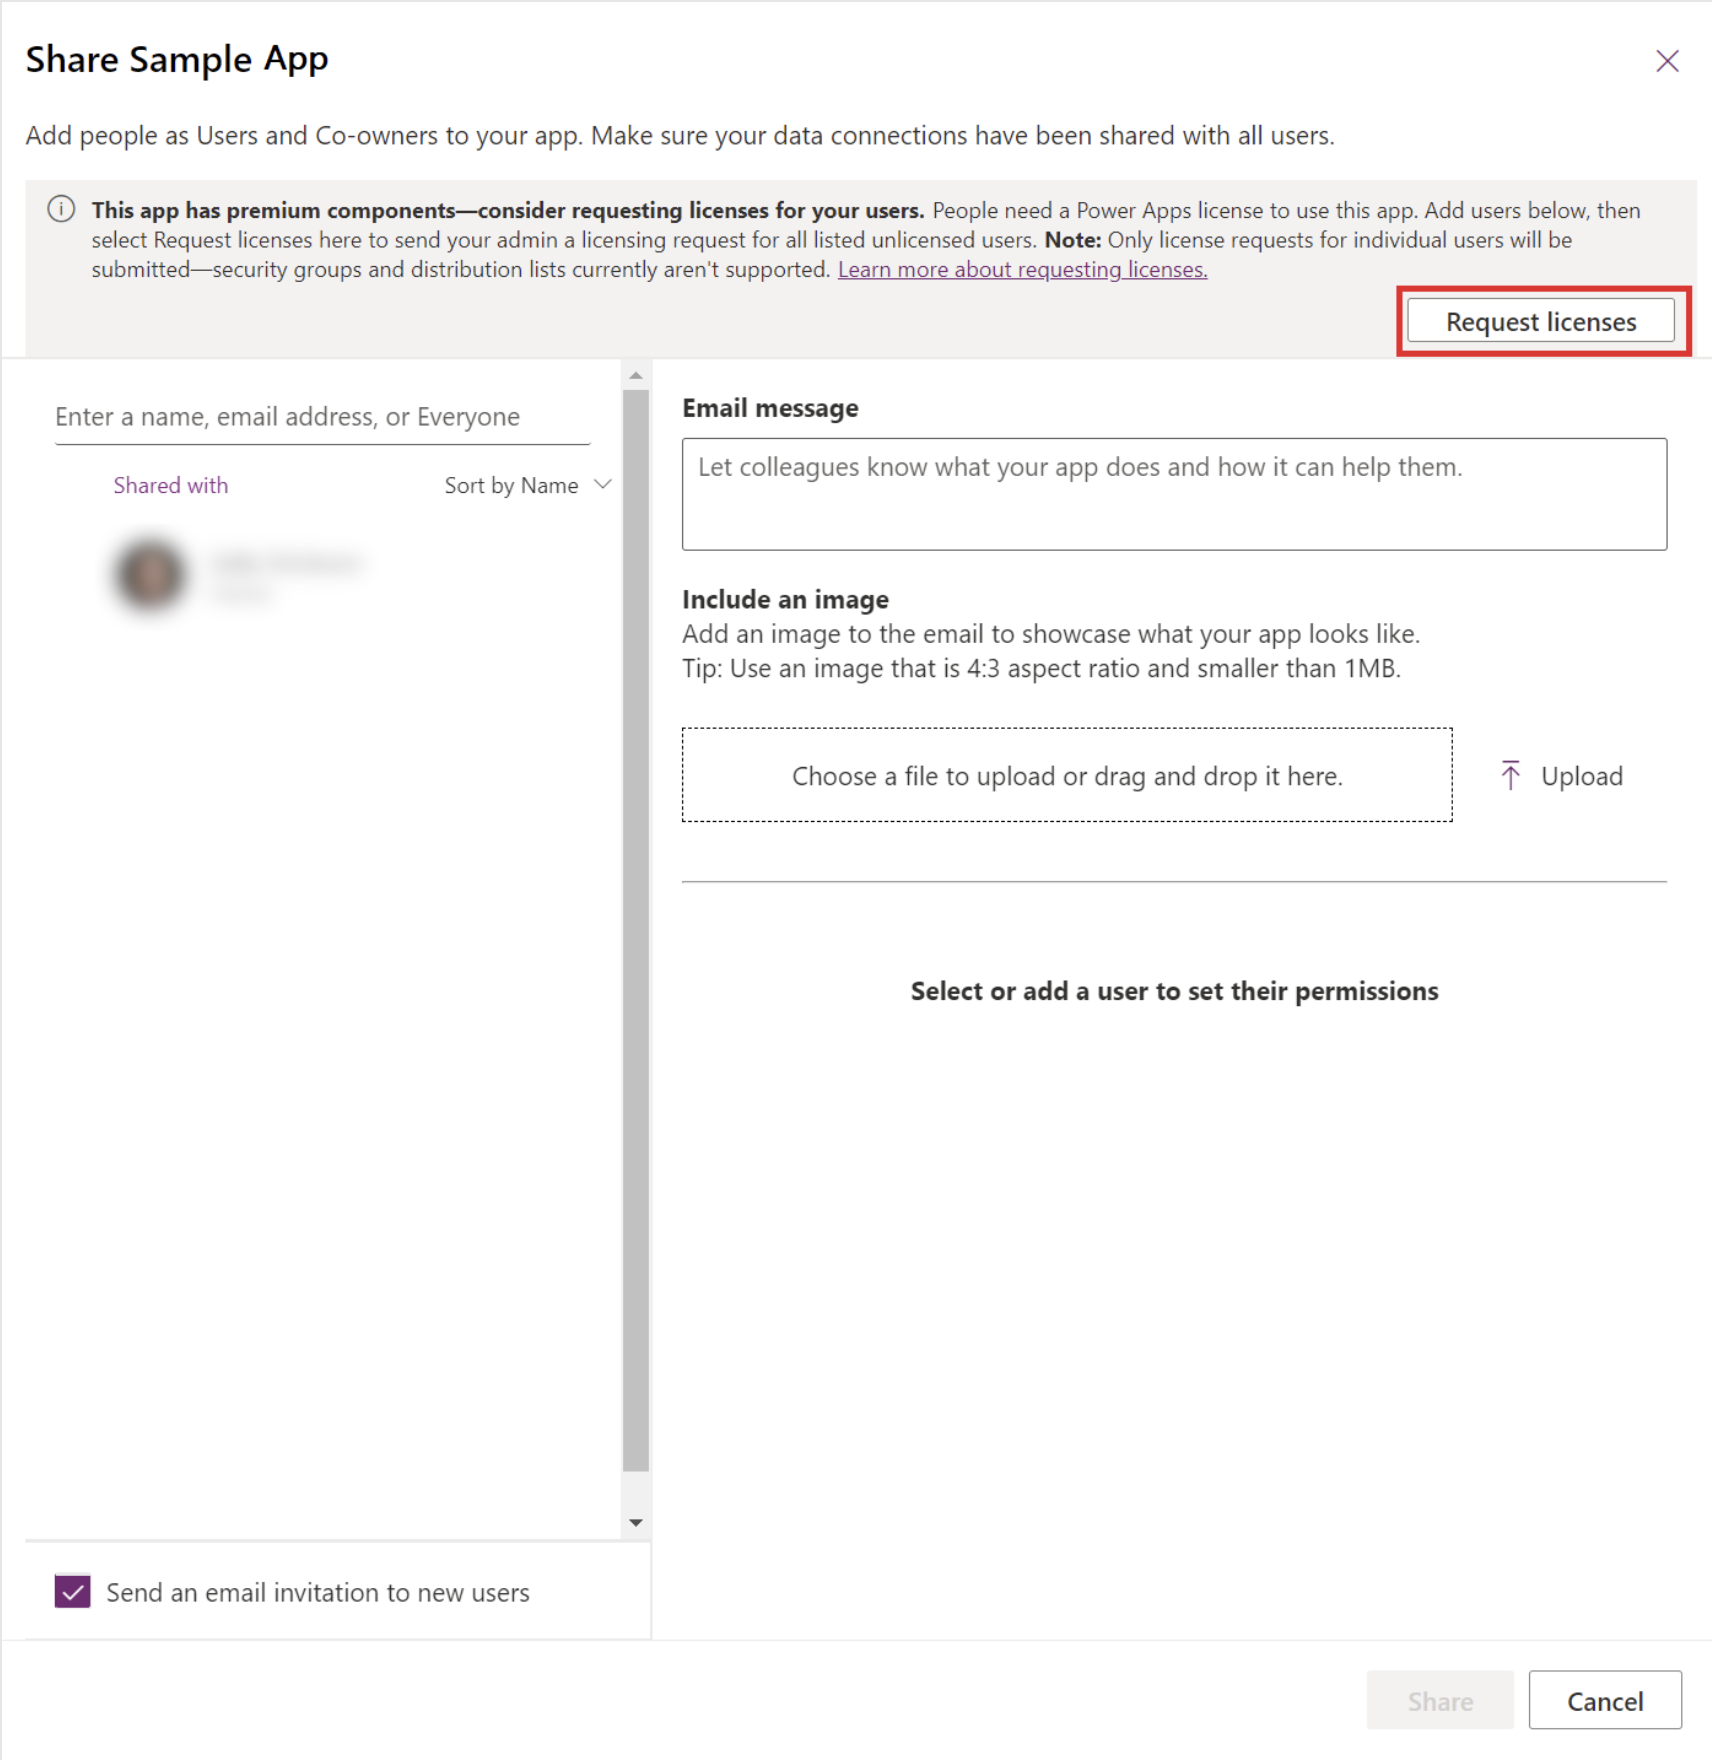
Image reference Microsoft Docs

Note: If your canvas app uses as premium components then the screen will prompt you to request a premium license for the user refer to the above screen shot.

Then the admin will receive a notification about the license request on Microsoft 365 Admin Center.

So admin can look at the requests and they can either approve or reject, they can configure custom license request process too from the Microsoft 365 Admin Center.

Thats it for today.

I hope this helps
Malla Reddy(@UK365GUY)
#365BlogPostsin365Days

Share this:

Associate records and auto update when a record already exists using Power Automate

Hello Everyone,

Today i am going to share use case scenario:

Create Operational cost records and associate with a project record when project is already created.

Solution: Power Automate Flow:

1. Manually trigger a flow.

2. List Projects

3. Apply to each.

Select an output from previous steps – outputs(‘List_Projects’)?[‘body/value’]

4. List Master Operational costs, select the Master Operational Costs (refer to above screenshot).

5. Apply to each 2: select an output from previous steps “value” outputs(‘List_Master_Operational_Costs’)?[‘body/value’]

Add a new row 2

Table name – Operational Costs

Name – Name ( formula: items(‘Apply_to_each_2’)?[‘acg_name’]

Project(projects) – msdyn_projects – items(‘Apply_to_each’)?[‘msdyn_projectid’]

Quantity – Quantity – items(‘Apply_to_each_2’)?[‘acg_quantity’]

Unit Cost = Unit Cost – items(‘Apply_to_each_2’)?[‘acg_unitcost’]

Finally when you run this flow “Operational Costs” records will be created for “Project” record.

I hope this helps.
Malla Reddy(@UK365GUY)
#365BlogPostsin365Days
Share this: