Menu Close

Tag: #uk365guy

{How to} Create work orders in Teams using AI on Dynamics 365 Field Service

Hello Everyone,

Today I am going to share my thoughts on how to create work orders in Teams using AI on Dynamics 365 Field Service(preview).

Let’s get’s started.

Creating work orders in Teams using AI on Dynamics 365 Field Service is a feature that allows frontline workers to create, view and manage work orders within Microsoft 365 applications, including Microsoft Teams.

This is made possible by harnessing the power of generative AI for assisted work order creation. With this feature, users can get assistance for work order creation and scheduling with Copilot in Microsoft Teams.

Here’s a high level overview of how it works:

1. Work Order Creation: Users can create work orders directly within Teams. The AI-based copilot assists by extracting relevant details from conversations and filling in the details of the work order form based on the text.

2. View and Manage: Users can also view and manage these work orders within Teams, making the process seamless and integrated with their daily workflow.

3. Integration: The Teams integration helps find answers and fix issues without leaving the Field Service app. It also lists team members that have previously worked on a work order.

This feature is part of the 2024 wave 1 release plan for Dynamics 365 Field Service and is expected to be available for public preview in August 2024.

It’s designed to save guide on setting up and using this feature, you can refer to the official Microsoft documentation.

That’s it for today.

I hope this helps.

Malla Reddy Gurram(@UK365GUY)
#365blogpostsin365days

Share this:

{How to} Increase control when attaching to data in Dataverse on Customer Insights – Data

Hello Everyone,

Today I am going to share my thoughts on how to increase control when attaching to data in dataverse.

Let’s get’s started.

Certainly! The Microsoft Dataverse connector has undergone significant improvements, granting you more control and flexibility when importing data into customer insights -data. Here are the key enhancements.

1. Performance Improvements:

You can now smoothly import large dataverse tables into Customer Insights – Data, eliminating previous scale and performance limitations.

The connector has been optimized to handle substantial data volumes efficiently.

2. Selective Table Import:

Say goodbye to mandatory read-only table selections. with the updated connector, you decide which dataverse tables you want to use in Customer Insights.

3. Column-Level Customization:

You have full control over column selection. Choose the specific columns you want to process and output in Customer Insights.

In summary, the Microsoft Dataverse connector is now the fastest and easiest way to bring data from Dataverse into Customer Insights – Data.

Enjoy the newfound flexibility.

That’s it for today.

I hope this helps.

Malla Reddy Gurram(@UK365GUY)
#365blogpostsin365days

Share this:

How to block IP Address from accessing Dataverse in Dynamics 365 Environment

Hello Everyone,

Today I am going to show how to block the IP address from accessing the Dataverse.

Let’s get’s started.

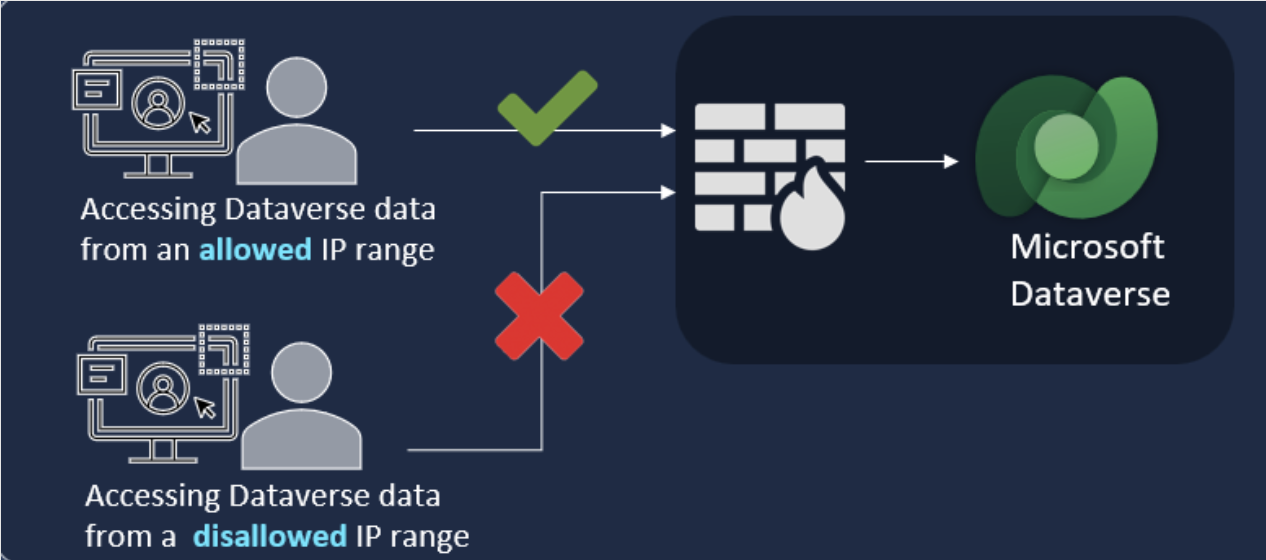
Suppose users might be looking to download data from tools like Excel or Power BI or try to access Dataverse from different network,Or if the user is trying to access the dataverse from public IP like Coffee shop or Open workspace thenif there no restrictions in place then users able to access the data as usual.

Then how do we restrict it?

Login into Power Platform Admin Center.

Go to the environment : Settings : Privacy + Security

Then : IP address settings:

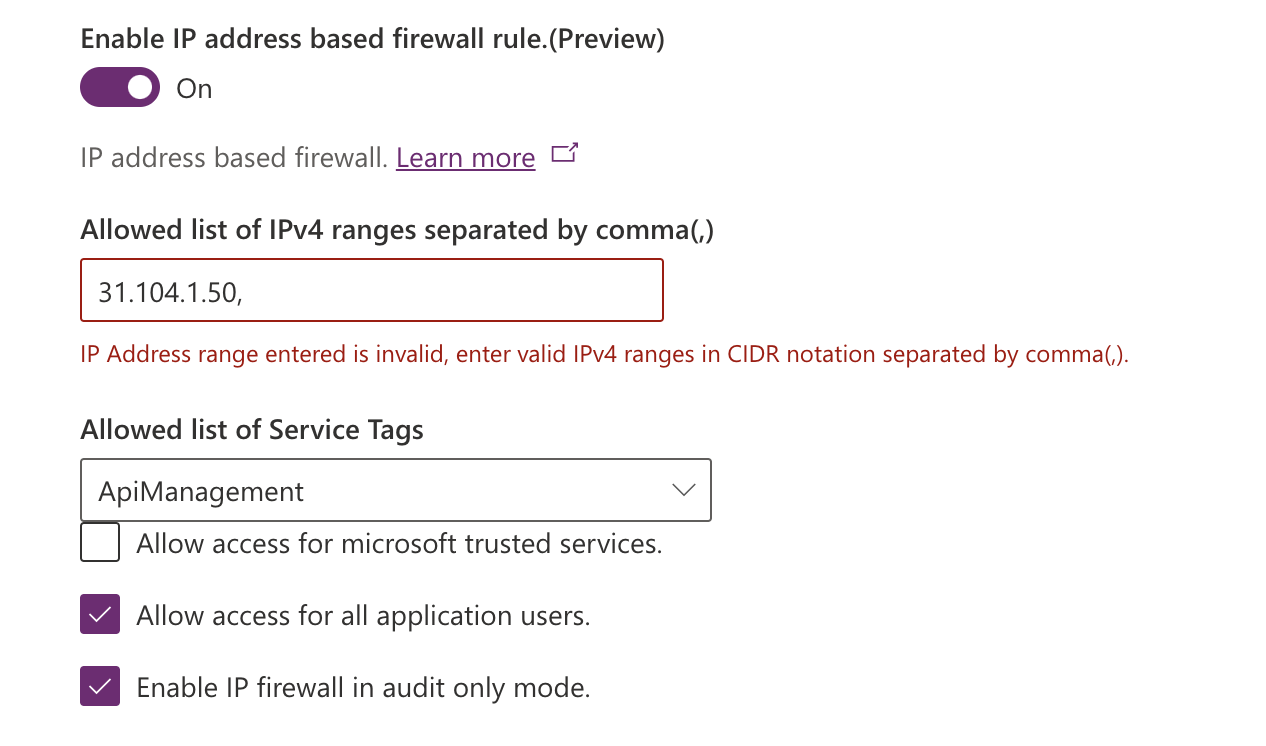
Enable IP address based firewall rule – which is currently in preview.

Paste the allowed List of IPv4 ranges separated by comma(,)

Also Select the Allowed list of Service Tags from the dropdown.

That’s it for today.

I hope this helps.

Malla Reddy Gurram(@UK365GUY)
#365blogpostsin365days

Share this:

Set privacy preference on Dynamics 365 CE Environment

Hello Everyone,

Today I am going to show how to set the privacy preference on Dynamics 365 CE environment.

Let’s get’s started.

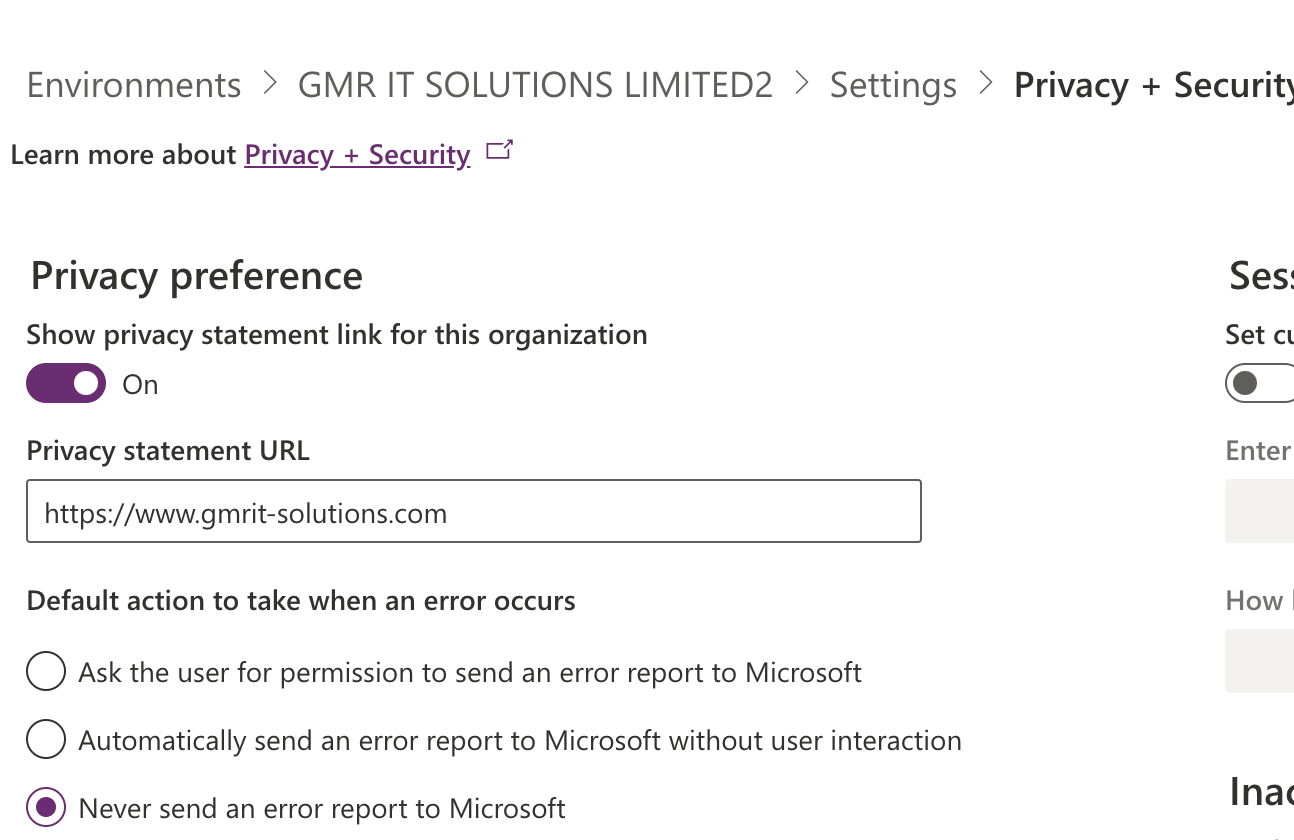
Suppose when you are accessing the Dynamics 365 CE environment and you may get errors popped up on the screen and there are some options available to the user like:

1. Ask the user for permission to send an error report to Microsoft

2. Automatically send an error report to Microsoft without user interaction.

3. Never send an error report to Microsoft.

How do you set that?

Login into Power Platform Admin Center.

Go to Settings: Privacy + Security

Privacy Preferences : Turn ON the show privacy statement link for this organisation.

Then default action to take when an error occurs:

Choose one of the options from the above and SAVE the changes.

That’s it for today.

I hope this helps.

Malla Reddy Gurram(@UK365GUY)
#365blogpostsin365days

Share this:

{Model Driven App} How to switch to classic buttons in Power Apps

Hello Everyone,

Today I am going to show how to switch to classic buttons in Power Apps.

Let’s get’s started.

With the modern UI usage of Model Driven Apps sometime the users are want to switch back to classic UI, as the classic app, forms and view designers are deprecated.

You need to enable manually from settings.

Login into PPAC(www.admin.powerplatform.microsoft.com)

Choose the environment,

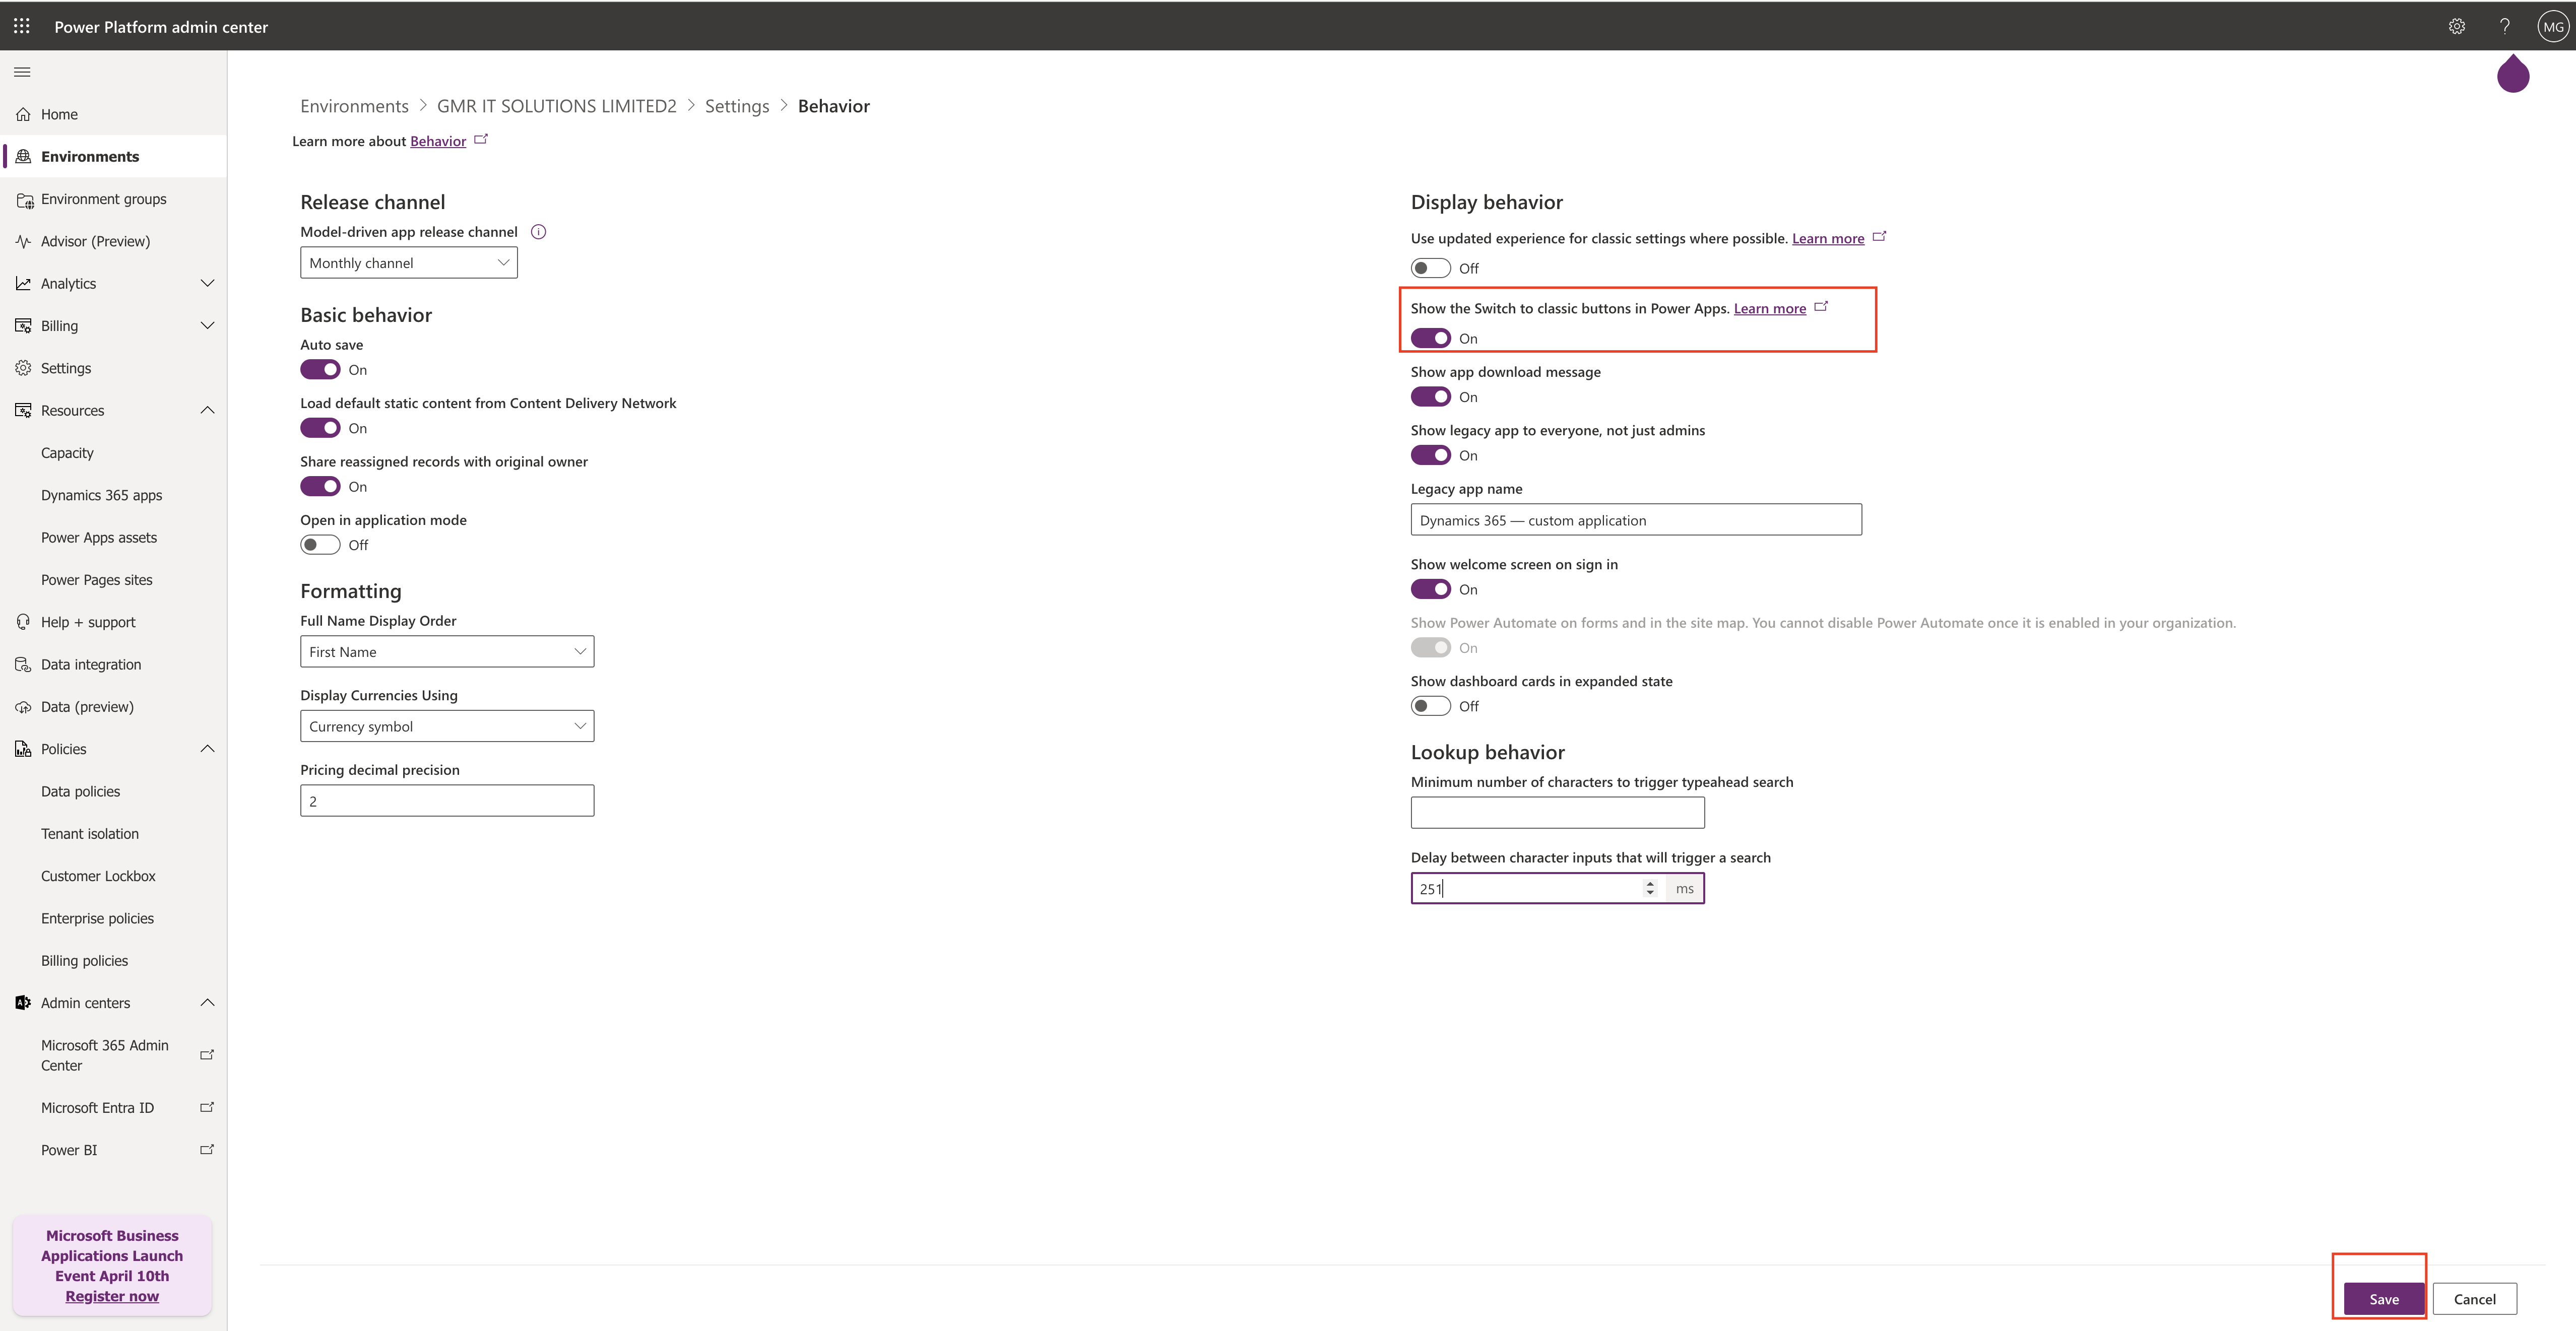
Then settings – Behavior:

Show the switch to classic buttons in Power Apps – ON

Save the changes.

That’s it for today.

I hope this helps.

Malla Reddy Gurram(@UK365GUY)
#365BlogPostsin365Days

Share this: