Menu Close

Tag: #uk365guy

{How to} Create Lead Scoring Matrix on Dynamics 365 Marketing

Hello Everyone,

Today I am going to share my thoughts on how to create lead scoring on Dynamics 365 Marketing.

Let’s get’s started.

Suppose you have a requirement to create a brand new lead scoring matrix on Dynamics 365 Marketing.

How do you do that?

In Dynamics 365 Marketing, Lead scoring helps you prioritize and qualify leads based on their interactions and attribites. Let’s dive into hoe you can set up lead scoring models:
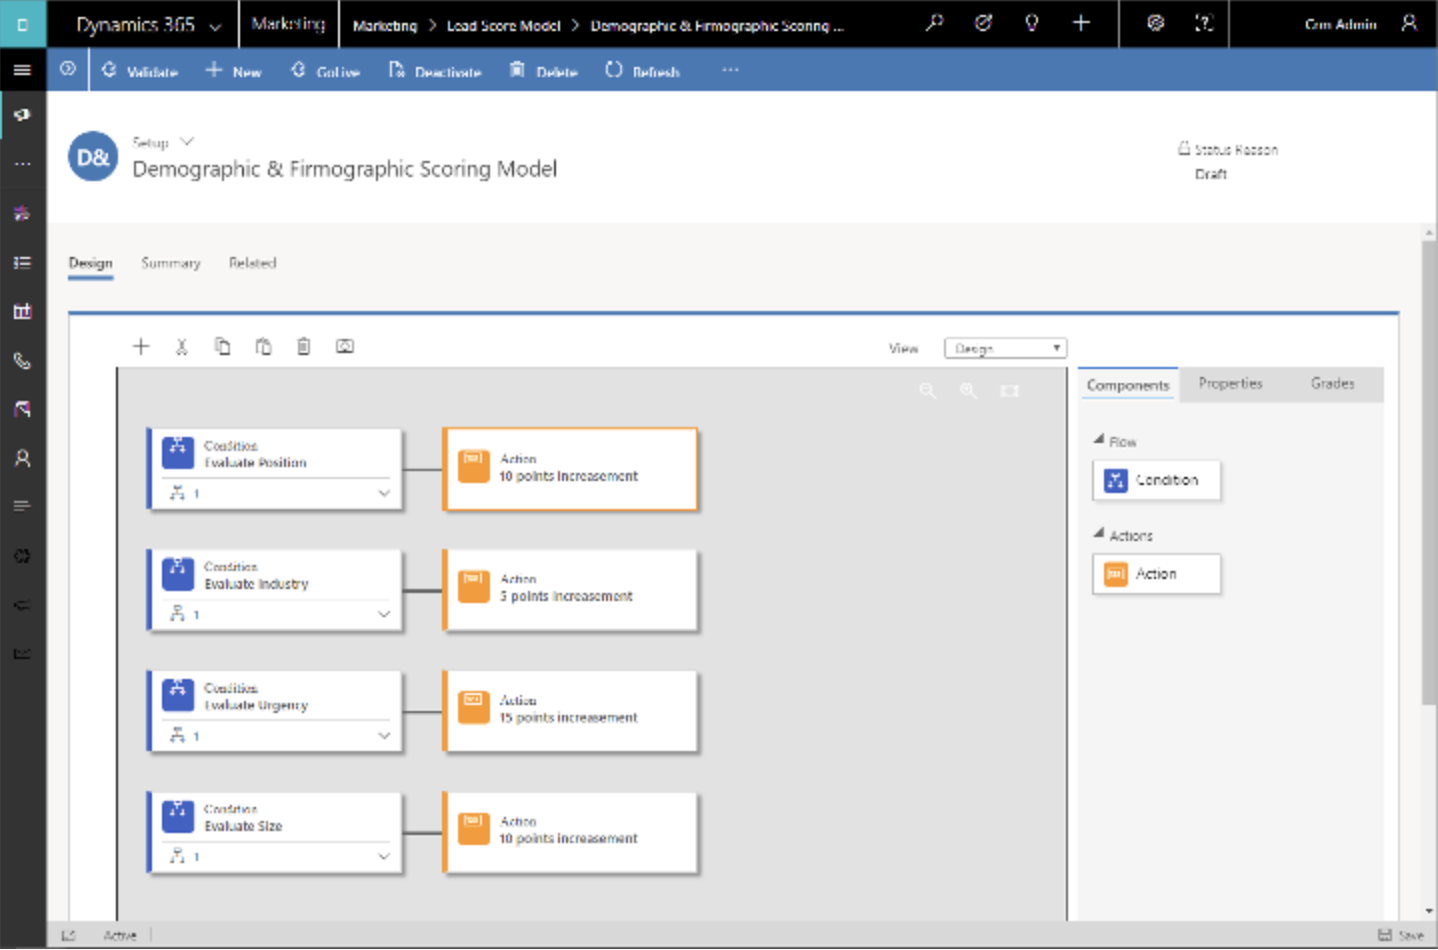
1. Navigate to Scoring Models:

Go to Outbound marketing > Lead management > Scoring Models.

Here, you’ll find a list of existing models. You can create, delete, search, sort or filter items in the list.

To create a new model, select New.

2. Design Your Scoring Model:

When creating a new model, you’ll be taken to the Design tab.

Use a combination of condition/action tile pairs to build your scoring models.

Conditions define the criteria for scoring(e.g email opens, webiste visits, form submissions).

Actions determine how points are assigned based on interactions(e.g.. +10 points for clicking an email link).

Actions determine how points are assigned based on interactions (e.g., +10 points for clicking an email link).

Connect these tiles to create a flow that calculates scores for leads.

3. Set Threholds:

Each scoring model includes a sales-ready threshold.

When a lead’s score surpasses this threshold, it’s marked as sales-ready.

This can trigger other events within Dynamics 365, such as advancing the lead through its business process or alerting salespeople.

4. Privacy Considerations:

Automatic lead scoring can introduce data privacy issues.

Ensure compliance with relevant data privacy regulations when using lead scoring features.

Remember, lead scoring is a powerful tool, but thoughtful design and testing are essential for effective lead management.

That’s it for today.

I hope this helps.

Malla Reddy Gurram(@UK365GUY)
#365BlogPostsin365Days

Share this:

Improvements on Microsoft Dataverse connector to import large dataverse tables into Customer Insights – Data.

Hello Everyone,

Today I am going to share my thoughts on the improvements on Microsoft Dataverse Connector to import large dataverse tables into Customer Insights – Data.

Let’s get’s started.

Certainly! The Microsoft Dataverse Connector has undergone significant enhancements, enabling seamless import of large dataverse tables into Customer Insights – Data.

Here are the key features:

1. Selective Tables Import:

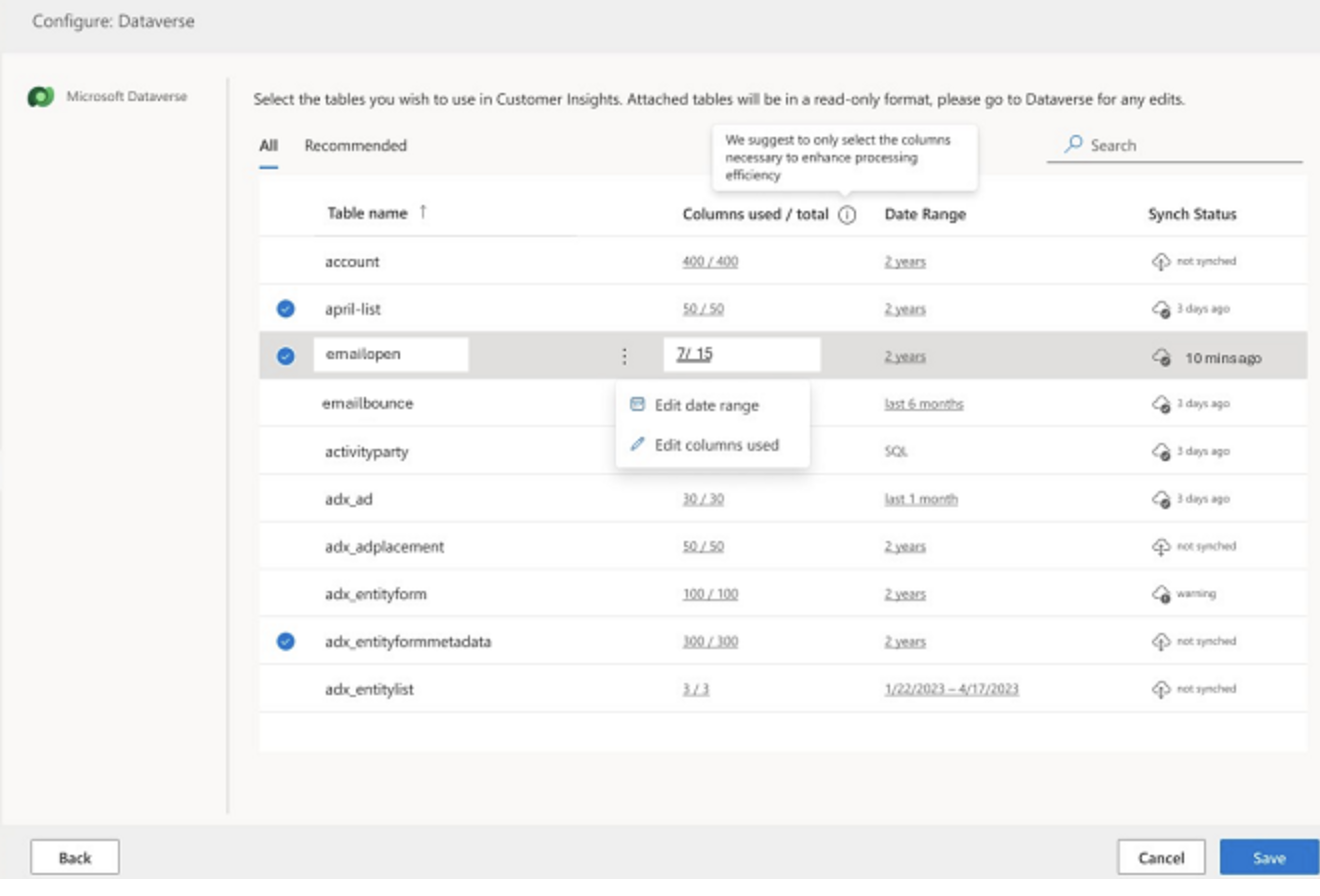
You can now select specific tables, columns, and even rows from Dataverse to import into Customer Insights.

New row filters allow you to save time by choosing only the data you need.

2. Performance improvements:

The Dataverse connector has been optimized to be best choice for importing tables.

Smoothly import large Dataverse tables into Customer Insights without previous scale or performance limitations.

3. Flexible Column Processing:

Select only the columns you want to process and output in Customer Insights.

Apply filters to exclude inactive records or include records modified within a specific time frame(e.g the last year).

4. Automatic Linking:

Tables imported via the Dataverse connector are automatically linked to the unified CustomerProfile tables in Customer Insights.

These improvements empower you with more control, faster performance, and efficient data management within Dynamics 365 Customer Insights.

No more read-only mandatory tables selections!.

That’s it for today.

I hope this helps.

Malla Reddy Gurram(@UK365GUY)
#365BlogPostsin365Days

Share this:

{How to} Lock and Unlock customizations for other user roles on Dynamics 365 Model Driven App

Hello Everyone,

Today I am going to show how to lock and unlock customizations for other user roles other than Administrators.

Let’s get’s started.

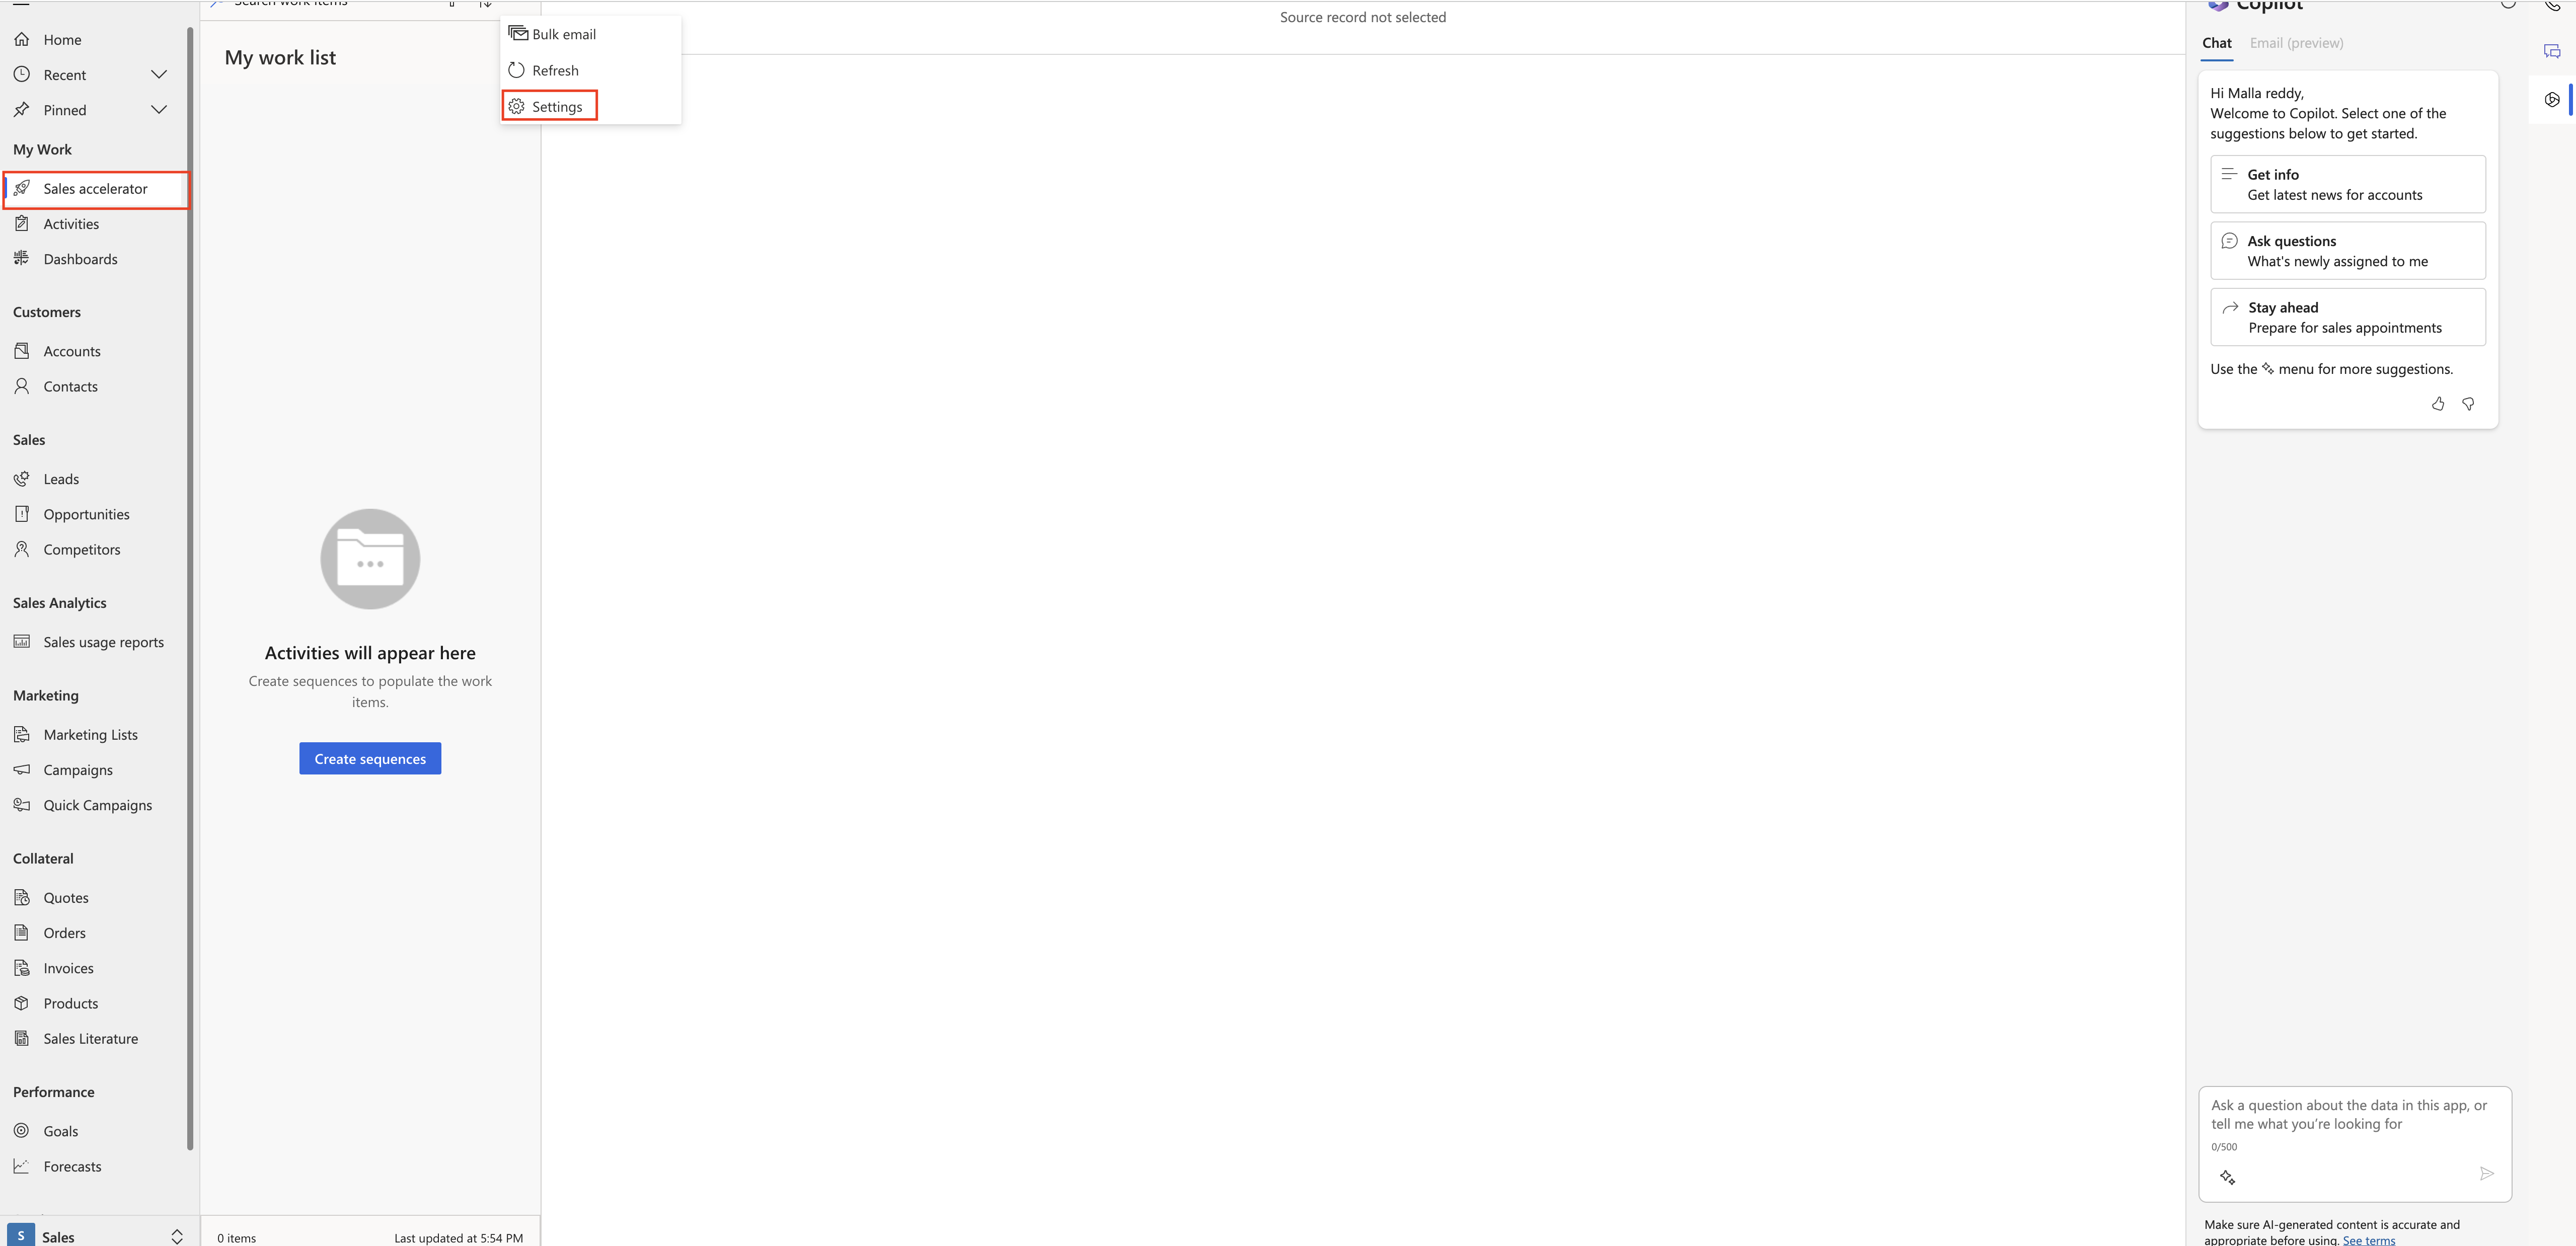
Login into Dynamics 365 Sales Hub.

Click on Sales Accelerator.

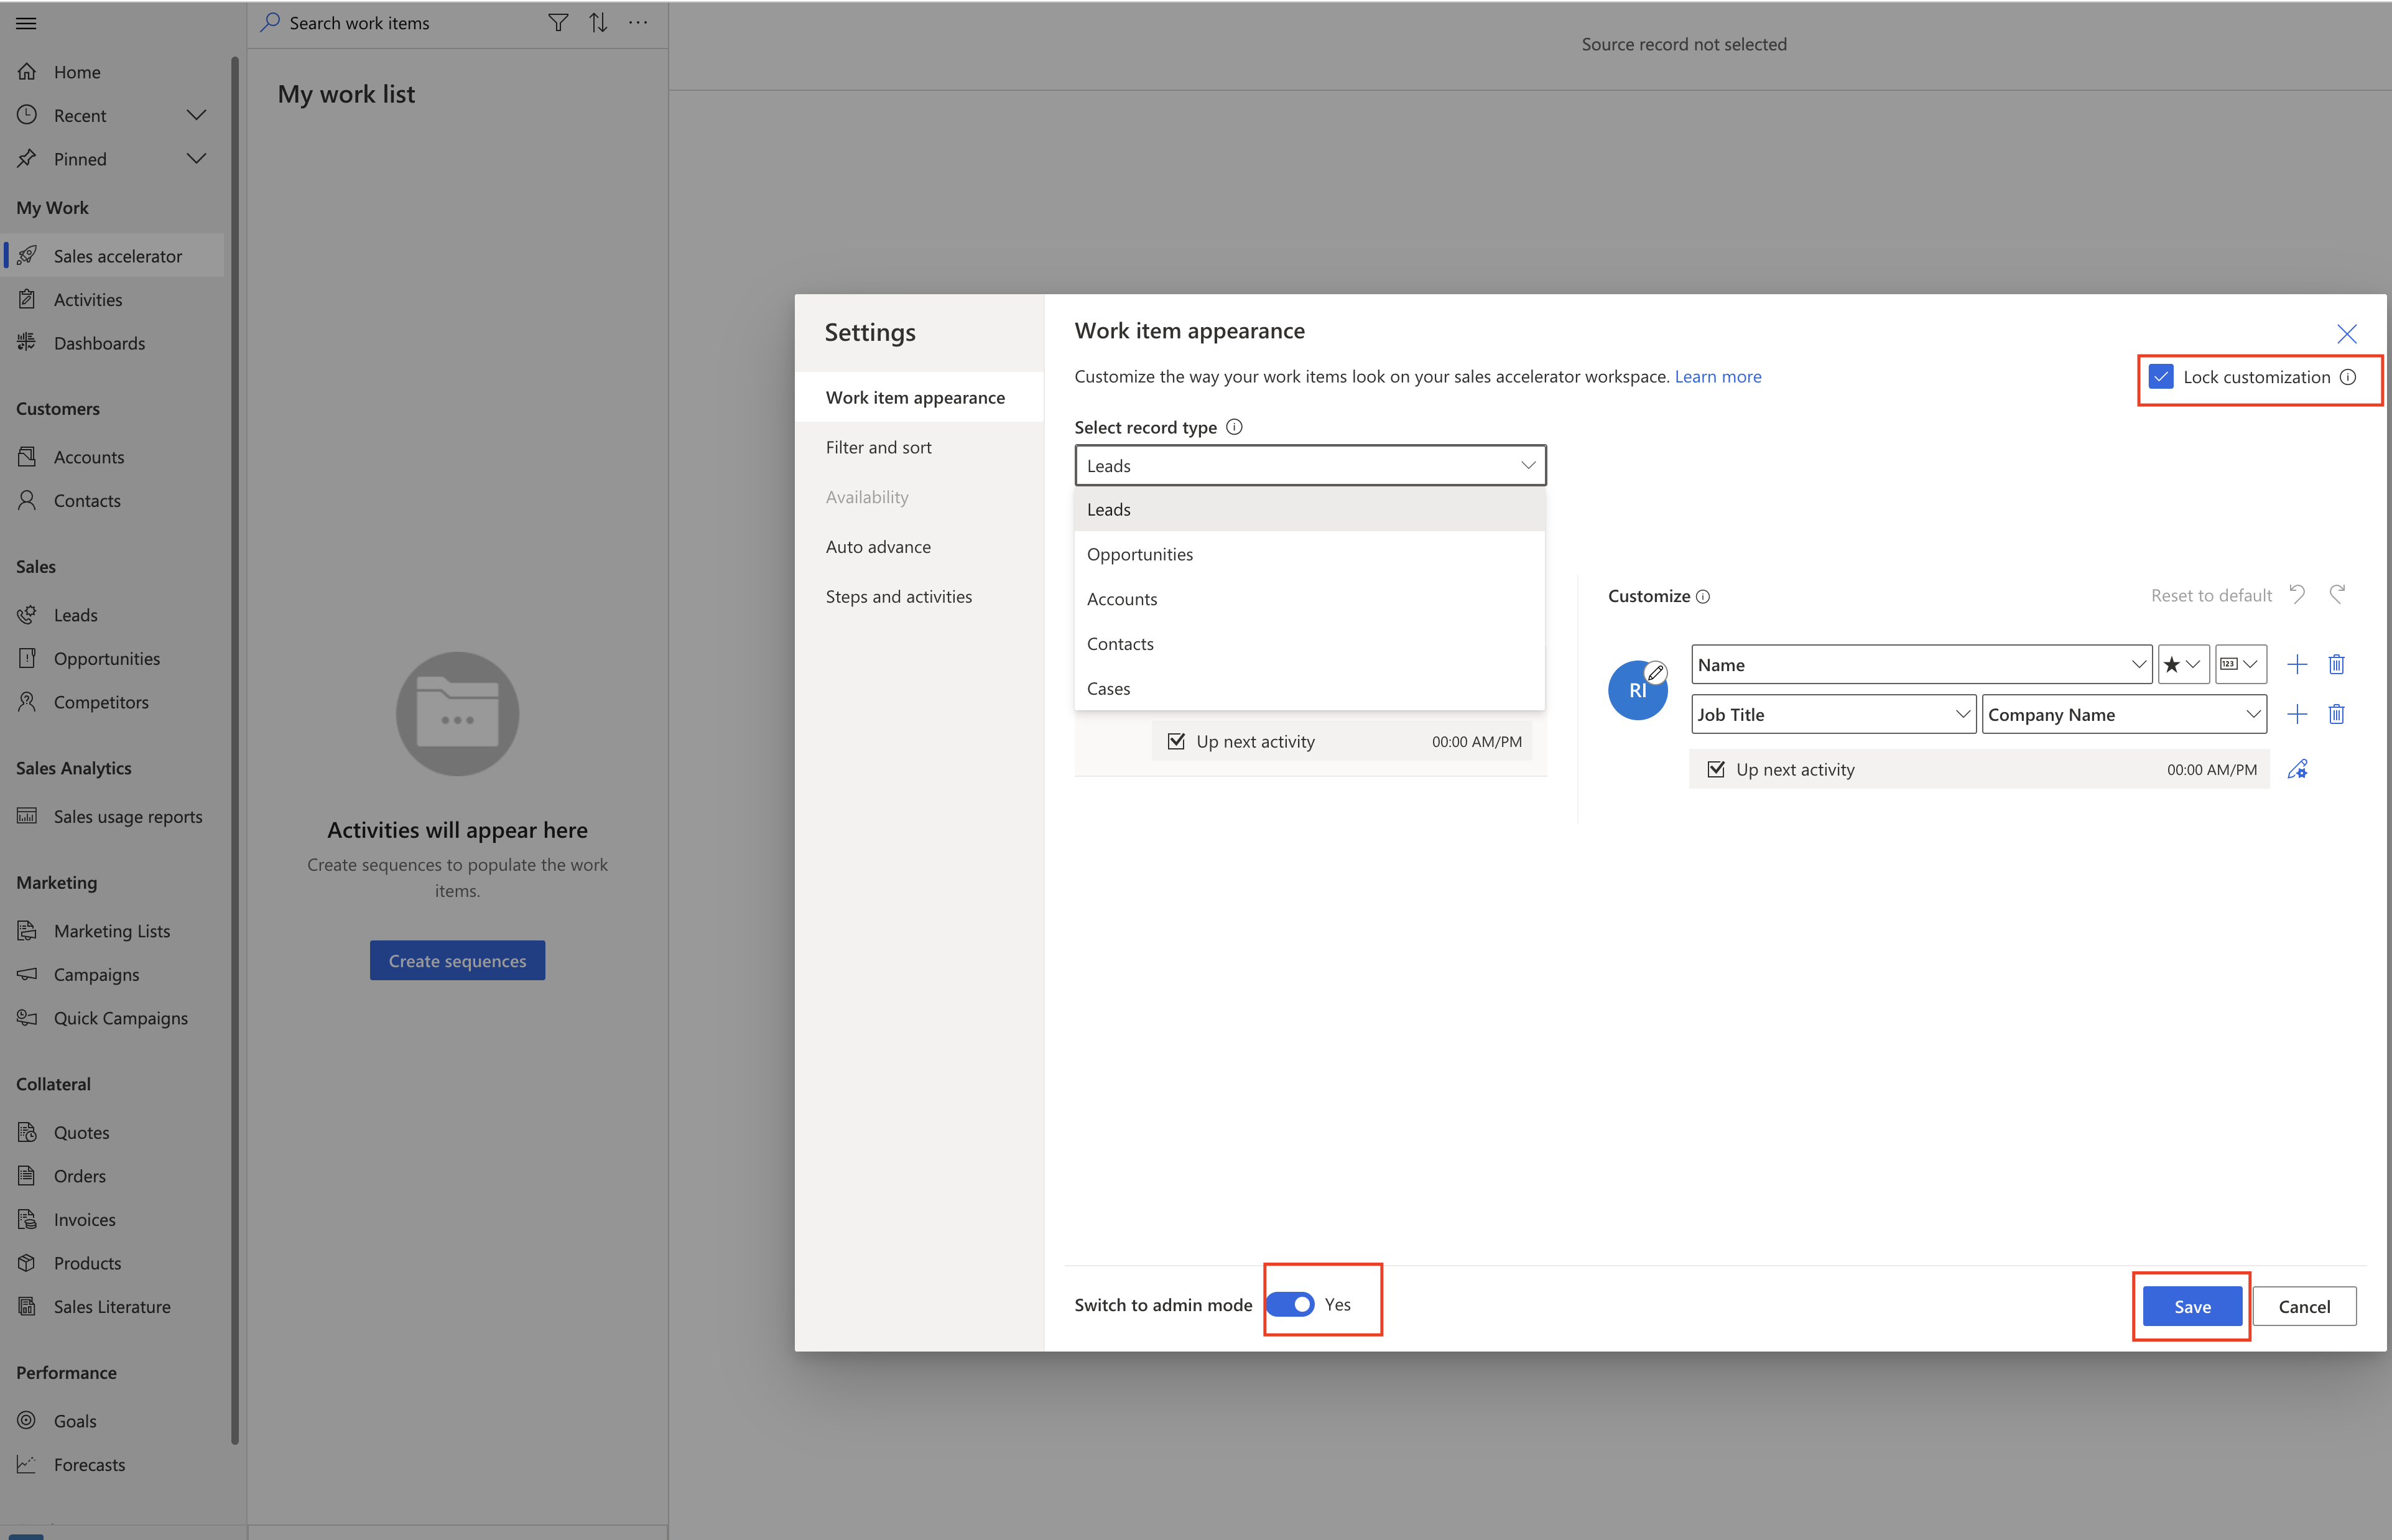
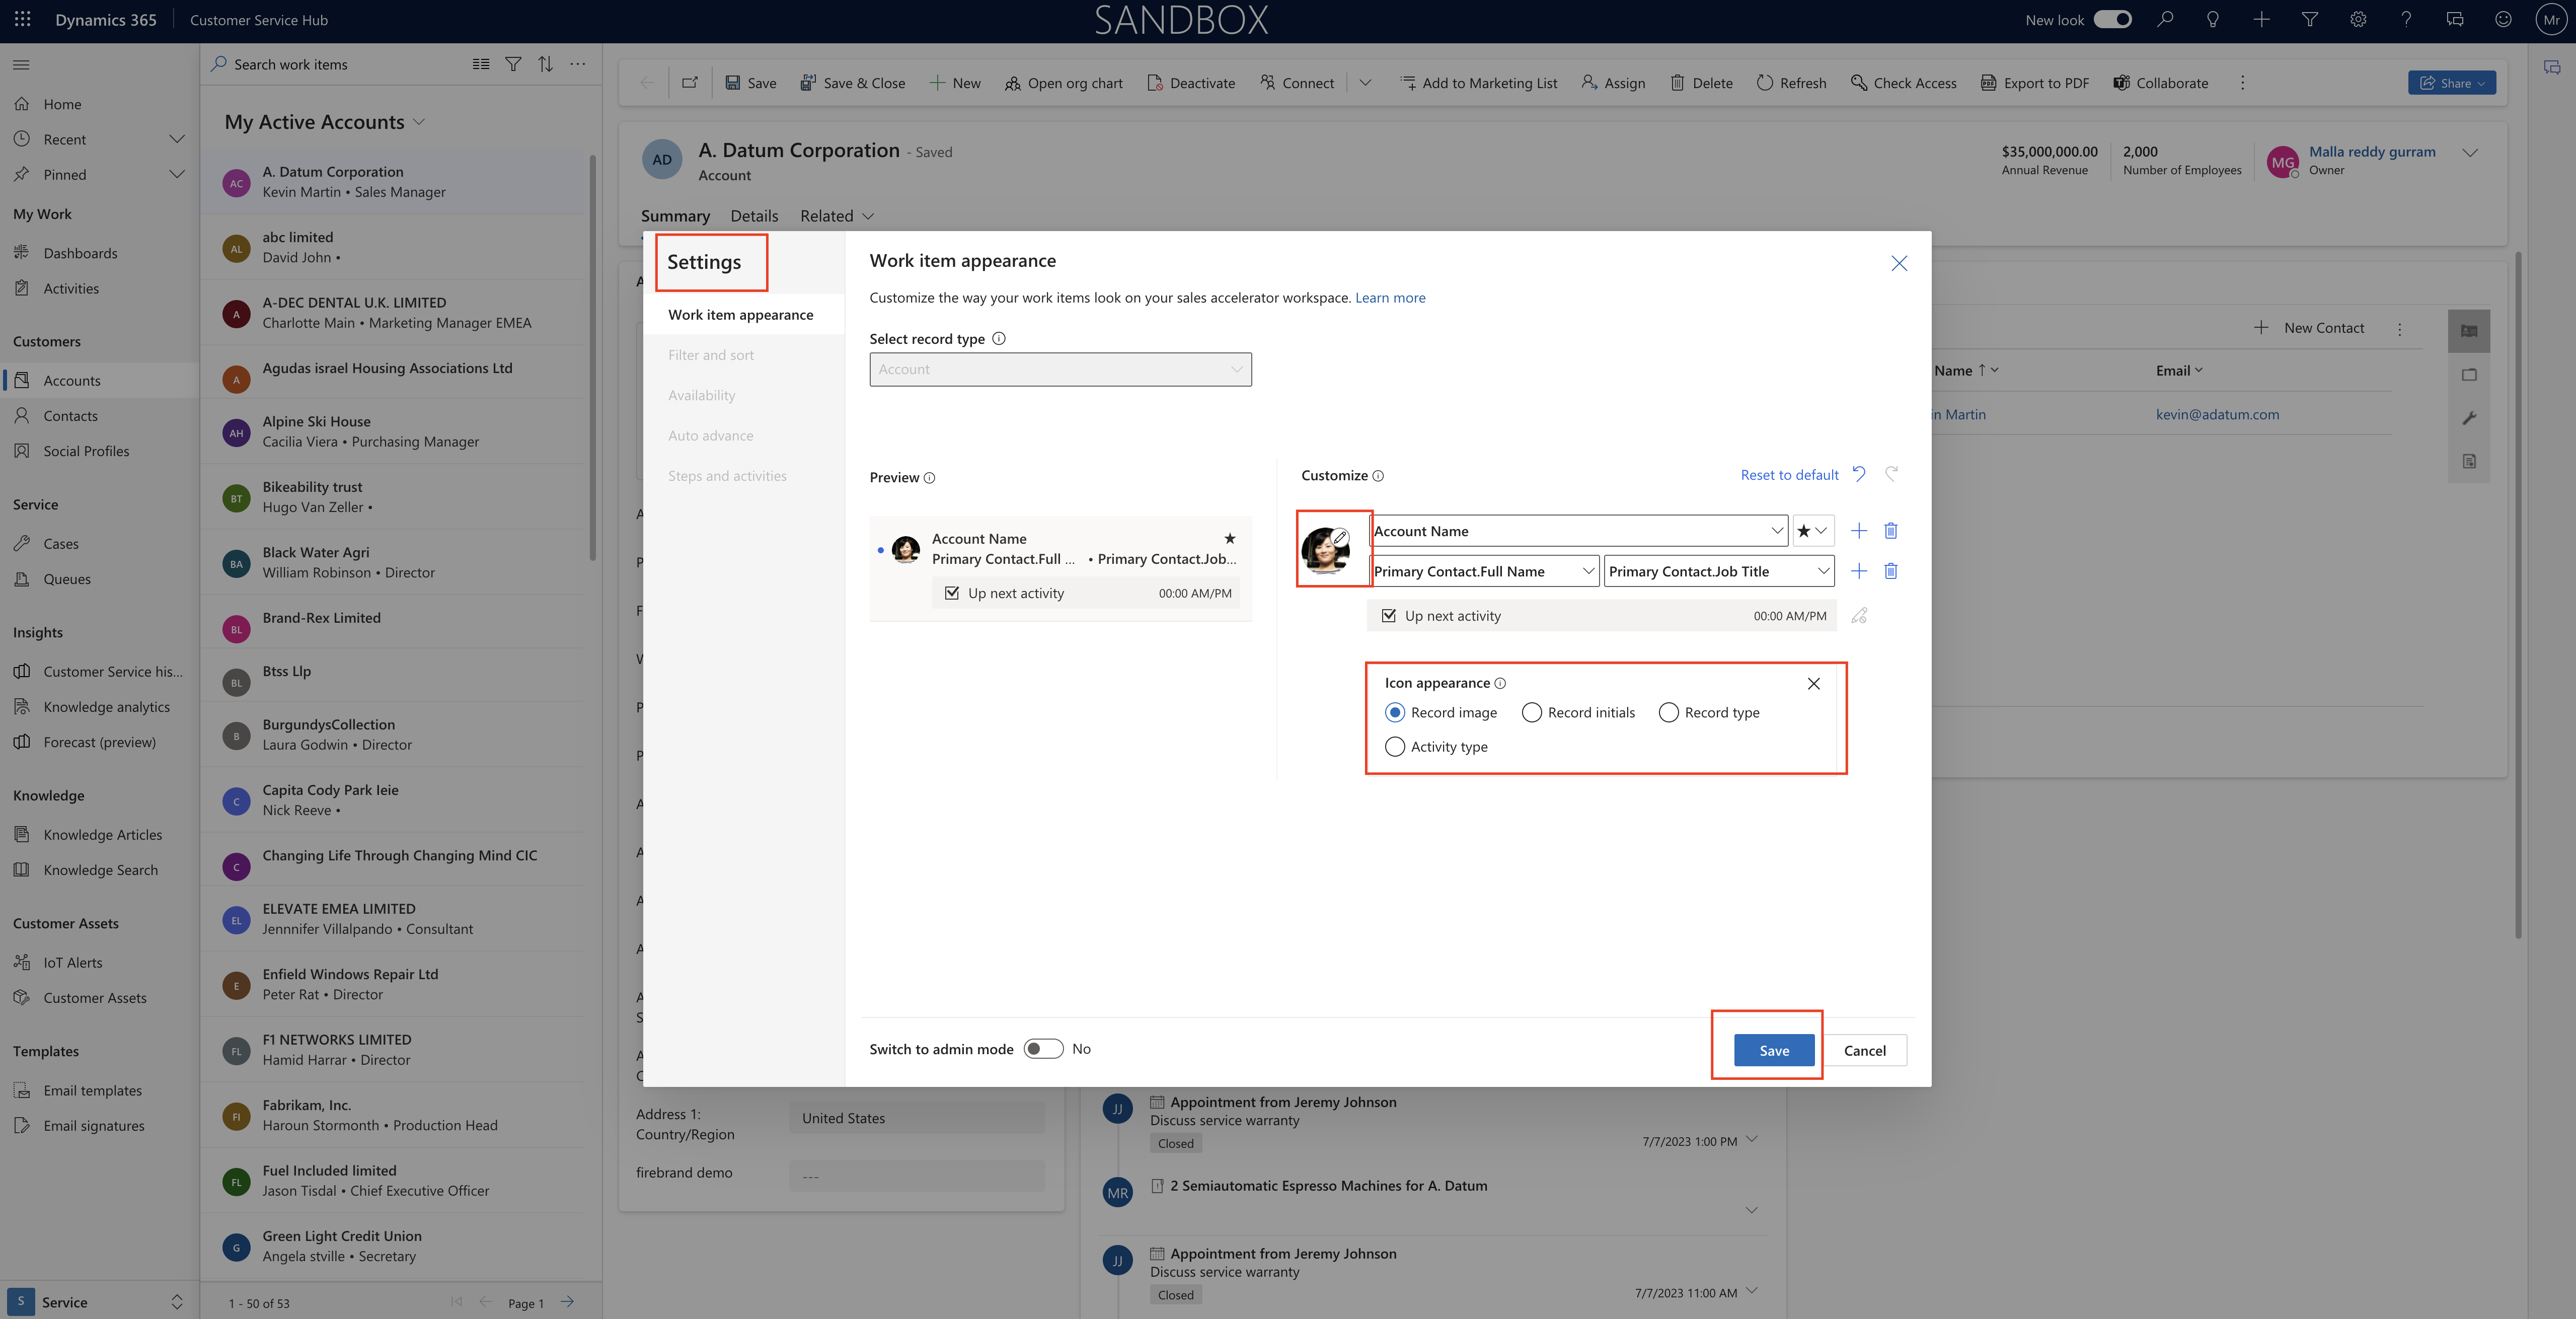
Settings new work item appearance window will be displayed.

You can switch the admin mode to YES and a check box with the LOCK CUSTOMIZATIONS will appear on the right hand corner of the screen where the sellers can’t edit any changes as admin mode is turned on, and save the changes.

That’t it for today.

I hope this helps.

Malla Reddy Gurram
#365BlogPostsin365Days

Share this:

{Do you know} How to change the model driven app record icon appearance

Hello Everyone,

Today I am going to show how to change the model driven app appearance.

Let’s get’s started.

Login into Dynamics 365 Customer Service Hub.

Select the ” Focused View” from Account Table List view.

Then account records will be on the focused view.

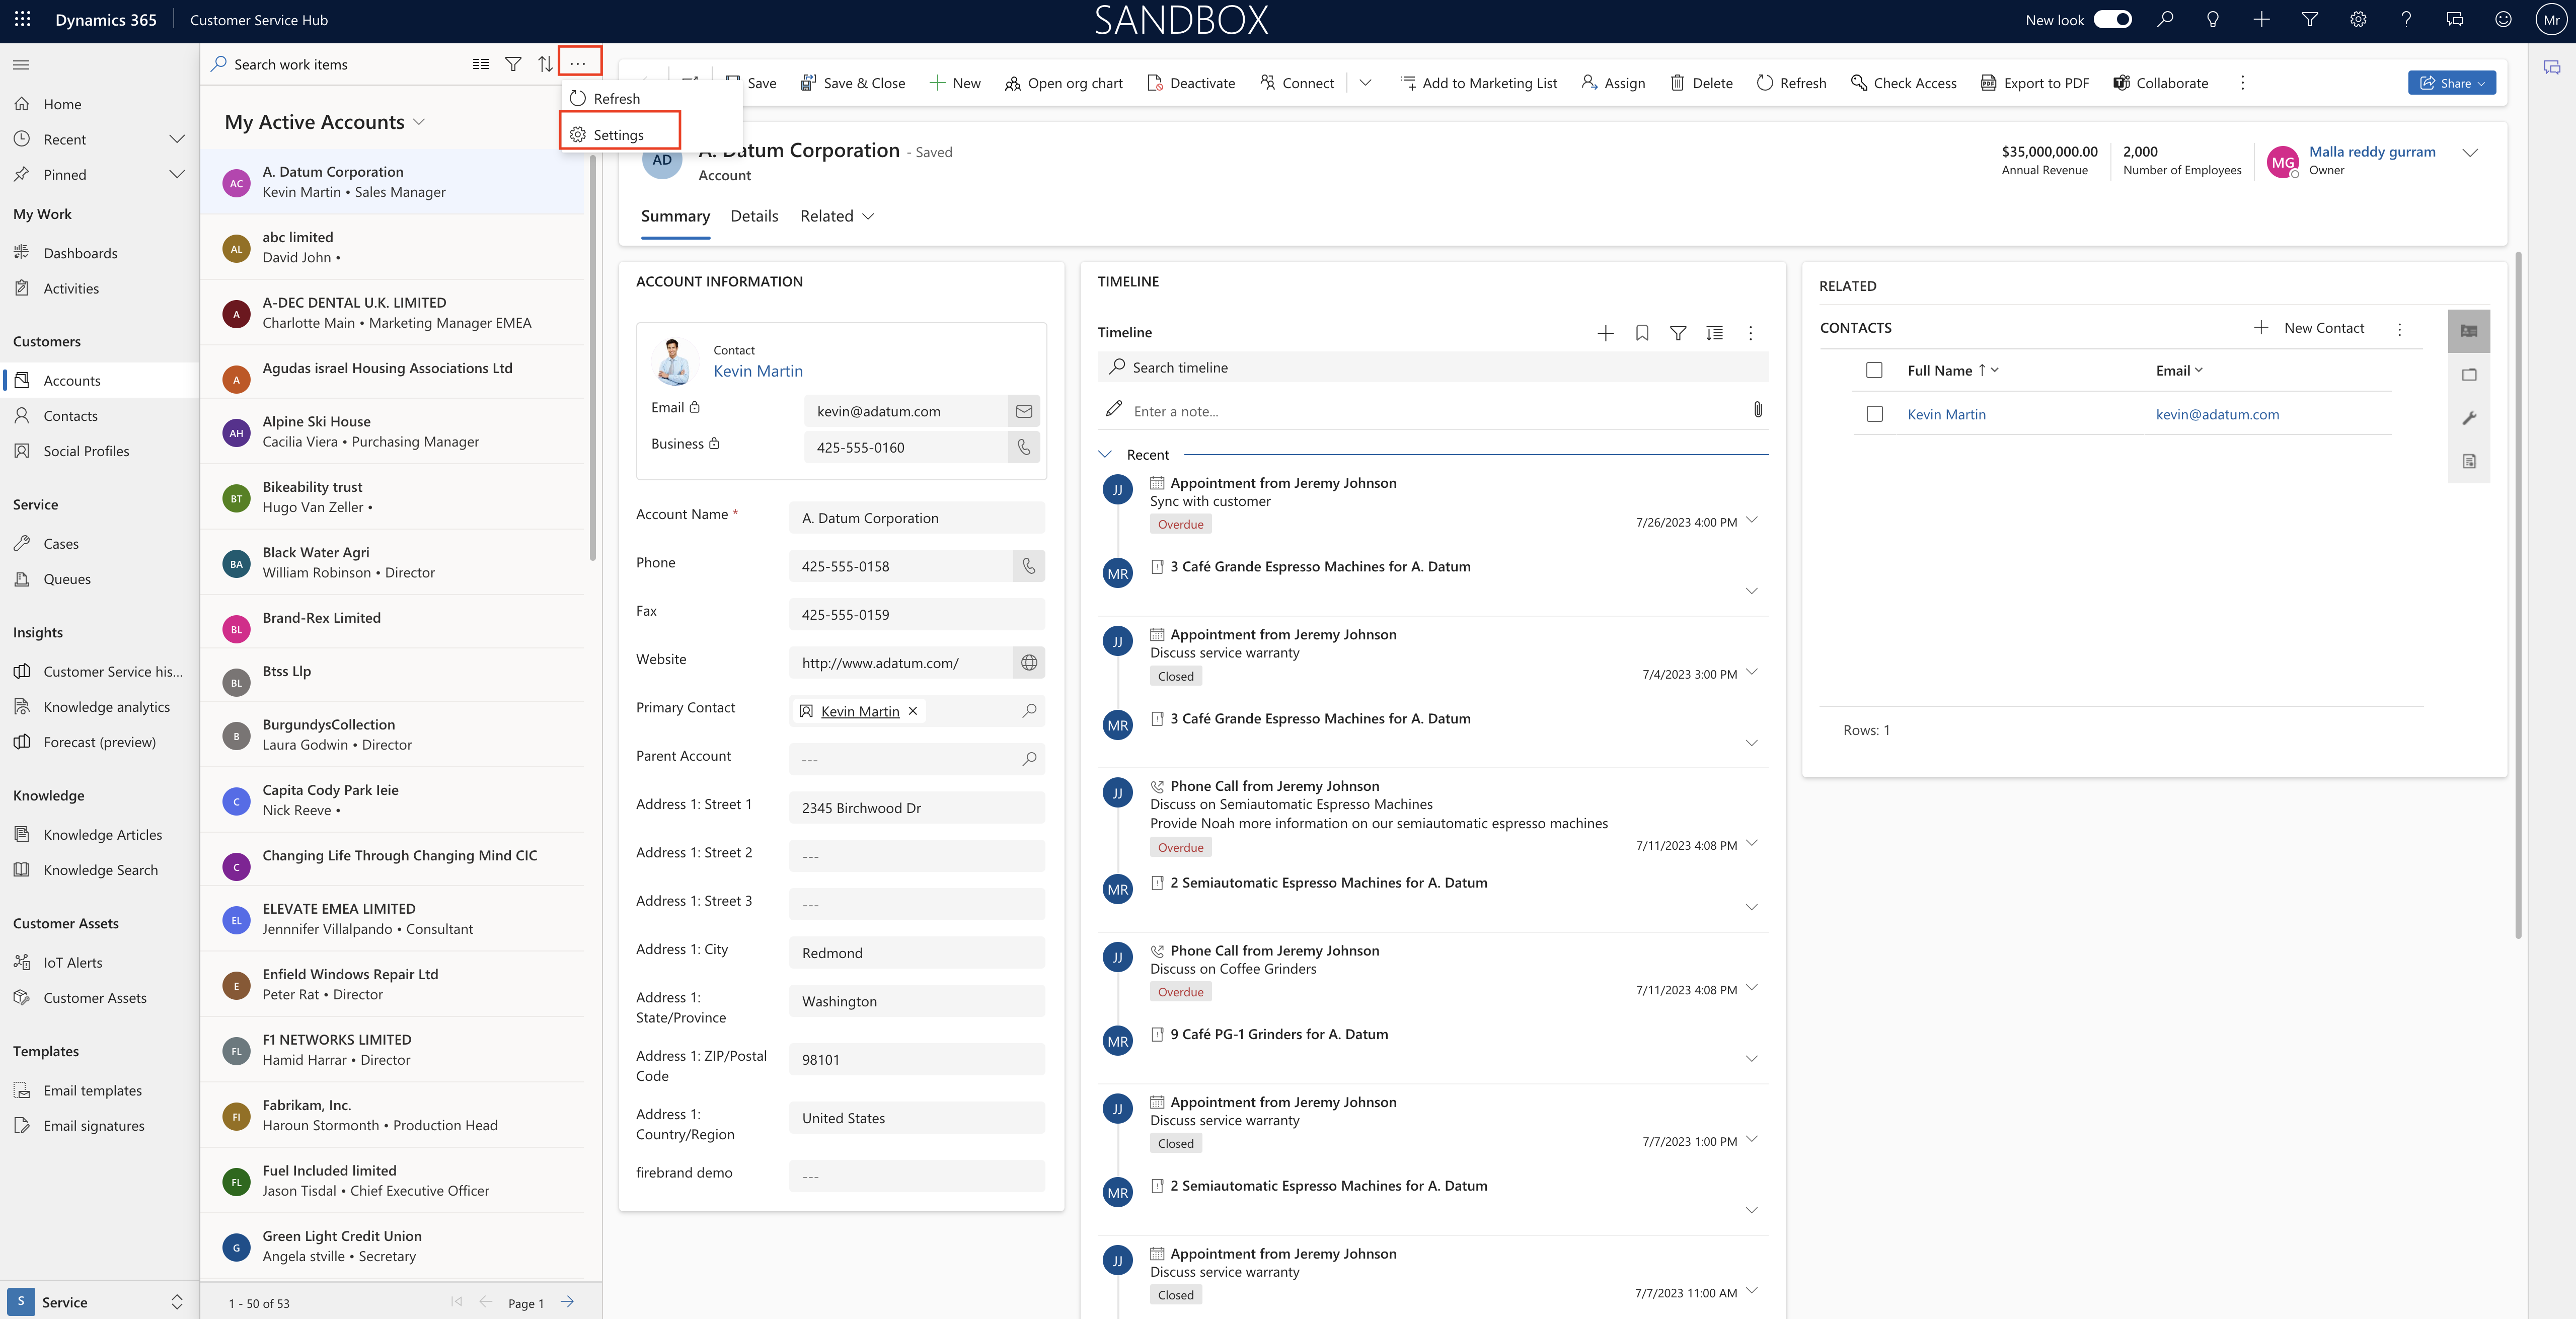
Click on three dots on focused view and then click on settings:

There are four icon appearances:

1. Record Image:

2. Record Initials

3. Record Type

4. Activity Type

You can set the icon apperance based on your preferences and save the changes.

That’s it for today.

I hope this helps.

Malla Reddy Gurram(@UK365GUY)
#365Blogpostsin365Days

Share this:

{Do you know} Set timelines display layout types on Dynamics 365 Model Driven Apps

Hello Everyone,

Today I am going to show types of timelines display layout on Dynamics 365 CE.

Let’s get’s started.

How do you set this display layout on Dynamics 365 CE Timeline View.

Login into Dynamics 365 Customer Service HUB.

Open an Account record as an example:

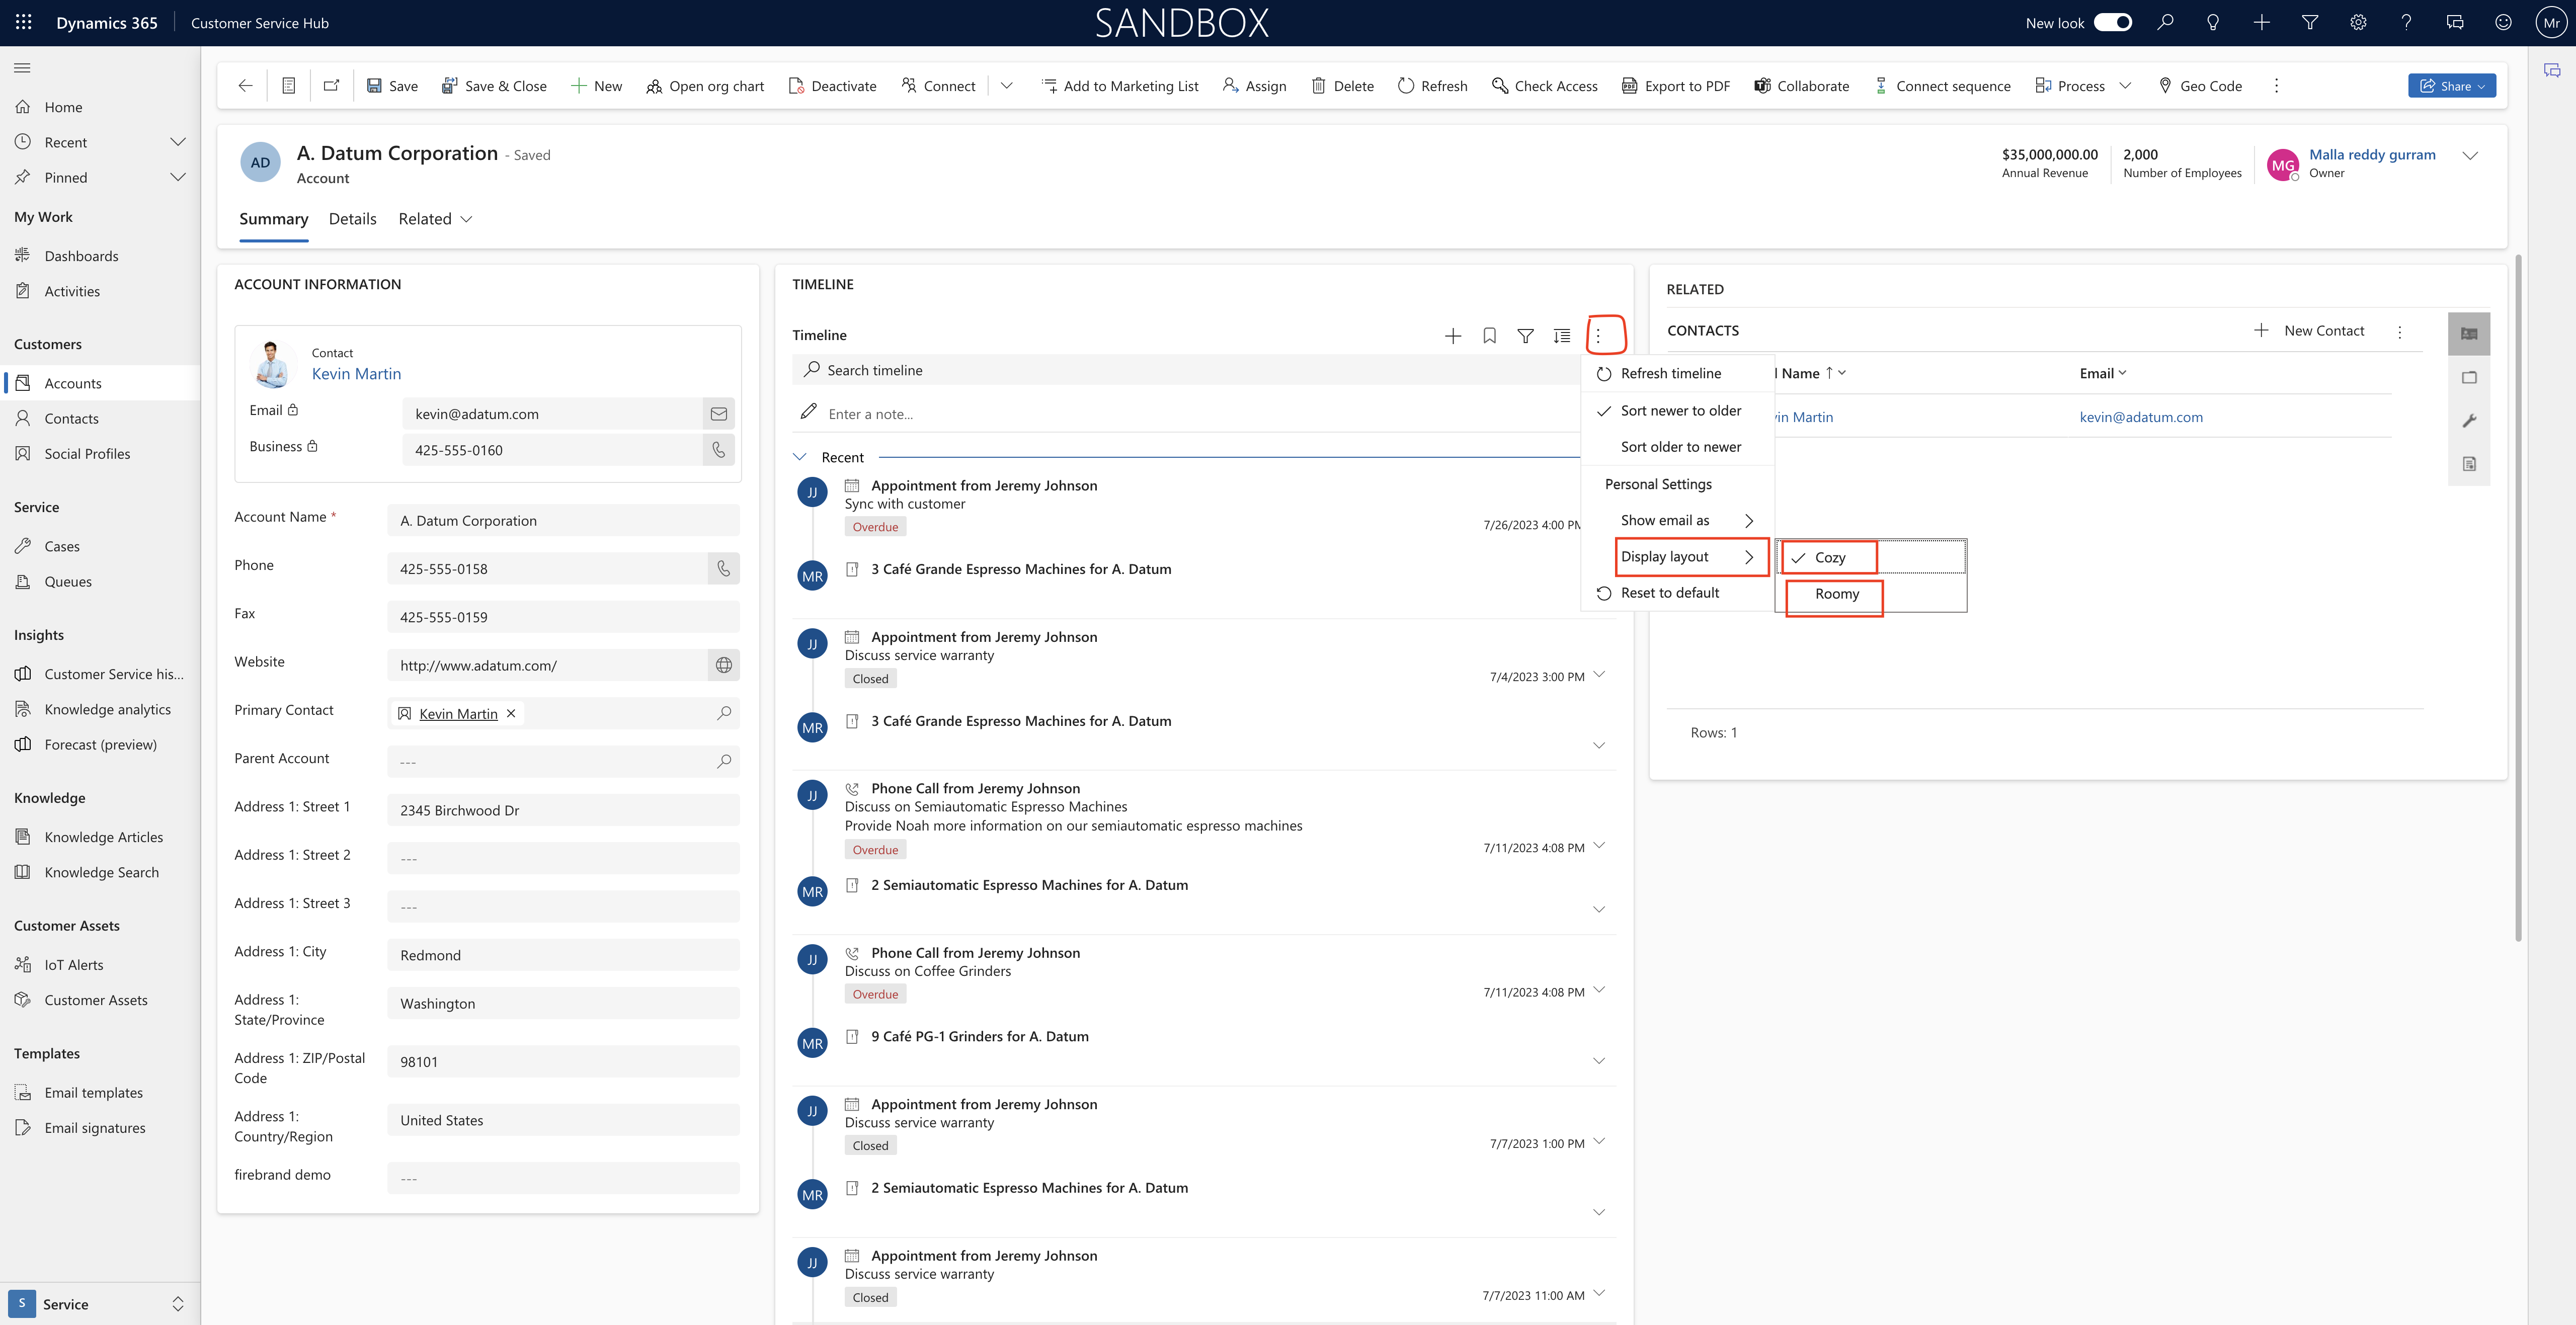
Go to the Timeline view and click on … three horizontal dots.

As you can see the two types of display layouts:

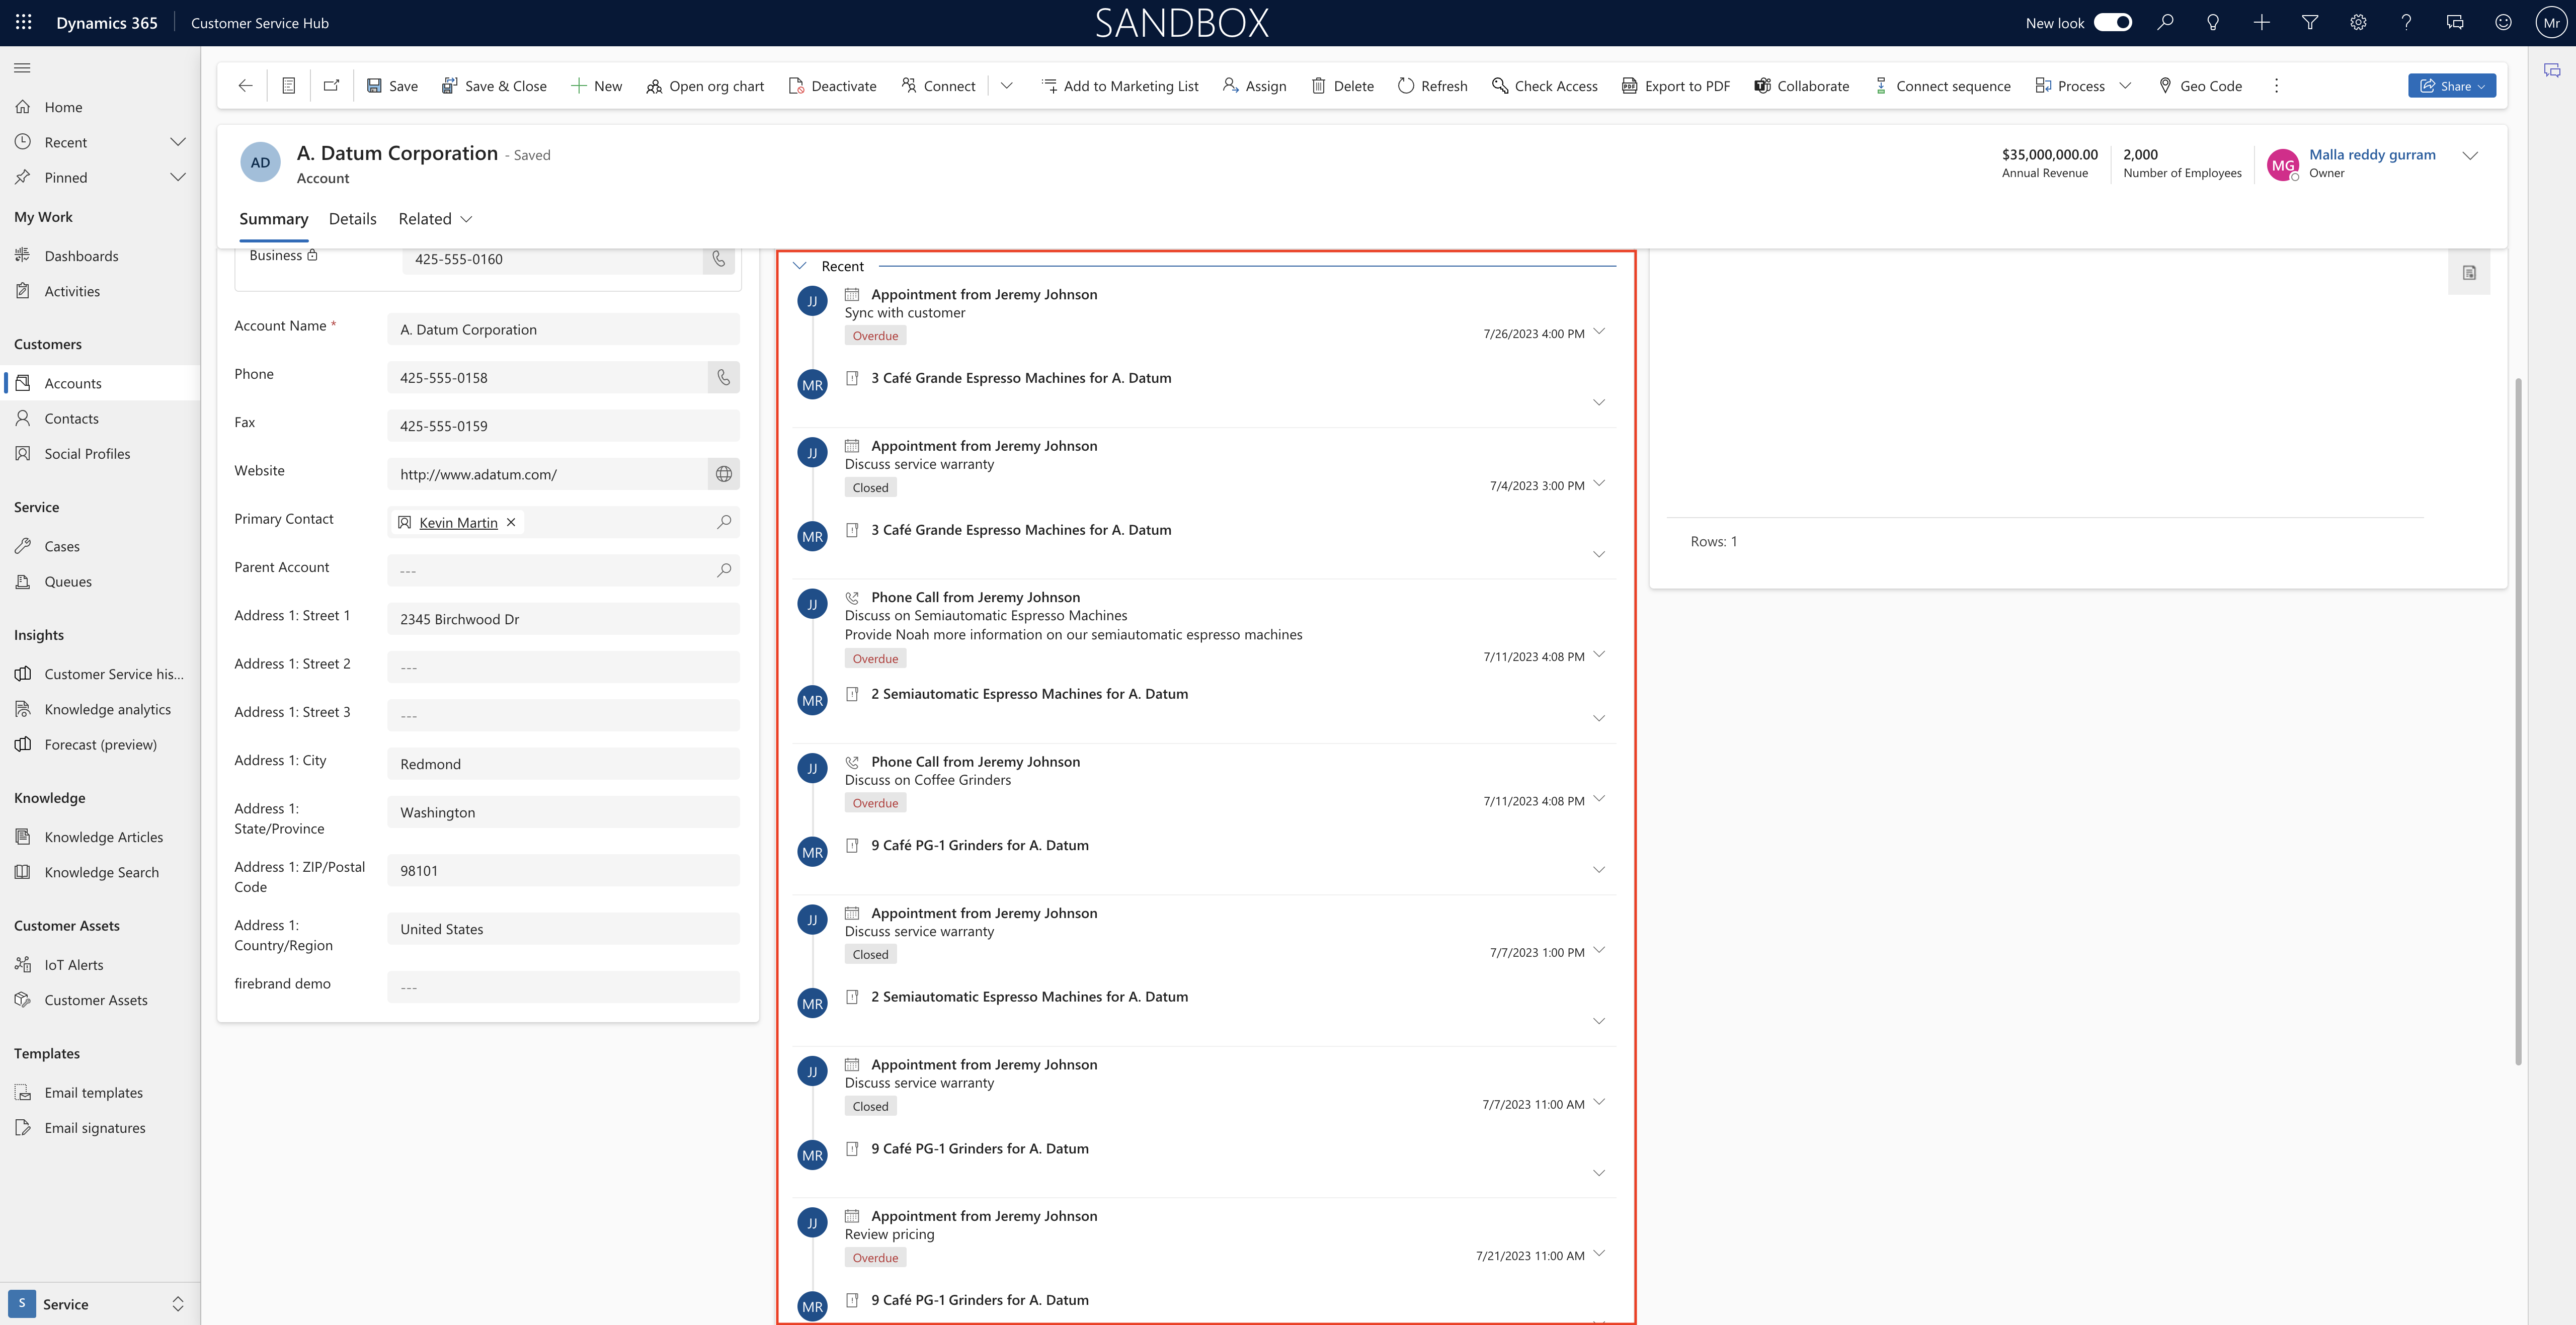
1. Cozy: It shows brief view of the activity on the Cozy View.

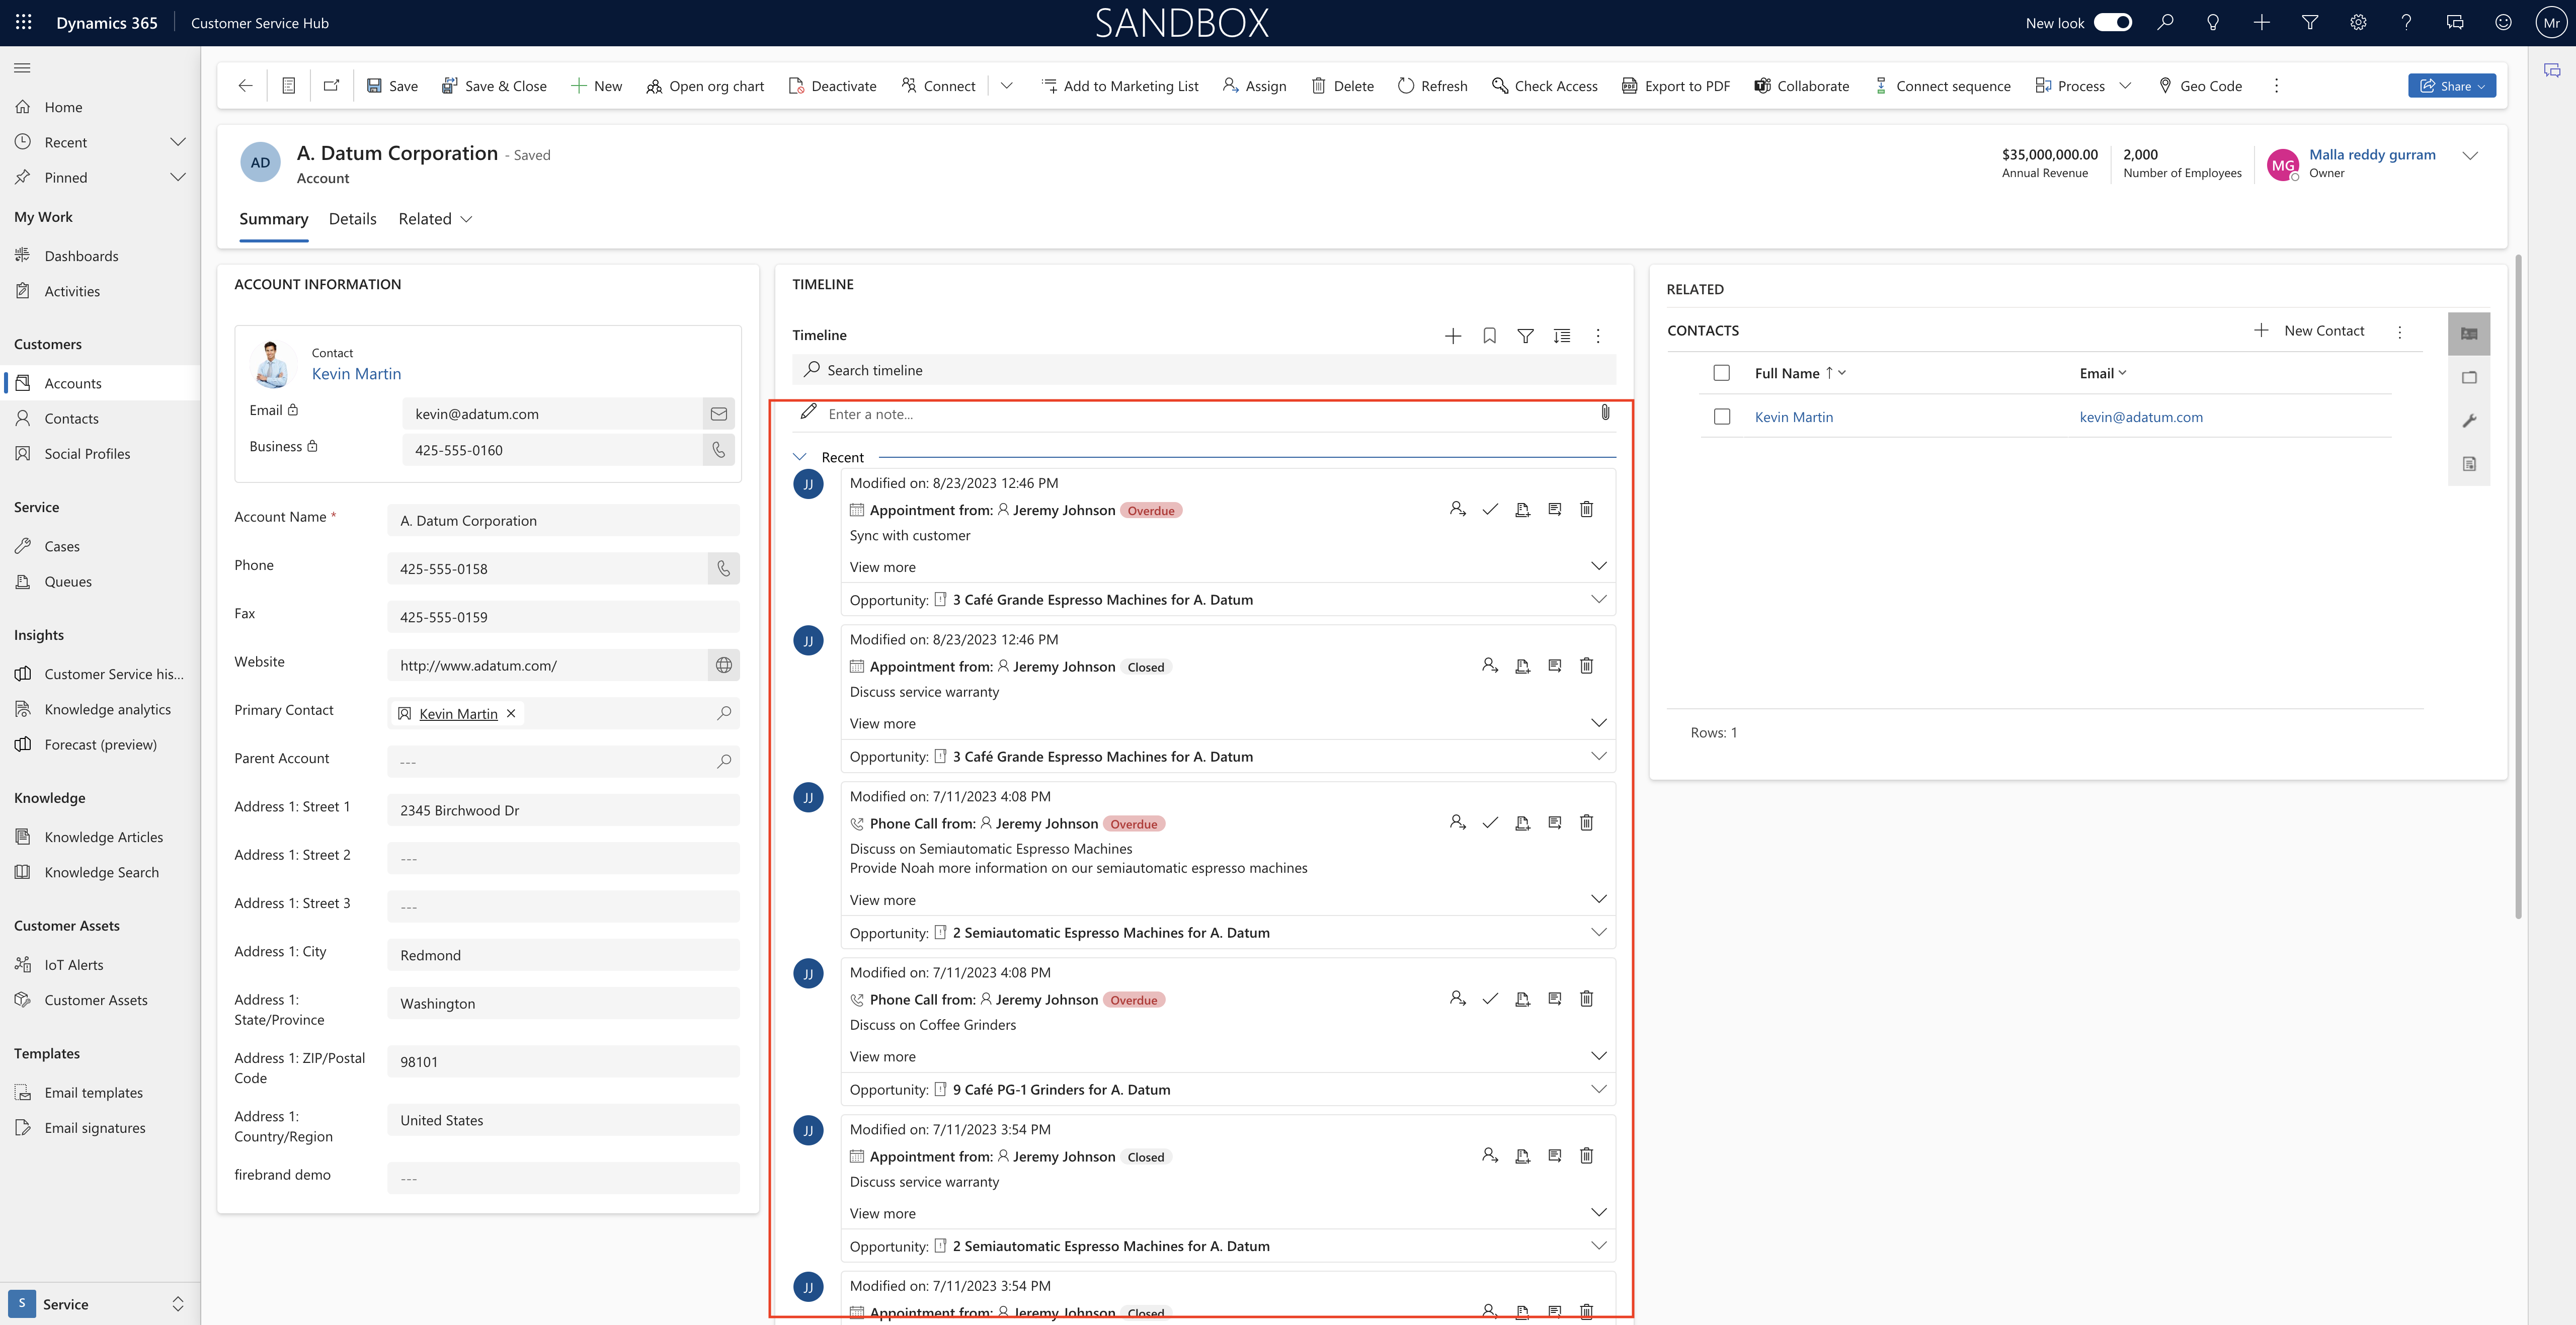
2. Roomy: It shows the details of the each activity on the roomy layout

That’s it for today.

I hope this helps.

Malla Reddy Gurram(@UK365GUY)
#365BlogPostsin365Days

Share this: