Menu Close

Tag: #uk365guy

How to document Power apps Canvas App and Power Auttomate Flow Solution with PowerDocu UI Tool

Hello Everyone,

Today i am going to share a tool which we can provide technical documentation for Power apps canvas apps and Power Automate Flows with the Powerdocu UI.

Let’s gets started.

Have you ever heard of POWERDOCU UI TOOL ?

Suppose you have a requirement to document what is inside the Power Apps and also in Flow Solutions, then you can use this PowerDocu tool for documenting how the power apps canvas app or Flow works. to ensure that any specific configuration in it is kept somewhere else as well, or for other reasons.

PowerDocu contains a Windows GUI executable to easily perform technical documentation.

Powerdocu UI Tool is developed by MVP @ReneModery

Kudo to him and many many thanks for saving number of hours documentation.

Download from the Github

PowerDocu provides technical documentation automatic generation documentation based on
a provided exported Flow package, or an exported Power Apps Canvas App, or an exported Solution package.

The documentation can be generated as a Word document or Markdown format(as an example to host in Github or Azure DevOps).
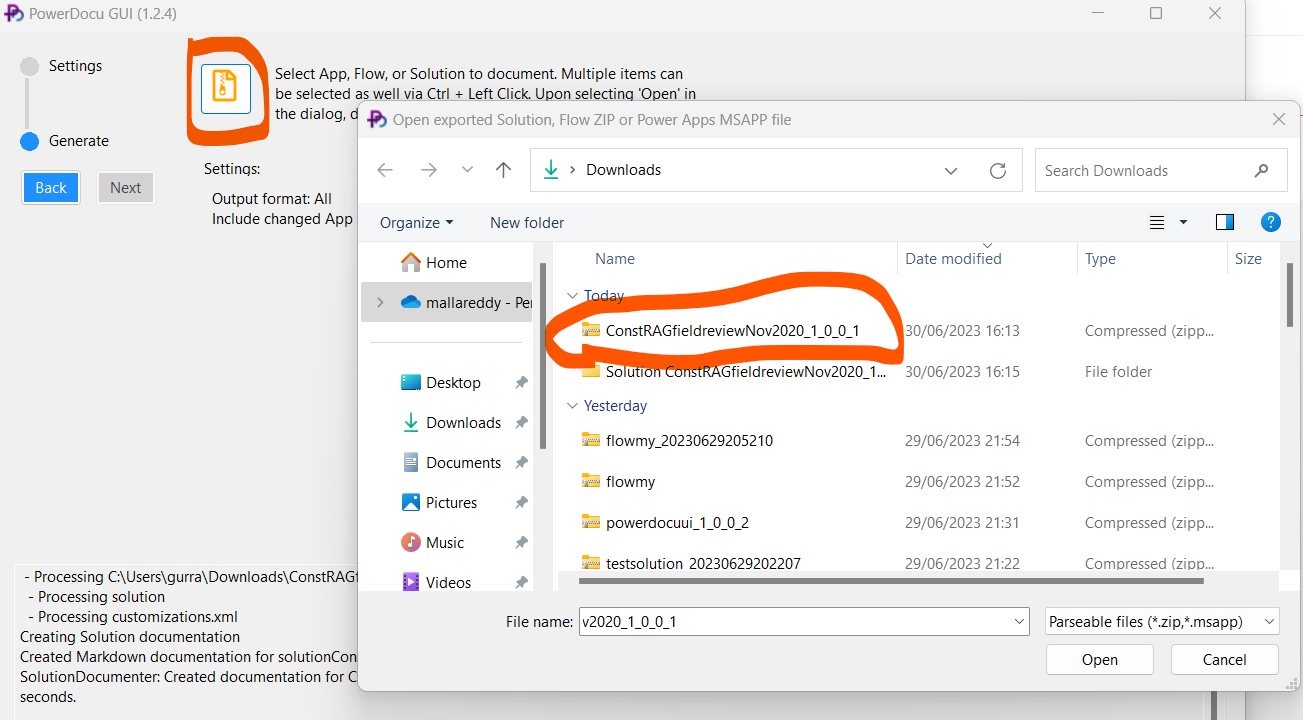
Open the PowerDocu tool and select the file solution and within fraction of seconds the documentation can be created at the same location as the file selected.
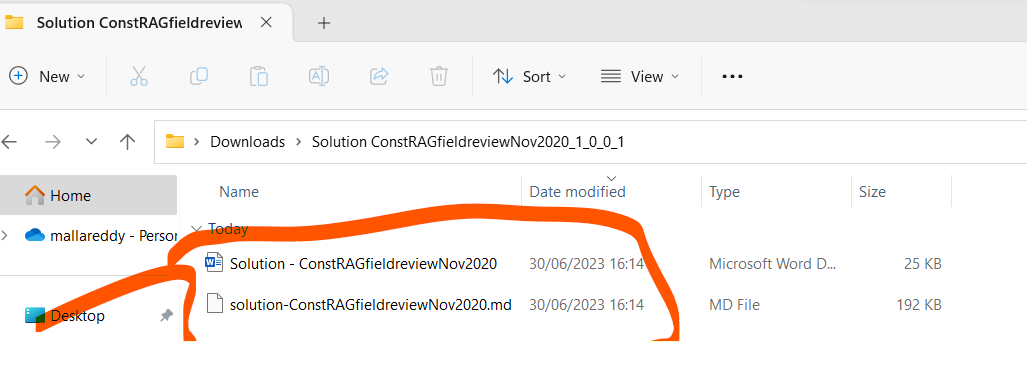
Similarly you can document for the Flow Solution or exported solution package.
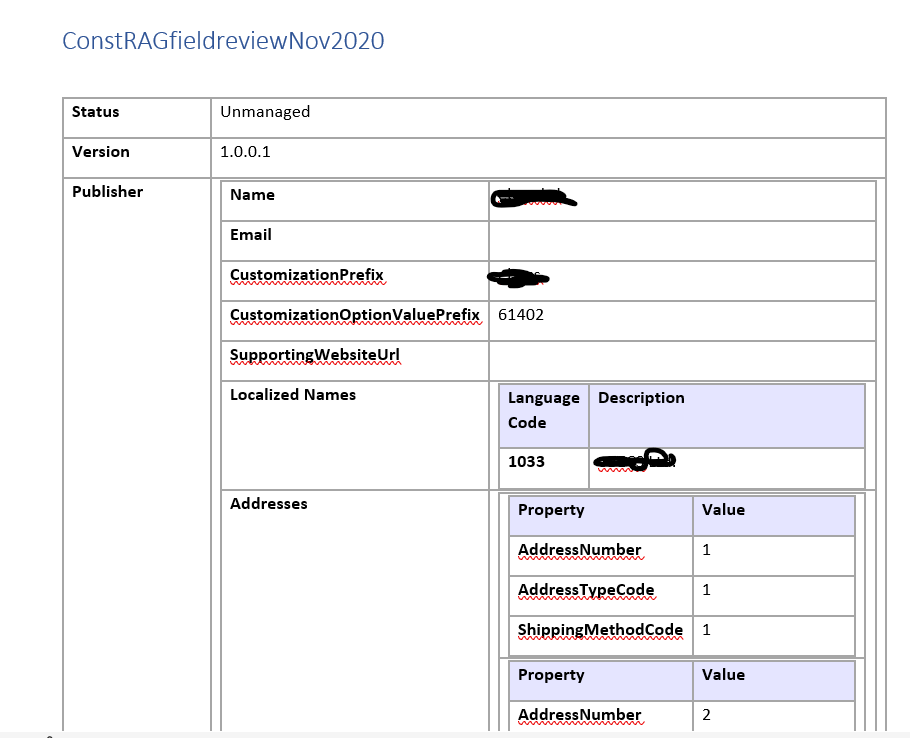
For more information about the tools click here

That’s it for today.

I hope this helps.
Malla Reddy(@UK365GUY)
#365BlogPostsin365Days

Share this:

Free Dynamics 365 Workflow tools managed solution

Hello Everyone,

Today i am going to share a Microsoft Community free tool which is available to available to download.

Dynamics 365 Workflow Tools ?

Microsoft Dynamics 365 Workflow Tools is a Community solution that expands Microsoft Dynamics 365(CRM) Workflow features with lots of new possibilities.

Which helps to build robust and very advanced Codeless solution in CRM.

Solution includes one Assembly that contains Tools based on Workflow Activities.

How to use this solution ?

You must import to use it. It only contains the workflow assembly and the activities to be used in workflows, so the import of this solution it will not affect any form, entity, view or navigation item.

Contributors suggests: You should always follow your ALM Procedure, downloading the source code, installing it in Non Production environments, test everything and then move to Production environment when you are sure that everything works as you need.

Here is the link for download

Here is the Github link for full documentation.

I have used the “Force Calculate Rollup Field” tool for auto calculate the Roll up field in my recent project.

updated the properties:

I hope this helps.
Malla Reddy
#365BlogPostsin365Days

Share this:

Associate records and auto update when a record already exists using Power Automate

Hello Everyone,

Today i am going to share use case scenario:

Create Operational cost records and associate with a project record when project is already created.

Solution: Power Automate Flow:

1. Manually trigger a flow.

2. List Projects

3. Apply to each.

Select an output from previous steps – outputs(‘List_Projects’)?[‘body/value’]

4. List Master Operational costs, select the Master Operational Costs (refer to above screenshot).

5. Apply to each 2: select an output from previous steps “value” outputs(‘List_Master_Operational_Costs’)?[‘body/value’]

Add a new row 2

Table name – Operational Costs

Name – Name ( formula: items(‘Apply_to_each_2’)?[‘acg_name’]

Project(projects) – msdyn_projects – items(‘Apply_to_each’)?[‘msdyn_projectid’]

Quantity – Quantity – items(‘Apply_to_each_2’)?[‘acg_quantity’]

Unit Cost = Unit Cost – items(‘Apply_to_each_2’)?[‘acg_unitcost’]

Finally when you run this flow “Operational Costs” records will be created for “Project” record.

I hope this helps.
Malla Reddy(@UK365GUY)
#365BlogPostsin365Days
Share this:

Create virtual table in Dataverse to connect external data source

Hello Everyone,

Today I am going to share my experience with virtual tables which can be connected from SQL or Sharepoint to create a virtual table.

Lets gets started.

What is Virtual Table?

Virtual table is an intersect table between two different systems, i.e replica of the data source table(SQL or Sharepoint) in Dataverse.

Previously if you want to connect to external data source, you are supposed to integrate the two systems, like sharepoint or SQL Server data source into the Dataverse.

Now no more coding required to integrate the data source into Dataverse from SQL or Sharepoint, Many thanks to Microsoft.

Note: When a virtual table is created inside the Dataverse from SQL or Sharepoint, the data stored in Dataverse virtual table is not considered towards Dataverse storage even millions of records exists in SQL or Sharepoint.

You can make relationship between virtual table and dataverse tables no issues at all.

Lets see how to create virtual table.

Login into Make.Powerapps.com

Create a virtual table from either ” Table” or from the “Solution”.

Click on the new table chervon and select New table from external data.

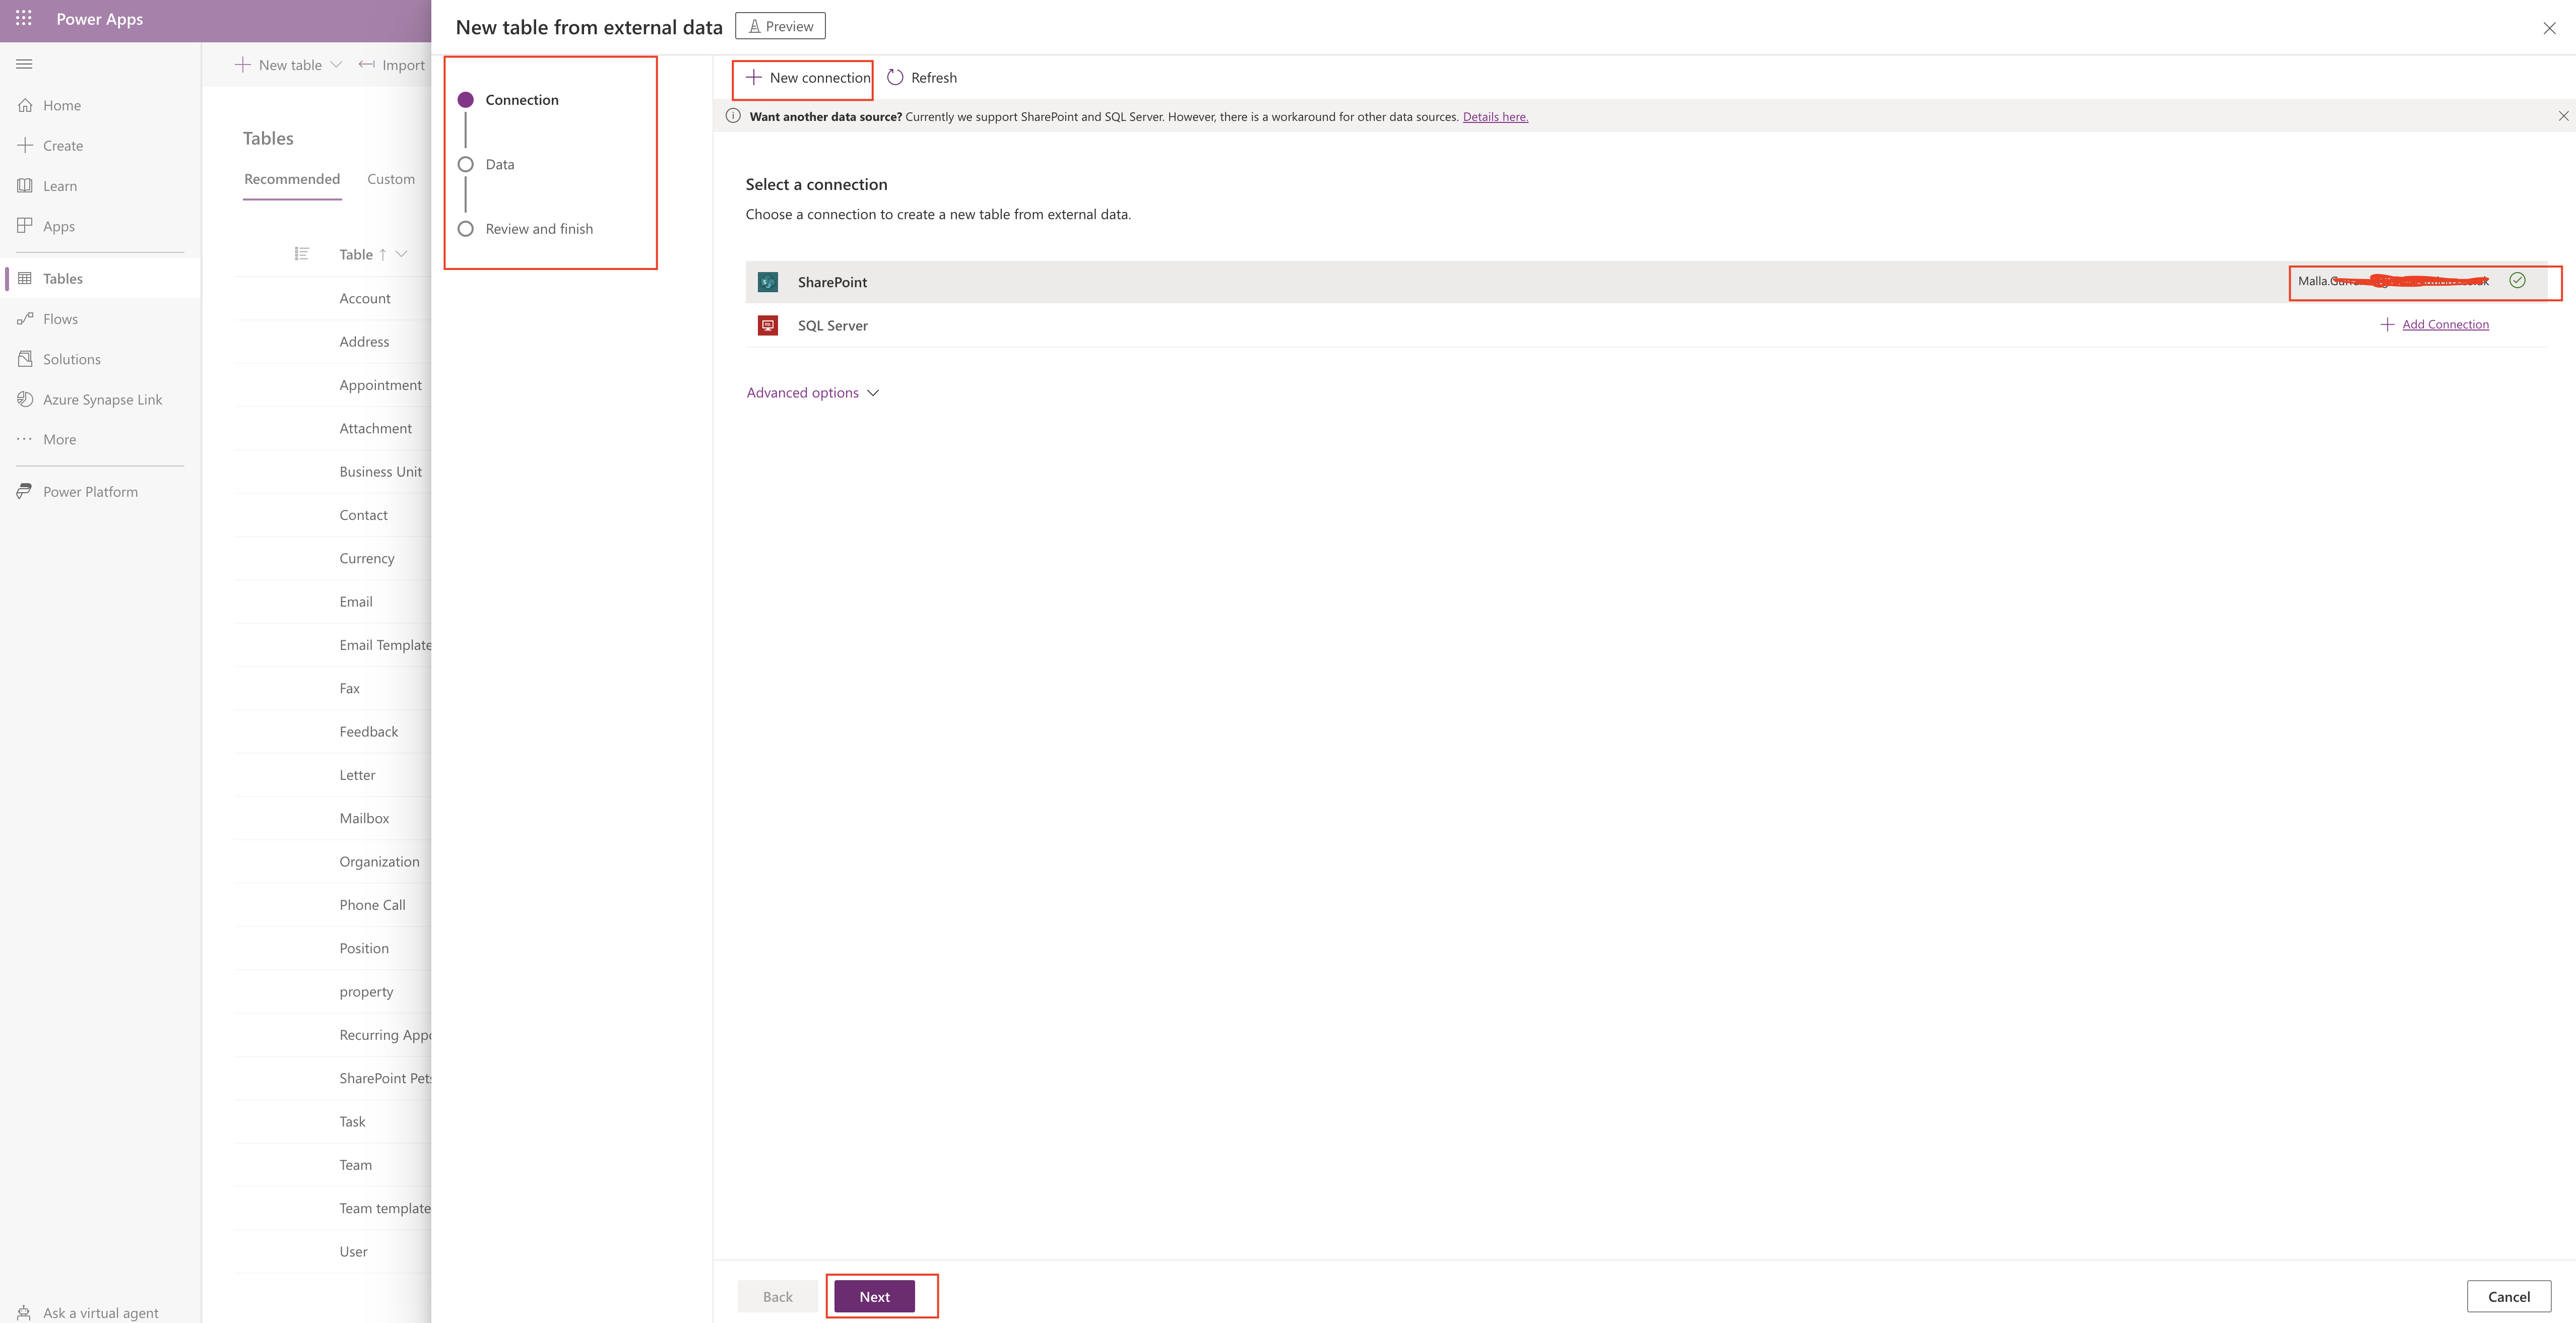
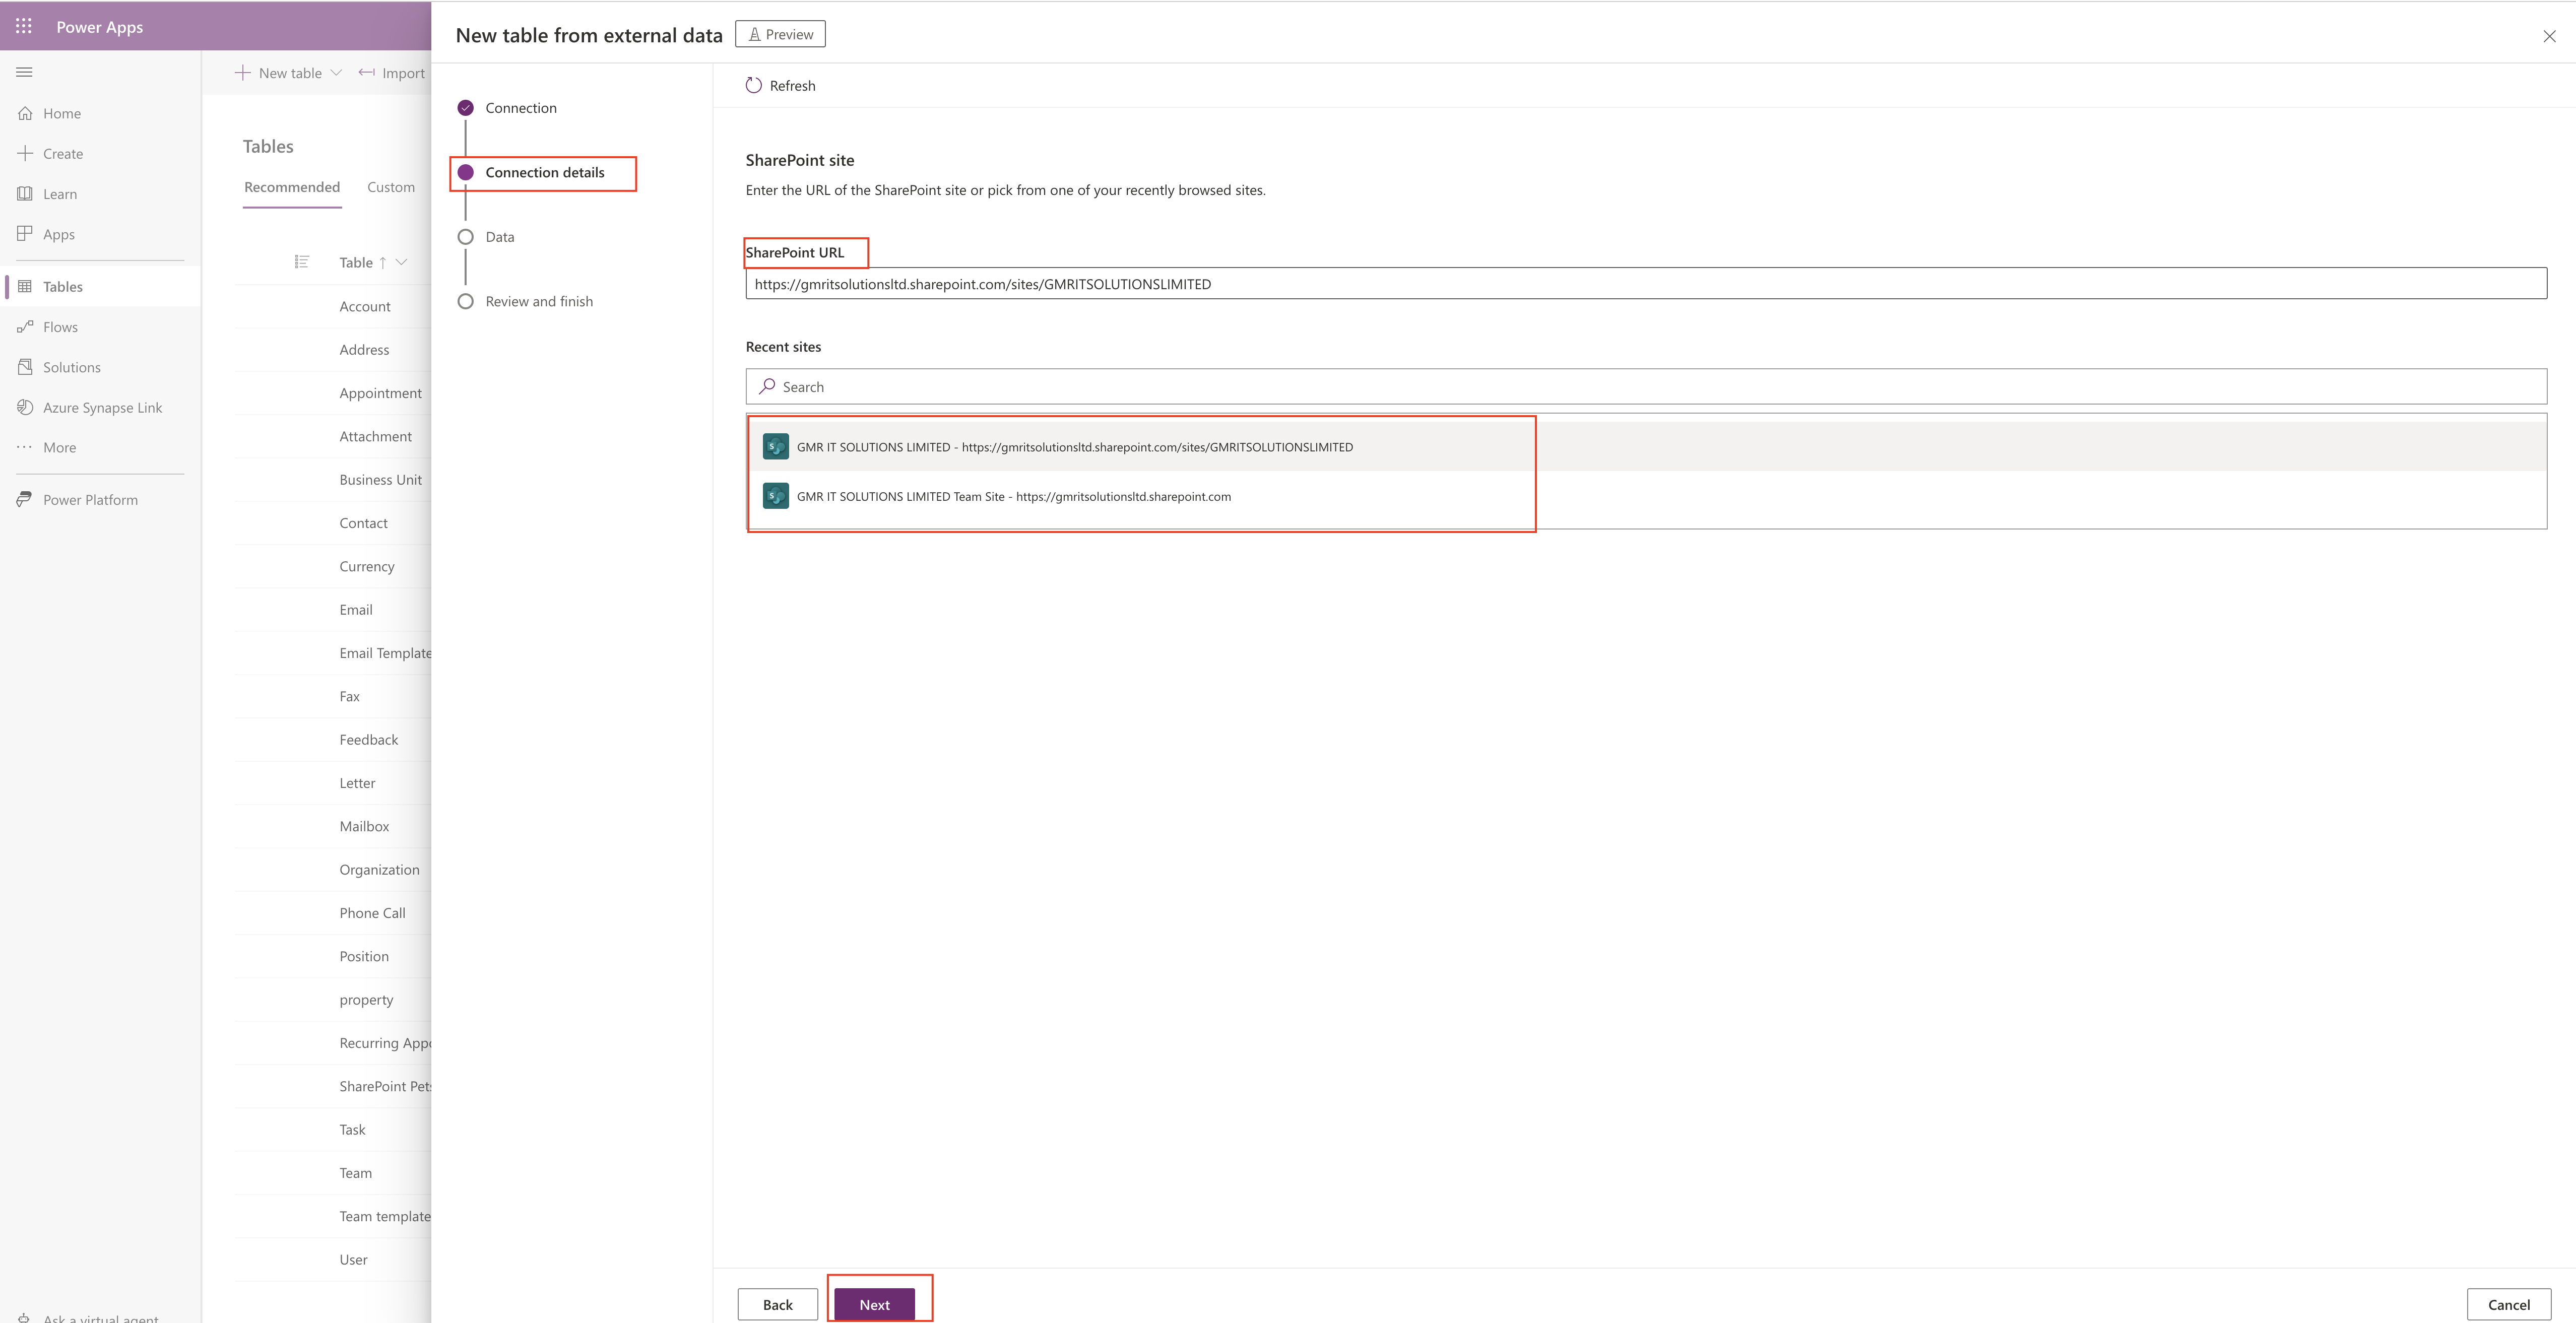
New window will be prompted so make a connection either sharepoint or sql server, in this example i am going to make sharepoint connection, provide your sharepoint url and credential and make a connection if successful a green right tick will appear and then click next.

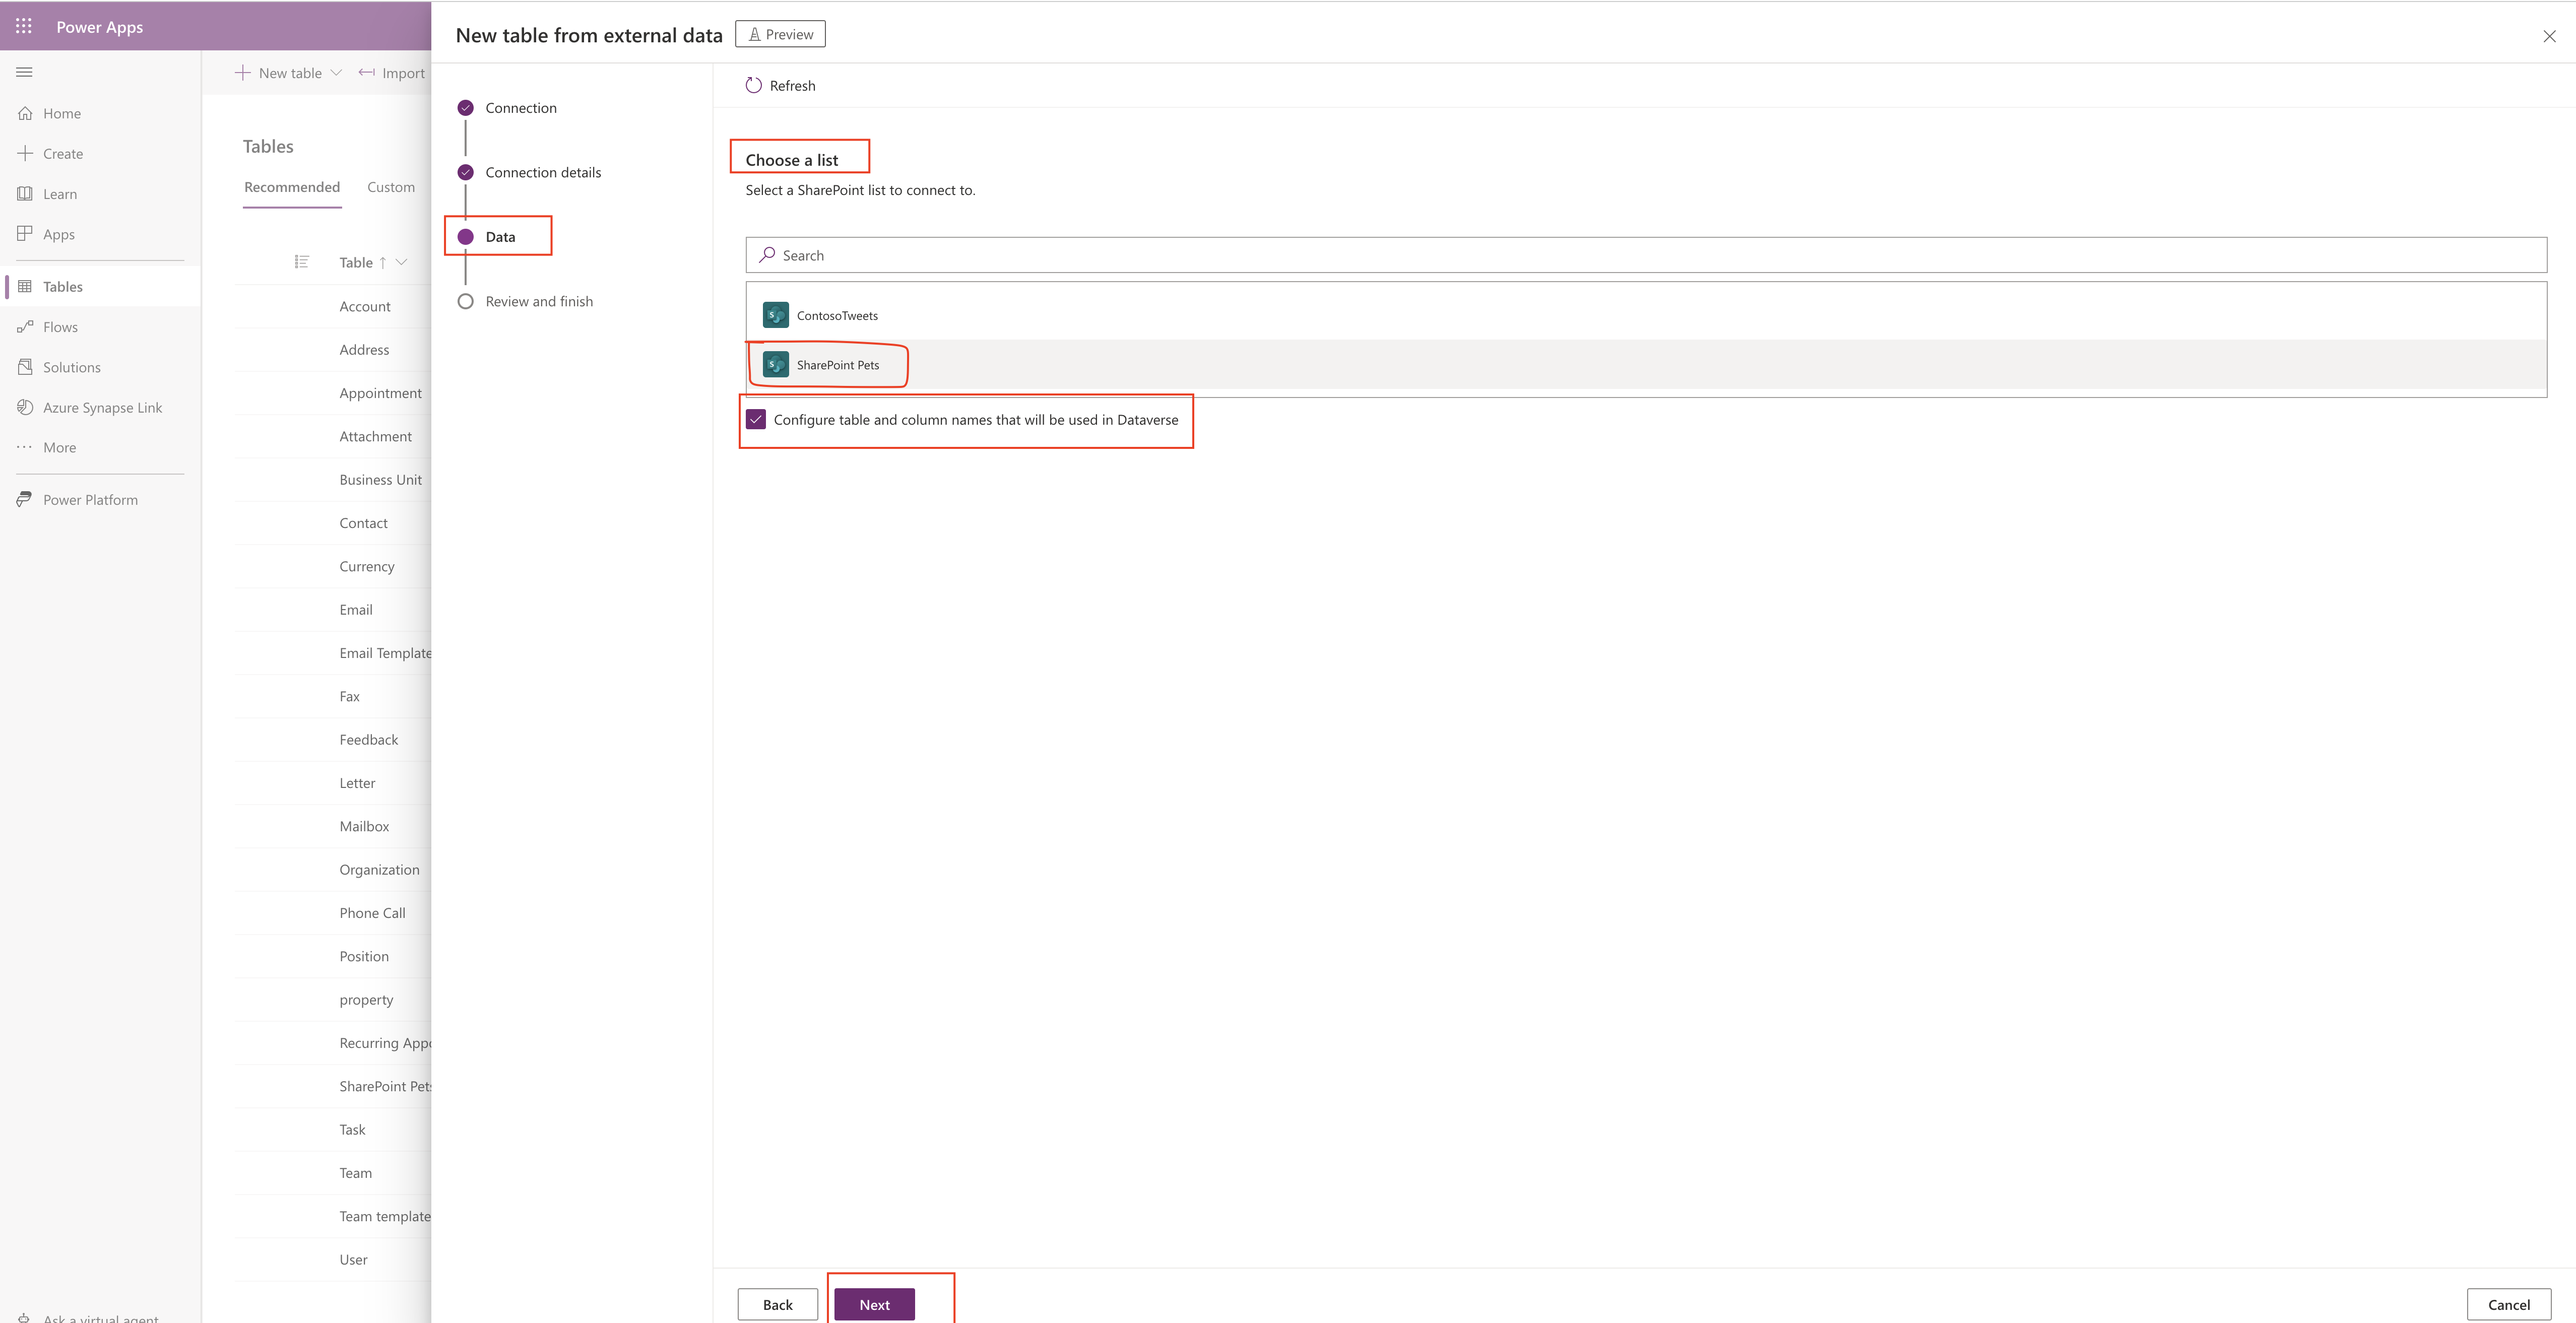
Now we have made a connection and the next screen will show the sharepoint lists available in the connection and make a selection and click “next” see below screen.

As you can see from the above screenshot its clearly asking for sharepoint list and also check the box for configure table and column names that will be used in Dataverse.

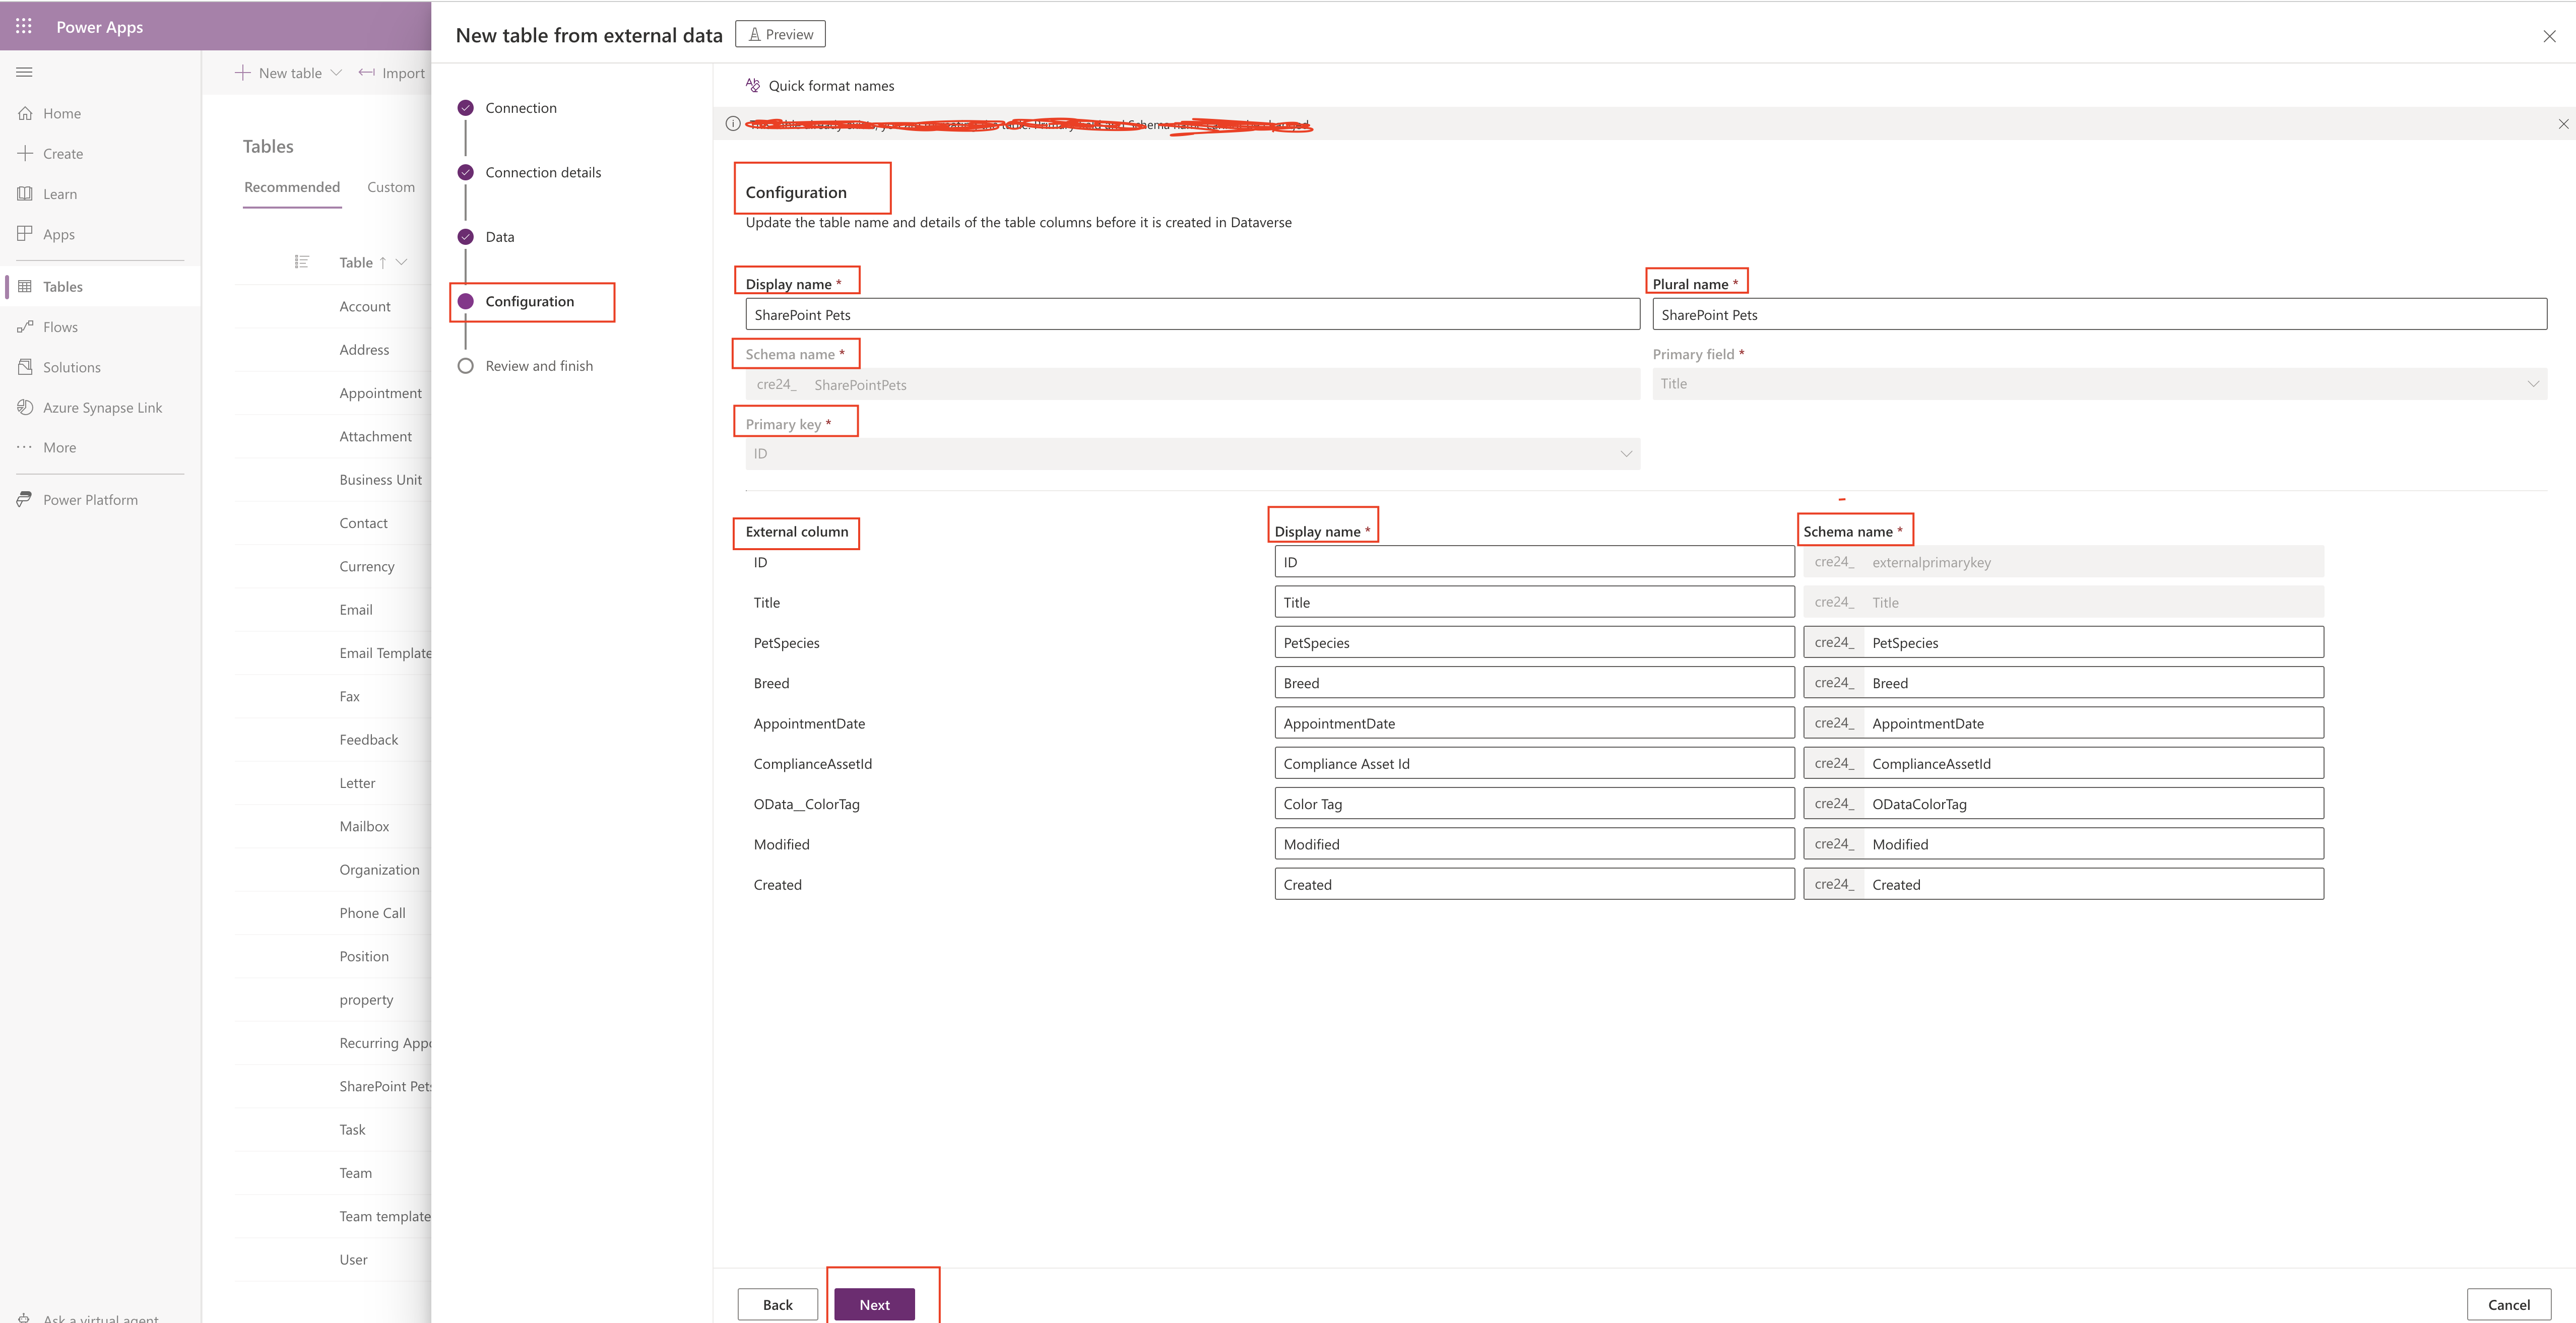
Next Configuration step:

Update the table name and details of the table columns before it is created in Dataverse.

Display name, Plural name, Schema name and Primary key will auto created from the data source.

External columns will be displayed once you are happy with the columns and click next.

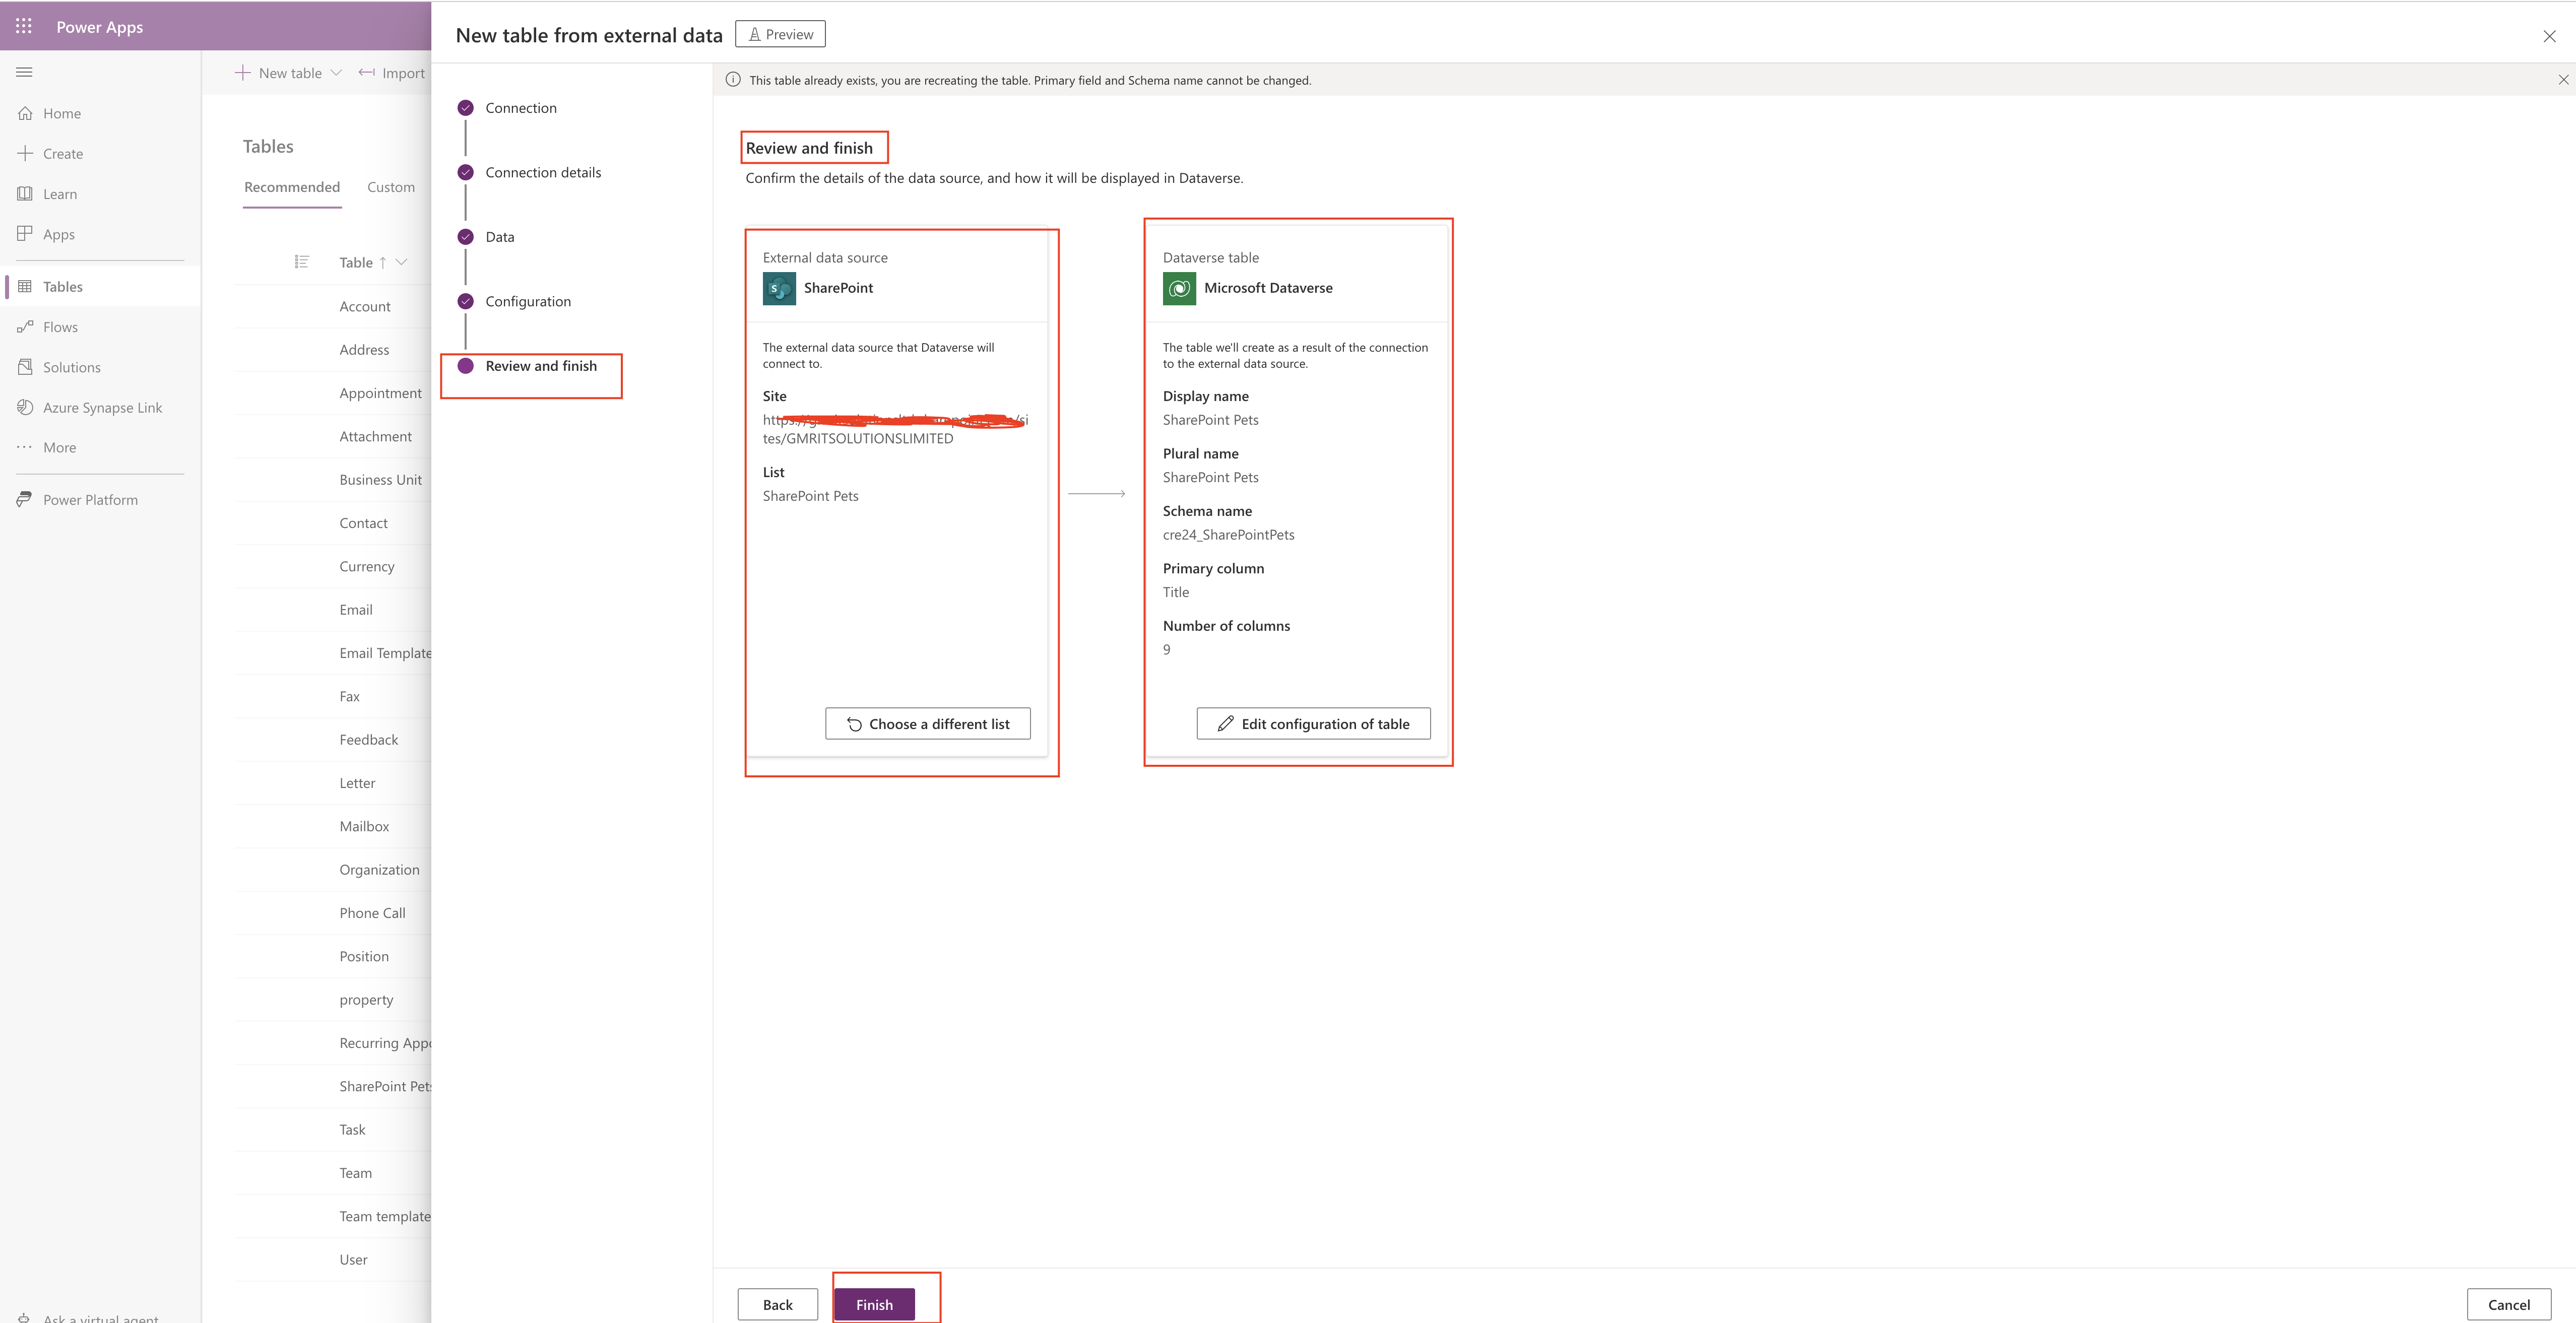
Final step is to Review and Finish:

Make sure the external data source and dataverse table are correct, if not you can edit from here, if you are happy then click finish.

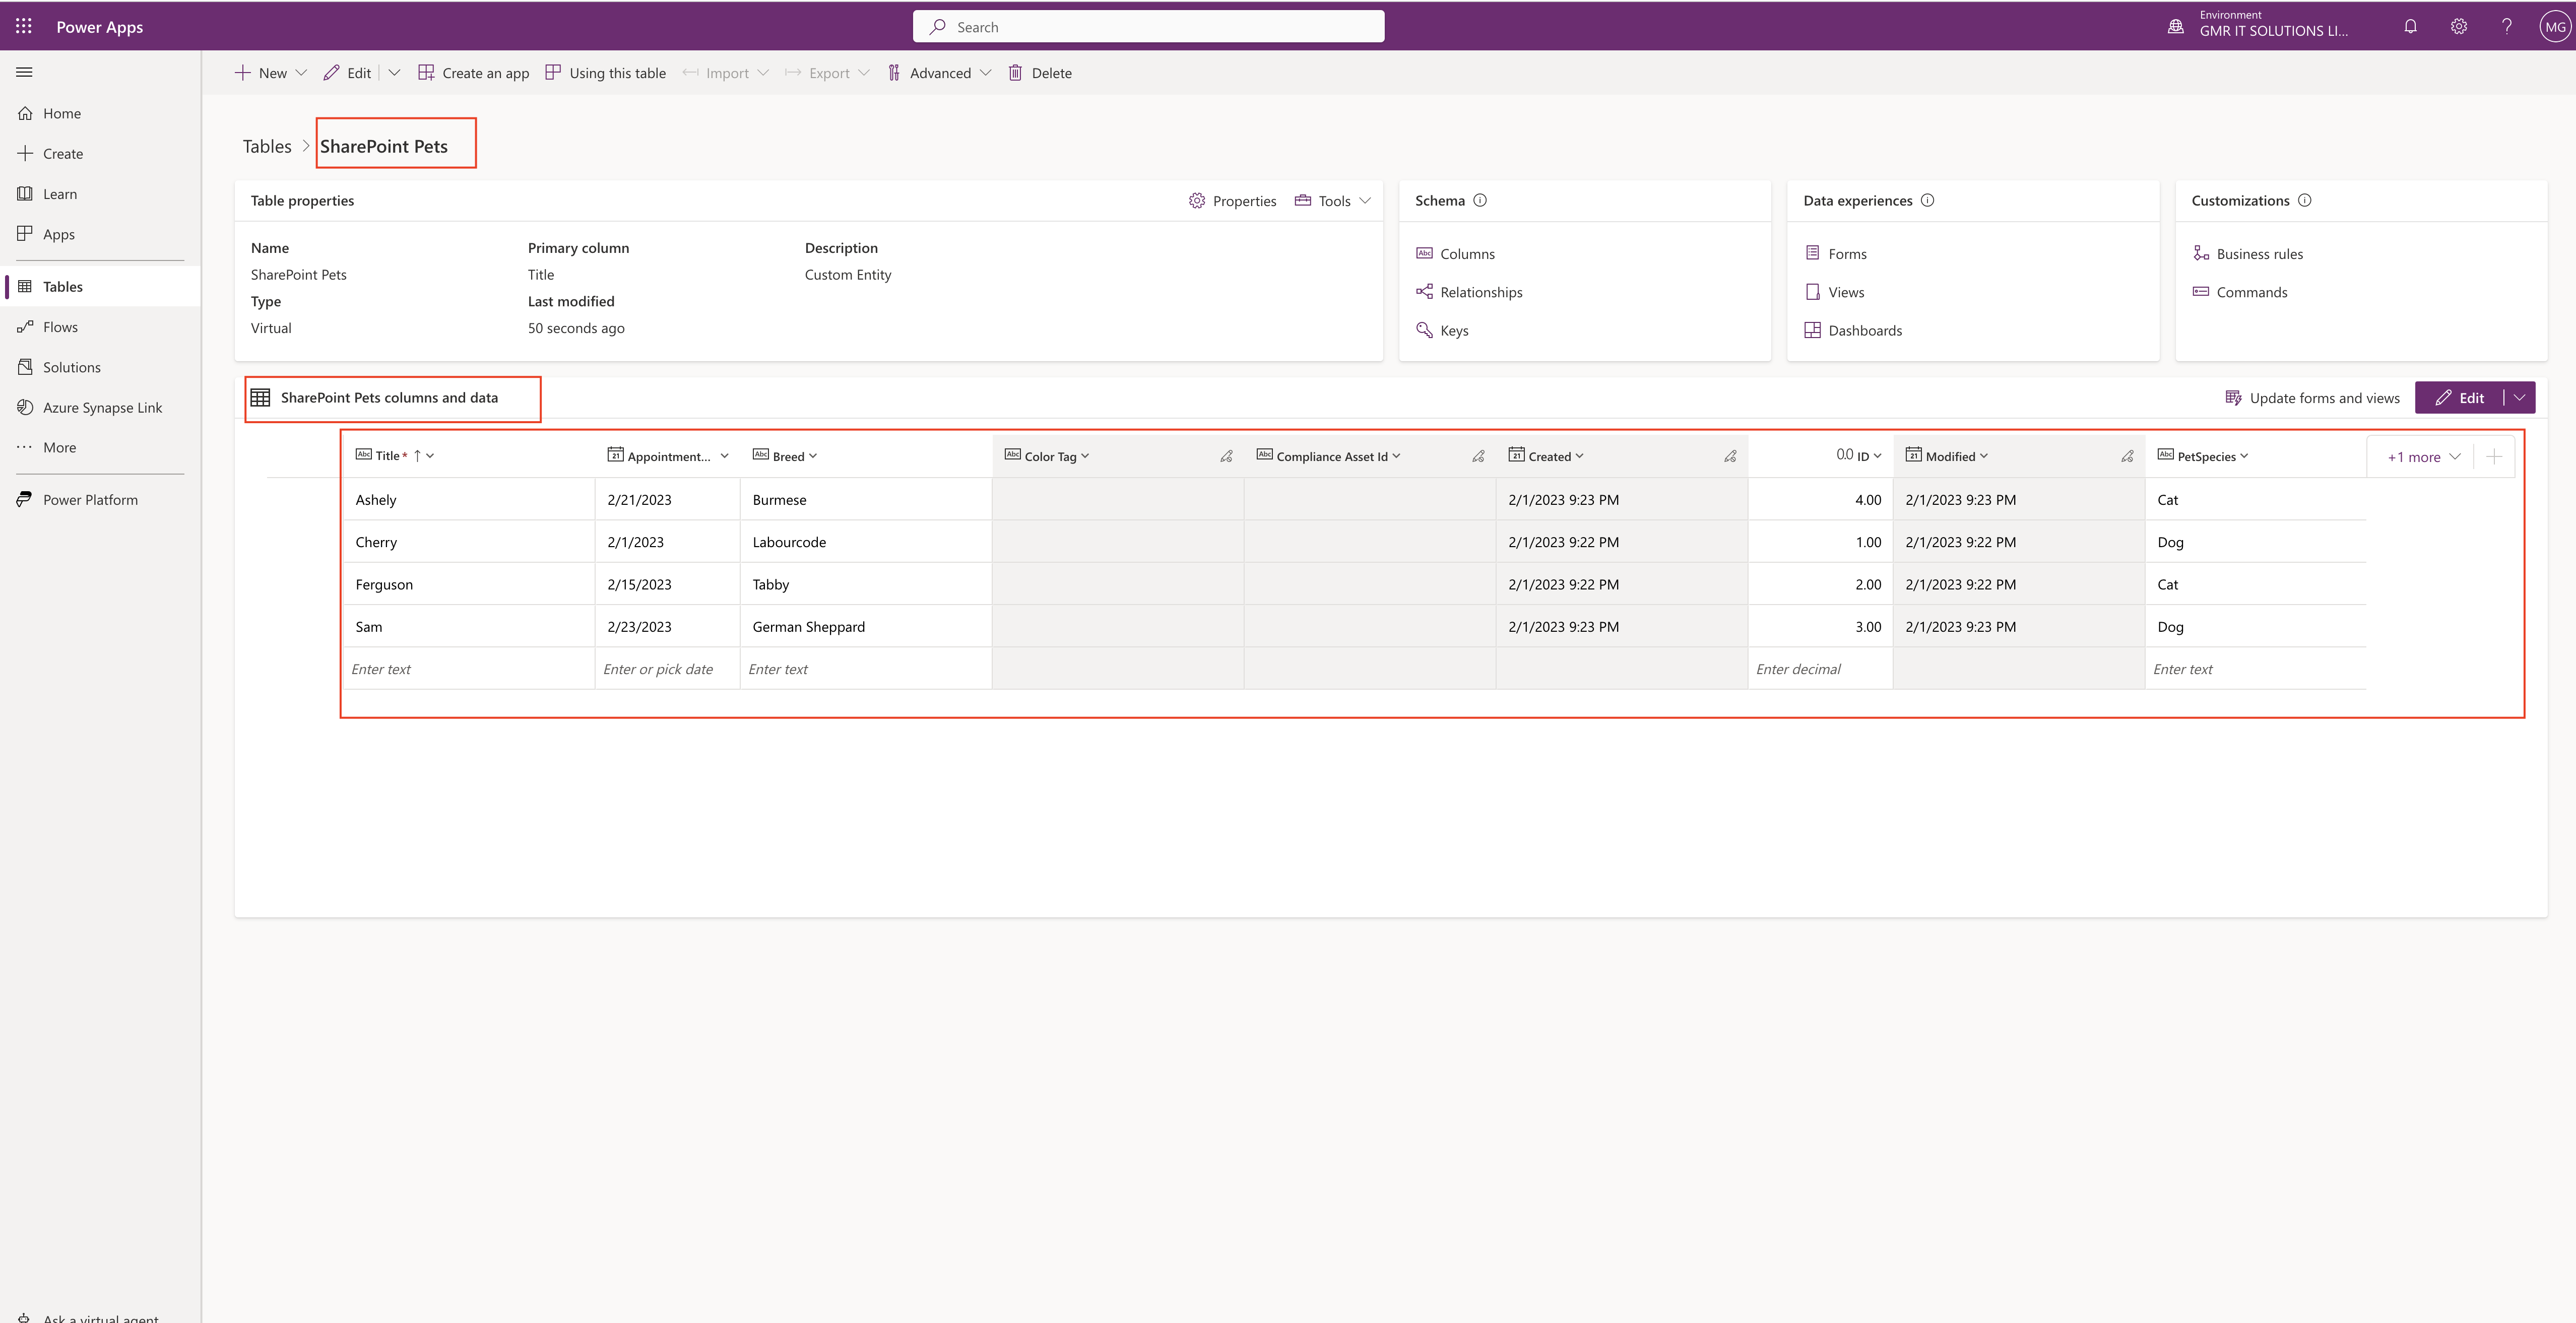
Virtual table will be created in Dataverse refer to above screenshot and you can start using this table in reporting or any other business.

I hope this helps.
Malla Reddy(@UK365GUY)
#365BlogPostsin365Days

Share this:

Billing Preview on Power Platform Admin Center

Hello Everyone,

Today i am going to share new preview feature related to billing – Licenses Preview.

To see the new feature:

Login into Power Platform Admin Center

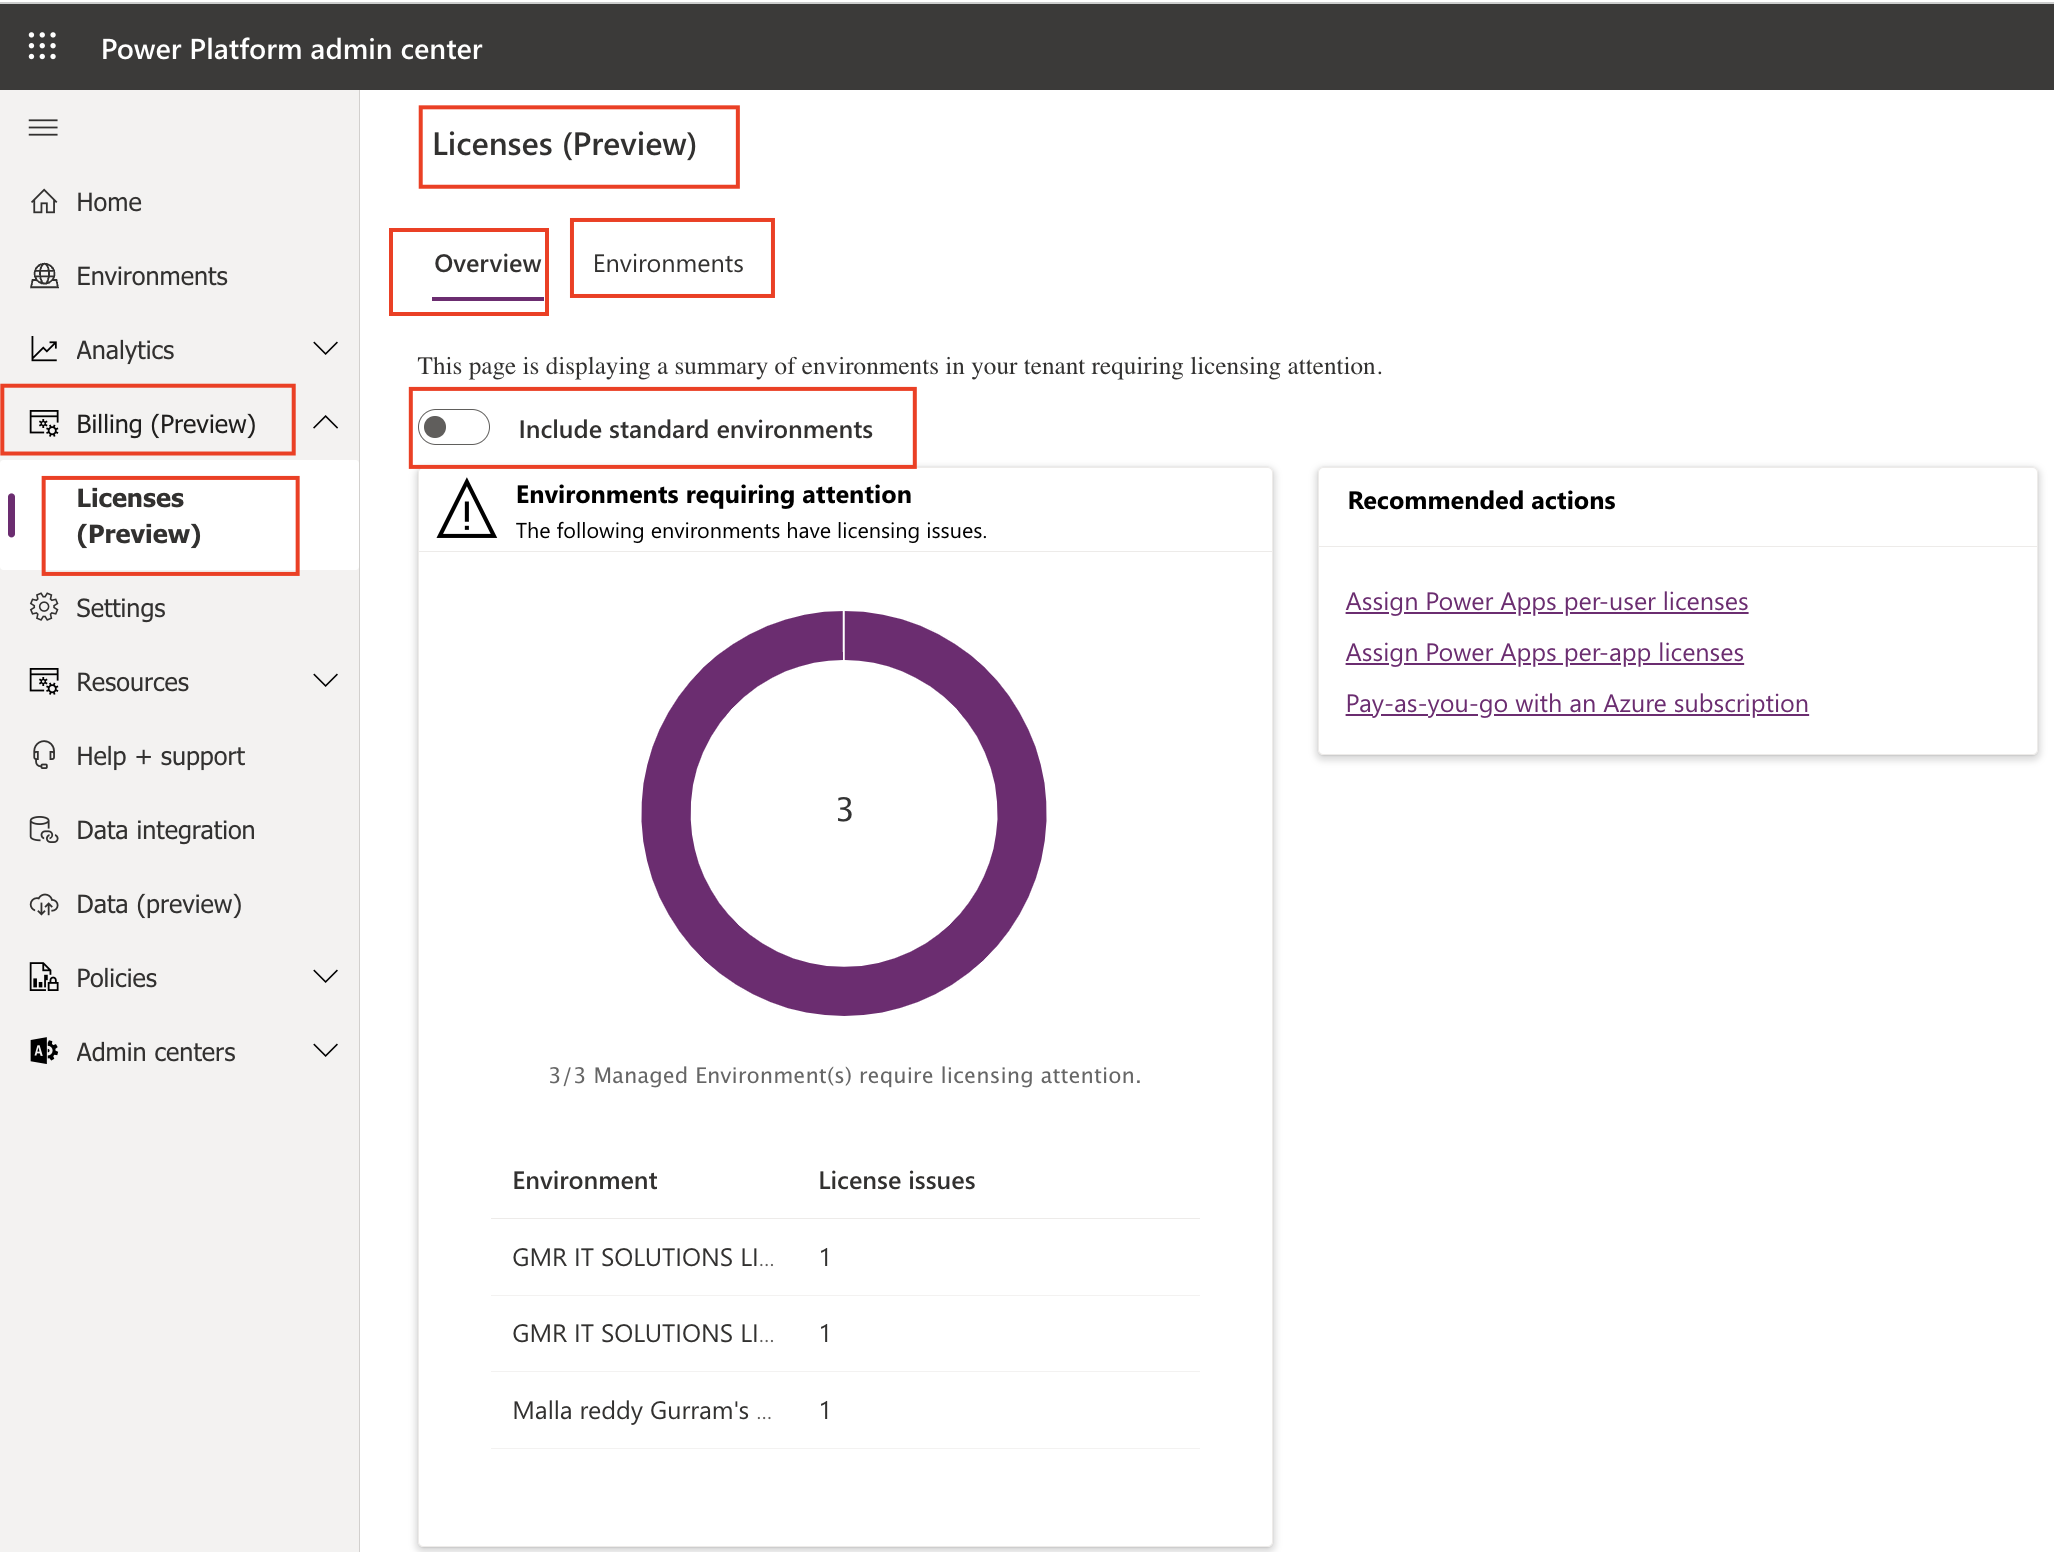
Click on Billing(Preview) and Licenses(Preview) will be displayed underneath the billing.

The page is displaying a summary of environments in your tenant requiring licensing attention.

Then the Licenses(Preview) will be displayed, there will be toggle button which is “Include standard environments”

Whats that mean is the environments which have licenses will be called as standard environments and rest of them like the trial and community environment not considered as standard environments.

From the above screenshot it says 3 licenses there for these environments.

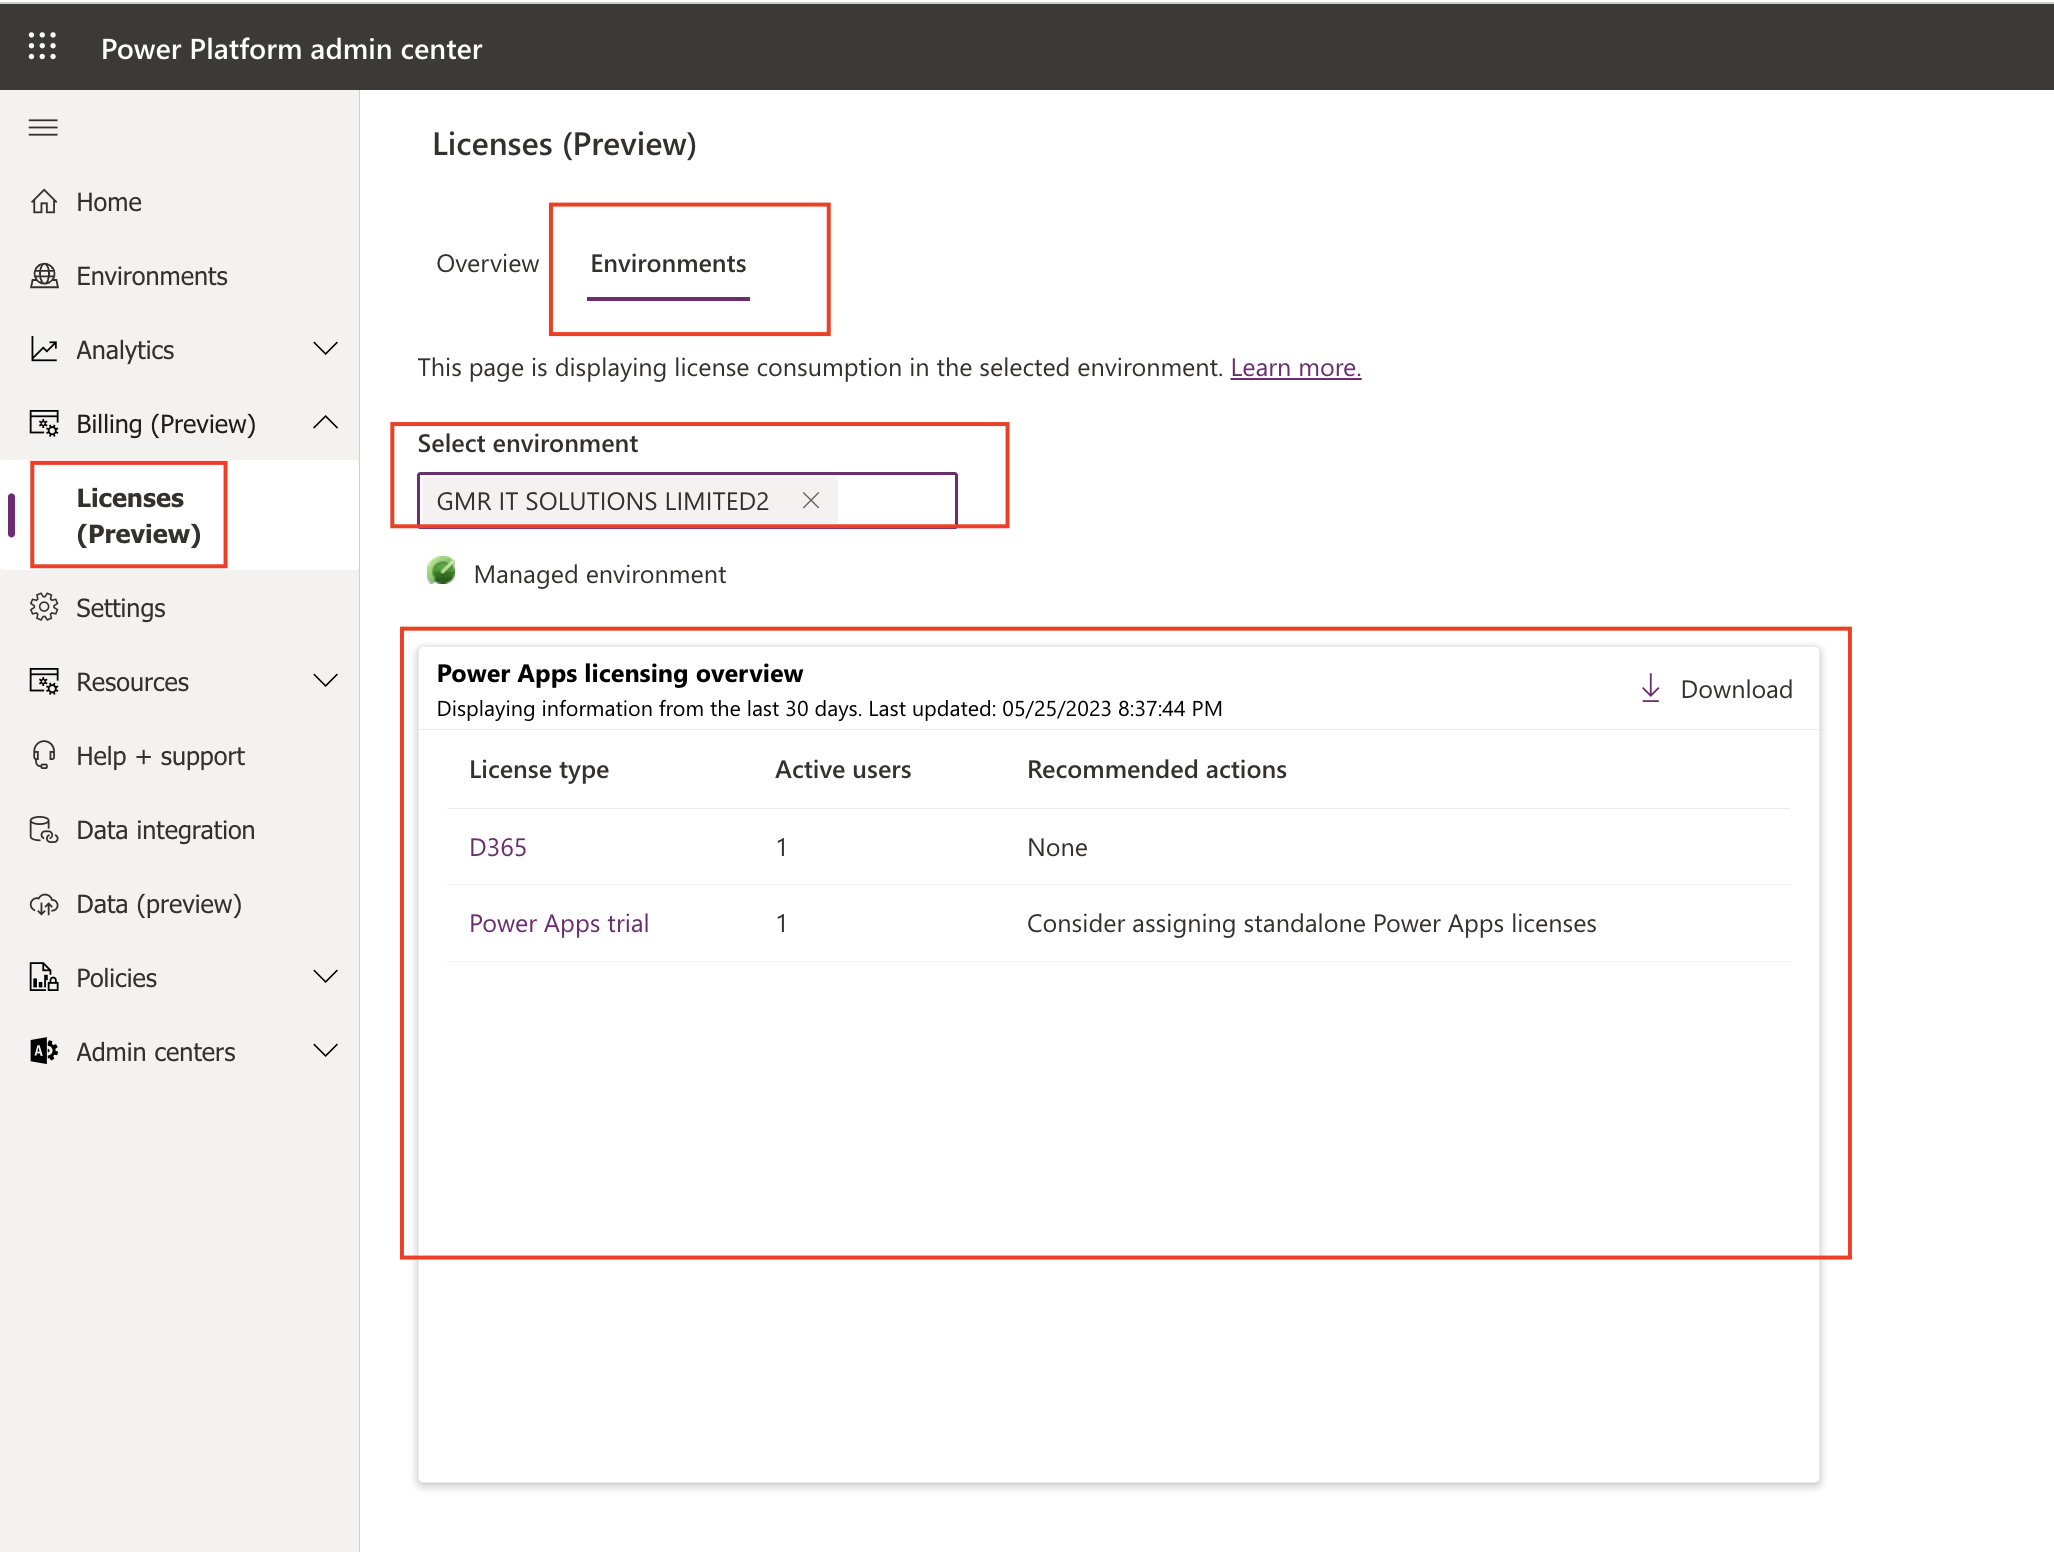
When you click on “Environments” Tab

The page will be displaying license consumption in the selected environment

Select the environment

I have chosen: GMR IT SOLUTIONS LIMITED2 – SANDBOX

It is displaying the Power Apps licensing overview of the License types like D365, Power Apps Trial.

It will also display whether it is managed environment or not.

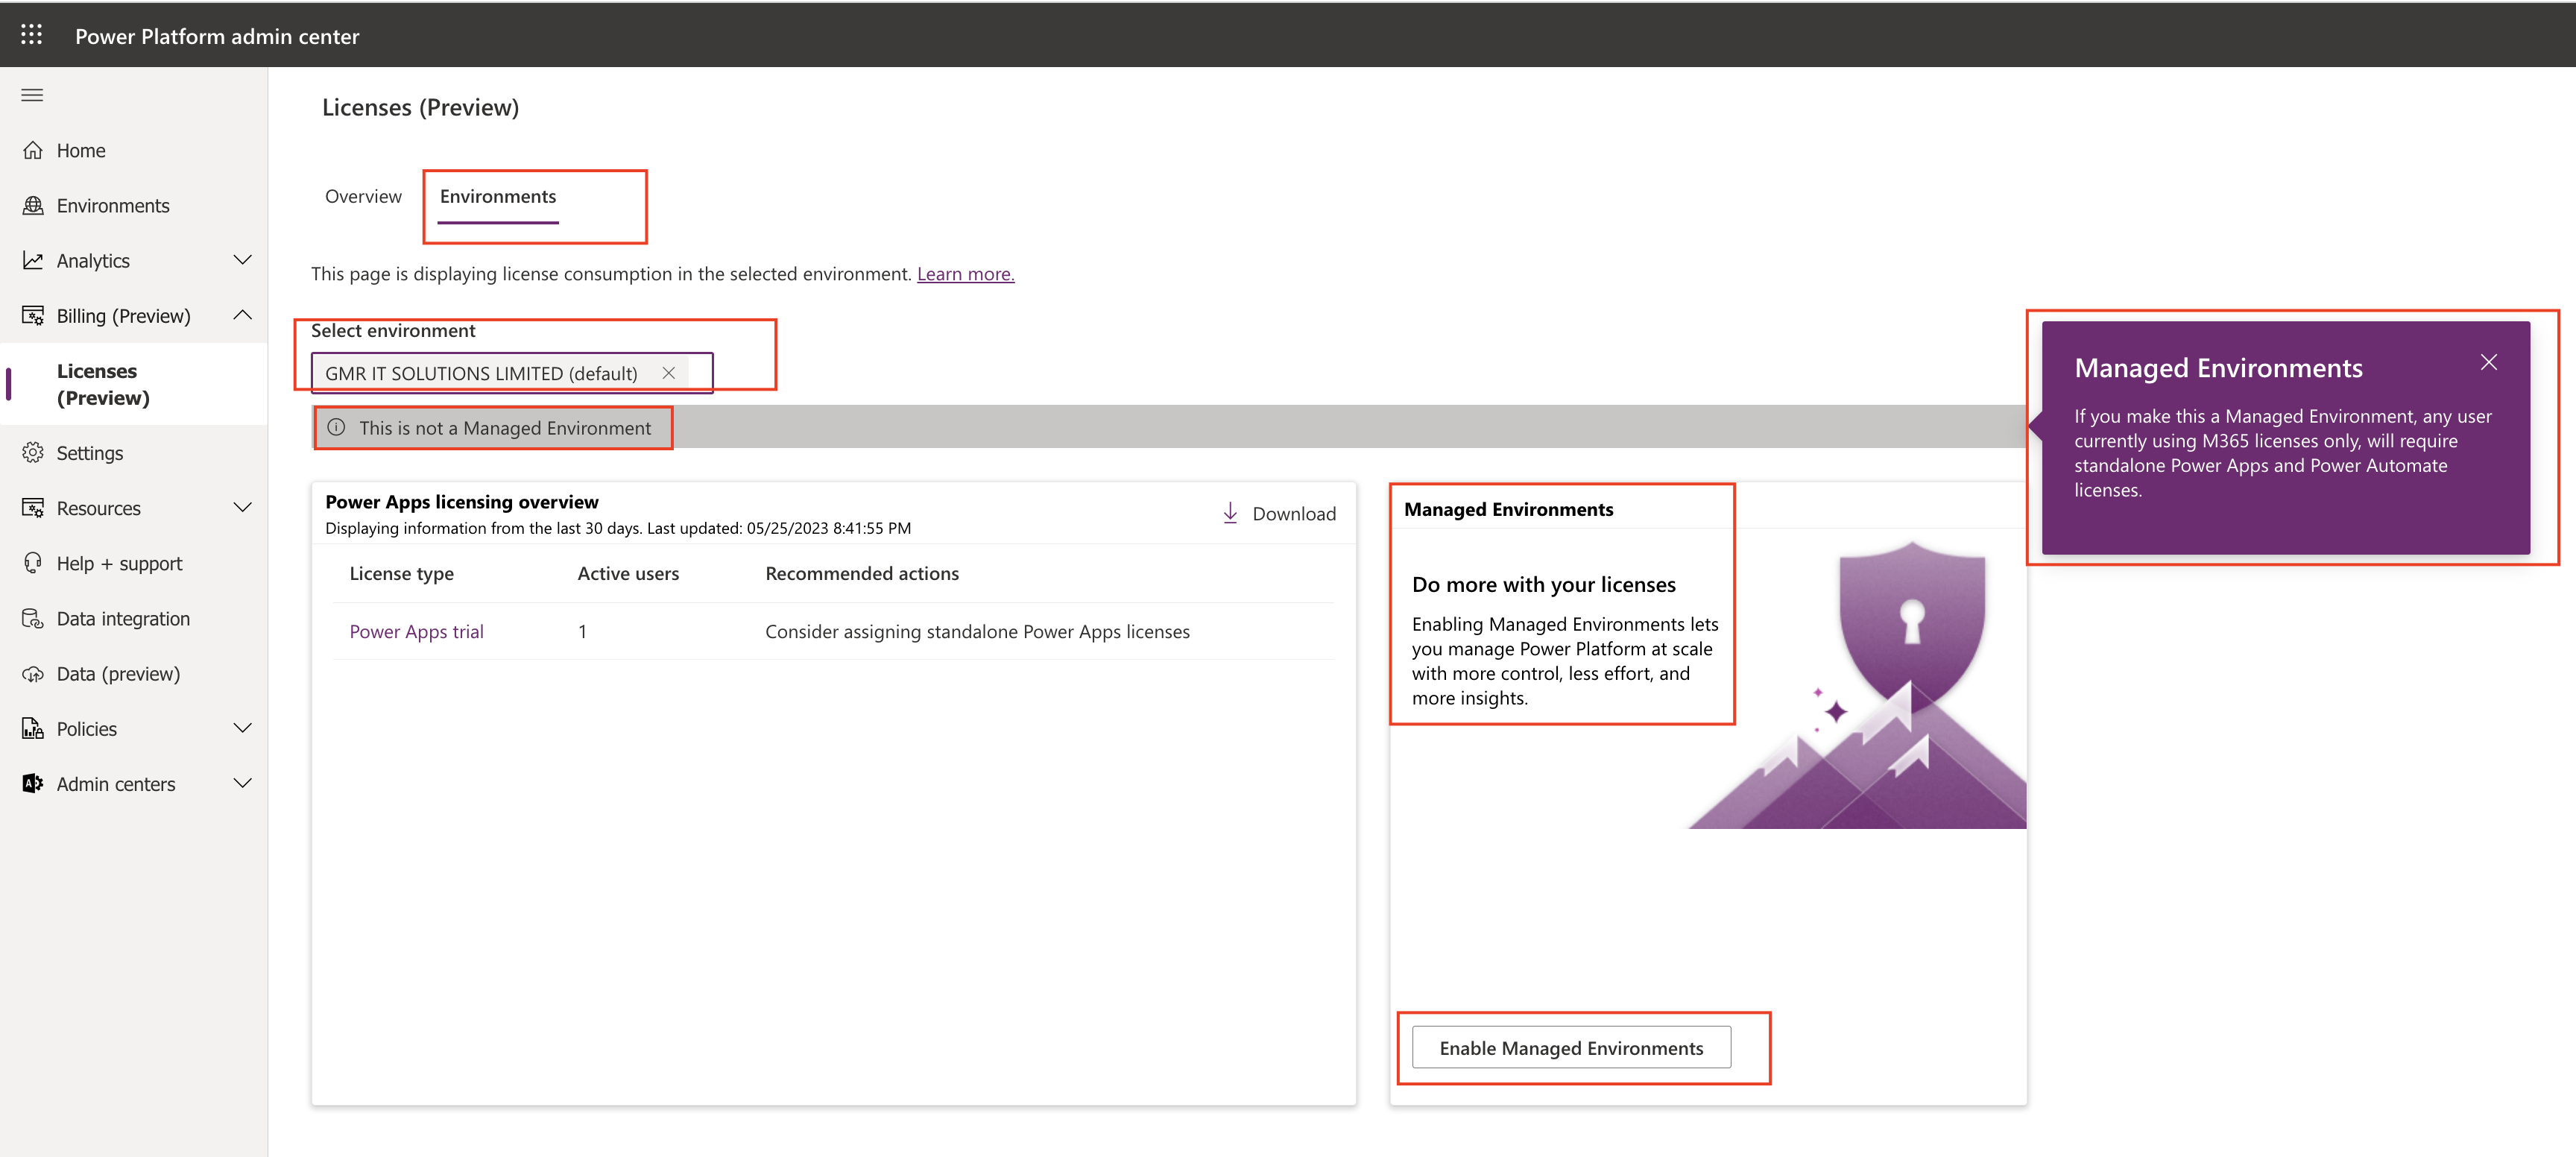
If you select the default environment :

It will show whether it is a managed environment if not you can enable managed environments.

Managed Environments: If you make this a Managed Environment, any user currently using M365 Licenses only, will require standalone Power Apps and Power Automate licenses.

For more information click here

Thats it for today.

I hope this helps
Malla Reddy(@UK365GUY)
#365BlogPostsin365Days
Share this: