Menu Close

Tag: #mallareddygurram

{How to} send an email to specific list of customers instead of creating new segments in dynamics 365 marketing real time marketing

Hello Everyone,

Today I am going to show how to send email without creating segmentation on Dynamics 365 Marketing.
Let’s get’s started.

Suppose you have a requirement to send urgent email to group of contacts and you don’t want to create a segment.

Then how do you do that?

Certainly! In Dynamics 365 Customer Insights – Journeys, you can use the “SEND NOW” feature to quickly send an email to specific recipients without creating new segments. Here’s how:

1. Create a Marketing Email Message:

Does your email message as usual, ensuring that you include all the requried elements(such as a subject and a name) and set all necessary fields.

Save the message with an appropriate name.

2. Use the Quick Send Feature:

Once your email message is ready, select ” SEND NOW”.

Dynamics 365 Customer Insights – Journeys will automatically create a static segment containing your selected contacts. The segement will have the same name as your email message.

Simultaneously, a customer journey will be preconfigured to send your message to that segment.

The Journey starts sending immediately.

3. Limitations of Quick Send:

You can send to a maximum of 30 contacts, selected one at a time(similar to a static segment).

Your message can include dynamic expressions, but you can’t use relations (only one hop in Dynamic expressions).

Ensure your message passes the standard error check, including all required content(subject, subscription-center link, physical post address, valid to/from addresses).

Remember, this feature is ideal for quick emails to specific recipients, bypassing the complexities of full-fledged campaigns. Both the generated segement and Journey will bear the same name as your email message.

That’s it for today.

I hope this helps.

Malla Reddy Gurram(@UK365GUY)
#365BlogPostsin365Days

Share this:

{How to} disable empty address record creation in Dynamics 365

Hello Everyone,

Today I am going to show how to disable empty address record creation in Dynamics 365.

Let’s get’s started.

Normally we can create a Account, Contact, or Lead etc without address columns filled in.

If you want to disable records being created without address columns filled in then continue reading this blog post.

Login into Power Platform Admin Center.

Go to settings and Features;

No empty address record will be created if create payload does not contain address info. This will ONLY take effect on 3 tables:

Account

Contact

Lead

it will NOT affect any other tables behavior.

That’s it for today.

I hope this helps,

Malla Reddy Gurram(@UK365GUY)
#365BlogPostsin365Days

Share this:

{Do you know} Maker and Admins can see App description from app lists view Power Platform

Hello Everyone,

Today I am going to show how to see the description of the app from app lists view on Power Platform Maker Portal.

Let’s get’s started.

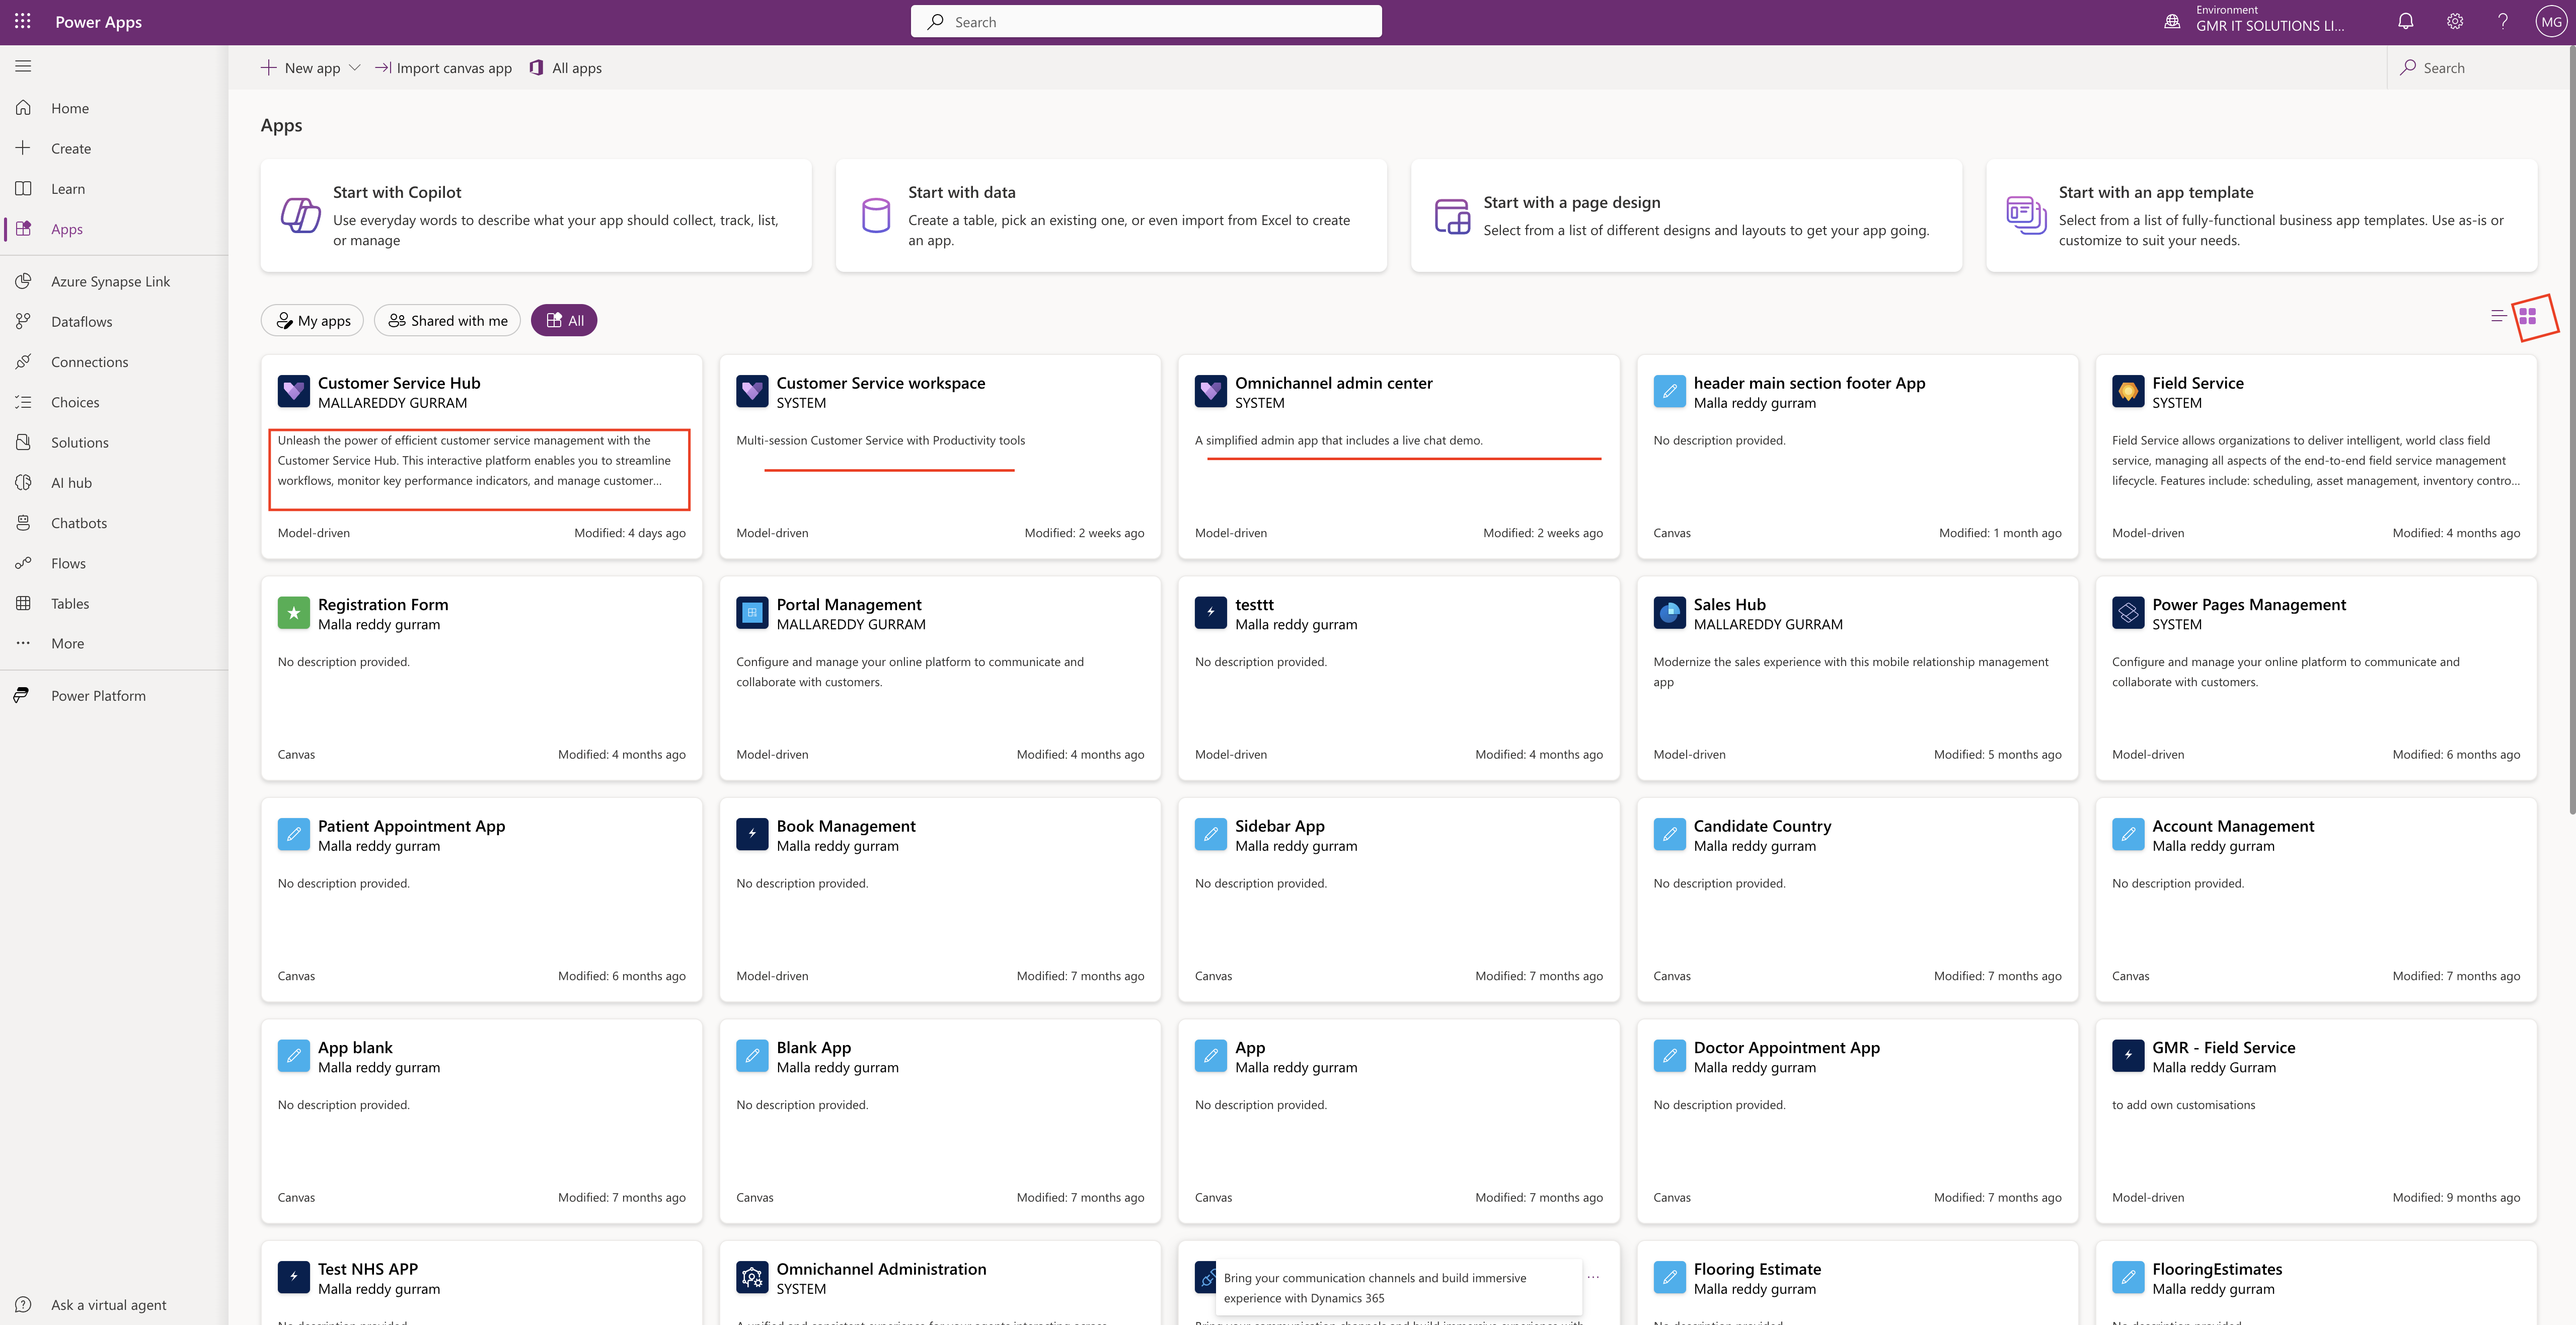
In the Power Apps environment, both makers and admins can now view their apps in a card format.
When managing a large number of resources within an organization, administrators no longer need to open each app individually to understand its functionality.

Instead, they can quickly get an overview of all their apps in one place.

Here are the key details:

1. Card View: Makers and Admins can see a card view of their apps in the Maker Portal. This format provides a concise summary of each app.

2. Description: Apps that don’t have description will have one automatically generated using AI(in managed environments within the US region).

These descriptions, whether AI-generated or set by the maker, are now visible in the card view. This
feature helps end-users easily understand what each app does without having to guess based on the app name or launch it.

So whether you’re a maker or an admin, you’ll find it easier to navigate and manage your apps with these environments.

That’s it for today.

I hope this helps.

Malla Reddy Gurram(@UK365GUY)
#365BlogPostsin365Days

Share this:

What is the difference between Standard and Elastic tables in Dataverse?

Hello Everyone,

Today I am going share my thoughts on the Elastic vs Standard Table in Dynamics 365.

Let’s get’s started.

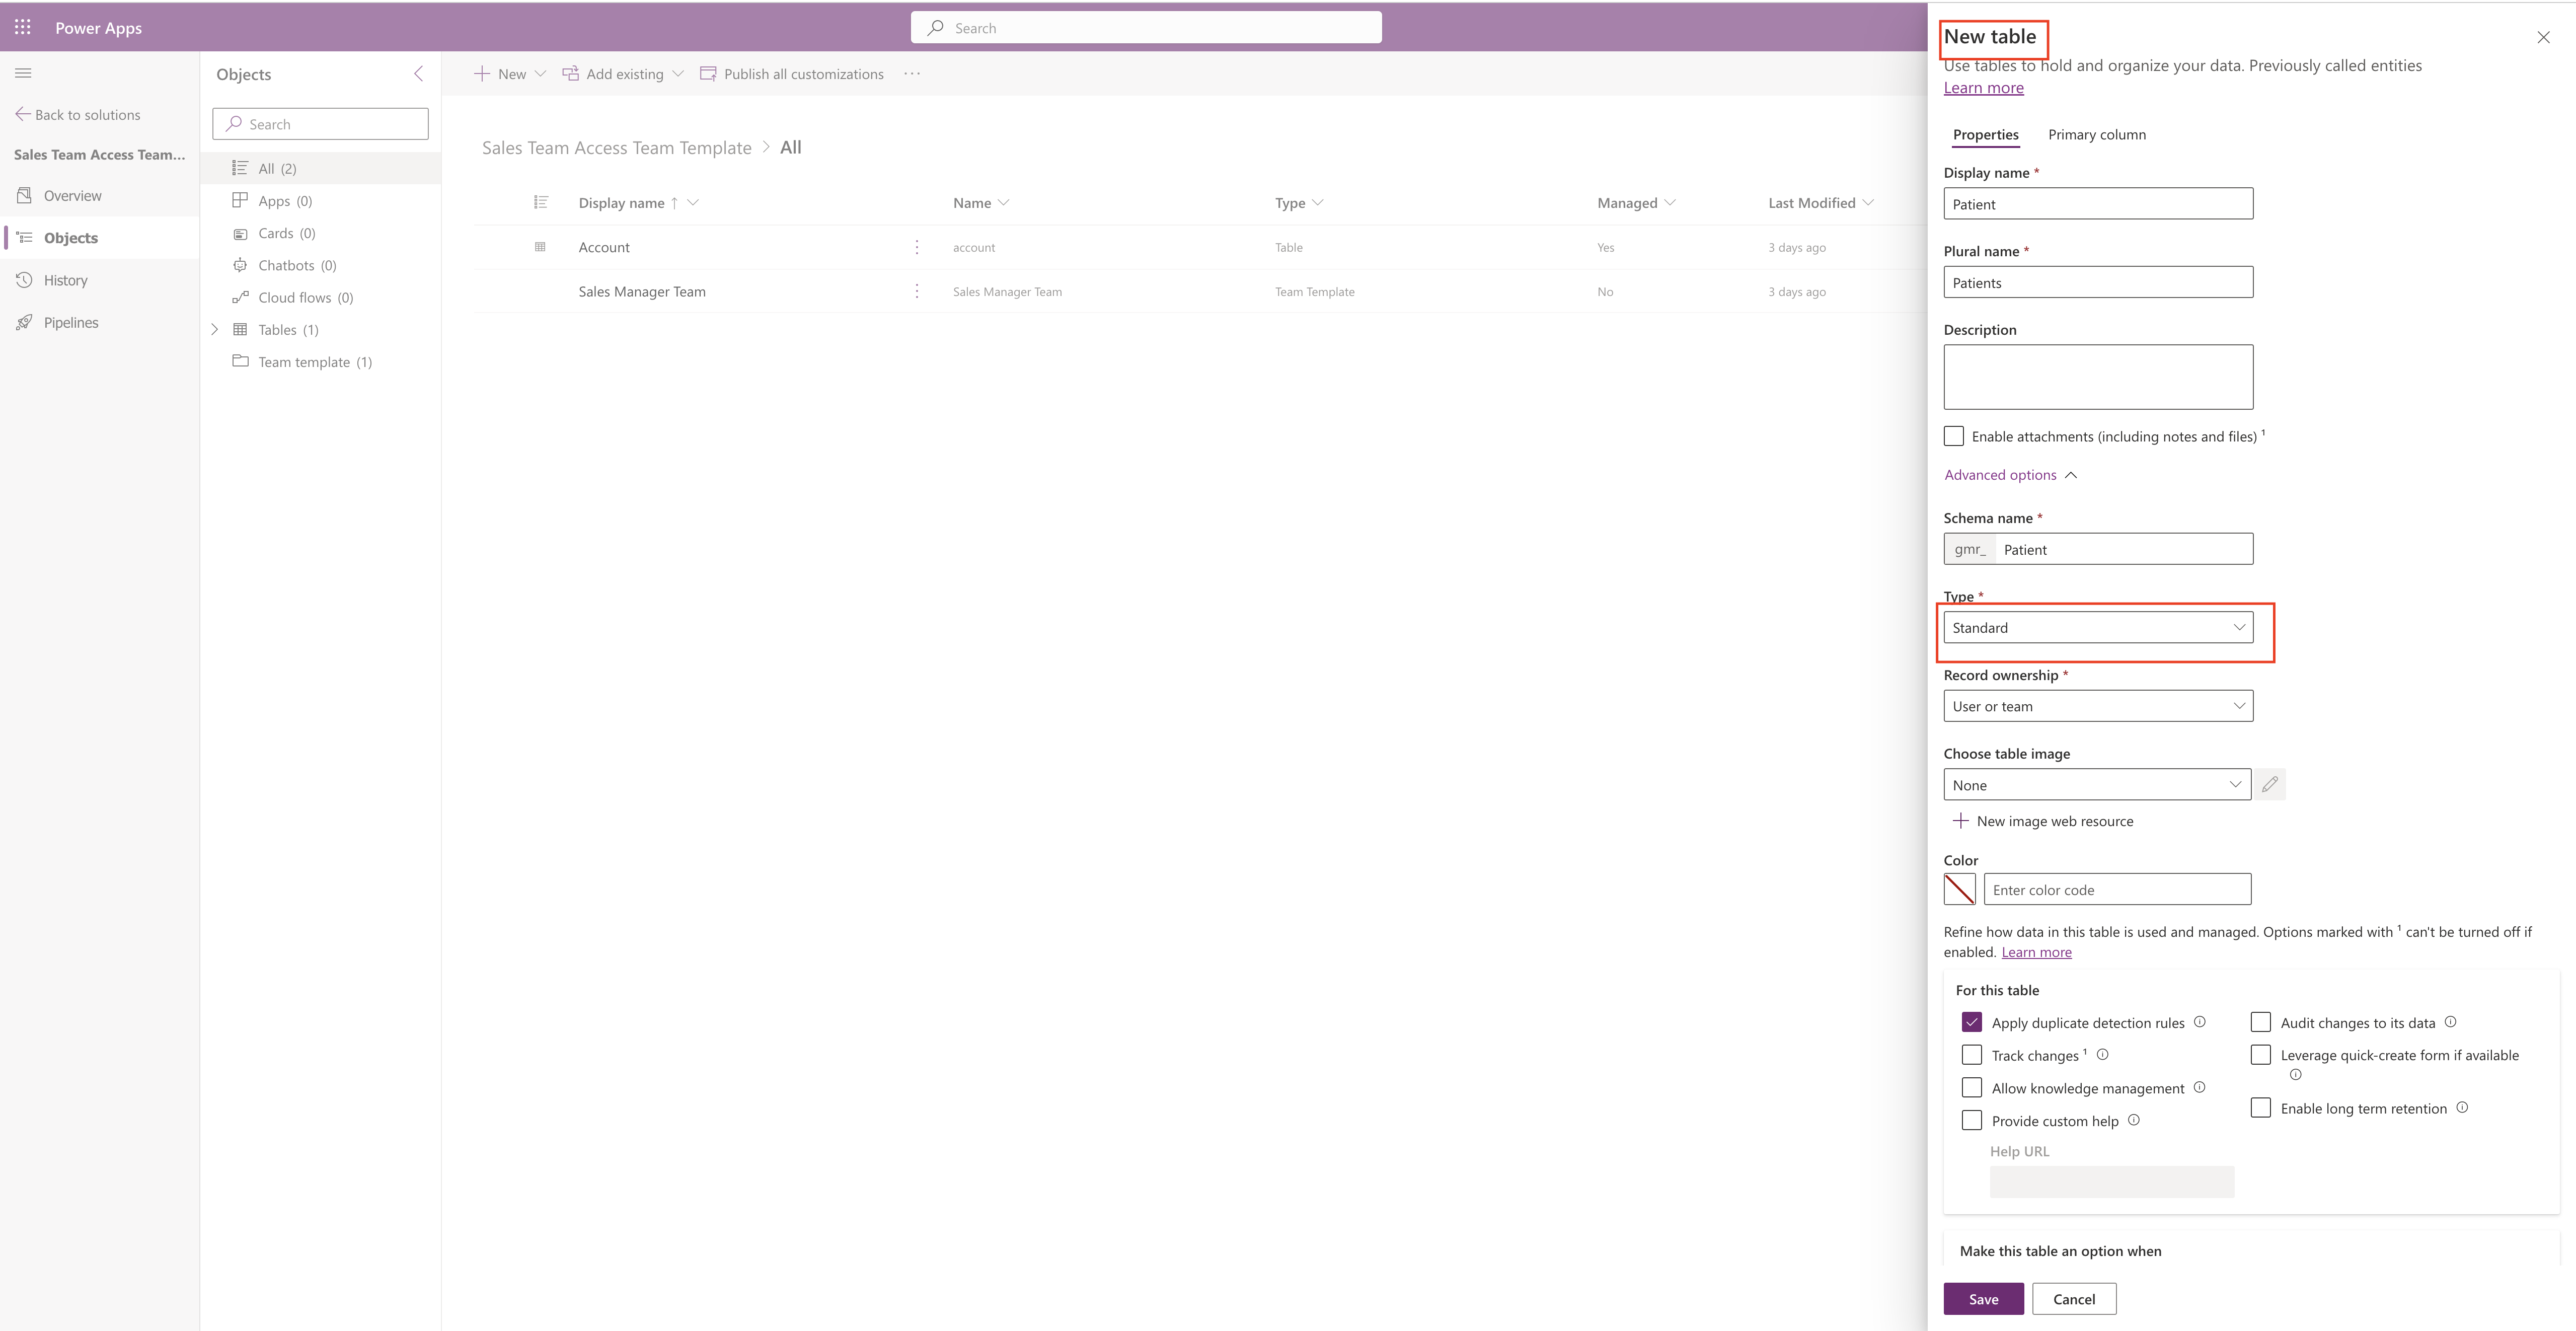
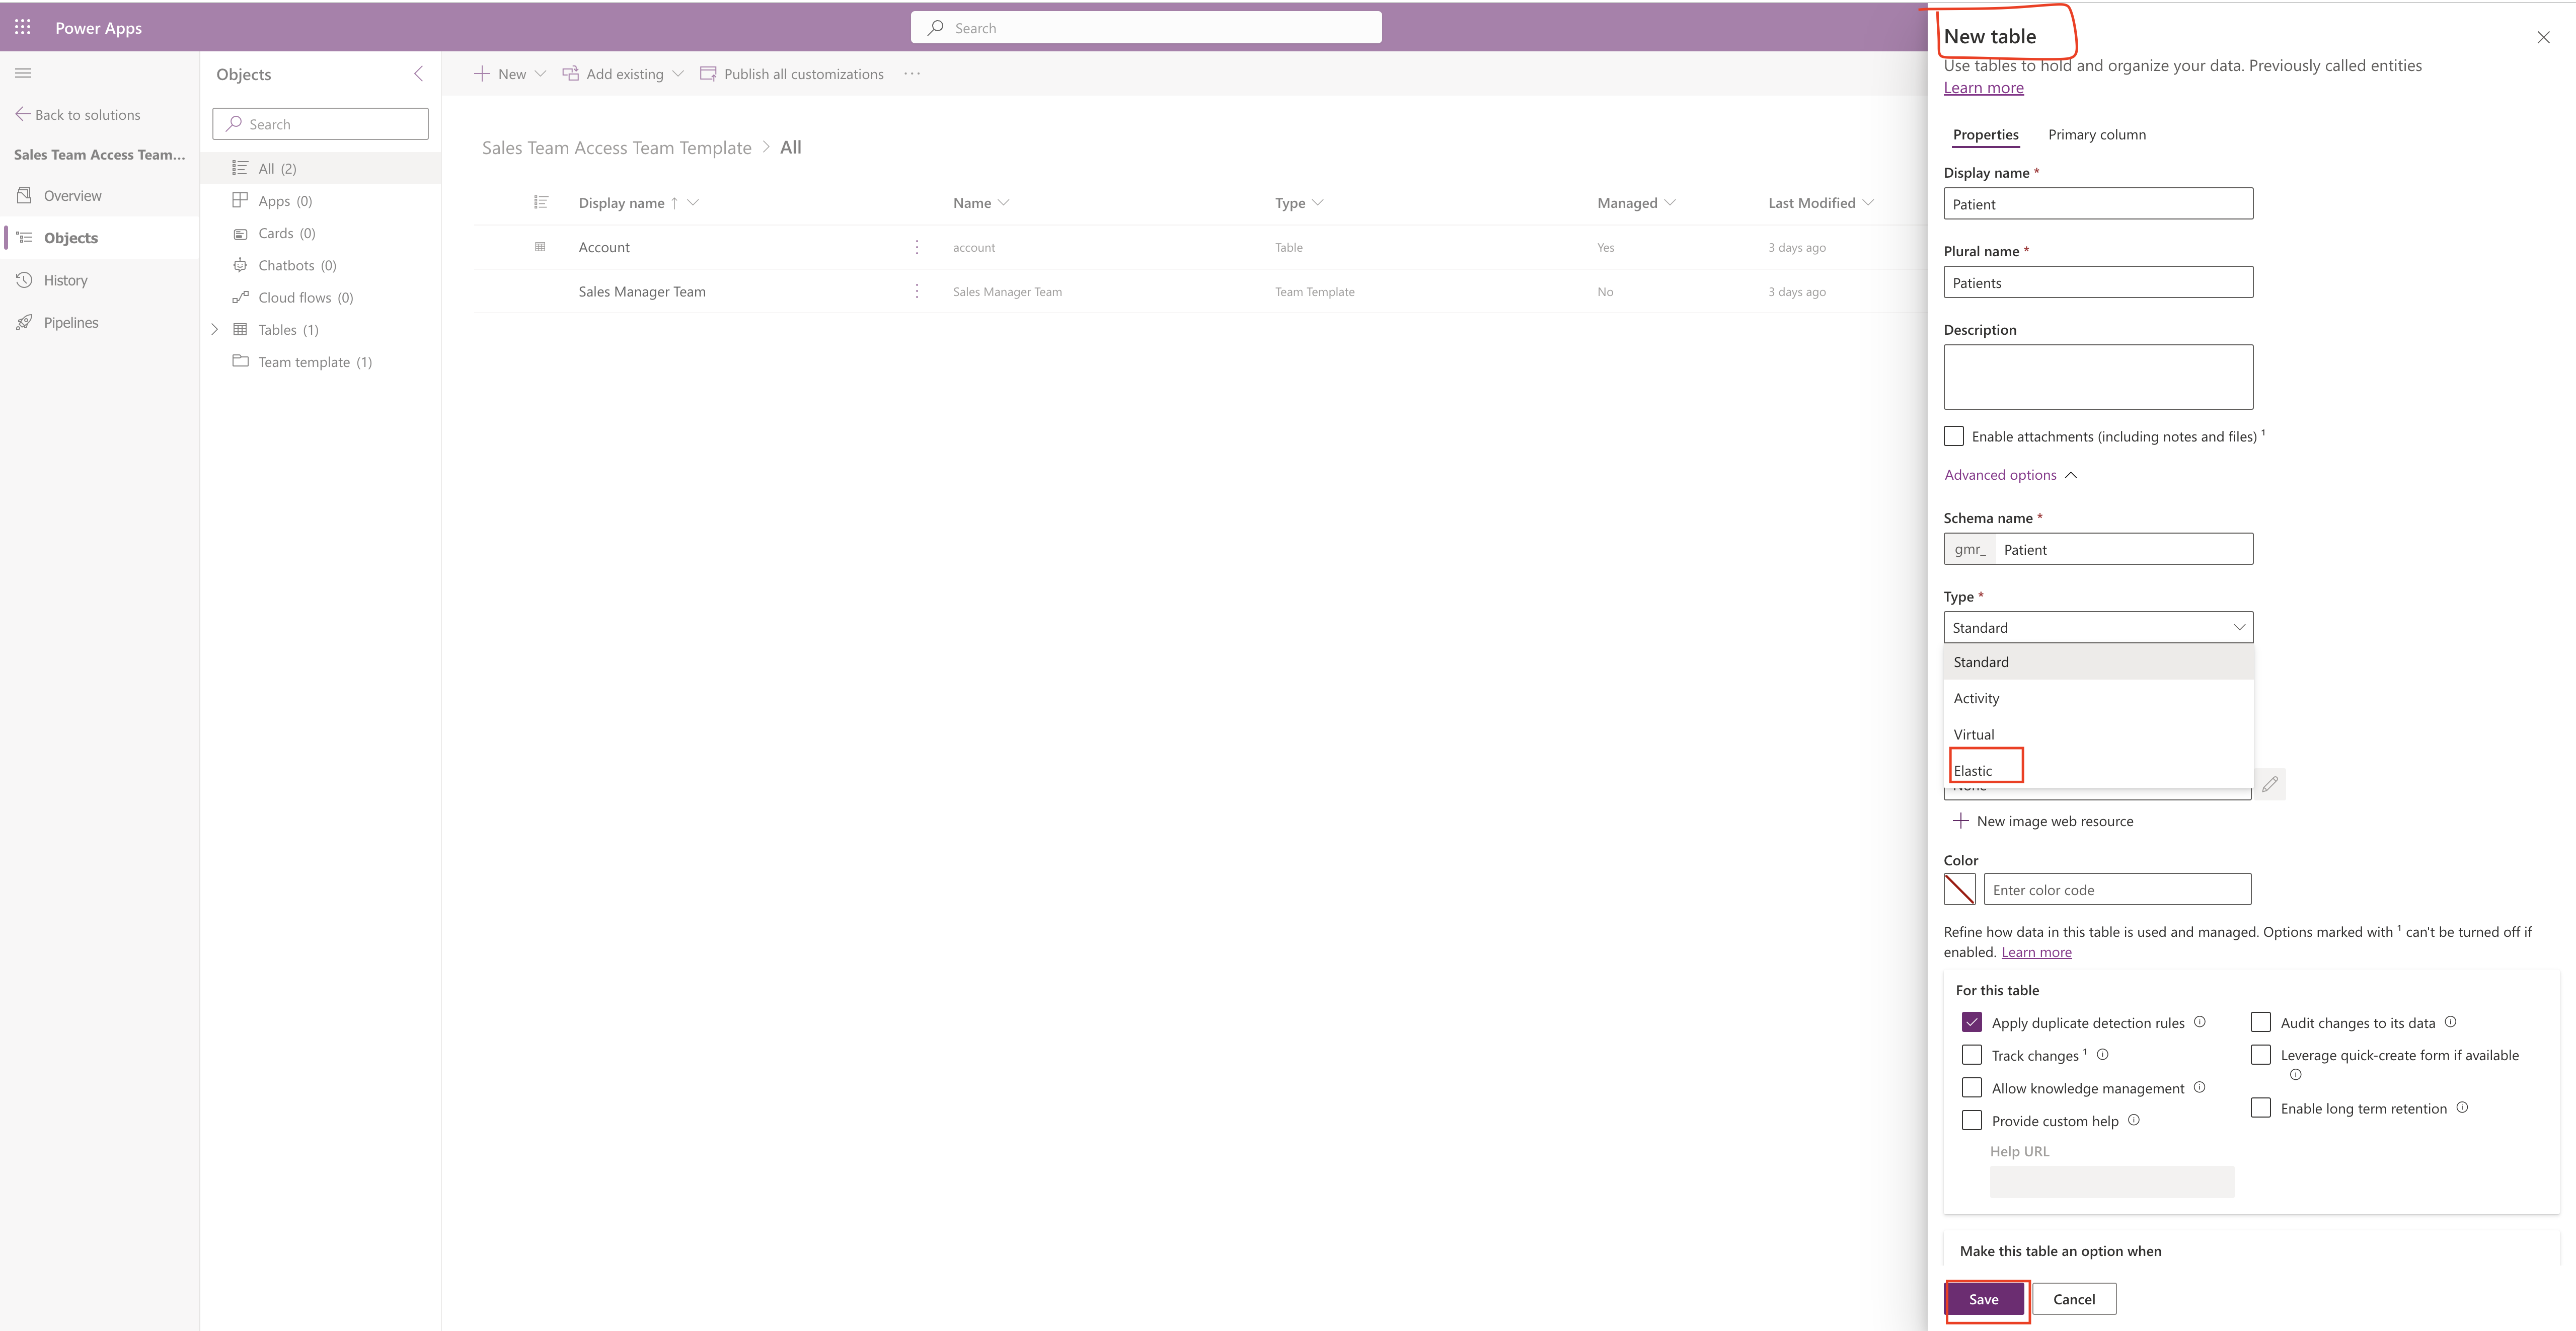
Certainly! In Dynamics 365, let’s explore the difference between Elastic tables and Standard tables in Dataverse.

1. Standard Tables:

Included with Power Platform: Standard tables, also known as out of box tables, come pre-defined within a Power Platform environment that includes Microsoft Dataverse.

Examples: Some common standard tables include Account, Business Unit, Contact and User tables.

Customization: Most standard tables can be customized to suit your specific needs.

Managed Solution Import: Tables imported as part of a managed solution and set as customizable also appear as standard tables.

Activity Tables: These are a special type of standard table, best suited for rows related to activities(e.g appointment, tasks, emails).

Ownership: Standard tables can be owned by users or teams.

2. Elastic Tables:

Managed by Dataverse: Elastic tables are managed by Microsoft Dataverse.

Azure Cosmos DB: They share the same user experience and API as standard tables but have unique features powered by Azure Cosmos DB.

Large Datasets: Elastic tables are designed for storing very large datasets, often exceeding tens of millions of rows.

Behind the scenes: While standard tables are stored in an Azure SQL database, elastic tables use Cosmos DB.

Benefits: Elastic tables offer benefits like scalability, flexibility, and global distribution.

Limitation: However, they come with some limitations due to their underlying technology.

In summary, choose standard tables for strong data consistency, relational modeling and complex joins. Elastic tables are ideal for handling massive datasets while leveraging the power of Azure Cosmos DB.

That’s it for today.

I hope this helps.

Malla Reddy Gurram(@UK365GUY)
#365BlogPostsin365Days

Share this:

{How to} Use Access Team Template on Modern UI Dynamics 365 Sales

Hello Everyone,

Today I am going to share how to use Access Team Template on Modern UI of Dynamics 365 Sales.

Let’s get’s started

Super users or System Admin’s are get used to classic UI when using Access Team Templates, with the introduction of Modern UI how we can use the Access Team Plates?

Let’s see in action.

First of all Login into www.make.powerapps.com

Select the environment of where you want to use the Access Team Templates.

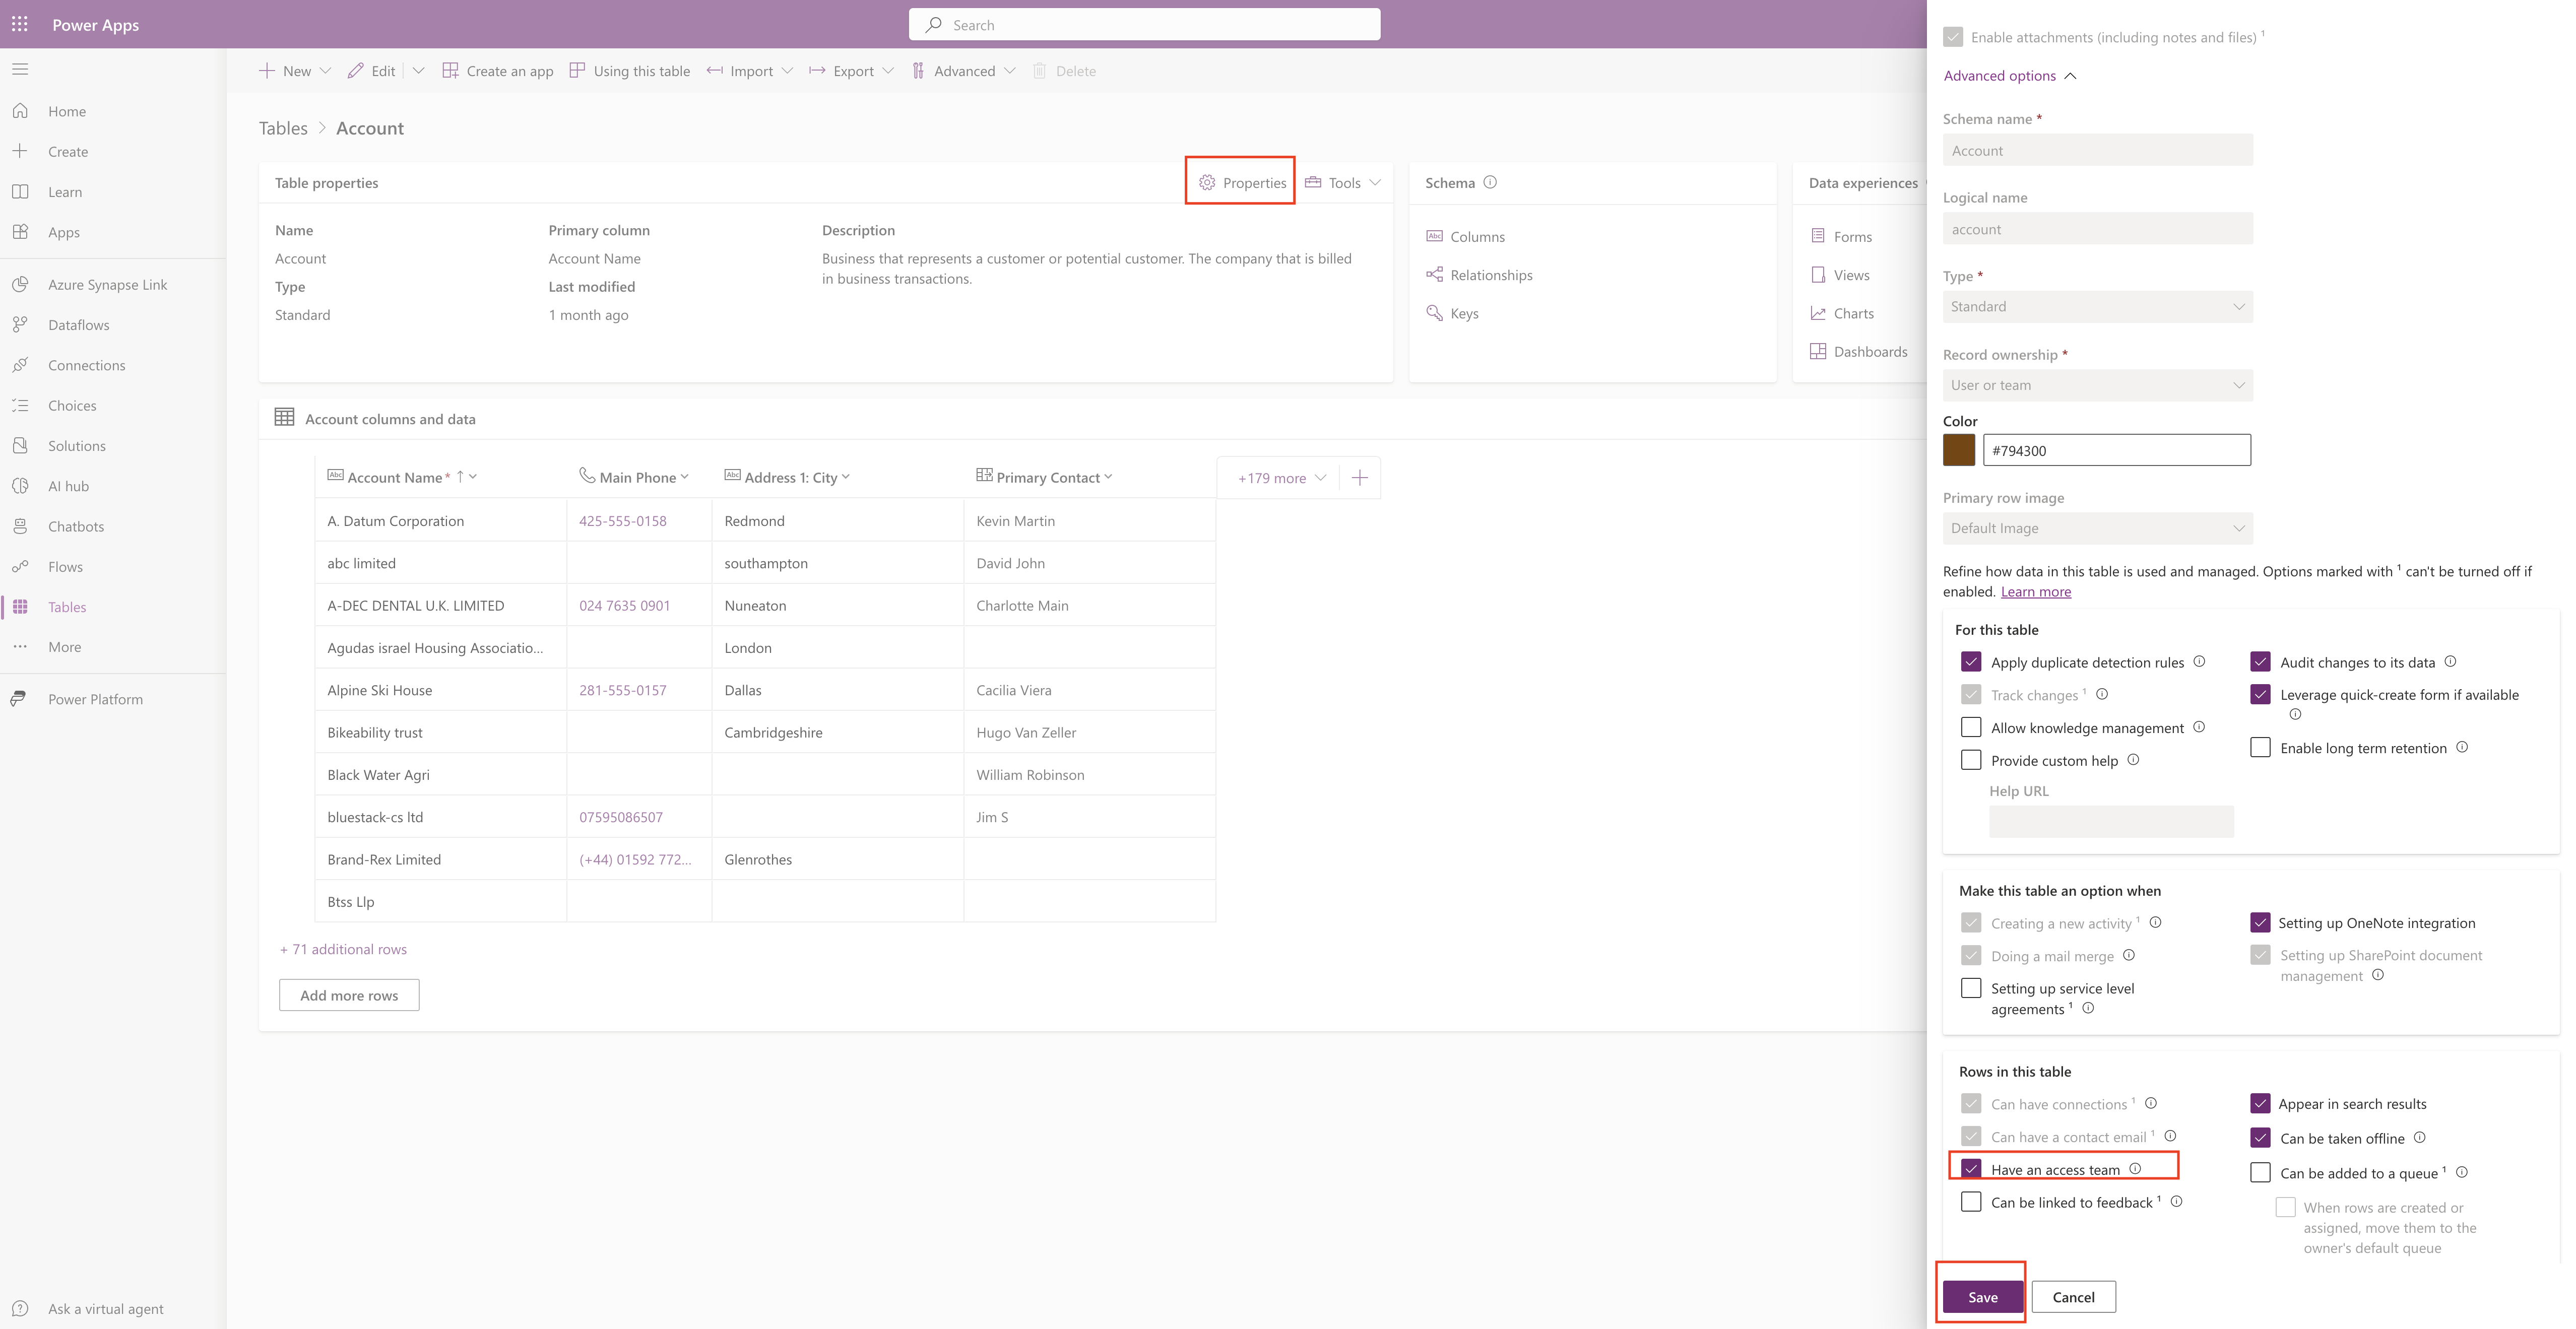
In this example open the Account Table and click on Properties and check the have an access team

Then click SAVE.

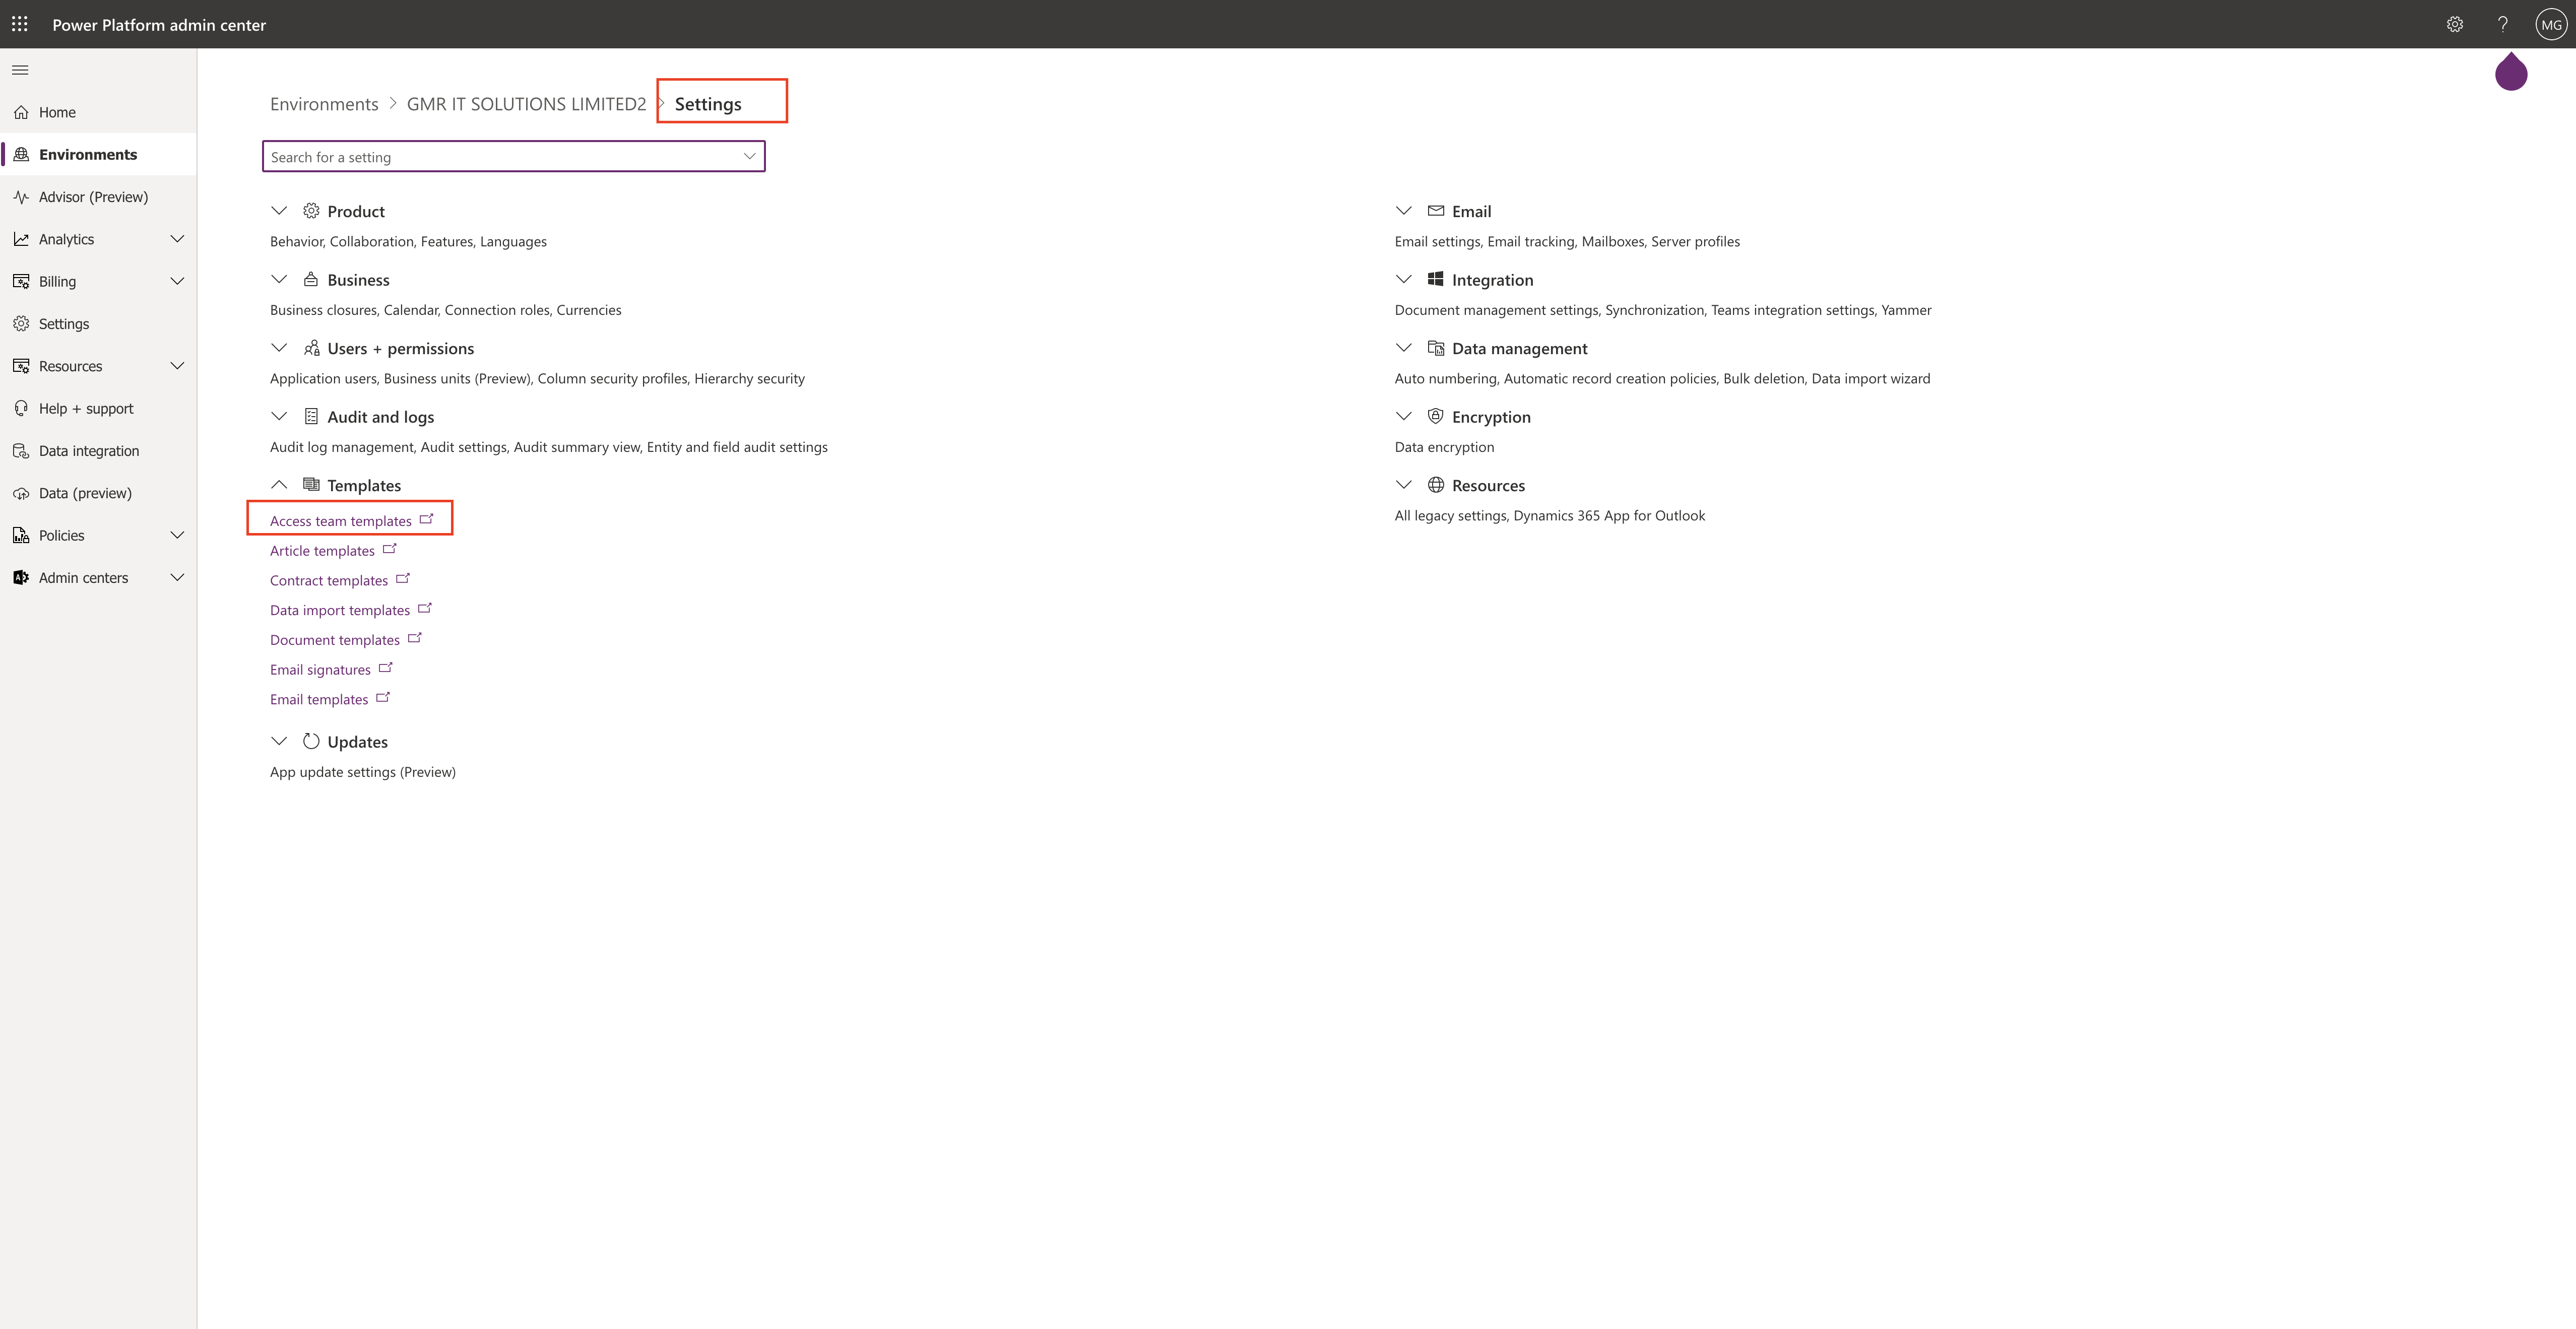
Head over to the Power Platform Admin Center: www.admin.powerplatform.onmicrosoft.com

Go to the Environment Settings and Expand Templates then click on the Access Team Templates.

Then a new window will popup and configure the Access Team Template with:

Name

Entity

Description

Save the template.

Now we have created Access Team Template and if you need to move this configuration into another environment.

Then create a solution from Maker Power Platform Portal.

Create a Solution.

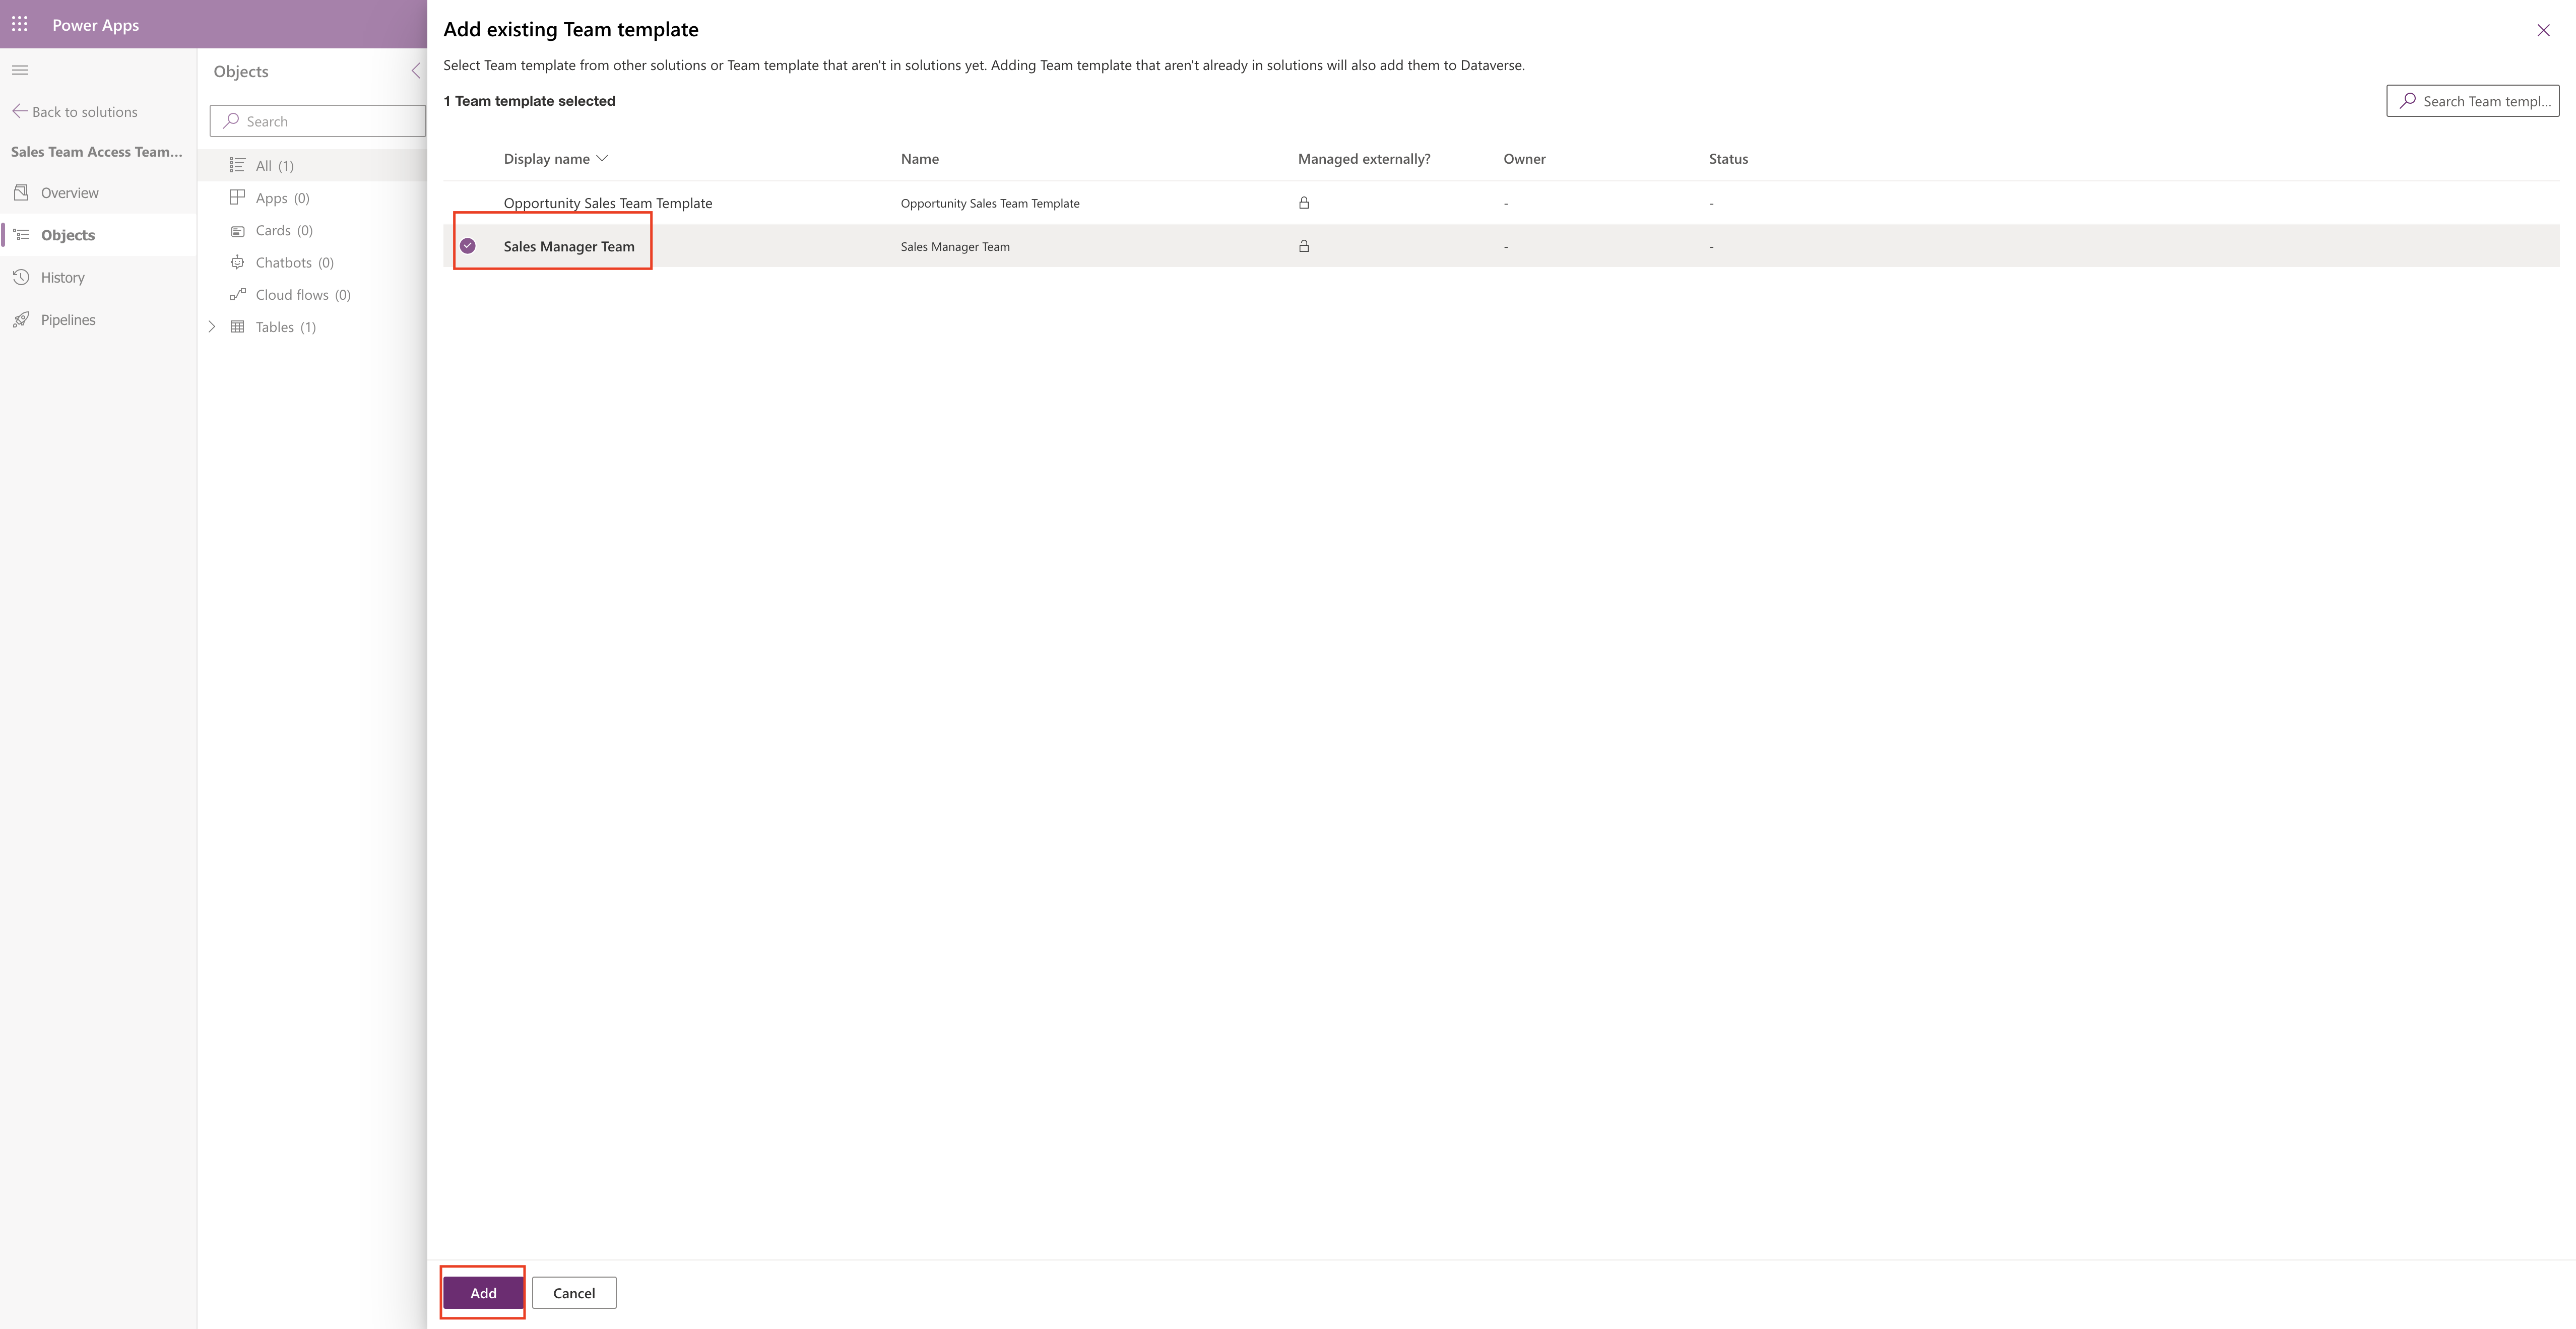
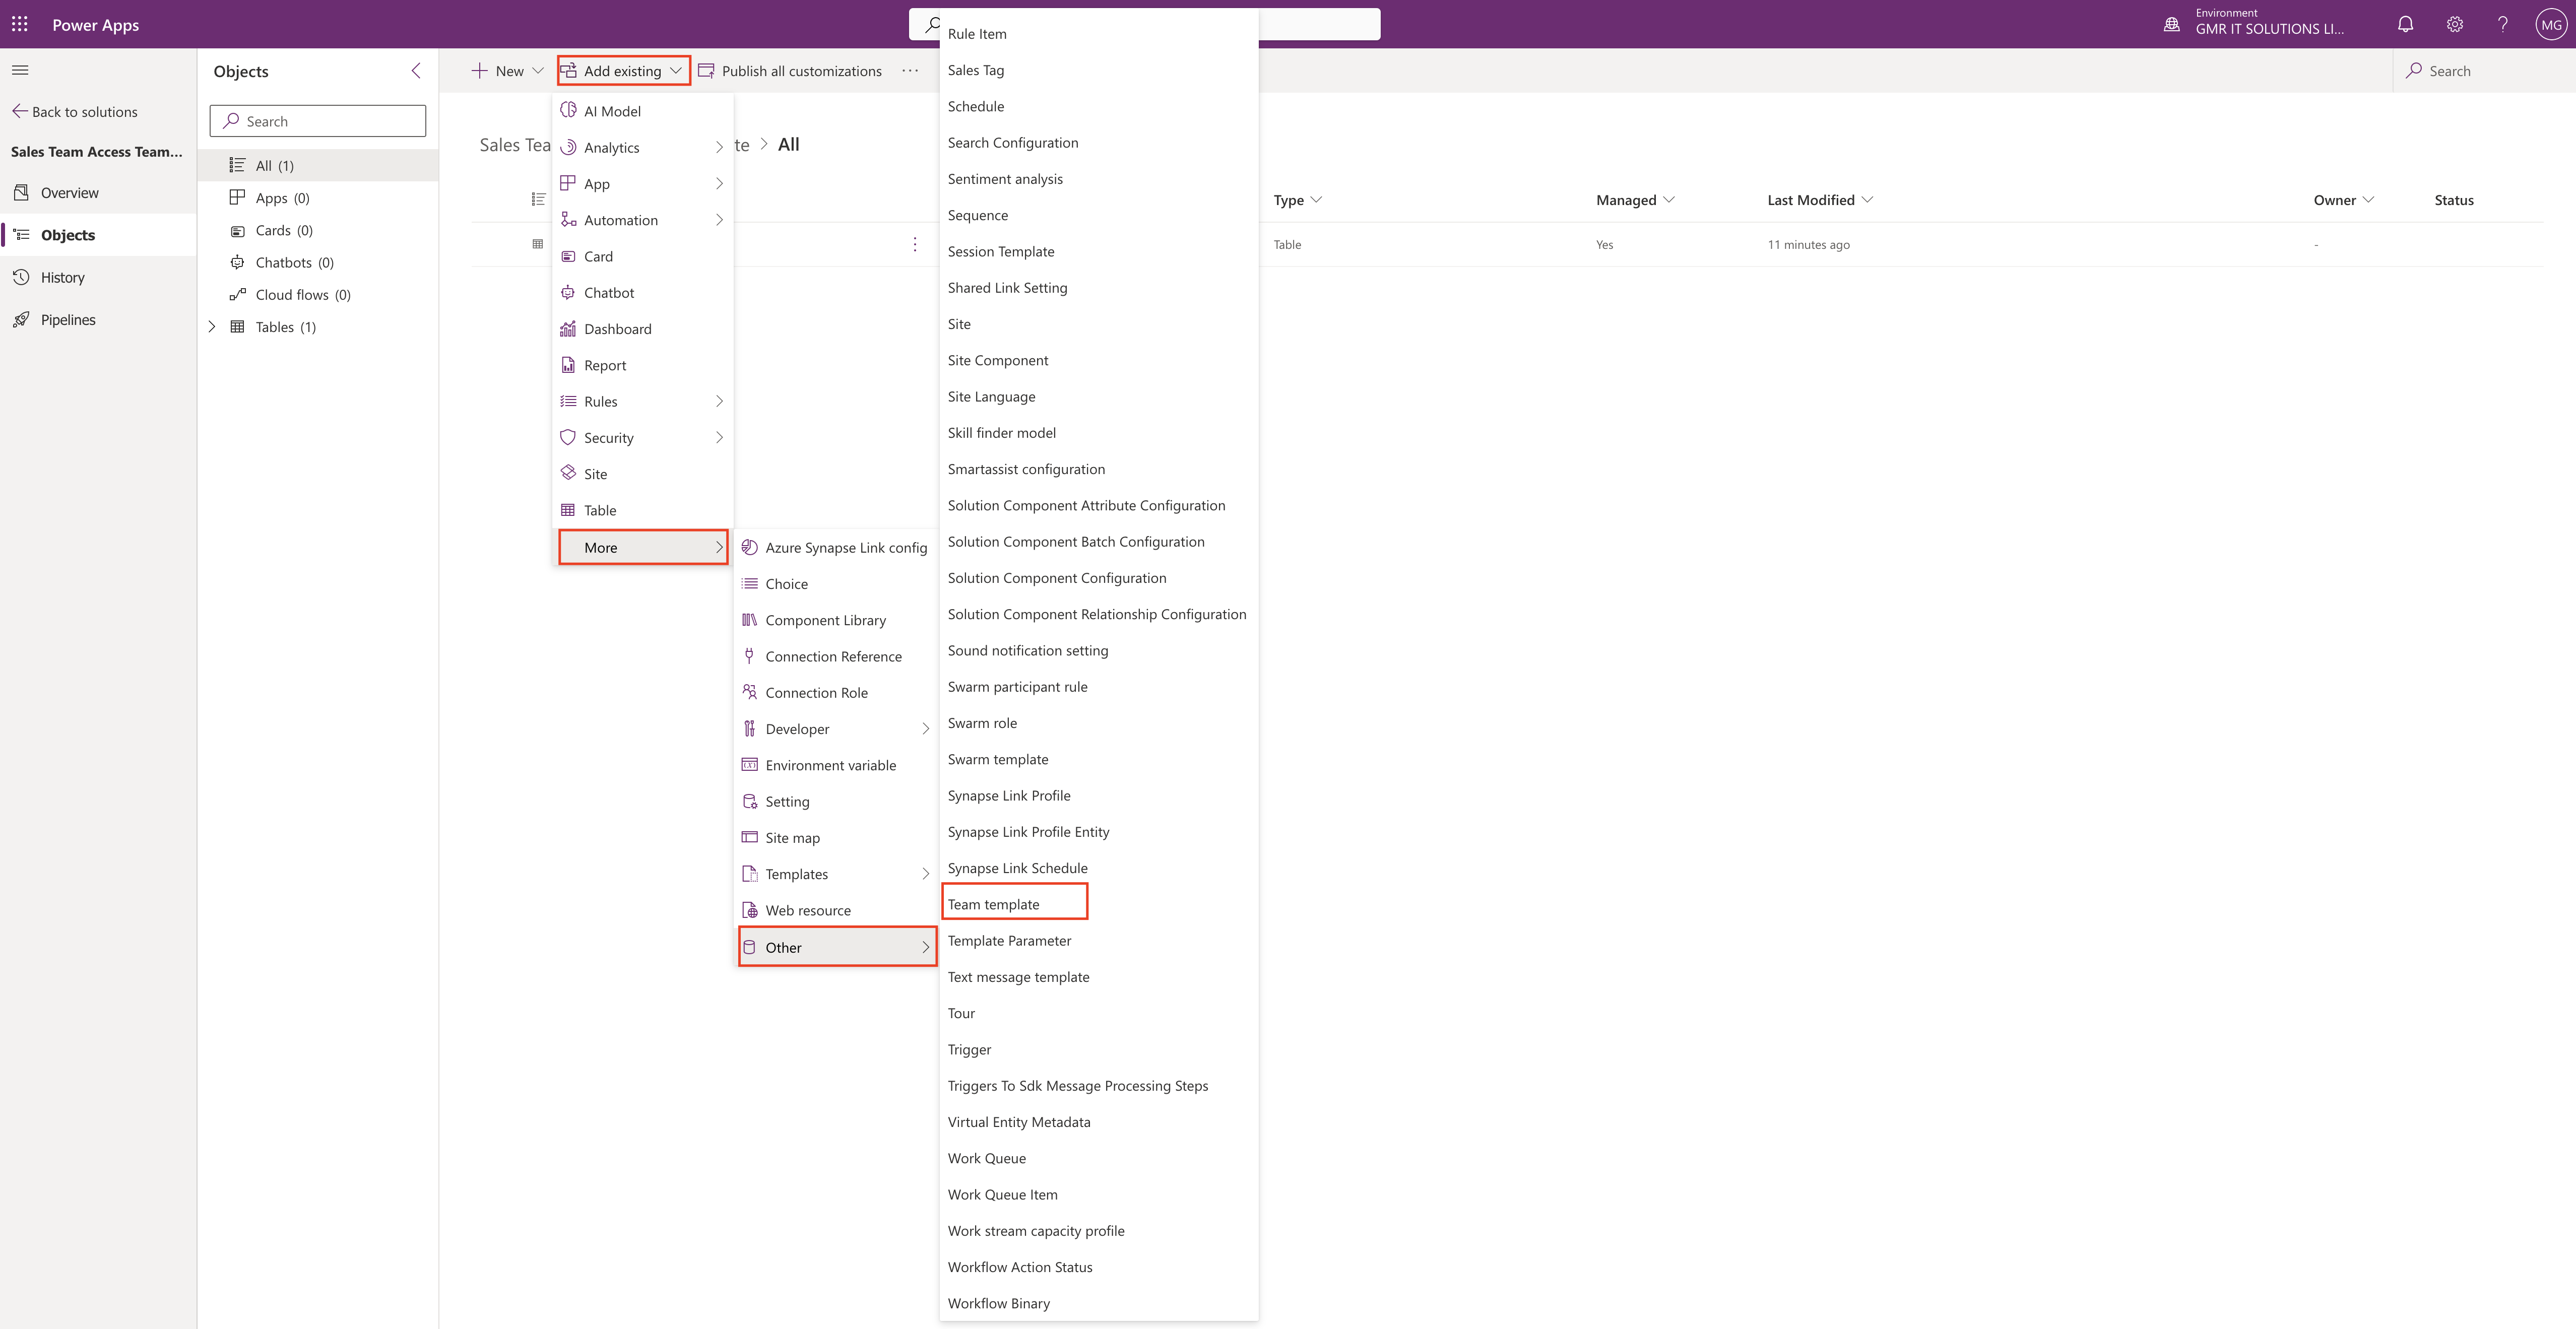
Then add the Template to it by going into add existing and select OTHERS then select the Team Template.

Then select the Sales Manager Team template and the Add it.

Now next step is to add the form where we need to embed the Access Team Template on the subgrid.

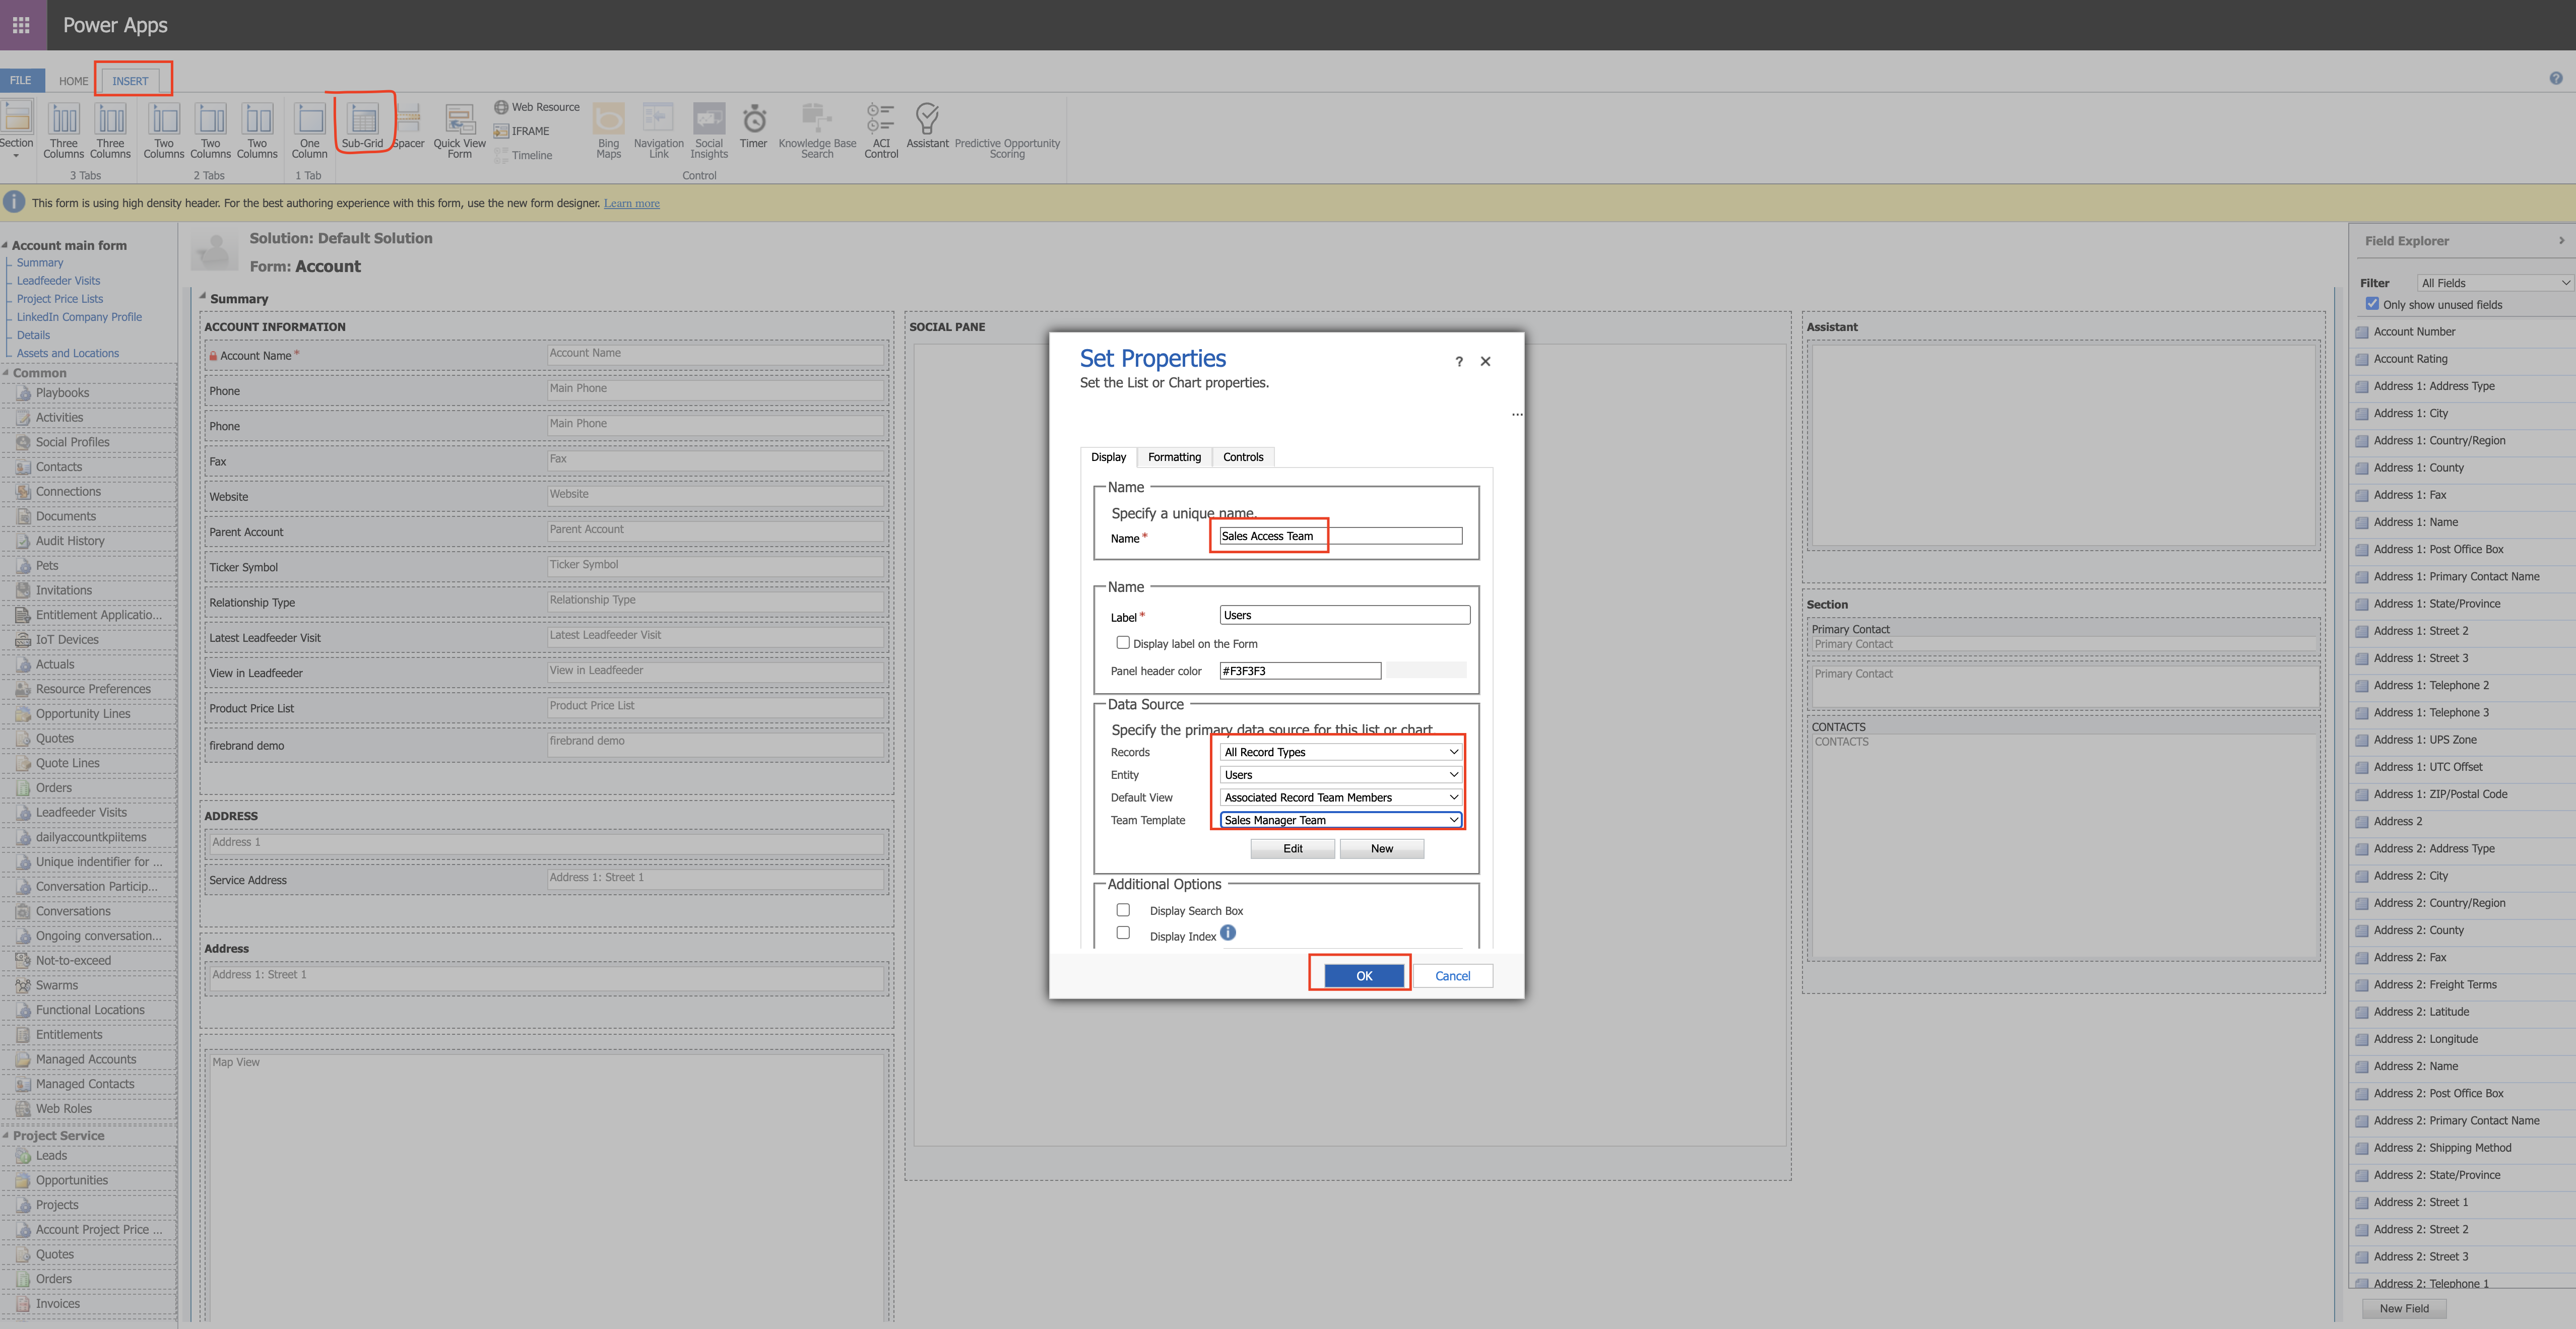
Go to the classic view of the customization and open the Account Table and the main form add the subgrid by clicking on the Inser Tab.

Configure the name and associated records and save.

On Account table the form changes needs to be added then publish the changes on the form.

Now head back to the solution and publish all customizations.

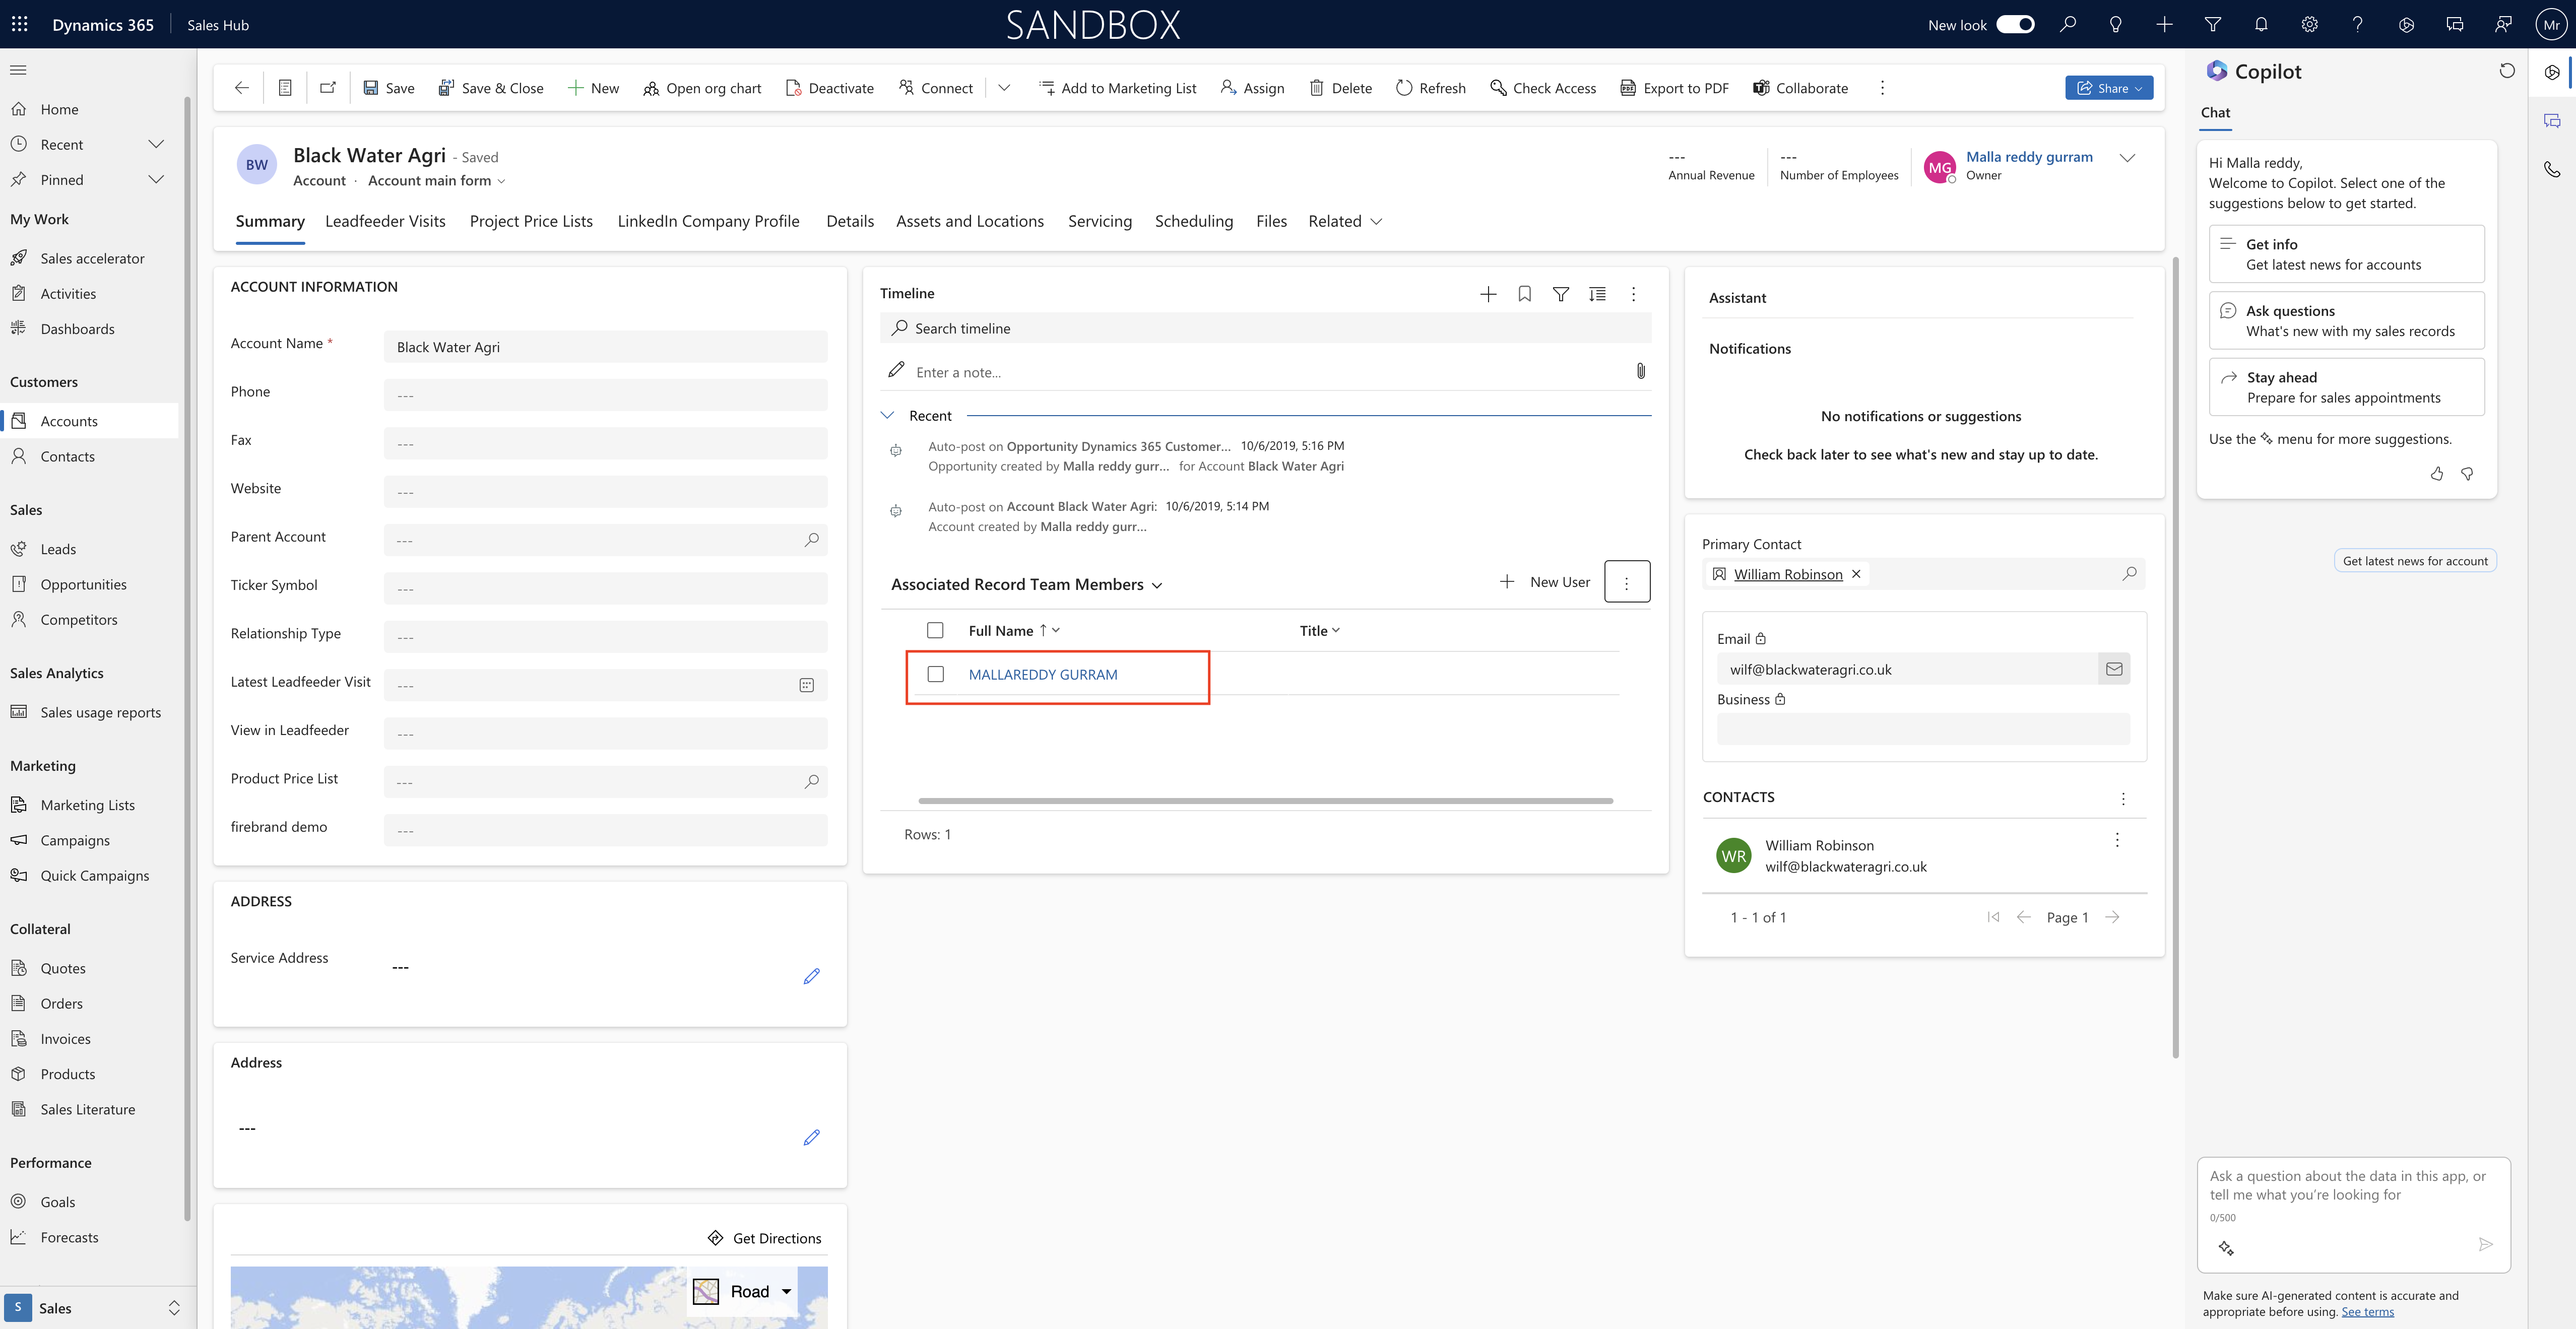
Then if you want to publish the changes in another environment then export the solution as unmanaged or managed and import into another environment then you will be able to see the access team on the Account record.

That’s it for today.

I hope this helps.

Malla Reddy Gurram
#365BlogPostsin365Days
Share this: