Menu Close

Tag: #mallareddygurram

How to share Canvas App or Model Driven App to co workers and request premium license from Maker Portal

Hello Everyone,

Today i am going to share how to share canvas app to other users in your organisation and how to request premium license.

Lets gets started.

Login into www.make.powerapps.com

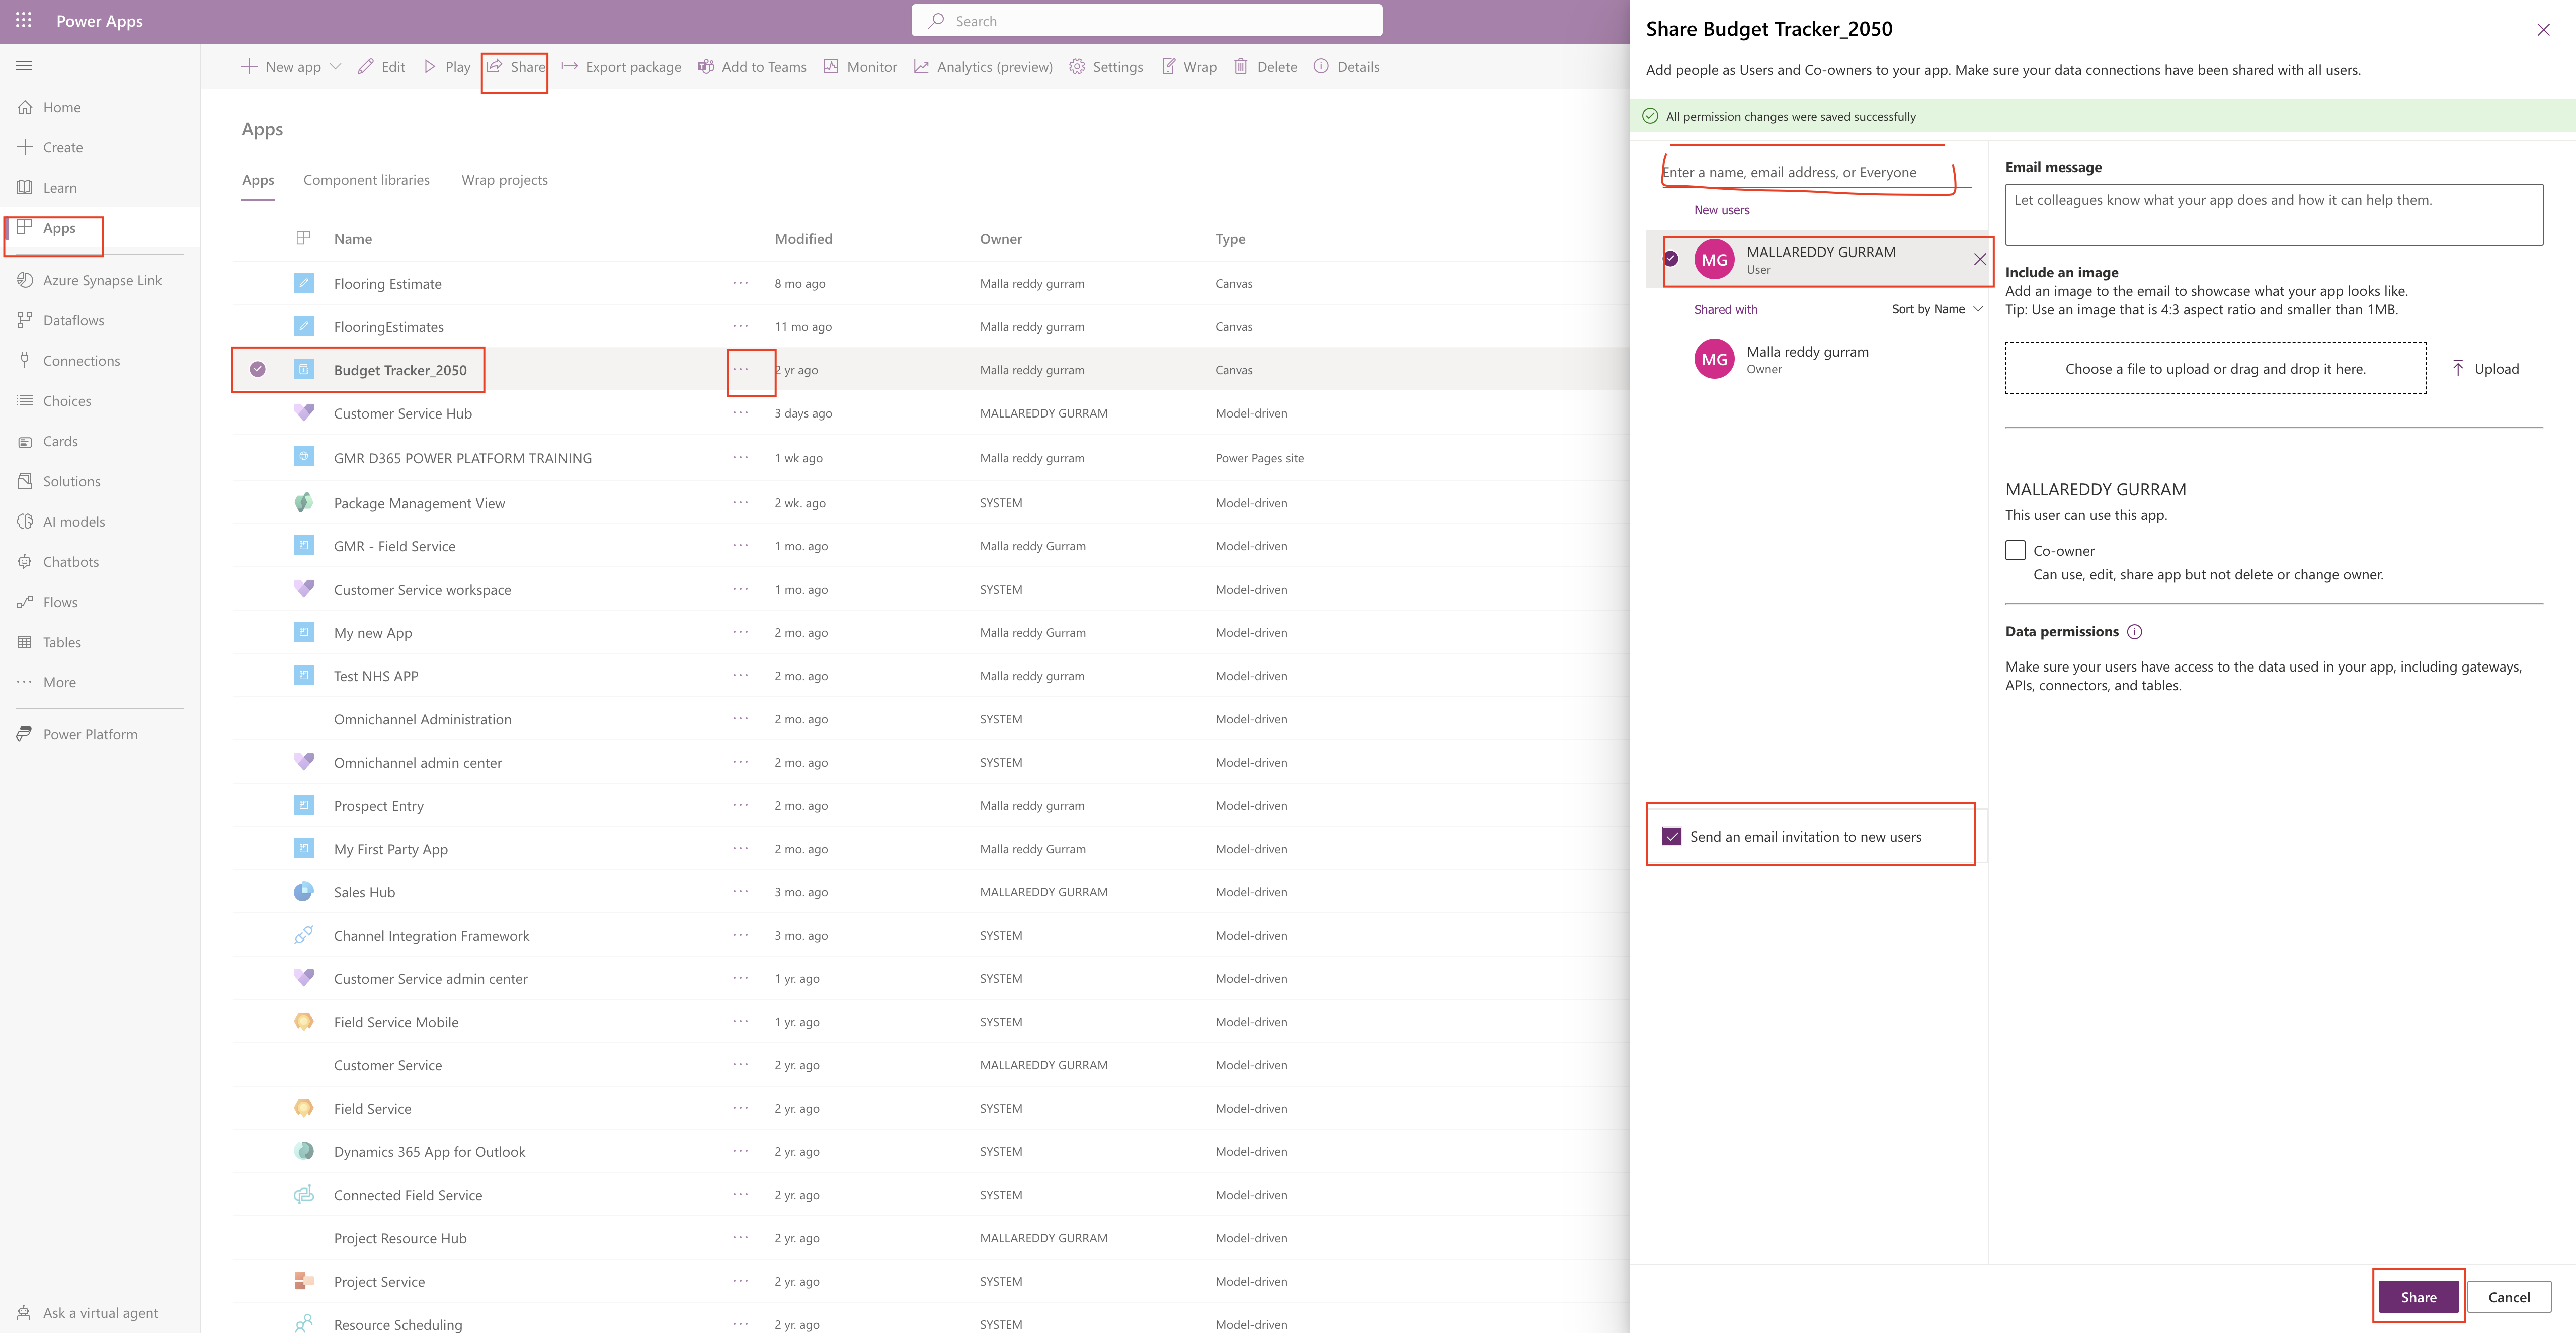
Click on the Apps on the left side of the menu.

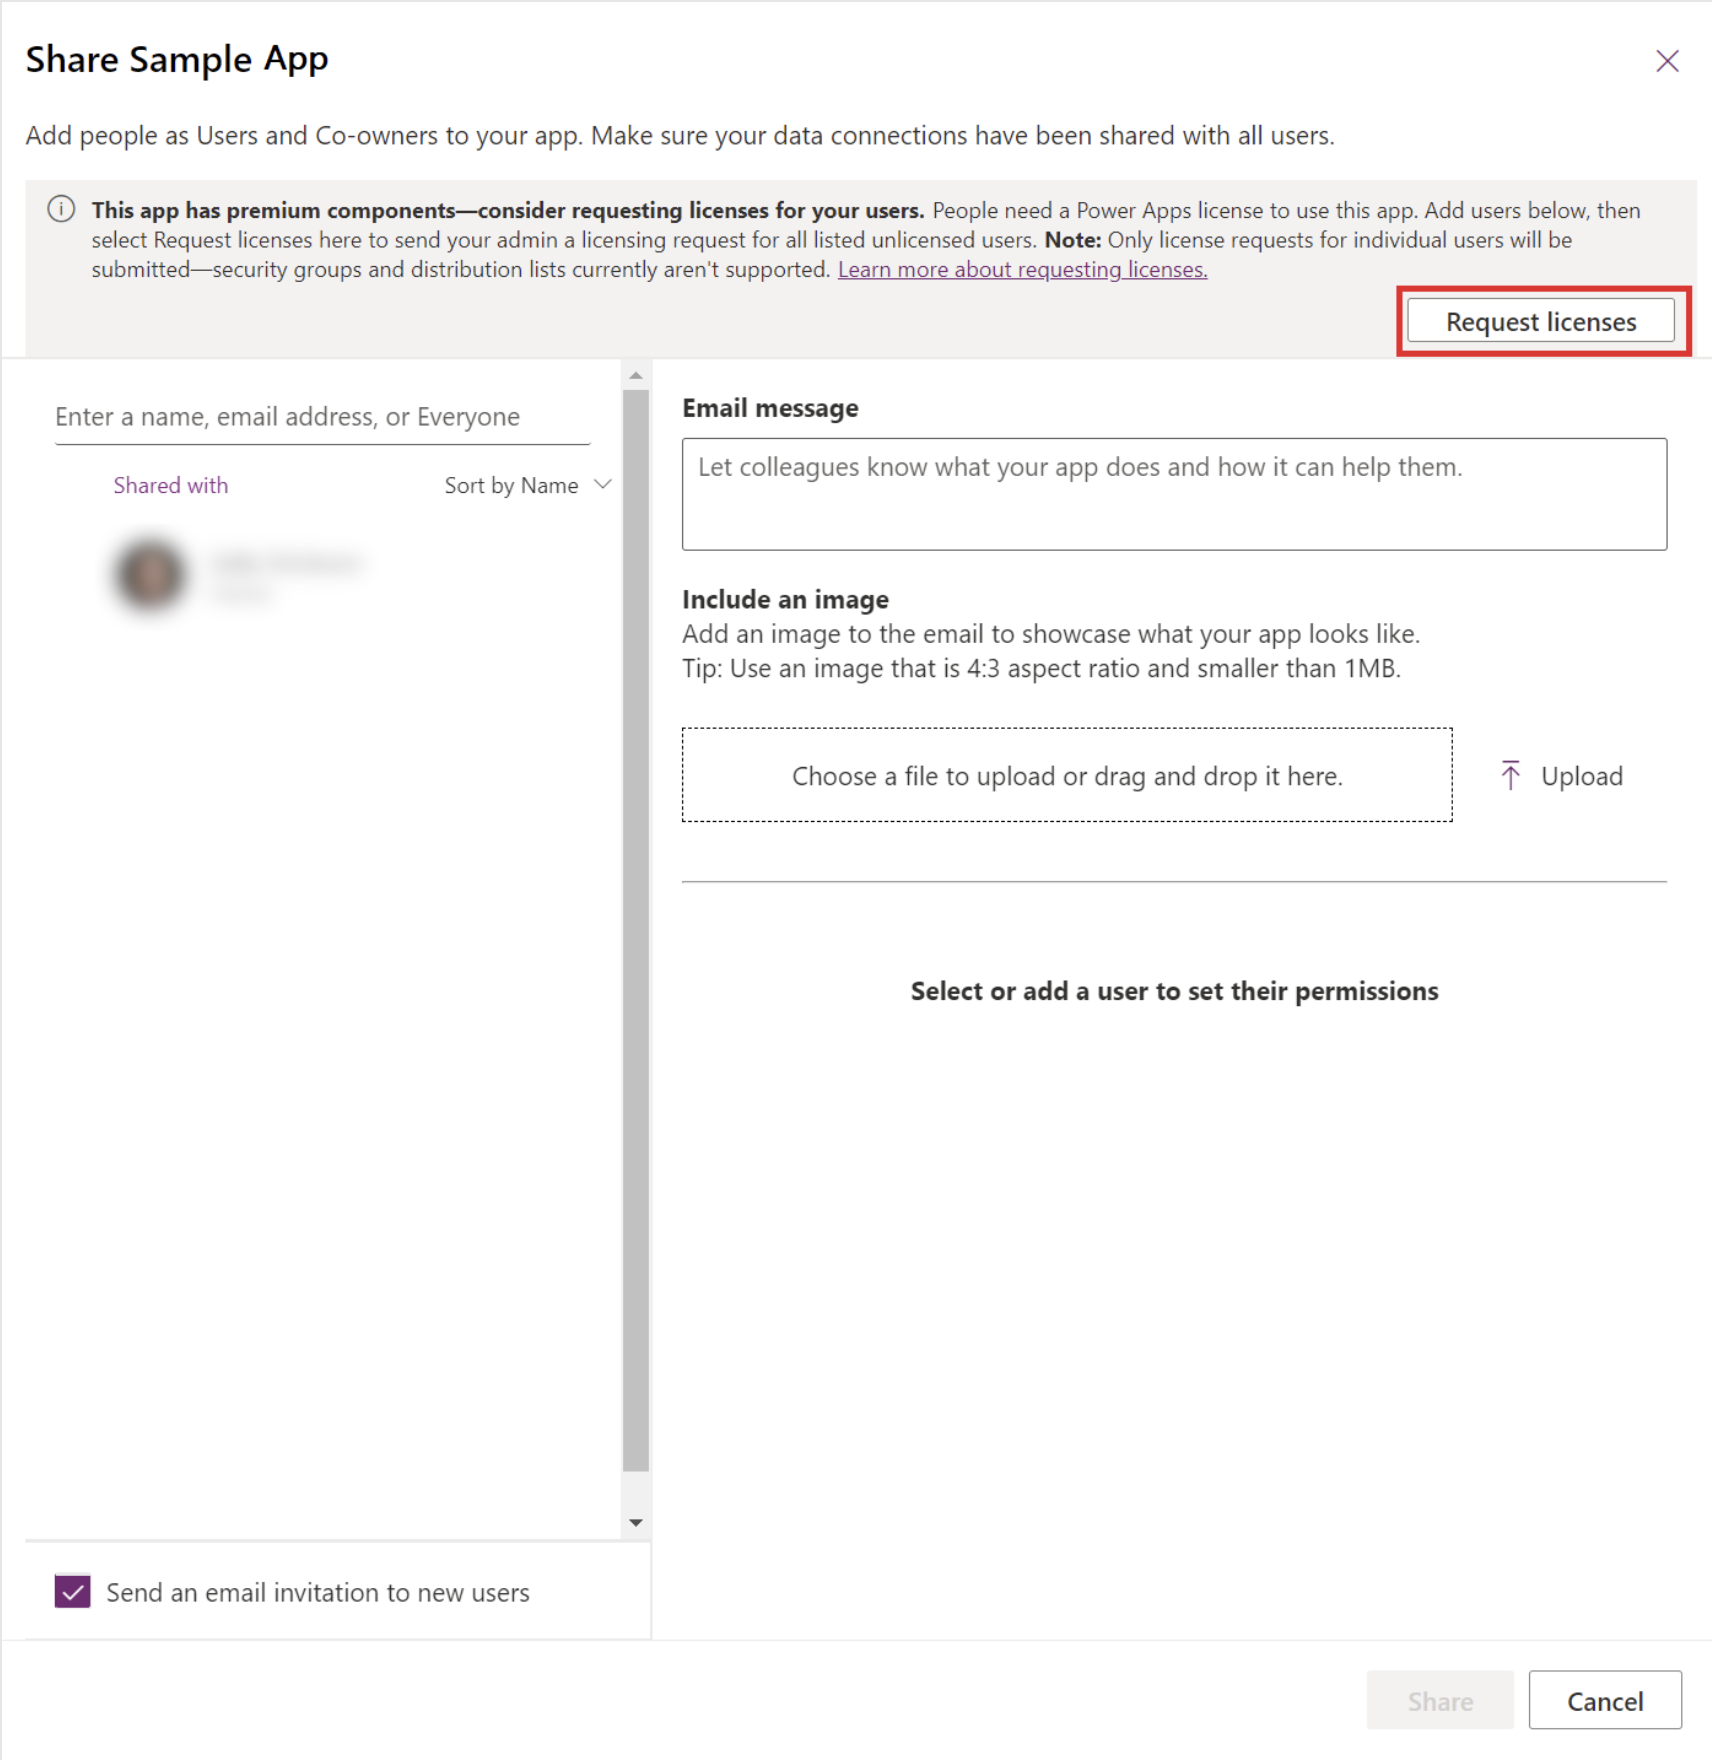
Select the canvas app you want to share with the user and then a new window will appear on right hand side of the screen.

In the search bar search for name of the user you would like to share this canvas app and select the user.

You can embed a email message while sharing this canvas app all about.

Also you can embed nice image to show case the canvas app in the email too.

You can also have an option of making the user as co owner and then finally share the app.

Image reference Microsoft Docs

Note: If your canvas app uses as premium components then the screen will prompt you to request a premium license for the user refer to the above screen shot.

Then the admin will receive a notification about the license request on Microsoft 365 Admin Center.

So admin can look at the requests and they can either approve or reject, they can configure custom license request process too from the Microsoft 365 Admin Center.

Thats it for today.

I hope this helps
Malla Reddy(@UK365GUY)
#365BlogPostsin365Days

Share this:

{How to} clear Power Pages cache

Hello Everyone,

Today i am going to share how to quickly clear the cache on Power Pages.

Lets gets started.

Suppose you have made some changes related to portal configuration and the changes are not reflecting on the portal.

How to resolve this issue.. many might know it the solution but for my blog readers i am posting this blog.

URL: Your Power Pages name.Microsoftportals.com/_services/about

Then you can clear the cache by clicking on the “CLEAR CACHE”

Thats it for today.

I hope this helps
Malla Reddy(@UK365GUY)
#365BlogPostsin365Days

Share this:

{ Update } Record status reason to in progress when a field is updated using classic worklfow

Hello Everyone,

Today i am going to share how to update the record status when a field is updated with classic workflow.

Lets gets started.

Scenario: Requirement to update the record status to “In progress” when a field “update checked by operation equals to Yes”.

How do you do that ?

Using system workflow we can achieve this functionality.

Lets create a workflow:

Go to the solution and click on the process and click “new” and give it a name for your process.

Name: Update status reason to in progress when a field is updated.

1. Process Name: Update status reason to in progress when a field is updated
2. Entity : Deliveries
3. Activate as Process
4. Scope as Organisation
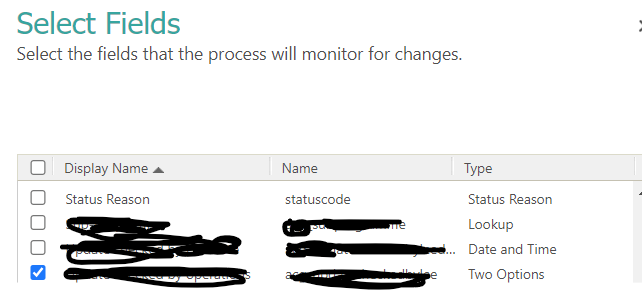
5. Record fields change : Open the “View” and select the field that this workflow needs to trigger.

Then create the condition that If checked by operations is YES then updated the fields to NO and status reason to In progress

Click save the changes and activate the process and the go to the active records and change the field value to YES and then workflow will trigger and updates the fields two fields to NO and status reason to In progress.

I hope this helps
Malla Reddy(@UK365GUY)
#365BlogsPostsin365Days

Share this:

Microsoft Dynamics 365 Community Blogs List

Hello Everyone,

Today i am going to share a link for all Dynamics 365 Community Blogs.

Lets gets started.

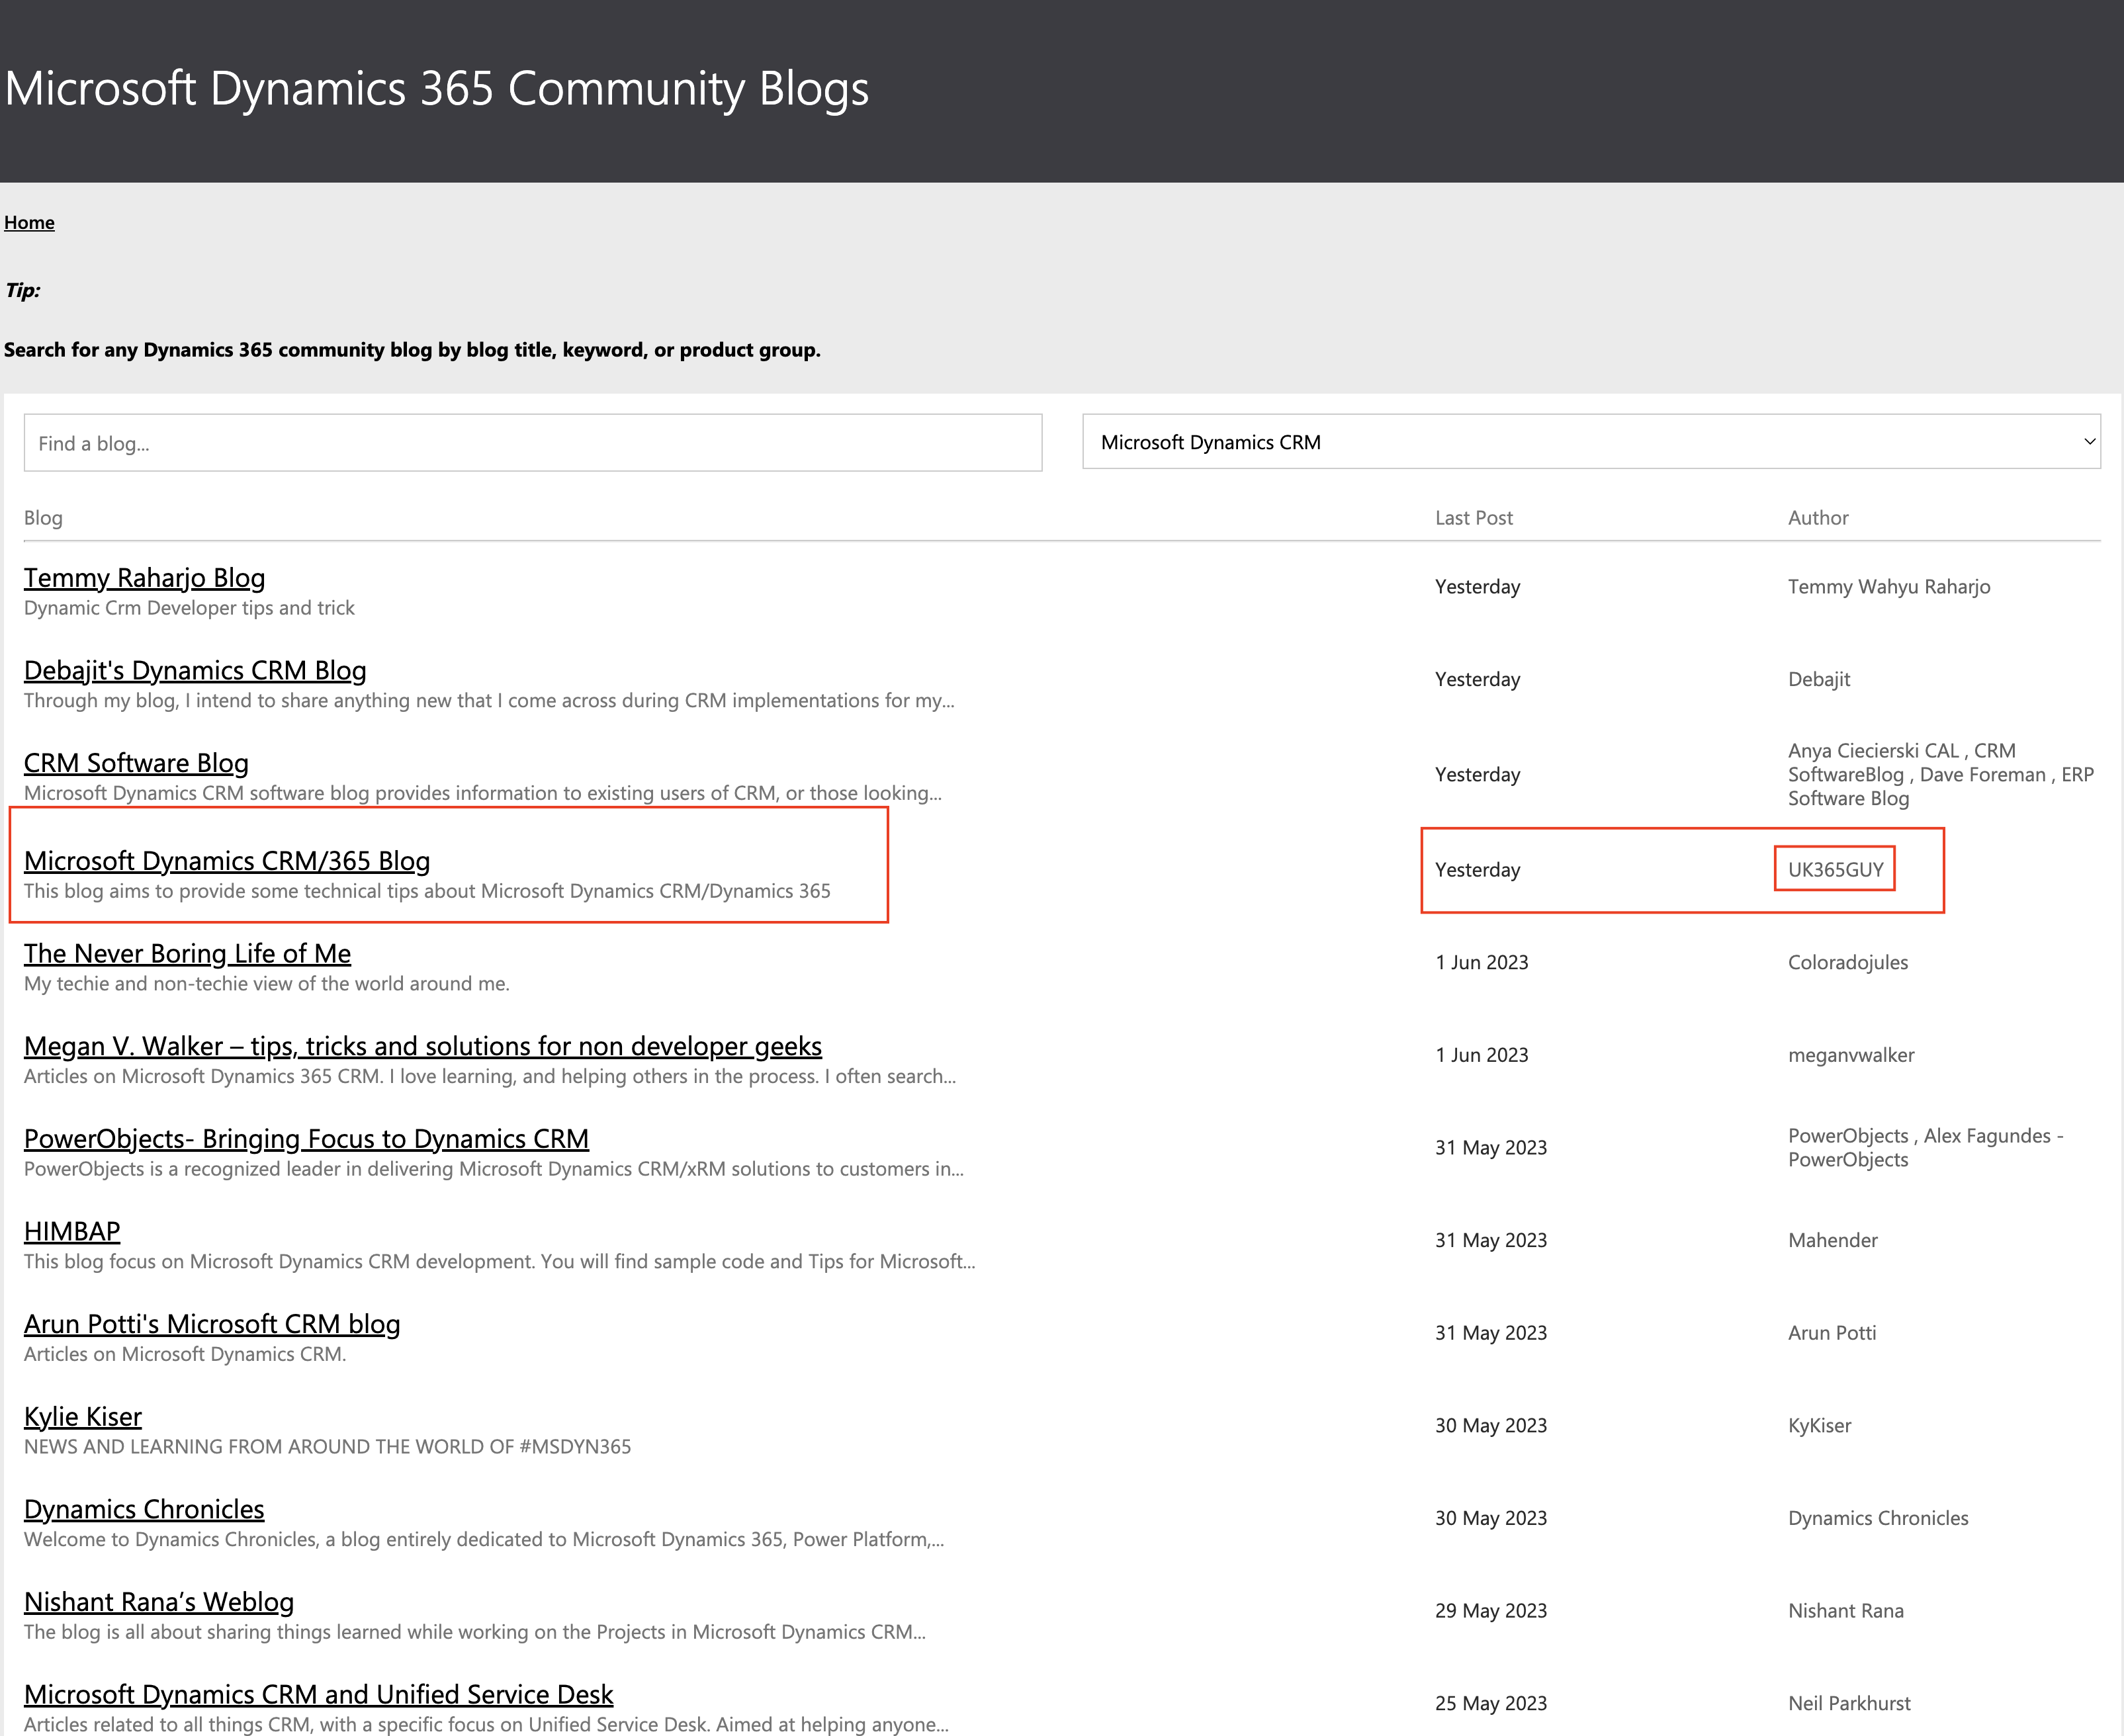
Either you are looking for Microsoft Dynamics 365 Cutomer Engagement Apps Blogs or Finance & Operations or Model Driven Apps Blogs.

Then once place to refer is Microsoft Dynamics 365 Community Blogs, You can get valuable information from the blog posts as the community bloggers will share their day to day experiences in the blog posts.

So click Here to visit the Microsoft Dynamics 365 Community Blogs

I hope this helps

Malla Reddy(@UK365GUY)
#365BlogPostsin365Days

Share this:

How to turn on Tenant Isolation from Power Platform Admin Center

Hello Everyone,

Today i am going to share information on how to turn on “Tenant Isolation” on Power Platform Admin Center.

Lets gets started.

What is Tenant Isolation ?

Tenant Isolation in terms of Power Platform Administrators can ensure that the connectors or Power Automate flows can be connected within the tenant while minimizing the risk of data expliotation outside the tenant.

Tenant Isolation can be used to block external tenants from establishing connections into your tenant (inbound isolation) as well as block your tenant from establishing connections to external connections to external tenants (outbound isolation)

Power Platform tenant isolation is different from Azure wide tenant restriction.it doesn’t impact Azure AD based access outside of Power Platform.

Power Platform tenant isolation only works for connectors using Azure AD based authentication such as Office 365 Outlook or sharepoint.

There are three types of tenant isolations:

1. Inbound

2. Outbound

3. Inbound and Outbound

With the tenant isolation Power Platform Administrators can put restriction on the users not to connect to other tenants by imposing the type of isolation based on the use case.

For example:

Tenant GMR – UK

Tenant GMR – Europe

Now the users from Tenant GMR – UK can connect to the data source of the Tenant GMR – Europe even the inbound and outbound restriction is imposed because the Bidirectional allowlists in enabled for the both tenants. Anyone from outside the tenant is not able to connect because of the Tenant Isolation imposed.

How to configure Tenant Isolation ?

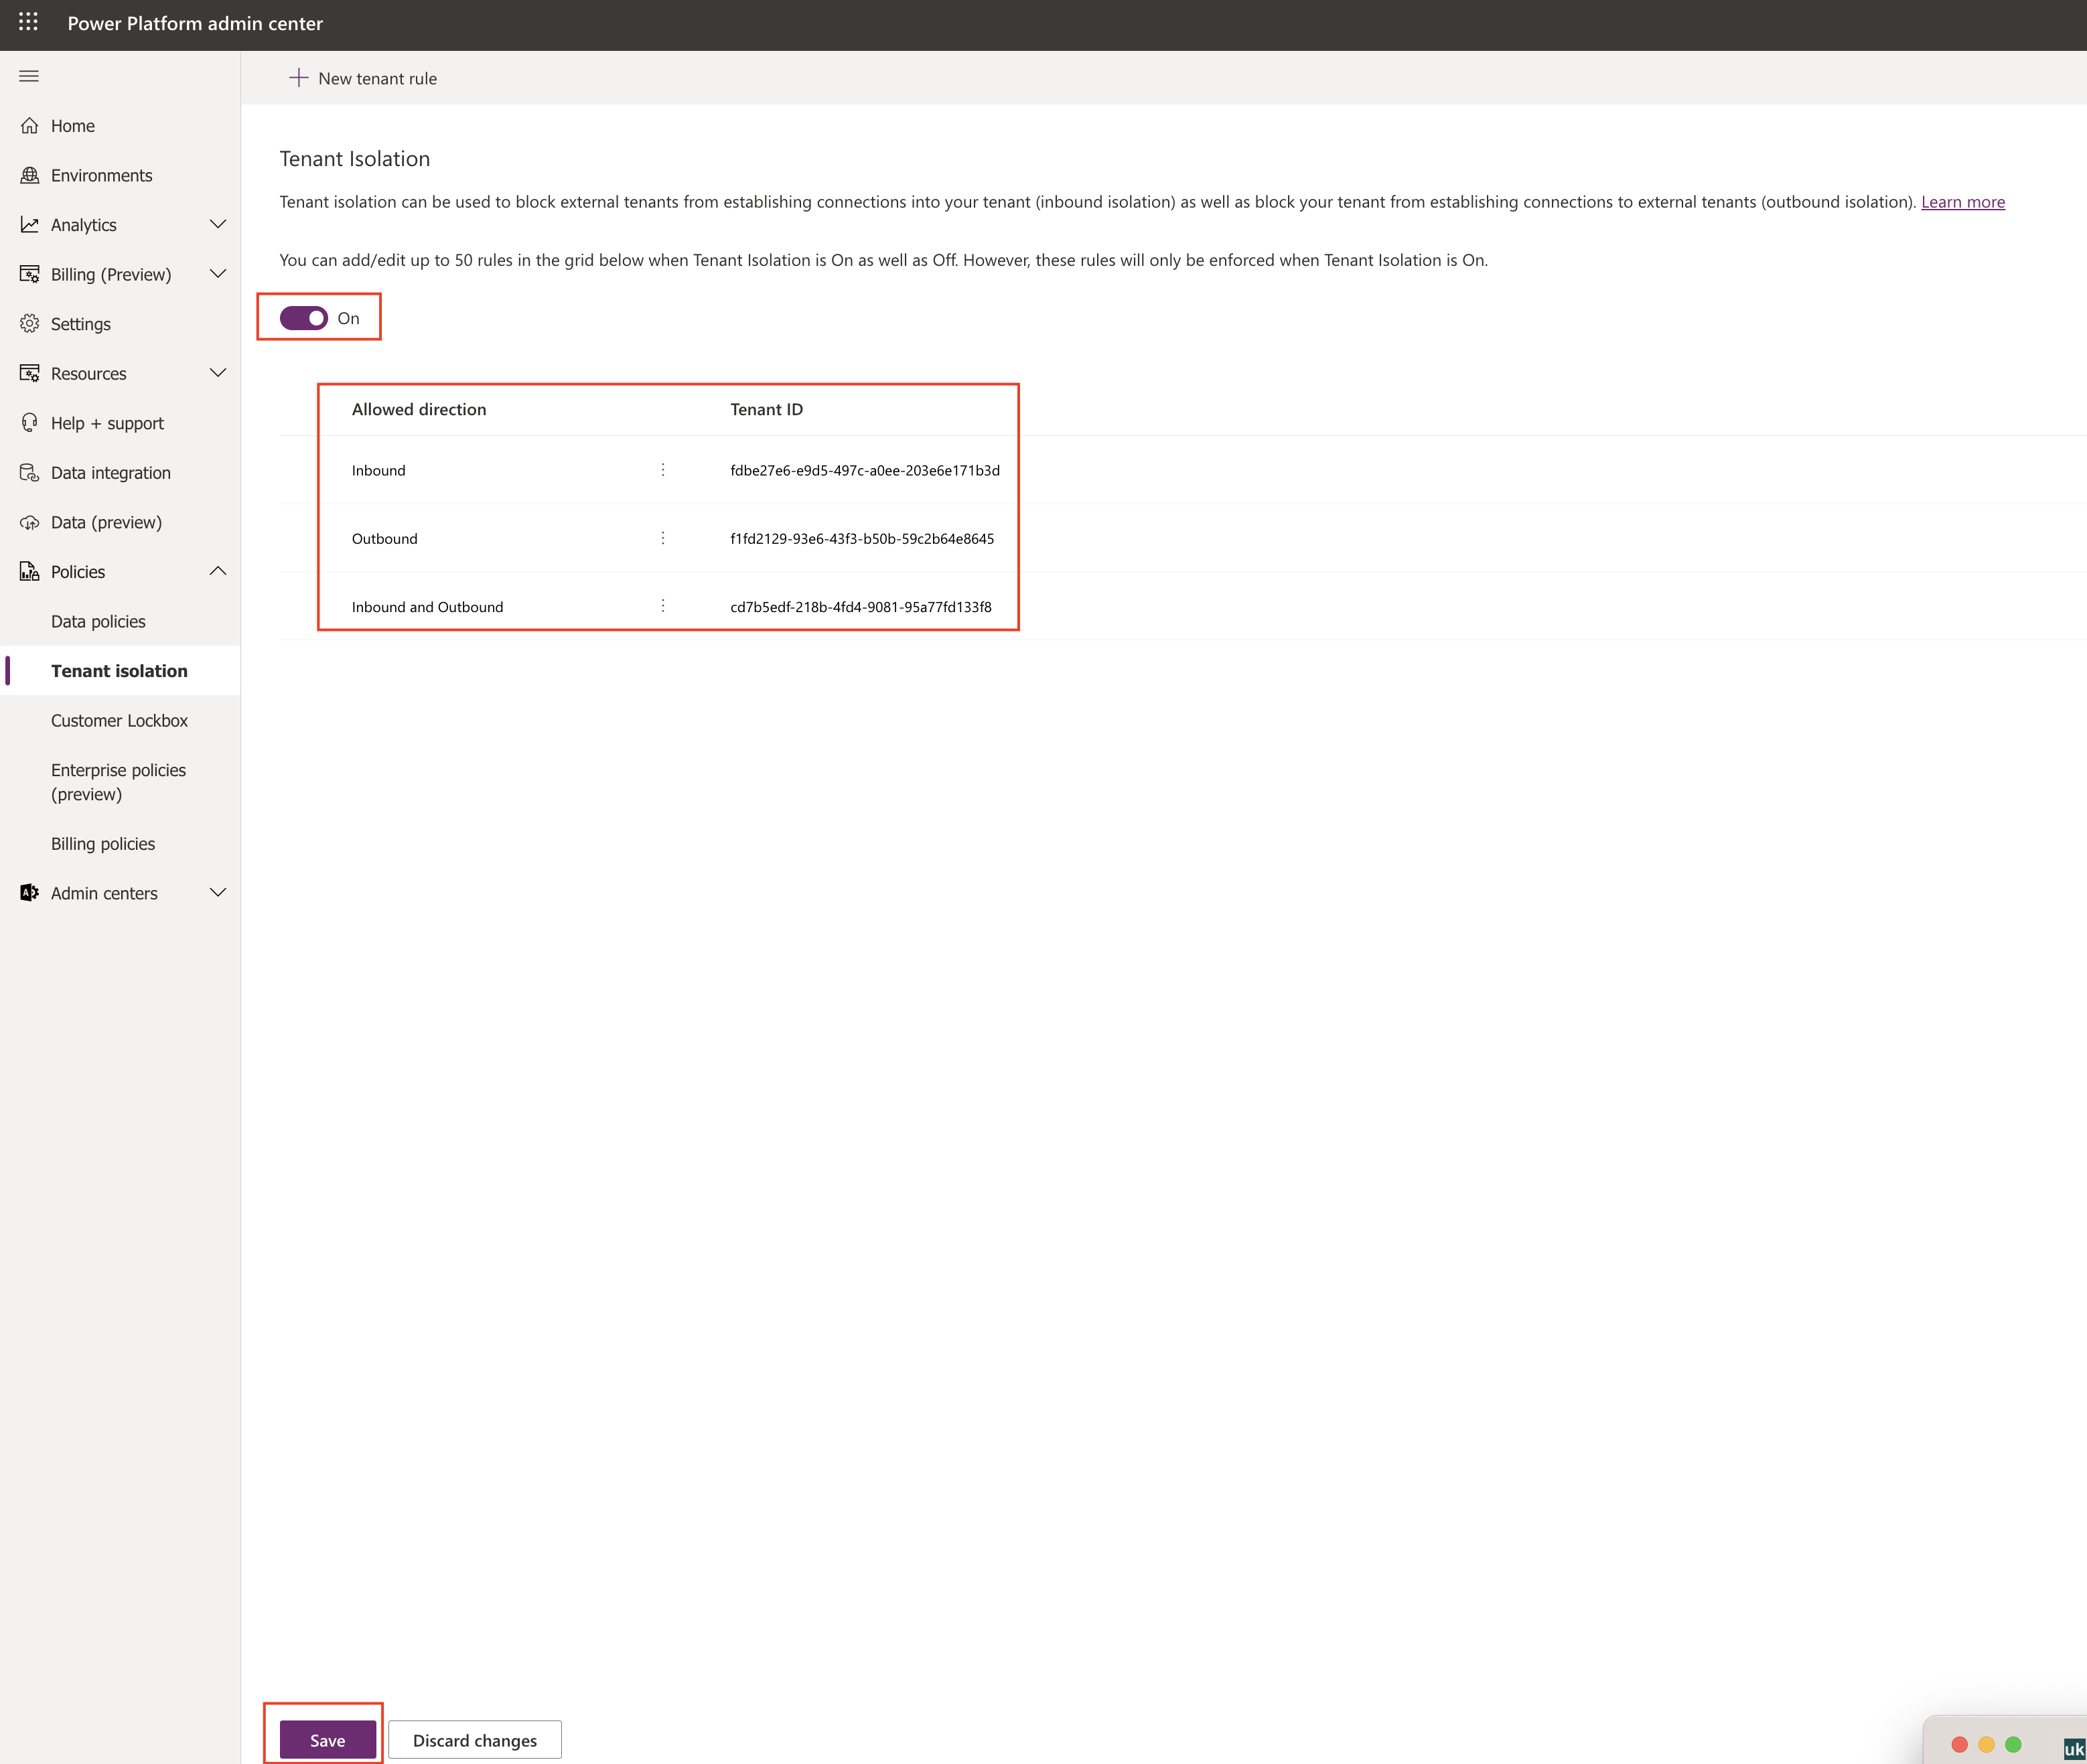
Login into PPAC

Expand Policies then click on Tenant Isolation
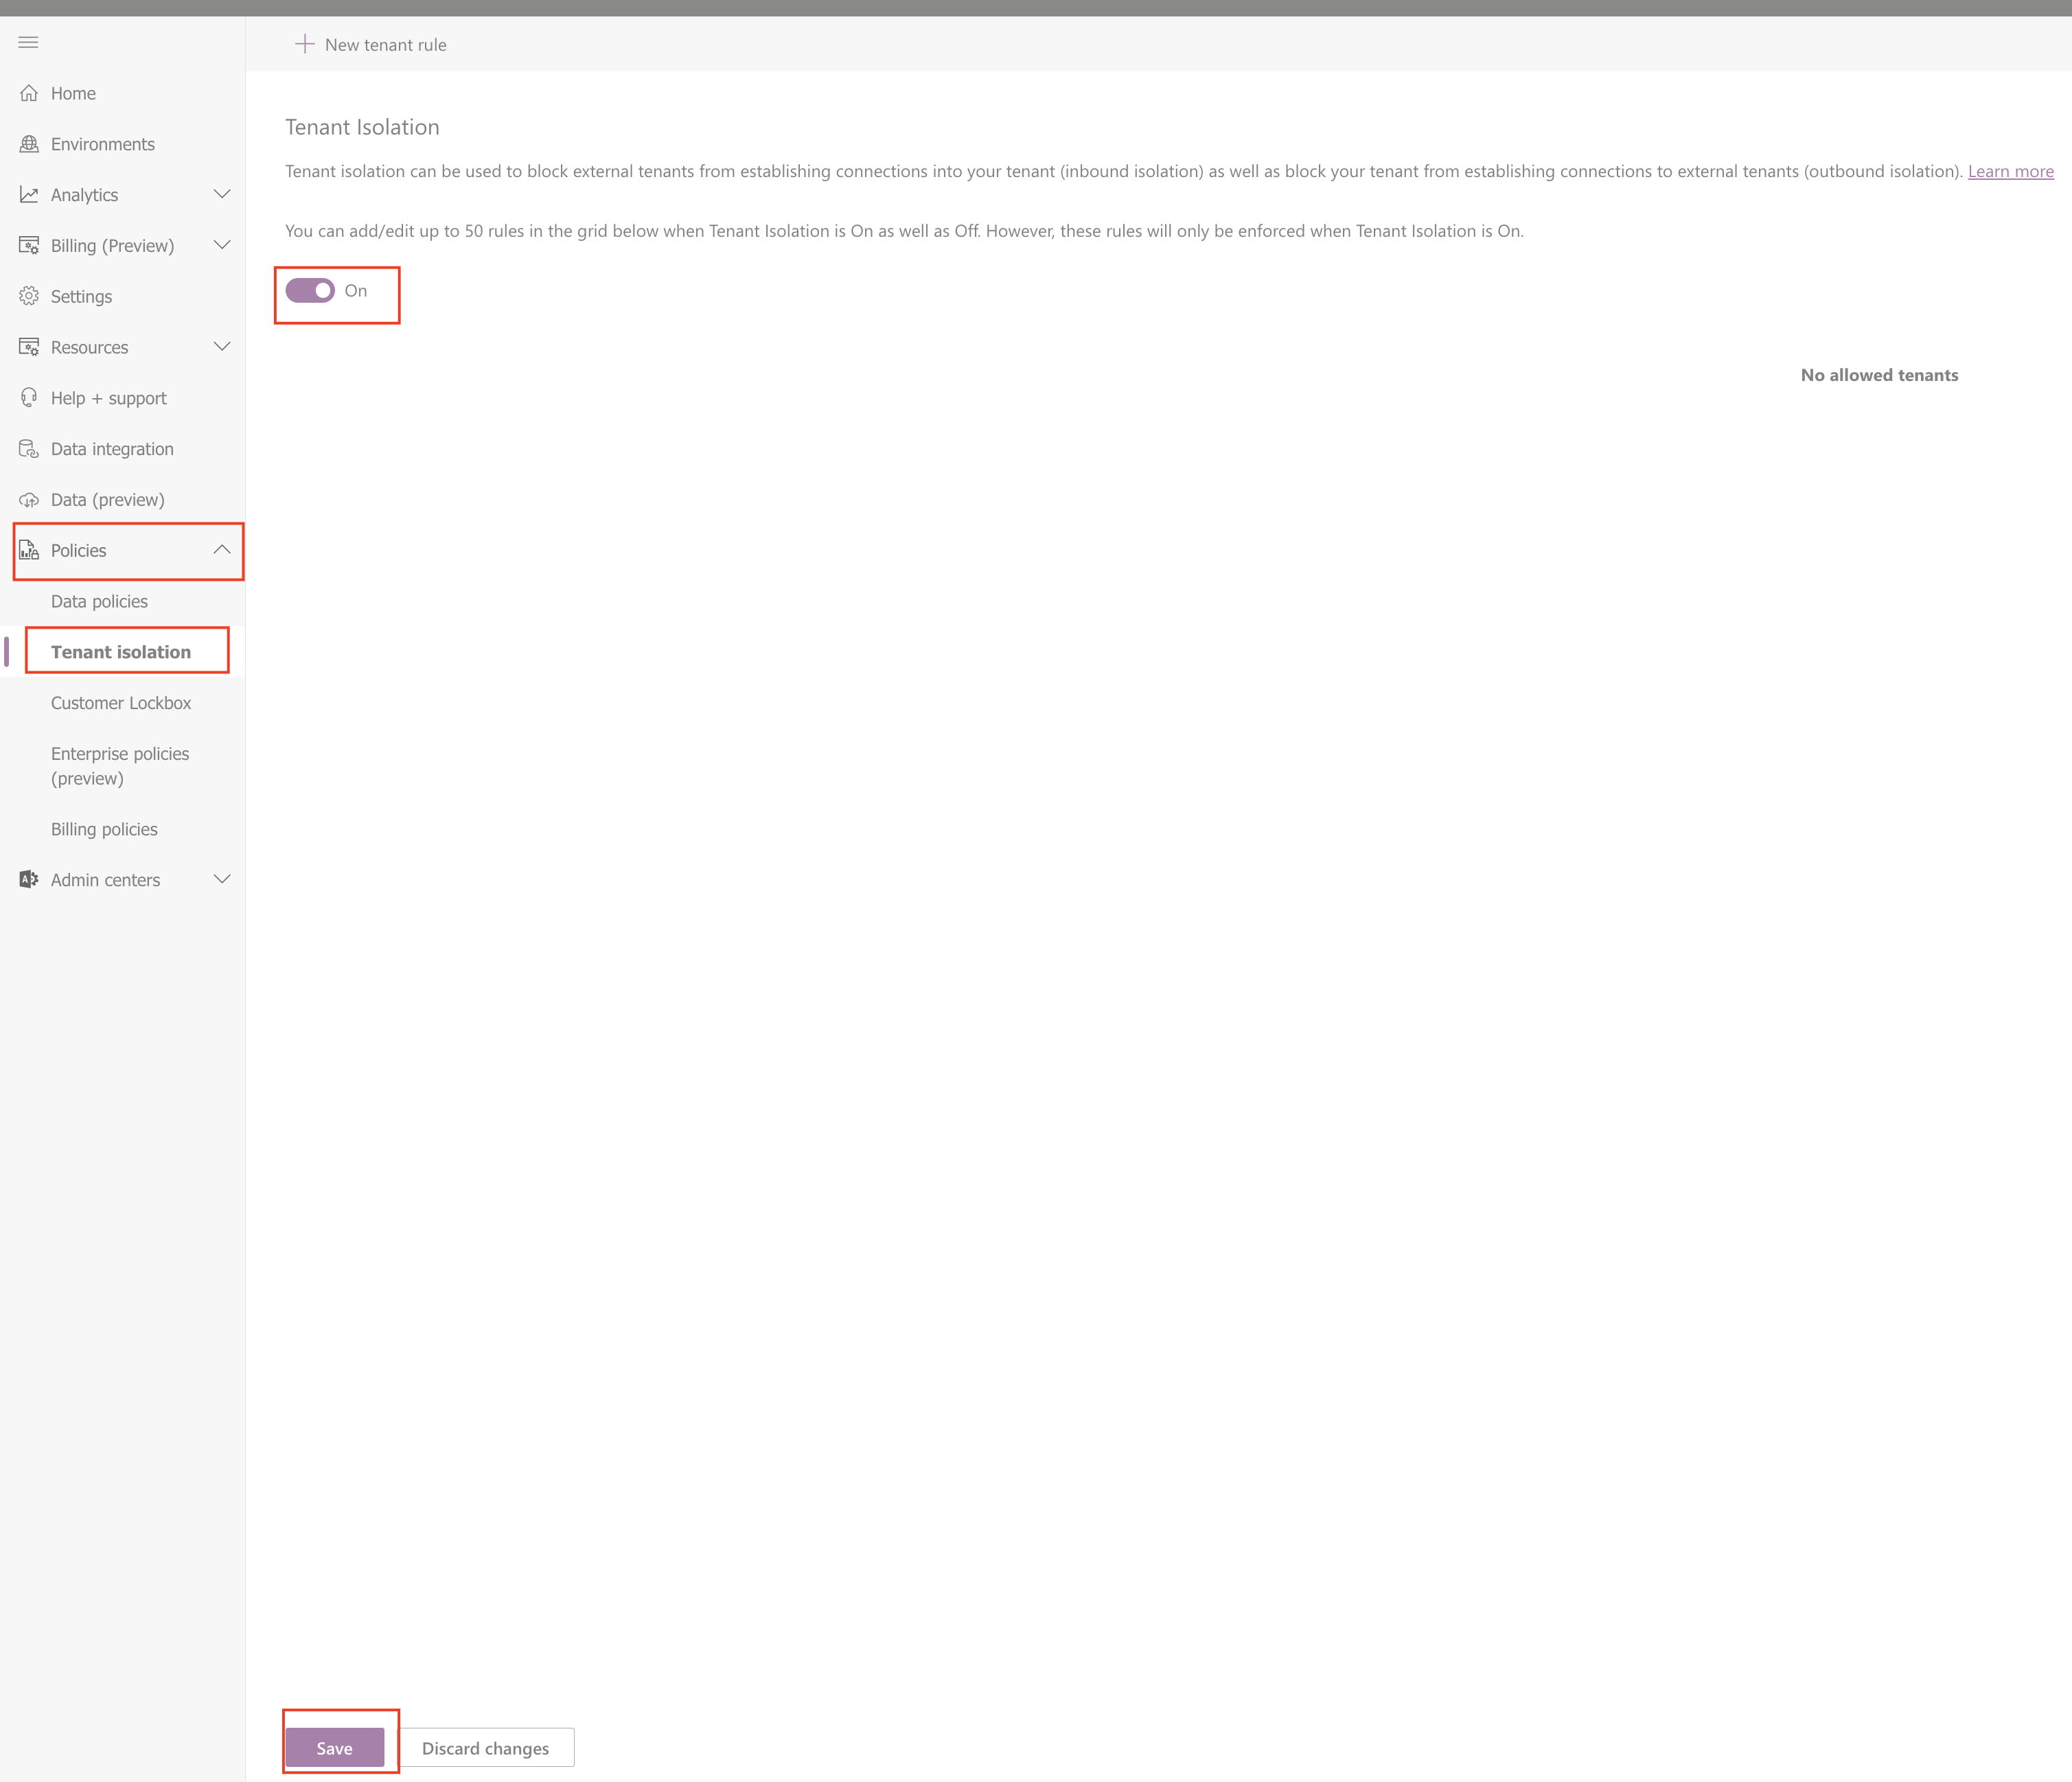
Turn “ON” Tenant Isolation then click save.

New Tenant Rule: Administrators can put restrictions by configuring the Tenant Rules.

Directon: Either – Inbound or Outbound or Inbound and Outbound

For example: INBOUND

I have chosen the direction as “INBOUND” Tenant Domain or ID AND click save.

OUTBOUND:

I have chosen the direction as “OUTBOUND” Tenant Domain or ID AND click save.

What is the effect of this OUTBOUND Isolation ?

Outbound connections to the tenant from external tenants are blocked by Power Platform evem if the user presents valid credentials to the Azure AD secured data source, you can use rules to add exceptions with “Allowlists”

Inbound and Outbound Isolation

Inbouhd and Outbound connections to the tenant from external tenants are blocked by Power Platform evem if the user presents valid credentials to the Azure AD secured data source, you can use rules to add exceptions with “Allowlists”

Allowlist: Allowlist allows the tenant users to connect to data source even the tenant isolation is imposed on some tenants.

Outbound Allowlists;

For example Tenant A, Tenant B

Allowlist – Tenant B

Tenant User can establish a connection using Tenant B credentials.

Similarly : Bidirectional allowlist,

Below configured Tenant rule isolation rule:
For more information of Tenant Isolation click here

I hope this helps
Malla Reddy(@UK365GUY)
#365BlogPostsin365Days
Share this: