Menu Close

Tag: #powerapps

{Do you know} Modernize maker experience security settings in maker portal

Hello Everyone,

Today I am going to show how to create new security profile from maker portal.

Let’s get’s started.

Now with the maker portal users can have modern security role settings.

How do you do that?

Login into your www.make.powerapps.com

So Enable makers to use a modern and accessible security role editor while creating apps.

Now, makers can configure security role settings in Power Apps using a new security role editor.

This feature includes a new panel called New Role and lets makers configure column security profiles.

That’s it for today.

I hope this helps.

Malla Reddy Gurram(@UK365GUY)
#365blogpostsin365days

Share this:

{How to} Set Power Apps Standard Settings

Hello Everyone,

Today I am going to share how to set Power Apps Settings.

Let’s get’s started.

Power Apps behaves based on its settings, lets see what they are?

When you open power apps and on ribbon you will see the settings, click on it.

Settings:

1. General
2. Display
3. Upcoming features
4. Support

General :

General settings will have what is the name of Power App, description about it, App icon, icon your app image can be selected from it.

Icon background fill, icon fill, Auto save.

Data row limit: you can set how many records can be retrieved from the server.

Debug published app: this enables app expressions and additional debug information to be displayed in the monitor tool when debugging your published app.

Automatically create environment variables when adding data sources:

Enable the automatic creation of environment variables when connecting to data. Environment variables allow you to change data sources within solutions.

Enable App.OnStart property:

Use of the App.OnStart property can cause delays when loading an app and must be used with caution. New alternatives such as App.StartScreen offer a better way to accomolish the same thing. See documentation for guidance turn on ON.

2. Display

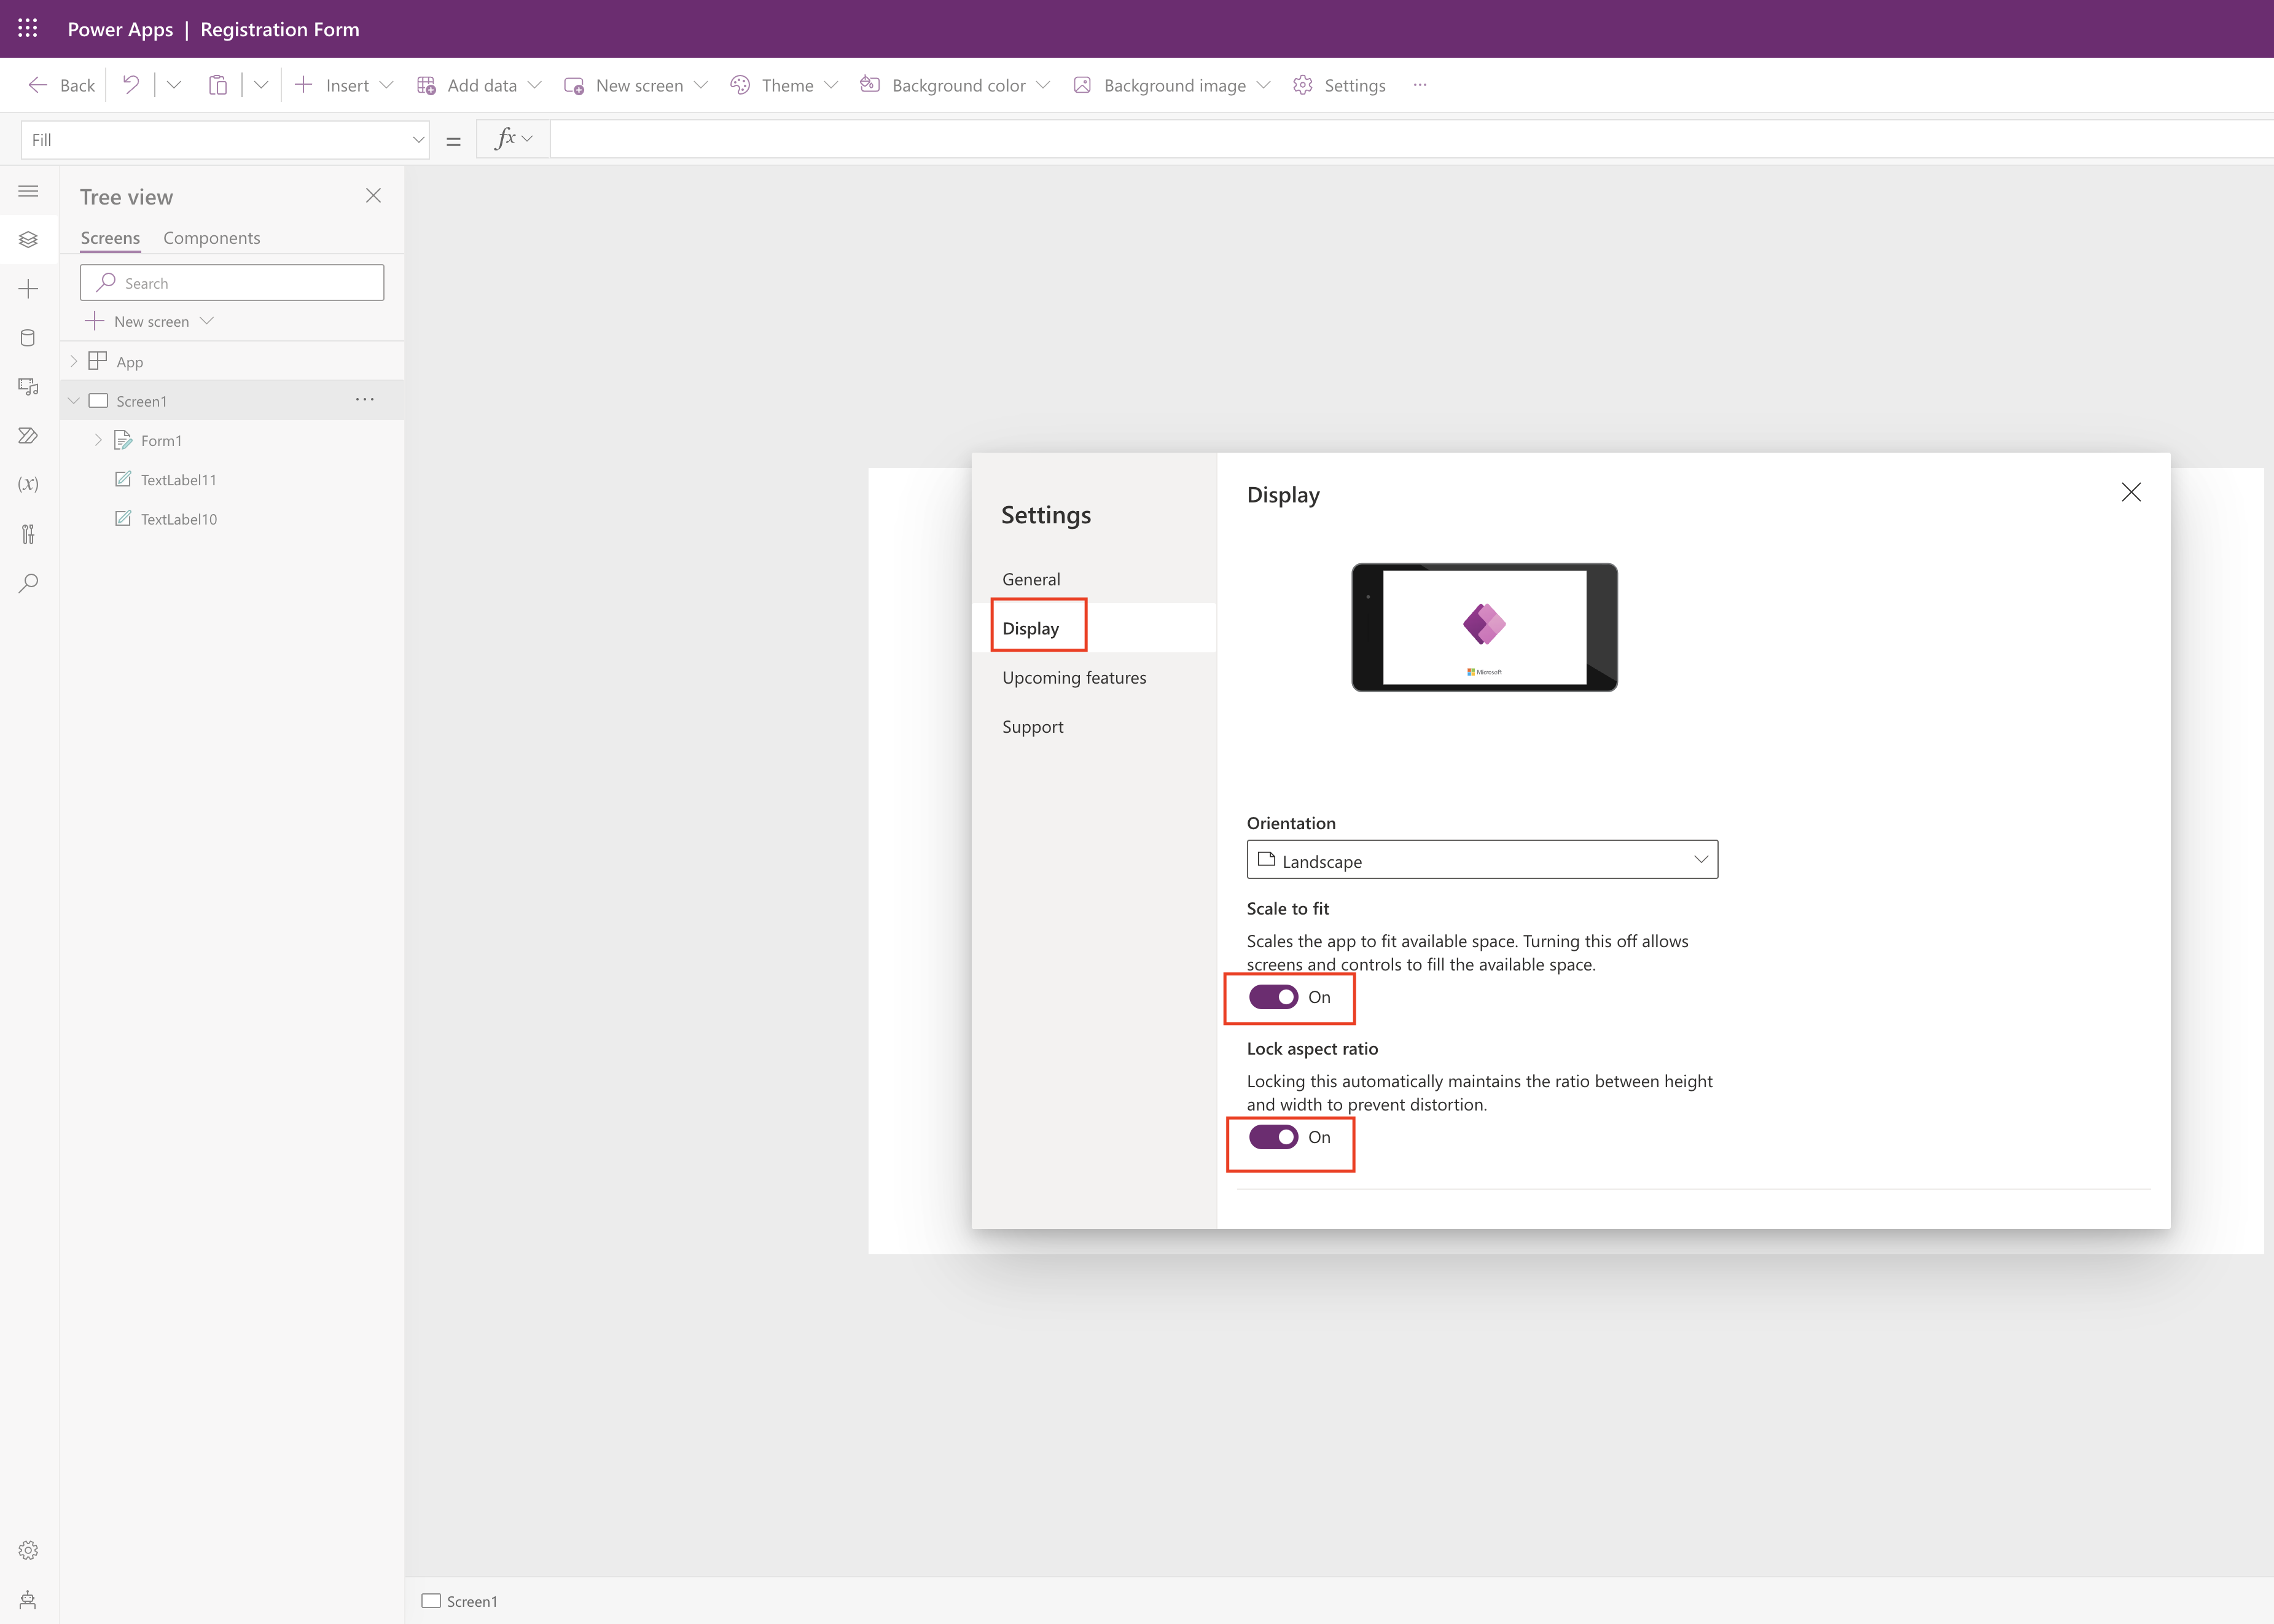
Display states how the power app looks based on this settings.

Screen Orientation can be either Potrait or Landscape.

Scale to fit:

Scale the app to fit available space. Turning this off allows screens and controls to fill available space.

Lock aspect ratio:

Locking this automatically maintains the ratio between height and width to prevent distortion.

what it mean is when it is turn on it will automatically adjust the height and width.

Lock orientation:

Lock orientation keeps the screen in its current orientation, even when the device is rotated.

Show mobile device notification area: When it is turned on an icon will show of the mobile operating system’s notifications, so any notifications user can see the time of messages.

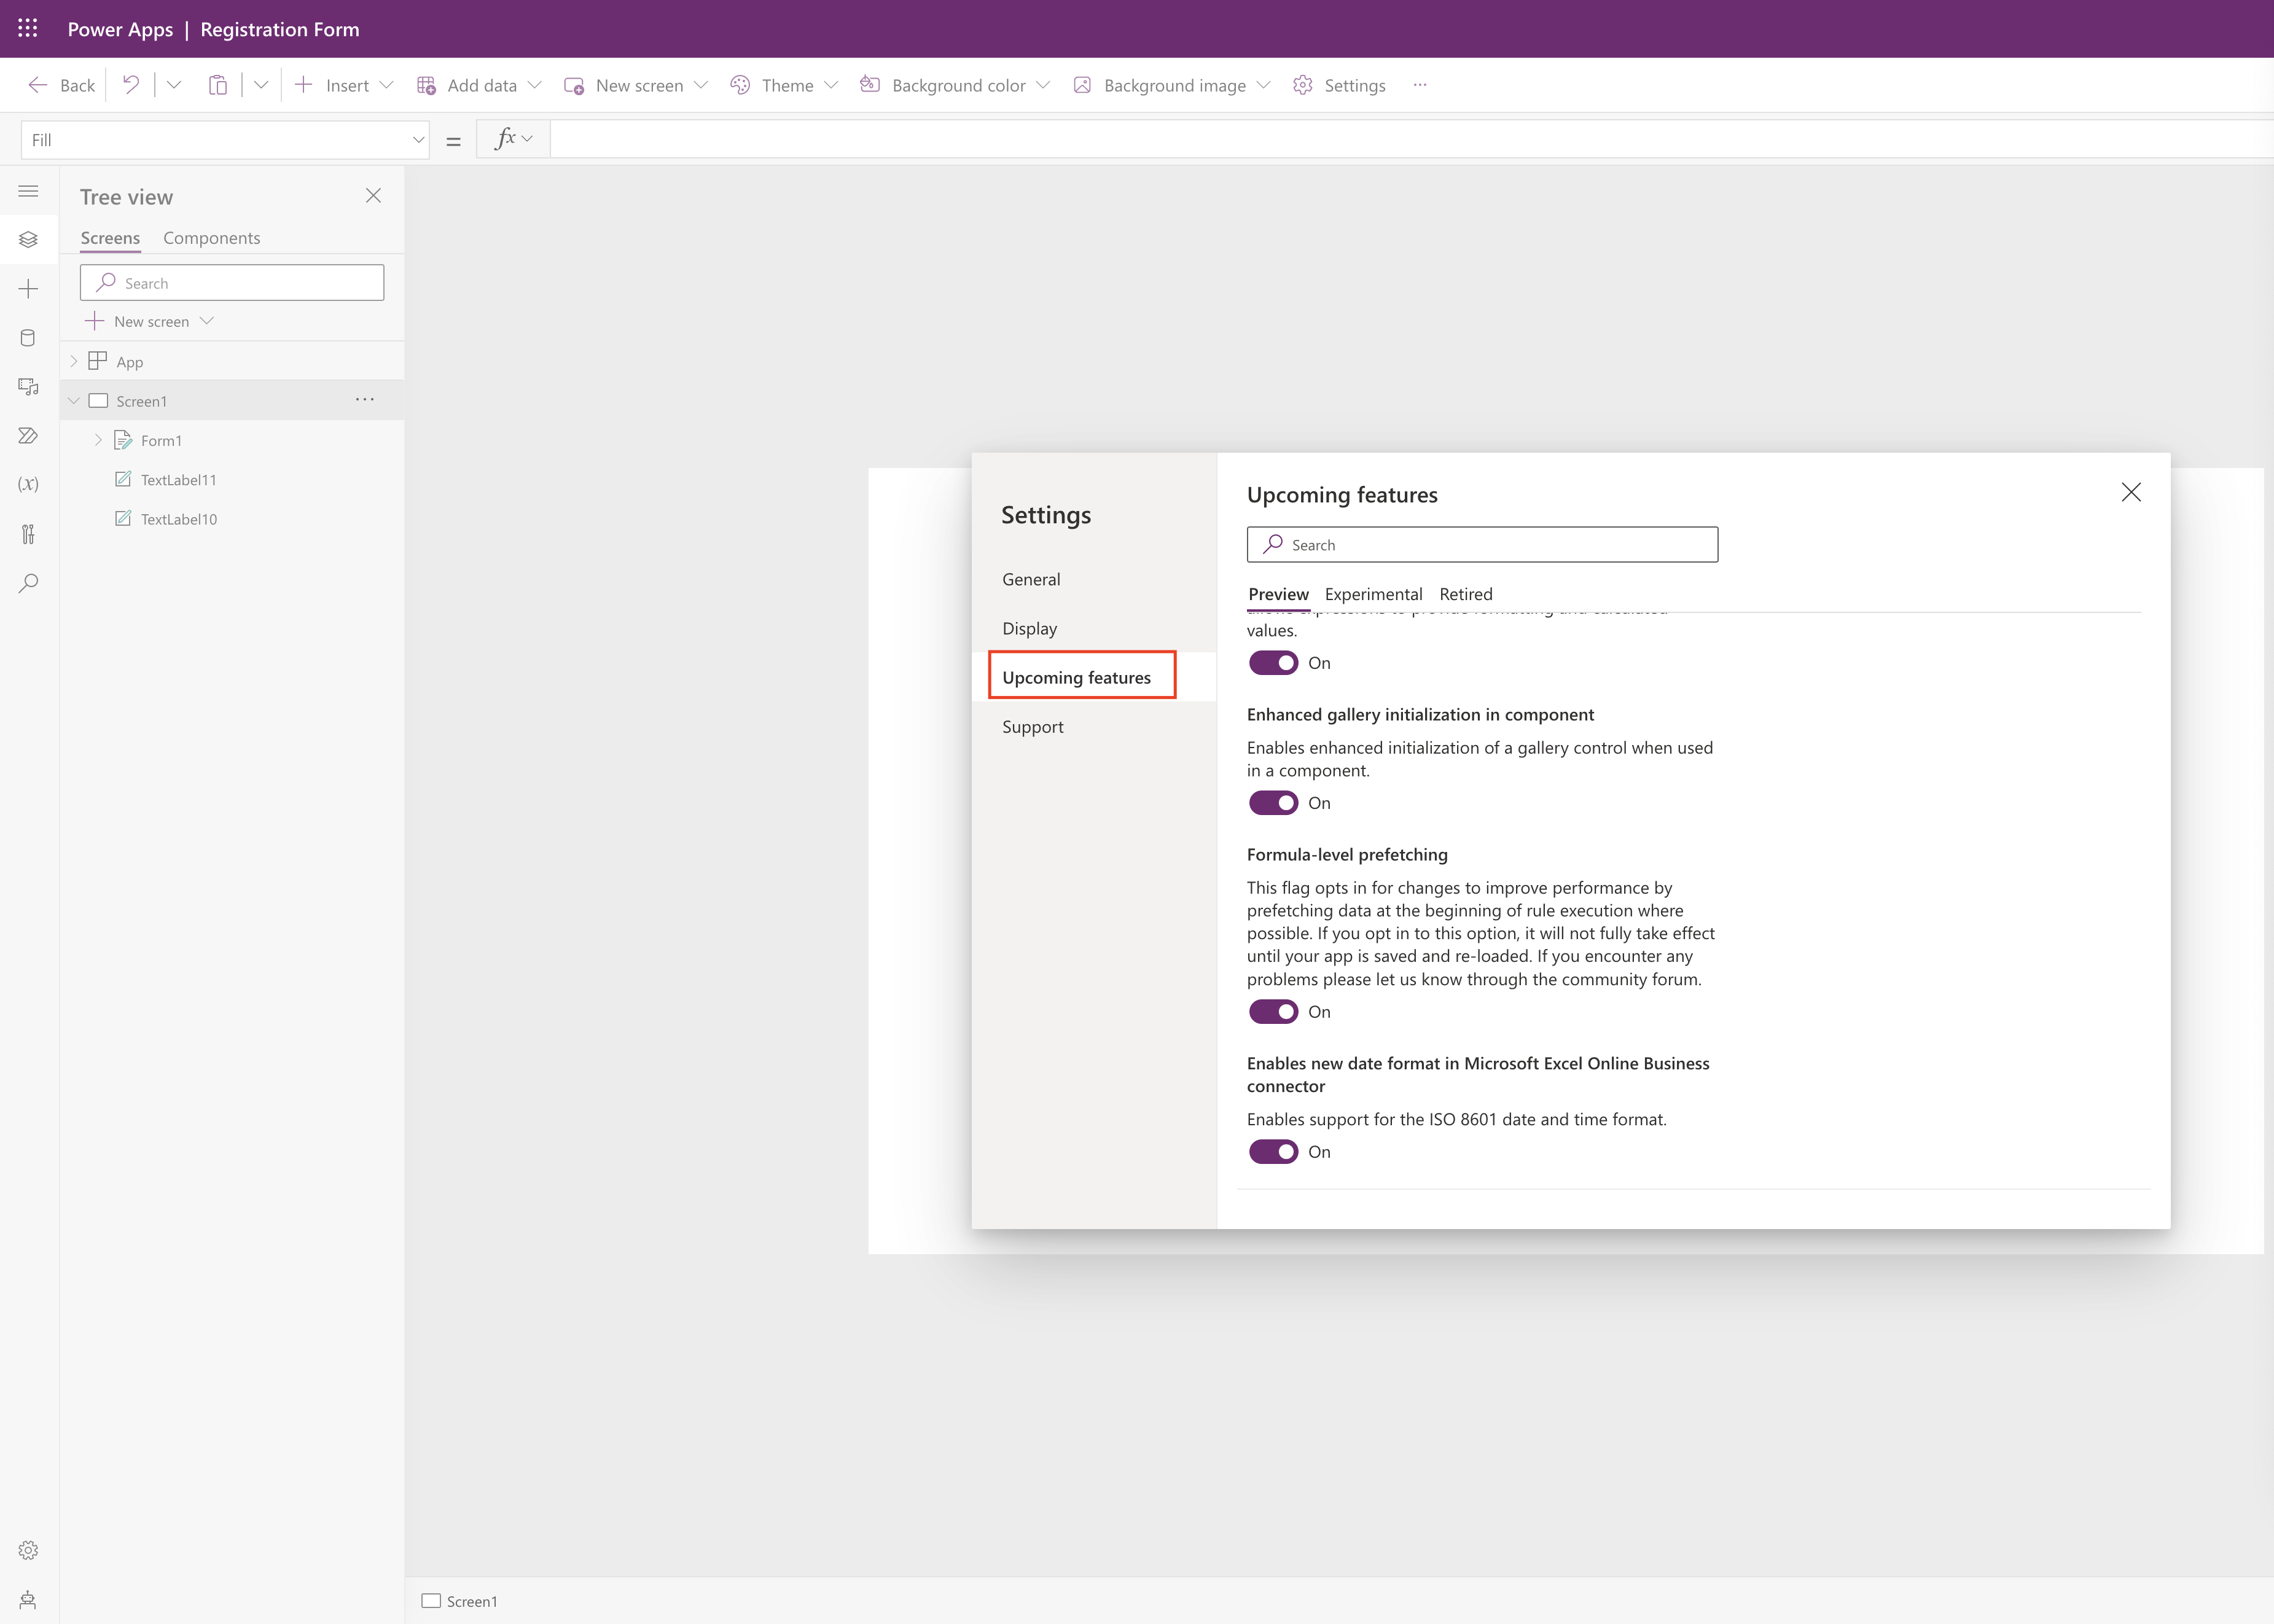
Upcoming features can be viewed with Preview, experimental and retired settings here, see below image.
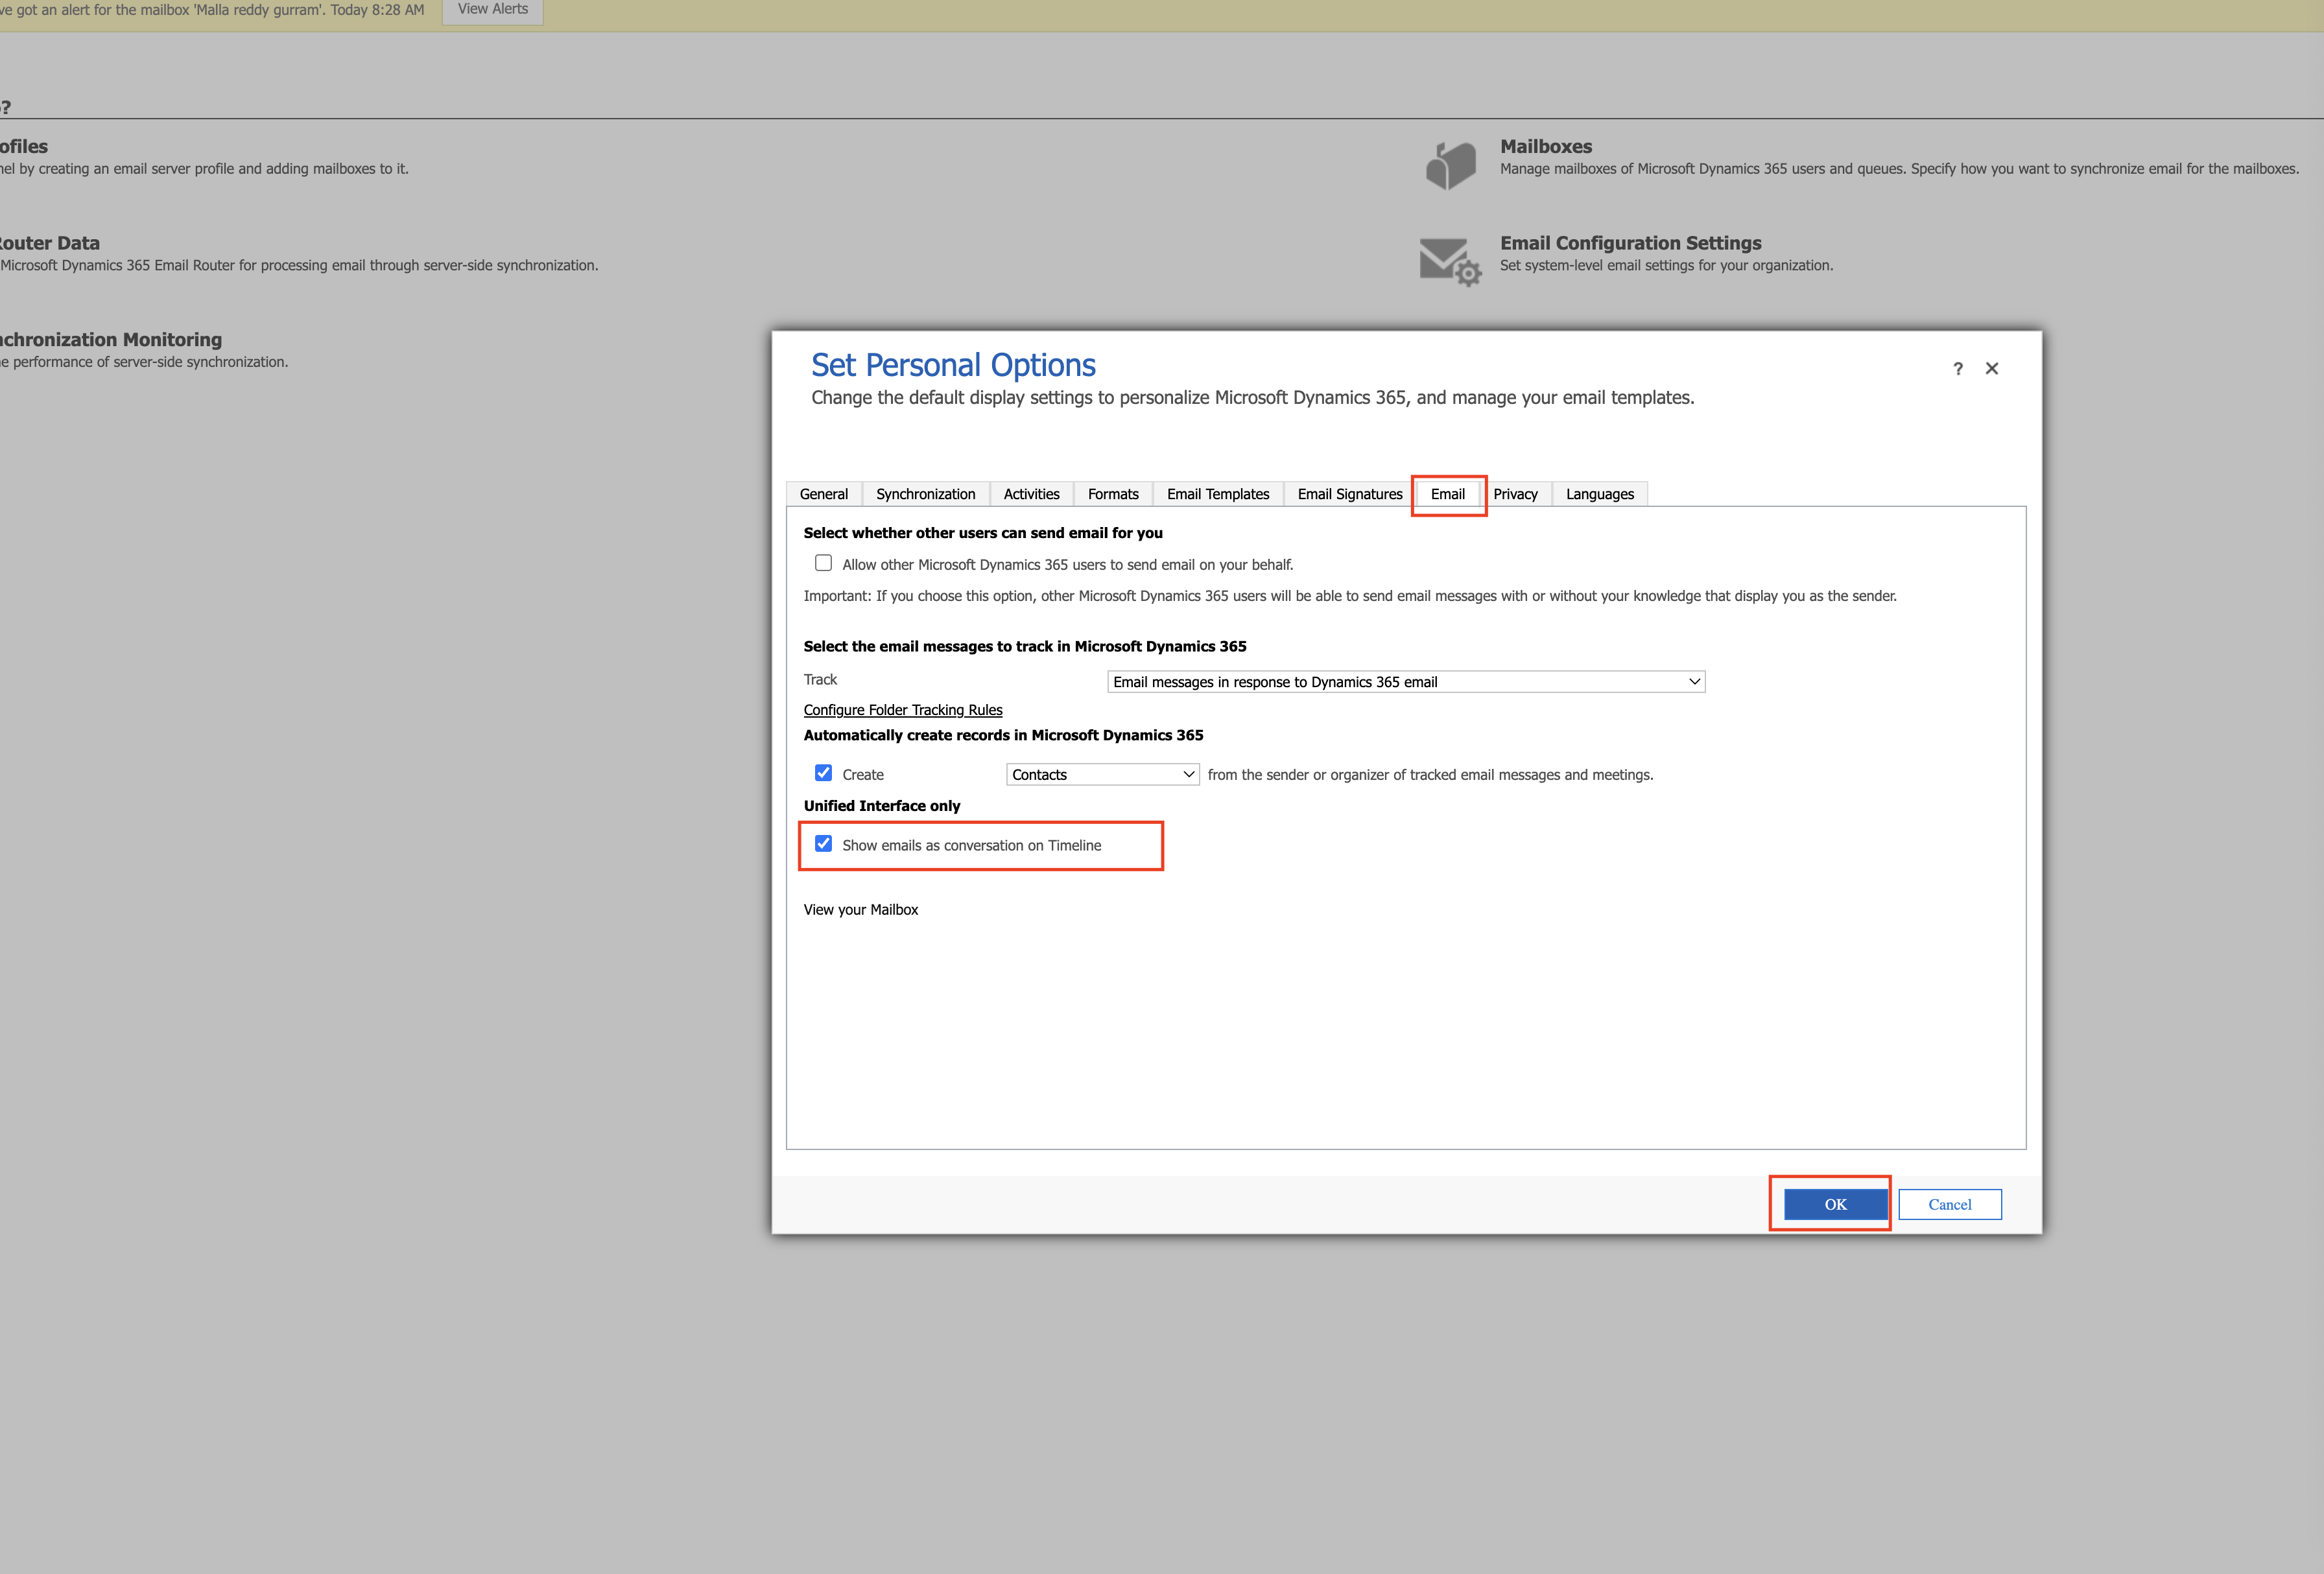
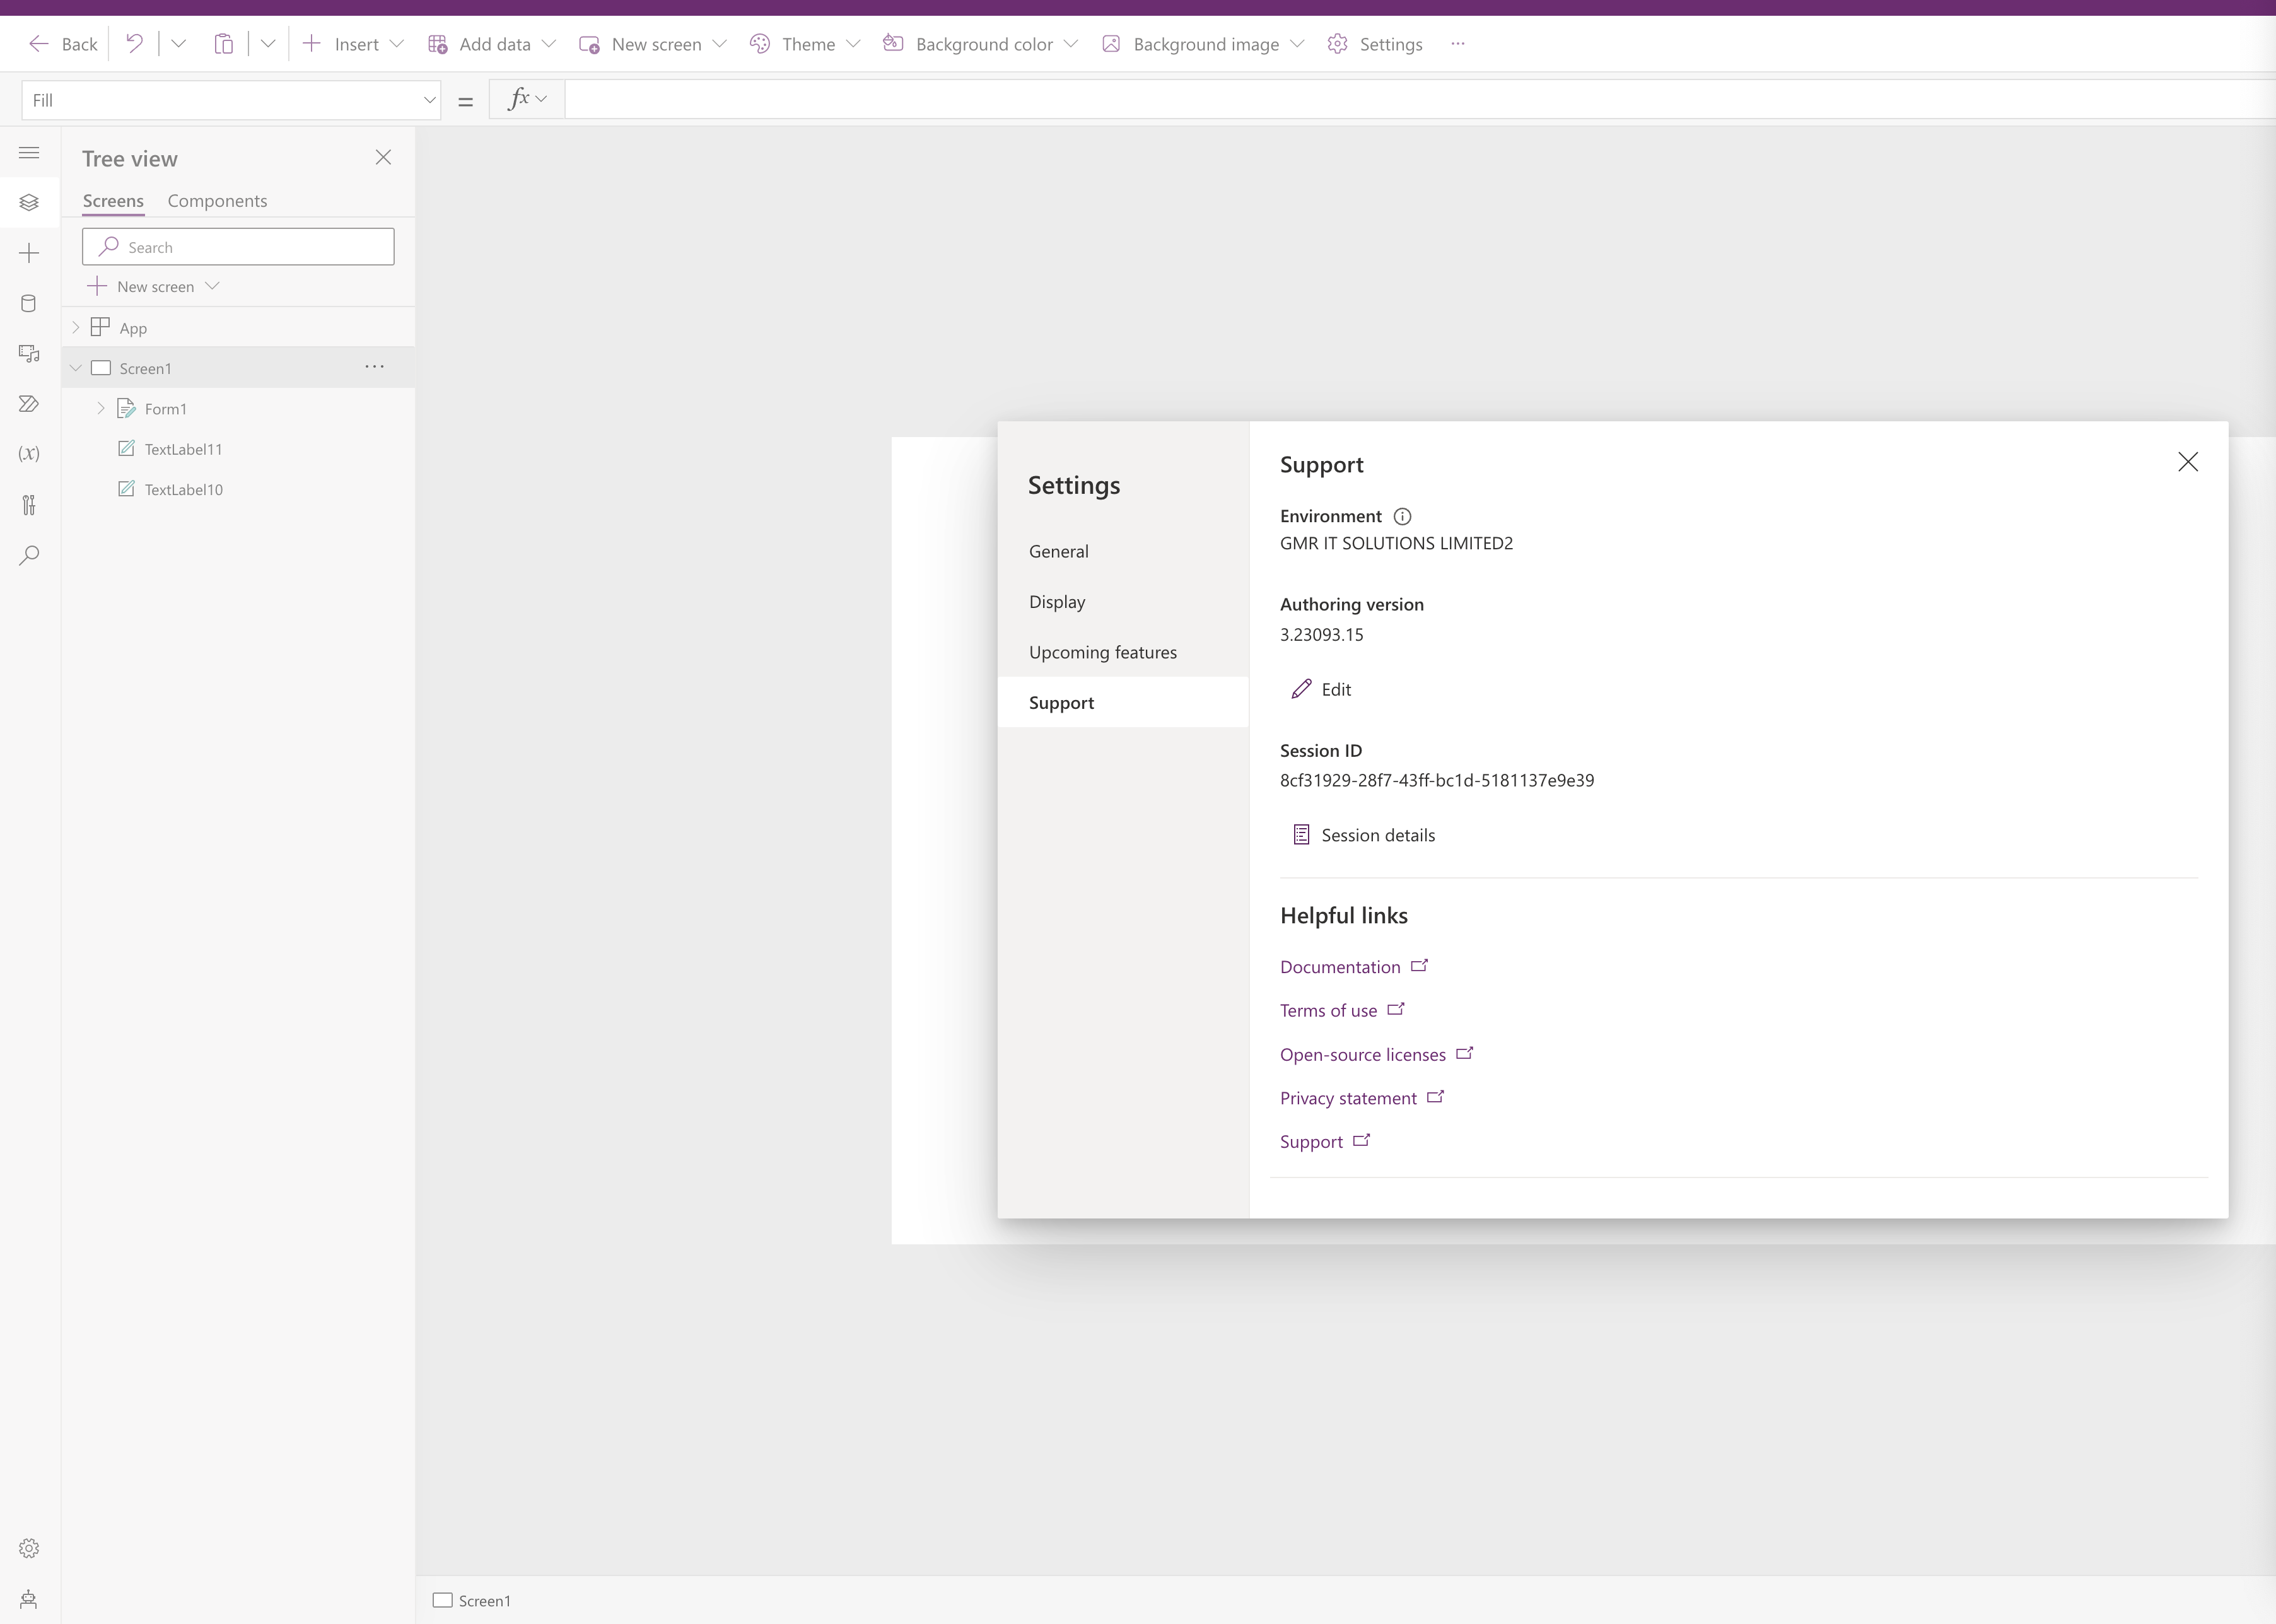
Support:

All about the Power App ennvironment, version, session id other useful links.

That’s it for today.

I hope this helps
Malla Reddy Gurram(@UK365GUY)
#365BlogPostsin365Days

Share this:

How to configure Power Apps Assets within Power Apps Admin Center

Hello Everyone,

Today i am going to share what is the significance of Power Apps Assets in Power Apps.

Let’s get’s started.

Normally when working with Power Apps you can get stuck in a problem and with the help of AI, you can get some answers.

But in some critical cases bot fail to give accurate answers for you.

To over come situation Microsoft introduced Power Apps Assets.

As the name itself is advisors, so it lets you configure the experts in your organisations so that the users can contact them if they are stuck anywhere.

You can configure as many advisors as possible no limitation.

The steps to configure Power Apps Assets – Advisor – you have to follow these below two points.

1. Internal Resource Links

2. Advisors.

Manage links to internal Power Apps documentation and community channels, as well as Power Apps advisors who wish to help other makers.

Internal resource links:

Documentation: You can provide the documentation url which might help when you got to do troubleshoot issues.

Team Group: You can insert the Microsoft Teams group link here when in troubleshooting you can use the Microsoft Teams group to ask for help.

Yammer Community: Similarly you can also provide the yammer community link in the event of issues you can ask questions.

Once you have provided the url’s for these and then save the changes.

Go to next TAB called Advisors:

Configure as many advisors as you can, in the event of help required.

How the advisors will help?

Advisors when they login into Power Platform Admin Central they will get notification whether they can help or not based on their choice.

That’s it for today.

I hope this helps.

Malla Reddy Gurram(@UK365GUY)
#365BlogPostsin365Days

Share this:

{How to} update Power Apps App Copilot App in Environments

Hello Everyone,

Today i am going to show how to update the Dynamics 365 Apps in Environment. In this example i am i will show how to update the Power Apps App Copilot App .

Login into Power Platform Admin Center.

Click on the environments and choose the environment that you would like to update the App, choose the Dynamics 365 Apps.

Choose the Power Apps App Copilot App and click on the “…” and choose the UPDATE and agree the terms and conditons of Microsoft and click UPDATE.

Update Power Apps App Copilot App – Click Confirm.

Update will take effect in an couple of hours time.

That’s it for today.

I hope this helps
Malla Reddy Gurram(@UK365GUY)

Share this:

{How to } enable show emails as conversation on timeline

Hello Everyone,

Today i am going to show how to enable show emails as conversation on timeline.

Let’s get’s started.

Sign in to Sales Hub.

Click on settings and then Personalization Settings. This displays the Set Personal Options dialog box so you can use the following steps to enable the email view on timeline.

Select the Email tab.

Select the Show emails as conversation on timeline check box.

Select OK.

The email conversation view is based on the user preferences. Personal Settings are tied to the user, not the form, which means when you enable the threaded email, the setting is applied to all of your timeline views.

That’s it for today.

I hope this helps.

Malla Reddy Gurram (@UK365GUY)
#365BlogPostsin365Days

Share this: