Menu Close

Category: Blog

{Do you know} Use Skills to find the right agents for a consult on Dynamics 365 Omnichannel

Hello Everyone,

Today I am going to share my thoughts use of skills to find the right agents for a consult on Dynamics 365 Omnichannel.

Certainly! When it comes to finding the right agents for consultations related to Dynamics 365 Omnichannel, there are a few key considerations:

1. Skill-Based Search for Agents:

In the context of Customer Service or support, organizations often need to connect customers with the most suitable agents. This involves matching the customer’s query or issue with an agent who possesses the relevant skills and experience,

With Dynamics 365 Omnichannel, you can implement a skills-based routing system. Here’s how it works:

Agent Skills Profiling: First, agents are profiled based on their skills, experience and knowledge. These skills can include product knowledge, language proficiency, technicial expertise and more.

Customer Query Analysis: When a customer initiates a conversation(via chat, email, or other channels), the system analyzes the query.

Skill Matching: The system then matches the query to the most appropriate agent based on the required skills. For example, if a customer has a technical issue with a specific product, the system will route the query to an agent with expertise in that product.

Real-Time Availability: Additionally, the system considers agent availability and workload. It ensures the selected agent is currently available to handle the query.

Seamless Transfer: If an agent needs to consult with another agent during the conversation, they can search for agents with specific skills and transfer the conversation seamlessly.

2. Skills Required for Dynamics 365 Omnichannel Agents:

If you’re looking for agents specifically skilled in Dynamics 365 Omnichannel, consider the following competencies:

Dynamics 365 Knowledge: Agents should have a solid understanding of the Dynamics 365 platform, including its various moduels( Sales, Customer Service, Field Service, etc)

Omnichannel Expertise: Familiarity with Omnichannel communication channels (chat, email, social media) and their integration within Dynamics 365.

Problem-Solving: Agents must be adept at troubleshooting and resolving customer issues efficiently.

Communication Skills: Clear Communication is essential for providing excellent customer service.

Adaptability: The ability to handle diverse customer scenarios and adapt to changing requirements.

Product Knowledge: Depending on the industry, agents may need specific product knowledge( e.g., retail, finance, healthcare).

Empathy: Understanding and empathizing with customer concerns.

Time Management: Efficiently managing multiple conversations.

Organisations can customize these skills based on their unique requirements.

3. Implementation and Monitoring:

To implement skills-based routing in Dynamics 365 Omnichannel:

Configure Skills: Set up agent profiles with relevant skills.

Define Routing Rules: Create rules that match customer queries to the appropriate agents.

Monitor Performances: Regularly assess how well the system routes queries and adjust as needed.

Feedback Loop: Gather feedback from agents and customers to refine the process.

Note: Ongoing monitoring and adjustments are crucial for optimal results.

That’s it for today.

I hope this helps.

Malla Reddy Gurram(@UK365GUY)
#365blogpostsin365days

Share this:

How to restrict deletion of Address Records in Dynamics 365 Apps

Hello Everyone,

Today I am going to show how to restrict the users from deleting the Address records in Dynamics 365 Apps.

Let’s get’s started.

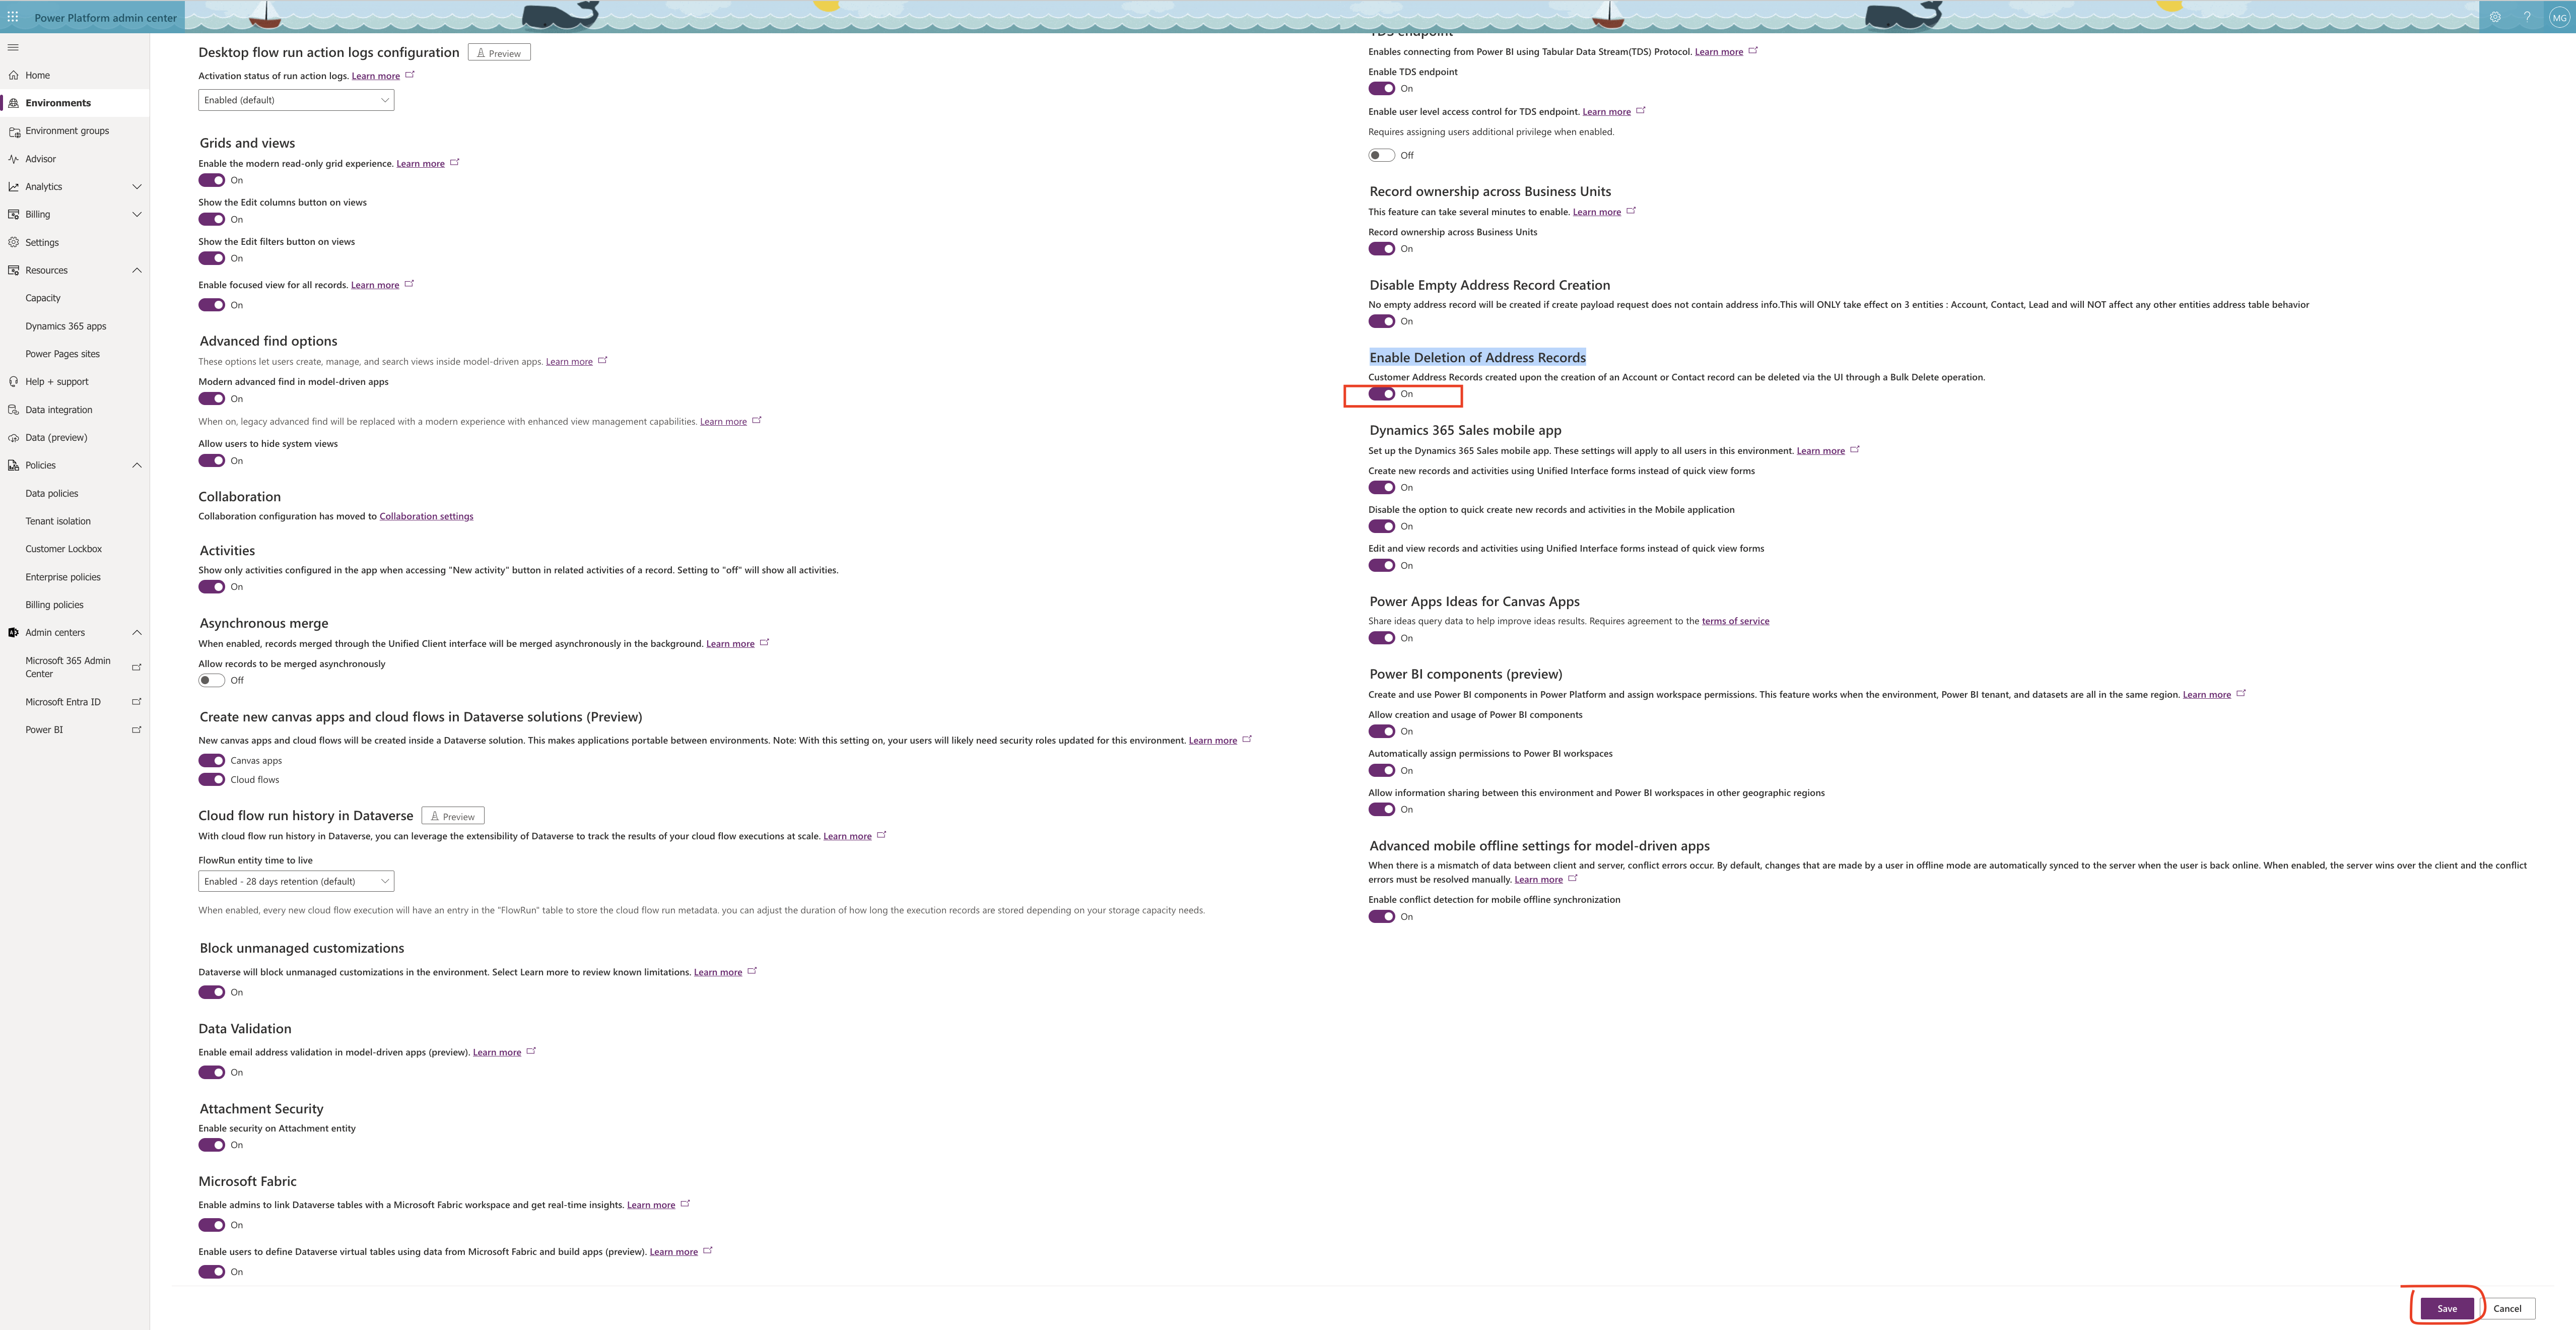
There will be situations where users can bulk delete the records from UI, in order to restrict the users from deleting the Address records, we can turn OFF the Deletion of Address Records from Admin Center.

Login into Power Platform Admin Center.

Go to the environment > Settings > Features > Enable Deletion of Address Records = Turn ON.

Once it is turned on, users can delete records but with address fields data on the records.

That’s it for today.

I hope this helps.

Malla Reddy Gurram(@UK365GUY)
#365blogpostsin365days

Share this:

{How to} Enable record ownership across Business Units in Dynamics 365

Hello Everyone,

Today I am going to show how to enable record ownership across Business Units in Dynamics 365.

Let’s get’s started.

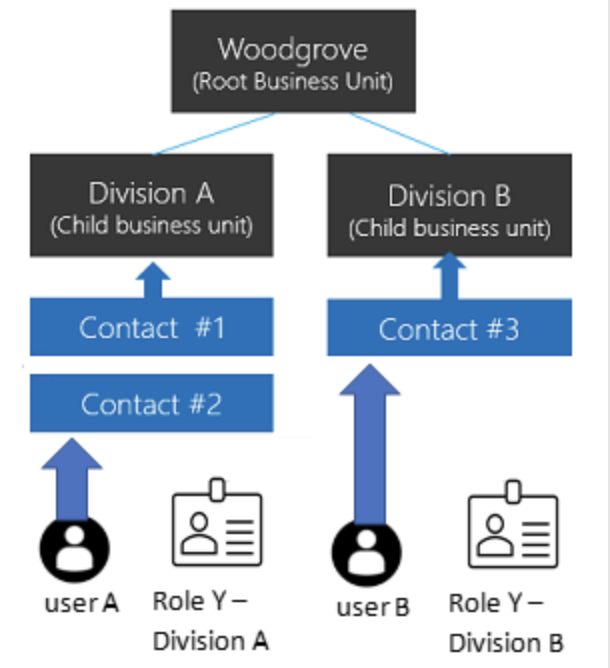
Normally User A from Business Unit A with Role Y – All contacts of the Business Unit A.

User B from Business unit B with Role Y – access – All contacts of the Business Unit B.

Here the USER A can not Contacts of Business Unit B vice versa.

This is usually called a hierarchy structure security.

Modern Matrix data access structure

With introduction of the Modern Matrix data access structure (Modernized Business Units)

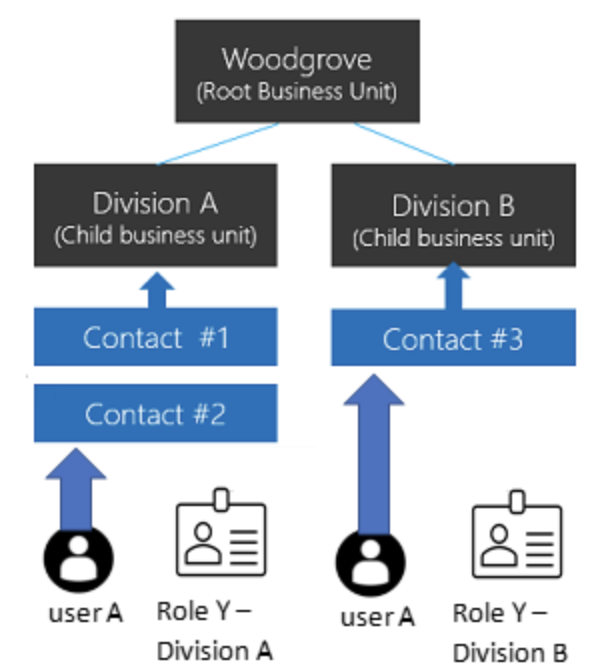
Customers can use an organization structure where data is compartmentalized in a tree-like hierarchy, and users can access any business unit’s data regardless of what the business unit the user is assigned to.

When we associate a user with this environment, we can set the user to be in one of the business units.
For each business unit that a user needs to access data, a security role from that business unit is assigned to the user.

When the user creates a record, the user can set the business unit to own the record.

Let’s see an example:

User A can be assocoated with any of the business units, including the root business unit. A security tole Y from Divison A is assigned to user A which gives the user access to Contact #1 and Contact #2 records.

A security role Y from Division B is assigned to user A which gives the user access to Contact #3 record.

How to enable this feature?

Note: If you to enable this feature, you will need to publish all your unpublished customizations tables for the feature.

If you find that that you have any unpublished tables that are not working with this feature after you have turned it on, you can set the RecomputeOwnershipAcrossBusinessUnits settings using the OrgDBOrgSettings tool for Microsoft Dynamics CRM.

Settings RecomputeOwnershipAcrossBusinessUnits to true allows the Owning Business Units field to be set and updated.

Go to Power Platform Admin Center:

Set the environment and then settings > Features:

That’s it for today.

I hope this helps.

Malla Reddy Gurram(@UK365GUY)
#365blogpostsin365days
Share this:

{How to} Show Support requests to all users on Power Platform Admin Center

Hello Everyone,

Today I am going to show support requests to all users on Power Platform Admin Center.

Let’s get’s started.

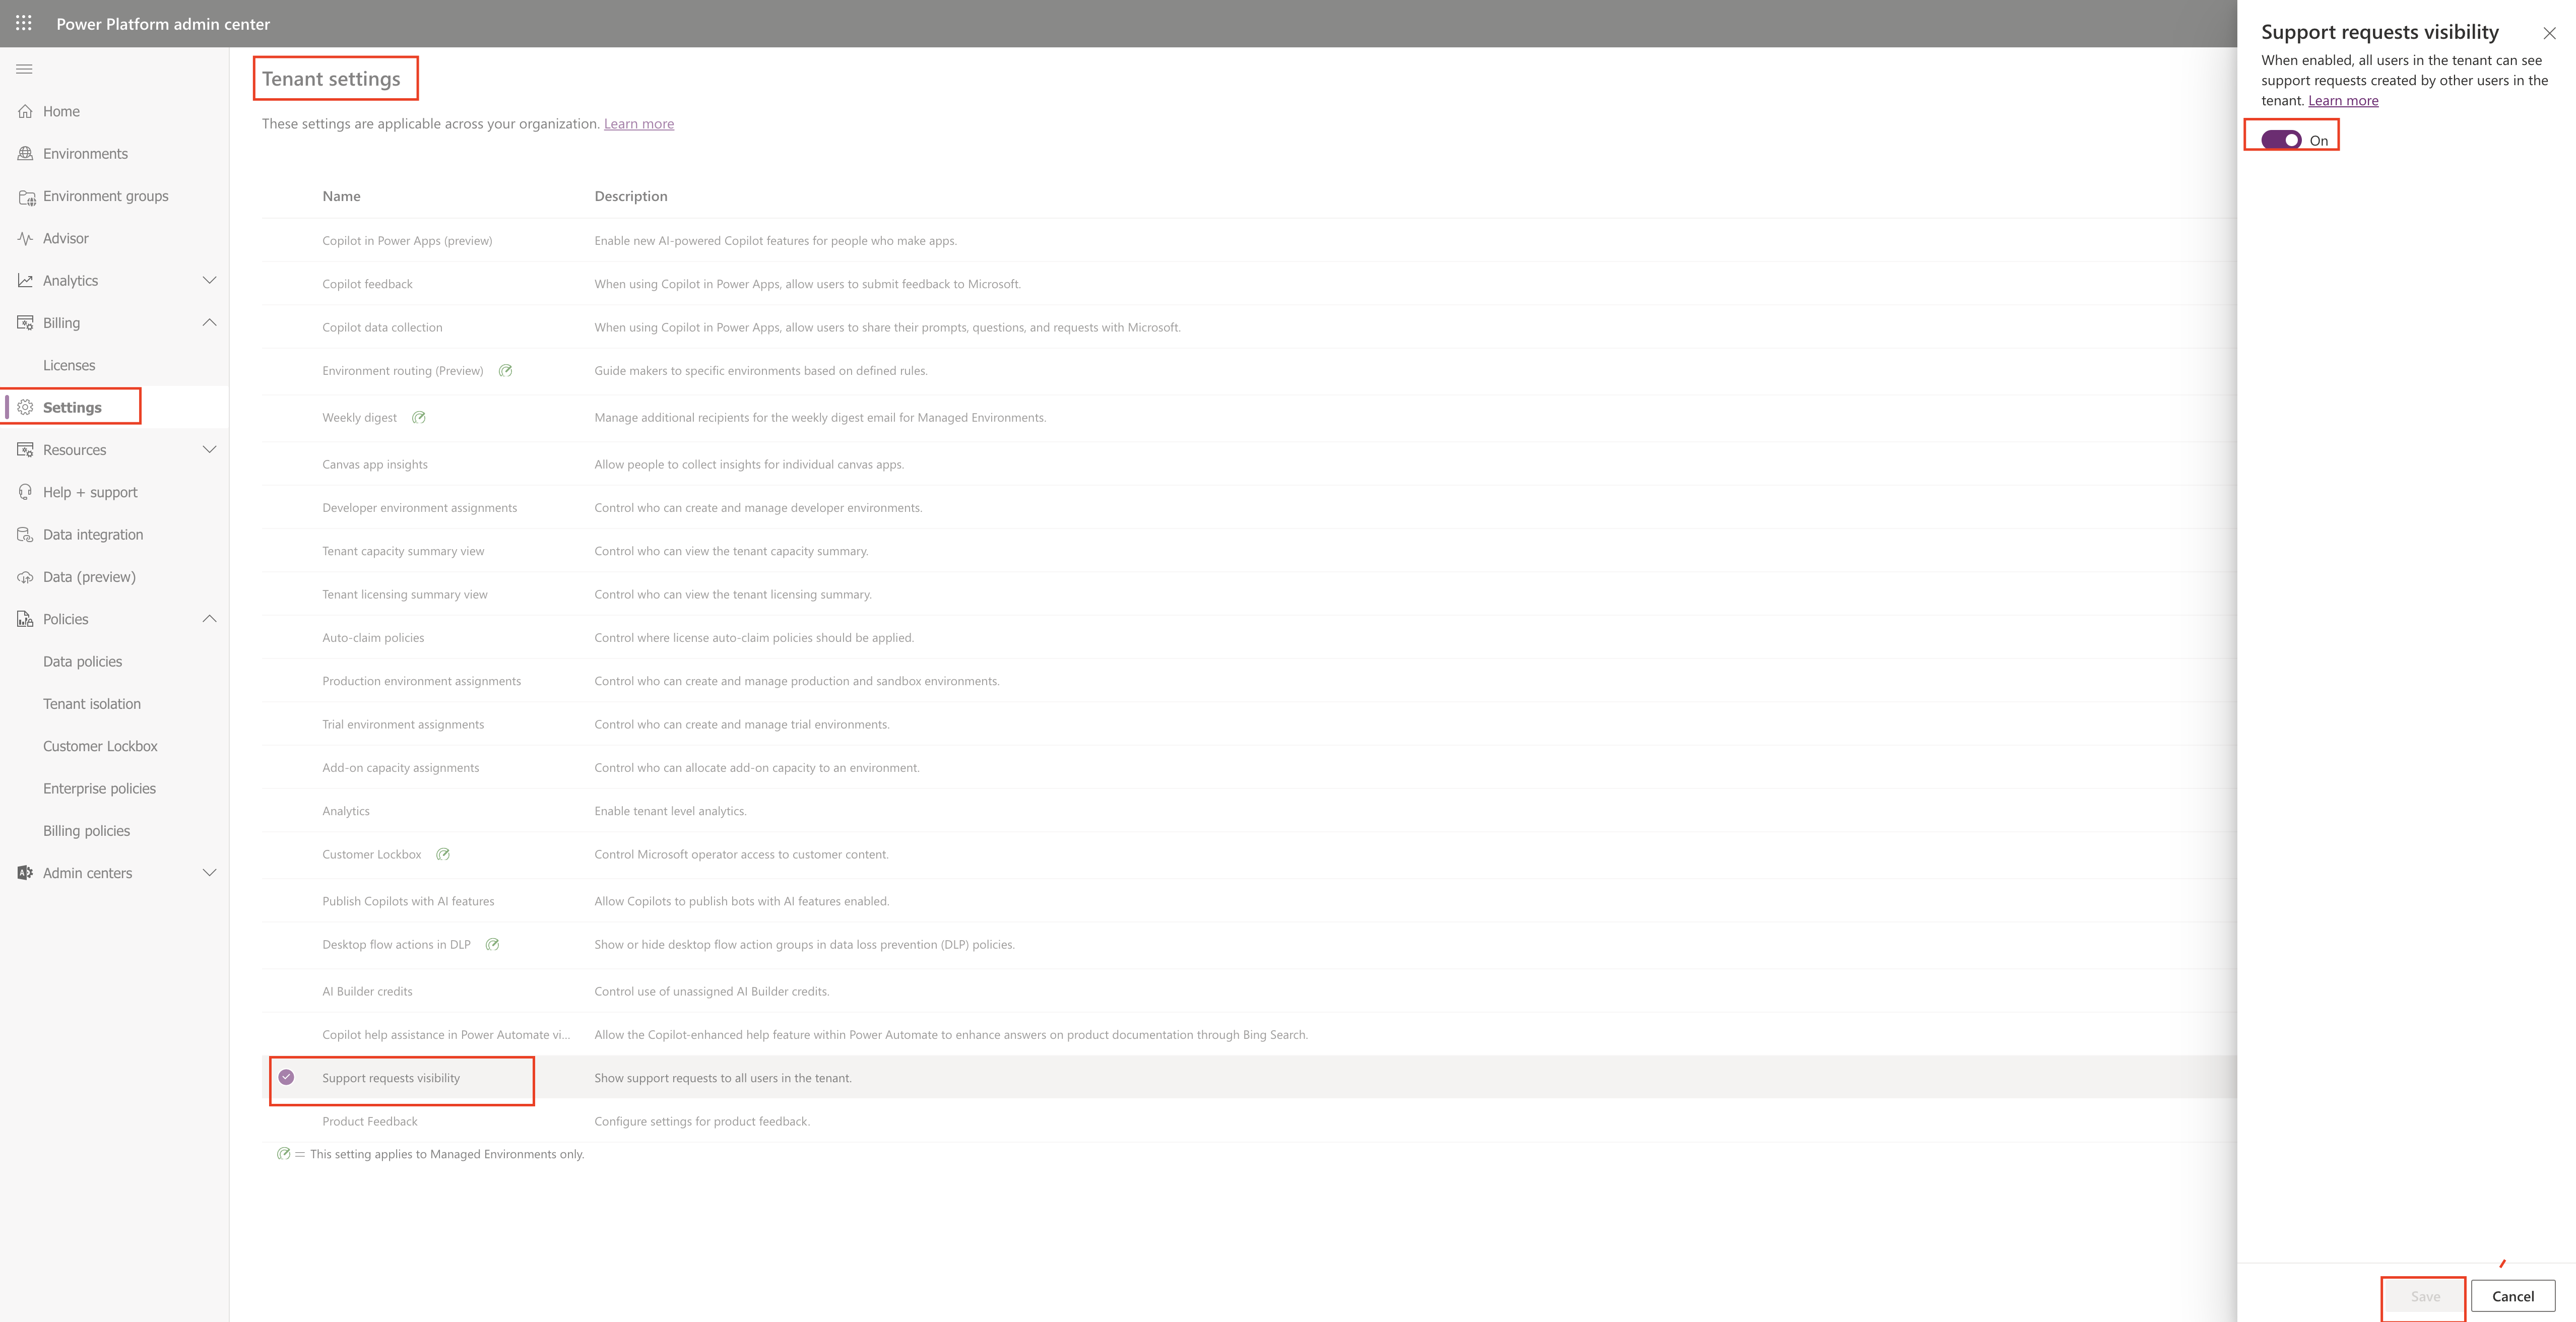
Login into Power Platform Admin Center.

Then go to settings > Tenant Settings:

Select the Support requests visibility and turn on the button and save.

So when users login they can see the support requests.

That’s it for today.

I hope this helps.

Malla Reddy Gurram(@UK365GUY)
#365blogpostsin365days

Share this: