Menu Close

Blog

Slide 1

Microsoft Business Applications Blogposts, YouTube Videos and Podcasts

Helping Businesses with Technology

Slide 2

Microsoft Business Applications Blogposts, YouTube Videos and Podcasts

Helping Businesses with Technology

Slide 3

Microsoft Business Applications Blogposts, YouTube Videos and Podcasts

Helping Businesses with Technology

previous arrow
next arrow

{Do you know} Create and edit expressions with Copilot

Hello Everyone,

Today I am going to share my thoughts on Create and edit expressions with Copilot.
Let’s get’s started.

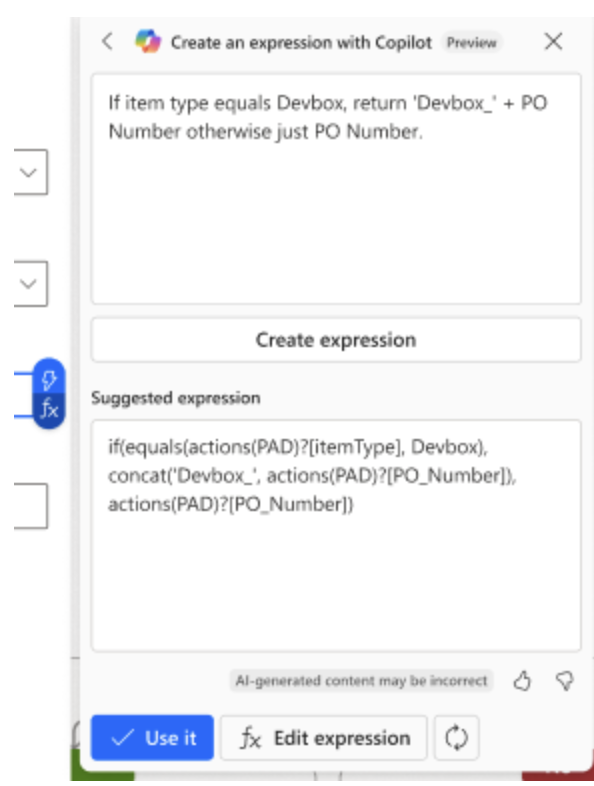
Certainly! Copilot in Power Automate allows you to streamline your workflow by creating and editing automation through natural language expressions. Here’s how you can use it.
1. Cloud Flows:

Describe what you need in natural language, and Copilot will guide you through creating a flow step by step.

Access the cloud flows designer with Copilot by selecting your flow and clicking “Edit” from the flow Details page.

Get contextual help from the Microsoft Copilot Studio bot.

Use flows as plugins in Copilot for Microsoft 365(preview).

2. Process Mining:

Copilot assists with ingestion and process analytics in Process Mining.

Navigate the ingestion experience with Copoilt.

Generate process insights through natural language.

Summarize findings quantitatively and qualitatively.

3. Desktop Flows:

Analyze desktop flow activity using Copilot.

Ask activit-specific questions in natural language.

Democratize access to insights.

4. Automation Center:

Retrieve information about the past flow runs, work queue performance and product features.

Ask questions in natural language.

That’s it for today.

I hope this helps.

Malla Reddy Gurram(@UK365GUY)
#365blogpostsin365days

Share this:

{How to} Connect Copilot Studio Voice IVR from Dynamics 365 Omnichannel

Hello Everyone,

Today I am going to share my thoughts on the Copilot Studio Voice IVR connect to Dynamics 365 Omnichannel.

Let’s get’s started.

Suppose you have a requirement for a call center to use Dynamics 365 Customer Service Omnichannel and organisation receive phone calls through toll free number and you would like to route those calls from Copilot Studio IVR and further transfer those calls into Omnichannel to answer the calls by customer service agents.

Prerequisites:

You will need:

1. Office 365 – License
2. Dynamics 365 Customer Service – License
3. Dynamics 365 Customer Service Digital Messaging and Voice Add-in
4. Copilot Studio – License
5. Azure Communication Services – Subscription and Phone number
6. Copilot Studio and Dynamics 365 Omnichannel should be in same Microsoft 365 Tenant

To connect Copilot Studio’s Voice IVR to Dynamics 365 Omnichannel, follow these steps:

1. Configure the BOT:

In the Copilot Studio, open the bot you want to integrate.
Navigate to settings > Customer Engagement Hub > Omnichannel.
Select Connect to link your bot with Omnichannel.

2. Enable Voice:

In the Omnichannel section, ensure the Enable voice option is selected.
Configure the bot to handle voice interactions, including speech recognition and DTMF inputs.

3. Agent Transfers:

Go to Manage > Agent Transfers in Copilot Studio.
Select Omnichannel and enable it to allow seamless handoff to live agents.

4. Test and Deploy:

Test the integration to ensure everything works as expected.
Deploy the bot to handle customer calls through the voice IVR.

For detailed information visit Microsoft Docs: here

That’s it for today.

I hope this helps.
Malla Reddy Gurram(@UK365GUY)
#365blogpostsin365days
Share this:

{Do you know} Use Azure Key Vault credentials in flow connections

Hello Everyone,

Today I am going to share my thoughts on Use Azure Key Vault credentials in flow connections.

Let’s get’s started.

You can use Azure Key Vault Credentials in your flow connections to enhance security and streamline credentials management. Here’s a brief overview of how it works:

1. Credentials Storage: Store your credentials as secrets in Azure Key Vault. This centralizes your credentials management and ensures they are securely stored.

2. Integration with Power Automate: Use the new Credentials page in Power Automate to create, edit, and share login credentials. These credentials can be used in desktop flow connections, allowing your flows to run on windows machines using the latest credentials retrieved at runtime.

3. Password Rotation: When the credentials in Azure Key Vault are updated, the connections using them are automatically updated as well. This means your desktop flows will continue to run smoothly even if the administrator changes the password.

To get started, you’ll need to configure Azure Key Vault and set up the credentials in Power Automate.

That’s it for today.

I hope this helps.

Malla Reddy Gurram(@UK365GUY)
#365blogpostsin365days

Share this:

{Do you know} Trigger attended desktop flows in picture-in-picture

Hello Everyone,

Today I am going to share my thoughts on triggering attended desktop flows in picture-in-picture.

Let’s get’s started.

You can trigger attended desktop flows in picture-in-picture mode using using Power Automate. This feature allows you to run desktop flows within a virtual window that replicates your desktop, enabling you to continue working on your machine while the automation runs in parallel.

Here are the steps to trigger a desktop flow in picture-in-picture mode:

1. Open Power Automate: Ensure you have Power Automate for desktop installed and are signed in.

2. Enable Picture-in-Picture Mode: You can enable this mode during installation or manually through the command prompt.

3. Trigger the Flow:

From the Power Automate Console: Select the target flow, Open the More actions menu, and choose “Run in picture-in-picture”.

From a Cloud Flow: In the action configuration pane of the “Run a flow built with Power Automate for Desktop” action, set the Run Mode to “Attended” and the Attended Mode to “Picture-in-Picture”,

That’s it for today.

I hope this helps.

Malla Reddy Gurram(@UK365GUY)
#365blogpostsin365days

Share this:

{Do you know} Self-heal UI and browser automation actions at execution with AI

Hello Everyone,

Today I am going to share my thoughts on the self heal UI and browser automation actions at execution with AI.

Let’s get’s started.

Self-healing UI and browser automation actions with AI is an exciting feature in Power Automate for desktop users. This features enhances the reliability of automated workflows by using AI to locate and interact with UI elements during execution.

Here are some key points:

AI-Powered Element Location: If a UI element can’t be found during execution, AI steps in to locate it. This helps in maintaining the flow without manual intervention.

Automatic Selector Repair: Once the AI locates the element, it repairs the selector, which is then used in future executions.

User Confirmation: After the AI repairs the selector, user confirmation is required to save the changes.

Optional Feature: This feature can be enabled or disabled based on user preference.

This self healing capability significantly improves the success rates of UI and web automation scenarios, making automation more robust and less prone to errors.

That’s it for today.

I hope this helps.

Malla Reddy Gurram(@UK365GUY)
#365blogpostsin365days

Share this: